ESP MERCEDES-BENZ SL65AMG 2011 R230 Repair Manual
[x] Cancel search | Manufacturer: MERCEDES-BENZ, Model Year: 2011, Model line: SL65AMG, Model: MERCEDES-BENZ SL65AMG 2011 R230Pages: 316, PDF Size: 7.21 MB
Page 141 of 316
The thumbwheel for adjusting the following
distance is located on the right side of the
center console.
XIncreasing distance: Turn
thumbwheel : towards ª.
Increasing the distance setting tells
Distronic to maintain a greater following
distance to the preceding vehicle.
XDecreasing distance: Turn
thumbwheel : towards ¥.
Decreasing the distance setting tells
Distronic to maintain a shorter following
distance to the preceding vehicle.
Driving with Distronic
This section describes a number of driving
situations where special precaution is
required on the part of the driver. Be prepared
to brake in such situations. Braking will
deactivate the Distronic system.
GWarning!
The Distronic works to maintain the speed
selected by the driver unless a moving
obstacle proceeding directly ahead of it in the
same travel direction is detected (e.g.
following another vehicle ahead of you at your
set distance).
This means that:
RYour vehicle can pass another vehicle after
you have changed lanes.
RWhile in a sharp turn or if the preceding
vehicle is in a sharp turn, the Distronic
could lose sight of the preceding vehicle.
Your vehicle could then accelerate to the
previously selected speed.
The Distronic regulates only the distance
between your vehicle and those directly
ahead of it, but does not register stationary
objects in the road, e.g.:
Ra stopped vehicle in a traffic jam
Ra disabled vehicle
Ran oncoming vehicle
The driver must always be alert, observe all
traffic and intercede as required by means of
steering or braking the vehicle.
GWarning!
The Distronic should not be used in snowy or
icy road conditions.
The most likely cause for a malfunctioning
system is a dirty Distronic system sensor
cover (located in the hood grille), especially
at times of snow and ice or heavy rain.
In such a case, the Distronic will switch off,
and the message DISTRONIC Currently
Unavailable – See Oper. Manual
appears in the multifunction display.
For cleaning and care of the Distronic system
sensor cover, see (Y page 218).
iIf the message DISTRONIC Currently
Unavailable – See Oper. Manual
disappears during driving, the dirt (e.g.
slush) has dissolved; the Distronic is
available again if you reactivate it
(Y page 136).
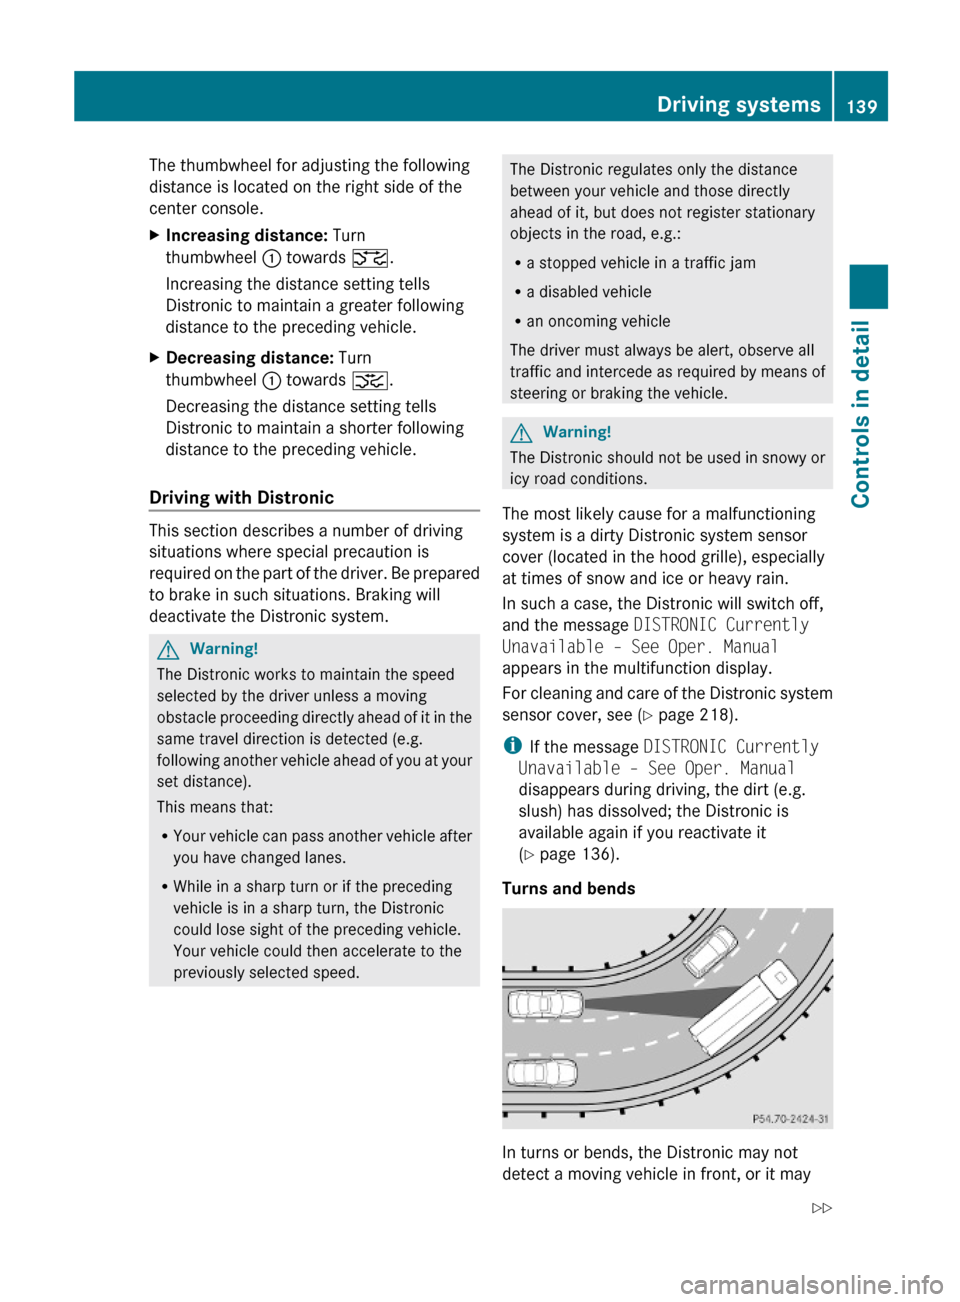
Turns and bends
In turns or bends, the Distronic may not
detect a moving vehicle in front, or it may
Driving systems139Controls in detail230_AKB; 6; 22, en-USd2ureepe,Version: 2.11.8.12009-07-28T18:49:58+02:00 - Seite 139Z
Page 142 of 316
detect one too soon. This may cause your
vehicle to brake late or unexpectedly.
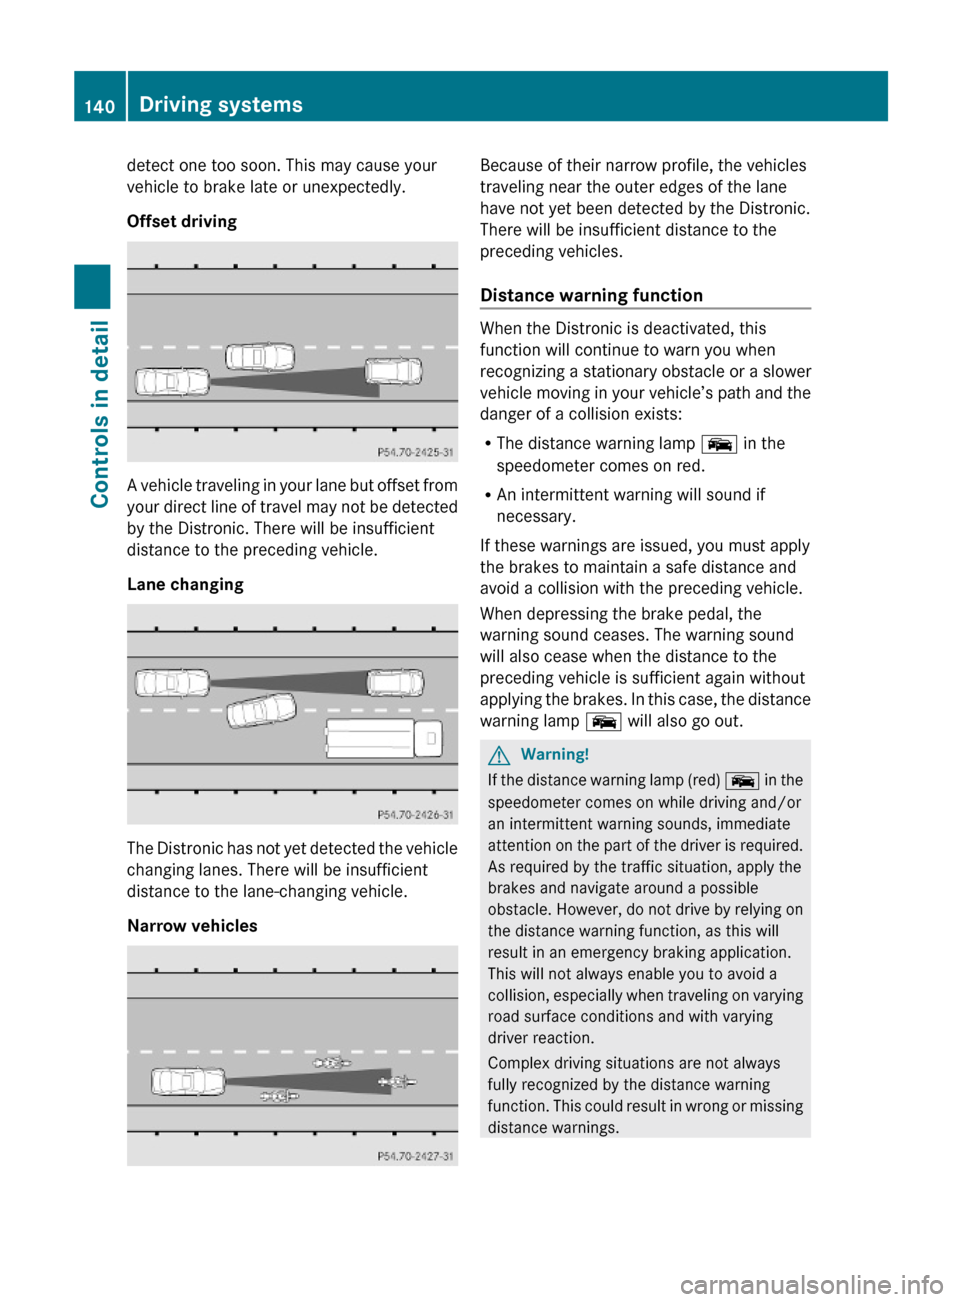
Offset driving
A vehicle traveling in your lane but offset from
your direct line of travel may not be detected
by the Distronic. There will be insufficient
distance to the preceding vehicle.
Lane changing
The Distronic has not yet detected the vehicle
changing lanes. There will be insufficient
distance to the lane-changing vehicle.
Narrow vehicles
Because of their narrow profile, the vehicles
traveling near the outer edges of the lane
have not yet been detected by the Distronic.
There will be insufficient distance to the
preceding vehicles.
Distance warning function
When the Distronic is deactivated, this
function will continue to warn you when
recognizing a stationary obstacle or a slower
vehicle moving in your vehicle’s path and the
danger of a collision exists:
RThe distance warning lamp Ò in the
speedometer comes on red.
RAn intermittent warning will sound if
necessary.
If these warnings are issued, you must apply
the brakes to maintain a safe distance and
avoid a collision with the preceding vehicle.
When depressing the brake pedal, the
warning sound ceases. The warning sound
will also cease when the distance to the
preceding vehicle is sufficient again without
applying the brakes. In this case, the distance
warning lamp Ò will also go out.
GWarning!
If the distance warning lamp (red) Ò in the
speedometer comes on while driving and/or
an intermittent warning sounds, immediate
attention on the part of the driver is required.
As required by the traffic situation, apply the
brakes and navigate around a possible
obstacle. However, do not drive by relying on
the distance warning function, as this will
result in an emergency braking application.
This will not always enable you to avoid a
collision, especially when traveling on varying
road surface conditions and with varying
driver reaction.
Complex driving situations are not always
fully recognized by the distance warning
function. This could result in wrong or missing
distance warnings.
140Driving systemsControls in detail
230_AKB; 6; 22, en-USd2ureepe,Version: 2.11.8.12009-07-28T18:49:58+02:00 - Seite 140
Page 144 of 316
Operator’s Manual appears in the right
multifunction display.XDepress the accelerator pedal fully.
The engine speed rises to approximately
4000 rpm.
The message RACE START appears in the
left multifunction display and the message
Release Brake To Start appears in the
right multifunction display.
i If you do not release the brake pedal
within 7 seconds, RACE START is canceled.
The message RACE START appears in the
left multifunction display and the message
Canceled appears in the right
multifunction display.
XTake your foot off the brake pedal while
keeping the accelerator pedal depressed.
The vehicle pulls away at maximum
acceleration.
The message RACE START appears in the
left multifunction display and the message
Active appears in the right multifunction
display.
RACE START deactivates at a vehicle speed
of approximately 50 km/h. The automatic
transmission switches to program mode S+.
The SPORT handling mode remains switched
on.
RACE START is canceled immediately if you
release the accelerator pedal while RACE
START is active or when the activation
conditions are not fulfilled anymore. The
message RACE START appears in the left
multifunction display and the message Not
Possible See Operator’s Manual
appears in the right multifunction display.
i If RACE START is used repeatedly in a
short period of time, it is only available
again after having driven the vehicle a
certain distance.
Hill-start assist system (SL 63 AMG)
On uphill grades, the hill-start assist system
maintains the pressure in the brake system
for approximately 1 second after you have
released the brake pedal. Therefore, you can
start off smoothly without the vehicle moving
immediately after releasing the brake pedal.GWarning!
The hill-start assist system is not designed to
function as a parking brake. It does not
prevent the vehicle from moving when parked
on an incline.
Always engage the parking brake in addition
to shifting the automatic transmission into
park position P.
XDepress the brake pedal.XShift the automatic transmission into drive
position D or reverse gear R.XRelease the brake pedal.XCarefully depress the accelerator pedal.
The hill-start assist system is inactive
R when starting off on a level road or downhill
grades
R with the automatic transmission in neutral
position N
R with the parking brake engaged
R if the ESP ®
has switched off due to a
malfunction
ABC
The ABC system is an active, computer-
controlled system that adjusts the
suspension hydraulically at all four wheels in
response to various driving situations. It
selects the optimum suspension tuning and
ride height for your vehicle automatically.
Vehicle level control
Your vehicle adjusts its ride height
automatically to increase vehicle safety and
to reduce fuel consumption.
142Driving systemsControls in detail
230_AKB; 6; 22, en-USd2ureepe,Version: 2.11.8.12009-07-28T18:49:58+02:00 - Seite 142
Page 147 of 316
distance between the vehicle and an obstacle
visually and audibly.
The Parktronic system is activated
automatically when
Ryou switch on the ignition
and
Ryou release the parking brake
and
Rthe automatic transmission is in drive
position D, reverse gear R, or neutral
position N
The Parktronic system deactivates at speeds
above approximately 11 mph (18 km/h). At
lower speeds, the Parktronic system
activates again.
The Parktronic system also deactivates when
you shift the automatic transmission into
park position P or engage the parking brake.
The Parktronic system monitors the
surroundings of your vehicle with six sensors
in the front bumper and four sensors in the
rear bumper.
Example illustration, sensors in the front bumper
To function properly, sensors : must be free
of dirt, ice, snow and slush. Clean
sensors : regularly. Be careful not to
scratch or damage sensors :, see “Cleaning
the driving systems sensors” (Y page 218).
GWarning!
The Parktronic is a supplemental system. It is
not intended to, nor does it replace, the need
for extreme care. The responsibility during
parking and other critical maneuvers always
remains with the driver.
GWarning!
Make sure no persons or animals are in or
near the area in which you are parking/
maneuvering. Otherwise, they could be
injured.
! Special attention must be paid to objects
with smooth surfaces or low silhouettes
(e.g. trailer couplings, painted posts,
elevated crossbars or road curbs). Such
objects may not be detected by the system
and can damage the vehicle.
During parking maneuvers, pay special
attention to objects located above or below
the height of the sensors (e.g. street curbs,
painted posts, or trailer hitches etc.). The
Parktronic system will not detect such
objects at close range and damage to your
vehicle or the object may result.
! Ultrasonic signals from outside sources
(e.g. truck air brakes, car wash, or
jackhammers) may impair the operation of
the Parktronic system.
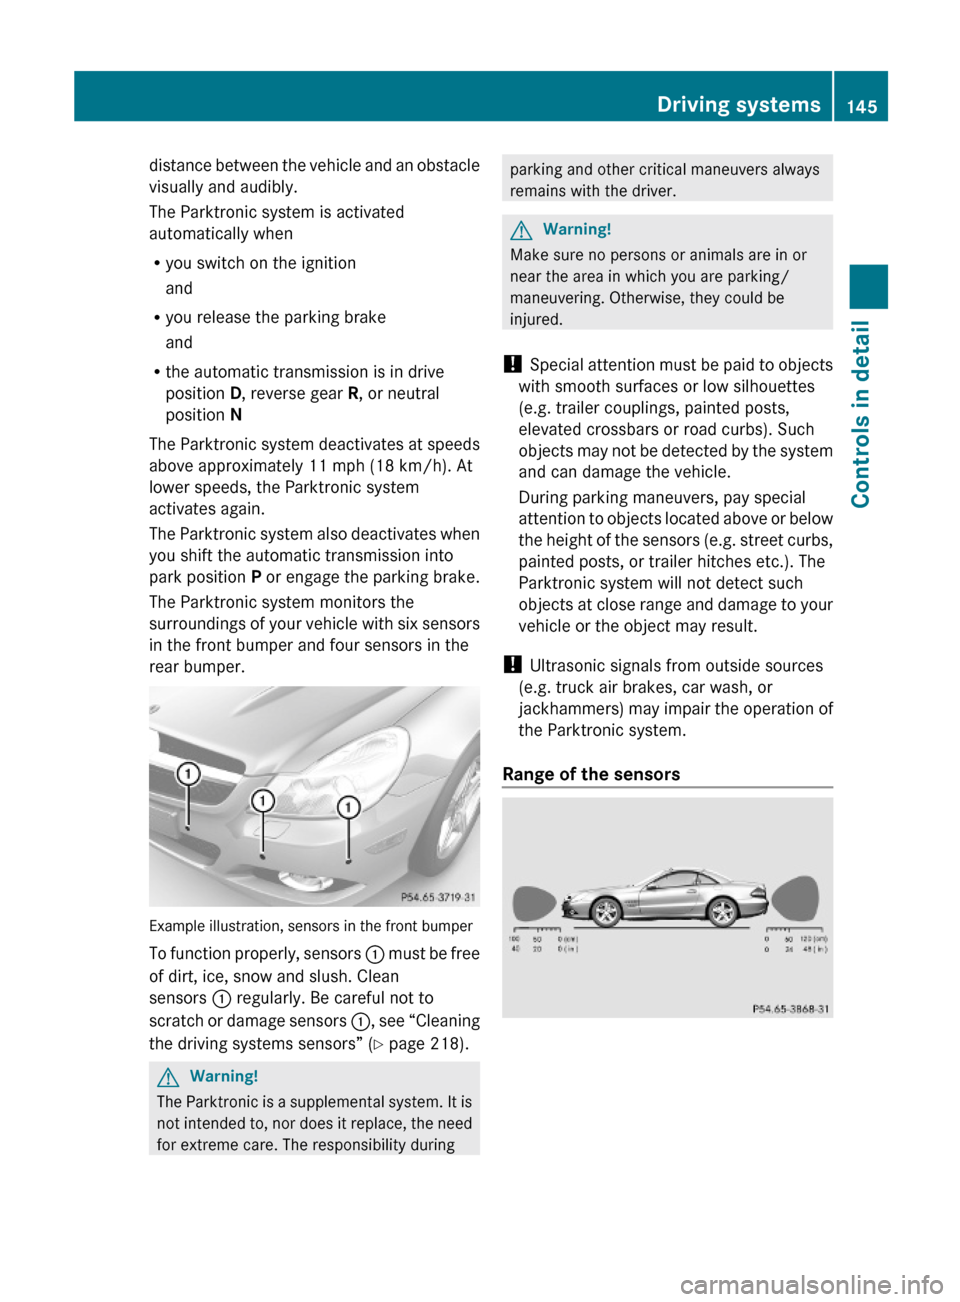
Range of the sensors
Driving systems145Controls in detail230_AKB; 6; 22, en-USd2ureepe,Version: 2.11.8.12009-07-28T18:49:58+02:00 - Seite 145Z
Page 152 of 316
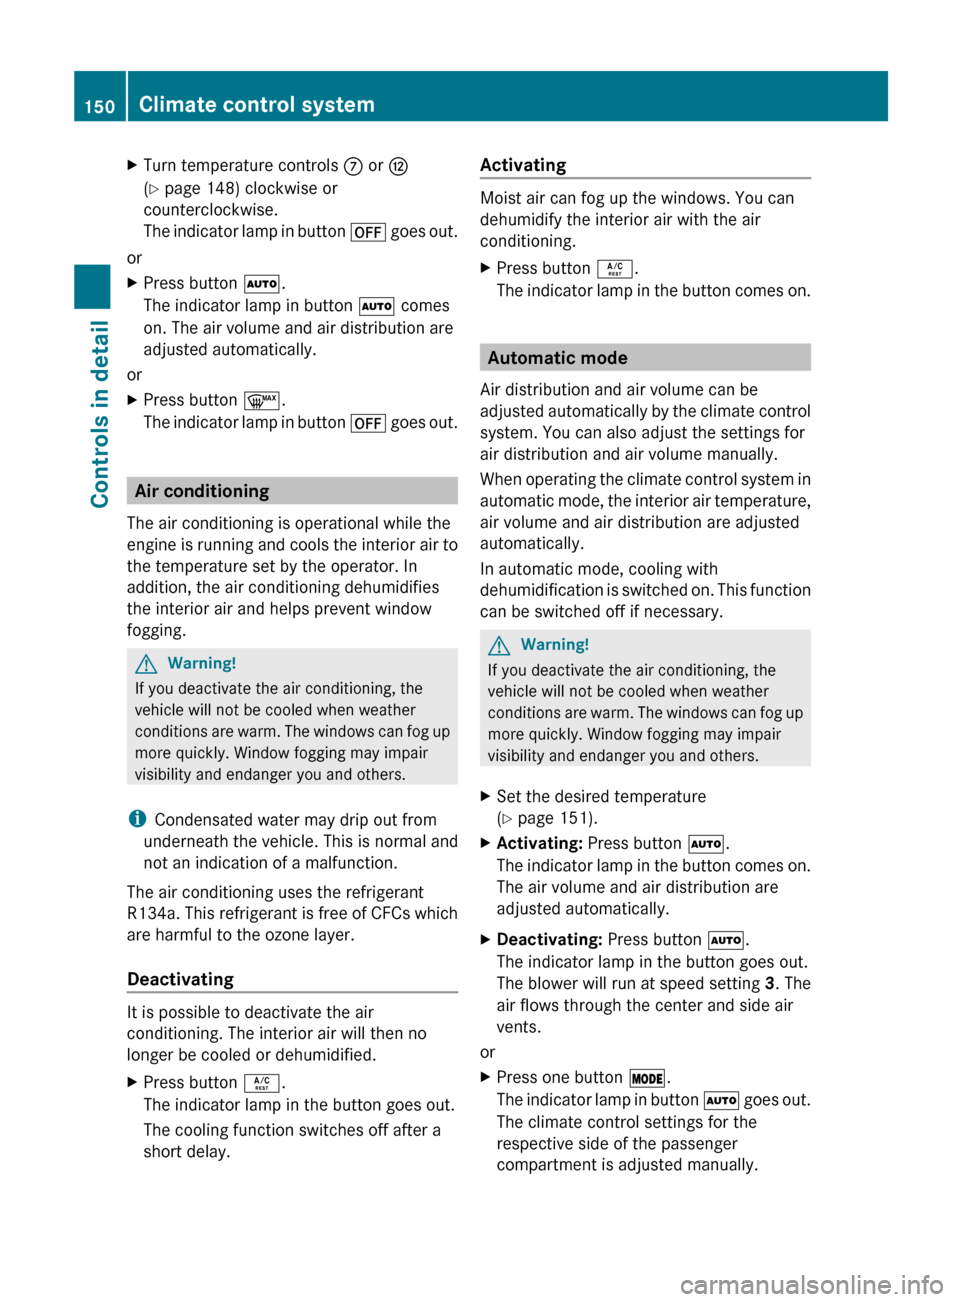
XTurn temperature controls C or H
( Y page 148) clockwise or
counterclockwise.
The indicator lamp in button ^ goes out.
or
XPress button Ã.
The indicator lamp in button à comes
on. The air volume and air distribution are
adjusted automatically.
or
XPress button ¬.
The indicator lamp in button ^ goes out.
Air conditioning
The air conditioning is operational while the
engine is running and cools the interior air to
the temperature set by the operator. In
addition, the air conditioning dehumidifies
the interior air and helps prevent window
fogging.
GWarning!
If you deactivate the air conditioning, the
vehicle will not be cooled when weather
conditions are warm. The windows can fog up
more quickly. Window fogging may impair
visibility and endanger you and others.
i Condensated water may drip out from
underneath the vehicle. This is normal and
not an indication of a malfunction.
The air conditioning uses the refrigerant
R134a. This refrigerant is free of CFCs which
are harmful to the ozone layer.
Deactivating
It is possible to deactivate the air
conditioning. The interior air will then no
longer be cooled or dehumidified.
XPress button Á.
The indicator lamp in the button goes out.
The cooling function switches off after a
short delay.Activating
Moist air can fog up the windows. You can
dehumidify the interior air with the air
conditioning.
XPress button Á.
The indicator lamp in the button comes on.
Automatic mode
Air distribution and air volume can be
adjusted automatically by the climate control
system. You can also adjust the settings for
air distribution and air volume manually.
When operating the climate control system in
automatic mode, the interior air temperature,
air volume and air distribution are adjusted
automatically.
In automatic mode, cooling with
dehumidification is switched on. This function
can be switched off if necessary.
GWarning!
If you deactivate the air conditioning, the
vehicle will not be cooled when weather
conditions are warm. The windows can fog up
more quickly. Window fogging may impair
visibility and endanger you and others.
XSet the desired temperature
( Y page 151).XActivating: Press button Ã.
The indicator lamp in the button comes on.
The air volume and air distribution are
adjusted automatically.XDeactivating: Press button Ã.
The indicator lamp in the button goes out.
The blower will run at speed setting 3. The
air flows through the center and side air
vents.
or
XPress one button Ä.
The indicator lamp in button à goes out.
The climate control settings for the
respective side of the passenger
compartment is adjusted manually.150Climate control systemControls in detail
230_AKB; 6; 22, en-USd2ureepe,Version: 2.11.8.12009-07-28T18:49:58+02:00 - Seite 150
Page 155 of 316
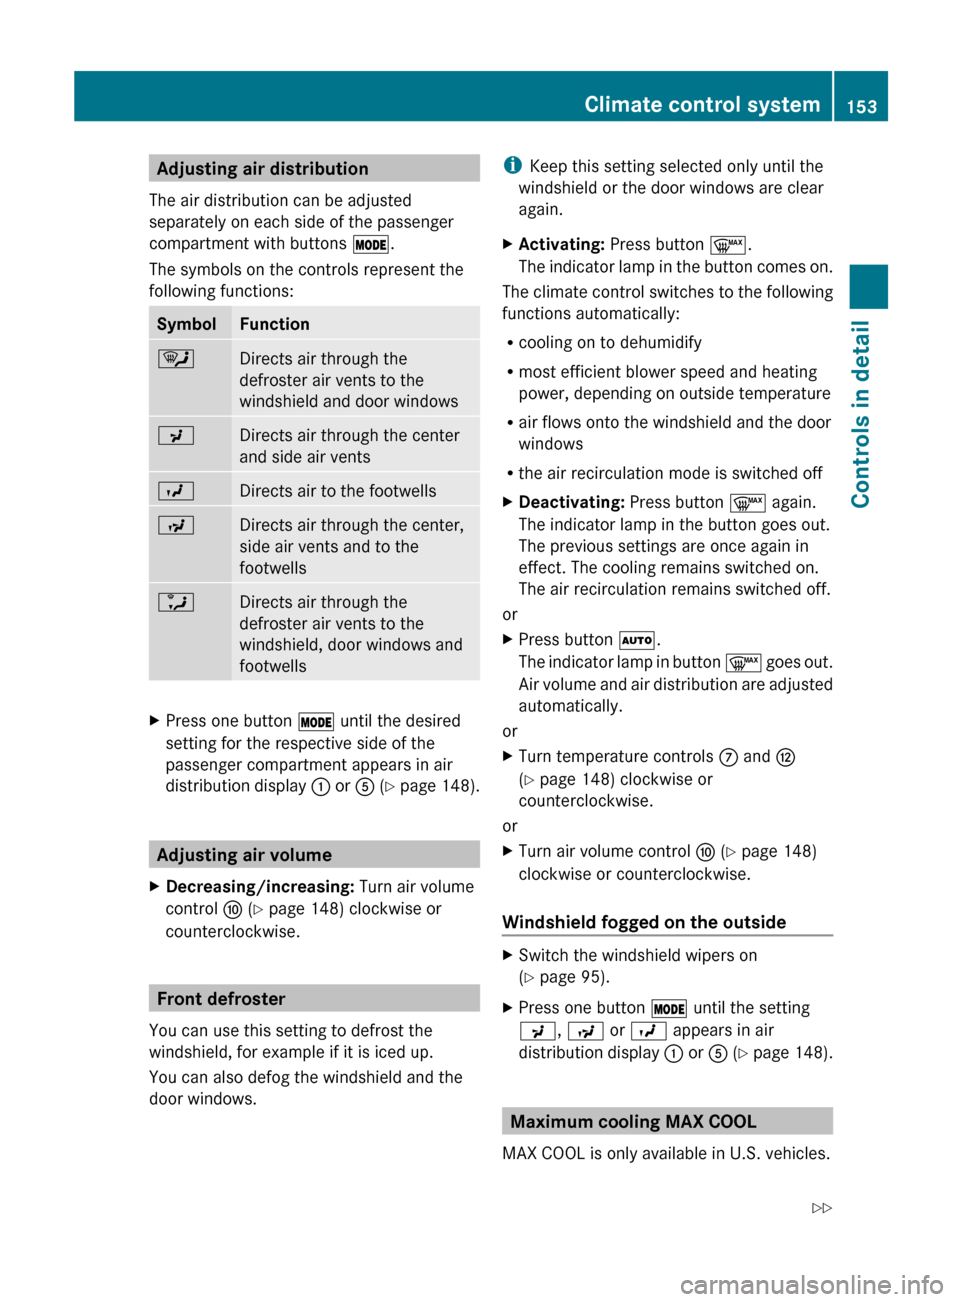
Adjusting air distribution
The air distribution can be adjusted
separately on each side of the passenger
compartment with buttons Ä.
The symbols on the controls represent the
following functions:SymbolFunction¯Directs air through the
defroster air vents to the
windshield and door windowsPDirects air through the center
and side air ventsODirects air to the footwellsNDirects air through the center,
side air vents and to the
footwellsaDirects air through the
defroster air vents to the
windshield, door windows and
footwellsXPress one button Ä until the desired
setting for the respective side of the
passenger compartment appears in air
distribution display : or A (Y page 148).
Adjusting air volume
XDecreasing/increasing: Turn air volume
control F (Y page 148) clockwise or
counterclockwise.
Front defroster
You can use this setting to defrost the
windshield, for example if it is iced up.
You can also defog the windshield and the
door windows.
i Keep this setting selected only until the
windshield or the door windows are clear
again.XActivating: Press button ¬.
The indicator lamp in the button comes on.
The climate control switches to the following
functions automatically:
R cooling on to dehumidify
R most efficient blower speed and heating
power, depending on outside temperature
R air flows onto the windshield and the door
windows
R the air recirculation mode is switched off
XDeactivating: Press button ¬ again.
The indicator lamp in the button goes out.
The previous settings are once again in
effect. The cooling remains switched on.
The air recirculation remains switched off.
or
XPress button Ã.
The indicator lamp in button ¬ goes out.
Air volume and air distribution are adjusted
automatically.
or
XTurn temperature controls C and H
( Y page 148) clockwise or
counterclockwise.
or
XTurn air volume control F (Y page 148)
clockwise or counterclockwise.
Windshield fogged on the outside
XSwitch the windshield wipers on
( Y page 95).XPress one button Ä until the setting
P , N or O appears in air
distribution display : or A (Y page 148).
Maximum cooling MAX COOL
MAX COOL is only available in U.S. vehicles.
Climate control system153Controls in detail230_AKB; 6; 22, en-USd2ureepe,Version: 2.11.8.12009-07-28T18:49:58+02:00 - Seite 153Z
Page 166 of 316
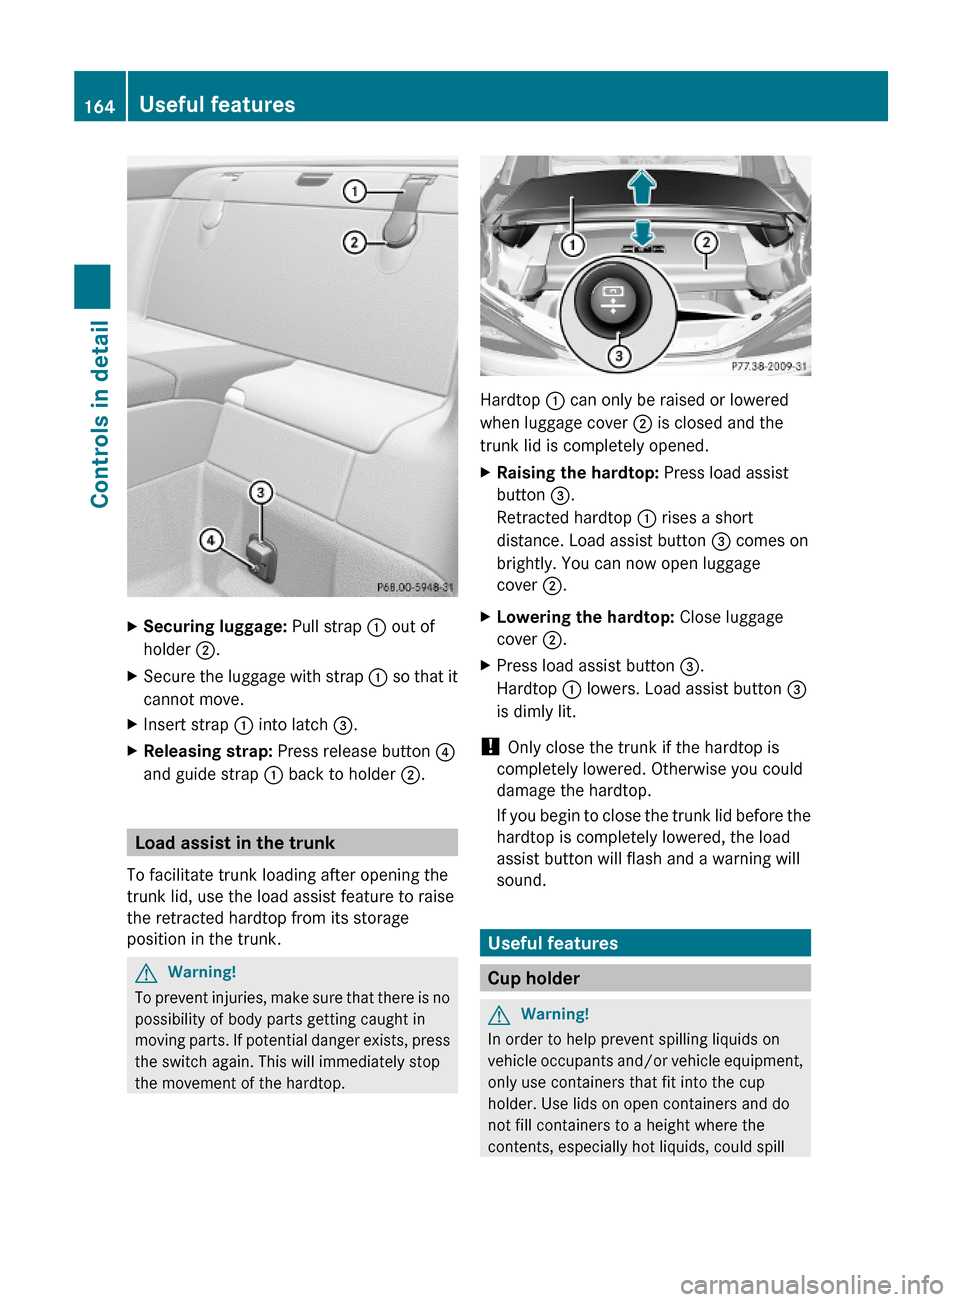
XSecuring luggage: Pull strap : out of
holder ;.
XSecure the luggage with strap : so that it
cannot move.
XInsert strap : into latch =.XReleasing strap: Press release button ?
and guide strap : back to holder ;.
Load assist in the trunk
To facilitate trunk loading after opening the
trunk lid, use the load assist feature to raise
the retracted hardtop from its storage
position in the trunk.
GWarning!
To prevent injuries, make sure that there is no
possibility of body parts getting caught in
moving parts. If potential danger exists, press
the switch again. This will immediately stop
the movement of the hardtop.
Hardtop : can only be raised or lowered
when luggage cover ; is closed and the
trunk lid is completely opened.
XRaising the hardtop: Press load assist
button =.
Retracted hardtop : rises a short
distance. Load assist button = comes on
brightly. You can now open luggage
cover ;.
XLowering the hardtop: Close luggage
cover ;.
XPress load assist button =.
Hardtop : lowers. Load assist button =
is dimly lit.
! Only close the trunk if the hardtop is
completely lowered. Otherwise you could
damage the hardtop.
If you begin to close the trunk lid before the
hardtop is completely lowered, the load
assist button will flash and a warning will
sound.
Useful features
Cup holder
GWarning!
In order to help prevent spilling liquids on
vehicle occupants and/or vehicle equipment,
only use containers that fit into the cup
holder. Use lids on open containers and do
not fill containers to a height where the
contents, especially hot liquids, could spill
164Useful featuresControls in detail
230_AKB; 6; 22, en-USd2ureepe,Version: 2.11.8.12009-07-28T18:49:58+02:00 - Seite 164
Page 169 of 316
Tele Aid
! In order to activate the Tele Aid system, a
subscriber agreement must be completed.
To ensure your system is activated and
operational, please press Information
button E to perform the acquaintance
call. Failure to complete either of these
steps may result in a system that is not
activated.
If you have any questions regarding
activation, please call the Customer
Assistance Center at
1-800-FOR-MERCedes (1-800-367-6372)
(USA only) or 1-888-923-8367 (Canada
only).
Shortly after the completion of your Tele Aid
acquaintance call, you will receive a user ID
and password in the mail. You may use this
password to access the Tele Aid section in
“Owner’s Online” at www.mbusa.com (USA
only). The “My Tele Aid” section will give you
access to account information, remote door
unlock and more.
The Tele Aid system is available if
R it has been activated and is operational.
Activation requires a subscription for
monitoring services, connection and
cellular air time
R vehicle battery power is available
R the relevant cellular phone network and
GPS signals are available and pass the
information on to the Customer Assistance
Center
i Location of the vehicle on a map is only
possible if the vehicle is able to receive
signals from the GPS satellite network and
pass the information on to the Customer
Assistance Center.
The Tele Aid system
(Telematic Alarm Identification on Demand)
The Tele Aid system consists of three types
of response:
R Automatic and manual emergency
R Roadside Assistance
R Information
To adjust the speaker volume during a Tele
Aid call do the following:XPress button W or X on the
multifunction steering wheel.
or
XUse the adjustment button on your
COMAND system.
Be sure to check “Owner’s Online” at
www.mbusa.com (USA only) for more
information and a description of all available
features.
System self-test
The system performs a self-test after you
have switched on the ignition.
GWarning!
A malfunction in the system has been
detected if any or all of the following
conditions occur:
R The indicator lamp in the SOS button does
not come on during the system self-test.
R The indicator lamp in Roadside Assistance
button º does not come on during the
system self-test.
R The indicator lamp in Information button
E does not come on during the system
self-test.
R The indicator lamp in the SOS button,
Roadside Assistance button º, or
Information button E remains
illuminated constantly in red after the
system self-test.
R The message Tele Aid Inoperative
appears in the multifunction display after
the system self-test.
Useful features167Controls in detail230_AKB; 6; 22, en-USd2ureepe,Version: 2.11.8.12009-07-28T18:49:58+02:00 - Seite 167Z
Page 170 of 316
If a malfunction is indicated as outlined above,
the system may not operate as expected. In
case of an emergency, help will have to be
summoned by other means.
Have the system checked at the nearest
Mercedes-Benz Center or contact the
Customer Assistance Center at
1-800-FOR-MERCedes (1-800-367-6372)
(USA only) or 1-888-923-8367 (Canada only)
as soon as possible.
Emergency calls
! In order to activate the Tele Aid system, a
subscriber agreement must be completed.
To ensure your system is activated and
operational, please press Information
button E to perform the acquaintance
call. Failure to complete either of these
steps may result in a system that is not
activated.
If you have any questions regarding
activation, please call the Customer
Assistance Center at
1-800-FOR-MERCedes (1-800-367-6372)
(USA only) or 1-888-923-8367 (Canada
only).
An emergency call is initiated automatically
following an accident in which the Emergency
Tensioning Devices (ETDs) or air bags have
deployed.
i An automatically initiated Tele Aid
emergency call cannot be canceled.
An emergency call can also be initiated
manually (Y page 168).
Once the emergency call is in progress, the
indicator lamp in the SOS button will begin to
flash. The message Connecting Call
appears in the multifunction display and the
COMAND system is muted. When the
connection is established, the message
Call Connected appears in the
multifunction display.
All information relevant to the emergency,
such as the location of the vehicle
(determined by the GPS satellite location
system), vehicle model, identification number
and color are generated.
A voice connection between the Customer
Assistance Center and the occupants of the
vehicle will be established automatically soon
after the emergency call has been initiated.
The Customer Assistance Center will attempt
to determine the nature of the emergency
more precisely, provided they can speak to
an occupant of the vehicle.
iIf no vehicle occupant responds, an
ambulance will be sent to the vehicle
immediately.
GWarning!
If the indicator lamp in the SOS button is
flashing continuously and there was no voice
connection to the Customer Assistance
Center established, then the Tele Aid system
could not initiate an emergency call (e.g. the
relevant cellular phone network is not
available).
The message Call Failed appears in the
multifunction display for approximately
10 seconds.
Should this occur, assistance must be
summoned by other means.
iThe “911” emergency call system is a
public service. Using it without due cause
is a criminal offense.
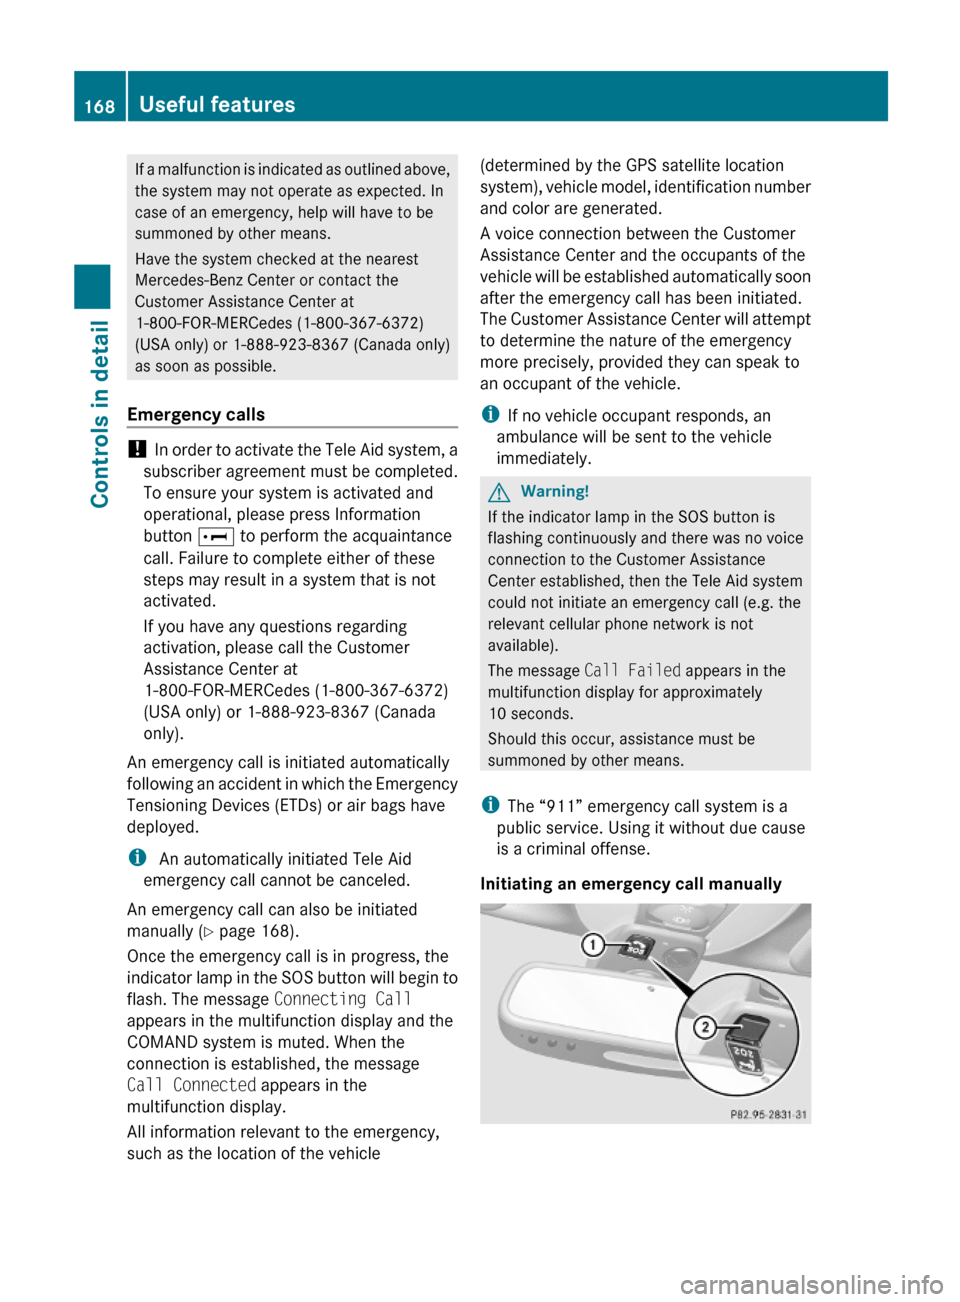
Initiating an emergency call manually
168Useful featuresControls in detail
230_AKB; 6; 22, en-USd2ureepe,Version: 2.11.8.12009-07-28T18:49:58+02:00 - Seite 168
Page 171 of 316
XBriefly press on cover : to open.XPress SOS button ; briefly.
The indicator lamp in SOS button ; will
flash until the emergency call is concluded.
XWait for a voice connection to the
Customer Assistance Center.
XClose cover : after the emergency call is
concluded.
GWarning!
If you feel at any way in jeopardy when in the
vehicle (e.g. smoke or fire in the vehicle,
vehicle in a dangerous road location), please
do not wait for voice contact after you have
pressed the emergency button. Carefully
leave the vehicle and move to a safe location.
The Customer Assistance Center will
automatically contact local emergency
officials with the vehicle’s approximate
location if they receive an automatic SOS
signal and cannot make voice contact with the
vehicle occupants.
XTerminating calls: Press button ~ on
the multifunction steering wheel.
or
XPress the respective button for ending a
telephone call on the COMAND system.
Roadside Assistance button
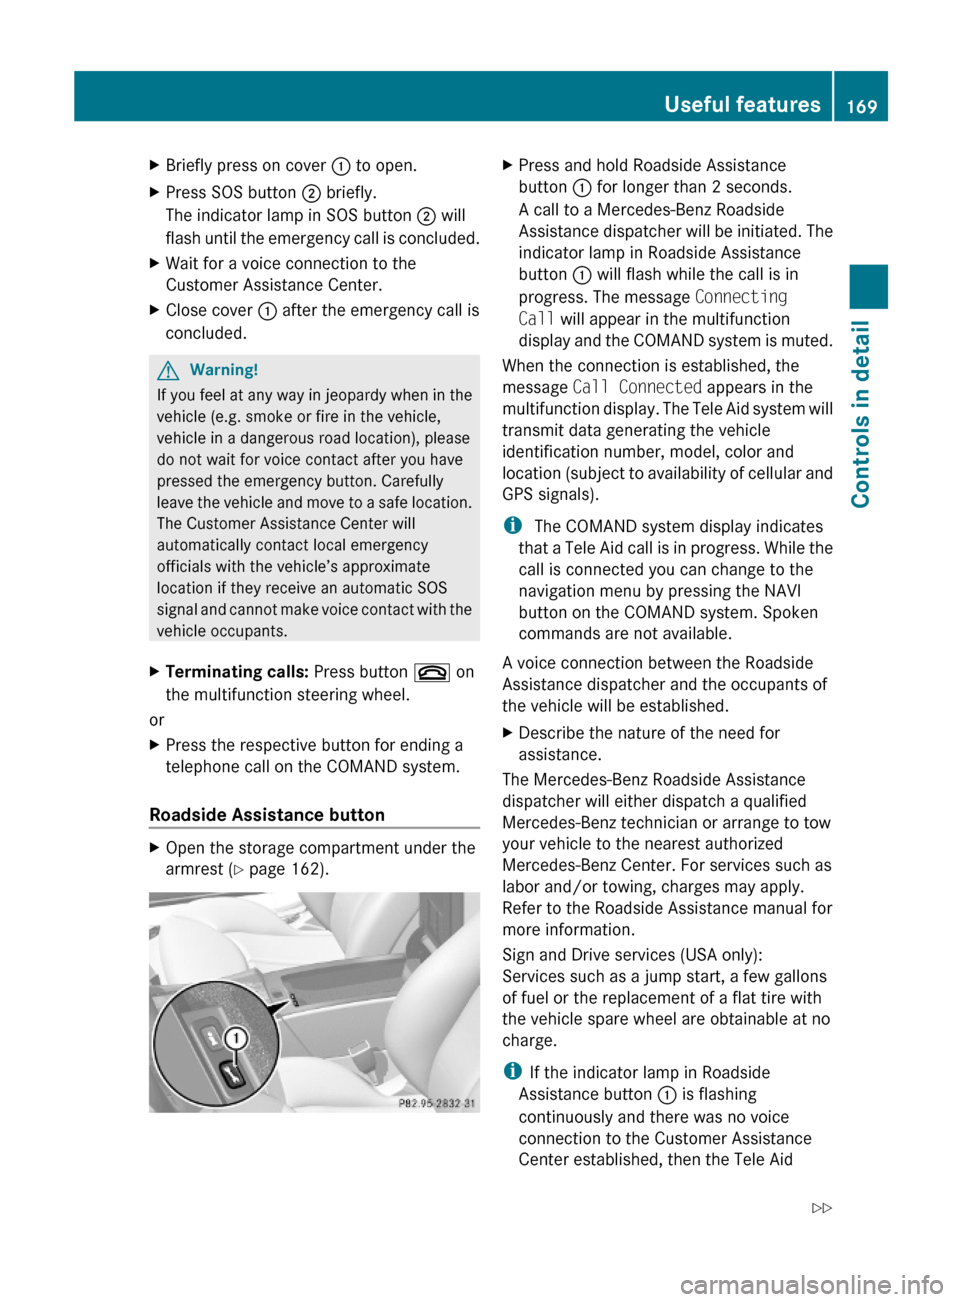
XOpen the storage compartment under the
armrest (Y page 162).
XPress and hold Roadside Assistance
button : for longer than 2 seconds.
A call to a Mercedes-Benz Roadside
Assistance dispatcher will be initiated. The
indicator lamp in Roadside Assistance
button : will flash while the call is in
progress. The message Connecting
Call will appear in the multifunction
display and the COMAND system is muted.
When the connection is established, the
message Call Connected appears in the
multifunction display. The Tele Aid system will
transmit data generating the vehicle
identification number, model, color and
location (subject to availability of cellular and
GPS signals).
i The COMAND system display indicates
that a Tele Aid call is in progress. While the
call is connected you can change to the
navigation menu by pressing the NAVI
button on the COMAND system. Spoken
commands are not available.
A voice connection between the Roadside
Assistance dispatcher and the occupants of
the vehicle will be established.
XDescribe the nature of the need for
assistance.
The Mercedes-Benz Roadside Assistance
dispatcher will either dispatch a qualified
Mercedes-Benz technician or arrange to tow
your vehicle to the nearest authorized
Mercedes-Benz Center. For services such as
labor and/or towing, charges may apply.
Refer to the Roadside Assistance manual for
more information.
Sign and Drive services (USA only):
Services such as a jump start, a few gallons
of fuel or the replacement of a flat tire with
the vehicle spare wheel are obtainable at no
charge.
iIf the indicator lamp in Roadside
Assistance button : is flashing
continuously and there was no voice
connection to the Customer Assistance
Center established, then the Tele Aid
Useful features169Controls in detail230_AKB; 6; 22, en-USd2ureepe,Version: 2.11.8.12009-07-28T18:49:58+02:00 - Seite 169Z