height MERCEDES-BENZ SL65AMG 2011 R230 Owner's Manual
[x] Cancel search | Manufacturer: MERCEDES-BENZ, Model Year: 2011, Model line: SL65AMG, Model: MERCEDES-BENZ SL65AMG 2011 R230Pages: 316, PDF Size: 7.21 MB
Page 11 of 316
Limiting .......................................... 108
Shifting into optimal ......................109
Gear selector lever ............................ 103
Cleaning ......................................... 220
Gearshift pattern ........................... 103
Lock ......................................... 99, 103
Messages in the multifunction
display ........................................... 234
Shifting procedure .........................104
Transmission position indicator .....104
Transmission positions ..................104
Generator
see Alternator
Global locking/unlocking
see Key, SmartKey
Glove box ........................................... 161
Gross Axle Weight Rating see GAWR
Gross Vehicle Weight
see GVW
Gross Vehicle Weight Rating
see GVWR
GVW (Gross Vehicle Weight) ............ 206
GVWR (Gross Vehicle Weight
Rating) ................................................ 206
H
Hard plastic trim items, cleaning .... 220
Hazard warning flasher ....................... 92
Headlamp cleaning system ................ 93
Headlamps
Active Bi-Xenon headlamps .............89
Automatic headlamp mode ..............90
Bi-Xenon .................................. 89, 272
Cleaning lenses ............................. 218
Cleaning system .............................. 93
Daytime running lamp mode ............90
Delayed shut-off ............................ 125
High-beam flasher ............................ 92
High-beam headlamps .....................92
Low-beam headlamps ......................90
Messages in the multifunction
display ........................................... 249
Replacing bulbs ............................. 271
Switch .............................................. 89
Headliner, cleaning and care of ....... 220
Head restraints .................................... 80
Adjustment ...................................... 80
Head-thorax air bags ........................... 42
Height adjustment
Seats ............................................... 80
High-beam flasher ............................... 92
High-beam headlamps ................ 92, 272
Indicator lamp ............................ 31, 32
Replacing bulbs ............................. 272
High-performance brake system ..... 211
Hill-start assist system ..................... 142
Hood ................................................... 180
Messages in the multifunction
display ........................................... 241
Horn ...................................................... 28
Hydroplaning ..................................... 212
I
Identification labels .......................... 294
Identification number, vehicle
(VIN) ................................................... 295
Ignition ..................................... 78, 79, 99
Immobilizer .......................................... 63
Indicator lamps see Lamps, indicator and warning
Infant and child restraint systems
see Children in the vehicle
Inflation pressure
see Tires, Inflation pressure
Inside door handle ........................ 35, 72
Instrument cluster ...................... 30, 111
Illumination .................................... 112
Lamps ............................................ 254
Multifunction display .....................114
Instrument lighting
see Instrument cluster, Illumination
Instrument panel
see Instrument cluster
Instruments and controls
see Cockpit
Interior lighting ................................... 94
Delayed shut-off ............................ 126
Reading lamps ................................. 94
Interior rear view mirror ..................... 86
Auto-dimming rear view mirrors ....... 86
Interior storage spaces
see Storage compartments
Index9230_AKB; 6; 22, en-USd2ureepe,Version: 2.11.8.12009-07-28T18:49:58+02:00 - Seite 9
Page 56 of 316
they reach a height where a lap/shoulder belt
fits properly without a booster.
When the child restraint is not in use, remove
it from the vehicle or secure it with the seat
belt to prevent the child restraint from
becoming a projectile in the event of an
accident.
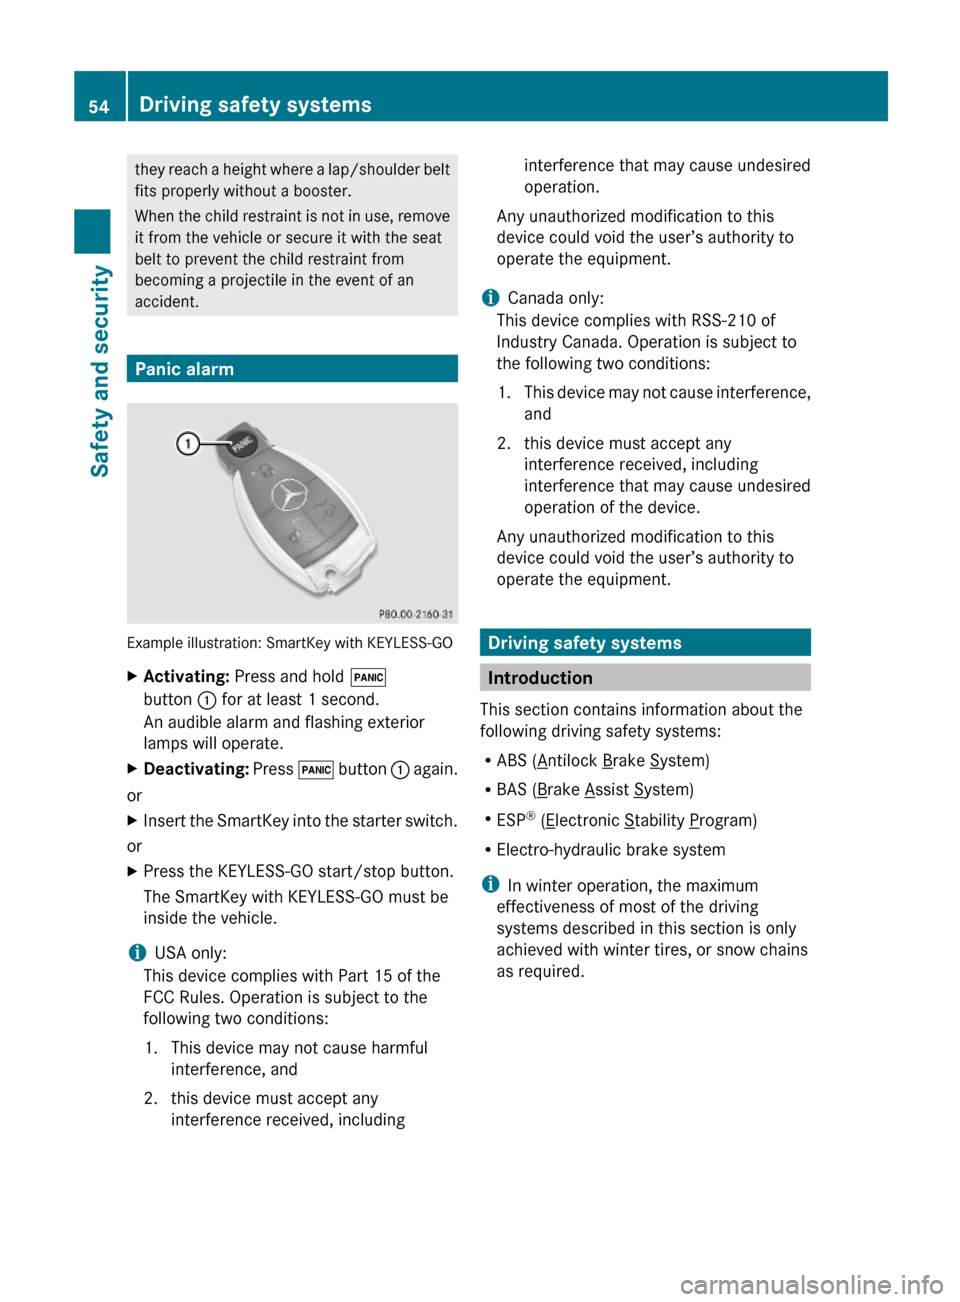
Panic alarm
Example illustration: SmartKey with KEYLESS-GO
XActivating: Press and hold !
button : for at least 1 second.
An audible alarm and flashing exterior
lamps will operate.
XDeactivating: Press ! button : again.
or
XInsert the SmartKey into the starter switch.
or
XPress the KEYLESS-GO start/stop button.
The SmartKey with KEYLESS-GO must be
inside the vehicle.
iUSA only:
This device complies with Part 15 of the
FCC Rules. Operation is subject to the
following two conditions:
1. This device may not cause harmful
interference, and
2. this device must accept any
interference received, including
interference that may cause undesired
operation.
Any unauthorized modification to this
device could void the user’s authority to
operate the equipment.
iCanada only:
This device complies with RSS-210 of
Industry Canada. Operation is subject to
the following two conditions:
1.This device may not cause interference,
and
2. this device must accept any
interference received, including
interference that may cause undesired
operation of the device.
Any unauthorized modification to this
device could void the user’s authority to
operate the equipment.
Driving safety systems
Introduction
This section contains information about the
following driving safety systems:
RABS (Antilock Brake System)
RBAS (Brake Assist System)
RESP® (Electronic Stability Program)
RElectro-hydraulic brake system
iIn winter operation, the maximum
effectiveness of most of the driving
systems described in this section is only
achieved with winter tires, or snow chains
as required.
54Driving safety systemsSafety and security
230_AKB; 6; 22, en-USd2ureepe,Version: 2.11.8.12009-07-28T18:49:58+02:00 - Seite 54
Page 75 of 316
Automatic central locking
You can switch the automatic central locking
on or off using the control system
(Y page 126).
The doors and the trunk lock automatically
when the vehicle is set into motion.
You can open a locked door from the inside.
Open door only when conditions are safe to
do so.
The doors are designed to unlock
automatically after an accident if the force of
the impact exceeds a preset threshold.
The vehicle locks automatically when the
ignition is switched on and the wheels are
turning at a vehicle speed of above 9 mph
(15 km/h). You could therefore lock yourself
out when the vehicle is pushed or towed or is
on a test stand.
Locking and unlocking from the inside
GObserve Safety notes, see page 51.
You can lock or unlock the vehicle from the
inside using the central locking or unlocking
switch. This can be useful, for example, if you
want to lock the vehicle before starting to
drive.
The central locking or unlocking switch does
not lock or unlock the fuel filler flap or the
interior storage compartments, such as the
glove box.
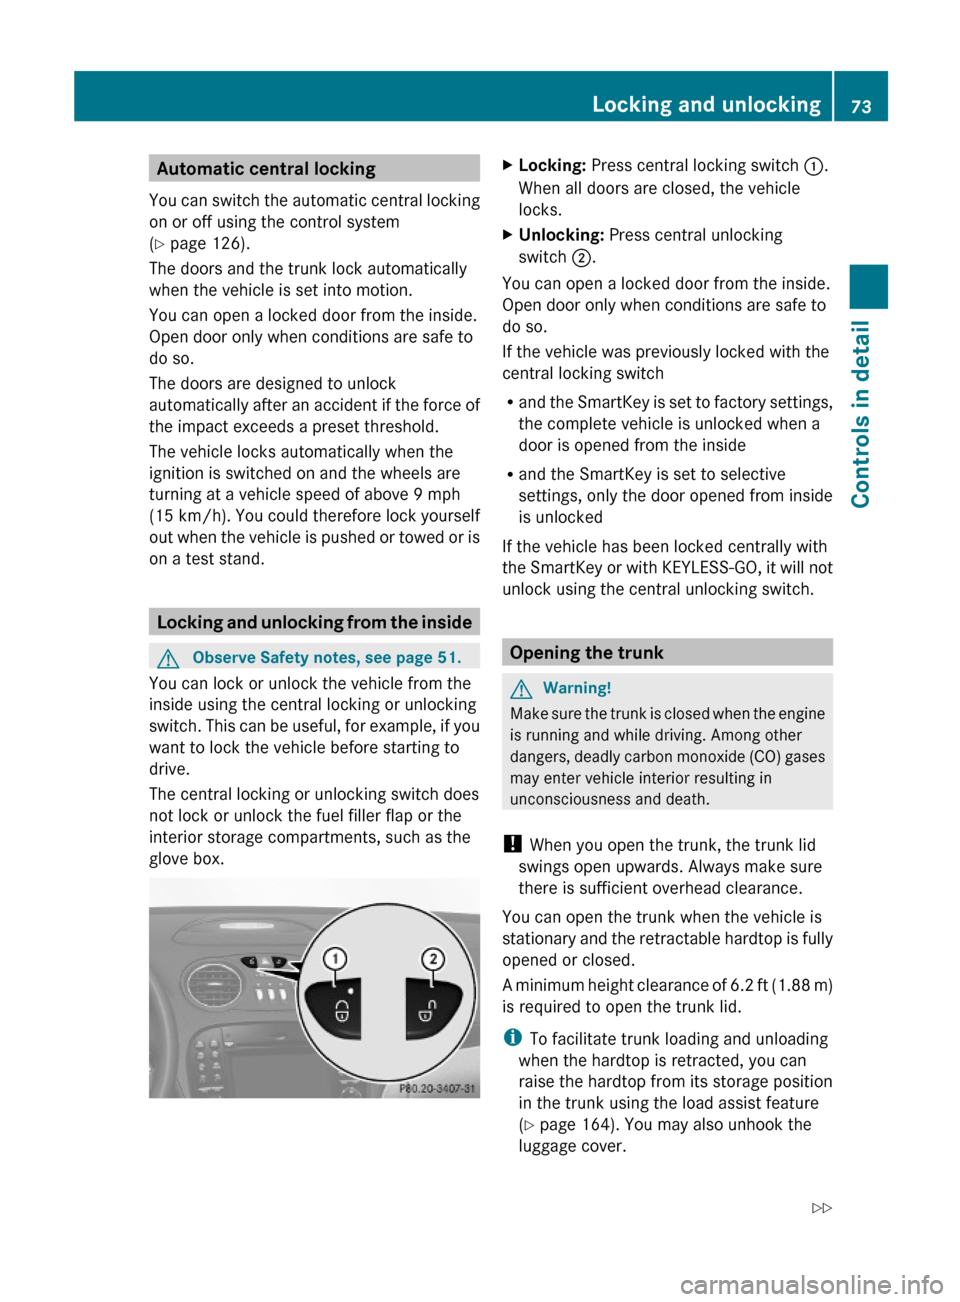
XLocking: Press central locking switch :.
When all doors are closed, the vehicle
locks.
XUnlocking: Press central unlocking
switch ;.
You can open a locked door from the inside.
Open door only when conditions are safe to
do so.
If the vehicle was previously locked with the
central locking switch
Rand the SmartKey is set to factory settings,
the complete vehicle is unlocked when a
door is opened from the inside
Rand the SmartKey is set to selective
settings, only the door opened from inside
is unlocked
If the vehicle has been locked centrally with
the SmartKey or with KEYLESS-GO, it will not
unlock using the central unlocking switch.
Opening the trunk
GWarning!
Make sure the trunk is closed when the engine
is running and while driving. Among other
dangers, deadly carbon monoxide (CO) gases
may enter vehicle interior resulting in
unconsciousness and death.
! When you open the trunk, the trunk lid
swings open upwards. Always make sure
there is sufficient overhead clearance.
You can open the trunk when the vehicle is
stationary and the retractable hardtop is fully
opened or closed.
A minimum height clearance of 6.2 ft (1.88 m)
is required to open the trunk lid.
iTo facilitate trunk loading and unloading
when the hardtop is retracted, you can
raise the hardtop from its storage position
in the trunk using the load assist feature
(Y page 164). You may also unhook the
luggage cover.
Locking and unlocking73Controls in detail230_AKB; 6; 22, en-USd2ureepe,Version: 2.11.8.12009-07-28T18:49:58+02:00 - Seite 73Z
Page 83 of 316
Seat adjustment
! When moving the seats, make sure there
are no items in the footwell or behind the
seats. Otherwise, you could damage the
seats and/or the items.
Power seats
iThe memory function (Y page 88) lets
you store the settings for the seat position
together with the settings for the steering
wheel and the exterior rear view mirrors.
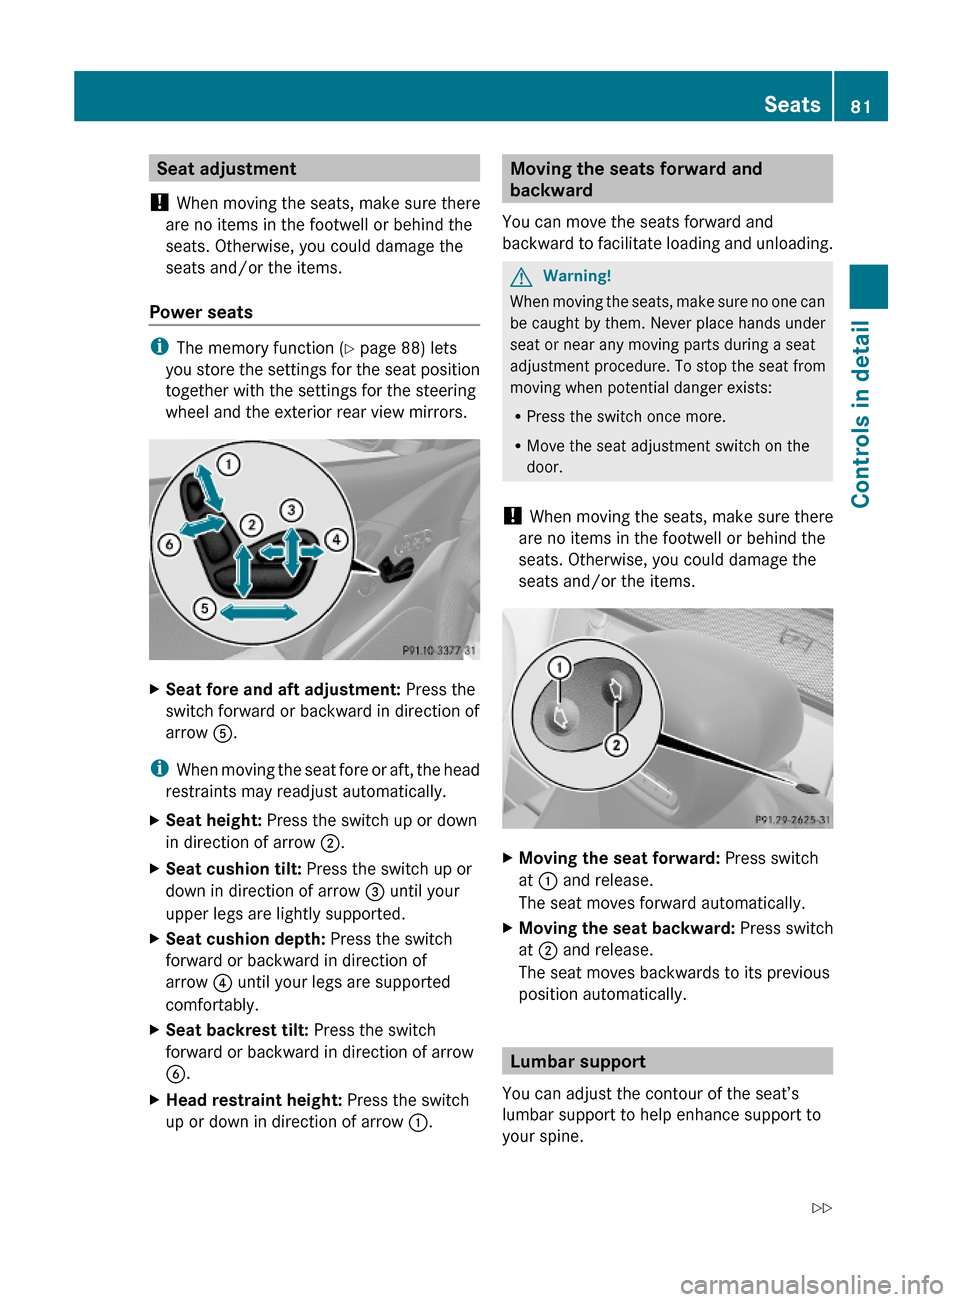
XSeat fore and aft adjustment: Press the
switch forward or backward in direction of
arrow A.
iWhen moving the seat fore or aft, the head
restraints may readjust automatically.
XSeat height: Press the switch up or down
in direction of arrow ;.
XSeat cushion tilt: Press the switch up or
down in direction of arrow = until your
upper legs are lightly supported.
XSeat cushion depth: Press the switch
forward or backward in direction of
arrow ? until your legs are supported
comfortably.
XSeat backrest tilt: Press the switch
forward or backward in direction of arrow
B.
XHead restraint height: Press the switch
up or down in direction of arrow :.Moving the seats forward and
backward
You can move the seats forward and
backward to facilitate loading and unloading.
GWarning!
When moving the seats, make sure no one can
be caught by them. Never place hands under
seat or near any moving parts during a seat
adjustment procedure. To stop the seat from
moving when potential danger exists:
RPress the switch once more.
RMove the seat adjustment switch on the
door.
! When moving the seats, make sure there
are no items in the footwell or behind the
seats. Otherwise, you could damage the
seats and/or the items.
XMoving the seat forward: Press switch
at : and release.
The seat moves forward automatically.
XMoving the seat backward: Press switch
at ; and release.
The seat moves backwards to its previous
position automatically.
Lumbar support
You can adjust the contour of the seat’s
lumbar support to help enhance support to
your spine.
Seats81Controls in detail230_AKB; 6; 22, en-USd2ureepe,Version: 2.11.8.12009-07-28T18:49:58+02:00 - Seite 81Z
Page 84 of 316
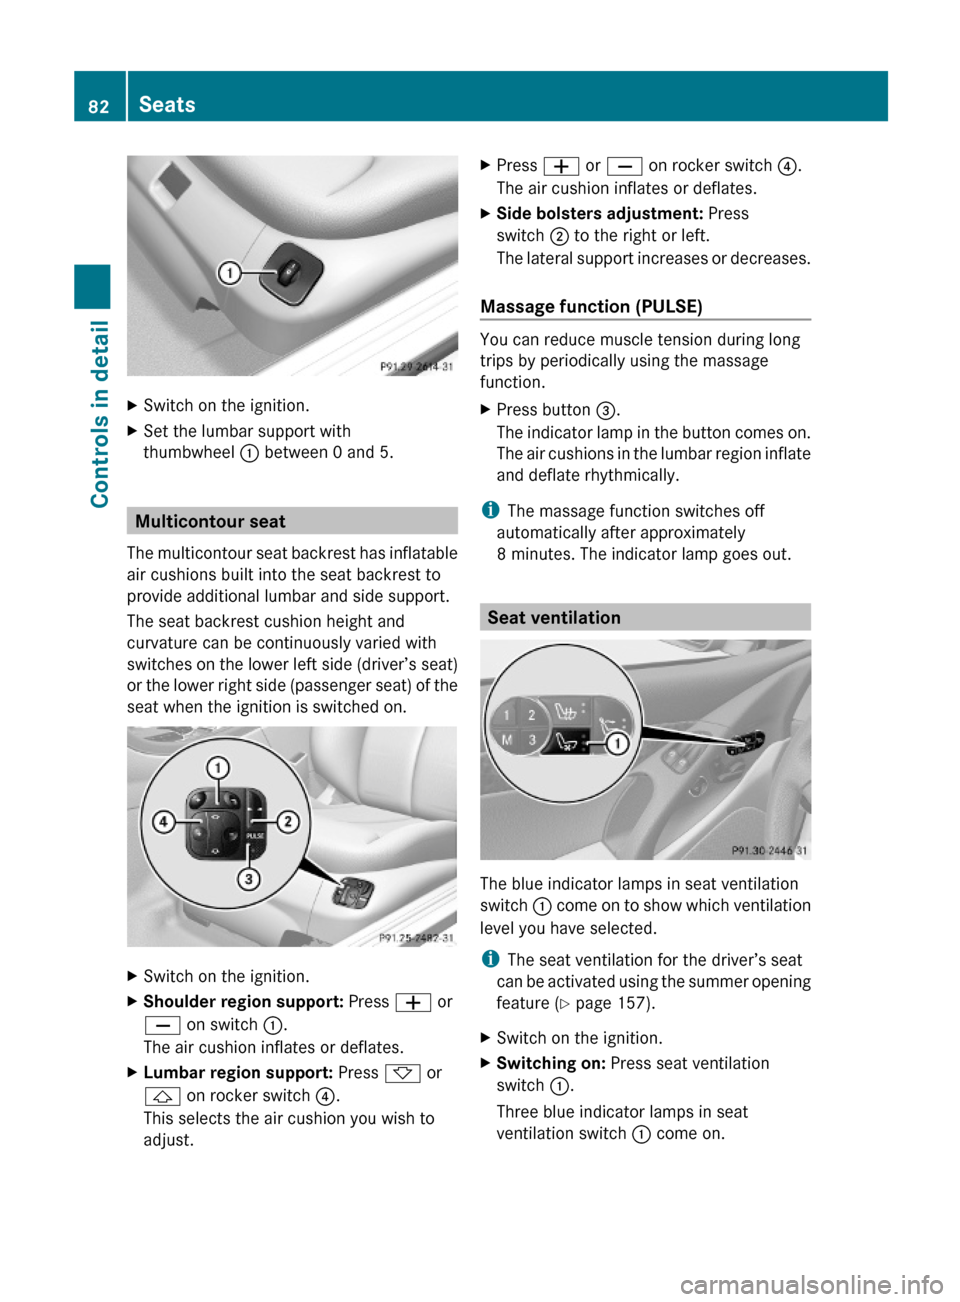
XSwitch on the ignition.XSet the lumbar support with
thumbwheel : between 0 and 5.
Multicontour seat
The multicontour seat backrest has inflatable
air cushions built into the seat backrest to
provide additional lumbar and side support.
The seat backrest cushion height and
curvature can be continuously varied with
switches on the lower left side (driver’s seat)
or the lower right side (passenger seat) of the
seat when the ignition is switched on.
XSwitch on the ignition.XShoulder region support: Press W or
X on switch :.
The air cushion inflates or deflates.
XLumbar region support: Press * or
& on rocker switch ?.
This selects the air cushion you wish to
adjust.
XPress W or X on rocker switch ?.
The air cushion inflates or deflates.
XSide bolsters adjustment: Press
switch ; to the right or left.
The lateral support increases or decreases.
Massage function (PULSE)
You can reduce muscle tension during long
trips by periodically using the massage
function.
XPress button =.
The indicator lamp in the button comes on.
The air cushions in the lumbar region inflate
and deflate rhythmically.
iThe massage function switches off
automatically after approximately
8 minutes. The indicator lamp goes out.
Seat ventilation
The blue indicator lamps in seat ventilation
switch : come on to show which ventilation
level you have selected.
iThe seat ventilation for the driver’s seat
can be activated using the summer opening
feature (Y page 157).
XSwitch on the ignition.XSwitching on: Press seat ventilation
switch :.
Three blue indicator lamps in seat
ventilation switch : come on.
82SeatsControls in detail
230_AKB; 6; 22, en-USd2ureepe,Version: 2.11.8.12009-07-28T18:49:58+02:00 - Seite 82
Page 144 of 316
Operator’s Manual appears in the right
multifunction display.XDepress the accelerator pedal fully.
The engine speed rises to approximately
4000 rpm.
The message RACE START appears in the
left multifunction display and the message
Release Brake To Start appears in the
right multifunction display.
i If you do not release the brake pedal
within 7 seconds, RACE START is canceled.
The message RACE START appears in the
left multifunction display and the message
Canceled appears in the right
multifunction display.
XTake your foot off the brake pedal while
keeping the accelerator pedal depressed.
The vehicle pulls away at maximum
acceleration.
The message RACE START appears in the
left multifunction display and the message
Active appears in the right multifunction
display.
RACE START deactivates at a vehicle speed
of approximately 50 km/h. The automatic
transmission switches to program mode S+.
The SPORT handling mode remains switched
on.
RACE START is canceled immediately if you
release the accelerator pedal while RACE
START is active or when the activation
conditions are not fulfilled anymore. The
message RACE START appears in the left
multifunction display and the message Not
Possible See Operator’s Manual
appears in the right multifunction display.
i If RACE START is used repeatedly in a
short period of time, it is only available
again after having driven the vehicle a
certain distance.
Hill-start assist system (SL 63 AMG)
On uphill grades, the hill-start assist system
maintains the pressure in the brake system
for approximately 1 second after you have
released the brake pedal. Therefore, you can
start off smoothly without the vehicle moving
immediately after releasing the brake pedal.GWarning!
The hill-start assist system is not designed to
function as a parking brake. It does not
prevent the vehicle from moving when parked
on an incline.
Always engage the parking brake in addition
to shifting the automatic transmission into
park position P.
XDepress the brake pedal.XShift the automatic transmission into drive
position D or reverse gear R.XRelease the brake pedal.XCarefully depress the accelerator pedal.
The hill-start assist system is inactive
R when starting off on a level road or downhill
grades
R with the automatic transmission in neutral
position N
R with the parking brake engaged
R if the ESP ®
has switched off due to a
malfunction
ABC
The ABC system is an active, computer-
controlled system that adjusts the
suspension hydraulically at all four wheels in
response to various driving situations. It
selects the optimum suspension tuning and
ride height for your vehicle automatically.
Vehicle level control
Your vehicle adjusts its ride height
automatically to increase vehicle safety and
to reduce fuel consumption.
142Driving systemsControls in detail
230_AKB; 6; 22, en-USd2ureepe,Version: 2.11.8.12009-07-28T18:49:58+02:00 - Seite 142
Page 145 of 316
The vehicle chassis ride height is raised or
lowered according to the selected level
setting and to the vehicle speed. With
increasing speed, the ride height is reduced
by up to approximately 0.5 in (12 mm). With
decreasing speed, the ride height is again
raised to the selected vehicle level.
These height adjustments are so small that
you may not notice any change.
Setting the vehicle level
GWarning!
To help avoid personal injury, keep hands and
feet away from wheel housing area, and stay
away from under the vehicle when lowering
the vehicle chassis.
The following vehicle level settings can be
selected when the vehicle is stationary and
the engine is running:
LevelUse forIndicator
lamps
NormalFor driving on
normal roads.
Both lamps
are off.
Level 1For driving on
rough roads or
with snow chains
(Y page 208).
One lamp
is on.
Level 2For driving on very
rough road surface
conditions.
Both lamps
are on.
Select the level 1 and level 2 settings only
when required by current driving conditions.
Otherwise the fuel consumption may
increase and/or the handling may be
impaired.
iThe selected setting remains stored in
memory, even when the engine is turned
off and restarted.
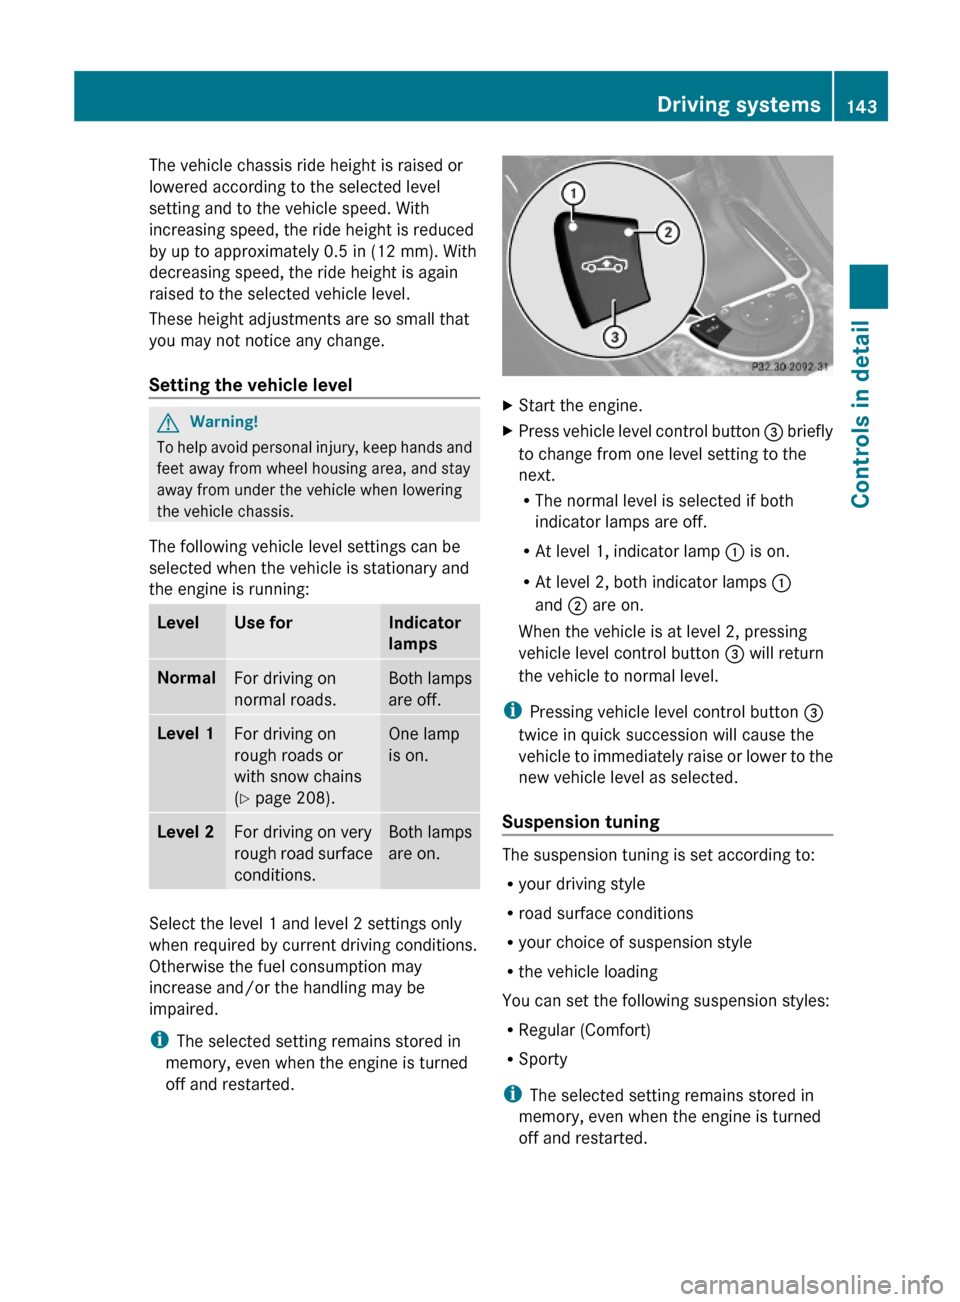
XStart the engine.XPress vehicle level control button = briefly
to change from one level setting to the
next.
RThe normal level is selected if both
indicator lamps are off.
RAt level 1, indicator lamp : is on.
RAt level 2, both indicator lamps :
and ; are on.
When the vehicle is at level 2, pressing
vehicle level control button = will return
the vehicle to normal level.
iPressing vehicle level control button =
twice in quick succession will cause the
vehicle to immediately raise or lower to the
new vehicle level as selected.
Suspension tuning
The suspension tuning is set according to:
Ryour driving style
Rroad surface conditions
Ryour choice of suspension style
Rthe vehicle loading
You can set the following suspension styles:
RRegular (Comfort)
RSporty
iThe selected setting remains stored in
memory, even when the engine is turned
off and restarted.
Driving systems143Controls in detail230_AKB; 6; 22, en-USd2ureepe,Version: 2.11.8.12009-07-28T18:49:58+02:00 - Seite 143Z
Page 147 of 316
distance between the vehicle and an obstacle
visually and audibly.
The Parktronic system is activated
automatically when
Ryou switch on the ignition
and
Ryou release the parking brake
and
Rthe automatic transmission is in drive
position D, reverse gear R, or neutral
position N
The Parktronic system deactivates at speeds
above approximately 11 mph (18 km/h). At
lower speeds, the Parktronic system
activates again.
The Parktronic system also deactivates when
you shift the automatic transmission into
park position P or engage the parking brake.
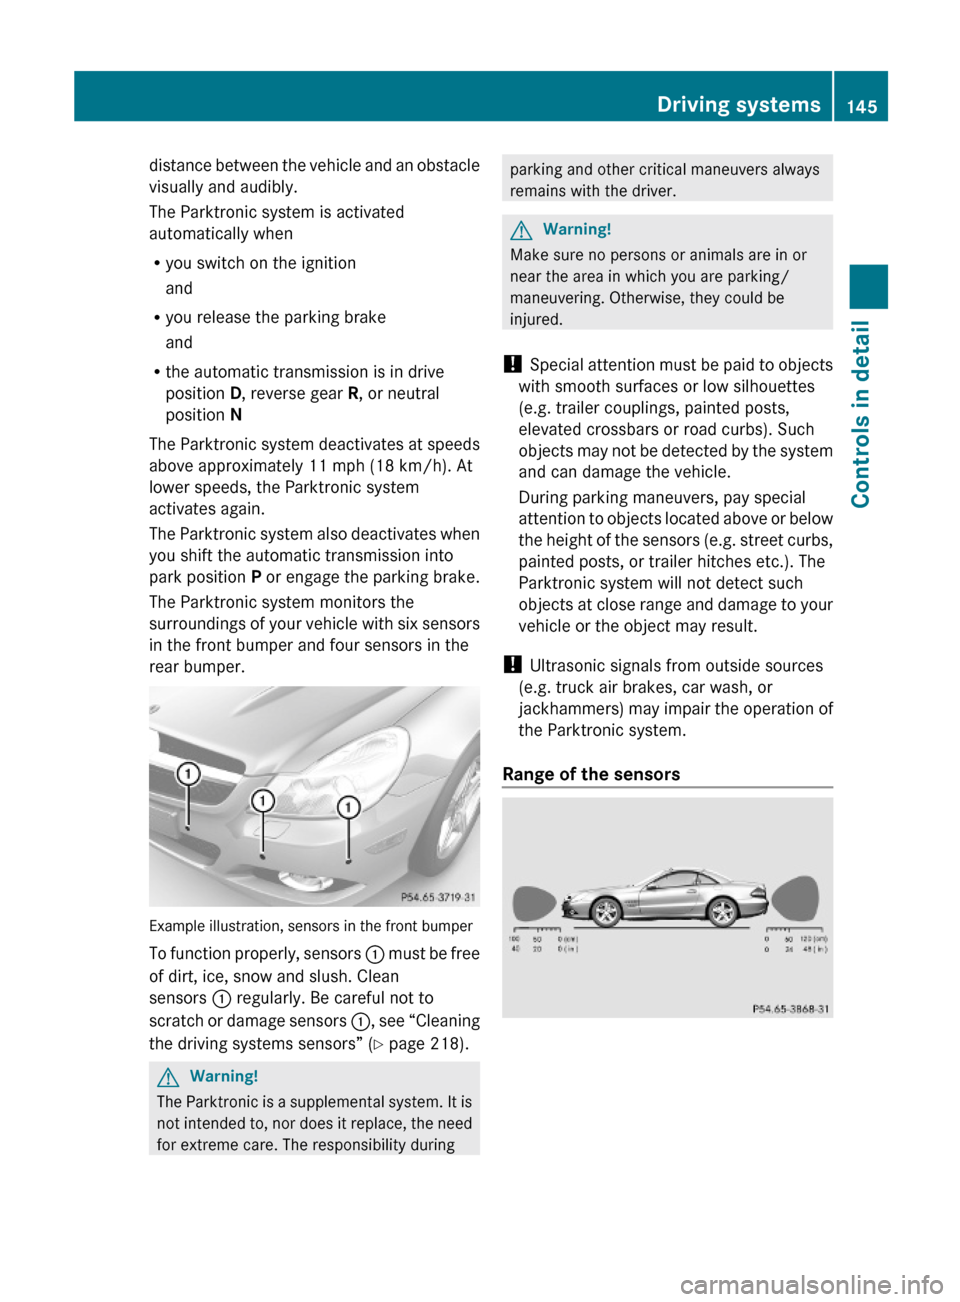
The Parktronic system monitors the
surroundings of your vehicle with six sensors
in the front bumper and four sensors in the
rear bumper.
Example illustration, sensors in the front bumper
To function properly, sensors : must be free
of dirt, ice, snow and slush. Clean
sensors : regularly. Be careful not to
scratch or damage sensors :, see “Cleaning
the driving systems sensors” (Y page 218).
GWarning!
The Parktronic is a supplemental system. It is
not intended to, nor does it replace, the need
for extreme care. The responsibility during
parking and other critical maneuvers always
remains with the driver.
GWarning!
Make sure no persons or animals are in or
near the area in which you are parking/
maneuvering. Otherwise, they could be
injured.
! Special attention must be paid to objects
with smooth surfaces or low silhouettes
(e.g. trailer couplings, painted posts,
elevated crossbars or road curbs). Such
objects may not be detected by the system
and can damage the vehicle.
During parking maneuvers, pay special
attention to objects located above or below
the height of the sensors (e.g. street curbs,
painted posts, or trailer hitches etc.). The
Parktronic system will not detect such
objects at close range and damage to your
vehicle or the object may result.
! Ultrasonic signals from outside sources
(e.g. truck air brakes, car wash, or
jackhammers) may impair the operation of
the Parktronic system.
Range of the sensors
Driving systems145Controls in detail230_AKB; 6; 22, en-USd2ureepe,Version: 2.11.8.12009-07-28T18:49:58+02:00 - Seite 145Z
Page 158 of 316
& on the SmartKey. This immediately
interrupts the raising or lowering procedure.
You then can operate the retractable hardtop
switch or press button % or & on the
SmartKey to raise or lower the retractable
hardtop away from the danger zone
! Never sit or place heavy objects on the
rear shelf. Doing so could cause damage to
the retractable hardtop and the rear shelf.
! Please keep in mind that weather
conditions can sometimes change rapidly.
Make sure to close the retractable hardtop
when leaving the vehicle. If water enters
the vehicle interior, vehicle electronics
could be damaged which is not covered by
the Mercedes-Benz Limited Warranty.
! When opening and closing the retractable
hardtop, make sure
Rthere is sufficient clearance for the
retractable hardtop to move up and for
the trunk lid to move back
Rthe luggage cover is installed, extended
and closed
Rthe trunk is loaded only to the height of
the luggage cover
Rthe luggage/cargo does not push up the
closed luggage cover
Rthe trunk lid is closed
Rthe outside temperature is above +5‡
(-15†)
Otherwise the retractable hardtop and
trunk as well as other parts of the vehicle
could be damaged.
Opening and closing
With the retractable hardtop switch
GObserve Safety notes, see page 155.XEngage the parking brake.XClose the luggage cover (Y page 158).XClose the trunk lid.XSwitch on the ignition.
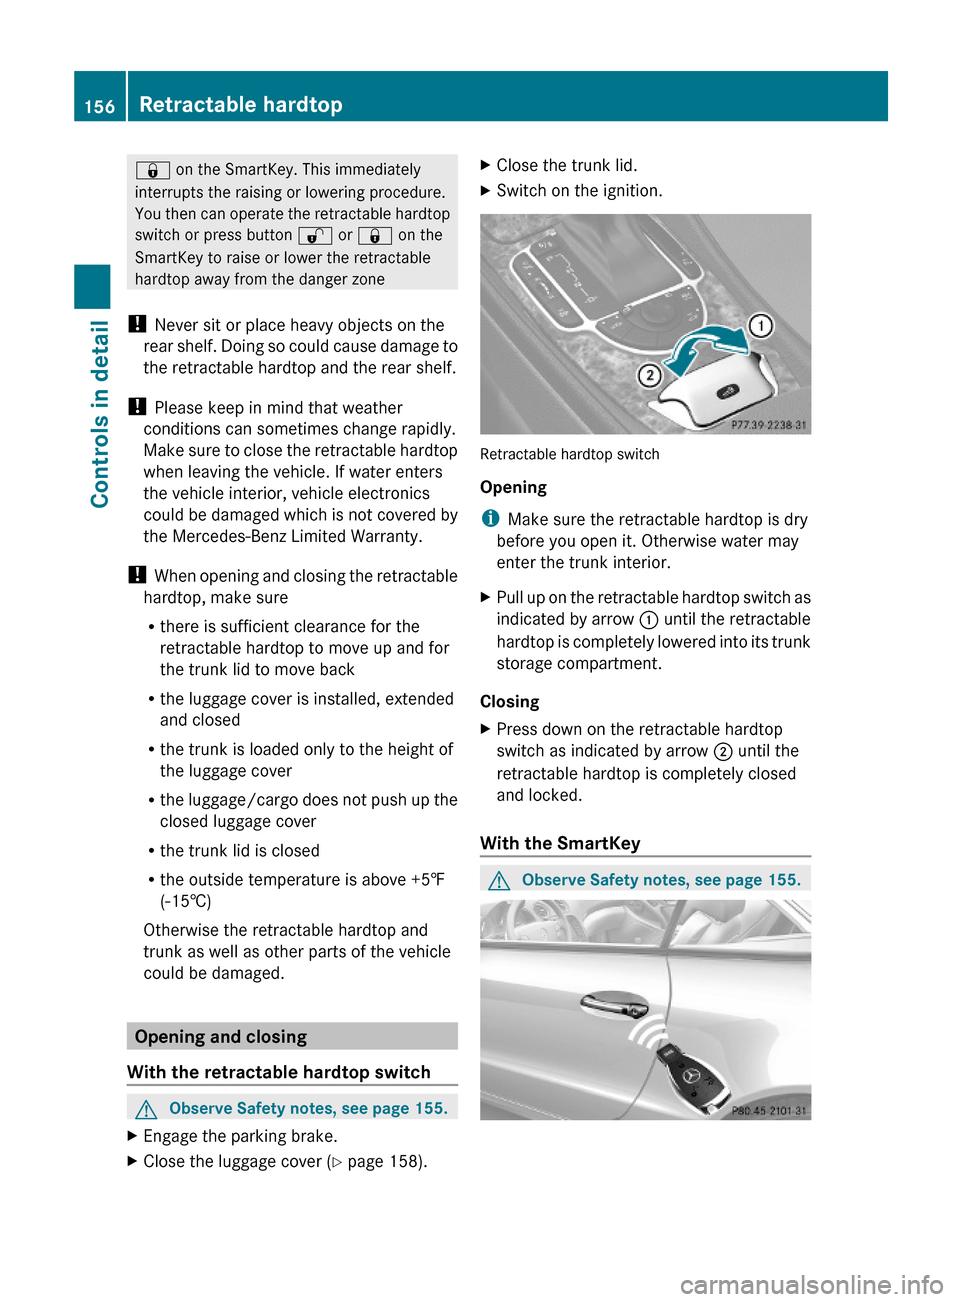
Retractable hardtop switch
Opening
iMake sure the retractable hardtop is dry
before you open it. Otherwise water may
enter the trunk interior.
XPull up on the retractable hardtop switch as
indicated by arrow : until the retractable
hardtop is completely lowered into its trunk
storage compartment.
Closing
XPress down on the retractable hardtop
switch as indicated by arrow ; until the
retractable hardtop is completely closed
and locked.
With the SmartKey
GObserve Safety notes, see page 155.156Retractable hardtopControls in detail
230_AKB; 6; 22, en-USd2ureepe,Version: 2.11.8.12009-07-28T18:49:58+02:00 - Seite 156
Page 160 of 316
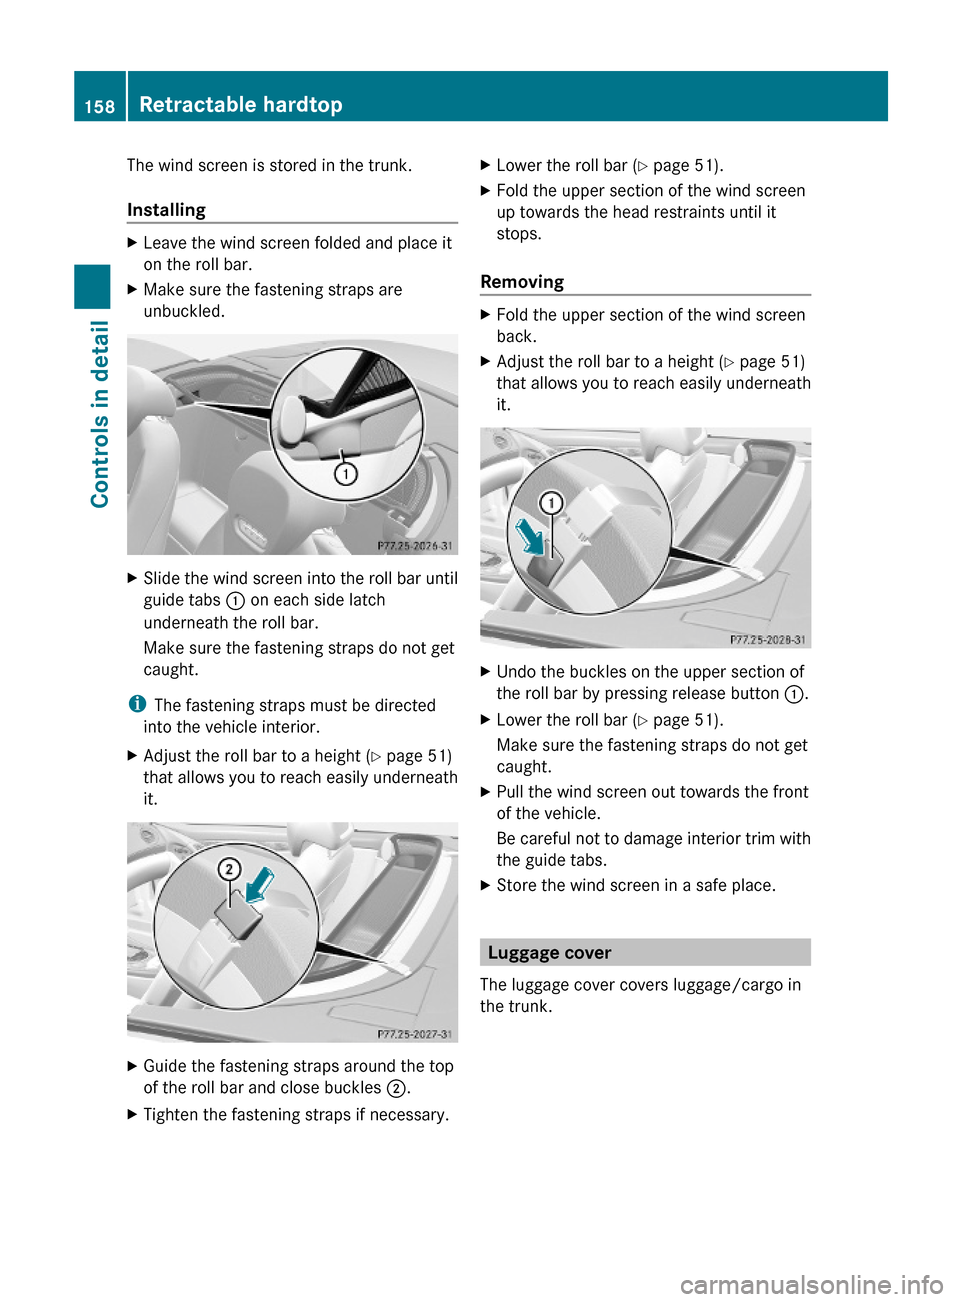
The wind screen is stored in the trunk.
Installing
XLeave the wind screen folded and place it
on the roll bar.
XMake sure the fastening straps are
unbuckled.
XSlide the wind screen into the roll bar until
guide tabs : on each side latch
underneath the roll bar.
Make sure the fastening straps do not get
caught.
iThe fastening straps must be directed
into the vehicle interior.
XAdjust the roll bar to a height (Y page 51)
that allows you to reach easily underneath
it.
XGuide the fastening straps around the top
of the roll bar and close buckles ;.
XTighten the fastening straps if necessary.XLower the roll bar (Y page 51).XFold the upper section of the wind screen
up towards the head restraints until it
stops.
Removing
XFold the upper section of the wind screen
back.
XAdjust the roll bar to a height (Y page 51)
that allows you to reach easily underneath
it.
XUndo the buckles on the upper section of
the roll bar by pressing release button :.
XLower the roll bar (Y page 51).
Make sure the fastening straps do not get
caught.
XPull the wind screen out towards the front
of the vehicle.
Be careful not to damage interior trim with
the guide tabs.
XStore the wind screen in a safe place.
Luggage cover
The luggage cover covers luggage/cargo in
the trunk.
158Retractable hardtopControls in detail
230_AKB; 6; 22, en-USd2ureepe,Version: 2.11.8.12009-07-28T18:49:58+02:00 - Seite 158