turn signal MERCEDES-BENZ SL65AMG 2012 R230 User Guide
[x] Cancel search | Manufacturer: MERCEDES-BENZ, Model Year: 2012, Model line: SL65AMG, Model: MERCEDES-BENZ SL65AMG 2012 R230Pages: 316, PDF Size: 7.21 MB
Page 81 of 316
orXGet a jump start (Y page 285).
KEYLESS-GO
GObserve Safety notes, see page 51.
Vehicles equipped with the KEYLESS-GO
feature are supplied with a SmartKey with
integrated KEYLESS-GO function.
The SmartKey must be present in the vehicle.
Pressing the KEYLESS-GO start/stop button
without depressing the brake pedal
corresponds to the various starter switch
positions (Y page 78).
Pressing the KEYLESS-GO start/stop button
with the brake pedal firmly depressed will
start the engine (Y page 98).
The function of the SmartKey overrules the
KEYLESS-GO function.
XMake sure the automatic transmission is in
park position P.
XDo not depress the brake pedal.
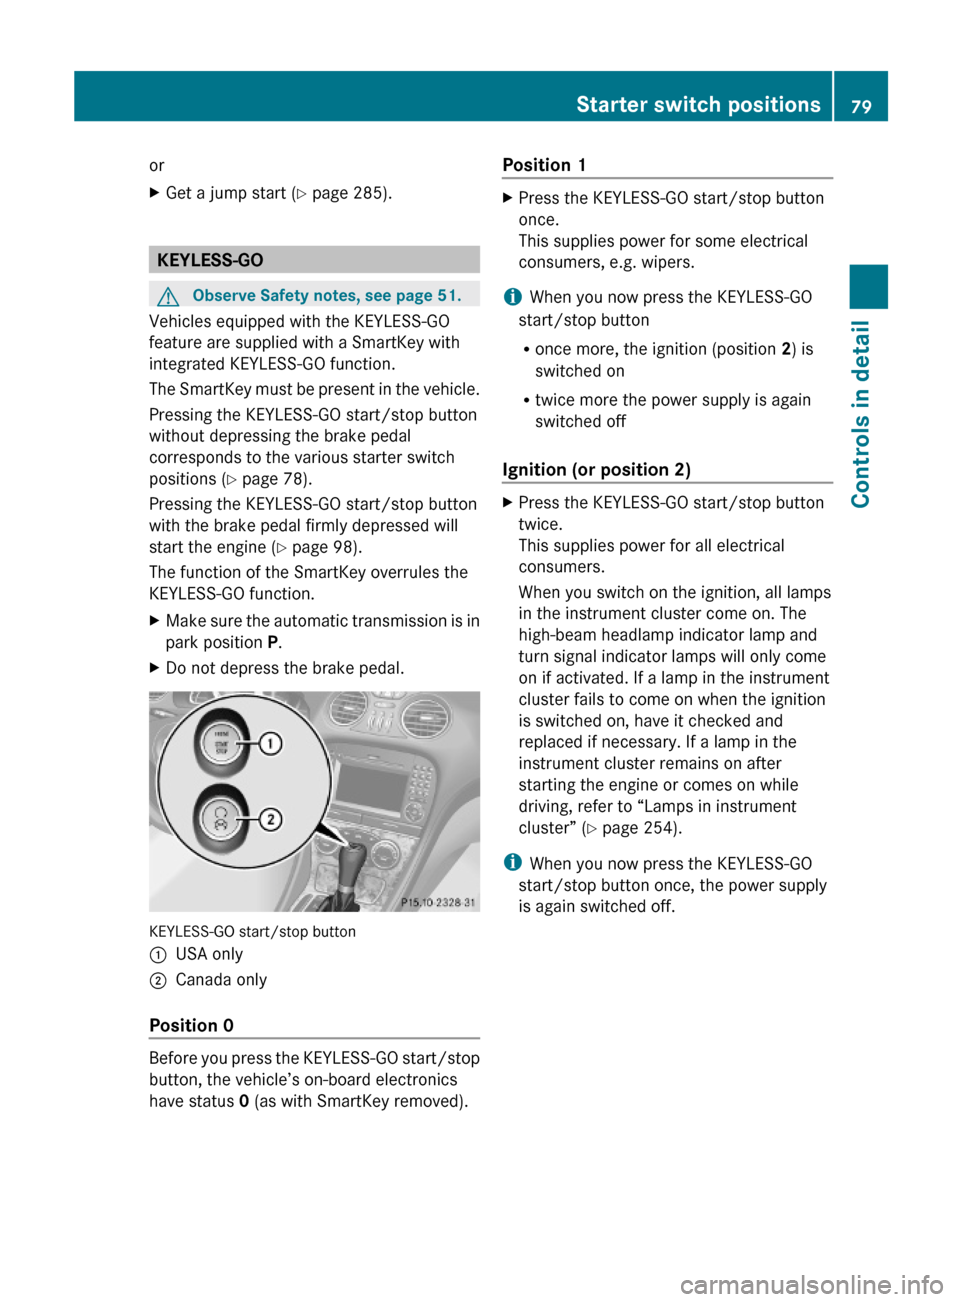
KEYLESS-GO start/stop button
:USA only;Canada only
Position 0
Before you press the KEYLESS-GO start/stop
button, the vehicle’s on-board electronics
have status 0 (as with SmartKey removed).
Position 1XPress the KEYLESS-GO start/stop button
once.
This supplies power for some electrical
consumers, e.g. wipers.
iWhen you now press the KEYLESS-GO
start/stop button
Ronce more, the ignition (position 2) is
switched on
Rtwice more the power supply is again
switched off
Ignition (or position 2)
XPress the KEYLESS-GO start/stop button
twice.
This supplies power for all electrical
consumers.
When you switch on the ignition, all lamps
in the instrument cluster come on. The
high-beam headlamp indicator lamp and
turn signal indicator lamps will only come
on if activated. If a lamp in the instrument
cluster fails to come on when the ignition
is switched on, have it checked and
replaced if necessary. If a lamp in the
instrument cluster remains on after
starting the engine or comes on while
driving, refer to “Lamps in instrument
cluster” (Y page 254).
iWhen you now press the KEYLESS-GO
start/stop button once, the power supply
is again switched off.
Starter switch positions79Controls in detail230_AKB; 6; 22, en-USd2ureepe,Version: 2.11.8.12009-07-28T18:49:58+02:00 - Seite 79Z
Page 92 of 316
SmartKey from the starter switch and open
the driver’s door, an acoustic signal
sounds.
In addition the message Lights Are
Still On appears in the multifunction
display.
Switch off the parking lamps or the rear fog
lamp manually.
! Failure to switch off the parking lamps
when leaving the vehicle may result in a
discharged battery.
Low-beam headlamps
The low-beam headlamps can be switched on
and off with the exterior lamp switch.
XSwitch on the ignition.XSwitching on: Turn the exterior lamp
switch to position L.
The following lamps come on:
R Low-beam headlamps
R Tail lamps
R Parking lamps
R License plate lamps
R Side marker lamps
R Instrument panel lamps
R Green indicator lamp T in the exterior
lamp switchXSwitching off: Turn the exterior lamp
switch to position $.
Automatic headlamp mode
The following lamps come on and go out
automatically depending on the brightness of
the ambient light:
R Low-beam headlamps
R Tail lamps
R Parking lamps
R License plate lamps
R Side marker lamps
GWarning!
If the exterior lamp switch is set to Ã, the
headlamps will not automatically come on
under foggy conditions.
To minimize risk to you and to others, activate
headlamps by turning exterior lamp switch to
L when driving or when traffic and/or
ambient lighting conditions require you to do
so.
In low ambient lighting conditions, only switch
from position à to L with the vehicle
at a standstill in a safe location. Switching
from à to L will briefly switch off the
headlamps. Doing so while driving in low
ambient lighting conditions may result in an
accident.
The automatic headlamp feature is only an aid
to the driver. The driver is responsible for the
operation of the vehicle’s lights at all times.
XSwitching on: Turn the exterior lamp
switch to position Ã.
The following lamps come on and go out
depending on the brightness of the ambient
light with the SmartKey in starter switch
position 1 or the KEYLESS-GO start/stop
button pressed once:
R Tail lamps
R Parking lamps
R License plate lamps
R Side marker lamps
When the engine is running, the low-beam
headlamps will also come on and turn off
automatically.
Canada only: High-beam headlamps are only
available with the exterior lamp switch in
position L.
Daytime running lamp mode
In Canada, the daytime running lamp mode is
mandatory and therefore in a constant mode.
In the USA, the daytime running lamp mode
is deactivated by default.
90LightingControls in detail
230_AKB; 6; 22, en-USd2ureepe,Version: 2.11.8.12009-07-28T18:49:58+02:00 - Seite 90
Page 94 of 316
Locator lighting and night security
illumination
Locator lighting and night security
illumination are described in the “Control
system” section, see “Switching locator
lighting on or off” (Y page 125) and
“Switching night security illumination
(Headlamps delayed shut-off feature) on or
off” (Y page 125).
Combination switch
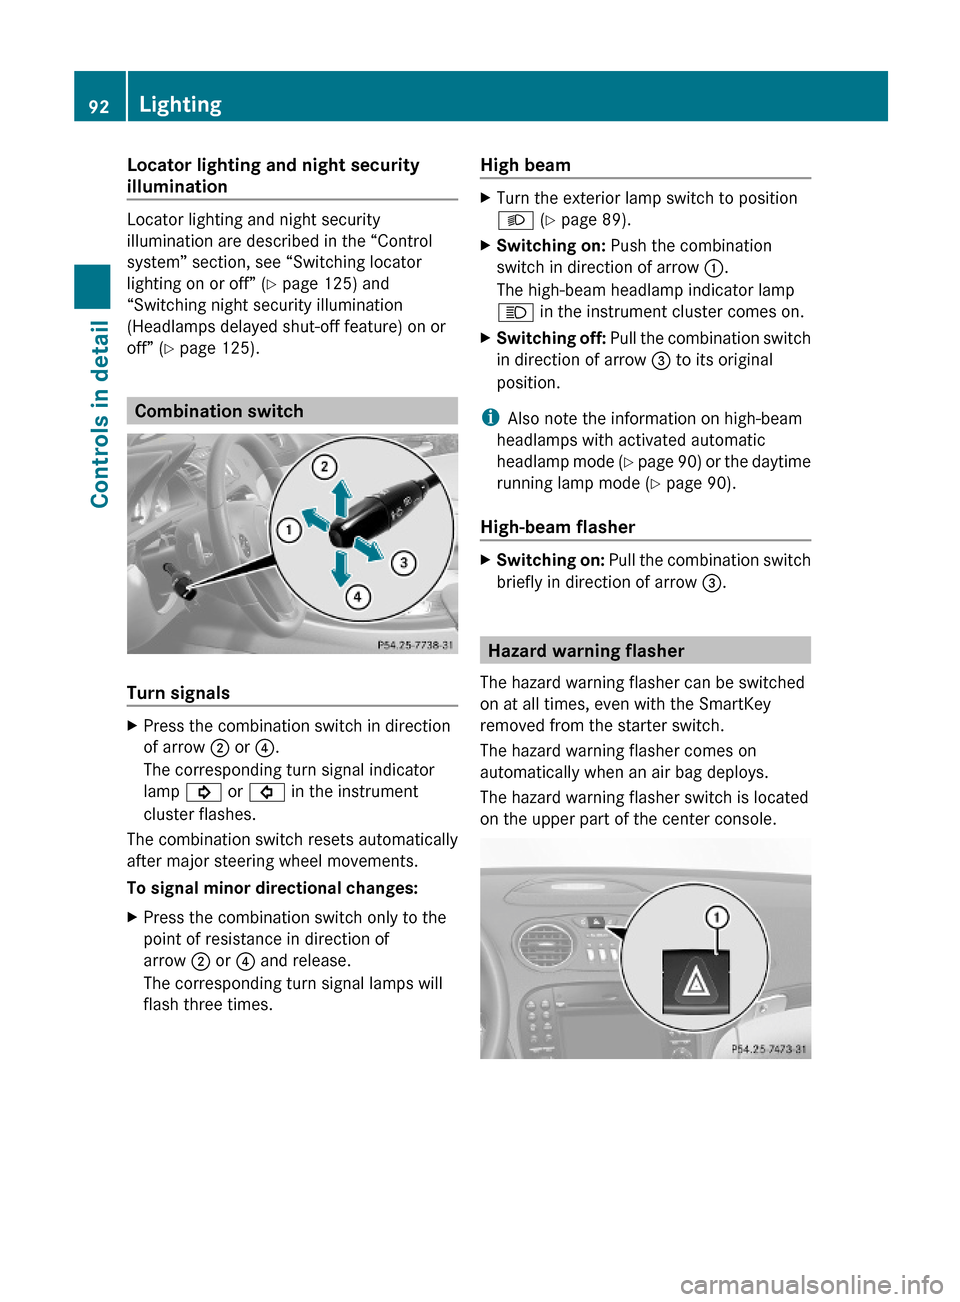
Turn signals
XPress the combination switch in direction
of arrow ; or ?.
The corresponding turn signal indicator
lamp ! or # in the instrument
cluster flashes.
The combination switch resets automatically
after major steering wheel movements.
To signal minor directional changes:
XPress the combination switch only to the
point of resistance in direction of
arrow ; or ? and release.
The corresponding turn signal lamps will
flash three times.
High beam XTurn the exterior lamp switch to position
L (Y page 89).
XSwitching on: Push the combination
switch in direction of arrow :.
The high-beam headlamp indicator lamp
K in the instrument cluster comes on.
XSwitching off: Pull the combination switch
in direction of arrow = to its original
position.
iAlso note the information on high-beam
headlamps with activated automatic
headlamp mode (Y page 90) or the daytime
running lamp mode (Y page 90).
High-beam flasher
XSwitching on: Pull the combination switch
briefly in direction of arrow =.
Hazard warning flasher
The hazard warning flasher can be switched
on at all times, even with the SmartKey
removed from the starter switch.
The hazard warning flasher comes on
automatically when an air bag deploys.
The hazard warning flasher switch is located
on the upper part of the center console.
92LightingControls in detail
230_AKB; 6; 22, en-USd2ureepe,Version: 2.11.8.12009-07-28T18:49:58+02:00 - Seite 92
Page 95 of 316
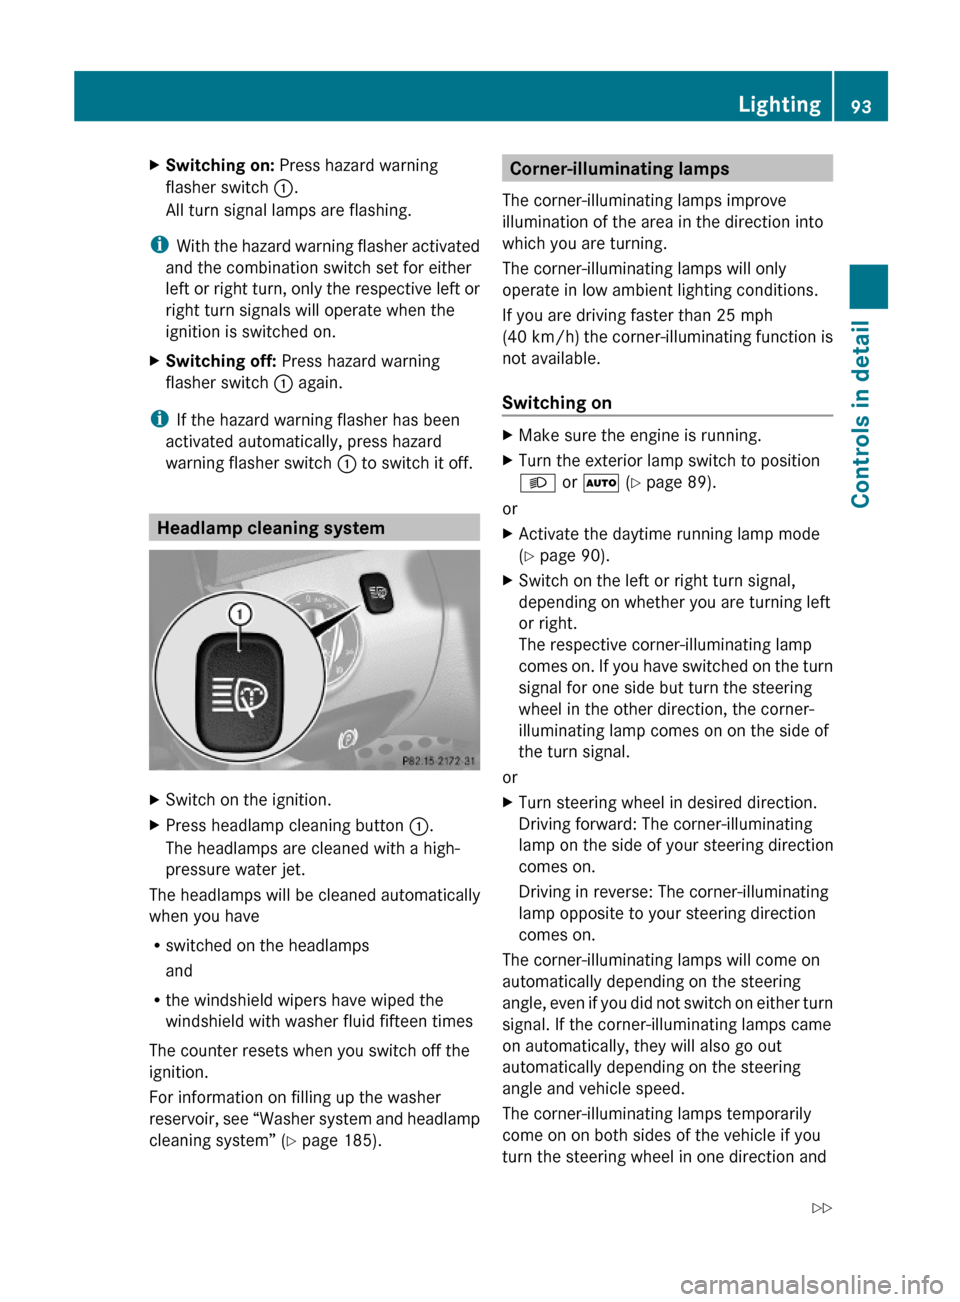
XSwitching on: Press hazard warning
flasher switch :.
All turn signal lamps are flashing.
iWith the hazard warning flasher activated
and the combination switch set for either
left or right turn, only the respective left or
right turn signals will operate when the
ignition is switched on.
XSwitching off: Press hazard warning
flasher switch : again.
iIf the hazard warning flasher has been
activated automatically, press hazard
warning flasher switch : to switch it off.
Headlamp cleaning system
XSwitch on the ignition.XPress headlamp cleaning button :.
The headlamps are cleaned with a high-
pressure water jet.
The headlamps will be cleaned automatically
when you have
Rswitched on the headlamps
and
Rthe windshield wipers have wiped the
windshield with washer fluid fifteen times
The counter resets when you switch off the
ignition.
For information on filling up the washer
reservoir, see “Washer system and headlamp
cleaning system” (Y page 185).
Corner-illuminating lamps
The corner-illuminating lamps improve
illumination of the area in the direction into
which you are turning.
The corner-illuminating lamps will only
operate in low ambient lighting conditions.
If you are driving faster than 25 mph
(40 km/h) the corner-illuminating function is
not available.
Switching on
XMake sure the engine is running.XTurn the exterior lamp switch to position
L or à (Y page 89).
or
XActivate the daytime running lamp mode
(Y page 90).
XSwitch on the left or right turn signal,
depending on whether you are turning left
or right.
The respective corner-illuminating lamp
comes on. If you have switched on the turn
signal for one side but turn the steering
wheel in the other direction, the corner-
illuminating lamp comes on on the side of
the turn signal.
or
XTurn steering wheel in desired direction.
Driving forward: The corner-illuminating
lamp on the side of your steering direction
comes on.
Driving in reverse: The corner-illuminating
lamp opposite to your steering direction
comes on.
The corner-illuminating lamps will come on
automatically depending on the steering
angle, even if you did not switch on either turn
signal. If the corner-illuminating lamps came
on automatically, they will also go out
automatically depending on the steering
angle and vehicle speed.
The corner-illuminating lamps temporarily
come on on both sides of the vehicle if you
turn the steering wheel in one direction and
Lighting93Controls in detail230_AKB; 6; 22, en-USd2ureepe,Version: 2.11.8.12009-07-28T18:49:58+02:00 - Seite 93Z
Page 96 of 316
then again in the other direction shortly
thereafter.
The corner-illuminating lamp remains lit for a
short time only. It then goes out
automatically.
Switching off
XSwitch off the left or right turn signal.
or
XSteer straight ahead.
The corner-illuminating lamp goes out.
iThere may be a brief delay before the
corner-illuminating lamps go out.
Interior lighting
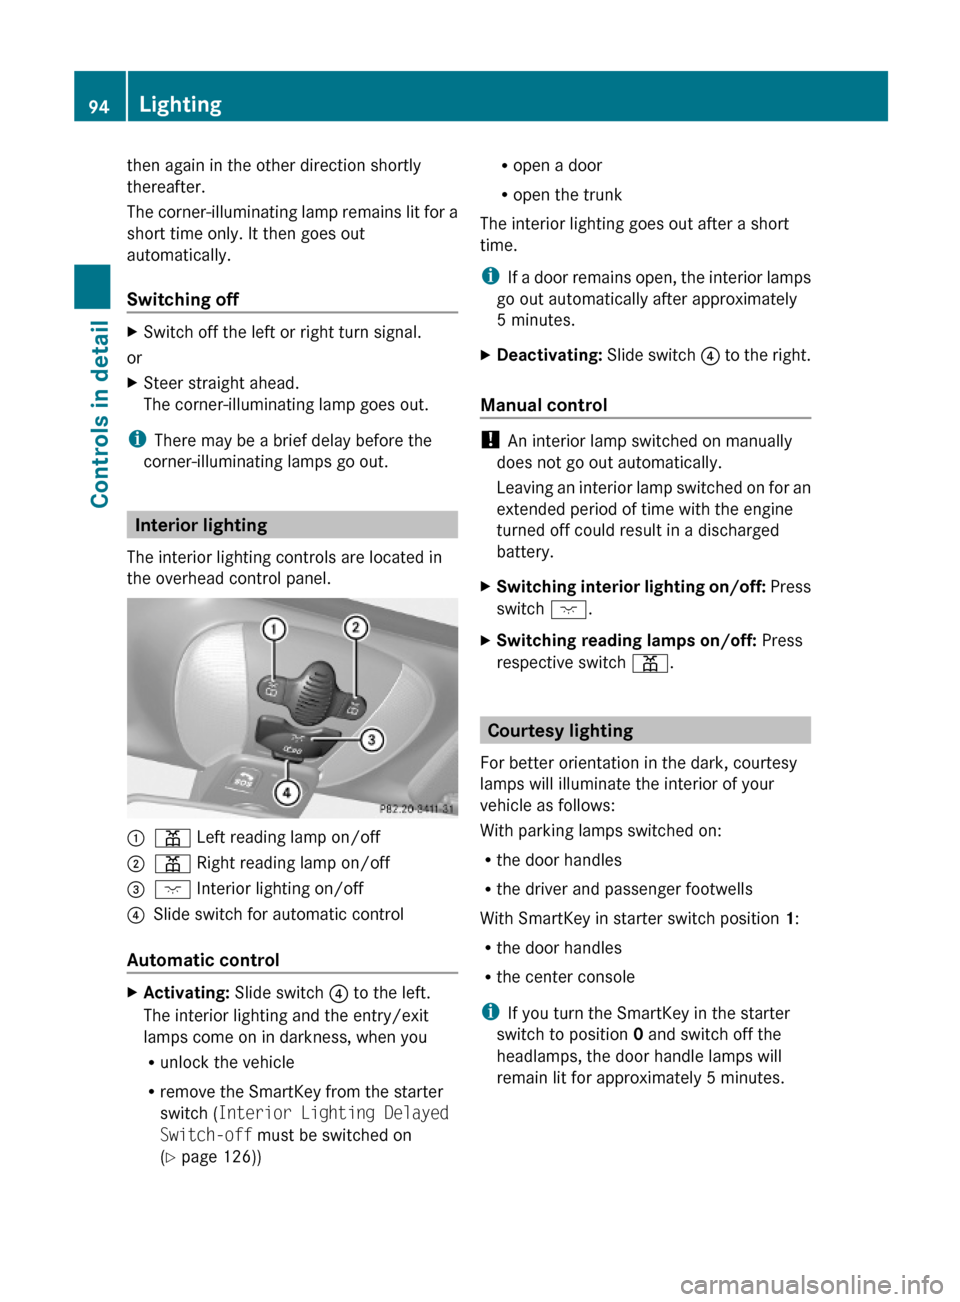
The interior lighting controls are located in
the overhead control panel.
:p Left reading lamp on/off ;p Right reading lamp on/off=c Interior lighting on/off ?Slide switch for automatic control
Automatic control
XActivating: Slide switch ? to the left.
The interior lighting and the entry/exit
lamps come on in darkness, when you
Runlock the vehicle
Rremove the SmartKey from the starter
switch (Interior Lighting Delayed
Switch-off must be switched on
(Y page 126))
Ropen a door
Ropen the trunk
The interior lighting goes out after a short
time.
iIf a door remains open, the interior lamps
go out automatically after approximately
5 minutes.
XDeactivating: Slide switch ? to the right.
Manual control
! An interior lamp switched on manually
does not go out automatically.
Leaving an interior lamp switched on for an
extended period of time with the engine
turned off could result in a discharged
battery.
XSwitching interior lighting on/off: Press
switch c.
XSwitching reading lamps on/off: Press
respective switch p.
Courtesy lighting
For better orientation in the dark, courtesy
lamps will illuminate the interior of your
vehicle as follows:
With parking lamps switched on:
Rthe door handles
Rthe driver and passenger footwells
With SmartKey in starter switch position 1:
Rthe door handles
Rthe center console
iIf you turn the SmartKey in the starter
switch to position 0 and switch off the
headlamps, the door handle lamps will
remain lit for approximately 5 minutes.
94LightingControls in detail
230_AKB; 6; 22, en-USd2ureepe,Version: 2.11.8.12009-07-28T18:49:58+02:00 - Seite 94
Page 175 of 316
Do not hold the buttons for longer than
30 seconds.
This procedure erases any previous
settings for all three channels and
initializes the memory. If you later wish to
program a second and/or third hand-held
transmitter to the remaining two signal
transmitter buttons, do not repeat this step
and begin directly with step 3.XStep 3: Hold the end of hand-held remote
control A of the device you wish to train
approximately 2 to 12 in (5 to 30 cm) away
from the signal transmitter button ( ;, =
or ? ) to be programmed, while keeping
indicator lamp : in view.XStep 4: Using both hands, simultaneously
press hand-held remote control button B
and the desired signal transmitter button
( ; , = or ?). Do not release the buttons
until step 5 is completed.
Indicator lamp : will flash, first slowly and
then rapidly.
i Indicator lamp : flashes immediately
the first time the signal transmitter button
is programmed. If this button has already
been programmed, the indicator lamp will
start flashing after 20 seconds.
XStep 5: After indicator lamp : changes
from a slow to a rapidly flashing light,
release the hand-held remote control
button and the signal transmitter button.XStep 6: Press and hold the just-trained
signal transmitter button ( ;, = or ?) and
observe indicator lamp :.
If indicator lamp : stays on constantly,
programming is complete and your device
should activate when the respective signal
transmitter button ( ;, = or ?) is pressed
and released.
i If indicator lamp : flashes rapidly for
approximately 2 seconds and then turns to
a constant light, continue with
programming steps 8 through 12 as your
garage door opener may be equipped with
the “rolling code” feature.XStep 7: To program the remaining two
signal transmitter buttons, repeat the steps
above starting with step 3.
Rolling code programming
To train a garage door opener (or other rolling
code devices) with the rolling code feature,
follow these instructions after completing the
“Programming” portion (steps 1 through 6) of
this text. For your convenience and to
complete the procedure faster, you might
want to have someone assist you.
XStep 8: Locate the “training” button on the
garage door opener motor head unit.
i Exact location and color of the button may
vary by garage door opener brand.
Depending on manufacturer, the “training”
button may also be referred to as “learn” or
“smart” button. If there is difficulty locating
the transmitting button, refer to the garage
door opener Operator’s Manual.
XStep 9: Press the “training” button on the
garage door opener motor head unit.
The “training light” is activated.
You have 30 seconds to initiate the
following two steps.XStep 10: Return to the vehicle and firmly
press, hold for 2 seconds and release the
programmed signal transmitter button ( ;,
= or ?).XStep 11: Press, hold for 2 seconds and
release same signal transmitter button a
second time to complete the training
process.
i Some garage door openers (or other
rolling code equipped devices) may require
you to press, hold for 2 seconds and
release the same signal transmitter button
a third time to complete the training
process.
Useful features173Controls in detail230_AKB; 6; 22, en-USd2ureepe,Version: 2.11.8.12009-07-28T18:49:58+02:00 - Seite 173Z
Page 220 of 316
Do not allow cleaning agents to dry on the
finish.
Automatic car wash
You can have your vehicle washed in an
automatic car wash from the start. Brushless
car washes are preferable.
XTo protect the filter system, activate the air
recirculation mode using button g on
the climate control panel.
! Do not clean your vehicle in an automatic
touchless car wash which uses caustic
spray. Caustic spray will damage the paint
or ornamental moldings.
If the vehicle is very dirty, prewash it before
running it through the automatic car wash.
! Make sure the combination switch is set
to wiper setting 0. Otherwise, the rain
sensor could activate and cause the wipers
to move unintentionally. This may lead to
vehicle damage.
Due to the width of the vehicle, fold in
exterior rear view mirrors prior to running
the vehicle through an automatic car wash
to prevent damage to the mirrors.
XWhen taking the vehicle through an
automatic conveyor-type car wash:
Make sure the automatic transmission
remains in neutral position N.
When leaving the automatic car wash, make
sure the mirrors are folded out.
After running the vehicle through an
automatic car wash, wipe any wax off of the
windshield and the wiper blade inserts. This
will prevent smears and reduce wiping noise
which can be caused by residual wax on the
windshield.
Ornamental moldings
XFor regular cleaning and care of ornamental
moldings, use a damp cloth.
! Do not use chrome cleaner on ornamental
moldings. Although ornamental moldings
may have chrome appearance, they could
be made of anodized aluminum that will be
damaged when cleaned with chrome
cleaner. Instead, use a damp cloth to clean
those ornamental moldings.
For very dirty ornamental moldings of
which you are sure are chrome-plated, use
a chrome cleaner. If in doubt whether an
ornamental molding is chrome-plated,
contact an authorized Mercedes-Benz
Center.
Headlamps, brake lamps, tail lamps,
side markers, turn signal lenses
XUse a mild vehicle wash detergent, such as
Mercedes-Benz approved Car Shampoo,
with plenty of water.
! Only use window cleaning solutions that
are suitable for plastic lamp lenses.
Window cleaning solutions which are not
suitable may damage the plastic lamp
lenses of the headlamps. Therefore, do not
use abrasives, solvents or cleaners that
contain solvents.
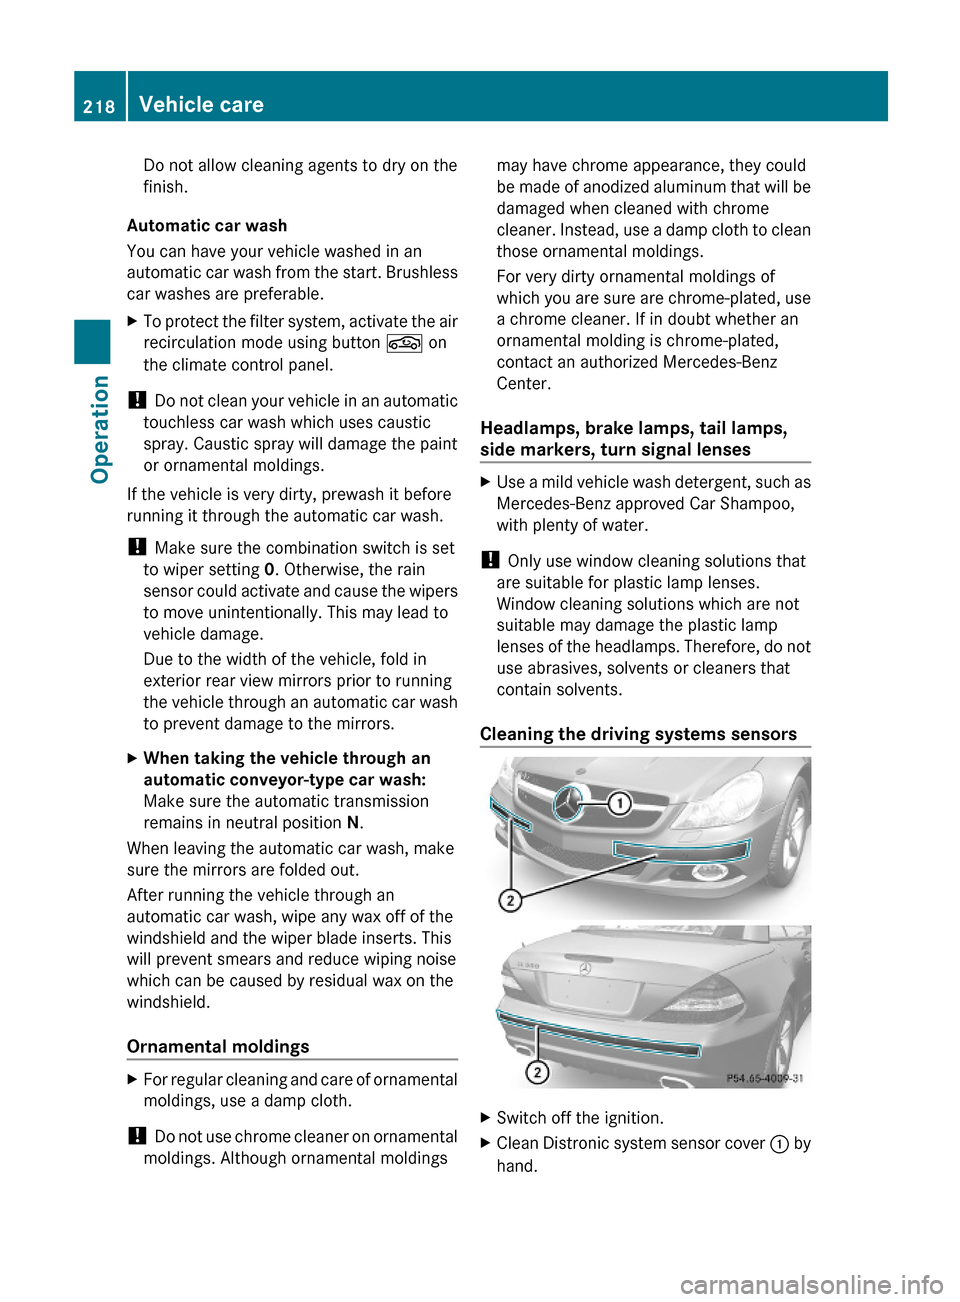
Cleaning the driving systems sensors
XSwitch off the ignition.XClean Distronic system sensor cover : by
hand.
218Vehicle careOperation
230_AKB; 6; 22, en-USd2ureepe,Version: 2.11.8.12009-07-28T18:49:58+02:00 - Seite 218
Page 228 of 316
XScrew the valve cap back onto the valve.
iVehicles with 19" spare wheel only:
Before placing the spare wheel in the spare
wheel well fasten tensioning straps, see
“Compressing the collapsible tire”
(Y page 226).
XPlace the spare wheel into the spare wheel
well.
XSecure the spare wheel by turning retaining
screw = clockwise.
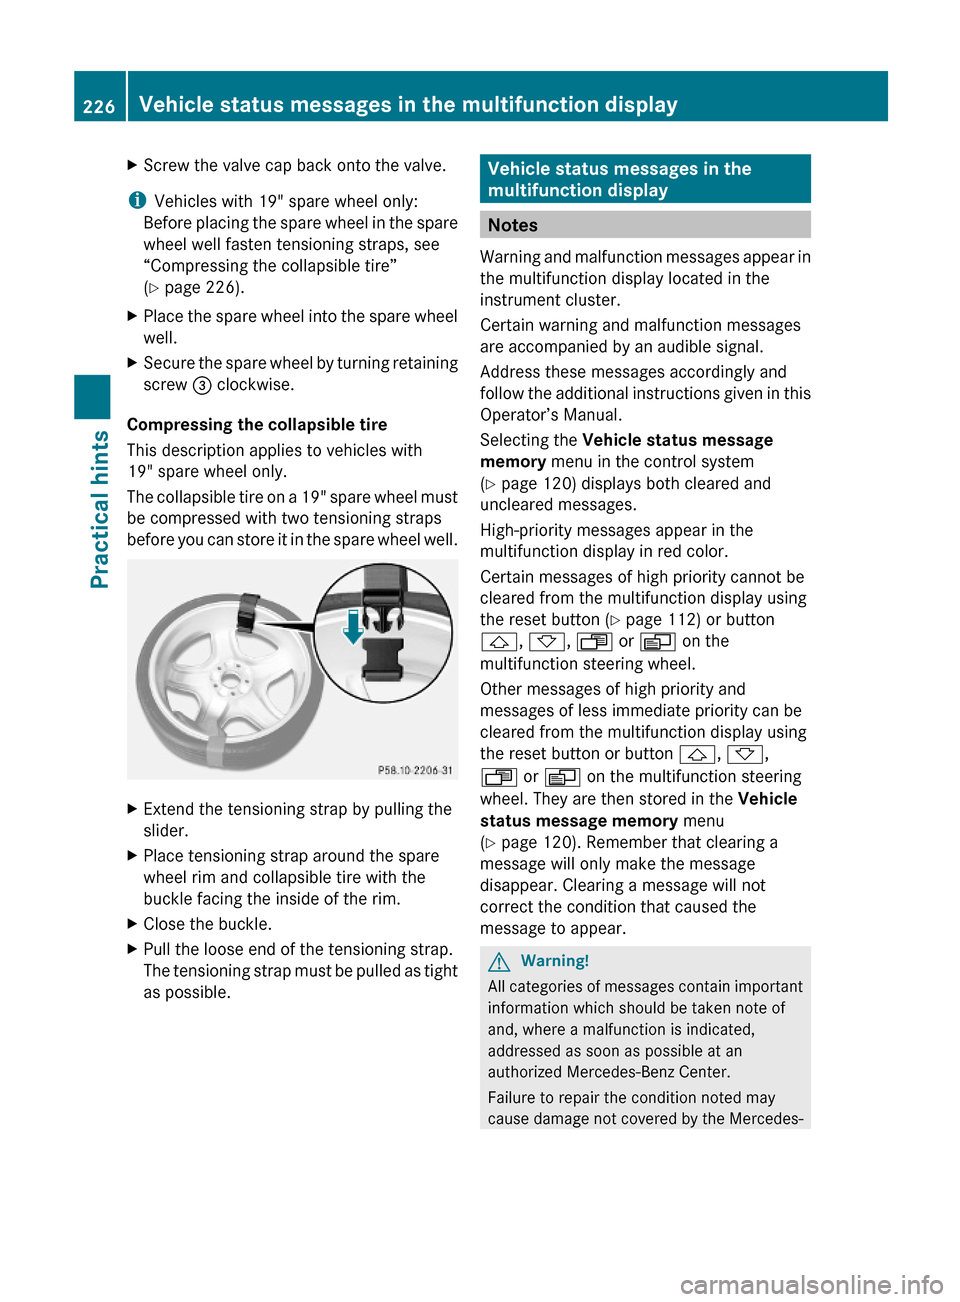
Compressing the collapsible tire
This description applies to vehicles with
19" spare wheel only.
The collapsible tire on a 19" spare wheel must
be compressed with two tensioning straps
before you can store it in the spare wheel well.
XExtend the tensioning strap by pulling the
slider.
XPlace tensioning strap around the spare
wheel rim and collapsible tire with the
buckle facing the inside of the rim.
XClose the buckle.XPull the loose end of the tensioning strap.
The tensioning strap must be pulled as tight
as possible.
Vehicle status messages in the
multifunction display
Notes
Warning and malfunction messages appear in
the multifunction display located in the
instrument cluster.
Certain warning and malfunction messages
are accompanied by an audible signal.
Address these messages accordingly and
follow the additional instructions given in this
Operator’s Manual.
Selecting the Vehicle status message
memory menu in the control system
(Y page 120) displays both cleared and
uncleared messages.
High-priority messages appear in the
multifunction display in red color.
Certain messages of high priority cannot be
cleared from the multifunction display using
the reset button (Y page 112) or button
&, *, U or V on the
multifunction steering wheel.
Other messages of high priority and
messages of less immediate priority can be
cleared from the multifunction display using
the reset button or button &, *,
U or V on the multifunction steering
wheel. They are then stored in the Vehicle
status message memory menu
(Y page 120). Remember that clearing a
message will only make the message
disappear. Clearing a message will not
correct the condition that caused the
message to appear.
GWarning!
All categories of messages contain important
information which should be taken note of
and, where a malfunction is indicated,
addressed as soon as possible at an
authorized Mercedes-Benz Center.
Failure to repair the condition noted may
cause damage not covered by the Mercedes-
226Vehicle status messages in the multifunction displayPractical hints
230_AKB; 6; 22, en-USd2ureepe,Version: 2.11.8.12009-07-28T18:49:58+02:00 - Seite 226
Page 254 of 316
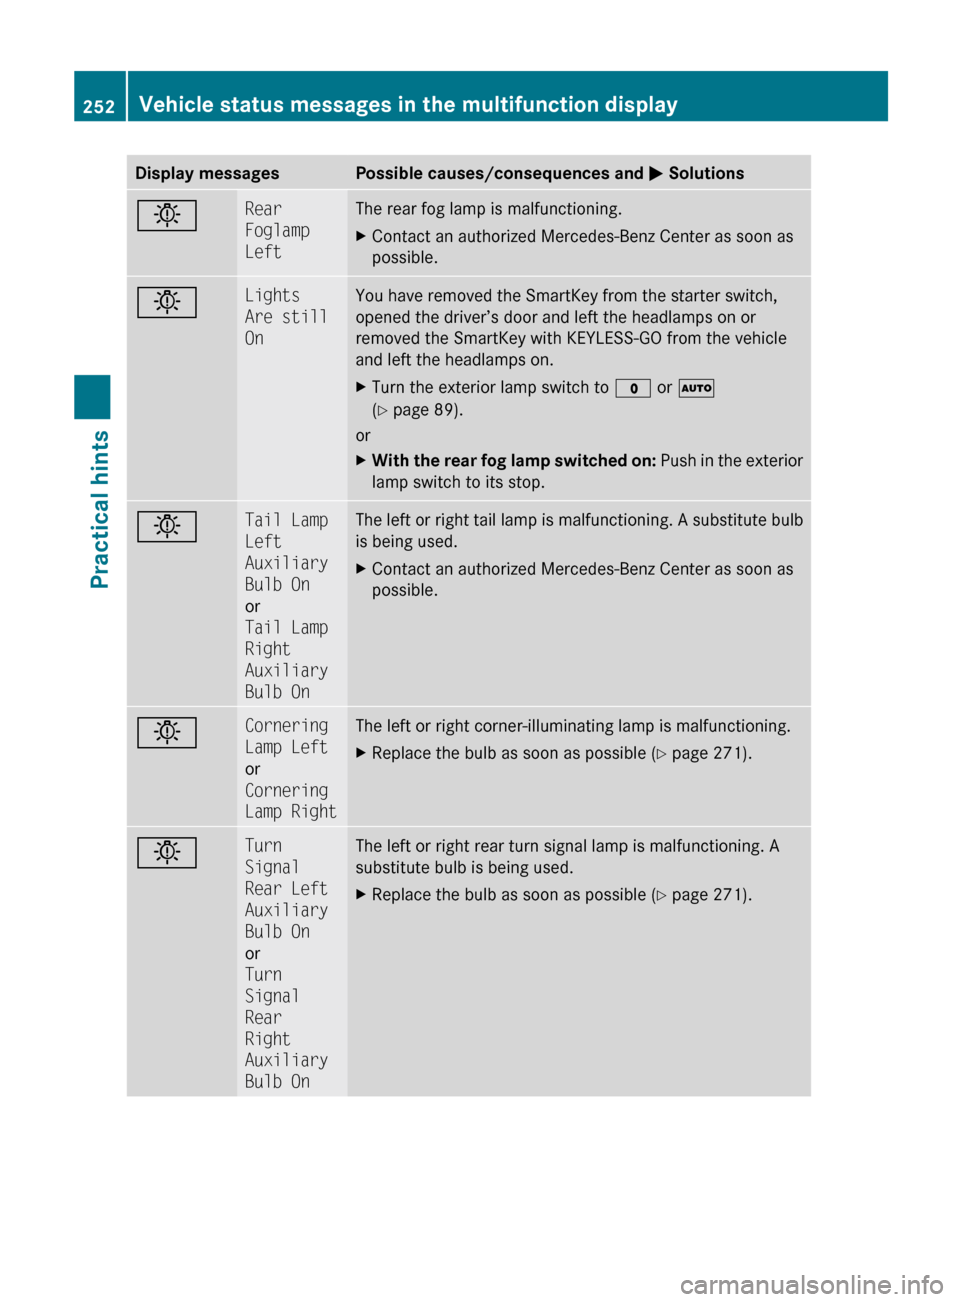
Display messagesPossible causes/consequences and M SolutionsbRear
Foglamp
LeftThe rear fog lamp is malfunctioning.XContact an authorized Mercedes-Benz Center as soon as
possible.bLights
Are still
OnYou have removed the SmartKey from the starter switch,
opened the driver’s door and left the headlamps on or
removed the SmartKey with KEYLESS-GO from the vehicle
and left the headlamps on.XTurn the exterior lamp switch to $ or Ã
( Y page 89).
or
XWith the rear fog lamp switched on: Push in the exterior
lamp switch to its stop.bTail Lamp
Left
Auxiliary
Bulb On
or
Tail Lamp
Right
Auxiliary
Bulb OnThe left or right tail lamp is malfunctioning. A substitute bulb
is being used.XContact an authorized Mercedes-Benz Center as soon as
possible.bCornering
Lamp Left
or
Cornering
Lamp RightThe left or right corner-illuminating lamp is malfunctioning.XReplace the bulb as soon as possible ( Y page 271).bTurn
Signal
Rear Left
Auxiliary
Bulb On
or
Turn
Signal
Rear
Right
Auxiliary
Bulb OnThe left or right rear turn signal lamp is malfunctioning. A
substitute bulb is being used.XReplace the bulb as soon as possible ( Y page 271).252Vehicle status messages in the multifunction displayPractical hints
230_AKB; 6; 22, en-USd2ureepe,Version: 2.11.8.12009-07-28T18:49:58+02:00 - Seite 252
Page 255 of 316
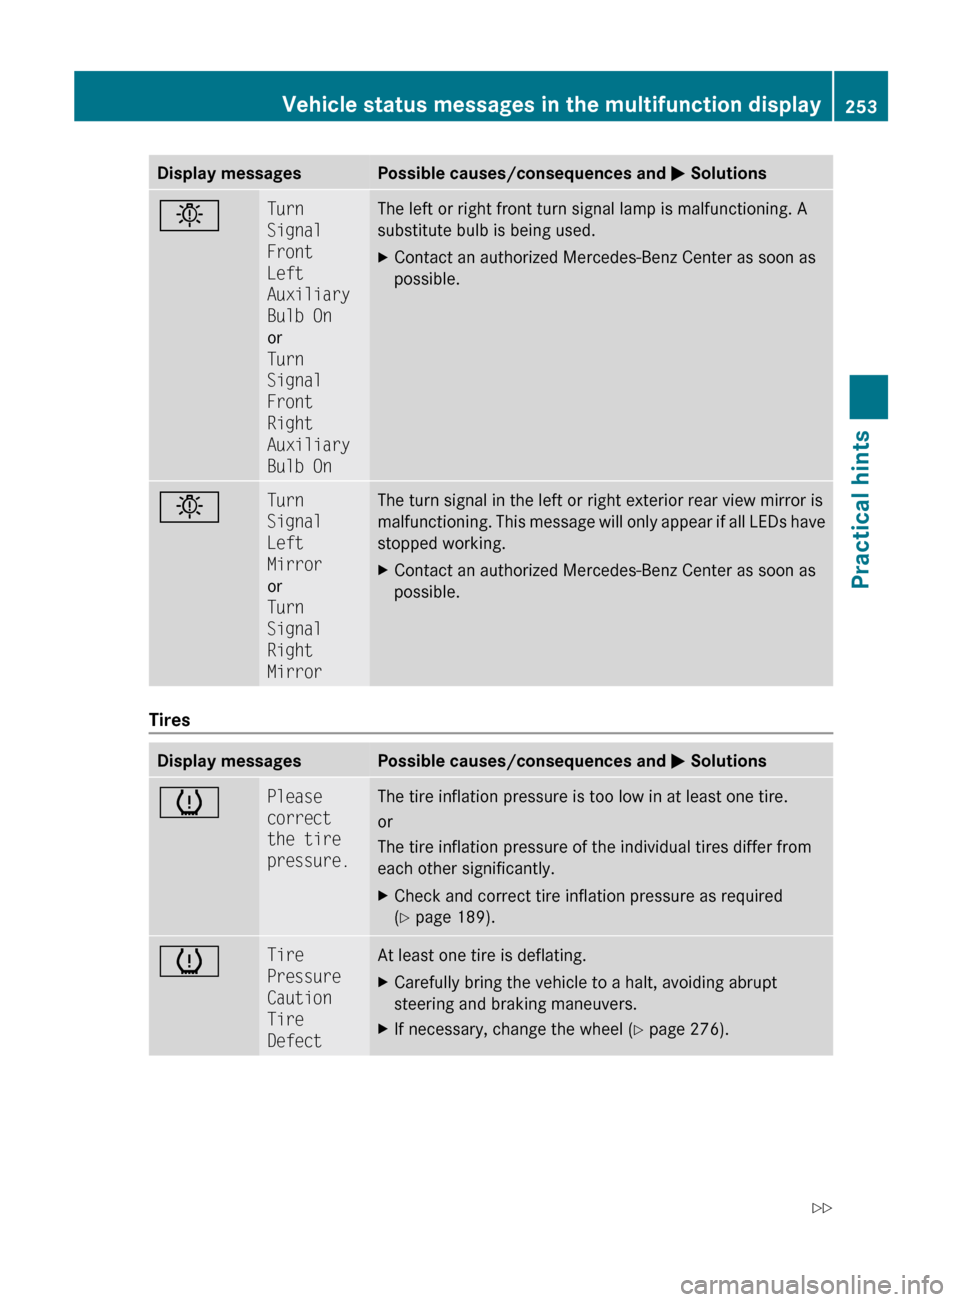
Display messagesPossible causes/consequences and M SolutionsbTurn
Signal
Front
Left
Auxiliary
Bulb On
or
Turn
Signal
Front
Right
Auxiliary
Bulb OnThe left or right front turn signal lamp is malfunctioning. A
substitute bulb is being used.XContact an authorized Mercedes-Benz Center as soon as
possible.bTurn
Signal
Left
Mirror
or
Turn
Signal
Right
MirrorThe turn signal in the left or right exterior rear view mirror is
malfunctioning. This message will only appear if all LEDs have
stopped working.XContact an authorized Mercedes-Benz Center as soon as
possible.
Tires
Display messagesPossible causes/consequences and M SolutionshPlease
correct
the tire
pressure.The tire inflation pressure is too low in at least one tire.
or
The tire inflation pressure of the individual tires differ from
each other significantly.XCheck and correct tire inflation pressure as required
( Y page 189).hTire
Pressure
Caution
Tire
DefectAt least one tire is deflating.XCarefully bring the vehicle to a halt, avoiding abrupt
steering and braking maneuvers.XIf necessary, change the wheel ( Y page 276).Vehicle status messages in the multifunction display253Practical hints230_AKB; 6; 22, en-USd2ureepe,Version: 2.11.8.12009-07-28T18:49:58+02:00 - Seite 253Z