oil type MERCEDES-BENZ SLC 2019 Owners Manual
[x] Cancel search | Manufacturer: MERCEDES-BENZ, Model Year: 2019, Model line: SLC, Model: MERCEDES-BENZ SLC 2019Pages: 306, PDF Size: 15 MB
Page 20 of 306

Technical data
Capacities ...................................... 298
Emergency spare wheel ................. 294
Information .................................... 296
Tires/wheels ................................. 292
Vehicle data ................................... 303
TELEAID
Call priority .................................... 233
Emergency call .............................. 231
General notes ................................ 230
MB info call button ........................233
Roadside Assistance button .......... 232
Self-test ......................................... 230
System .......................................... 230
Vehicle Health Check .................... 233
Telephone
Accepting a call (multifunction
steering wheel) .............................. 174
Authorizing a mobile phone (con-
necting) ......................................... 221
Authorizing a mobile phone via
the device manager (connecting) ... 222
Connecting a mobile phone
(device manager) ........................... 222
Connecting a mobile phone (gen-
eral information) ............................ 221
Display message ............................ 205
Menu (on-board computer) ............ 173
Number from the phone book ........174
Redialing ........................................ 174
Rejecting/ending a call ................. 174
see also Digital Operator's Man-
ual ..................................................217
Temperature
Coolant .......................................... 168
Coolant (on-board computer,
Mercedes-AMG SLC 43) ................ 179
Engine oil (on-board computer,
Mercedes-AMG SLC 43) ................ 179
Outside temperature ......................167
Setting (climate control) ................ 111
Transmission oil (on-board com-
puter, Mercedes-AMG SLC 43) ...... 179
Timing (RACETIMER)......................... 180
Tire pressure
Calling up (on-board computer) ..... 274
Checking manually ........................ 273
Display message ............................ 201
Maximum ....................................... 273
Not reached (TIREFIT) .................... 256
Notes ............................................. 272
Reached (TIREFIT) .......................... 256
Recommended ............................... 270
Tire pressure loss warning sys-
tem
General notes ................................ 273
Important safety notes .................. 274
Restarting ...................................... 274
Tire pressure monitor
Checking the tire pressure elec-
tronically ........................................ 276
Function/notes .............................274
General notes ................................ 274
Important safety notes .................. 275
Radio type approval for the tire
pressure monitor ........................... 278
Restarting ...................................... 277
Warning lamp ................................. 216
Warning message .......................... 276
Tire-change tool kit........................... 252
TIREFIT kit.......................................... 254
Important safety notes .................. 254
Storage location ............................ 252
Tire pressure not reached .............. 256
Tire pressure reached .................... 256
Tires
Aspect ratio (definition) ................. 287
Average weight of the vehicle
occupants (definition) .................... 286
Bar (definition) ............................... 286
Changing a wheel .......................... 288
Characteristics .............................. 286
Checking ........................................ 267
Curb weight (definition) ................. 287
Definition of terms ......................... 286
Direction of rotation...................... 289
Display message ............................ 201
Distribution of the vehicle occu-
pants (definition) ............................ 288
DOT (Department of Transporta-
tion) (definition) ............................. 286
DOT, Tire Identification Number
(TIN) ............................................... 285
GAWR (Gross Axle Weight Rat-
ing) (definition) .............................. 287
18Index
Page 249 of 306

XThoroughly hose down the vehicle with agentle jet of water.
XDo not point the water jet directly towardsthe air inlet or the edges of decorative foils.
XUse plenty of water and rinse out thesponge frequently.
XRinse the vehicle with clean water and drythoroughly with a chamois.
XDo not let the cleaning agent dry on thepaintwork or the decorative foils.
Carefully remove all deposits of road salt assoon as possible when driving in winter.
Power washers
GWARNING
The water jet from a circular jet nozzle (dirt
blasters) can cause invisible exterior dam-
age to the tires or chassis components.
Components damaged in this way may fail
unexpectedly. There is a risk of an accident.
Do not use power washers with circular jet
nozzles to clean the vehicle. Have damaged
tires or chassis components replaced imme-
diately.
!Vehicles with decorative film: parts of yourvehicle are covered with decorative film.Maintain a distance of at least 27.5 in(70 cm) between the film-covered parts ofthe vehicle and the nozzle of the powerwasher.
Information about the correct distance isavailable from the equipment manufacturer.
Move the power washer nozzle around whencleaning your vehicle.
The water temperature of the power washermust not exceed 140 ‡ (60 †).
!Always maintain a distance of at least12 in (30 cm) between the vehicle and thepower washer nozzle. Information about thecorrect distance is available from the equip-ment manufacturer.
Move the power washer nozzle around whencleaning your vehicle.
Do not aim directly at any of the following:
RTires
RDoor gaps, roof gaps, joints, etc.
RElectrical components
RBattery
RPlug-type couplings
RLight bulbs
RSeals
RTrim elements
RVentilation slots
Damaged seals or electrical componentscan lead to leaks or failures.
!If you clean the tank filler recess when it isopen, do not use a power washer. This cancause damage to the seals or other compo-nents.
Cleaning the paintwork
!Do not affix:
Rstickers
Rfilms
Rmagnetic plates or similar items
to painted surfaces. You could otherwisedamage the paintwork.
Scratches, corrosive deposits, areas affectedby corrosion and damage caused by inade-quate care cannot always be completelyrepaired. In such cases, visit a qualified spe-cialist workshop.
XRemove dirt immediately, where possible,while avoiding rubbing too hard.
XSoak insect remains with insect removerand rinse off the treated areas afterwards.
XSoak bird droppings with water and rinse offthe treated areas afterwards.
XRemove tree resin, oils, fuels and greases byrubbing gently with a cloth soaked in petro-leum ether or lighter fluid
XRemove coolant and brake fluid with a moistcloth and clear water.
XUse tar remover to remove tar stains.
XUse silicone remover to remove wax.
If water no longer forms "beads" on the paintsurface, use the paint care products recom-mended and approved by Mercedes-Benz. Thisis the case approximately every three to fivemonths, depending on the climate conditionsand the care product used.
If dirt has penetrated the paint surface or ifthe paint has become dull, the paint cleanerrecommended and approved by Mercedes-Benz should be used.
Care247
Maintenance and care
Z
Page 305 of 306

Climate control system refrigerant
Important safety notes
The climate control system of your vehicle isfilled with refrigerant R‑134a.
The instruction label regarding the refrigeranttype used can be found on the radiator crossmember.
!Only the refrigerant R‑134a and the PAGoil approved by Mercedes-Benz may beused. The approved PAG oil may not bemixed with any other PAG oil that is notapproved for R-134a refrigerant. Otherwise,the climate control system may be dam-aged.
Service work, such as refilling with refrigerantor replacing component parts, may only becarried out by a qualified specialist workshop.All applicable regulations, as well as SAEstandard J639, must be adhered to.
Always have work on the climate control sys-tem carried out at a qualified specialist work-shop.
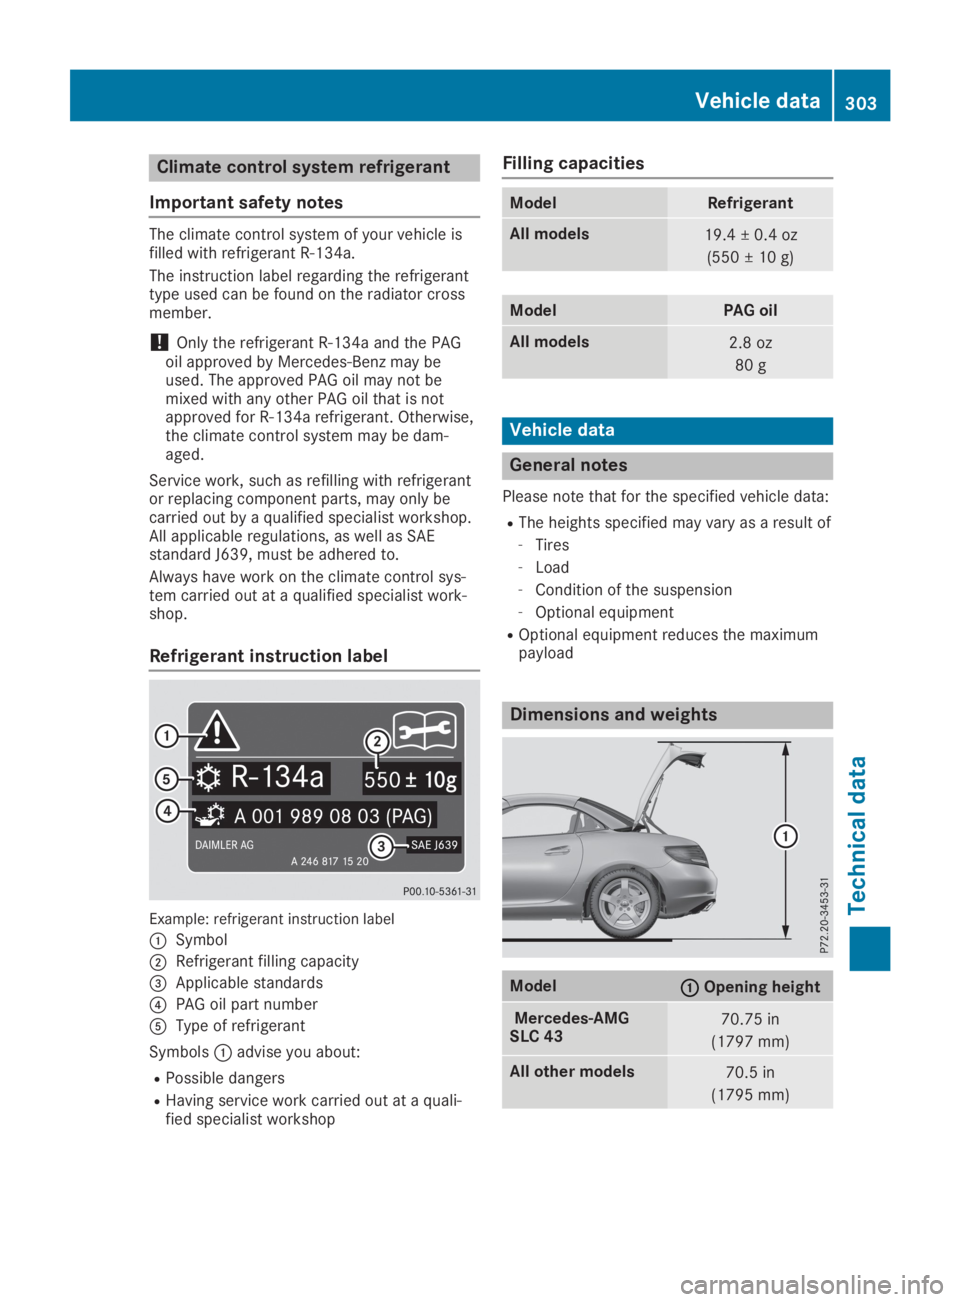
Refrigerant instruction label
Example: refrigerant instruction label
�CSymbol
�DRefrigerant filling capacity
�