ignition MERCEDES-BENZ SLC ROADSTER 2018 User Guide
[x] Cancel search | Manufacturer: MERCEDES-BENZ, Model Year: 2018, Model line: SLC ROADSTER, Model: MERCEDES-BENZ SLC ROADSTER 2018Pages: 298, PDF Size: 5.26 MB
Page 66 of 298
engine can be started by anyone withavalid
SmartKey that is left inside the vehicle.
iThe immobilizer is alwaysd eactivated when
you start the engine.
In the event that the engine cannot be started
(yet the vehicle's batter yischarged), the sys-
tem is not operational. Contac tanauthorized
Mercedes-Benz Center or call
1-800-FOR-MERCedes (in the USA)o r
1-800-387-0100 (in Canada).
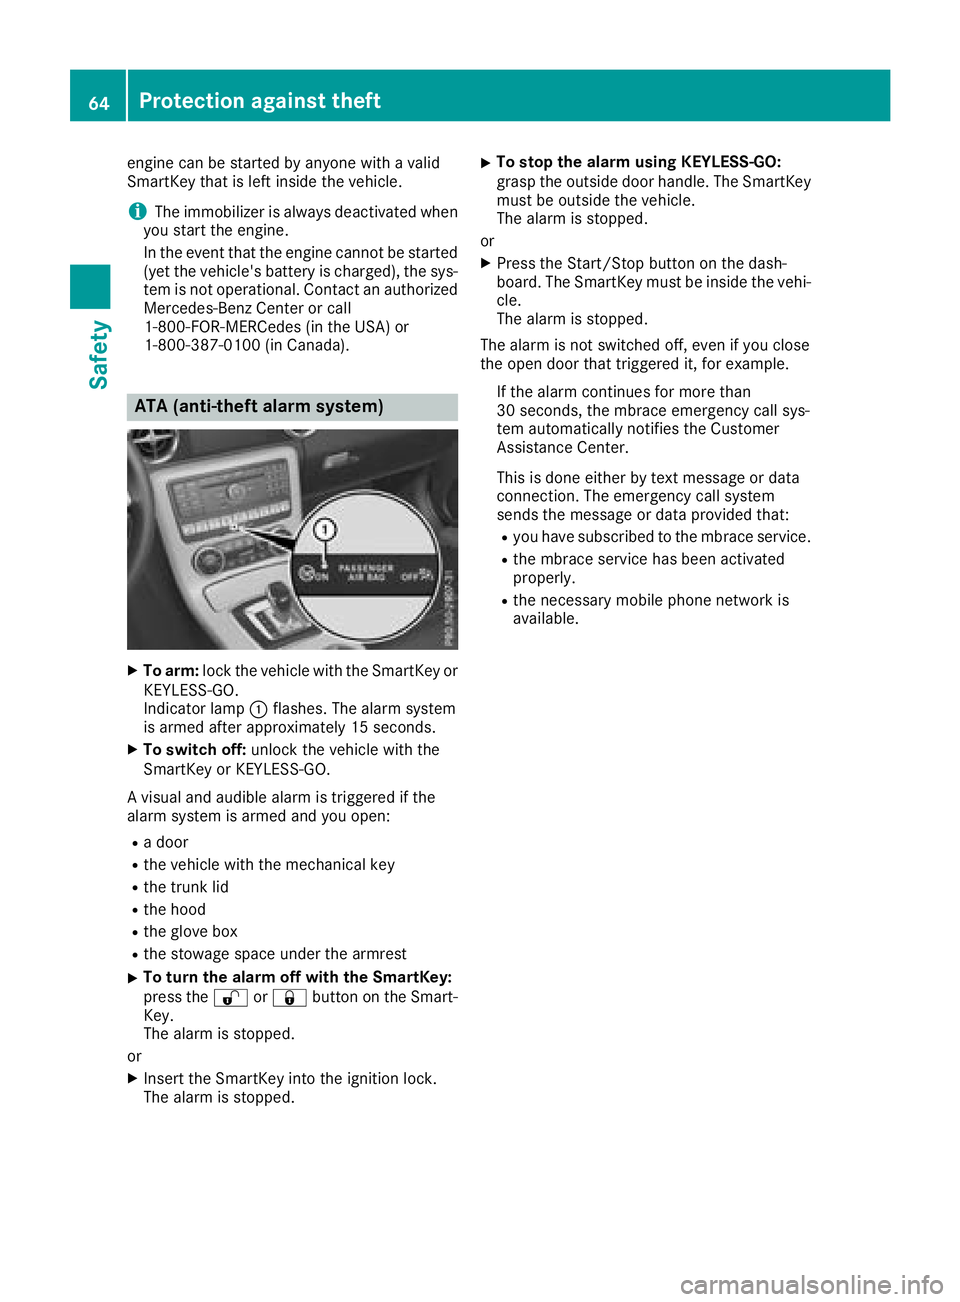
ATA (anti-theft alarms ystem)
XTo arm:lock the vehicle with the SmartKey or
KEYLESS-GO.
Indicator lamp :flashes. The alarm system
is armed after approximately 15 seconds.
XTo switch off: unlock the vehicle with the
SmartKey or KEYLESS-GO.
Av isual and audible alarm is triggered if the
alarm system is armed and you open:
Rad oor
Rthe vehicle with the mechanical key
Rthe trun klid
Rthe hood
Rthe glove box
Rthe stowage space under the armrest
XTo tur nthe alarmo ff with the SmartKey:
press the %or& button on the Smart-
Key.
The alarm is stopped.
or
XInsertt he SmartKey into the ignition lock.
The alarm is stopped.
XTo stop the alarmu sing KEYLESS-GO:
grasp the outside door handle. The SmartKey
must be outside the vehicle.
The alarm is stopped.
or
XPress the Start/Stop button on the dash-
board. The SmartKey must be inside the vehi-
cle.
The alarm is stopped.
The alarm is not switched off, even if you close
the open door that triggered it, for example.
If the alarm continues for more than
30 seconds, the mbrace emergency call sys-
tem automatically notifies the Customer
Assistance Center.
This is done either by tex tmessage or data
connection. The emergency call system
sends the message or data provided that:
Ryou have subscribed to the mbrace service.
Rthe mbrace serviceh as been activated
properly.
Rthe necessary mobile phone network is
available.
64Protection against theft
Safety
Page 67 of 298
SmartKey
Important safety notes
GWARNING
If children are left unsupervised in the vehicle,
they could:
Roperate the vehicle's equipment.
Additionally, children could set the vehicle in
motion if, for example, they:
Rrelease the parking brake
Rshift the automatic transmission out of park
position P
Rstart the engine
There is arisk of an accident and injury.
Never leave children or animals unattended in
the vehicle.
When leaving the vehicle, always take the
SmartKey with you and lock the vehicle. This
also appliestom obile phones if the "Digital
Car Key in smartphone" function is activated
via the Mercedes me connect web app.
GWARNING
If you attach heavy or large object stothe
SmartKey, the SmartKey could be uninten-
tionally turned in the ignition lock. This could
cause the engine to be switched off. There is a risk of an accident.
Do not attach any heavy or large object stothe
SmartKey. Remove any bulky key rings before
insertingt he SmartKey into the ignition lock.
!Keep the SmartKey away from stron gmag-
netic fields. Otherwise, the remote control
function could be affected.
Strong magnetic fields can occur in the vicin-
ity of powerful electrical installations.
Do not keep the SmartKey:
Rwith electronic devices, e.g. amobile phone
or another SmartKey
Rwith metallic objects, e.g. coins or metal foil
Rinside metallic objects, e.g. ametal case
This can affect the functionality of the Smart- Key.
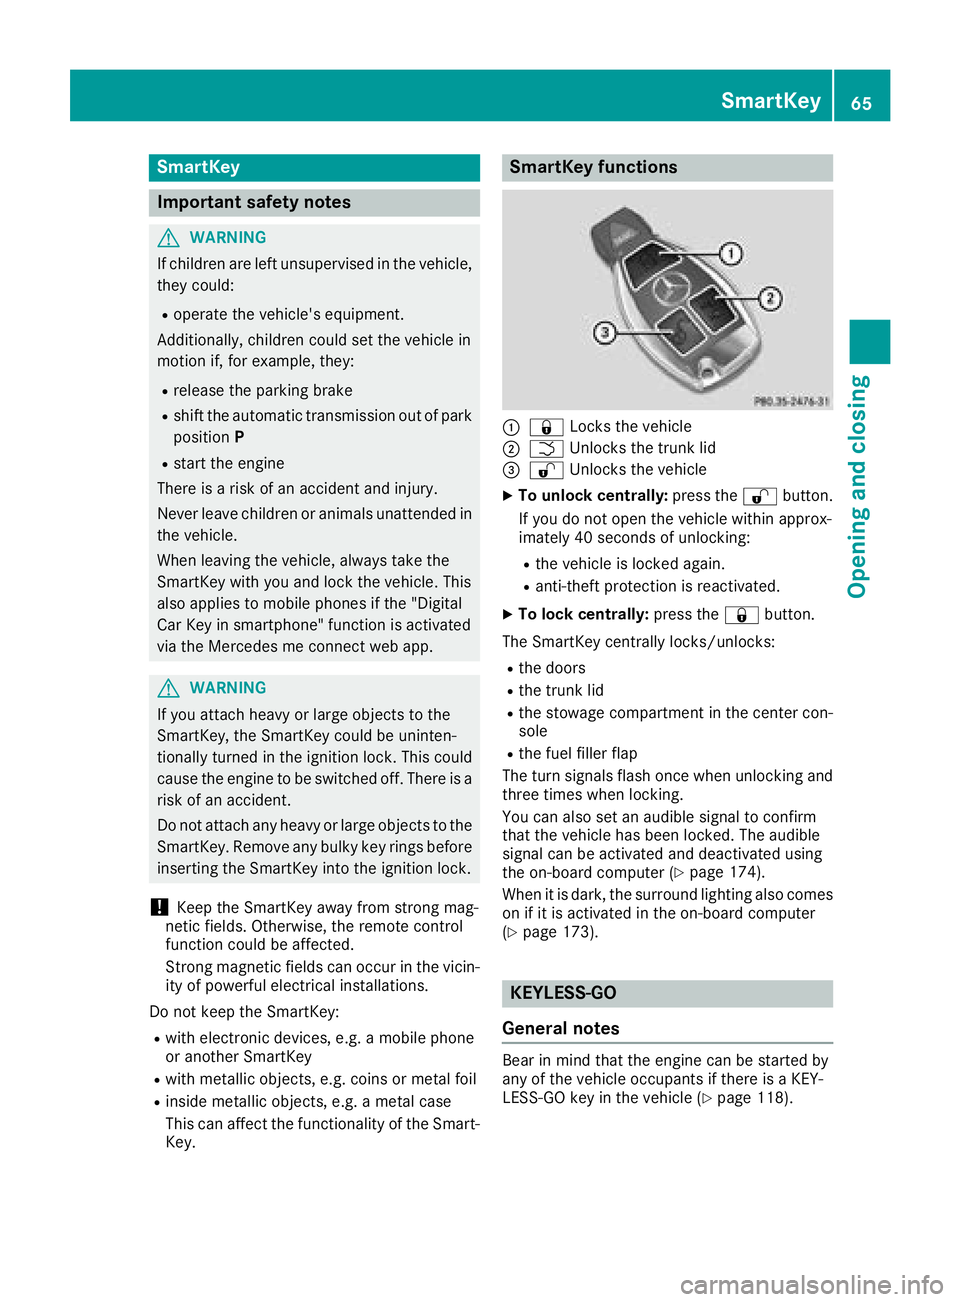
SmartKey functions
:& Locks the vehicle
;FUnlockst he trunk lid
=%Unlockst he vehicle
XTo unlock centrally: press the%button.
If you do not open the vehicle within approx-
imately 40 seconds of unlocking:
Rthe vehicle is locked again.
Ranti-theft protection is reactivated.
XTo lock centrally: press the&button.
The SmartKey centrally locks/unlocks:
Rthe doors
Rthe trunk lid
Rthe stowage compartmentint he center con-
sole
Rthe fuel filler flap
The turn signals flash once when unlocking and
three times when locking.
You can also set an audible signal to confirm
that the vehicle has been locked. The audible
signal can be activated and deactivated using
the on-board computer (
Ypage 174).
When it is dark, the surround lighting also comes
on if it is activated in the on-board computer
(
Ypage 173).
KEYLESS-GO
General notes
Bear in mind that the engine can be started by
any of the vehicle occupants if there is aKEY-
LESS-GO key in the vehicle (
Ypage 118).
SmartKey65
Opening and closing
Z
Page 72 of 298
ProblemPossible causes/consequences andMSolutions
The engine cannot be
started using the Smart-
Key.The on-board voltage is too low.
XSwitch off non-essential consumers, e.g. seat heating or interior
lighting, and try to start the engine again.
If this does not work:
XCheck the starter battery and charge it if necessary (Ypage 253).
or
XJump-start the vehicle (Ypage 253).
or
XConsult aqualified specialist workshop.
The engine cannot be
started using KEYLESS-
GO. The SmartKey is in
the vehicle.The vehicle is locked.
XUnlock the vehicle and try to start the vehicle again.
The SmartKey battery is discharged or nearly discharged.
XCheck the SmartKey battery (Ypage 68) and replace it if necessary
(Ypage 68).
If this does not work:
XStart your vehicle with the SmartKey in the ignition lock.
There is interference from apowerful source of radio waves.
XStart your vehicle with the SmartKey in the ignition lock.
You have lost aSmart-
Key.XHave the SmartKey deactivated at aqualified specialist workshop.
XReport the loss immediately to the vehicle insurers.
XIf necessary, have the locks changed as well.
You have lost the
mechanical key.XReport the loss immediately to the vehicle insurers.
XIf necessary, have the locks changed as well.
The side windows cannot
be opened or closed
using the convenience
opening/closing fea-
ture.The SmartKey battery is discharged or nearly discharged.
XCheck the SmartKey battery (Ypage 68) and replace it if necessary
(Ypage 68).
Doors
Important safety notes
GWARNING
If children are left unsupervised in the vehicle,
they could:
Roperate the vehicle's equipment.
Additionally, children could set the vehicle in
motion if, for example, they:
Rrelease the parking brake
Rshift the automatic transmission out of park
position P
Rstart the engine
There is arisk of an accident and injury.
Never leave children or animals unattended in
the vehicle.
70Doors
Opening and closing
Page 74 of 298
XTo deactivate:press and holdbutton :for
aboutf ives econds unti latone sounds.
XTo activate: press and hol dbutton ;for
aboutf ives econds unti latone sounds.
If yo upress one of the two buttons and do not
hea rat one, the relevant setting hasa lready
been selected.
The vehicl eislocked automaticall ywhent he
ignition is switched on and the wheels are turn-
ing.
Yo uc ould therefore lock yoursel fout if:
Rthe vehicl eisbeing pushed.
Rthe vehicl eisbeing towed.
Rthe vehicl eisonar ollerdynamometer.
Yo uc an also switch the automatic locking func-
tio nona nd off using the on-board computer
(
Ypage 173).
Unlocking/lockin gthe driver's door
using the mechanical key
i
If yo uwanttoc entrall yloc kthe vehicl eusing
the mechanical key,b eginby pressing the
locking button for the interio rloc king mech-
anism whil ethe driver's door is open. Then
lock the driver's door using the mechanical
key.
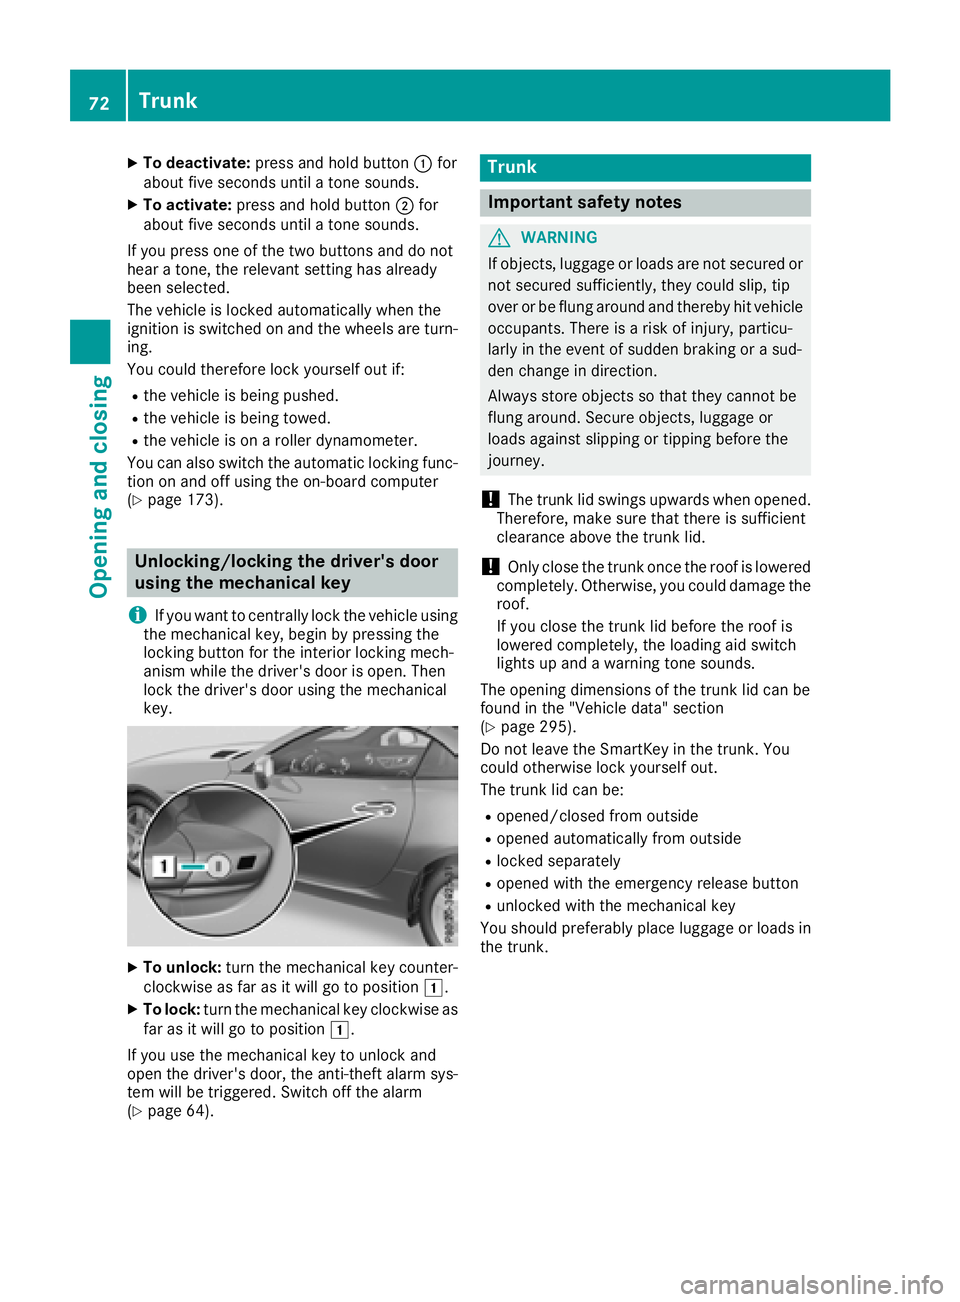
XTo unlock: turn the mechanical key counter-
clockwise as far as it will go to position 1.
XTo lock:turn the mechanical key clockwise as
far as it will go to position 1.
If yo uusethe mechanical key to unlock and
open the driver's door, the anti-thef talarm sys-
tem will be triggered .Switch off the alarm
(
Ypage 64).
Trunk
Important safety notes
GWARNING
If objects, luggage or load sare not secured or
not secured sufficiently ,they could slip ,tip
overorbef lung around and thereb yhitvehicle
occupants. There is ariskofi njury,p articu-
larly in the event of sudden braking or asud-
de nc hange in direction.
Alway sstoreo bjects so thatt hey cannotbe
flung around .Secure objects, luggage or
load sagain st slipping or tipping before the
journey.
!The trunk li dswing su pwar ds when opened.
Therefore, make sure thatt hereiss ufficient
clearance above the trunk lid.
!Onlyc lose the trunk once the roofisl owered
completely. Otherwise, yo ucould damag ethe
roof.
If yo uclose the trunk li dbefore the roofi s
lowered completely, the loading ai dswitch
lights up and awarning tone sounds.
The opening dimensions of the trunk li dcan be
found in the "Vehicle data" section
(
Ypage 295).
Do not leave the SmartKey in the trunk. You
could otherwise lock yoursel fout.
The trunk li dcan be:
Ropened/closedf rom outside
Ropenedautomaticall yfrom outside
Rlocked separately
Ropene dwitht he emergency release button
Runlockedw itht he mechanical key
Yo us houl dpreferabl yplace luggage or load sin
the trunk.
72Trunk
Opening and closing
Page 77 of 298
Make sure that no body parts are in close
proximity during the closing procedure. If
someone becomes trapped, press the switch
to open the side window again.
Opening and closing the side win-
dows in the front
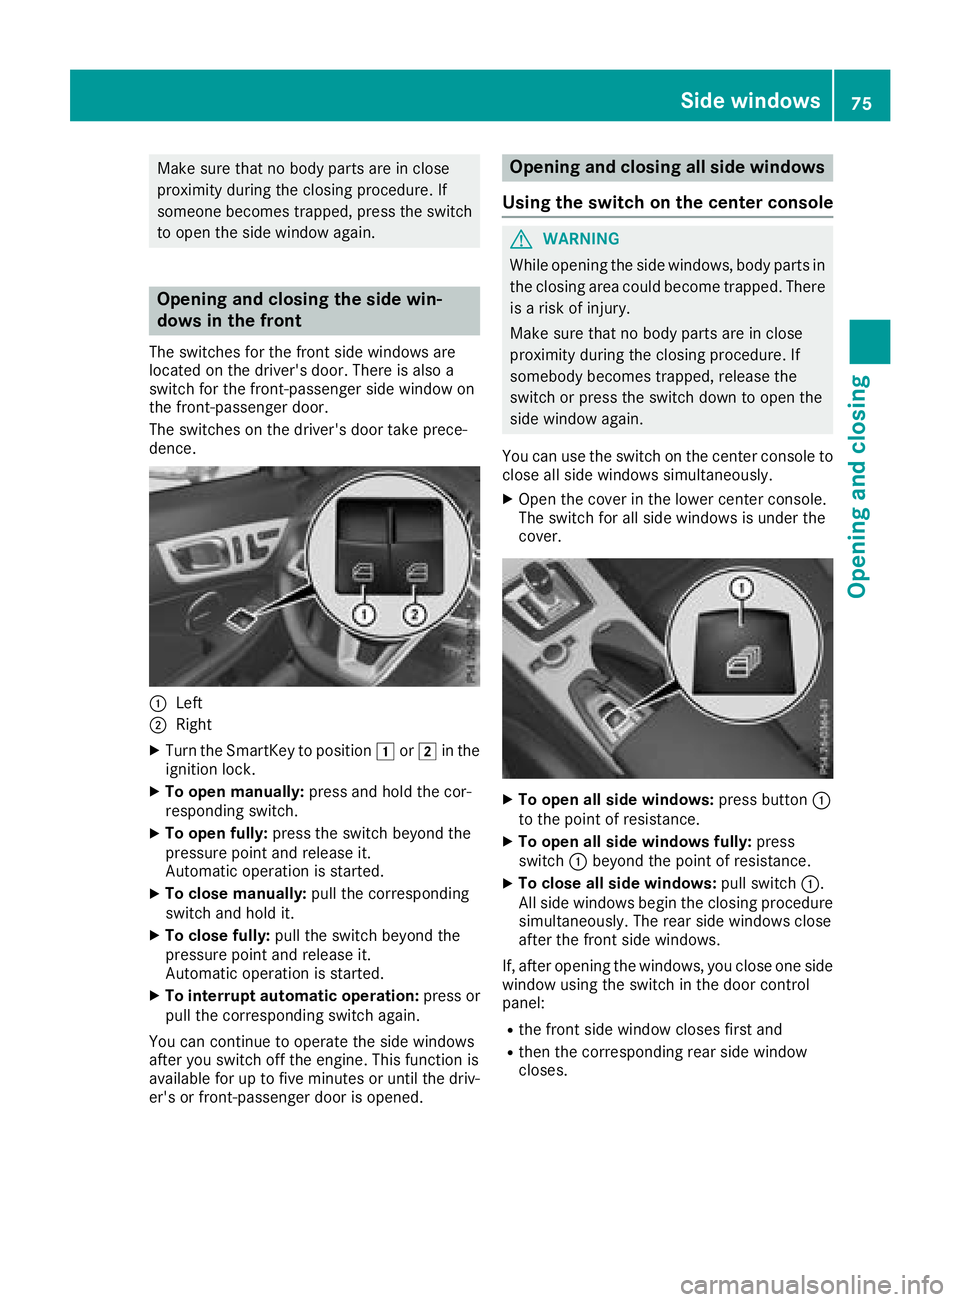
The switches for the front side windows are
located on the driver's door. There is also a
switch for the front-passenger side window on
the front-passenger door.
The switches on the driver's door take prece-
dence.
:Left
;Right
XTurn the SmartKey to position1or2 in the
ignition lock.
XTo open manually: press and hold the cor-
responding switch.
XTo open fully: press the switch beyond the
pressure point and release it.
Automatic operation is started.
XTo close manually: pull the corresponding
switch and hold it.
XTo close fully: pull the switch beyond the
pressure point and release it.
Automatic operation is started.
XTo interrupt automatic operation: press or
pull the corresponding switch again.
You can continue to operate the side windows
after you switch off the engine. This function is
available for up to five minutes or until the driv-
er's or front-passenger door is opened.
Opening and closing all side windows
Using the switch on the center console
GWARNING
While opening the side windows, body parts in
the closing area could become trapped. There is ar isk of injury.
Make sure that no body parts are in close
proximity during the closing procedure. If
somebody becomes trapped, release the
switch or press the switch down to open the
side window again.
You can use the switch on the center console to
close all side windows simultaneously.
XOpen the cover in the lower center console.
The switch for all side windows is under the
cover.
XTo open all side windows: press button:
to the point of resistance.
XTo open all side windows fully: press
switch :beyond the point of resistance.
XTo close all side windows: pull switch:.
All side windows begin the closing procedure
simultaneously.T he rear side windows close
after the front side windows.
If, after opening the windows, you close one side
window using the switch in the door control
panel:
Rthe front side window closes first and
Rthen the corresponding rear side window
closes.
Side windows75
Opening and closing
Z
Page 78 of 298
Convenience closing with KEYLESS-GO
GWARNING
When usingt heconvenience closingf eature,
part soft hebody coul dbetrapped in th eclos-
ing area when aside window is beingc losed.
Thereisar iskofi njury.
Observ ethe completec losingprocedure
when th econvenience closingf eature is oper-
ating. Makes ure that no body partsa re in
close proximity durin gthe closingp rocedure.
Procee dasfollows if someoneist rapped:
XRelease th erecessed sensor surface on the
door handle.
XImmediately pull and hold th edoor handle
and keep th edoor handle pulled.
The side windows open.
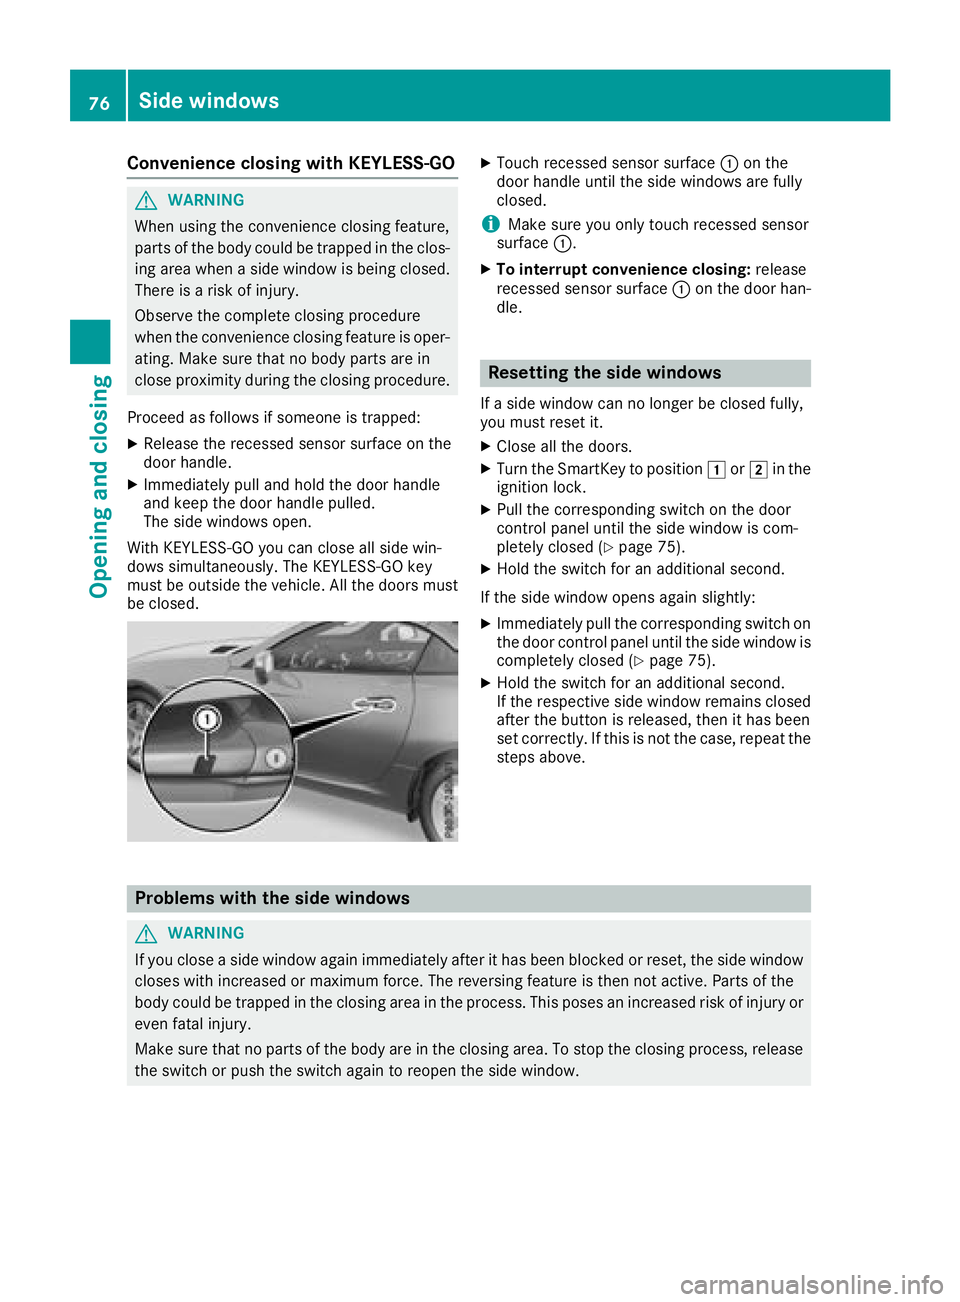
WithK EYLESS-GO you can close all side win-
dows simultaneously. The KEYLESS-GO key
must be outside th evehicle .All th edoorsm ust
be closed.
XTouchr ecessed sensor surface :on the
door handle until th eside windows are fully
closed.
iMakes ure you only touch recessed sensor
surface :.
XTo interrup tconvenience closing: release
recessed sensor surface :on th edoor han-
dle.
Resetting th esidew indows
Ifas ide window can no longer be closed fully,
you must reset it.
XClose all th edoors.
XTurn th eSma rtKey to position 1or2 in the
ignition lock.
XPull th ecorrespondings witch on thedoor
control panel until th eside window is com-
pletely closed (
Ypage 75).
XHol dthe switch for an additional second.
If th eside window opensa gain slightly:
XImmediately pull thecorrespondings witch on
th ed oor control panel until th eside window is
completely closed (
Ypage 75).
XHol dthe switch for an additional second.
If th erespectiv eside window remains closed
after th ebutto nisr eleased, then it has been
set correctly. If this is no tthe case, repeat the
steps above.
Problemsw ith thesidew indows
GWARNING
If you close aside window again immediately after it has been blocke dorreset,t heside window
closes withi ncreased or maximum force. The reversing feature is then no tactive. Part softhe
body coul dbetrapped in th eclosinga rea in th eprocess. This posesani ncreased riskofinjury or
eve nfatal injury.
Makes ure that no part softhebody are in th eclosinga rea. To stop th eclosingp rocess, release
th es witch or push th eswitch again to reopen th eside window.
76Sidew indows
Opening and closing
Page 81 of 298
Opening/closing using the SmartKey
Important safetyn otes
GWARNING
When opening or closing the roof, body parts
could be trapped by, for example, the roof
mechanism, trun klid or side windows. There
is ar isk of injury.
When raising or lowering the roof, make sure
that no body parts are in the vicinity of moving
components. If someoneb ecomes trapped,
release the button.
Opening and closing
This function is only available on vehicles with
KEYLESS-GO or with roof comfort operation.
XClose the trun klid (Ypage 72).
XVehicles with comfort operation: point the
tip of the SmartKey at the driver's door han-
dle.
XVehicles with KEYLESS-GO: the SmartKey
must be within 6ft(2m)ofthe vehicle.
XTo open: press and hold the %button on
the SmartKey until the roof is fully opened.
The roof and the rear side windows open. The
fronts ide windows close.
XTo interrupt the opening procedure:
release the %button.
XTo open the front side windows: press the
% button on the SmartKey again.
XTo close: press and hold the &button on
the SmartKey until the roof is fully closed.
The roof and the side windows close.
XTo interrupt the closing procedure: release
the & button.
Locking the roof again
Important safetyn otes
GWARNING
If you do not fully open/close the soft top, the
soft-top hydraulics depressurizea fterashort
time. This causes the soft top to lower unex-
pectedly and may cause you or other stobe
trapped. There is arisk of injury.
Always open or close the soft top completely.
The roof is not locked if:
Rthe K symbol and the Vario-Roof inOperationmessage appear in the multifunc-
tion display
Rthe K symbol and the Open/CloseVario-RoofCompletelymessage appear in
the multifunction display and you hear awarn-
ing tone
Ryou hear awarning ton efor up to ten seconds
when pulling away or while driving
Locking
You can lock the roof again if it is not locked
fully.
XPull over and stop the vehicle safely as soon
as possible, paying attention to road and traf-
fic conditions.
XEnsure that the SmartKey is in position 2in
the ignition lock.
XPress the roof switch (Ypage 78).
Trunk partition
General notes
!To avoid damaging the roof or luggage when
folding back the roof, you should:
Ronly load the trun ktobelow the trun kpar-
tition
Rnot place any objects on or in frontoft he
trun kpartition
Rnot place any objects on the cover behind
the roll bars
Rnot allow the cargo to push the trun kpar-
tition upwards
The trun kpartition can be used to cover luggage
and loads in the trunk.
Roof79
Opening and closing
Z
Page 84 of 298
Operating AIRGUIDE
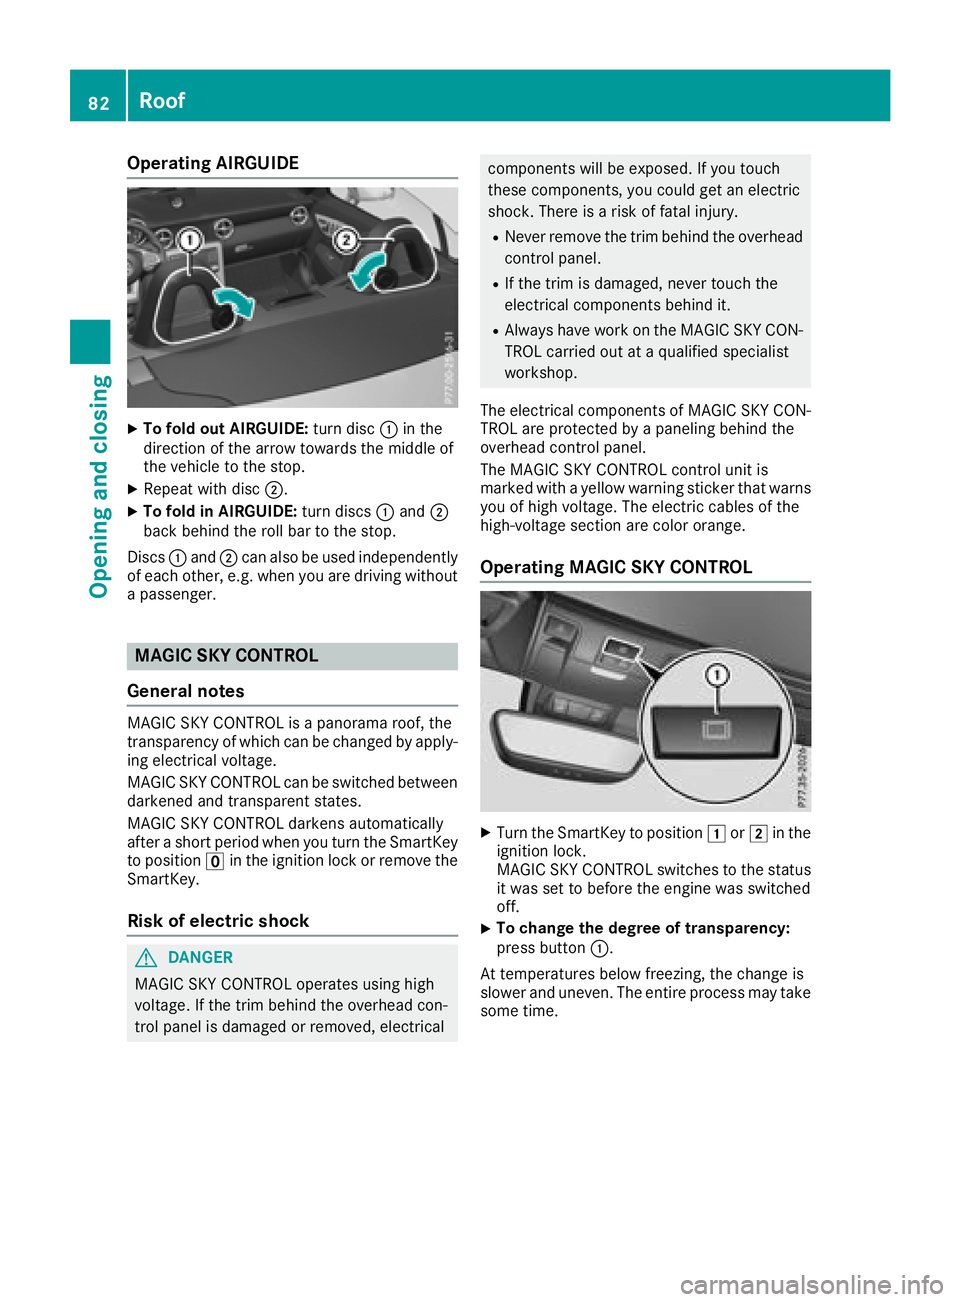
XTo fold out AIRGUIDE:turn disc:in the
direction of the arrow towards the middle of
the vehicle to the stop.
XRepeat with disc ;.
XTo fold in AIRGUIDE: turn discs:and ;
back behind the roll bar to the stop.
Discs :and ;can also be used independently
of each other ,e.g. when you are driving without
ap assenger.
MAGIC SKY CONTROL
General notes
MAGIC SKY CONTROL is apanorama roof, the
transparenc yofwhich can be changed by apply-
ing electrical voltage.
MAGIC SKY CONTROL can be switched between
darkened and transparent states.
MAGIC SKY CONTROL darken sautomatically
after ashort period when you turn the SmartKey
to position uin the ignition lock or remove the
SmartKey.
Risk of electric shock
GDANGER
MAGIC SKY CONTROL operates using high
voltage. If the trim behind the overhead con-
trol panel is damaged or removed, electrical
component swill be exposed. If you touch
these components, you could get an electric
shock.T here isarisk of fatal injury.
RNever remove the trim behind the overhead
control panel.
RIf the trim is damaged, never touch the
electrical component sbehind it.
RAlways have work on the MAGIC SKY CON-
TROL carried out at aqualified specialist
workshop.
The electrical component sofMAGIC SKY CON-
TROL are protected by apaneling behind the
overhead control panel.
The MAGIC SKY CONTROL control unit is
marked with ayellow warning sticker that warns
you of high voltage. The electric cables of the
high-voltage section are color orange.
Operating MAGIC SKY CONTROL
XTurn the SmartKey to position 1or2 in the
ignition lock.
MAGIC SKY CONTROL switches to the status
it was set to before the engin ewas switched
off.
XTo change the degree of transparency:
press button :.
At temperatures below freezing, the change is
slower and uneven .The entire process may take
some time.
82Roof
Opening and closing
Page 85 of 298
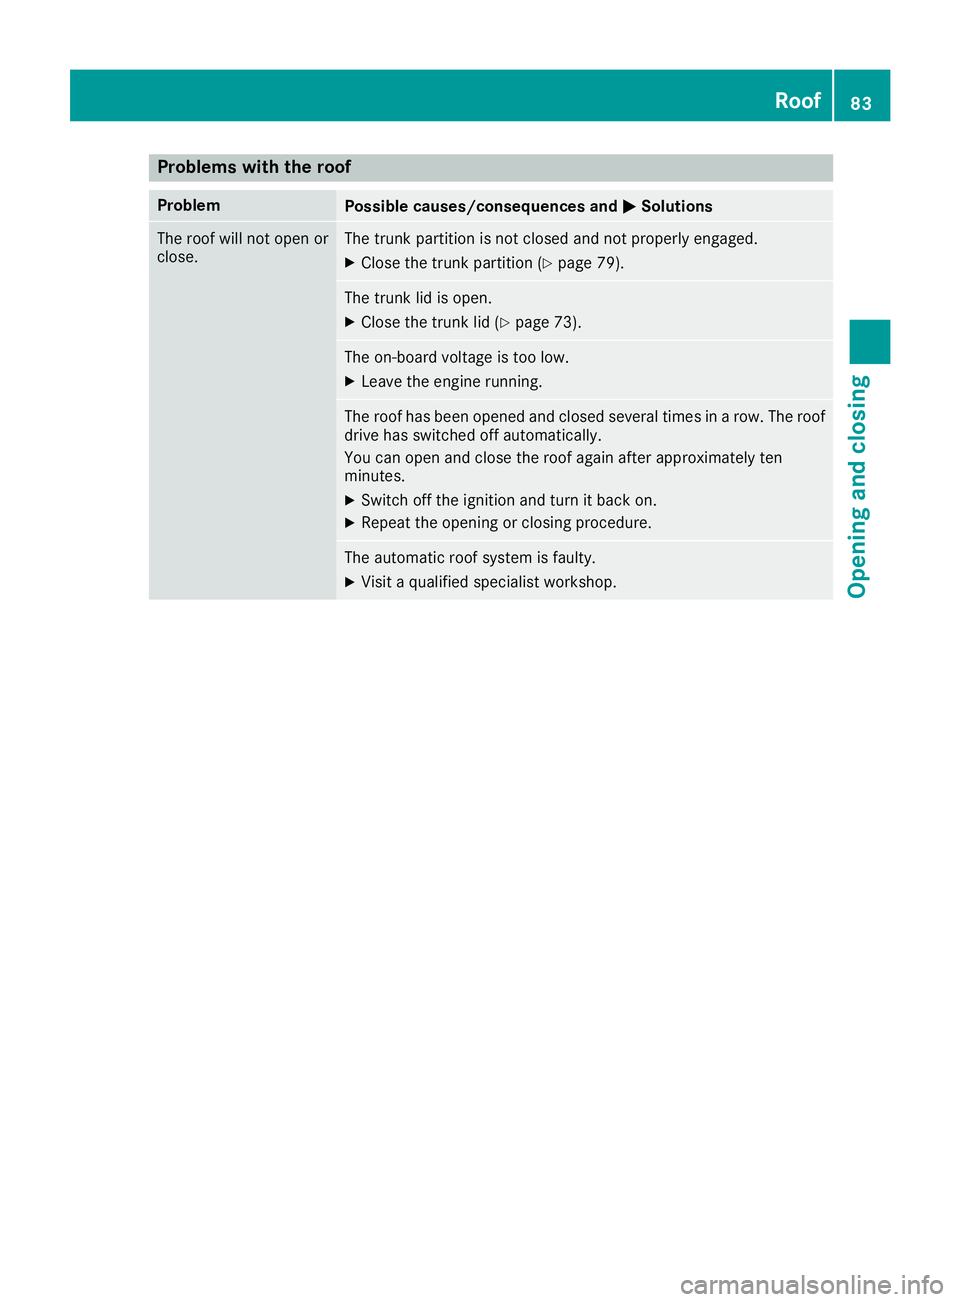
Problems with the roof
ProblemPossible causes/consequences andMSolutions
The roof will not open or
close.The trunk partition is not closed and not properly engaged.
XClose the trunk partition (Ypage 79).
The trunk lid is open.
XClose the trunk lid (Ypage 73).
The on-board voltage is too low.
XLeave the engine running.
The roof has been opened and closed several times in arow. The roof
drive has switched off automatically.
You can open and close the roof again after approximately ten
minutes.
XSwitch off the ignition and turn it back on.
XRepeat the opening or closing procedure.
The automatic roof system is faulty.
XVisit aqualified specialist workshop.
Roof83
Opening and closing
Z
Page 87 of 298
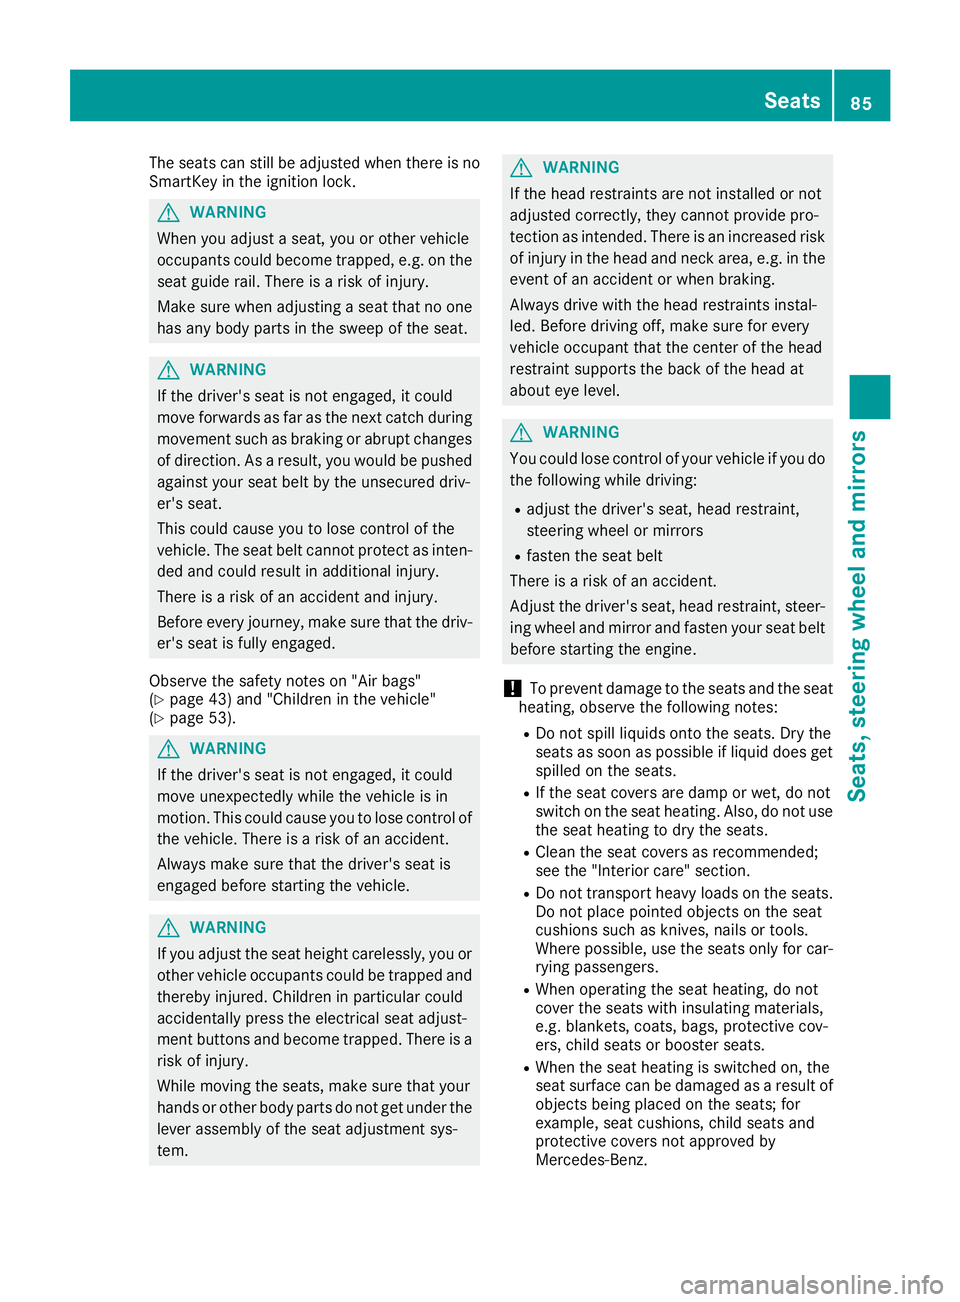
The seats can still be adjusted when there is no
SmartKey in the ignition lock.
GWARNING
When you adjust aseat, you or other vehicle
occupantsc ould become trapped, e.g. on the
seat guide rail. There is arisk of injury.
Make sure when adjusting aseat that no one
has any body parts in the sweep of the seat.
GWARNING
If the driver's seat is not engaged, it could
move forwards as far as the next catc hduring
movements uch as braking or abrupt changes
of direction .Asaresult, you would be pushed
against your seat belt by the unsecured driv-
er's seat.
This could cause you to lose control of the
vehicle. The seat belt cannot protec tasinten-
ded and could result in additional injury.
There is arisk of an accident and injury.
Before every journey, make sure that the driv-
er's seat is fully engaged.
Observe the safety notes on "Air bags"
(
Ypage 43) and "Children in the vehicle"
(Ypage 53).
GWARNING
If the driver's seat is not engaged, it could
move unexpectedly while the vehicle is in
motion.T his could cause you to lose control of
the vehicle. There is arisk of an accident.
Always make sure that the driver's seat is
engaged before starting the vehicle.
GWARNING
If you adjust the seat height carelessly, you or
other vehicle occupantsc ould be trapped and
thereby injured. Children in particular could
accidentally press the electrical seat adjust-
ment button sand become trapped. There is a
risk of injury.
While moving the seats, make sure that your
hands or other body parts do not get under the
lever assembly of the seat adjustmen tsys-
tem.
GWARNING
If the head restraints are not installed or not
adjusted correctly, they cannot provide pro-
tection as intended. There is an increased risk
of injury in the head and neck area, e.g. in the event of an accident or when braking.
Always drive with the head restraints instal-
led. Before driving off, make sure for every
vehicle occupant that the center of the head
restraint supports the back of the head at
about eye level.
GWARNING
You could lose control of your vehicle if you do the following while driving:
Radjust the driver's seat, head restraint,
steerin gwheel or mirrors
Rfasten the seat belt
There is arisk of an accident.
Adjust the driver's seat, head restraint, steer-
ing wheel and mirror and fasten your seat belt before starting the engine.
!To prevent damage to the seats and the seat
heating, observe the following notes:
RDo not spill liquids ontot he seats. Dry the
seats as soon as possible if liquid does get
spilled on the seats.
RIf the seat covers are damp or wet, do not
switch on the seat heating. Also, do not use
the seat heating to dry the seats.
RClean the seat covers as recommended;
see the "Interior care" section.
RDo not transport heavy loads on the seats.
Do not place pointed object sonthe seat
cushions such as knives, nails or tools.
Where possible, use the seats only for car-
rying passengers.
RWhen operating the seat heating, do not
cover the seats with insulating materials,
e.g. blankets ,coats, bags, protective cov-
ers, child seats or booster seats.
RWhen the seat heating is switched on, the
seat surface can be damaged as aresult of
object sbeing placed on the seats; for
example, seat cushions, child seats and
protective covers not approved by
Mercedes-Benz.
Seats85
Seats, steering wheel and mirrors
Z