oil pressure MERCEDES-BENZ SLC ROADSTER 2018 Owner's Manual
[x] Cancel search | Manufacturer: MERCEDES-BENZ, Model Year: 2018, Model line: SLC ROADSTER, Model: MERCEDES-BENZ SLC ROADSTER 2018Pages: 298, PDF Size: 5.26 MB
Page 20 of 298
System .......................................... 224
VehicleHealth Check .................... 227
Telephone
Accepting acall( multifunction
steering wheel ).............................. 170
Authorizing amobilephone (con-
necting )......................................... 215
Authorizing amobil ephone via the
device manager (connecting )......... 216
Connecting amobilephone
(device manager )........................... 216
Connecting amobilephone (gen-
erali nformation) ............................ 215
Displa ymessage ............................ 200
Menu (on-board computer) ............ 169
Numbe rfrom the phone boo k........ 170
Redialing ........................................ 170
Rejecting/ending acall. ................ 170
see also Digital Operator's Man-
ua l.................................................. 211
Temperature
Coolant .......................................... 164
Coolant (on-board computer,
Mercedes-AMGS LC 43) ................ 175
Engine oil( on-board computer,
Mercedes-AMGS LC 43) ................ 175
Outsid etemperature ...................... 163
Setting (climate control )................ 109
Transmission oil( on-board com-
puter, Mercedes-AMGS LC 43) ...... 175
Timing (RACETIMER) ......................... 175
Tire pressure
Calling up (on-board computer) ..... 267
Checking manually ........................ 266
Displa ymessage ............................ 196
Maximu m....................................... 266
Not reached (TIREFIT) .................... 249
Notes. ............................................ 265
Reached (TIREFIT) .......................... 249
Recommended ............................... 263
Tire pressure loss warnin gsystem
Generaln otes ................................ 266
Important safety notes .................. 267
Restarting ...................................... 267
Tire pressure monitor
Checking the tire pressure elec-
tronically ........................................ 269
Function/note s............................. 267 Generaln
otes ................................ 267
Important safety notes .................. 268
Radi otypea pproval for the tire
pressure monitor ........................... 270
Restarting ...................................... 270
Warning lamp ................................. 210
W
arning message .......................... 269
Tire-changet oolkit........................... 246
TIREFI Tkit.......................................... 247
Important safety notes .................. 247
Storage location ............................ 246
Tire pressure not reached .............. 249
Tire pressure reached .................... 249
Tires
Aspect rati o(definition) ................. 279
Average weight of the vehicle
occupants (definition) .................... 278
Bar (definition) ............................... 278
Changing awheel .......................... 280
Characteristics .............................. 278
Checking ........................................ 260
Curb weight (definition) ................. 279
Definition of terms ......................... 278
Directio nofrotation ...................... 280
Displa ymessage ............................ 196
Distribution of the vehicl eoccu-
pants (definition) ............................ 280
DOT (Department of Transporta-
tion) (definition) ............................. 278
DOT, Tire Identification Number
(TIN) ............................................... 277
GAW R(GrossA xle Weight Rating)
(definition) ..................................... 278
GV W( GrossV ehicleWeight) (def-
inition) ........................................... 279
GVWR (GrossV ehicleWeight Rat-
ing )(de finition) .............................. 279
Important safety notes .................. 260
Increased vehicl eweigh tdue to
optionale quipment (definition) ...... 278
Information on driving .................... 260
Kilopascal( kPa)(de finition) ........... 279
Labeling (overview) ........................ 275
Loadb earing index (definition) ...... 280
Loadi ndex ..................................... 277
Loadi ndex (definition) ................... 279
M+S tire s....................................... 262
18Index
Page 240 of 298
lead to increased wear and damage to the
majorassemblies or the vehicle.
Aq ualified specialist workshop, e.g. an author-
ized Mercedes-Ben zCenter, will reset the
ASSYS TPLUS service interval display after the
service work has been carried out. You can also
obtain further information on maintenance
work,f or example.
Specia lservice requirements
The specified maintenance interval takes only
the normal operation of the vehicle into
account .Under arduous operating condition sor
increased load on the vehicle, maintenance
work must be carried out more frequently, for
example:
Rregular cit ydrivingw ith frequent intermediate
stops
Rif the vehicle is primarily used to travel short
distances
Ruse in mountainous terrain or on poor road
surfaces
Rif the engin eisoften left idling for long periods
Under these or similar conditions, have, for
example, the air filter, engin eoil and oil filter
replaced or changed more frequently. Under
arduous operating conditions, the tires must be
checked more often. Further information can be
obtained at aqualified specialist workshop, e.g.
an authorized Mercedes-Ben zCenter.
Driving abroad
An extensive Mercedes-Ben zService network is
also available in other countries. You can obtain
further information froma ny authorized
Mercedes-Ben zCenter.
Care
Notes on care
HEnvironmental note
Dispose of emptyp ackaging and cleaning
cloths in an environmentally responsible man-
ner.
!When cleaning your car, do not use:
Rdry, coarse or hard cloths
Rabrasive cleaning agents
Rsolvents
Rcleaning agent scontaining solvents
Do not scrub.
Do not touc hthe surfaces and films with hard
objects, e.g. rings or ice scrapers. Otherwise,
you may scratc hordamage the surfaces and
films.
!Do not park your vehicle for along period of
tim edirectly after cleaning, particularly after
cleaning the wheel rim with wheel cleaner.
Wheel cleaner can lead to the increased cor-
rosionoft he braked iscs and pads. Therefore,
drive for afew minutes after cleaning. By
heatin gupthe brakes, the braked iscs and
pads dry. The vehicle can the nbeparked for a
long period of time.
Regular care of your vehicle is acondition for
retainin gthe quality in the long term.
Use care products and cleaning agent srecom-
mended and approved by Mercedes-Benz.
Washing th evehicle and cleaning the
paintwork
Automatic car wash
GWARNING
Braking efficienc yisreduced after washing
the vehicle. There is arisk of an accident.
After the vehicle has been washed, brake
carefully while paying attention to the traffic
condition suntil full braking power is restored.
!When DISTRONIC PLUS or the HOL Dfunc-
tion is activated, the vehicle brakes automat-
ically in certain situations.
To avoid damage to the vehicle, deactivate
DISTRONIC PLUS and the HOL Dfunction in
the followingors imilar situations:
Rwhen towingthe vehicle
Rin the car wash
!It is preferable to use car washes with
adjustable high-pressure pre-cleaning that
corresponds to the specification for the Cab-
riolet program. In car washes that use high
water pressures, there is arisk that asmall
amount of water may leak int othe vehicle.
238Care
Maintenance and care
Page 241 of 298
!Lock the car if you wash it in an automatic
car wash. Otherwise, the vehicle might be
damaged.
!Never clean your vehicle in aTouchless
Automatic Car Wash as these use special
cleaning agents. These cleaning agents can
damage the paintwork or plastic parts.
If you have your vehicle cleaned in ahigh-
pressure automatic car wash, small amounts
of water may enter the vehicle.
!Make sure that the automatic transmission
is in position Nwhen washing your vehicle in
at ow-through car wash. The vehicle could be
damagedift he transmission is in another
position.
!Make sure that:
Rthe side windows and the roof are com-
pletely closed
Rthe climate control blower is switched off
Rthe windshieldw iper switch is at position 0
The vehicle could otherwise be damaged.
You can clean the vehicle at an automatic car
wash from the very start.
Preferably clean the vehicle at automatic car
washes that use textile washing elements with-
out brushes. This prevents fine scratches from
forming on the paintwork and film.
If the vehicle is very dirty, pre-wash it before
cleaning it in an automatic car wash.
After using an automatic car wash, wipe off wax
from the windshielda nd the wiper blades. This
will prevent smears and reduce wiping noises
caused by residue on the windshield.
iVehicles with decorative film: select awash
program without hot wax at the automatic car
wash.
Washing by hand
In some countries, washing by hand is only
allowed at speciallye quipped washing bays.
Observe the legal requirements in each country.
XDo not use hot water and do not wash the
vehicle in direct sunlight.
XUse asoft sponge to clean.
XUse amild cleaning agent, such as acar
shampoo approved by Mercedes-Benz.
XThoroughly hose down the vehicle with agen-
tle jet of water.
XDo not point the water jet directly towards the
air inlet or the edges of decorative foils.
XUse plenty of water and rinse out the sponge
frequently.
XRinse the vehicle with clean water and dry
thoroughly with achamois.
XDo not let the cleaning agent dry on the paint-
work or the decorative foils.
Carefully remove all deposits of road salt as
soon as possible when driving in winter.
Powerw ashers
GWARNING
The water jet from acircular jet nozzle (dirt
blasters) can cause invisible exterior damage
to the tires or chassis components. Compo-
nentsd amagedint his way may fail unexpect-
edly.T here is arisk of an accident.
Do not use power washers with circular jet
nozzles to clean the vehicle. Have damaged
tires or chassis componentsr eplaced imme-
diately.
!Vehicles with decorative foil: parts of your
vehicle are covered with decorative foil. Main-
tain adistance of at least 27.5 in (70 cm)
between the foil-wrappedp arts of the vehicle
and the nozzle of the high pressure cleaner.
Information aboutt he correct distance is
available from the equipment manufacturer.
Move the power washer nozzle around when
cleaning your vehicle.
The water temperature of the high-pressure
cleaner must not exceed 140 °F (60 °C).
!Alwaysm aintainadistance of at least
11.8 in (30 cm) between the vehicle and the
power washer nozzle. Information aboutt he
correct distance is available from the equip-
ment manufacturer.
Move the power washer nozzle around when
cleaning your vehicle.
Do not aim directly at any of the following:
Rtires
Rdoor gaps, roof gaps, joints, etc.
Relectrical components
Rbattery
Rplug-type couplings
Rlights
Care239
Maintenance and care
Z
Page 242 of 298
Rseals
Rtrim
Rventilation slots
Damaged seals or electrical componentsc an
lead to leaks or failures.
!Do not use high-pressure cleaners if the
tank recess is open while you clean it. This
can cause damage to the seals or other com-
ponents.
Cleaning the paintwork
!Do not affix:
Rstickers
Rfilms
Rmagnetic plates or similar items
to painted surfaces. You could otherwise
damage the paintwork.
Scratches, corrosive deposits, areas affected by
corrosion and damage caused by inadequate
care cannot always be completely repaired. In
such cases, visit aqualified specialist workshop.
XRemove dirt immediately,w here possible,
while avoiding rubbing too hard.
XSoak insect remains with insect remover and
rinse off the treated areas afterwards.
XSoak bird droppings with water and rinse off
the treated areas afterwards.
XRemove coolant, brake fluid, tree resin, oils,
fuels and greases by rubbing gently with a
cloth soaked in petroleum ether or lighter
fluid.
XUse tar remover to remove tar stains.
XUse silicone remover to remove wax.
If water no longer forms "beads" on the paint
surface, use the paint care products recommen-
ded and approved by Mercedes-Benz.T his is the
case approximately every three to five months,
depending on the climate conditions and the
care product used.
If dirt has penetrated the paint surface or if the
paint has become dull,t he paint cleaner recom-
mended and approved by Mercedes-Benz
should be used.
Do not use these care products in the sun or on
the hood while the hood is hot.
XUse asuitable touch-up stick, e.g. MB Touch-
Up Stick,tor epair slight damage to the paint-
work quickly and provisionally.
Mattef inish care
!Never polish the vehicle or the light alloy
wheels. Polishing causes the finish to shine.
!The following can give the paint aglossy
appearance and thus reduce the matt effect:
RRubbing hard with unsuitable agents
RWashing the vehicle in direct sunlight
!Never use paint cleaner, buffing or polishing
products, or gloss preserver, e.g. wax, for the
purpose of paintwork care. These products
are only suitable for high-gloss surfaces. Their
use on vehicles with matte paintwork leads to
considerable surface damage or, more spe-
cifically,tos hiny, spotted areas.
Always have paintwork repairs carried out at a
qualified specialist workshop.
!Only use automatic car washes which cor-
respond to the latest technological stand-
ards. Never use wash programs which finish
by treating the vehicle with hot wax.
Observe these notes if your vehicle has aclear
matte finish. This will help you to avoid damage
to the paintwork due to incorrect treatment.
These notes also apply to light alloy wheels with
ac lear matte finish.
iUse only insect remover and car shampoo
from the range of recommended and
approved Mercedes-Benz care products.
Cleaning the decorative film
!The following may have an effect on the ser-
vice life and coloring of decorative film:
Rsunlight
Rtemperature, e.g. hot-air fan
Rweather conditions
Rstone impacts and dirt
Rchemical cleaning agents
Rgreasy substances
!Do not use any types of polish on matt dec-
orative film. Polishing surfaces covered with
film gives it ashiny finish.
!Do not treat matt or structured decorative
film with wax. This may lead to marks that
cannot be removed.
240Care
Maintenance and care
Page 251 of 298
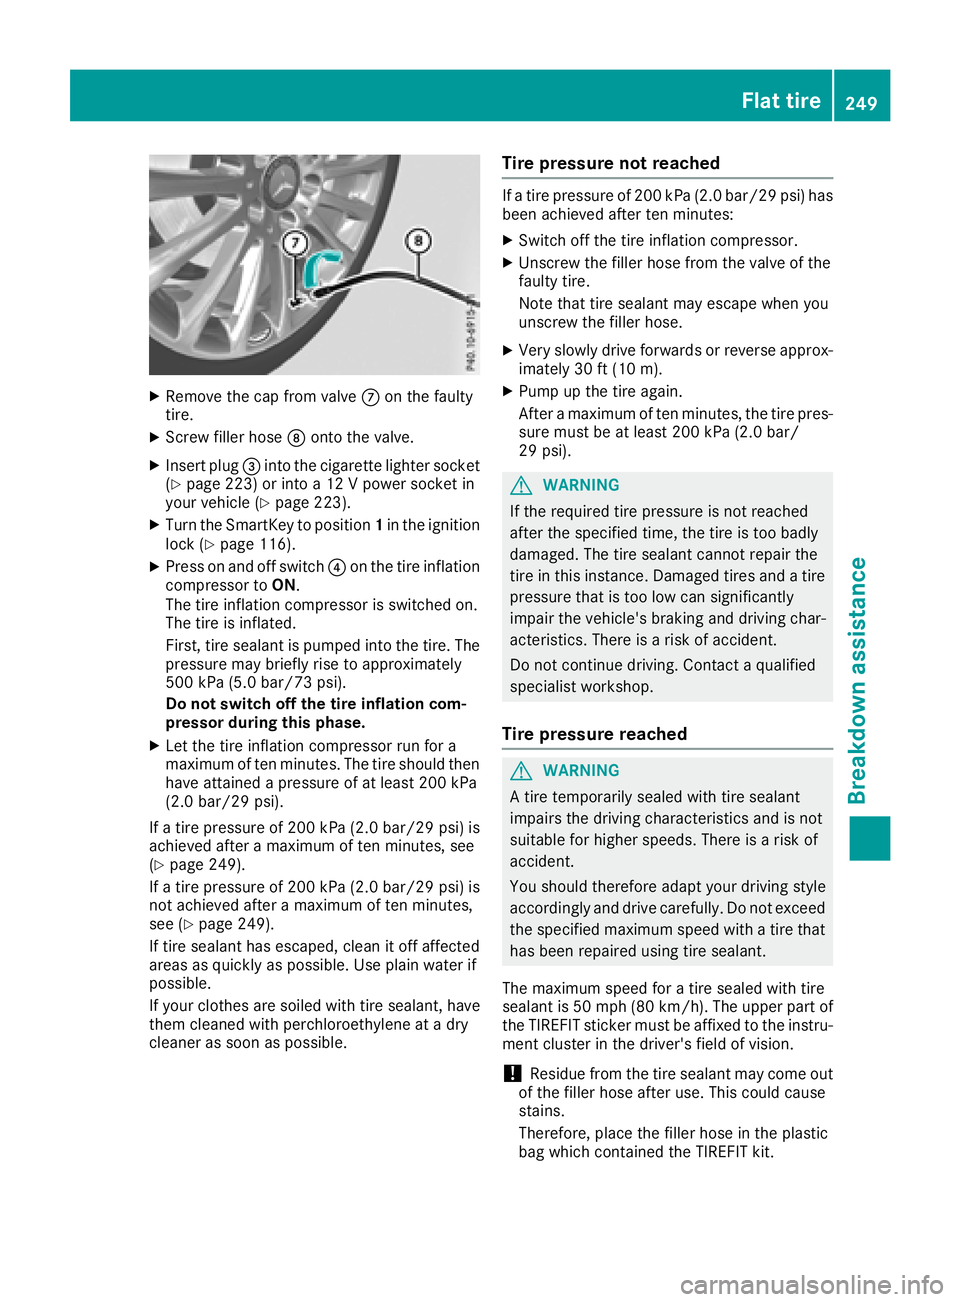
XRemove thecap from valv eC on th efault y
tire.
XScrew filler hos eD onto th evalve.
XInser tplug =intothe cigarette lighte rsocke t
(Ypage 223) or int oa12Vpower socke tin
your vehicl e(Ypage 223).
XTurn theSma rtKey to position 1in th eignition
loc k(Ypage 116).
XPress on and off switch ?on th etirei nflation
compressor to ON.
The tire inflation compressor is switched on .
The tire is inflated.
First ,tires ealan tispumped int othe tire. The
pressur emay briefly ris etoapproximately
50 0k Pa(5.0b ar/7 3psi).
Do not switch off th etirei nflation com -
pressor during this phase .
XLet thetirei nflation compressor run for a
maximum of te nminutes. The tire should then
hav eattained apressur eofatl east 200kPa
(2. 0b ar/29 psi) .
If at irep ressur eof200 kPa( 2.0b ar/29 psi) is
achieved after amaximum of te nminutes, see
(
Ypage 249).
If at irep ressur eof200 kPa( 2.0b ar/29 psi) is
no ta chieved after amaximum of te nminutes,
see (
Ypage 249).
If tire sealan thas escaped, clean it off affecte d
areas as quickly as possible. Use plain water if
possible.
If your clothes are soiled wit htires ealant, hav e
them cleane dwithp erchloroethylen eatadry
cleane rassoo
nasp o
ssible.
Tire pressure not reached
Ifat irep ressur eof200 kPa(2.0 bar/29 psi) has
beena chieved after ten minutes:
XSwitch off the tire inflation compressor.
XUnscrew the filler hose from the valve of the
faulty tire.
Note that tire sealant may escap ewheny ou
unscrew the filler hose.
XVery slowly drive forwards or reverse approx- imately 30 ft (10 m).
XPump up the tire again.
After amaximu moften minutes ,the tire pres-
sure must be at least 200 kPa (2.0 bar/
29 psi).
GWARNING
If the required tire pressure is not reached
after the specified time, the tire is too badly
damaged. The tire sealant cannot repair the
tire in this instance. Damaged tires and atire
pressure that is too low can significantly
impair the vehicle's braking and driving char-
acteristics. There is arisk of accident.
Do not continue driving. Contact aqualified
specialist workshop.
Tire pressure reached
GWARNING
At ire temporarily sealed with tire sealant
impairs the driving characteristics and is not
suitabl efor higher speeds. There is arisk of
accident.
You should thereforea dapt yourdriving style
accordingly and drive carefully .Donot exceed
the specified maximu mspeedw ithatire that
has beenr epaired using tire sealant.
The maximu mspeedf oratire sealed with tire
sealant is 50 mph (80 km/h). The upper part of
the TIREFIT sticker must be affixed to the instru-
ment cluster in the driver's fieldofv ision.
!Residuefrom the tire sealant may come out
of the filler hose after use .This coul dcause
stains.
Therefore, place the filler hose in the plastic
bag which contained the TIREFIT kit.
Flat tire249
Breakdowna ssistance
Z
Page 281 of 298
Speed rating
The speed rating is part of the tire identification.It specifies the speed range for which the tire is
approved.
GVW (Gross Vehicle Weight)
The gross vehicle weight includes the weight of the vehicle including fuel, tools, the spare wheel,
accessories installed, occupants, luggage and
the drawbar noseweight, if applicable. The gross
vehicle weight must not exceed the gross vehi-
cle weight rating GVWR as specified on the vehi- cle identification plate on the B-pillar on the
driver's side.
GVWR (Gross Vehicle Weight Rating)
The GVWR is the maximum permissible gross
weight of afully loaded vehicle (the weight of the
vehicle including all accessories, occupants,
fuel, luggage and the drawbar noseweight, if
applicable). The gross vehicle weight rating is
specified on the vehicle identification plate on
the B-pillar on the driver's side.
Maximu mloaded vehicle weight
The maximum weight is the sum of:
Rthe curb weight of the vehicle
Rthe weight of the accessories
Rthe load limit
Rthe weight of the factory installed optional
equipment
Kilopascal (kPa)
Metric unit for tire pressure. 6.9 kPa corre-
sponds to 1psi. Another unit for tire pressure is
bar. 100 kilopascals (kPa) are the equivalent of
1b ar.
Load index
In addition to the load-bearing index, the load
index may also be imprinted on the sidewallo f
the tire. This specifies the load-bearing capacity
more precisely.
Curb weight
The weight of avehicle with standard equipment
including the maximum capacity of fuel, oil and
coolant. It also includes the air-conditioning sys-
tem and optional equipment if these are instal-
led in the vehicle, but does not include passen-
gers or luggage.
Maximu mload rating
The maximum load rating is the maximum per-
missible weight in kilograms or lbs for which a
tire is approved.
Maximu mpermissible tire pressure
Maximum permissible tire pressure for one tire.
Maximu mload on one tire
Maximum load on one tire. This is calculated by
dividing the maximum axle load of one axle by
two.
PSI (pounds per squarei nch)
Astandard unit of measure for tire pressure.
Aspect ratio
Relationship between tire height and tire width
in percent.
Tire pressure
This is pressure inside the tire applying an out-
ward force to each square inch of the tire's sur-
face. The tire pressure is specified in pounds per
square inch (psi), in kilopascal (kPa) or in bar.
The tire pressure should only be corrected when the tires are cold.
Cold tire pressure
The tires are cold:
Rif the vehicle has been parked with the tires
out of direct sunlight for at least three hours
and
Rif the vehicle has not been driven further than
1m ile (1.6 km)
Tread
The part of the tire that comes into contact with
the road.
Bead
The tire bead ensures that the tire sits securely
on the wheel. There are several steel wires in the
bead to prevent the tire from coming loose from
the wheel rim.
Sidewall
The part of the tire between the tread and the
bead.
All about wheelsa nd tires279
Wheels and tires
Z