Lamp MERCEDES-BENZ SLK 230 KOMPRESSOR 2002 R170 Owner's Guide
[x] Cancel search | Manufacturer: MERCEDES-BENZ, Model Year: 2002, Model line: SLK 230 KOMPRESSOR, Model: MERCEDES-BENZ SLK 230 KOMPRESSOR 2002 R170Pages: 290, PDF Size: 20.03 MB
Page 68 of 290
65 Adjusting telescoping steering column
Te ch n i c a l
data Instruments
and controlsOperationDrivingInstrument
cluster displayPractical hints Car care Index Adjusting telescoping steering column
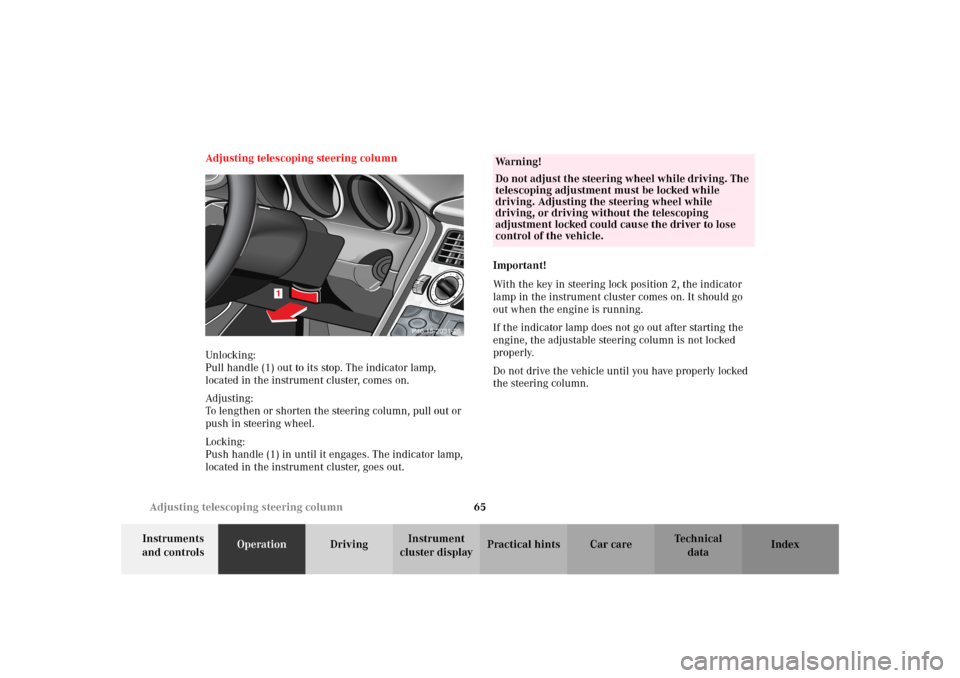
Unlocking:
Pull handle (1) out to its stop. The indicator lamp,
located in the instrument cluster, comes on.
Adjusting:
To lengthen or shorten the steering column, pull out or
push in steering wheel.
Locking:
Push handle (1) in until it engages. The indicator lamp,
located in the instrument cluster, goes out.Important!
With the key in steering lock position 2, the indicator
lamp in the instrument cluster comes on. It should go
out when the engine is running.
If the indicator lamp does not go out after starting the
engine, the adjustable steering column is not locked
properly.
Do not drive the vehicle until you have properly locked
the steering column.
AU
DIO
TEL
AUDIO
TEL
1
AUDIO
TEL
AUDIO
TEL
P46.15-2031-26
Wa r n i n g !
Do not adjust the steering wheel while driving. The
telescoping adjustment must be locked while
driving. Adjusting the steering wheel while
driving, or driving without the telescoping
adjustment locked could cause the driver to lose
control of the vehicle.
Page 69 of 290
66 Rear view mirrors
Te ch n i c a l
data Instruments
and controlsOperationDrivingInstrument
cluster displayPractical hints Car care Index
Rear view mirrors
Inside rear view mirror
Manually adjust the inside rear view mirror.
Use your inside rear view mirror to determine the size
and distance of objects seen in the passenger-side
exterior mirror.
Inside rear view mirror, antiglare mode
With the key in steering lock position 2, the mirror
reflection brightness responds to changes in light
sensitivity.
With gear selector lever (manual transmission: gearshift
lever) in position “R”, or with the interior lamp switched
on, the mirror brightness does not respond to changes
in light sensitivity.Note:
The automatic antiglare function does not react, if
incoming light is not aimed directly at sensors in the
inside rear view mirror.
The automatic antiglare function will not react for
example, if the wind screen is installed.
Wa r n i n g !
In the case of an accident liquid electrolyte may
escape the mirror housing when the mirror glass
breaks.Electrolyte has an irritating effect. Do not allow the
liquid to come into contact with eyes, skin,
clothing, or respiratory system. In cases it does,
immediately flush affected area with water, and
seek medical help if necessary.
Page 71 of 290
68 Rear view mirrors
Te ch n i c a l
data Instruments
and controlsOperationDrivingInstrument
cluster displayPractical hints Car care Index
Driver’ s side exterior rear view mirror, antiglare
mode
With the key in steering lock position 2, the driver’s
side mirror reflection brightness responds to changes in
light sensitivity.
With gear selector lever (manual transmission: gearshift
lever) in position “R”, or with the interior lamp switched
on, the driver’s side mirror brightness does not respond
to changes in light sensitivity.Note:
The automatic antiglare function does not react, if
incoming light is not aimed directly at sensors in the
inside rear view mirror.
The automatic antiglare function will not react for
example, if the wind screen is installed.
Page 74 of 290
71 Instrument cluster
Te ch n i c a l
data Instruments
and controlsOperationDrivingInstrument
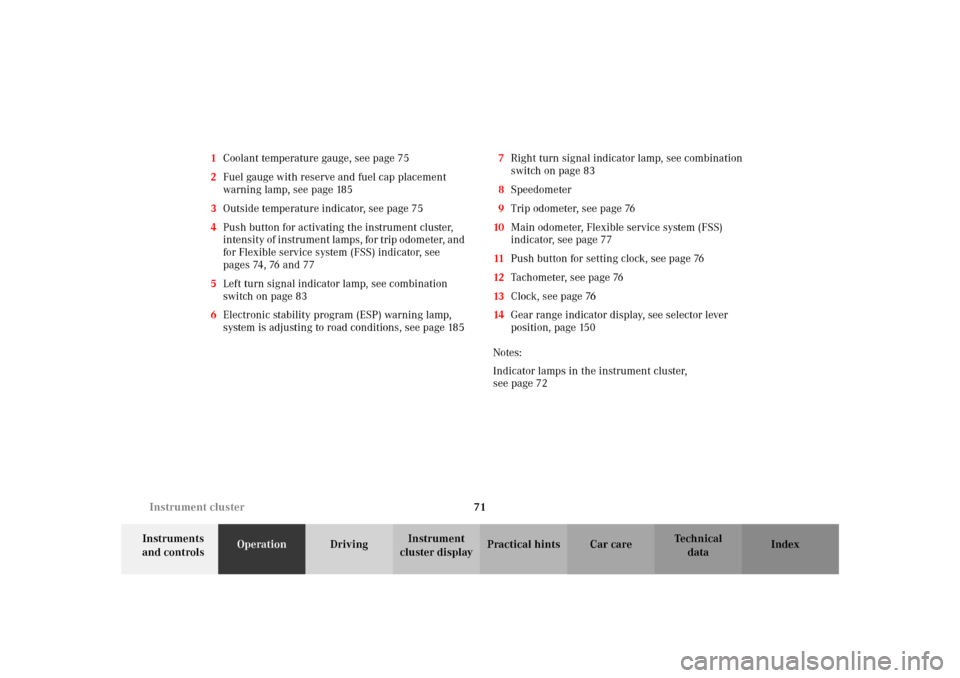
cluster displayPractical hints Car care Index 1Coolant temperature gauge, see page 75
2Fuel gauge with reserve and fuel cap placement
warning lamp, see page 185
3Outside temperature indicator, see page 75
4Push button for activating the instrument cluster,
intensity of instrument lamps, for trip odometer, and
for Flexible service system (FSS) indicator, see
pages 74, 76 and 77
5Left turn signal indicator lamp, see combination
switch on page 83
6Electronic stability program (ESP) warning lamp,
system is adjusting to road conditions, see page 1857Right turn signal indicator lamp, see combination
switch on page 83
8Speedometer
9Trip odometer, see page 76
10Main odometer, Flexible service system (FSS)
indicator, see page 77
11Push button for setting clock, see page 76
12Tachometer, see page 76
13Clock, see page 76
14Gear range indicator display, see selector lever
position, page 150
Notes:
Indicator lamps in the instrument cluster,
see page 72
Page 75 of 290
72 Instrument cluster
Te ch n i c a l
data Instruments
and controlsOperationDrivingInstrument
cluster displayPractical hints Car care Index
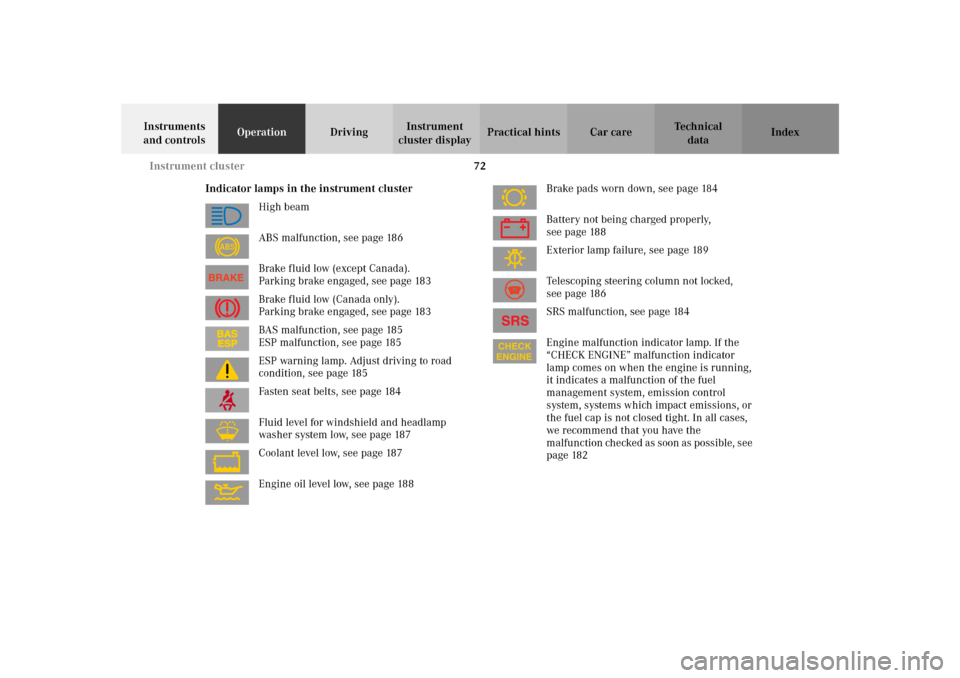
Indicator lamps in the instrument cluster
High beam
ABS malfunction, see page 186
Brake fluid low (except Canada).
Parking brake engaged, see page 183
Brake fluid low (Canada only).
Parking brake engaged, see page 183
BAS malfunction, see page 185
ESP malfunction, see page 185
ESP warning lamp. Adjust driving to road
condition, see page 185
Fasten seat belts, see page 184
Fluid level for windshield and headlamp
washer system low, see page 187
Coolant level low, see page 187
Engine oil level low, see page 188Brake pads worn down, see page 184
Battery not being charged properly,
see page 188
Exterior lamp failure, see page 189
Telescoping steering column not locked,
see page 186
SRS malfunction, see page 184
Engine malfunction indicator lamp. If the
“CHECK ENGINE” malfunction indicator
lamp comes on when the engine is running,
it indicates a malfunction of the fuel
management system, emission control
system, systems which impact emissions, or
the fuel cap is not closed tight. In all cases,
we recommend that you have the
malfunction checked as soon as possible, see
page 182
ABS
Page 76 of 290
73 Instrument cluster
Te ch n i c a l
data Instruments
and controlsOperationDrivingInstrument
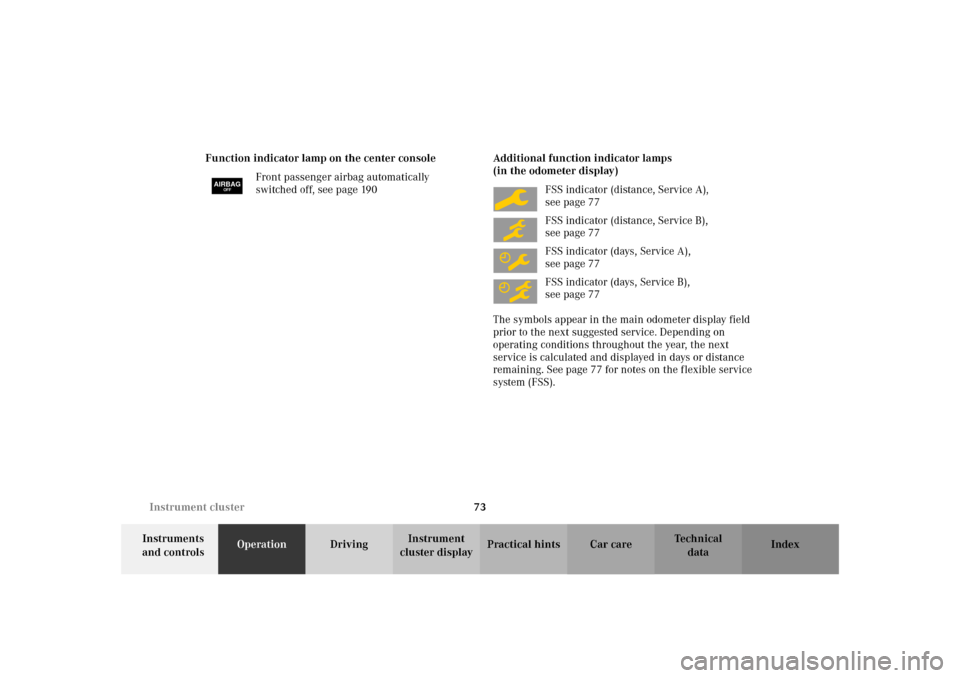
cluster displayPractical hints Car care Index Function indicator lamp on the center console
Front passenger airbag automatically
switched off, see page 190Additional function indicator lamps
(in the odometer display)
FSS indicator (distance, Service A),
see page 77
FSS indicator (distance, Service B),
see page 77
FSS indicator (days, Service A),
see page 77
FSS indicator (days, Service B),
see page 77
The symbols appear in the main odometer display field
prior to the next suggested service. Depending on
operating conditions throughout the year, the next
service is calculated and displayed in days or distance
remaining. See page 77 for notes on the flexible service
system (FSS).
AIRBAGOFF
Page 77 of 290
74 Instrument cluster
Te ch n i c a l
data Instruments
and controlsOperationDrivingInstrument
cluster displayPractical hints Car care Index
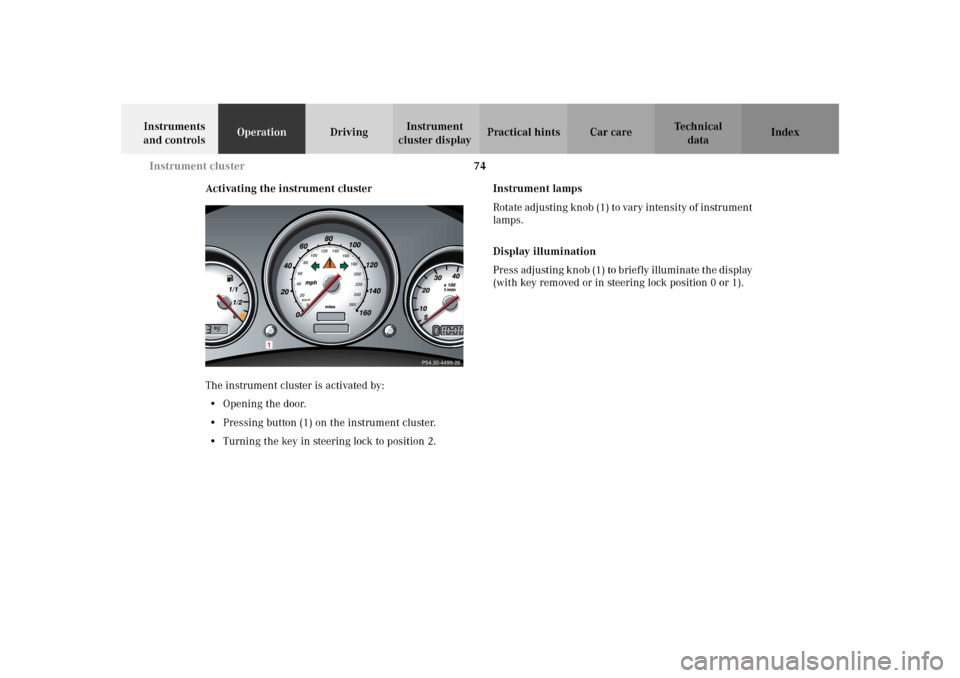
Activating the instrument cluster
The instrument cluster is activated by:
•Opening the door.
•Pressing button (1) on the instrument cluster.
•Turning the key in steering lock to position 2.Instrument lamps
Rotate adjusting knob (1) to vary intensity of instrument
lamps.
Display illumination
Press adjusting knob (1) to briefly illuminate the display
(with key removed or in steering lock position 0 or 1).
P54.30-4499-26
1
Page 83 of 290
80 Checking engine oil level
Te ch n i c a l
data Instruments
and controlsOperationDrivingInstrument
cluster displayPractical hints Car care Index
Perform the oil level check with the dipstick, if it cannot
be completed via the odometer display field. In this case
we recommend that you have the system checked at a
Mercedes-Benz Center.
Notes:
If the symbols : and I are continuously
illuminated after pressing left button on the instrument
cluster twice and there is no change in the odometer
display field or the low engine oil level warning lamp
comes on, a malfunction has occurred to the system.
Perform the engine oil level check with the dipstick.
If no oil leaks are noted continue to drive to the nearest
Mercedes-Benz Center to have the system checked.Engine oil consumption
Engine oil consumption checks should only be made
after the break-in period. During the break-in period,
higher oil consumption may be noticed and is normal.
Frequent driving at high engine speeds results in
increased consumption.
Page 84 of 290
81 Exterior lamp switch
Te ch n i c a l
data Instruments
and controlsOperationDrivingInstrument
cluster displayPractical hints Car care Index Exterior lamp switch
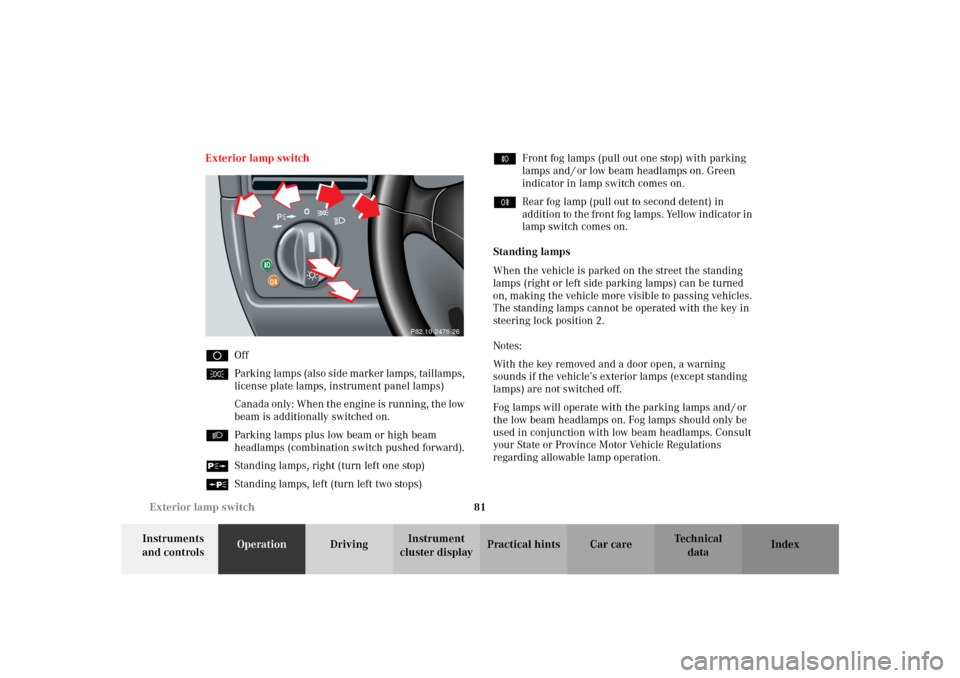
DOff
CParking lamps (also side marker lamps, taillamps,
license plate lamps, instrument panel lamps)
Canada only: When the engine is running, the low
beam is additionally switched on.
BParking lamps plus low beam or high beam
headlamps (combination switch pushed forward).
ˆStanding lamps, right (turn left one stop)
‚Standing lamps, left (turn left two stops)‡Front fog lamps (pull out one stop) with parking
lamps and / or low beam headlamps on. Green
indicator in lamp switch comes on.
†Rear fog lamp (pull out to second detent) in
addition to the front fog lamps. Yellow indicator in
lamp switch comes on.
Standing lamps
When the vehicle is parked on the street the standing
lamps (right or left side parking lamps) can be turned
on, making the vehicle more visible to passing vehicles.
The standing lamps cannot be operated with the key in
steering lock position 2.
Notes:
With the key removed and a door open, a warning
sounds if the vehicle’s exterior lamps (except standing
lamps) are not switched off.
Fog lamps will operate with the parking lamps and / or
the low beam headlamps on. Fog lamps should only be
used in conjunction with low beam headlamps. Consult
your State or Province Motor Vehicle Regulations
regarding allowable lamp operation.
P82.10-2476-26
Page 85 of 290
82 Exterior lamp switch
Te ch n i c a l
data Instruments
and controlsOperationDrivingInstrument
cluster displayPractical hints Car care Index
Fog lamps are automatically switched off when the
exterior lamp switch is turned to position D.
Daytime running lamps (Canada only)
Vehicles with automatic transmission:
When the engine is running and the selector lever is in
a driving position, the low beam headlamps (includes
parking lamps, side marker lamps, taillamps and
license plate lamps) are automatically switched on.
When shifting from a driving position to position “N”
or “P”, the low beam switches off (2 seconds delay).
Vehicles with manual transmission:
With the engine running, the low beam headlamps
(includes parking lamps, side marker lamps, taillamps
and license plate lamps) are automatically switched on.
For nighttime driving the exterior lamp switch should
be turned to position B to permit activation of the
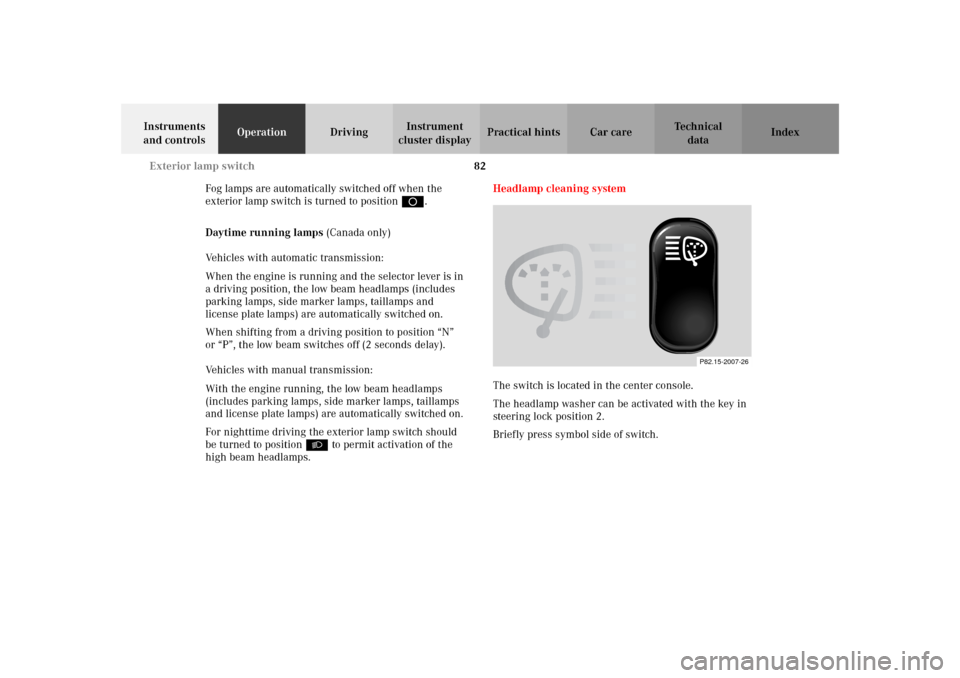
high beam headlamps.Headlamp cleaning system
The switch is located in the center console.
The headlamp washer can be activated with the key in
steering lock position 2.
Briefly press symbol side of switch.
P82.15-2007-26