battery spec MERCEDES-BENZ SLK-Class 2013 R172 Owner's Manual
[x] Cancel search | Manufacturer: MERCEDES-BENZ, Model Year: 2013, Model line: SLK-Class, Model: MERCEDES-BENZ SLK-Class 2013 R172Pages: 358, PDF Size: 4.61 MB
Page 17 of 358
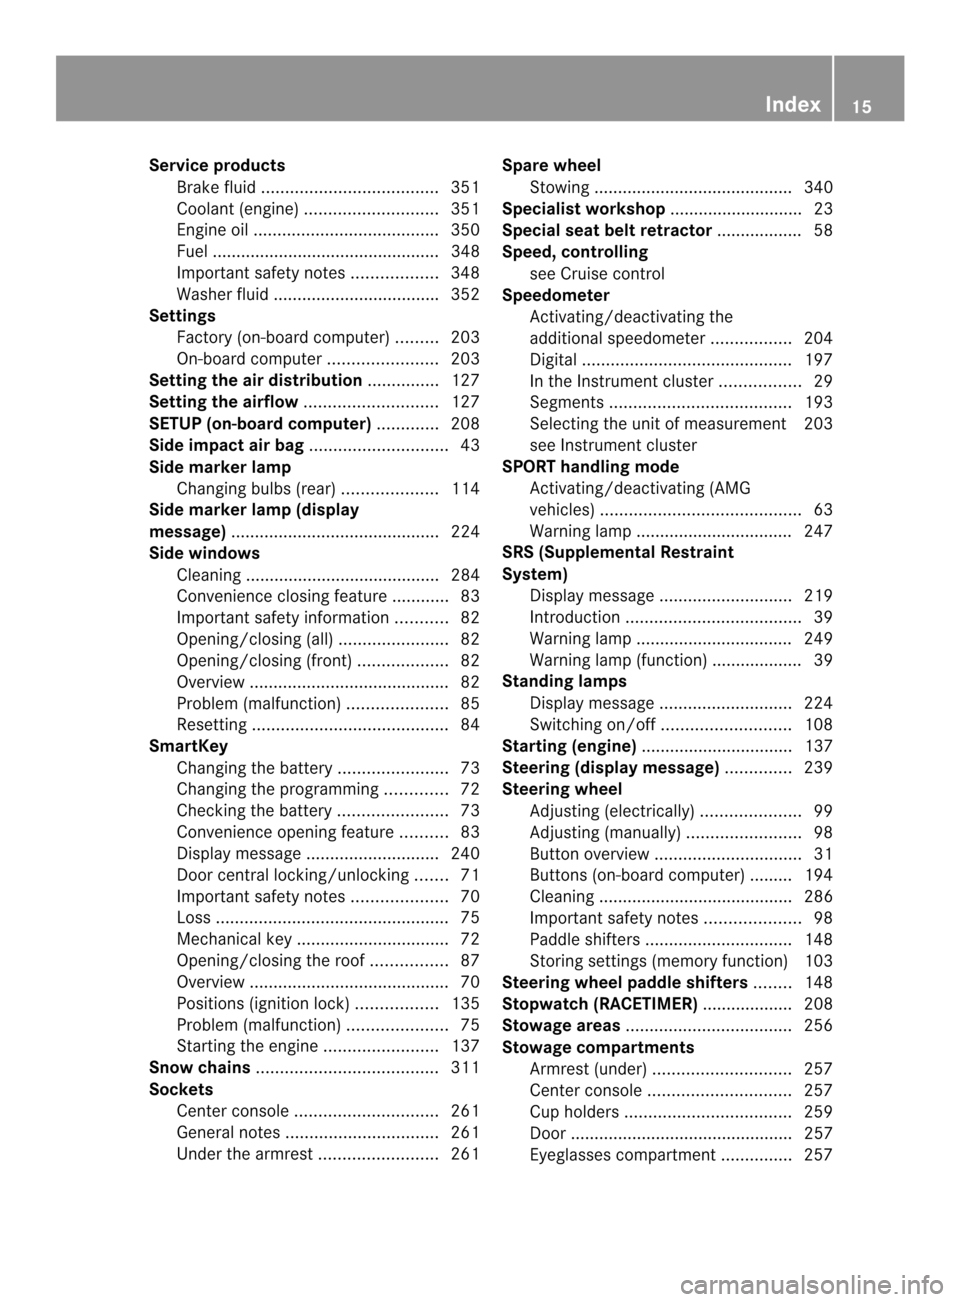
Service products
Brake fluid ..................................... 351
Coolant (engine) ............................ 351
Engine oil ....................................... 350
Fuel ................................................ 348
Important safety notes ..................348
Washer fluid .................................. .352
Settings
Factory (on-board computer) .........203
On-board computer .......................203
Setting the air distribution ...............127
Setting the airflow ............................127
SETUP (on-board computer) .............208
Side impact air bag .............................43
Side marker lamp Changing bulbs (rear) ....................114
Side marker lamp (display
message) ............................................ 224
Side windows Cleaning ......................................... 284
Convenience closing feature ............83
Important safety information ...........82
Opening/closing (all) .......................82
Opening/closing (front) ...................82
Overview .......................................... 82
Problem (malfunction) .....................85
Resetting ......................................... 84
SmartKey
Changing the battery .......................73
Changing the programming .............72
Checking the battery .......................73
Convenience opening feature ..........83
Display message ............................ 240
Door central locking/unlocking .......71
Important safety notes ....................70
Loss ................................................. 75
Mechanical key ................................ 72
Opening/closing the roof ................87
Overview .......................................... 70
Positions (ignition lock) .................135
Problem (malfunction) .....................75
Starting the engine ........................137
Snow chains ...................................... 311
Sockets Center console .............................. 261
General notes ................................ 261
Under the armrest .........................261Spare wheel
Stowing .......................................... 340
Specialist workshop ............................ 23
Special seat bel tretractor .................. 58
Speed ,controlling
see Cruise control
Speedometer
Activating/deactivating the
additional speedometer .................204
Digita l............................................ 197
In the Instrument cluster .................29
Segments ...................................... 193
Selecting the unit of measurement 203
see Instrument cluster
SPORT handling mode
Activating/deactivating (AMG
vehicles) .......................................... 63
Warning lamp ................................. 247
SRS (Supplemental Restraint
System)
Display message ............................ 219
Introduction ..................................... 39
Warning lamp ................................. 249
Warning lamp (function) ................... 39
Standing lamps
Display message ............................ 224
Switching on/off ........................... 108
Starting (engine) ................................ 137
Steering (display message) ..............239
Steering wheel Adjusting (electrically). ....................99
Adjusting (manually )........................ 98
Button overview ............................... 31
Buttons (on-board computer) ......... 194
Cleaning ......................................... 286
Important safety notes ....................98
Paddle shifters ............................... 148
Storing settings (memory function) 103
Steering wheel paddle shifters ........148
Stopwatch (RACETIMER) ................... 208
Stowage areas ................................... 256
Stowage compartments Armrest (under) ............................. 257
Center console .............................. 257
Cuph olders ................................... 259
Door ............................................... 257
Eyeglasses compartment ...............257 Index
15
Page 25 of 358
Declarations of conformity
Vehicle components which receive
and/or transmit radio waves USA:
"The wireless devices of this vehicle
comply with Par t15ofthe FCC Rules.
Operation is subject to the following two
conditions: 1) These devices may not cause
harmful interference, and 2) These devices
must accept any interference received,
including interference that may cause
undesired operation. Changes or
modifications not expressly approved by the
party responsible for compliance could void
the user’s authority to operate the
equipment."
Canada: "The wireless devices of this vehicle
comply with Industry Canada license-exempt
RSS standard(s). Operation is subject to the
following two conditions: (1) These devices
may not cause interference, and (2) These
devices must accept any interference,
including interference that may cause
undesired operation of the device." Diagnostics connection
G
WARNING
If you connect equipment to the on-board
diagnostics connection, it can affect the
operation of the vehicle systems. This can
impair the operating safety of your vehicle
while driving. There is a risk of an accident.
Do not connect any equipment to the on-
board diagnostics connection. G
WARNING
Loose equipment or equipment cables which
are connected to the on-board diagnostics
connection can obstruct the area around the
pedals. The equipment or the cables could
come between the pedals in the event of
sudden braking or acceleration. This may
affect the function of the pedals. There is a
risk of an accident. Do not attach any equipment or cables in the
driver's footwell.
! If the engine is switched off and
equipment on the diagnostics connection
is used, the starter battery may discharge.
The diagnostics connection is only intended
for the connection of diagnostic equipment at
a qualified specialist workshop.
Connecting equipment to the diagnostics
connection can, for example, lead to
emissions monitoring information being
reset. This may lead to the vehicle failing to
meet the requirements of the next emissions
test during the main inspection. Qualified specialist workshop
An authorized Mercedes-Ben zCenter is a
qualified specialist workshop. It has the
necessary specialist knowledge, tools and
qualifications to correctly carry out the work
required on your vehicle. This is especially the
case for work relevant to safety.
Observe the notes in the Maintenance
Booklet.
Always have the following work carried out at
an authorized Mercedes-BenzC enter:
R work relevant to safety
R service and maintenance work
R repair work
R alterations, installation work and
modifications
R work on electronic components Correct use
G
WARNING
There are various warning stickers affixed to
your vehicle. Their purpose is to alert you and
others to various dangers. Therefore, do not
remove any warning stickers unless the
sticker clearly states that you may do so. Introduction
23 Z
Page 40 of 358
Useful information
i This Operator's Manual describes all
models and all standard and optional
equipment of your vehicle available at the
time of publication of the Operator's
Manual. Country-specific differences are
possible. Please note that your vehicle may
not be equipped with all features
described. This also applies to safety-
related systems and functions.
i Read the information on qualified
specialist workshops: (Y page 23).Panic alarm
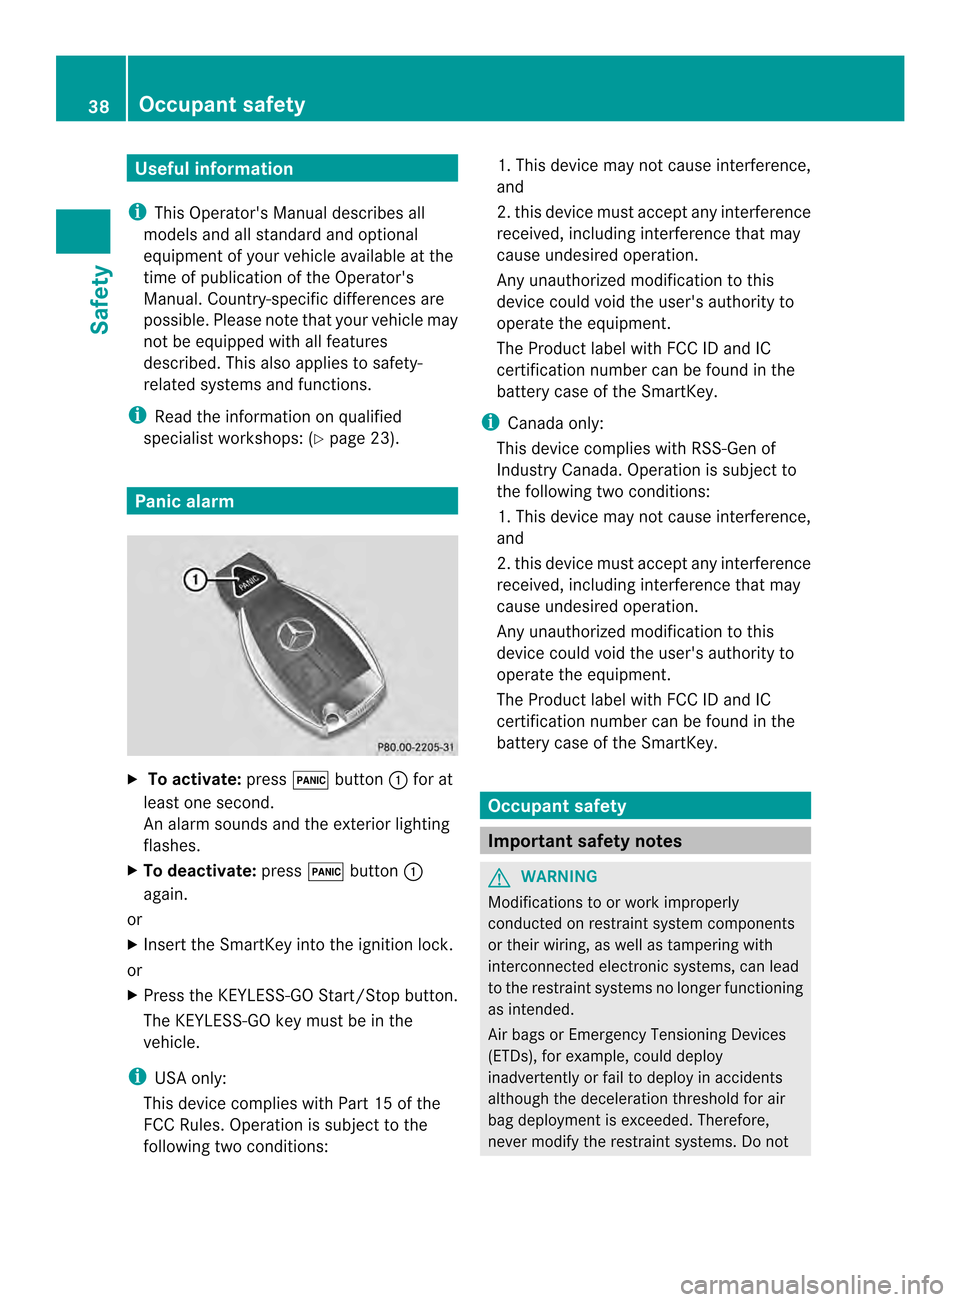
X
To activate: press0011button 0003for at
least one second.
An alarm sounds and the exterior lighting
flashes.
X To deactivate: press0011button 0003
again.
or
X Insert the SmartKey into the ignition lock.
or
X Press the KEYLESS-GO Start/Stop button.
The KEYLESS-GO key must be in the
vehicle.
i USA only:
This device complies with Part 15 of the
FCC Rules. Operation is subjec tto the
following two conditions: 1. This device may not cause interference,
and
2. this device must accept any interference
received, including interference that may
cause undesired operation.
Any unauthorized modification to this
device could void the user's authority to
operate the equipment.
The Product label with FCC ID and IC
certification number can be found in the
battery case of the SmartKey.
i Canada only:
This device complies with RSS-Gen of
Industry Canada. Operation is subject to
the following two conditions:
1. This device may not cause interference,
and
2. this device must accept any interference
received, including interference that may
cause undesired operation.
Any unauthorized modification to this
device could void the user's authority to
operate the equipment.
The Product label with FCC ID and IC
certification number can be found in the
battery case of the SmartKey. Occupant safety
Important safety notes
G
WARNING
Modifications to or work improperly
conducted on restraint system components
or their wiring, as well as tampering with
interconnected electronic systems, can lead
to the restraint systems no longer functioning
as intended.
Air bags or Emergency Tensioning Devices
(ETDs), for example, could deploy
inadvertently or fail to deploy in accidents
although the deceleration threshold for air
bag deployment is exceeded. Therefore,
never modify the restraint systems. Do not 38
Occupant safetySafety
Page 72 of 358
Useful information
i This Operator's Manual describes all
models and all standard and optional
equipment of your vehicle available at the
time of publication of the Operator's
Manual. Country-specific differences are
possible. Please note that your vehicle may
not be equipped with all features
described. This also applies to safety-
related systems and functions.
i Read the information on qualified
specialist workshops: (Y page 23).SmartKey
Important safety notes
G
WARNING
When leaving the vehicle, always remove the
SmartKey from the ignition lock. Always take
the SmartKey with you and lock the vehicle.
Do not leave children unsupervised in the
vehicle, even if they are secured in a child
restraint system, and do not give them access
to an unlocked vehicle. Achild's unsupervised
access to a vehicle could result in an accident
and/or serious personal injury. They could:
R injure themselves on vehicle parts
R be seriously or fatally injured by extreme
heat or cold
R injure themselves or have an accident with
vehicle equipment that may still be in
operation even after the SmartKey has
been removed from the ignition, such as the
seat adjustment, steering wheel
adjustment or memory function.
If children open a door, they could cause
severe or even fatal injury to other persons; if
they get out of the vehicle, they could injure
themselves when doing so or be seriously or
even fatally injured by any passing traffic.
Do not expose the child restraint system to
direct sunlight. The child restraint system's
metal parts, for example, could become very hot, and a child could be burned on these
parts.
G
WARNING
If a key ring is too heavy or too large, the
weight acting on the SmartKey could cause it
to turn in the ignition lock or catch on the
steering wheel. This could cause the engine
to be switched off suddenly. You could lose
control of the vehicle and cause an accident.
Do not attach any heavy or large key rings to
the SmartKey that is inserted in the ignition.
i USA only:
This device complies with Part 15 of the
FCC Rules. Operation is subject to the
following two conditions:
1. This device may not cause interference,
and
2. this device must accept any interference
received, including interference that may
cause undesired operation.
Any unauthorized modification to this
device could void the user's authority to
operate the equipment.
The Product label with FCC ID and IC
certification number can be found in the
battery case of the SmartKey.
i Canada only:
This device complies with RSS-210 of
Industry Canada.O peration is subjectto
the following two conditions:
1. This device may not cause interference,
and
2. this device must accep tany interference
received, including interference tha tmay
cause undesired operation.
Any unauthorized modificatio nto this
device could void the user's authority to
operate the equipment. 70
SmartKeyOpening/closing
Page 75 of 358

or
X
Lock or unlock the vehicle using KEYLESS-
GO. The SmartKey must be outside the
vehicle.
If you unlock the vehicle using the mechanical
key, the fuel filler flap will not be unlocked
automatically.
X To unlock the fuel filler flap: insert the
SmartKey into the ignition lock.
Removing the mechanical key X
Push release catch 0003in the direction of
the arrow and at the same time, remove
mechanical key 0004from the SmartKey. SmartKey battery
Important safety notes G
WARNING
Batteries contain toxic and caustic
substances. For this reason, keep batteries
out of the reach of children.
If a battery has been swallowed, seek medical
help immediately. G
WARNING
The SmartKey batteries contain perchlorate
material, which may require special handling
and regard for the environment. Observe
government disposal guidelines. California
residents, see www.dtsc.ca.gov/ HazardousWaste/Perchlorate/
index.cfm.
Mercedes-Benz recommends that you have
the batteries replaced at a qualified specialist
workshop.
Checking the battery X
Press the 000For0010 button.
The battery is working properly if battery
check lamp 0003lights up briefly.
The battery is discharged if battery check
lamp 0003does not light up briefly.
X Changing the battery (Y page 73)
i If the SmartKey battery is checked within
the signal reception range of the vehicle,
pressing the 000For0010 button:
R locks or
R unlocks the vehicle
i You can get a battery in any qualified
specialist workshop.
Replacing the battery You require a CR 2025 3 V cell battery.
X
Take the mechanical key out of the
SmartKey (Y page 72). SmartKey
73Opening/closing Z
Page 77 of 358
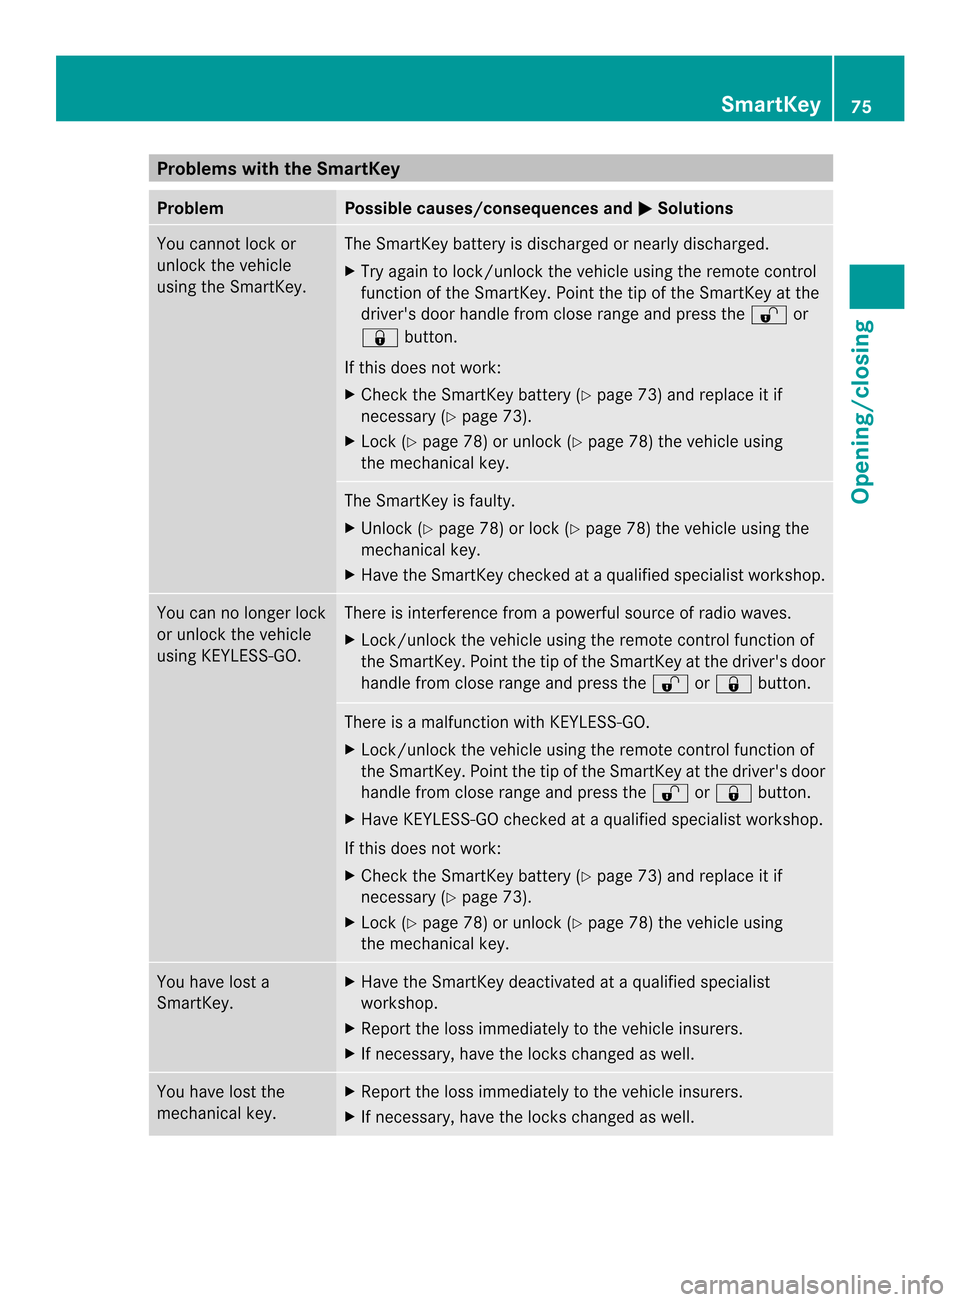
Problems with the SmartKey
Problem Possible causes/consequences and
0001 Solutions
You cannot lock or
unlock the vehicle
using the SmartKey. The SmartKey battery is discharged or nearly discharged.
X
Try again to lock/unlock the vehicle using the remote control
function of the SmartKey. Point the tip of the SmartKey at the
driver's door handle from close range and press the 0010or
000F button.
If this does not work:
X Check the SmartKey battery (Y page 73) and replace it if
necessary (Y page 73).
X Lock (Y page 78) or unlock (Y page 78) the vehicle using
the mechanical key. The SmartKey is faulty.
X
Unlock (Y page 78) or lock (Y page 78) the vehicle using the
mechanical key.
X Have the SmartKey checked at a qualified specialist workshop. You can no longer lock
or unlock the vehicle
using KEYLESS-GO. There is interference from a powerful source of radio waves.
X Lock/unlock the vehicle using the remote control function of
the SmartKey. Point the tip of the SmartKey at the driver's door
handle from close range and press the 0010or000F button. There is a malfunction with KEYLESS-GO.
X Lock/unlock the vehicle using the remote control function of
the SmartKey. Point the tip of the SmartKey at the driver's door
handle from close range and press the 0010or000F button.
X Have KEYLESS-GO checked at a qualified specialist workshop.
If this does not work:
X Check the SmartKey battery (Y page 73) and replace it if
necessary (Y page 73).
X Lock (Y page 78) or unlock (Y page 78) the vehicle using
the mechanical key. You have lost a
SmartKey. X
Have the SmartKey deactivated at a qualified specialist
workshop.
X Report the loss immediately to the vehicle insurers.
X If necessary, have the locks changed as well. You have lost the
mechanical key. X
Report the loss immediately to the vehicle insurers.
X If necessary, have the locks changed as well. SmartKey
75Opening/closing Z
Page 78 of 358
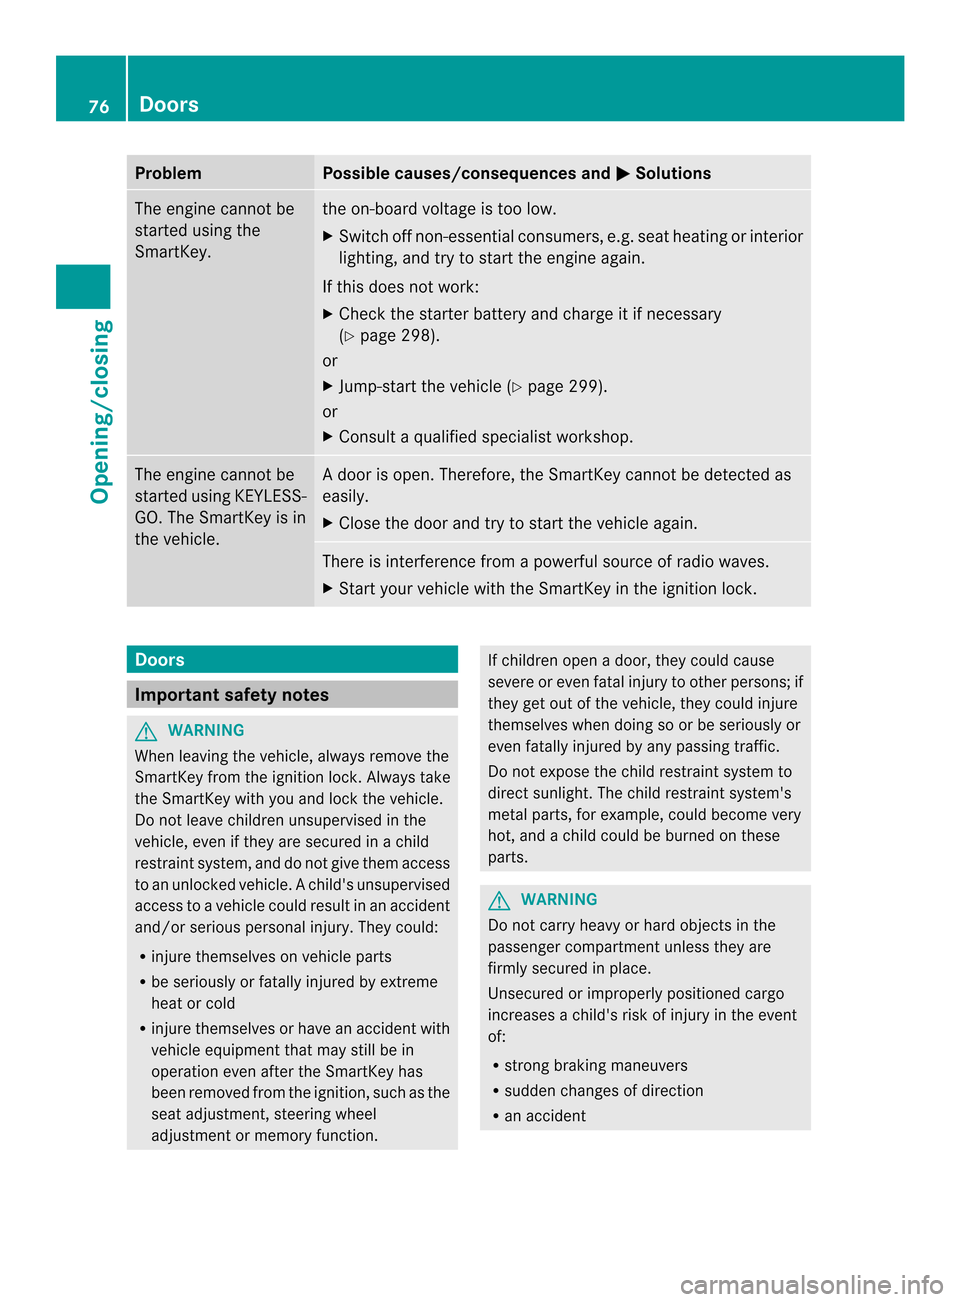
Problem Possible causes/consequences and
0001 Solutions
The engine cannot be
started using the
SmartKey. the on-board voltage is too low.
X
Switch off non-essential consumers, e.g. seat heating or interior
lighting, and try to start the engine again.
If this does not work:
X Check the starter battery and charge it if necessary
(Y page 298).
or
X Jump-start the vehicle (Y page 299).
or
X Consult a qualified specialist workshop. The engine cannot be
started using KEYLESS-
GO. The SmartKey is in
the vehicle. Ad
oor is open. Therefore, the SmartKey cannot be detected as
easily.
X Close the door and try to start the vehicle again. There is interference from a powerful source of radio waves.
X
Start your vehicle with the SmartKey in the ignition lock. Doors
Important safety notes
G
WARNING
When leaving the vehicle, always remove the
SmartKey from the ignition lock. Always take
the SmartKey with you and lock the vehicle.
Do not leave children unsupervised in the
vehicle, even if they are secured in a child
restraint system, and do not give them access
to an unlocked vehicle. Achild's unsupervised
access to a vehicle could result in an accident
and/or serious personal injury. They could:
R injure themselves on vehicle parts
R be seriously or fatally injured by extreme
heat or cold
R injure themselves or have an accident with
vehicle equipment that may still be in
operation even after the SmartKey has
been removed from the ignition, such as the
seat adjustment, steering wheel
adjustment or memory function. If children open a door, they could cause
severe or even fatal injury to other persons; if
they get out of the vehicle, they could injure
themselves when doing so or be seriously or
even fatally injured by any passing traffic.
Do not expose the child restraint system to
direct sunlight. The child restraint system's
metal parts, for example, could become very
hot, and a child could be burned on these
parts. G
WARNING
Do not carry heavy or hard objects in the
passenger compartmentu nless they are
firmly secured in place.
Unsecured or improperly positioned cargo
increases a child's risk of injury in the event
of:
R strong braking maneuvers
R sudden changes of direction
R an accident 76
DoorsOpening/closing
Page 84 of 358
The trunk lid emergency release does not
unlock the trunk lid if the battery is
disconnected or discharged.
Trunk lid emergency release light:
R
emergency release button 0003flashes for
30 minutes after the trunk lid is opened
R emergency release button 0003flashes for
60 minutes after the trunk lid is closed Side windows
Important safety notes
G
WARNING
When opening or closing the door windows,
make sure that there is no danger of anyone
being harmed by the opening/closing
procedure.
The frontd oor windows are equipped with
automatic operation and the anti-entrapment
feature. If in automatic mode a front door
window encounters an obstruction that
blocks its path, the anti-entrapment feature
will stop the door window and open it slightly.
The door windows operate differently when
the switch is pulled. See the "Problems with
door windows" section for more details.
The closing of the door windows can be
immediately halted by releasing the switch or,
if the switch was pulled past the resistance
point and released, by pressing or pulling the
respective switch.
If a door window encounters an obstruction
that blocks its path in a circumstance where
you are closing the windows by pressing and
holding 000Fbutton on the SmartKey or by
pressing and holding the lock button (vehicles
with KEYLESS-GO) on an outside door handle,
the anti-entrapment feature will not operate. Opening and closing the side
windows in the front
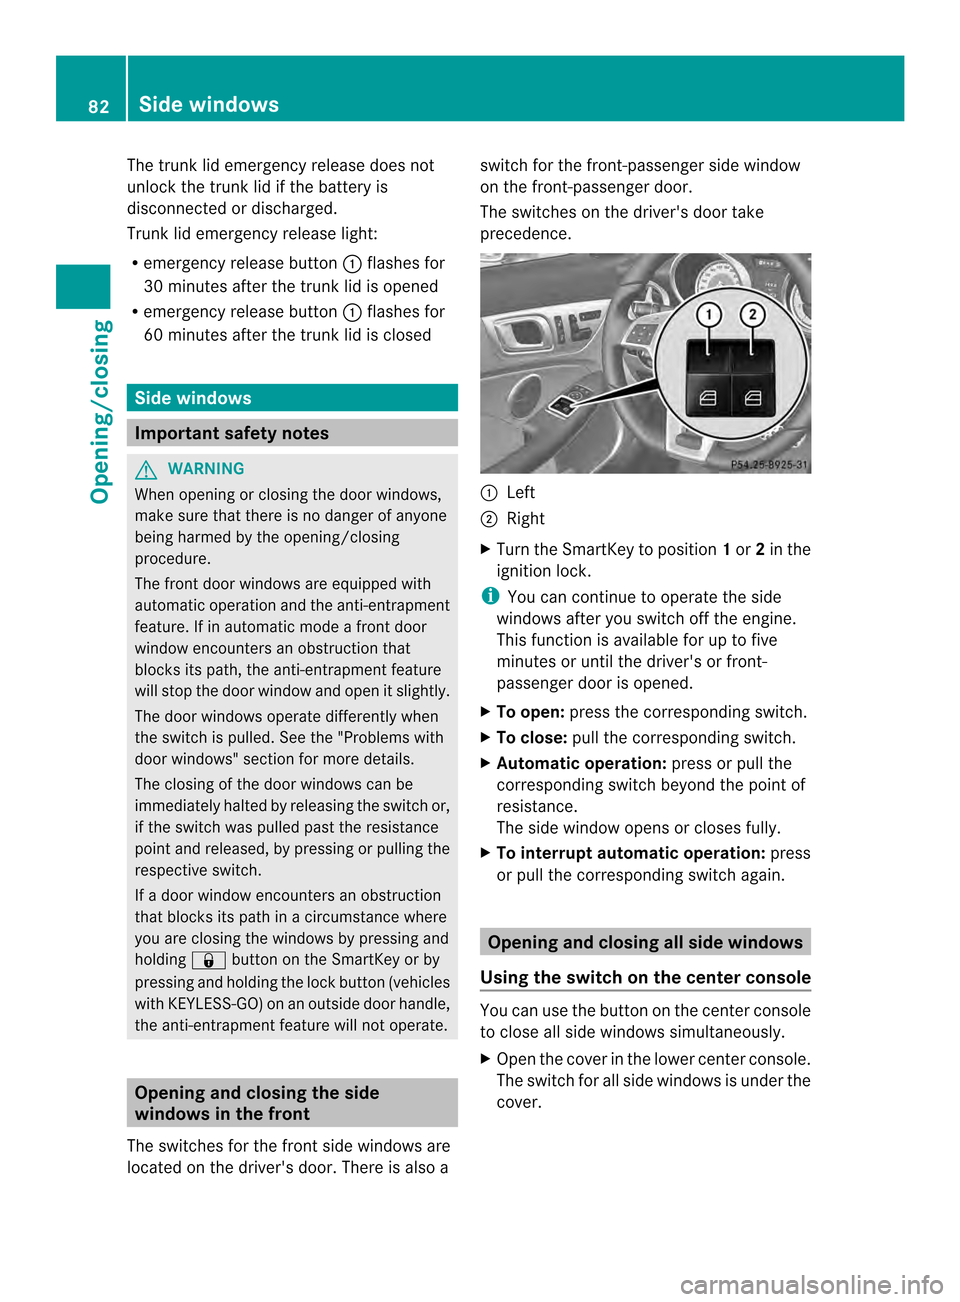
The switches for the front side windows are
located on the driver's door. There is also a switch for the front-passenger side window
on the front-passenger door.
The switches on the driver's door take
precedence.
0003
Left
0004 Right
X Turn the SmartKey to position 1or 2in the
ignition lock.
i You can continue to operate the side
windows after you switch off the engine.
This function is available for up to five
minutes or until the driver's or front-
passenger door is opened.
X To open: press the corresponding switch.
X To close: pull the corresponding switch.
X Automatic operation: press or pull the
corresponding switch beyond the point of
resistance.
The side window opens or closes fully.
X To interrupt automatic operation: press
or pull the corresponding switch again. Opening and closing all side windows
Using the switch on the center console You can use the button on the center console
to close all side windows simultaneously.
X
Open the cover in the lower center console.
The switch for all side windows is under the
cover. 82
Side windowsOpening/closing
Page 110 of 358

Front fog lamps
In conditions where visibility is poor due to
fog, snow or rain, the fog lamps improve
visibility as well as making it easie
rfor other
road users to see you. They can be operated
together with the parking lamps or together
with the parking lamps and low-beam
headlamps.
X To switch on the front fog lamps: turn
the SmartKey in the ignition lock to position
2 or start the engine.
X Turn the light switch to 000Aor0005.
X Press the 000Bbutton.
The green 000Bindicator lamp in the
instrument cluster lights up.
X To switch off the front fog lamps: press
the 000B button.
The green 000Bindicator lamp in the
instrument cluster goes out.
Only vehicles with front fog lamps have the
fog lamps function.
Rear fog lamp
The rear fog lamp improves visibility of your
vehicle for the traffic behind in the event of
heavy fog. Please take note of the country-
specific regulations for the use of rear fog
lamps.
X To switch on the rear fog lamp: turn the
SmartKey in the ignition lock to position 2
or start the engine.
X Turn the light switch to 000Aor0005.
X Press the 000Dbutton.
The yellow 000Dindicator lamp in the
instrument cluster lights up.
X To switch off the rear fog lamp: press the
000D button.
The yellow 000Dindicator lamp in the
instrument cluster goes out.
Parking lamps
! If the battery has been excessively
discharged, the parking lamps or standing
lamps are automatically switched off to
enable the next engine start.A lways parkyour vehicle safely and sufficiently lit
according to legal standards. Avoid the
continuous use of the
0013parking lamps
for several hours. If possible, switch on the
0010 right or the 000Eleft standing lamp.
X To switch on: turn light switch to 0013.
Standing lamps
Switching on the standin glamps ensures the
corresponding side of the vehicle is
illuminated.
X To switch on the standing lamps: the
SmartKey is not in the ignition lock or it is
in position 0.
X Turn the light switch to 000E(left-hand side
of the vehicle) or 0010(right-hand side of
the vehicle). Combination switch
Turn signals 0003
High-beam headlamps
0004 Turn signal, right
0024 High-beam flasher
0023 Turn signal, left
X To indicate briefly: press the combination
switch briefly to the pressure poin tinthe
direction of arrow 0004or0023.
The corresponding turn signal flashes three
times.
X To indicate: press the combination switch
beyond the pressure point in the direction
of arrow 0004or0023. 108
Exterior lightingLights and windshield wipers
Page 114 of 358
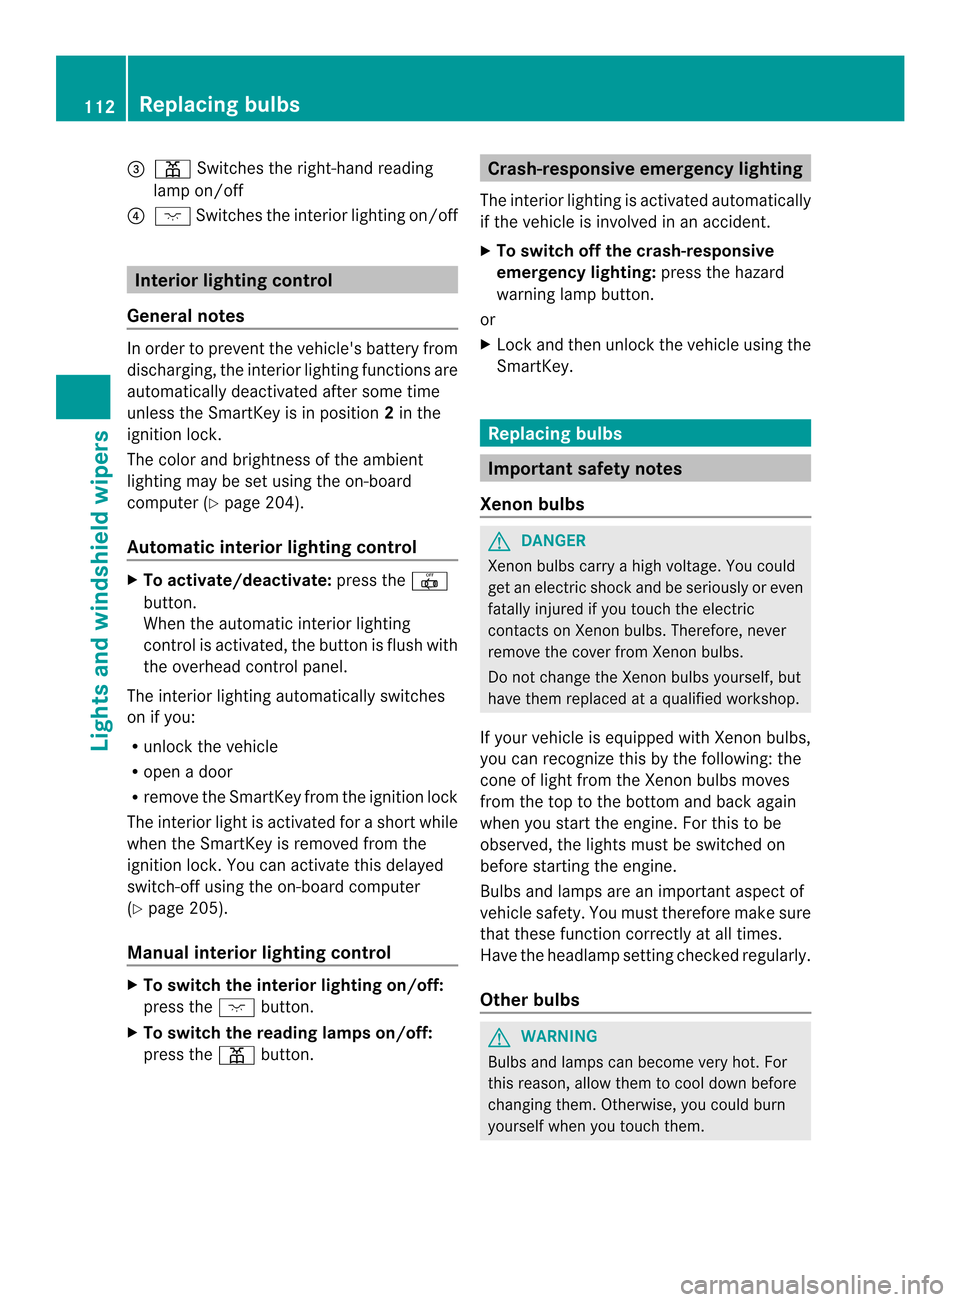
0024
0012 Switches the right-hand reading
lamp on/off
0023 0003 Switches the interio rlighting on/off Interior lighting control
General notes In order to prevent the vehicle's battery from
discharging, the interior lighting functions are
automatically deactivated after some time
unless the SmartKey is in position 2in the
ignition lock.
The color and brightness of the ambient
lighting may be set using the on-board
computer (Y page 204).
Automatic interior lighting control X
To activate/deactivate: press the0019
button.
When the automatic interior lighting
control is activated, the button is flush with
the overhead control panel.
The interior lighting automatically switches
on if you:
R unloc kthe vehicle
R open a door
R remove the SmartKey from the ignition lock
The interior light is activated for a short while
when the SmartKey is removed from the
ignition lock. You can activate this delayed
switch-off using the on-board computer
(Y page 205).
Manual interior lighting control X
To switch the interior lighting on/off:
press the 0003button.
X To switch the reading lamps on/off:
press the 0012button. Crash-responsive emergency lighting
The interior lighting is activated automatically
if the vehicle is involved in an accident.
X To switch off the crash-responsive
emergency lighting: press the hazard
warning lamp button.
or
X Lock and then unlock the vehicle using the
SmartKey. Replacing bulbs
Important safety notes
Xenon bulbs G
DANGER
Xenon bulbs carry a high voltage. You could
get an electric shock and be seriously or even
fatally injured if you touch the electric
contacts on Xenon bulbs. Therefore, never
remove the cover from Xenon bulbs.
Do not change the Xenon bulbs yourself, but
have them replaced at a qualified workshop.
If your vehicle is equipped with Xenon bulbs,
you can recognize this by the following: the
cone of light from the Xenon bulbs moves
from the top to the bottom and back again
when you start the engine. For this to be
observed, the lights must be switched on
before starting the engine.
Bulbs and lamps are an important aspect of
vehicle safety. You must therefore make sure
that these function correctly at all times.
Have the headlamp setting checked regularly.
Other bulbs G
WARNING
Bulbs and lamps can become very hot. For
this reason, allow them to cool down before
changing them. Otherwise, you could burn
yourself when you touch them. 112
Replacing bulbsLights and windshield wipers