ignition MERCEDES-BENZ SLK-Class 2014 R172 Owner's Manual
[x] Cancel search | Manufacturer: MERCEDES-BENZ, Model Year: 2014, Model line: SLK-Class, Model: MERCEDES-BENZ SLK-Class 2014 R172Pages: 354, PDF Size: 4.02 MB
Page 304 of 354
Towing the vehicle with the rear axle
raised
! The ignition must be switched off if you
are towing the vehicle with the rear axle
raised. Intervention by ESP ®
could
otherwise damage the brake system.
X Switch on the hazard warning lamps
(Y page 111).
X Turn the SmartKey to position 0in the
ignition lock and remove the SmartKey
from the ignition lock.
X When leaving the vehicle, take the
SmartKey or the KEYLESS-GO key with you.
When towing your vehicle with the rear axle
raised, it is important that you observe the
safety instructions ( Ypage 300). Towing a vehicle with both axles on
the ground G
WARNING
You can no longer steer the vehicle if the
steering wheel lock has been engaged. There
is a risk of an accident.
Always switch off the ignition when towing the
vehicle with a tow cable or a tow bar.
X Switch on the hazard warning lamps
(Y page 111).
i When towing with the hazard warning
lamps switched on, use the combination
switch as usual to signal a change of
direction. In this case, only the indicator
lamps for the direction of travel flash. When
you reset the combination switch, the
hazard warning flashers start flashing
again.
X Turn the SmartKey to position 2in the
ignition lock.
X When the vehicle is stationary, depress the
brake pedal and keep it depressed. X
Vehicles with manual transmission:
depress the clutch pedal fully and shift to
neutral.
or
X Vehicles with automatic transmission:
shift the automatic transmission to
position N.
X Release the brake pedal.
X Release the electric parking brake.
It is important that you observe the safety
instructions when towing away your vehicle
(Y page 300). Transporting the vehicle
! You may only secure the vehicle by the
wheels, not by parts of the vehicle such as
axle or steering components. Otherwise,
the vehicle could be damaged.
The towing eye can be used to pull the vehicle
onto a trailer or transporter for transporting
purposes.
X Vehicles with manual transmission:
depress the clutch pedal fully and shift to
neutral.
X Vehicles with automatic transmission:
turn the SmartKey to position 2in the
ignition lock.
X Move the selector lever to N.
As soon as the vehicle has been loaded:
X Prevent the vehicle from rolling away by
applying the electric parking brake.
X Vehicles with manual transmission:
fully depress the clutch pedal and engage
first or reverse gear.
X Vehicles with automatic transmission:
move the selector lever to P.
X Turn the SmartKey to position 0in the
ignition lock and remove the SmartKey
from the ignition lock.
X Secure the vehicle. 302
Towing and tow-startingBreakdown assistance
Page 305 of 354
Tow-starting (emergency engine
starting)
! Vehicles with automatic transmission
must not be tow-started. You could
otherwise damage the automatic
transmission.
You can find information on "Jump-starting"
at (Y page 298).
Before tow-starting:
R the battery must be connected
R the engine must be cold
R the exhaust system must have cooled
down.
When tow-starting, it is important that you
observe the safety instructions (Y page 300).
X Switch on the hazard warning lamps
(Y page 111).
X Install the towing eye (Y page 301).
X Secure the rigid towing bar or the towing
rope.
X Depress and hold the brake pedal.
X Turn the SmartKey to position 2in the
ignition lock.
X Depress the clutch pedal fully, engage
second gear and keep the clutch pedal
depressed.
X Release the brake pedal.
X Tow-start the vehicle.
X Release the clutch pedal slowly; do not
depress the accelerator pedal while doing
so.
X As soon as the engine starts, depress the
clutch pedal immediately and shift to
neutral.
X Stop at a suitable place, in accordance with
the traffic conditions.
X Depress the parking brake.
X Remove the rigid towing bar or towing rope.
X Remove the towing eye (Y page 301).
X Switch off the hazard warning lamps. Fuses
Important safety notes
G
WARNING
If you manipulate or bridge a faulty fuse or if
you replace it with a fuse with a higher
amperage, the electric cables could be
overloaded. This could result in a fire. There
is a risk of an accident and injury.
Always replace faulty fuses with the specified
new fuses having the correct amperage.
! Only use fuses that have been approved
for Mercedes-Benz vehicles and which
have the correct fuse rating for the system
concerned. Otherwise, components or
systems could be damaged.
The fuses in your vehicle serve to close down
faulty circuits. If a fuse blows, all the
components on the circuit and their functions
stop operating.
Blown fuses must be replaced with fuses of
the same rating, which you can recognize by
the color and value. The fuse ratings are listed
in the fuse allocation chart.
If a newly inserted fuse also blows, have the
cause traced and rectified at a qualified
specialist workshop, e.g. an authorized
Mercedes-Benz Center. Before changing a fuse
X Secure the vehicle against rolling away
(Y page 159).
X Switch off all electrical consumers.
X Turn the SmartKey to position 0in the
ignition lock and remove it ( Ypage 139).
or
X On vehicles with KEYLESS-GO, make sure
the ignition is switched off (Y page 139).
All indicator lamps in the instrument cluster
must be off. Fuses
303Breakdown assistance Z
Page 306 of 354

The fuses are located in various fuse boxes:
R Fuse box in the engine compartment on the
left-hand side of the vehicle, when viewed
in the direction of travel
R Fuse box in the trunk
The fuse allocation chart is located in the
vehicle tool kit in the stowage compartment
under the trunk floor (Y page 289).Fuse box in the engine compartment
G
WARNING
When the hood is open and the windshield
wipers are set in motion, you can be injured
by the wiper linkage. There is a risk of injury.
Always switch off the windshield wipers and
the ignition before opening the hood.
! Make sure that no moisture can enter the
fuse box when the cover is open.
! When closing the cover, make sure that it
is lying correctly on the fuse box. Moisture
seeping in or dirt could otherwise impair
the operation of the fuses.
X Make sure that the windshield wipers are
turned off.
X Open the hood. X
Use a dry cloth to remove any moisture
from the fuse box.
X To open: open clamp 0043.
X Remove fuse box cover 0044forwards. X
To close: check whether the seal is seated
correctly in cover 0044.
X Insert cover 0044at the rear of the fuse box
into the retainer.
X Fold down cover 0044and close clamps 0043.
X Close the hood. Fuse box in the trunk
! Make sure that no moisture can enter the
fuse box when the cover is open.
The fuse box is located in the trunk behind the
partition covering.
X Open the trunk lid. X
To open: release cover 0043on the right and
left-hand sides with a flat object.
X Open cover 0043downwards in the direction
of the arrow. 304
FusesBreakdown assistance
Page 316 of 354
R
you adopt a very sporty driving style
(cornering at high speeds or driving with
high rates of acceleration).
R you drive with a heavy load.
Restarting the tire pressure loss
warning system Restart the tire pressure loss warning system
if you have:
R changed the tire pressure
R changed the wheels or tires
R mounted new wheels or tires
X Before restarting, make sure that the tire
pressures are set properly on all four tires
for the respective operating conditions.
The recommended tire pressures can be
found on the Tire and Loading Information
placard on the B-pillar on the driver's side
or the tire pressure table on the fuel filler
flap.
The tire pressure loss warning system can
only give reliable warnings if you have set
the correct tire pressure. If an incorrect tire
pressure is set, these incorrect values will
be monitored.
X Also observe the notes in the section on tire
pressures ( Ypage 310).
X Make sure that the SmartKey is in position
2 in the ignition lock (Y page 139).
X Press the 0059or0065 button on the
steering wheel to select the Service Service
menu.
X Press the 0063or0064 button to select
Tire Pressure
Tire Pressure .
X Press the 0076button.
The Run Flat Indicator Active
Run Flat Indicator Active
Press 'OK' to Restart
Press 'OK' to Restart message
appears in the multifunction display. If you wish to confirm the restart:
X
Press the 0076button.
The Tire Pressure Now OK? Tire Pressure Now OK? message
appears in the multifunction display.
X Press the 0063or0064 button to select
Yes
Yes .
X Press the 0076button.
The Run Flat Indicator Restarted
Run Flat Indicator Restarted
message appears in the multifunction
display.
After a teach-in period, the tire pressure
loss warning system will monitor the set
tire pressures of all four tires.
If you wish to cancel the restart:
X Press the 0038button.
or
X If the Tire Pressure Now OK? Tire Pressure Now OK? message
appears, use the 0063or0064 button to
select Cancel
Cancel .
X Press the 0076button.
The tire pressure values stored at the last
restart will continue to be monitored. Tire pressure monitor
General notes If a tire pressure monitor is installed, the
vehicle's wheels have sensors that monitor
the tire pressures in all four tires. The tire
pressure monitor warns you if the pressure
drops in one or more of the tires. The tire
pressure monitor only functions if the correct
sensors are installed on all wheels.
Information on tire pressures is displayed in
the multifunction display. After a few minutes
of driving, the current tire pressure of each
tire is shown in the Service Servicemenu of the
multifunction display. 314
Ti
re pressureWhe els and tires
Page 318 of 354
event of a sudden loss of pressure, bring the
vehicle to a halt by braking carefully. Avoid
abrupt steering maneuvers.
The tire pressure monitor has a yellow
warning lamp in the instrument cluster for
indicating a pressure loss or malfunction.
Whether the warning lamp flashes or lights up
indicates whether a tire pressure is too low or
the tire pressure monitor is malfunctioning:
R if the warning lamp is lit continuously, the
tire pressure on one or more tires is
significantly too low. The tire pressure
monitor is not malfunctioning.
R if the warning lamp flashes for around a
minute and then remains lit constantly, the
tire pressure monitor is malfunctioning.
i In addition to the warning lamp, a
message appears in the multifunction
display.
Further information can be found on
(Y page 233).
If the tire pressure monitor is malfunctioning,
it may take more than ten minutes for the tire
pressure warning lamp to inform you of the
malfunction by flashing for approximately one
minute and then remaining lit. When the
malfunction has been rectified, the tire
pressure warning lamp goes out after a few
minutes of driving.
The tire pressure values indicated by the on-
board computer may differ from those
measured at a gas station with a pressure
gauge. The tire pressures shown by the on-
board computer refer to those measured at
sea level. At high altitudes, the tire pressure
values indicated by a pressure gauge are
higher than those shown by the on-board
computer. In this case, do not reduce the tire
pressures.
The operation of the tire pressure monitor can
be affected by interference from radio
transmitting equipment (e.g. radio
headphones, two-way radios) that may be
being operated in or near the vehicle. Checking the tire pressure
electronically X
Make sure that the SmartKey is in position
2in the ignition lock (Y page 139).
X Press the 0059or0065 button on the
steering wheel to select the Service Service
menu.
X Press the 0063or0064 button to select
Tire Pressure
Tire Pressure.
X Press the 0076button.
The current tire pressure of each tire is
shown in the multifunction display.
If the vehicle has been parked for over
20 minutes, the Tire pressure will be Tire pressure will be
displayed after driving a few
displayed after driving a few
minutes minutes message appears.
After a teach-in process, the tire pressure
monitor automatically detects new wheels or
new sensors. As long as a clear allocation of
the tire pressure value to the individual
wheels is not possible, the Tire Pressure Tire Pressure
Monitor Active
Monitor Active display message is shown
instead of the tire pressure display. The tire
pressures are already being monitored.
i If an emergency spare wheel is mounted,
the system may continue to show the tire
pressure of the wheel that has been
removed for a few minutes. If this occurs,
note that the value displayed for the
position where the spare wheel is mounted
is not the same as the current tire pressure
of the emergency spare wheel.
Tire pressure monitor warning
messages If the tire pressure monitor detects a pressure
loss in one or more tires, a warning message
is shown in the multifunction display and the
yellow tire pressure monitor warning lamp
comes on.
R If the Please Correct Tire Pressure Please Correct Tire Pressure
message appears in the multifunction
display, the tire pressure in at least one tire 316
Tire pressureWheels and tires
Page 319 of 354
is too low and must be corrected at the next
opportunity.
R If the Check Check Tires
Tiresmessage appears in the
multifunction display, the tire pressure in
one or more tires has dropped significantly
and the tires must be checked.
R If the Warning Tire Malfunction
Warning Tire Malfunction
appears in the multifunction display, the
tire pressure in one or more tires has
dropped suddenly and the tires must be
checked.
Observe the instructions and safety notes in
the display messages in the "Tires" section
(Y page 233).
i If the wheel positions on the vehicle are
rotated, the tire pressures may be
displayed for the wrong positions for a
short time. This is rectified after a few
minutes of driving, and the tire pressures
are displayed for the correct positions.
Restarting the tire pressure monitor When you restart the tire pressure monitor,
all existing warning messages are deleted and
the warning lamps go out. The monitor uses
the currently set tire pressures as the
reference values for monitoring. In most
cases, the tire pressure monitor will
automatically detect the new reference
values after you have changed the tire
pressure. However, you can also define
reference values manually as described here.
The tire pressure monitor then monitors the
new tire pressure values.
X Set the tire pressure to the value
recommended for the corresponding
driving situation on the Tire and Loading
Information placard on the driver's side
B-pillar (Y page 310).
Additional tire pressure values for different
loads can also be found on the tire pressure
table on the inside of the fuel filler flap
(Y page 310).
X Make sure that the tire pressure is correct
on all four wheels. X
Make sure that the SmartKey is in position
2in the ignition lock.
X Press the 0059or0065 button on the
steering wheel to select the Service
Service
menu.
X Press the 0063or0064 button to select
Tire Pressure Tire Pressure .
X Press the 0076button.
The multifunction display shows the
current tire pressure for the individual tires
or the Tire pressure will be Tire pressure will be
displayed after driving a few
displayed after driving a few
minutes minutes message.
X Press the 0064button.
The Use Current Pressures as New
Use Current Pressures as New
Reference Values
Reference Values message appears in
the multifunction display.
If you wish to confirm the restart:
X Press the 0076button.
The Tire Pressure Monitor Tire Pressure Monitor
Restarted
Restarted message appears in the
multifunction display.
After driving for a few minutes, the system
checks whether the current tire pressures
are within the specified range. The new tire
pressures are then accepted as reference
values and monitored.
If you wish to cancel the restart:
X Press the 0038button.
The tire pressure values stored at the last
restart will continue to be monitored. Loading the vehicle
Instruction labels for tires and loads
G
WARNING
Overloaded tires can overheat, causing a
blowout. Overloaded tires can also impair the
steering and driving characteristics and lead
to brake failure. There is a risk of accident.
Observe the load rating of the tires. The load
rating must be at least half of the GAWR of Loading the vehicle
317Wheels and tires
Z
Page 331 of 354

Direction of rotation
Tires with a specified direction of rotation
have additional benefits, e.g. if there is a risk
of hydroplaning. You will only gain these
benefits if the correct direction of rotation is
maintained.
An arrow on the sidewall of the tire indicates
its correct direction of rotation. Storing wheels
Store wheels that are not being used in a cool,
dry and preferably dark place. Protect the
tires from oil, grease, gasoline and diesel. Cleaning the wheels
G
WARNING
The water jet from a circular jet nozzle (dirt
blasters) can cause invisible exterior damage
to the tires or chassis components.
Components damaged in this way may fail
unexpectedly. There is a risk of an accident.
Do not use power washers with circular jet
nozzles to clean the vehicle. Have damaged
tires or chassis components replaced
immediately. Mounting a wheel
Preparing the vehicle X
Stop the vehicle on solid, non-slippery and
level ground.
X Apply the electric parking brake manually.
X Bring the front wheels into the straight-
ahead position.
X Vehicles with manual transmission:
fully depress the clutch pedal and engage
first or reverse gear.
X Vehicles with automatic transmission:
move the selector lever to P.
X Switch off the engine. X
Vehicles without KEYLESS-GO: remove
the SmartKey from the ignition lock.
X Vehicles with KEYLESS-GO: open the
driver's door.
The on-board electronics now have status
0. This is the same as the SmartKey having
been removed.
X Vehicles with KEYLESS-GO: remove the
Start/Stop button from the ignition lock
(Y page 139).
X If included in the vehicle equipment,
remove the tire-change tool kit from the
vehicle.
X Secure the vehicle to prevent it from rolling
away.
i Due to differences in vehicle equipment,
not all vehicles are equipped with a tire-
change tool kit. For information on which
tools are required to perform a wheel
change on your vehicle, consult an
authorized Mercedes-Benz Center.
Necessary wheel-changing tools can
include, for example:
R Jack
R Wheel chock
R Lug wrench
Securing the vehicle to prevent it from
rolling away If your vehicle is equipped with a wheel chock,
it can be found in the tire-change tool kit
(Y
page 289).
The folding wheel chock is an additional
securing measure to prevent the vehicle from Changing a wheel
329Wheels andtires Z
Page 341 of 354

The collapsible spare wheel must be
mounted before it is inflated.
X Pull plug 0085out of the housing.
X Take the air hose out of the housing.
X Insert the yellow hose connector of the air
hose into the guide in the housing and push
it into the fixture until the hose connector
engages.
X Remove the cap from the valve on the
collapsible spare wheel.
X Screw union nut 0043on the air hose onto the
valve.
X Make sure the tire inflation compressor's
on/off switch 0083is set to OFF.
X Insert plug 0085into the socket of the
cigarette lighter or into a 12 V power socket
in your vehicle.
Observe the notes on the cigarette lighter
(Y page 258). Observe the notes on
sockets (Y page 258).
X Turn the SmartKey to position 1in the
ignition lock (Y page 139).
X Press on/off switch 0083on the tire inflation
compressor to ON.
The tire inflation compressor is switched
on. The tire is inflated. The tire pressure is
shown on pressure gauge 0087.
X Inflate the tire to the specified tire
pressure.
The specified tire pressure is printed on the
yellow label of the emergency spare wheel.
X When the specified tire pressure has been
reached, press on/off switch 0083toOFF, on
the tire inflation compressor.
The tire inflation compressor is switched
off.
X Turn the SmartKey to position 0in the
ignition lock.
X If the tire pressure is higher than the
specified pressure, press pressure release
button 0044until the correct tire pressure has
been reached. X
Unscrew union nut 0043on the air hose from
the valve.
X Screw the cap onto the valve of the
collapsible spare wheel again. Removing an air hose
X
To remove the hose from the tire inflation
compressor, push down the rocker switch
on the hose connector and pull out the
hose.
X Stow plug 0085and the air hose in the lower
section of the blower housing.
X Stow the tire inflation compressor in the
vehicle. Emergency spare wheel
339Wheels and tires Z
Page 347 of 354
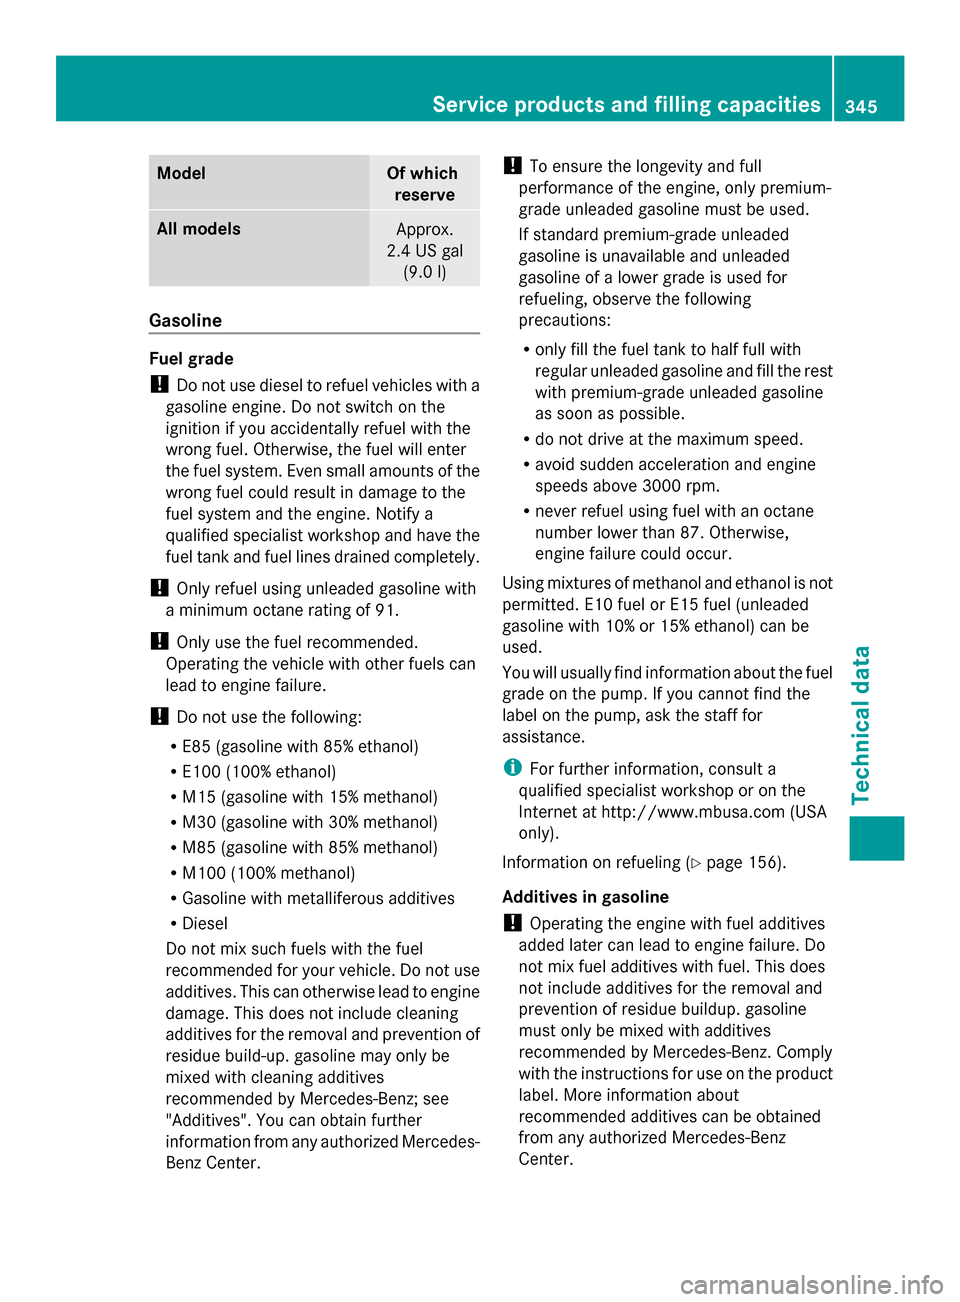
Model Of which
reserve All models
Approx.
2.4 US gal (9.0 l) Gasoline
Fuel grade
!
Do not use diesel to refuel vehicles with a
gasoline engine. Do not switch on the
ignition if you accidentally refuel with the
wrong fuel. Otherwise, the fuel will enter
the fuel system. Even small amounts of the
wrong fuel could result in damage to the
fuel system and the engine. Notify a
qualified specialist workshop and have the
fuel tank and fuel lines drained completely.
! Only refuel using unleaded gasoline with
a minimum octane rating of 91.
! Only use the fuel recommended.
Operating the vehicle with other fuels can
lead to engine failure.
! Do not use the following:
R E85 (gasoline with 85% ethanol)
R E100 (100% ethanol)
R M15 (gasoline with 15% methanol)
R M30 (gasoline with 30% methanol)
R M85 (gasoline with 85% methanol)
R M100 (100% methanol)
R Gasoline with metalliferous additives
R Diesel
Do not mix such fuels with the fuel
recommended for your vehicle. Do not use
additives. This can otherwise lead to engine
damage. This does not include cleaning
additives for the removal and prevention of
residue build-up. gasoline may only be
mixed with cleaning additives
recommended by Mercedes-Benz; see
"Additives". You can obtain further
information from any authorized Mercedes-
Benz Center. !
To ensure the longevity and full
performance of the engine, only premium-
grade unleaded gasoline must be used.
If standard premium-grade unleaded
gasoline is unavailable and unleaded
gasoline of a lower grade is used for
refueling, observe the following
precautions:
R only fill the fuel tank to half full with
regular unleaded gasoline and fill the rest
with premium-grade unleaded gasoline
as soon as possible.
R do not drive at the maximum speed.
R avoid sudden acceleration and engine
speeds above 3000 rpm.
R never refuel using fuel with an octane
number lower than 87. Otherwise,
engine failure could occur.
Using mixtures of methanol and ethanol is not
permitted. E10 fuel or E15 fuel (unleaded
gasoline with 10% or 15% ethanol) can be
used.
You will usually find information about the fuel
grade on the pump. If you cannot find the
label on the pump, ask the staff for
assistance.
i For further information, consult a
qualified specialist workshop or on the
Internet at http://www.mbusa.com (USA
only).
Information on refueling (Y page 156).
Additives in gasoline
! Operating the engine with fuel additives
added later can lead to engine failure. Do
not mix fuel additives with fuel. This does
not include additives for the removal and
prevention of residue buildup. gasoline
must only be mixed with additives
recommended by Mercedes-Benz. Comply
with the instructions for use on the product
label. More information about
recommended additives can be obtained
from any authorized Mercedes-Benz
Center. Service products and filling capacities
345Technical data Z