clutch MERCEDES-BENZ SLK-Class 2015 R172 Owner's Manual
[x] Cancel search | Manufacturer: MERCEDES-BENZ, Model Year: 2015, Model line: SLK-Class, Model: MERCEDES-BENZ SLK-Class 2015 R172Pages: 358, PDF Size: 6.18 MB
Page 144 of 358
i
AMG vehicles:
the exhaust flap of the
exhaust system will be checked after every cold start. A resulting noise can be heard
during this process.
i During a cold start, the engine runs at
higher speeds to enable the catalytic con-
verter to reach its operating temperature.
The sound of the engine may change during this time.
Manual transmission X
Depress the brake pedal and keep it
depressed.
X Fully depress the clutch pedal.
X Shift to neutral N.
i You can only start the engine when the
clutch pedal is fully depressed.
Automatic transmission X
Shift the transmission to position P.
The transmission position display in the
multifunction display shows P.
i You can also start the engine when the
transmission is in position N.
Starting procedure with the SmartKey X
Turn the SmartKey to position 3in the igni-
tion lock (Y page 139) and release it as
soon as the engine is running.
i To start the engine using the SmartKey
instead of KEYLESS-GO, pull the Start/
Stop button out of the ignition lock.
Using KEYLESS-GO to start the engine i
The Start/Stop button can be used to
start the vehicle manually without inserting
the SmartKey into the ignition lock. The
Start/Stop button must be inserted in the
ignition lock and the SmartKey must be in
the vehicle. This mode for starting the
engine operates independently of the ECO
start/stop automatic engine start function. X
Depress the brake pedal and keep it
depressed.
X Press the Start/Stop button (Y page 140)
once.
The engine starts. Pulling away
Manual transmission !
Change gear in good time and avoid spin-
ning the wheels. You could otherwise dam-
age the vehicle.
X Depress the brake pedal and keep it
depressed.
X Depress the clutch pedal fully.
X Shift to either first gear or reverse gear R.
X Release the electric parking brake
(Y page 162).
X Release the brake pedal.
X Slowly release the clutch pedal and gently
depress the accelerator pedal.
i Follow the shift recommendations in the
multifunction display for an economical
driving style (Y page 151).
i The vehicle locks centrally once you have
pulled away. The locking knobs in the doors
drop down.
You can open the doors from the inside at
any time.
You can also deactivate the automatic lock- ing feature (Y page 207).
Automatic transmission G
WARNING
If the engine speed is above the idling speed
and you engage transmission position Dor R,
the vehicle could pull away suddenly. There is a risk of an accident.
When engaging transmission position Dor R,
always firmly depress the brake pedal and do not simultaneously accelerate. 142
DrivingDriving and pa
rking
Page 147 of 358
R
the set temperature for the vehicle interior
has been reached.
R the battery is sufficiently charged.
R the system detects that the windshield is
not fogged up when the air-conditioning
system is switched on.
R the hood is closed.
R the driver's door is closed and the driver's
seat belt is fastened.
If the conditions for automatic engine switch- off are not all fulfilled, the 00D6symbol is lit
yellow.
i All of the vehicle's systems remain active
when the engine is stopped automatically.
i The engine can be switched off automat-
ically a maximum of four times (first stop
and three subsequent stops) in succession.
The 00D6 ECO symbol is shown in yellow in
the multifunction display after the engine
has been started automatically for the
fourth time. When the 00D6ECO symbol is
shown in green in the multifunction display,
automatic engine switch-off is again possi- ble.
i The HOLD function can be activated if the
engine has been switched off automati-
cally. It is then not necessary to continue
applying the brakes during the automatic
stop phase. When you depress the accel-
erator pedal, the engine starts automati-
cally and the braking effect of the HOLD
function is deactivated.
Vehicles with manual transmission (SLK
250) The ECO start/stop function switches off the
engine automatically at low speeds.
X Brake the vehicle.
X Engage neutral N(follow gearshift instruc-
tion 0043to engage neutral N, if necessary).
X Release the clutch pedal.
The engine is switched off automatically.
Vehicles with automatic transmission
(SLK 250)
If the vehicle is braked to a standstill in Dor N,
the ECO start/stop function switches off the engine automatically.
SLK 350
If the vehicle is braked to a standstill in Dor N,
the ECO start/stop function switches off the engine automatically.
The ECO start/stop function is operational
when:
R the indicator lamp in the ECO button is lit
green.
R the outside temperature is within the range
that is suitable for the system.
R the engine is at normal operating temper-
ature.
R the set temperature for the vehicle interior
has been reached.
R the battery is sufficiently charged.
R the system detects that the windshield is
not fogged up when the air-conditioning
system is switched on.
R the hood is closed.
R the driver's door is closed and the driver's
seat belt is fastened.
i All of the vehicle's systems remain active
when the engine is stopped automatically.
i The engine can be switched off automat-
ically a maximum of four times (first stop
and three subsequent stops) in succession.
i The HOLD function can be activated if the
engine has been switched off automati-
cally. It is then not necessary to continue
applying the brakes during the automatic Driving
145Driving an d parking Z
Page 148 of 358
stop phase. When you depress the accel-
erator pedal, the engine starts automati-
cally and the braking effect of the HOLD
function is deactivated.
SLK 55 AMG
If the vehicle is braked to a standstill in Dor N,
the ECO start/stop function switches off the engine automatically.
The ECO start/stop function is operational
and the 00D6ECO symbol is displayed in
green in the multifunction display, if:
R the indicator lamp in the ECO button is lit
green.
R the outside temperature is within the range
that is suitable for the system.
R the engine is at normal operating temper-
ature.
R the set temperature for the vehicle interior
has been reached.
R the battery is sufficiently charged.
R the system detects that the windshield is
not fogged up when the air-conditioning
system is switched on.
R the hood is closed.
R the driver's door is closed and the driver's
seat belt is fastened.
If the conditions for automatic engine switch-
off are not all fulfilled, the 00D6ECO symbol is
lit yellow.
i All of the vehicle's systems remain active
when the engine is stopped automatically.
i The engine can be automatically switched
off an unlimited number of times.
i The HOLD function can be activated if the
engine has been switched off automati-
cally. It is then not necessary to continue
applying the brakes during the automatic
stop phase. When you depress the accel-
erator pedal, the engine starts automati-
cally and the braking effect of the HOLD
function is deactivated. Automatic engine start Operation (SLK 250)
The engine starts automatically if:
R you switch off the ECO start/stop function
by pressing the ECO button.
R you engage reverse gear R.
R you unfasten your seat belt or open the
driver's door.
R the vehicle starts to roll.
R the brake system requires this.
R the temperature in the vehicle interior devi-
ates from the set range.
R the system detects moisture on the wind-
shield when the air-conditioning system is
switched on.
R the battery's condition of charge is too low.
Vehicles with manual transmission (SLK
250)
! Only engage gear when the clutch pedal is
depressed.
The engine is started automatically if you: R fully depress the clutch pedal.
R depress the accelerator pedal.
Vehicles with automatic transmission
(SLK 250)
The engine is started automatically if you: R release the brake pedal in transmission
position Dor Nwhen the HOLD function is
not active.
R depress the accelerator pedal.
R move the transmission out of position P.
i Shifting the transmission to position
P
does not start the engine.
i If you shift the transmission from
Rto D,
the ECO start/stop function is available
again once the 00D6ECO symbol reap-
pears in green in the multifunction display. 146
DrivingDriving and parking
Page 152 of 358
Problem
Possible causes/consequences and
0050
0050Solutions The coolant tempera-
ture gauge shows a
value above 248 ‡
(120 †). The coolant
warning lamp may also
be on and a warning
tone may sound. The coolant level is too low. The coolant is too hot and the engine
is no longer being cooled sufficiently.
X Stop as soon as possible and allow the engine and the coolant to
cool down.
X Check the coolant level (Y page 281). Observe the warning
notes as you do so and add coolant if necessary. If the coolant level is correct, the engine radiator fan may be faulty.
The coolant is too hot and the engine is no longer being cooled
sufficiently.
X At coolant temperatures below 248 ‡ (120 †), drive to the
nearest qualified specialist workshop.
X Avoid heavy loads on the engine as you do so, e.g. driving in
mountainous terrain and start/stop traffic. Manual transmission
Gear lever
! Only engage gear when the clutch pedal is
depressed.
! When shifting between
5thand 6thgear,
you should always push the gear lever all
the way to the right. You could otherwise
shift unintentionally into 3rdor4th gear
and damage the transmission.
If you shift down at too high a speed (trans-
mission braking), this can cause the engine to overrev, leading to engine damage.
Never hold the vehicle stopped on a hill by
using the clutch pedal. There is otherwise a risk of damaging the clutch. Gear lever
005E
Reverse gear
0047 -004C
Forward gears Engaging reverse gear
! Only shift into reverse gear
Rwhen the
vehicle is stationary. Otherwise, you could
damage the transmission.
X Stop the vehicle.
X Depress the clutch pedal fully.
X Shift to neutral N.
X Move the gear lever firmly to the left
beyond the point of resistance and then
forwards. 150
Manual transmissionDriving and parking
Page 155 of 358
Double-clutch function
When shifting down, the double-clutch func-
tion is active regardless of the currently selec-
ted drive program. The double-clutch function reduces load change reactions and is condu-cive to a sporty driving style. The sound gen-
erated by the double-clutch function depends
on the drive program selected.
Kickdown Use kickdown for maximum acceleration.
X Depress the accelerator pedal beyond the
pressure point.
The automatic transmission shifts to a
lower gear depending on the engine speed.
X Ease off the accelerator pedal once the
desired speed is reached.
The automatic transmission shifts back up. Program selector button
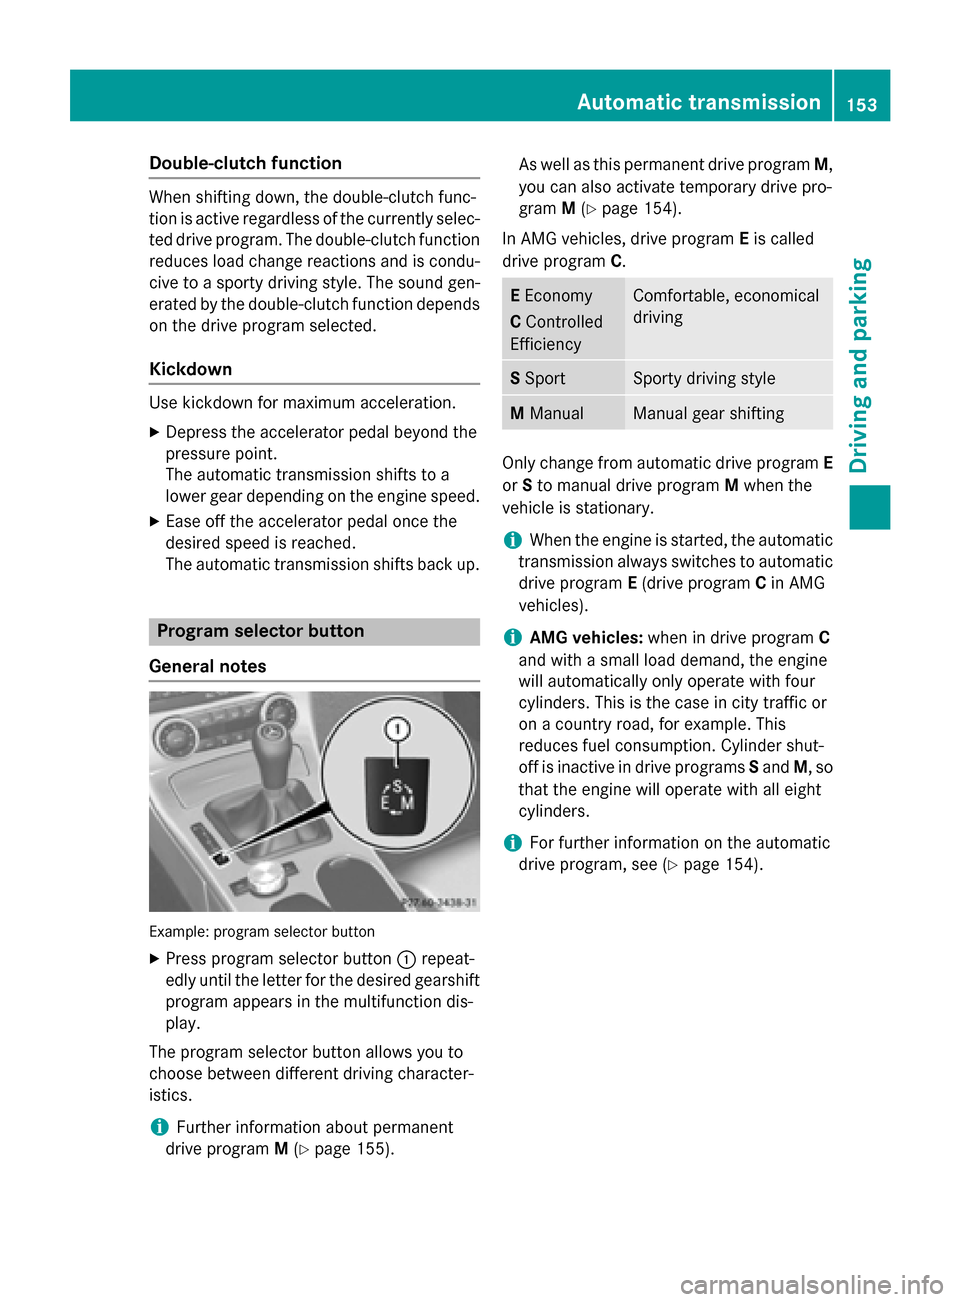
General notes Example: program selector button
X Press program selector button 0043repeat-
edly until the letter for the desired gearshift program appears in the multifunction dis-
play.
The program selector button allows you to
choose between different driving character-
istics.
i Further information about permanent
drive program M(Y page 155). As well as this permanent drive program
M,
you can also activate temporary drive pro-
gram M(Y page 154).
In AMG vehicles, drive program Eis called
drive program C. E
Economy
C Controlled
Efficiency Comfortable, economical
driving
S
Sport Sporty driving style
M
Manual Manual gear shifting
Only change from automatic drive program
E
or Sto manual drive program Mwhen the
vehicle is stationary.
i When the engine is started, the automatic
transmission always switches to automatic drive program E(drive program Cin AMG
vehicles).
i AMG vehicles:
when in drive program C
and with a small load demand, the engine
will automatically only operate with four
cylinders. This is the case in city traffic or
on a country road, for example. This
reduces fuel consumption. Cylinder shut-
off is inactive in drive programs Sand M, so
that the engine will operate with all eight
cylinders.
i For further information on the automatic
drive program, see (Y page 154). Automatic transmission
153Driving and parking Z
Page 242 of 358
Display messages
Possible causes/consequences and
0050
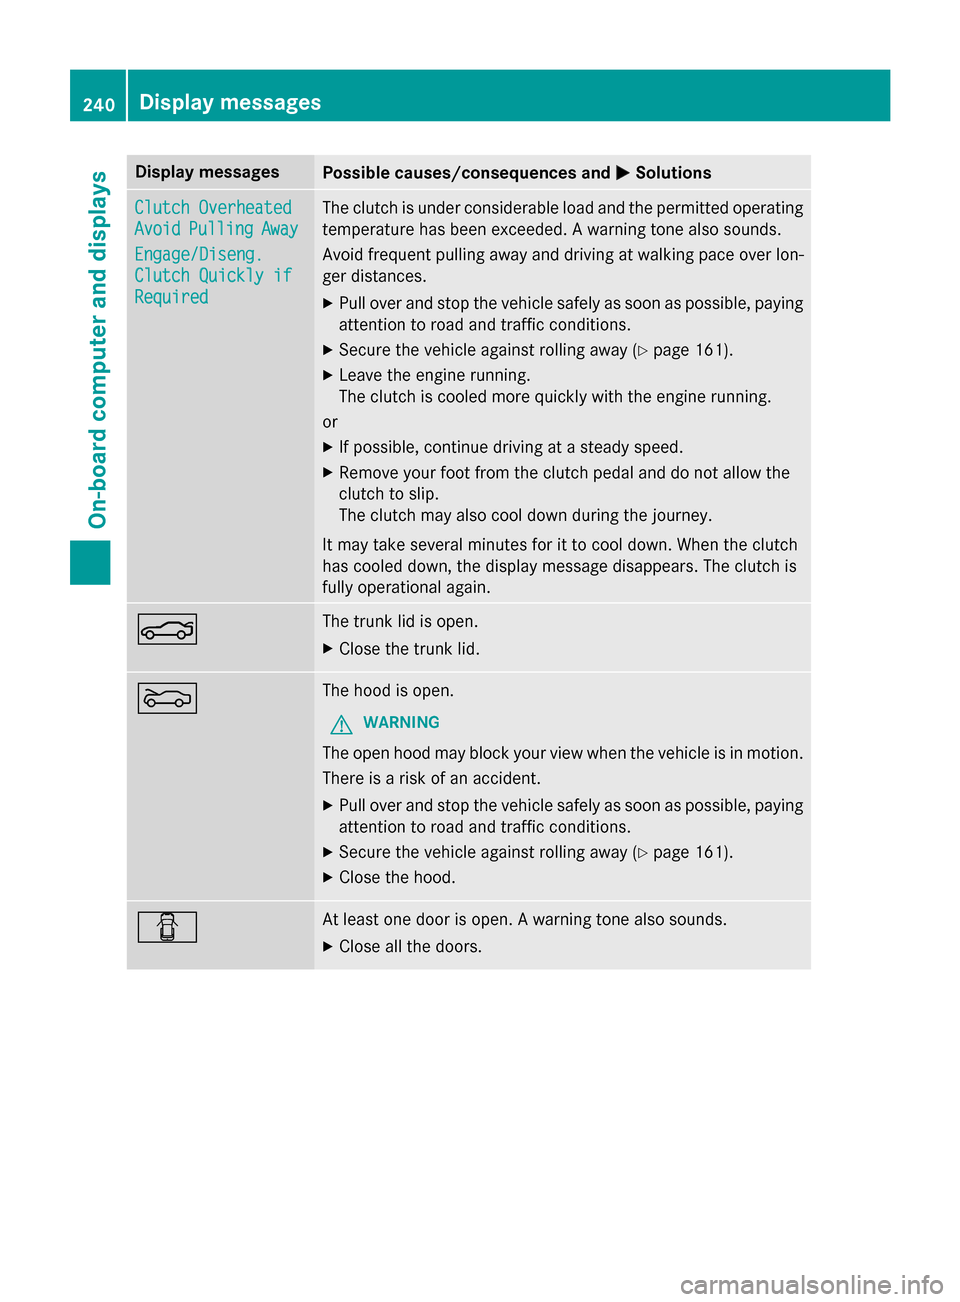
0050Solutions Clutch Overheated
Clutch Overheated
Avoid Avoid
Pulling
Pulling Away
Away
Engage/Diseng.
Engage/Diseng.
Clutch Quickly if Clutch Quickly if
Required Required The clutch is under considerable load and the permitted operating
temperature has been exceeded. A warning tone also sounds.
Avoid frequent pulling away and driving at walking pace over lon-
ger distances.
X Pull over and stop the vehicle safely as soon as possible, paying
attention to road and traffic conditions.
X Secure the vehicle against rolling away (Y page 161).
X Leave the engine running.
The clutch is cooled more quickly with the engine running.
or X If possible, continue driving at a steady speed.
X Remove your foot from the clutch pedal and do not allow the
clutch to slip.
The clutch may also cool down during the journey.
It may take several minutes for it to cool down. When the clutch
has cooled down, the display message disappears. The clutch is
fully operational again. 0084 The trunk lid is open.
X Close the trunk lid. 0083 The hood is open.
G WARNING
The open hood may block your view when the vehicle is in motion.
There is a risk of an accident.
X Pull over and stop the vehicle safely as soon as possible, paying
attention to road and traffic conditions.
X Secure the vehicle against rolling away (Y page 161).
X Close the hood. 0051 At least one door is open. A warning tone also sounds.
X Close all the doors. 240
Display
messagesOn-board computer and displays
Page 304 of 358
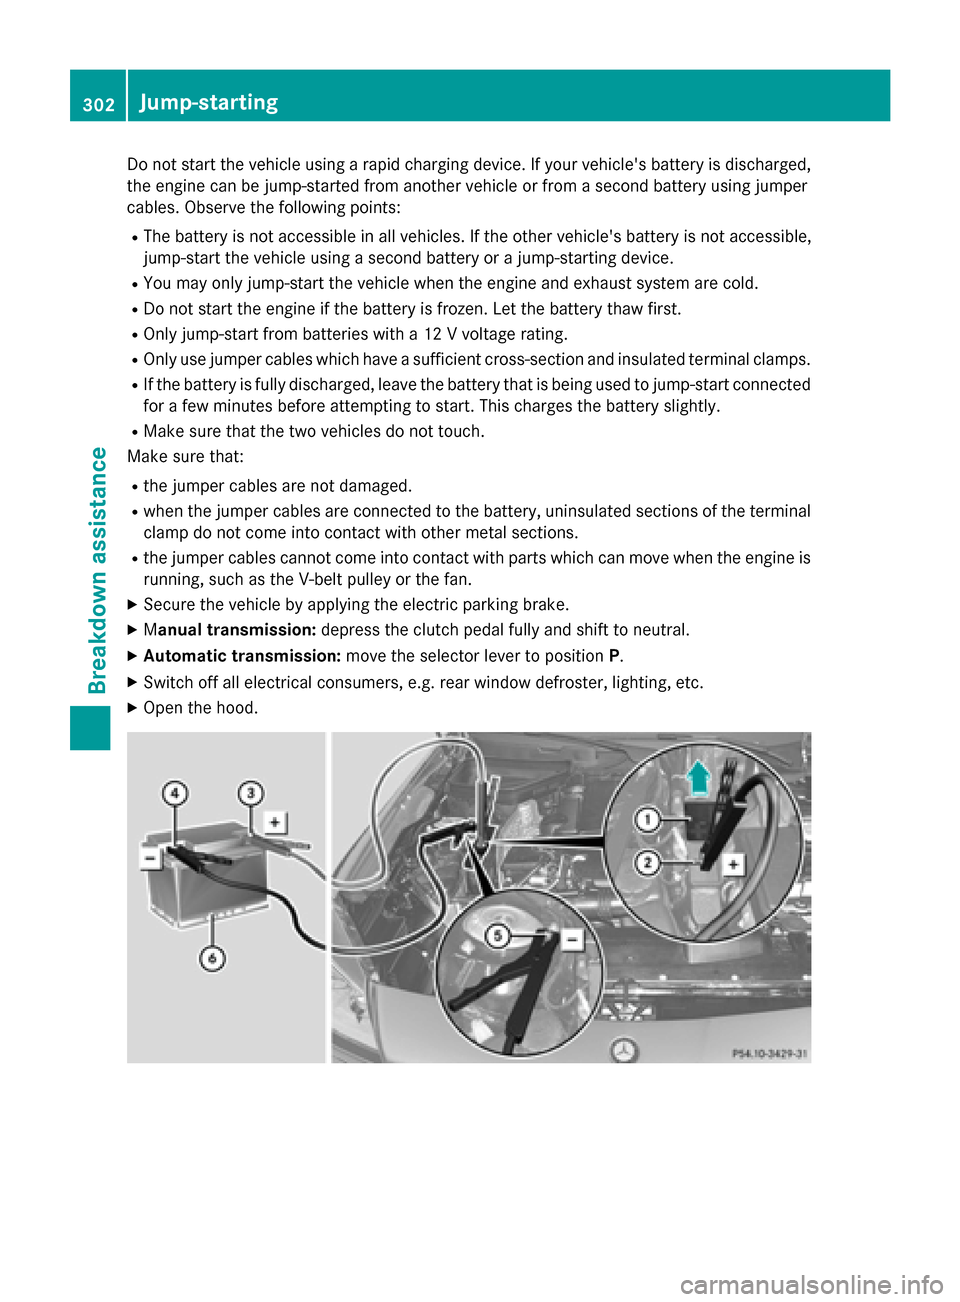
Do not start the vehicle using a rapid charging device. If your vehicle's battery is discharged,
the engine can be jump-started from another vehicle or from a second battery using jumper
cables. Observe the following points:
R The battery is not accessible in all vehicles. If the other vehicle's battery is not accessible,
jump-start the vehicle using a second battery or a jump-starting device.
R You may only jump-start the vehicle when the engine and exhaust system are cold.
R Do not start the engine if the battery is frozen. Let the battery thaw first.
R Only jump-start from batteries with a 12 V voltage rating.
R Only use jumper cables which have a sufficient cross-section and insulated terminal clamps.
R If the battery is fully discharged, leave the battery that is being used to jump-start connected
for a few minutes before attempting to start. This charges the battery slightly.
R Make sure that the two vehicles do not touch.
Make sure that:
R the jumper cables are not damaged.
R when the jumper cables are connected to the battery, uninsulated sections of the terminal
clamp do not come into contact with other metal sections.
R the jumper cables cannot come into contact with parts which can move when the engine is
running, such as the V-belt pulley or the fan.
X Secure the vehicle by applying the electric parking brake.
X Manual transmission: depress the clutch pedal fully and shift to neutral.
X Automatic transmission: move the selector lever to position P.
X Switch off all electrical consumers, e.g. rear window defroster, lighting, etc.
X Open the hood. 302
Jump-startingBreakdown assistance
Page 307 of 358
Towing the vehicle with the rear axle
raised
! The ignition must be switched off if you
are towing the vehicle with the rear axle
raised. Intervention by ESP ®
could other-
wise damage the brake system.
X Switch on the hazard warning lamps
(Y page 111).
X Bring the front wheels into the straight-
ahead position.
X Turn the SmartKey to position 0in the igni-
tion lock and remove the SmartKey from
the ignition lock.
X When leaving the vehicle, take the Smart-
Key or the KEYLESS-GO key with you.
When towing your vehicle with the rear axle
raised, it is important that you observe the
safety instructions (Y page 303).Towing a vehicle with both axles on
the ground G
WARNING
You can no longer steer the vehicle if the
steering wheel lock has been engaged. There is a risk of an accident.
Always switch off the ignition when towing the
vehicle with a tow cable or a tow bar.
X Switch on the hazard warning lamps
(Y page 111).
i When towing with the hazard warning
lamps switched on, use the combination
switch as usual to signal a change of direc- tion. In this case, only the indicator lamps
for the direction of travel flash. When you
reset the combination switch, the hazard
warning flashers start flashing again.
X Turn the SmartKey to position 2in the igni-
tion lock.
X When the vehicle is stationary, depress the
brake pedal and keep it depressed. X
Vehicles with manual transmission:
depress the clutch pedal fully and shift to
neutral.
or
X Vehicles with automatic transmission:
shift the automatic transmission to posi-
tion N.
X Release the brake pedal.
X Release the electric parking brake.
It is important that you observe the safety
instructions when towing away your vehicle
(Y page 303). Transporting the vehicle
! You may only secure the vehicle by the
wheels, not by parts of the vehicle such as axle or steering components. Otherwise,
the vehicle could be damaged.
The towing eye can be used to pull the vehicle
onto a trailer or transporter for transporting
purposes.
X Vehicles with manual transmission:
depress the clutch pedal fully and shift to
neutral.
X Vehicles with automatic transmission:
turn the SmartKey to position 2in the igni-
tion lock.
X Move the selector lever to N.
As soon as the vehicle has been loaded:
X Prevent the vehicle from rolling away by
applying the electric parking brake.
X Vehicles with manual transmission:
fully depress the clutch pedal and engage
first or reverse gear.
X Vehicles with automatic transmission:
move the selector lever to P.
X Turn the SmartKey to position 0in the igni-
tion lock and remove the SmartKey from
the ignition lock.
X Secure the vehicle. Towing and tow-starting
305Breakdown assistance Z
Page 308 of 358
Tow-starting (emergency engine
starting)
! Vehicles with automatic transmission
must not be tow-started. You could other-
wise damage the automatic transmission.
i You can find information on "Jump-start-
ing" under (Y page 301).
Before tow-starting:
R the battery must be connected
R the engine must be cold
R the exhaust system must have cooled down
When tow-starting, it is important that you
observe the safety instructions (Y page 303).
X Switch on the hazard warning lamps
(Y page 111).
X Install the towing eye (Y page 304).
X Secure the rigid towing bar or the towing
rope.
X Depress and hold the brake pedal.
X Turn the SmartKey to position 2in the igni-
tion lock.
X Depress the clutch pedal fully, engage sec-
ond gear and keep the clutch pedal
depressed.
X Release the brake pedal.
X Tow-start the vehicle.
X Release the clutch pedal slowly; do not
depress the accelerator pedal while doing
so.
X As soon as the engine starts, depress the
clutch pedal immediately and shift to neu-
tral.
X Stop at a suitable place, in accordance with
the traffic conditions.
X Depress the parking brake.
X Remove the rigid towing bar or towing rope.
X Remove the towing eye (Y page 304).
X Switch off the hazard warning lamps. Fuses
Important safety notes
G
WARNING
If you manipulate or bridge a faulty fuse or if
you replace it with a fuse with a higher amper- age, the electric cables could be overloaded.
This could result in a fire. There is a risk of an
accident and injury.
Always replace faulty fuses with the specified
new fuses having the correct amperage.
! Only use fuses that have been approved
for Mercedes-Benz vehicles and which
have the correct fuse rating for the system concerned. Otherwise, components or sys-
tems could be damaged.
The fuses in your vehicle serve to close down faulty circuits. If a fuse blows, all the compo- nents on the circuit and their functions stop
operating.
Blown fuses must be replaced with fuses of
the same rating, which you can recognize by
the color and value. The fuse ratings are listedin the fuse allocation chart.
If a newly inserted fuse also blows, have the
cause traced and rectified at a qualified spe-
cialist workshop, e.g. an authorized
Mercedes-Benz Center. Before changing a fuse
X Secure the vehicle against rolling away
(Y page 161).
X Switch off all electrical consumers.
X Turn the SmartKey to position 0in the igni-
tion lock and remove it (Y page 139).
or X On vehicles with KEYLESS-GO, make sure
the ignition is switched off (Y page 140).
All indicator lamps in the instrument cluster
must be off. 306
FusesBreakdown assistance
Page 335 of 358

Cleaning the wheels
G
WARNING
The water jet from a circular jet nozzle (dirt
blasters) can cause invisible exterior damage to the tires or chassis components. Compo-
nents damaged in this way may fail unexpect-edly. There is a risk of an accident.
Do not use power washers with circular jet
nozzles to clean the vehicle. Have damaged
tires or chassis components replaced imme-
diately. Mounting a wheel
Preparing the vehicle X
Stop the vehicle on solid, non-slippery and
level ground.
X Apply the electric parking brake manually.
X Bring the front wheels into the straight-
ahead position.
X Vehicles with manual transmission:
fully depress the clutch pedal and engage
first or reverse gear.
X Vehicles with automatic transmission:
move the selector lever to P.
X Switch off the engine.
X Vehicles without KEYLESS-GO: remove
the SmartKey from the ignition lock.
X Vehicles with KEYLESS-GO: open the
driver's door.
The on-board electronics now have status
0. This is the same as the SmartKey having
been removed.
X Vehicles with KEYLESS-GO: remove the
Start/Stop button from the ignition lock
(Y page 140).
X If included in the vehicle equipment,
remove the tire-change tool kit from the
vehicle.
X Secure the vehicle to prevent it from rolling
away. i
Due to differences in vehicle equipment,
not all vehicles are equipped with a tire-
change tool kit. For information on which
tools are required to perform a wheel
change on your vehicle, consult an author- ized Mercedes-Benz Center.
Necessary wheel-changing tools can
include, for example:
R Jack
R Wheel chock
R Lug wrench
Securing the vehicle to prevent it from
rolling away If your vehicle is equipped with a wheel chock,
it can be found in the tire-change tool kit
(Y page 292).
The folding wheel chock is an additional
securing measure to prevent the vehicle from
rolling away, for example when changing a
wheel.
X Fold both plates upwards 0043.
X Fold out lower plate 0044.
X Guide the lugs on the lower plate fully into
the openings in base plate 0087. Changing a wheel
333Wheels and tires Z