emergency towing MERCEDES-BENZ SLK-Class 2015 R172 Owner's Manual
[x] Cancel search | Manufacturer: MERCEDES-BENZ, Model Year: 2015, Model line: SLK-Class, Model: MERCEDES-BENZ SLK-Class 2015 R172Pages: 358, PDF Size: 6.18 MB
Page 7 of 358
AUTO lights
Display message ............................ 228
see Lights
Automatic engine start (ECO start/
stop function) .................................... 146
Automatic engine switch-off (ECO
start/stop function) .......................... 144
Automatic headlamp mode .............. 109
Automatic transmission Accelerator pedal position ............ .152
Automatic drive program .............. .154
Changing gear ............................... 152
Display message ............................ 238
Driving tips ................................... .152
Emergency running mode .............. 158
Kickdown ....................................... 153
Manual drive program .................... 154
Manual drive program (vehicles
with Sports package AMG) ............ 155
Overview ........................................ 151
Problem (malfunction) ................... 158
Program selector button ................ 153
Pulling away ................................... 142
Releasing the parking lock man-
ually ............................................... 158
Selector lever ................................ 151
Starting the engine ........................ 142
Steering wheel paddle shifters ...... 154
Transmission position displa y........ 151
Transmission positions .................. 152
Automatic transmission emer-
gency mode ....................................... 158 B
Backup lamp Changing bulb s.............................. 117
BAS (Brake Assist System) ................. 62
BAS PLUS (Brake Assist System
PLUS) .................................................... 62
Battery (SmartKey) Checking .......................................... 75
Important safety notes .................... 74
Replacing ......................................... 75
Battery (vehicle)
Charging ........................................ 299
Display message ............................ 229
Important safety notes .................. 297 Jump starting ................................. 301
Overview ........................................ 297
Belt
see Seat belts
Blind Spot Assist
Activating/deactivating ................. 204
Display message ............................ 232
Notes/function .............................. 189
Brake Assist
see BAS (Brake Assist System)
Brake fluid
Display message ............................ 220
Notes ............................................. 350
Brake force distribution, elec-
tronic
see EBD (electronic brake force
distribution)
Brake lamps
Display message ............................ 226
Brakes
ABS .................................................. 61
BAS .................................................. 62
BAS PLUS ........................................ 62
Brake fluid (notes) ......................... 350
Display message ............................ 213
EBD .................................................. 67
High-performance brake system .... 168
Important safety notes .................. 166
Maintenance .................................. 167
Parking brake ................................ 162
Riding tips ...................................... 166
Warning lamp ................................. 245
Breakdown
see Flat tire
see Towing away
Brightness control (instrument
cluster lighting) ................................... 31
Bulbs see Replacing bulbs C
California Important notice for retail cus-
tomers and lessees .......................... 23
Calling up a malfunction
see Display messages Index
5
Page 11 of 358
ECO start/stop function
Automatic engine start .................. 146
Automatic engine switch-off .......... 144
Deactivating/activating ................ .147
General information ....................... 144
Important safety notes .................. 143
Introduction ................................... 143
Electronic Stability Program
see ESP ®
(Electronic Stability Program)
Emergency
Automatic measures after an acci-
dent ................................................. 57
Emergency release
Driver's door ................................... .80
Trunk ............................................... 83
Vehicle ............................................. 80
Emergency spare wheel
General notes ................................ 341
Important safety notes .................. 341
Removing ....................................... 341
Stowing .......................................... 342
Technical data ...............................3 44
Emergency Tensioning Devices
Activation ......................................... 54
Emissions control
Service and warranty information .... 22
Engine
Check Engine warning lamp ........... 251
Display message ............................ 228
ECO start/stop function ................ 143
Engine number ............................... 347
Irregular running ............................ 149
Jump-starting ................................. 301
Starting problems .......................... 149
Starting the engine with the
SmartKey ....................................... 142
Starting with KEYLESS-GO ............. 142
Switching off .................................. 162
Tow-starting (vehicle) ..................... 306
Engine electronics
Problem (malfunction) ................... 149
Engine oil
Adding .......................................... .280
Additives ........................................ 350
Checking the oil level ..................... 279
Checking the oil level using the
dipstick .......................................... 279 Display message ............................ 230
Filling capacity ............................... 350
Notes about oil grades ................... 349
Notes on oil level/consumption .... 279
Temperature (on-board com-
puter) ............................................. 208
Viscosity ........................................ 350
ESP ®
(Electronic Stability Pro-
gram) AMG menu (on-board computer) ... 209
Characteristics ................................. 64
Deactivating/activating (AMG
vehicles) .......................................... 65
Deactivating/activating (notes;
except AMG vehicles) ..................... .64
Display message ............................ 213
ETS .................................................. 63
Function/note s................................ 63
General notes .................................. 63
Important safety information ........... 64
Warning lamp ................................. 247
ETS (Electronic Traction System) ....... 63
Exhaust check ................................... 165
Exhaust pipe (cleaning instruc-
tions) .................................................. 287
Exterior lighting Setting options .............................. 108
see Lights
Exterior mirrors
Adjusting ....................................... 103
Dipping (automatic) ....................... 104
Folding in/out (automatically )....... 104
Folding in/out (electrically) ........... 104
Folding in when locking (on-board
computer) ...................................... 208
Out of position (troubleshooting) ... 104
Storing settings (memory func-
tion) ............................................... 106
Storing the parking position .......... 105
Eyeglasses compartment ................. 257 F
Filler cap see Fuel filler flap
Filling capacities (Technical data) ... 347
Flat tire MOExtended tire s.......................... 293 Index
9
Page 20 of 358
Increased vehicle weight due to
optional equipment (definition) ...... 330
Kilopascal (kPa) (definition) ........... 330
Labeling (overview) ........................ 326
Load bearing index (definition) ...... 331
Load index .....................................3 28
Load index (definition) ................... 331
M+S tires ....................................... 312
Maximum loaded vehicle weight
(definition) ..................................... 330
Maximum load on a tire (defini-
tion) ............................................... 331
Maximum permissible tire pres-
sure (definition) ............................ .331
Maximum tire load ......................... 328
Maximum tire load (definition) ....... 331
MOExtended tires .......................... 312
Optional equipment weight (defi-
nition) ............................................ 331
Overview ........................................ 310
PSI (pounds per square inch) (def-
inition) .......................................... .331
Replacing ....................................... 332
Service life ..................................... 312
Sidewall (definition) ....................... 331
Speed rating (definition) ................ 330
Storing .......................................... .332
Structure and characteristics
(definition) ..................................... 329
Summer tires ................................. 312
Temperature .................................. 325
TIN (Tire Identification Number)
(definition) ..................................... 331
Tire bead (definition) ..................... .331
Tire pressure (definition) ................ 331
Tire pressures (recommended) ...... 330
Tire size (data) ............................... 337
Tire size designation, load-bearing capacity, speed rating .................... 326
Tire tread ....................................... 311
Tire tread (definition) ..................... 331
Total load limit (definition) ............. 332
Traction ......................................... 325
Traction (definition) ....................... 332
Tread wea r..................................... 325
Uniform Tire Quality Grading
Standards ...................................... 324 Uniform Tire Quality Grading
Standards (definition) .................... 330
Wear indicator (definition) ............. 332
Wheel and tire combination ........... 339
Wheel rim (definition) .................... 330
see Flat tire
Towing
Important safety guidelines ........... 303
Installing the towing eye ................ 304
Removing the towing eye ............... 304
With the rear axle raised ................ 305
Towing away
With both axles on the ground ....... 305
Tow-starting
Emergency engine starting ............ 306
Important safety notes .................. 303
Installing the towing eye ................ 304
Removing the towing eye ............... 304
Transmission
Selector lever ................................ 151
see Automatic transmission
see Manual transmission
Transporting the vehicle .................. 305
Trim pieces (cleaning instruc-
tions) .................................................. 288
Trip computer (on-board com-
puter) .................................................. 197
Trip odometer Calling up ....................................... 197
Resetting (on-board computer) ...... 198
Trunk
Emergency release .......................... 82
Important safety notes .................... 80
Locking separately ........................... 82
Opening/closing (manually from
outside) ............................................ 81
Opening (automatically from out-
side) ................................................. 82
Overview .......................................... 80
Trunk lid
Display message ............................ 240
Opening/closing .............................. 80
Opening dimensions ...................... 353
Trunk load (maximum) ...................... 35318
Index
Page 21 of 358
Trunk partition
Display message ............................ 241
General notes .................................. 89
Opening/closing .............................. 90
Turn signals
Changing bulbs (front) ................... 116
Display message ............................ 225
Switching on/off ........................... 110
Type identification plate
see Vehicle identification plate U
Unlocking Emergency unlocking ....................... 80
From inside the vehicle (central
unlocking button) ............................. 79 V
Vanity mirror (in the sun visor) ........ 260
Vehicle Correct use ...................................... 26
Data acquisition ............................... 27
Display message ............................ 238
Equipment ....................................... 22
Individual settings .......................... 204
Limited Warranty ............................. 27
Loading .......................................... 322
Locking (in an emergency) ............... 80
Locking (SmartKey) .......................... 72
Lowering ........................................ 336
Maintenance .................................... 23
Parking for a long period ................ 164
Pulling away ................................... 142
Raising ........................................... 334
Reporting problems ......................... 26
Securing from rolling away ............ 333
Towing away .................................. 303
Tow-starting ................................... 303
Transporting .................................. 305
Unlocking (in an emergency) ........... 80
Unlocking (SmartKey) ...................... 72
Vehicle data ................................... 353
Vehicle battery
see Battery (vehicle)
Vehicle data ....................................... 353
Vehicle dimensions ........................... 353 Vehicle emergency locking
................ 80
Vehicle identification number see VIN
Vehicle identification plate .............. 346
Vehicle tool kit .................................. 292
Video Operating the DVD ........................ .201
VIN ...................................................... 346 W
Warning and indicator lamps ABS ................................................ 245
Brakes .......................................... .245
Check Engine ................................. 251
Coolant .......................................... 251
Distance warning ........................... 253
DISTRONIC PLUS ........................... 253
ESP ®
.............................................. 247
ESP ®
OFF ....................................... 248
Overview .......................................... 32
PASSENGER AIR BAG OFF .............. .41
Reserve fuel .................................. .251
Restraint system ............................ 250
Seat belt ........................................ 244
SPORT handling mode ................... 248
Tire pressure monitor .................... 254
Warranty .............................................. 22
Washer fluid Display message ............................ 242
Wheel and tire combination
see Tires
Wheel bolt tightening torque ........... 336
Wheel chock ...................................... 333
Wheels Changing a wheel .......................... 332
Checking ........................................ 311
Cleaning ......................................... 286
Cleaning (warning) ......................... 333
Emergency spare wheel ................. 341
Important safety notes .................. 310
Interchanging/changing ................ 332
Mounting a new wheel ................... 336
Mounting a wheel .......................... 333
Overview ........................................ 310
Removing a wheel .......................... 335
Storing .......................................... .332 Index
19
Page 266 of 358
Making an emergency call
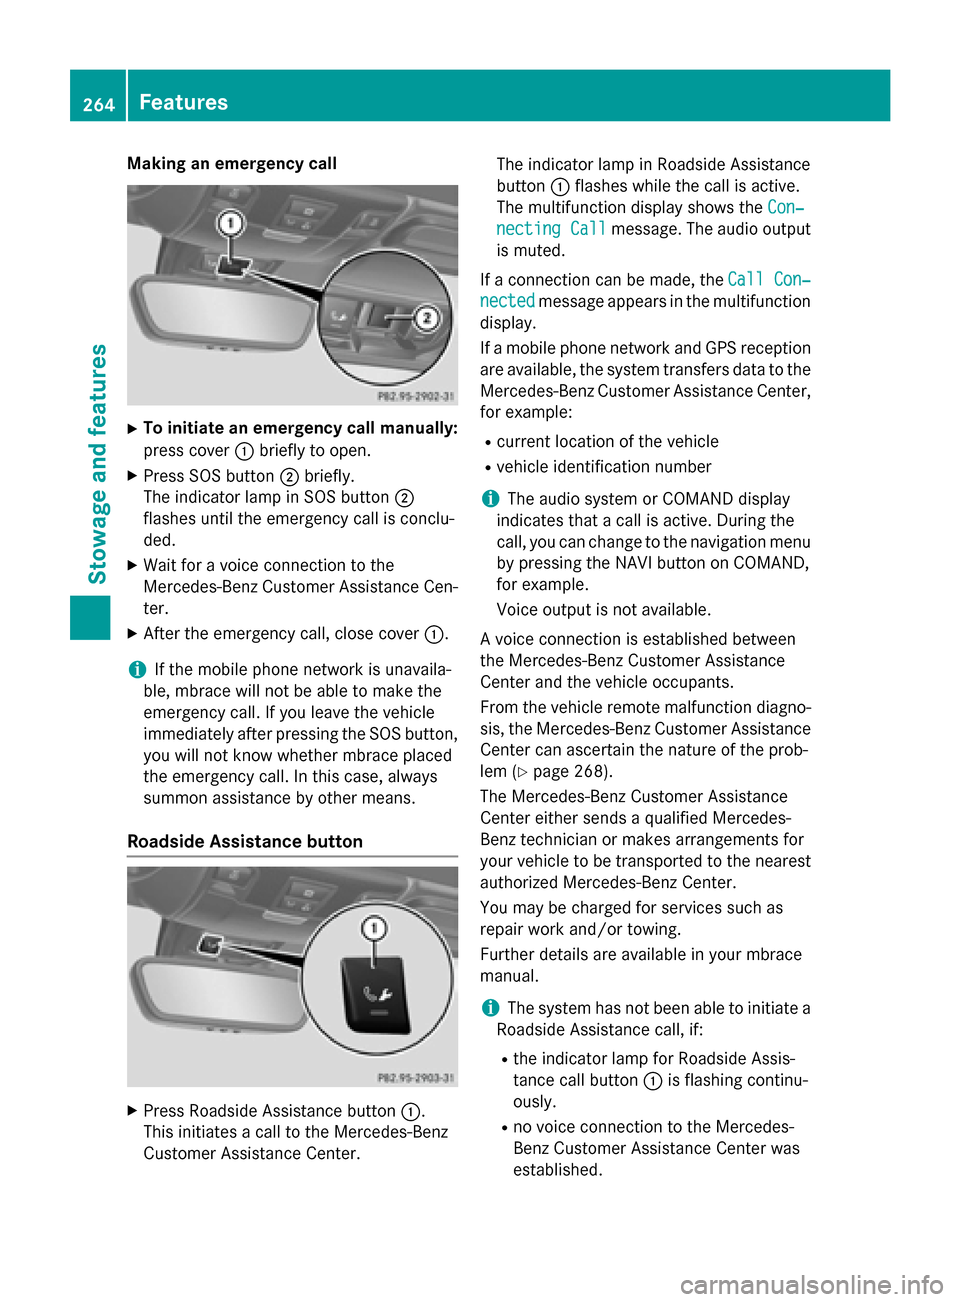
X
To initiate an emergency call manually:
press cover 0043briefly to open.
X Press SOS button 0044briefly.
The indicator lamp in SOS button 0044
flashes until the emergency call is conclu-
ded.
X Wait for a voice connection to the
Mercedes-Benz Customer Assistance Cen-
ter.
X After the emergency call, close cover 0043.
i If the mobile phone network is unavaila-
ble, mbrace will not be able to make the
emergency call. If you leave the vehicle
immediately after pressing the SOS button,
you will not know whether mbrace placed
the emergency call. In this case, always
summon assistance by other means.
Roadside Assistance button X
Press Roadside Assistance button 0043.
This initiates a call to the Mercedes-Benz
Customer Assistance Center. The indicator lamp in Roadside Assistance
button
0043flashes while the call is active.
The multifunction display shows the Con‐ Con‐
necting Call necting Call message. The audio output
is muted.
If a connection can be made, the Call Con‐
Call Con‐
nected
nected message appears in the multifunction
display.
If a mobile phone network and GPS reception are available, the system transfers data to the
Mercedes-Benz Customer Assistance Center, for example:
R current location of the vehicle
R vehicle identification number
i The audio system or COMAND display
indicates that a call is active. During the
call, you can change to the navigation menu
by pressing the NAVI button on COMAND,
for example.
Voice output is not available.
A voice connection is established between
the Mercedes-Benz Customer Assistance
Center and the vehicle occupants.
From the vehicle remote malfunction diagno- sis, the Mercedes-Benz Customer Assistance
Center can ascertain the nature of the prob-
lem (Y page 268).
The Mercedes-Benz Customer Assistance
Center either sends a qualified Mercedes-
Benz technician or makes arrangements for
your vehicle to be transported to the nearest
authorized Mercedes-Benz Center.
You may be charged for services such as
repair work and/or towing.
Further details are available in your mbrace
manual.
i The system has not been able to initiate a
Roadside Assistance call, if:
R the indicator lamp for Roadside Assis-
tance call button 0043is flashing continu-
ously.
R no voice connection to the Mercedes-
Benz Customer Assistance Center was
established. 264
FeaturesStowage and features
Page 294 of 358
Useful information
i This Operator's manual describes all
models and all standard and optional equip- ment of your vehicle available at the time of
publication of the Operator's manual.
Country-specific differences are possible.
Please note that your vehicle may not be
equipped with all features described. This
also applies to safety-related systems and
functions.
i Read the information on qualified special-
ist workshops (Y page 26). Where will I find...?
Vehicle tool kit
General notes The vehicle tool kit can be found in the stow-
age well under the trunk floor.
i Apart from certain country-specific varia-
tions, the vehicles are not equipped with a
tire-change tool kit. Some tools for chang-
ing a wheel are specific to the vehicle. For
more information on which tools are
required to perform a wheel change on your
vehicle, consult a qualified specialist work-
shop.
Tools required for changing a wheel may
include, for example:
R Jack
R Wheel chock
R Lug wrench
R Ratchet wrench
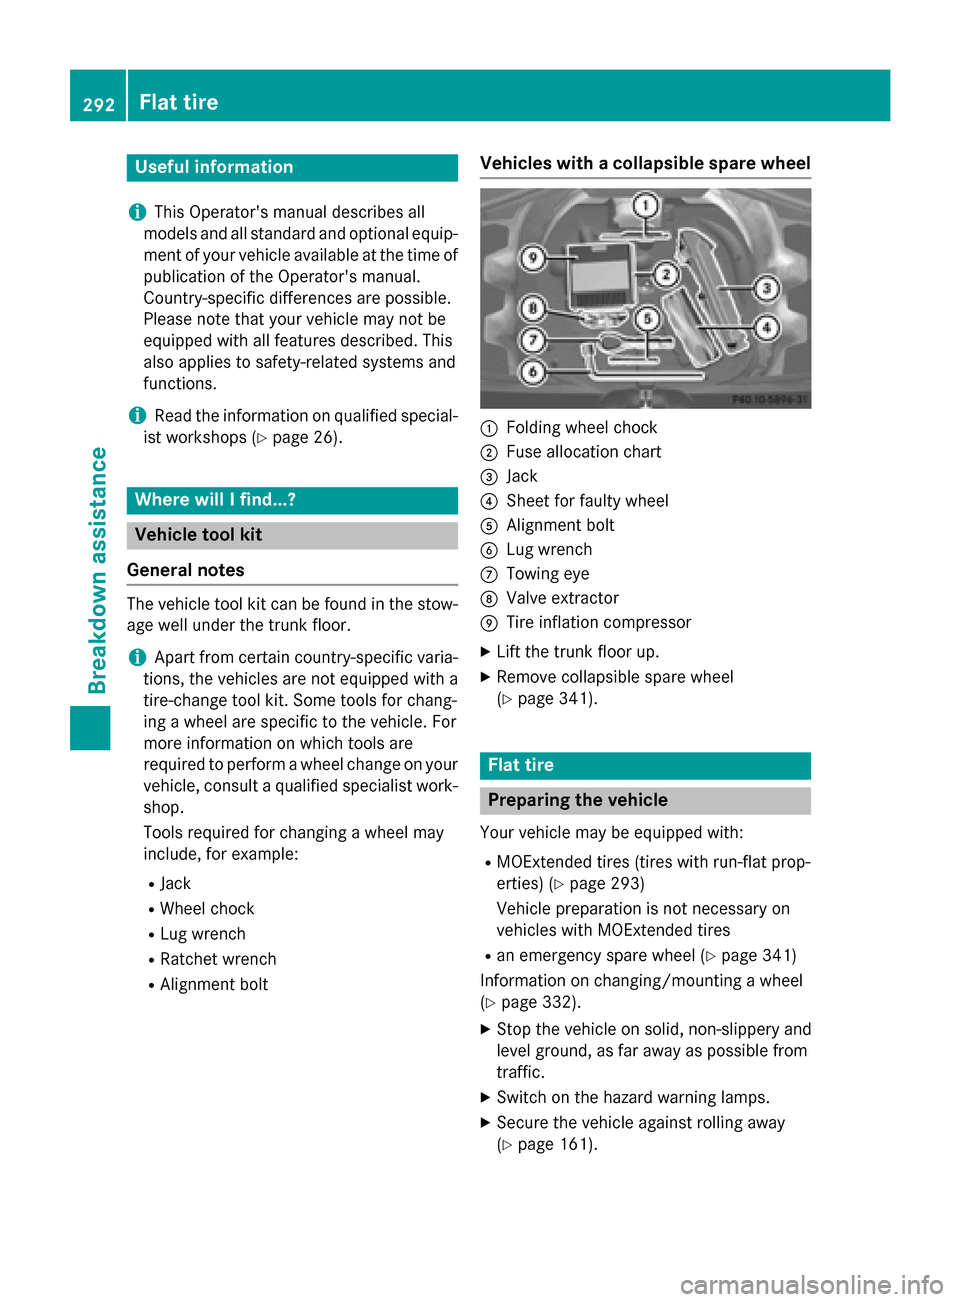
R Alignment bolt Vehicles with a collapsible spare wheel 0043
Folding wheel chock
0044 Fuse allocation chart
0087 Jack
0085 Sheet for faulty wheel
0083 Alignment bolt
0084 Lug wrench
006B Towing eye
006C Valve extractor
006D Tire inflation compressor
X Lift the trunk floor up.
X Remove collapsible spare wheel
(Y page 341). Flat tire
Preparing the vehicle
Your vehicle may be equipped with: R MOExtended tires (tires with run-flat prop-
erties) (Y page 293)
Vehicle preparation is not necessary on
vehicles with MOExtended tires
R an emergency spare wheel (Y page 341)
Information on changing/mounting a wheel
(Y page 332).
X Stop the vehicle on solid, non-slippery and
level ground, as far away as possible from
traffic.
X Switch on the hazard warning lamps.
X Secure the vehicle against rolling away
(Y page 161). 292
Flat tireBreakdown assistance
Page 308 of 358
Tow-starting (emergency engine
starting)
! Vehicles with automatic transmission
must not be tow-started. You could other-
wise damage the automatic transmission.
i You can find information on "Jump-start-
ing" under (Y page 301).
Before tow-starting:
R the battery must be connected
R the engine must be cold
R the exhaust system must have cooled down
When tow-starting, it is important that you
observe the safety instructions (Y page 303).
X Switch on the hazard warning lamps
(Y page 111).
X Install the towing eye (Y page 304).
X Secure the rigid towing bar or the towing
rope.
X Depress and hold the brake pedal.
X Turn the SmartKey to position 2in the igni-
tion lock.
X Depress the clutch pedal fully, engage sec-
ond gear and keep the clutch pedal
depressed.
X Release the brake pedal.
X Tow-start the vehicle.
X Release the clutch pedal slowly; do not
depress the accelerator pedal while doing
so.
X As soon as the engine starts, depress the
clutch pedal immediately and shift to neu-
tral.
X Stop at a suitable place, in accordance with
the traffic conditions.
X Depress the parking brake.
X Remove the rigid towing bar or towing rope.
X Remove the towing eye (Y page 304).
X Switch off the hazard warning lamps. Fuses
Important safety notes
G
WARNING
If you manipulate or bridge a faulty fuse or if
you replace it with a fuse with a higher amper- age, the electric cables could be overloaded.
This could result in a fire. There is a risk of an
accident and injury.
Always replace faulty fuses with the specified
new fuses having the correct amperage.
! Only use fuses that have been approved
for Mercedes-Benz vehicles and which
have the correct fuse rating for the system concerned. Otherwise, components or sys-
tems could be damaged.
The fuses in your vehicle serve to close down faulty circuits. If a fuse blows, all the compo- nents on the circuit and their functions stop
operating.
Blown fuses must be replaced with fuses of
the same rating, which you can recognize by
the color and value. The fuse ratings are listedin the fuse allocation chart.
If a newly inserted fuse also blows, have the
cause traced and rectified at a qualified spe-
cialist workshop, e.g. an authorized
Mercedes-Benz Center. Before changing a fuse
X Secure the vehicle against rolling away
(Y page 161).
X Switch off all electrical consumers.
X Turn the SmartKey to position 0in the igni-
tion lock and remove it (Y page 139).
or X On vehicles with KEYLESS-GO, make sure
the ignition is switched off (Y page 140).
All indicator lamps in the instrument cluster
must be off. 306
FusesBreakdown assistance
Page 344 of 358
Stowing the emergency spare wheel
! Only place the collapsible spare wheel in
the vehicle when it is dry. Otherwise, mois-
ture may get into the vehicle.
Take the following steps to stow a used col-
lapsible spare wheel. Otherwise, the collaps-
ible spare wheel will not fit in the trunk in the
intended manner. Mercedes-Benz recom-
mends that you have this work carried out at
a qualified specialist workshop.
X Unscrew the valve cap from the valve.
X If possible, unscrew the valve insert from
the valve and release the air.
i Fully deflating the tires can take a few
minutes.
X Screw the valve insert back into the valve.
X Screw the valve cap back on.
X Pull the protective sheet provided with the
spare wheel over the collapsible spare
wheel.
X Stow the collapsible spare wheel in the
emergency spare wheel well under the
trunk.
X Use the retaining screw to pierce the pro-
tective sheet and fasten the collapsible
spare wheel in place. Inflating the collapsible spare wheel
! Inflate the collapsible spare wheel using
the tire inflation compressor before lower-
ing the vehicle. The wheel rim could other-
wise be damaged.
! Do not operate the tire inflation compres-
sor for longer than ten minutes at a time
without a break. It may otherwise overheat.
The tire inflation compressor can be oper-
ated again once it has cooled down. X
Mount the collapsible spare wheel as
described (Y page 333).
The collapsible spare wheel must be moun-
ted before it is inflated.
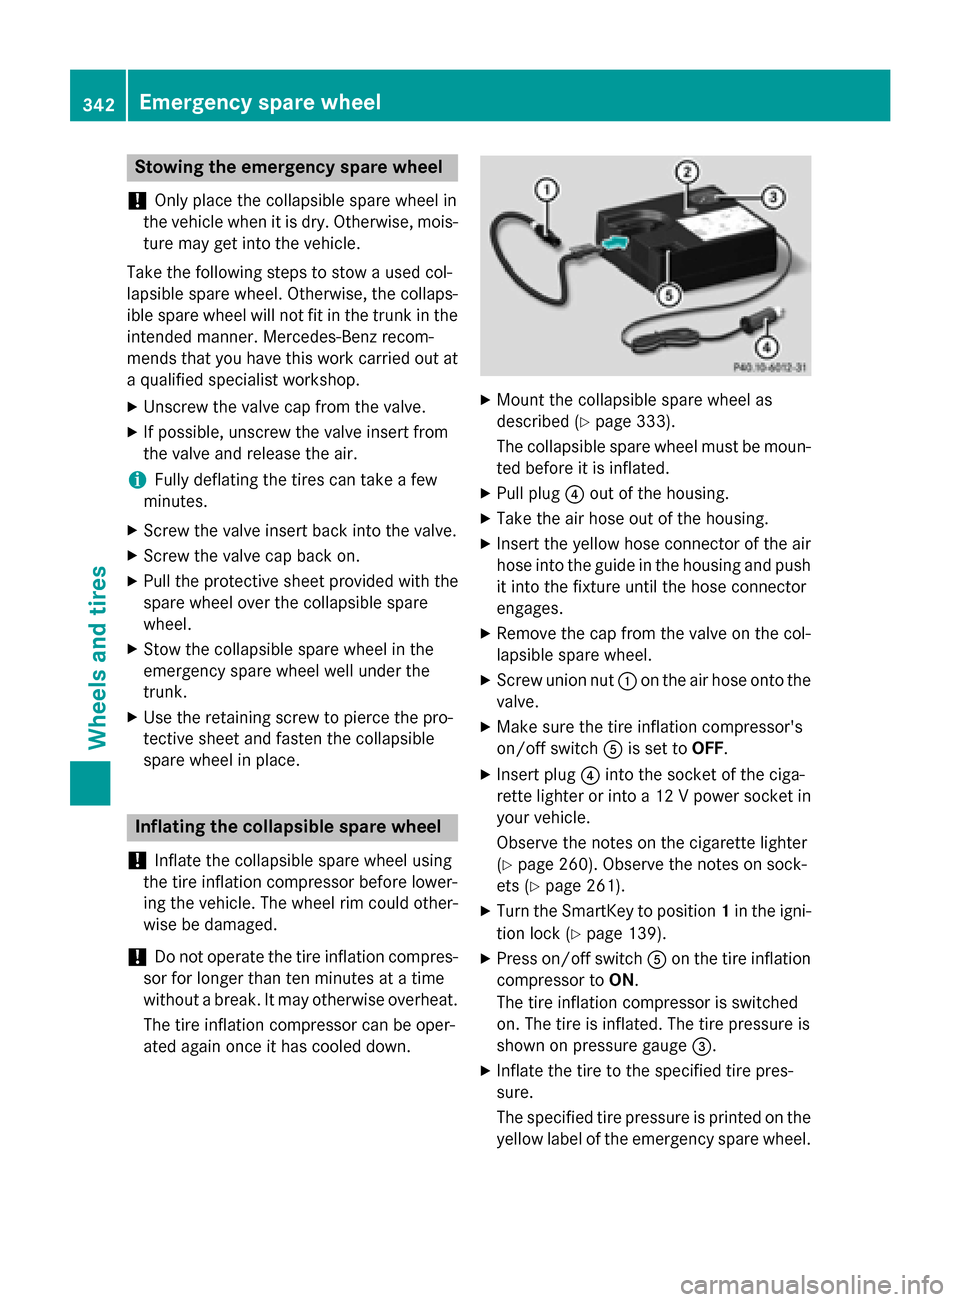
X Pull plug 0085out of the housing.
X Take the air hose out of the housing.
X Insert the yellow hose connector of the air
hose into the guide in the housing and push it into the fixture until the hose connector
engages.
X Remove the cap from the valve on the col-
lapsible spare wheel.
X Screw union nut 0043on the air hose onto the
valve.
X Make sure the tire inflation compressor's
on/off switch 0083is set to OFF.
X Insert plug 0085into the socket of the ciga-
rette lighter or into a 12 V power socket in your vehicle.
Observe the notes on the cigarette lighter
(Y page 260). Observe the notes on sock-
ets (Y page 261).
X Turn the SmartKey to position 1in the igni-
tion lock (Y page 139).
X Press on/off switch 0083on the tire inflation
compressor to ON.
The tire inflation compressor is switched
on. The tire is inflated. The tire pressure is
shown on pressure gauge 0087.
X Inflate the tire to the specified tire pres-
sure.
The specified tire pressure is printed on the
yellow label of the emergency spare wheel. 342
Emergency spare wheelWheels and tires