seat memory MERCEDES-BENZ SLK-Class 2015 R172 Owner's Manual
[x] Cancel search | Manufacturer: MERCEDES-BENZ, Model Year: 2015, Model line: SLK-Class, Model: MERCEDES-BENZ SLK-Class 2015 R172Pages: 358, PDF Size: 6.18 MB
Page 17 of 358
Warning lamp ................................. 250
Warning lamp (function) ...................41
Reverse gear
Engaging (automatic transmis-
sion) ............................................... 151
Engaging (manual transmission) .... 150
Reversible floor panel (trunk) .......... 258
Reversing feature Side windows ................................... 83
Trunk lid ........................................... 81
Reversing lamps (display mes-
sage) ................................................... 227
Roadside Assistance (breakdown) .... 23
Roof Display messag e............................ 241
Important safety notes .................... 87
Opening/closing (with roof
switch) ............................................. 88
Opening/closing (with Smart-
Key) ................................................. 89
Overview .......................................... 87
Problem (malfunction) ..................... 94
Relocking ......................................... 89
Roof carrier ........................................ 258
Roof lining and carpets (cleaning
guidelines) ......................................... 289
Roof switch .......................................... 88 S
Safety Children in the vehicle ..................... 57
Child restraint systems .................... 59
Occupant Classification System
(OCS) ............................................... 49
Safety system
see Driving safety systems
Seat belts
Adjusting the driver's and front-
passenger seat belt ......................... 45
Cleaning ......................................... 289
Correct usage .................................. 44
Fastening ......................................... 44
Important safety guidelines ............. 42
Introduction ..................................... 42
Releasing ......................................... 45
Switching belt adjustment on/off
(on-board computer) ...................... 208 Warning lamp ................................. 244
Warning lamp (function) ................... 45
Seats
Adjusting (electrically) ..................... 98
Adjusting (manually) ........................ 98
Adjusting the 4-way lumbar sup-
port .................................................. 99
Adjusting the head restraint ............ 98
Cleaning the cover ......................... 289
Correct driver's seat position ........... 96
Important safety notes .................... 97
Overview .......................................... 97
Seat heating problem ...................... 99
Storing settings (memory func-
tion) ............................................... 106
Switching AIRSCARF on/of f.......... 100
Switching seat heating on/of f......... 99
Selector lever
Cleaning ......................................... 288
Sensors (cleaning instructions) ....... 287
Service center see Qualified specialist workshop
Service Center
see Qualified specialist workshop
Service menu (on-board com-
puter) .................................................. 204
Service products Brake fluid ..................................... 350
Coolant (engine) ............................ 351
Engine oil ....................................... 349
Fuel ................................................ 348
Important safety notes .................. 347
Refrigerant (air-conditioning sys-
tem) ............................................... 352
Washer fluid ................................... 352
Settings
Factory (on-board computer) ......... 208
On-board compute r....................... 204
Setting the air distribution ............... 130
Setting the airflow ............................ 130
SETUP (on-board computer) ............. 209
Side impact air bag ............................. 48
Side marker lamp Changing bulbs (rear) .................... 116
Side marker lamp (display mes-
sage) ................................................... 227 Index
15
Page 18 of 358
Side windows
Cleaning ......................................... 286
Convenience closing feature ............ 85
Important safety information ........... 83
Opening/closing (all) ....................... 84
Opening/closing (front) ................... 84
Overview .......................................... 83
Problem (malfunction) ..................... 87
Resetting ......................................... 86
SmartKey
Changing the battery ....................... 75
Changing the programming ............. 73
Checking the battery ....................... 75
Convenience opening feature .......... 85
Display message ............................ 242
Door central locking/unlocking ....... 72
Important safety notes .................... 72
Loss ................................................. 77
Mechanical key ................................ 74
Opening/closing the roo f................ 89
Overview .......................................... 72
Positions (ignition lock) ................. 139
Problem (malfunction) ..................... 77
Starting the engine ........................ 142
Snow chains ...................................... 313
Sockets Center console .............................. 261
General notes ................................ 261
Under the armrest ......................... 261
Spare wheel
Stowing .......................................... 342
Specialist workshop ............................ 26
Special seat belt retractor .................. 58
Speed, controlling see Cruise control
Speedometer
Activating/deactivating the addi-
tional speedometer ........................ 205
Digital ............................................ 198
In the Instrument cluster ................. 31
Segments ...................................... 195
Selecting the unit of measure-
ment .............................................. 204
SPORT handling mode
Activating/deactivating (AMG
vehicles) .......................................... 65
Warning lamp ................................. 248 Standing lamps
Display message ............................ 227
Switching on/of f........................... 110
Start/stop function
see ECO start/stop function
Starting (engine) ................................ 141
Steering (display message) .............. 241
Steering wheel Adjusting (electrically) ................... 101
Adjusting (manually) ...................... 101
Button overview ............................... 33
Buttons (on-board computer) ......... 195
Cleaning ......................................... 288
Important safety notes .................. 100
Paddle shifters ............................... 154
Storing settings (memory func-
tion) ............................................... 106
Steering wheel paddle shifters ........ 154
Stopwatch (RACETIMER) ................... 209
Stowage areas ................................... 256
Stowage compartments Armrest (under) ............................. 257
Center console .............................. 257
Cup holders ................................... 258
Door ............................................... 257
Eyeglasses compartment ............... 257
Glove box ....................................... 256
Important safety information ......... 256
Rear wall ........................................ 257
Stowage net ................................... 258
Stowage net ....................................... 258
Summer tires ..................................... 312
Sun visor ............................................ 259
Surround lighting (on-board com-
puter) .................................................. 206
Switching air-recirculation mode
on/off ................................................. 133 T
Tachometer ........................................ 195
Tail lamps Display message ............................ 226
see Lights
Tank content
Fuel gauge ....................................... 31 16
Index
Page 59 of 358

Important safety notes
!
Make sure that there are no objects in the
footwell or behind the seats. There is a dan- ger that the seats and/or objects could be
damaged when PRE-SAFE ®
is activated.
Although your vehicle is equipped with PRE-
SAFE ®
, the possibility of injury in the event of
an accident cannot be ruled out. Always
adapt your driving style to suit the prevailing
road and weather conditions and maintain a
safe distance from the vehicle in front. Drive
carefully.
Function PRE-SAFE
®
intervenes:
R in emergency braking situations, e.g. when
BAS is activated
R in critical driving situations, e.g. when phys-
ical limits are exceeded and the vehicle
understeers or oversteers severely
R on vehicles with the Driving Assistance
package: if BAS PLUS intervenes power-
fully or the radar sensor system detects an
imminent danger of collision in certain sit-
uations
PRE-SAFE ®
takes the following measures
depending on the hazardous situation detec-
ted:
R the seat belts are pre-tensioned.
R if the vehicle skids, the side windows are
closed so that only a small gap remains.
R vehicles with the memory function: the
front-passenger seat is adjusted if it is in an
unfavorable position.
If the hazardous situation passes without
resulting in an accident, PRE-SAFE ®
slackens
the belt pre-tensioning. All settings made by
PRE-SAFE ®
can then be reversed.
If the seat belt pre-tensioning is not reduced:
X Move the seat backrest or seat back
slightly when the vehicle is stationary.
The seat belt pre-tensioning is reduced and
the locking mechanism is released. The seat-belt adjustment is an integral part of
the PRE-SAFE ®
convenience function. Infor-
mation about the convenience function can
be found under "Belt adjustment"
(Y page 45). Automatic measures after an acci-
dent
Immediately after an accident, the following
measures are implemented, depending on
the type and severity of the impact: R by activating the hazard warning lamps
R the emergency lighting is activated
R the vehicle doors are unlocked
R the front side windows are lowered
R in vehicles with a memory function: the
electrically adjustable steering wheel is
raised
R the engine is switched off
R vehicles with mbrace: automatic emer-
gency call Children in the vehicle
Important safety notes
If a child younger than 12 years and under 5 ft
(1.50 m) in height is traveling in the vehicle:
R always secure the child in a child restraint
system suitable for Mercedes-Benz vehi-
cles. The child restraint system must be
appropriate to the age, weight and size of
the child
R be sure to observe the instructions and
safety notes in this section in addition to
the child restraint system manufacturer's
installation instructions
R be sure to observe the instructions and
safety notes on the "Occupant classifica-
tion system (OCS)" (Y page 49) Children in the vehicle
57Safety Z
Page 97 of 358
Useful information
..............................96
Correct driver's seat position ............96
Seats .................................................... 97
Steering wheel .................................. 100
Mirrors ............................................... 103
Memory function .............................. 106 95Seats, steering wheel and mirrors
Page 98 of 358
Useful information
i This Operator's manual describes all
models and all standard and optional equip- ment of your vehicle available at the time of
publication of the Operator's manual.
Country-specific differences are possible.
Please note that your vehicle may not be
equipped with all features described. This
also applies to safety-related systems and
functions.
i Read the information on qualified special-
ist workshops (Y page 26). Correct driver's seat position
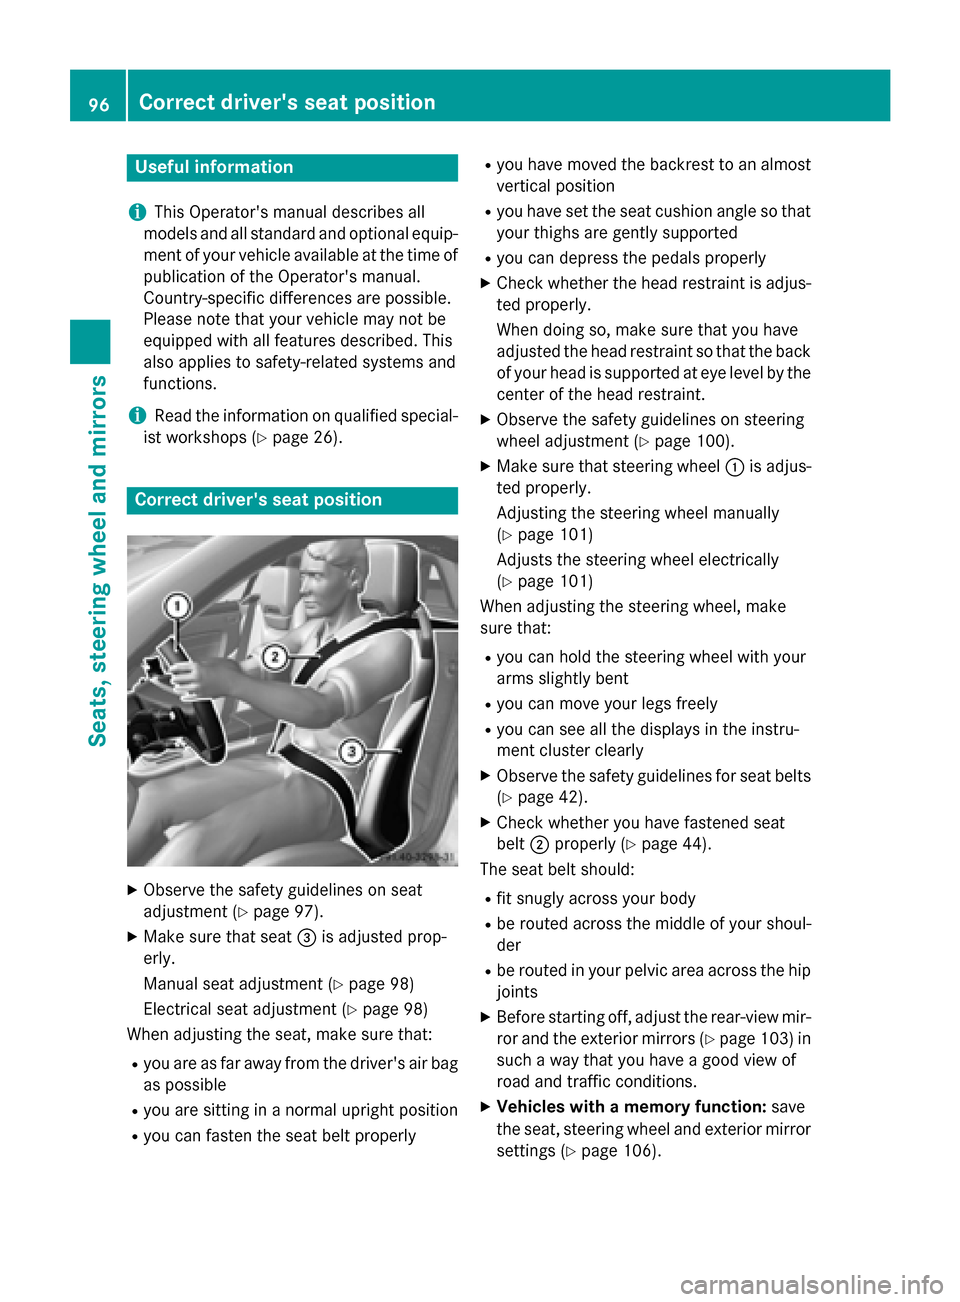
X
Observe the safety guidelines on seat
adjustment (Y page 97).
X Make sure that seat 0087is adjusted prop-
erly.
Manual seat adjustment (Y page 98)
Electrical seat adjustment (Y page 98)
When adjusting the seat, make sure that:
R you are as far away from the driver's air bag
as possible
R you are sitting in a normal upright position
R you can fasten the seat belt properly R
you have moved the backrest to an almost
vertical position
R you have set the seat cushion angle so that
your thighs are gently supported
R you can depress the pedals properly
X Check whether the head restraint is adjus-
ted properly.
When doing so, make sure that you have
adjusted the head restraint so that the back of your head is supported at eye level by the center of the head restraint.
X Observe the safety guidelines on steering
wheel adjustment (Y page 100).
X Make sure that steering wheel 0043is adjus-
ted properly.
Adjusting the steering wheel manually
(Y page 101)
Adjusts the steering wheel electrically
(Y page 101)
When adjusting the steering wheel, make
sure that:
R you can hold the steering wheel with your
arms slightly bent
R you can move your legs freely
R you can see all the displays in the instru-
ment cluster clearly
X Observe the safety guidelines for seat belts
(Y page 42).
X Check whether you have fastened seat
belt 0044properly (Y page 44).
The seat belt should:
R fit snugly across your body
R be routed across the middle of your shoul-
der
R be routed in your pelvic area across the hip
joints
X Before starting off, adjust the rear-view mir-
ror and the exterior mirrors (Y page 103) in
such a way that you have a good view of
road and traffic conditions.
X Vehicles with a memory function: save
the seat, steering wheel and exterior mirror settings (Y page 106). 96
Correct driver's seat positionSeats, steering wheel and mirrors
Page 100 of 358
moving the seats back. There is a risk that
the seats and/or the objects could be dam-
aged.
i The head restraints are installed with the
NECK-PRO system (Y page 56). For this
reason, it is not possible to remove the
head restraints from the seats.
For more information, contact a qualified
specialist workshop. Adjusting the seats manually
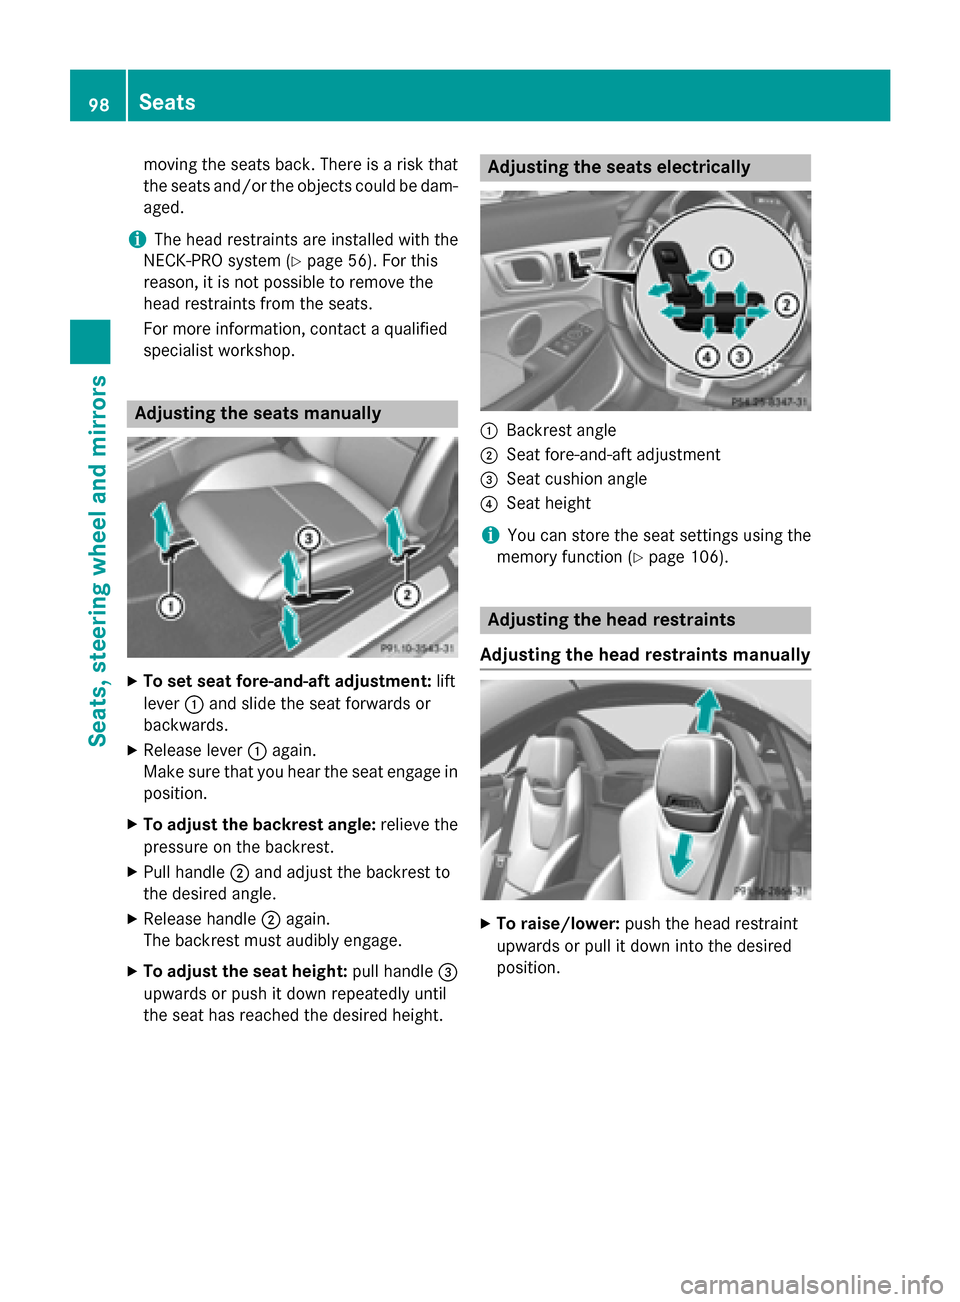
X
To set seat fore-and-aft adjustment: lift
lever 0043and slide the seat forwards or
backwards.
X Release lever 0043again.
Make sure that you hear the seat engage in
position.
X To adjust the backrest angle: relieve the
pressure on the backrest.
X Pull handle 0044and adjust the backrest to
the desired angle.
X Release handle 0044again.
The backrest must audibly engage.
X To adjust the seat height: pull handle0087
upwards or push it down repeatedly until
the seat has reached the desired height. Adjusting the seats electrically
0043
Backrest angle
0044 Seat fore-and-aft adjustment
0087 Seat cushion angle
0085 Seat height
i You can store the seat settings using the
memory function (Y page 106). Adjusting the head restraints
Adjusting the head restraints manually X
To raise/lower: push the head restraint
upwards or pull it down into the desired
position. 98
SeatsSeats, steering wheel and mirrors
Page 103 of 358

Adjusting the steering wheel man-
ually
0043
Release lever
0044 To adjust the steering wheel height
0087 To adjust the steering wheel position
(fore-and-aft adjustment)
X Push release lever 0043down completely in
the direction of the arrow.
The steering column is unlocked.
X Adjust the steering wheel to the desired
position.
X Push release lever 0043up completely.
The steering column is locked.
X Check if the steering column is locked.
When doing so, try to push the steering
wheel up or down or try to move it in the
fore-and-aft direction. Adjusting the steering wheel electri-
cally 0043
To adjust the steering wheel height
0044 To adjust the steering wheel position
(fore-and-aft adjustment) i
Further related subjects:
R EASY-ENTRY/EXIT feature
(Y page 101)
R Storing settings (Y page 106) EASY-ENTRY/EXIT feature
Important safety notes G
WARNING
If you drive off while the EASY-ENTRY/EXIT
feature is making adjustments, you could lose
control of the vehicle. There is a risk of an
accident.
Always wait until the adjustment process is
complete before driving off. G
WARNING
When the EASY-ENTRY/EXIT feature adjusts
the steering wheel, you and other vehicle
occupants – particularly children – could
become trapped. There is a risk of injury.
While the EASY-ENTRY/EXIT feature is mak-
ing adjustments, make sure that no one has
any body parts in the sweep of the steering
wheel.
If somebody becomes trapped:
R press one of the memory function position
buttons, or
R move the switch for steering wheel adjust-
ment in the opposite direction to that in
which the steering wheel is moving.
The adjustment process is stopped. G
WARNING
When the EASY-ENTRY/EXIT feature adjusts
the steering wheel and the driver's seat, you
and other vehicle occupants – particularly
children – could become trapped. There is a
risk of injury.
While the EASY-ENTRY/EXIT feature is mak-
ing adjustments, make sure that no one has
any body parts in the sweep of the seat and
the steering wheel. Steering wheel
101Seats, steering wheel and mirrors
Z
Page 104 of 358
If somebody becomes trapped:
R press one of the memory function position
buttons, or
R press one of the memory function memory
buttons, or
R move the switch for steering wheel adjust-
ment in the opposite direction to that in
which the steering wheel is moving
The adjustment process is stopped. G
WARNING
If you use openings in the bodywork or
detachable parts as steps, you could:
R slip and/or fall
R damage the vehicle and cause yourself to
fall.
There is a risk of injury.
Always use secure climbing aids, e.g. a suita-
ble ladder.
The EASY-ENTRY/EXIT feature makes getting
in and out of your vehicle easier.
You can activate and deactivate the EASY-
ENTRY/EXIT feature in the on-board com-
puter (Y page 207).
Position of the steering wheel when the EASY-ENTRY/EXIT feature is active The steering wheel swings upwards when
you:
R remove the SmartKey from the ignition lock
R open the driver's door with KEYLESS-GO in
position 1
R open the driver's door and the SmartKey is
in position 0or 1in the ignition lock
i The steering wheel only moves upwards if
it has not already reached the upper end
stop. Position of the steering wheel for driv-
ing The steering wheel is moved to the last selec-
ted position when:
R the driver's door is closed
R you insert the SmartKey into the ignition
lock
or
R you press the Start/Stop button once on
vehicles with KEYLESS-GO
When you close the driver's door with the
ignition switched on, the steering wheel is
also automatically moved to the previously
set position.
The last position of the steering wheel is
stored when you switch off the ignition or
when you store the setting with the memory
function (Y page 106).
Crash-responsive EASY-EXIT feature If the crash-responsive EASY-EXIT feature is
triggered in an accident, the steering column
will move upwards when the driver's door is
opened. This occurs irrespective of the posi-
tion of the SmartKey in the ignition lock. This
makes it easier to exit the vehicle and rescue the occupants.
The crash-responsive EASY-EXIT feature is
only operational if the EASY-EXIT/ENTRY fea-
ture is activated in the on-board computer
(Y page 207). 102
Steering wheelSeats, steering wheel and mirrors
Page 107 of 358

Parking position for the exterior mir-
ror on the front-passenger side
Setting and storing the parking position Using reverse gear
You can position the front-passenger side
exterior mirror in such a way that you can see
the rear wheel on that side as soon as you
engage reverse gear. You can store this posi-
tion.
X Make sure that the vehicle is stationary and
that the SmartKey is in position 2in the
ignition lock.
X Press button 0044for the exterior mirror on
the front-passenger side.
X Engage reverse gear.
The exterior mirror on the front-passenger
side moves to the preset parking position.
X Use adjustment button 0087to adjust the
exterior mirror to a position that allows you to see the rear wheel and the curb.
The parking position is stored.
i If you shift the transmission to another
position, the exterior mirror on the front-
passenger side returns to the driving posi-
tion. Using the memory button You can position the front-passenger side
exterior mirror in such a way that you can see
the rear wheel on that side as soon as you
engage reverse gear. This setting can be
stored using memory button M0085.
X Make sure that the SmartKey is in position
2 in the ignition lock.
X With the exterior mirror on the front-
passenger side activated, use adjustment
button 0087to adjust the exterior mirror. In
the exterior mirror, the rear wheel and the
curb should be visible.
X Press memory button M0085 and one of the
arrows on adjustment button 0087within
three seconds.
The parking position is stored if the exterior
mirror does not move.
X If the mirror moves out of position, repeat
the steps.
Calling up a stored parking position set- ting Mirrors
105Seats, steering wheel and mirrors Z
Page 108 of 358
X
Turn the SmartKey to position 2in the igni-
tion lock.
X Adjust the exterior mirror on the front-
passenger side using button 0044.
X Engage reverse gear.
The exterior mirror on the front-passenger
side moves to the stored parking position.
The exterior mirror on the front-passenger
side moves back to its original position:
R as soon as you exceed a speed of 9 mph
(15 km/h)
R if you press button 0043for the exterior mir-
ror on the driver's side Memory function
Storing settings
G
WARNING
If you use the memory function on the driver's side while driving, you could lose control of
the vehicle as a result of the adjustments
being made. There is a risk of an accident.
Only use the memory function on the driver's
side when the vehicle is stationary. G
WARNING
When the memory function adjusts the seat or steering wheel, you and other vehicle occu-
pants – particularly children – could become
trapped. There is a risk of injury.
While the memory function is making adjust-
ments, make sure that no one has any body
parts in the sweep of the seat or steering
wheel. If somebody becomes trapped, imme-
diately release the memory function position
button. The adjustment process is stopped. G
WARNING
When the memory function adjusts the seat,
you and other vehicle occupants – particularly children – could become trapped. There is a
risk of injury.
While the memory function is making adjust-
ments, make sure that no one has any body parts in the sweep of the seat. If somebody
becomes trapped, immediately release the
memory function position button. The adjust- ment process is stopped. G
WARNING
Children could become trapped if they acti-
vate the memory function, particularly when
unattended. There is a risk of injury.
When leaving the vehicle, always take the
SmartKey with you and lock the vehicle. Never leave children unsupervised in the vehicle. X
Adjust the seat electrically (Y page 98).
X On the driver's side, adjust the steering
wheel (Y page 101) and the exterior mirrors
(Y page 103).
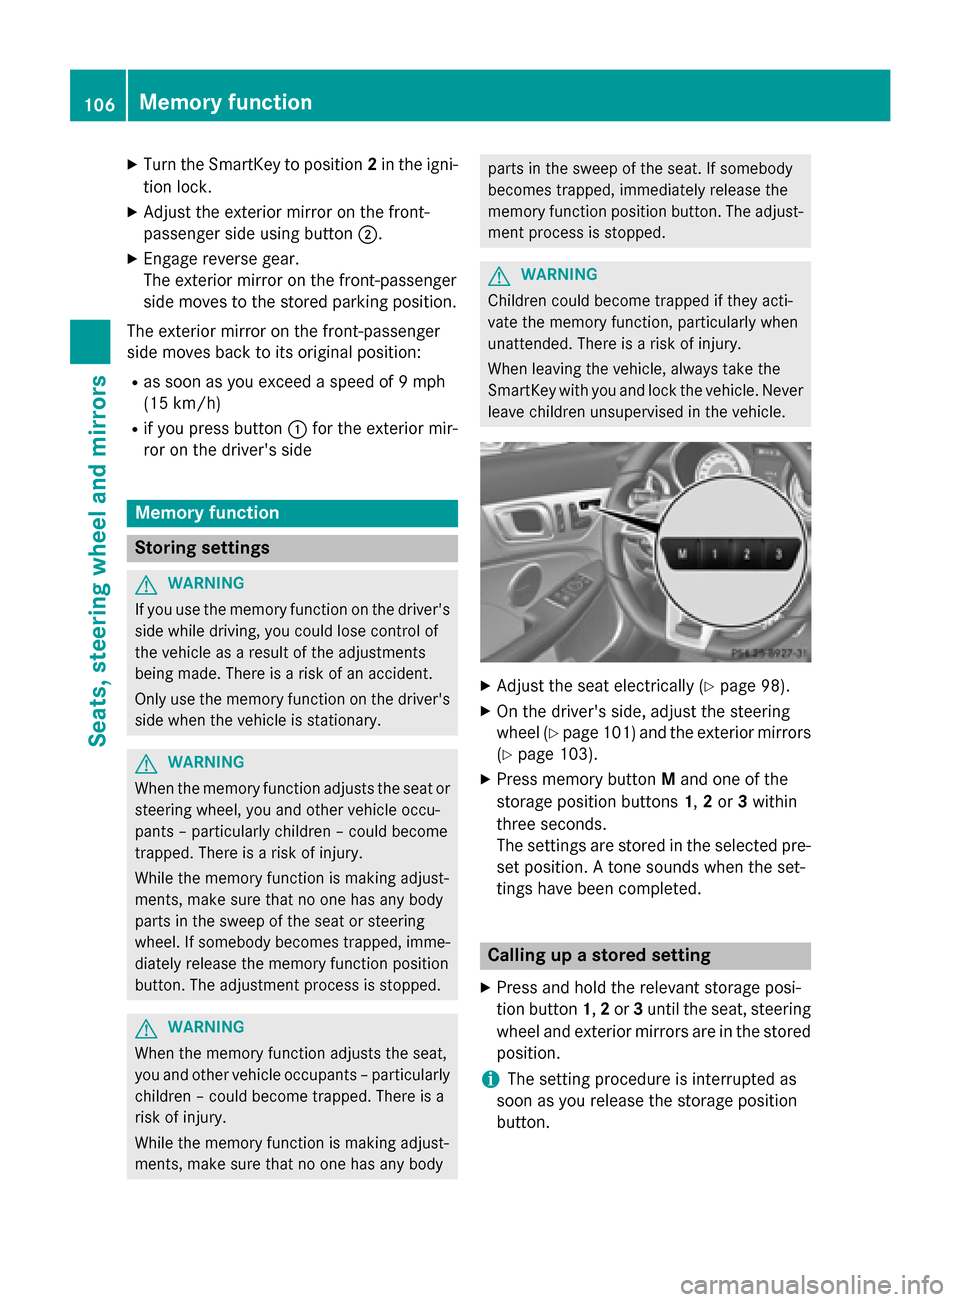
X Press memory button Mand one of the
storage position buttons 1,2or 3within
three seconds.
The settings are stored in the selected pre- set position. A tone sounds when the set-
tings have been completed. Calling up a stored setting
X Press and hold the relevant storage posi-
tion button 1,2or 3until the seat, steering
wheel and exterior mirrors are in the stored position.
i The setting procedure is interrupted as
soon as you release the storage position
button. 106
Memory functionSeats, steering wheel and mirrors