flat tire MERCEDES-BENZ SLK-Class 2016 R172 Owner's Guide
[x] Cancel search | Manufacturer: MERCEDES-BENZ, Model Year: 2016, Model line: SLK-Class, Model: MERCEDES-BENZ SLK-Class 2016 R172Pages: 358, PDF Size: 7.24 MB
Page 334 of 358
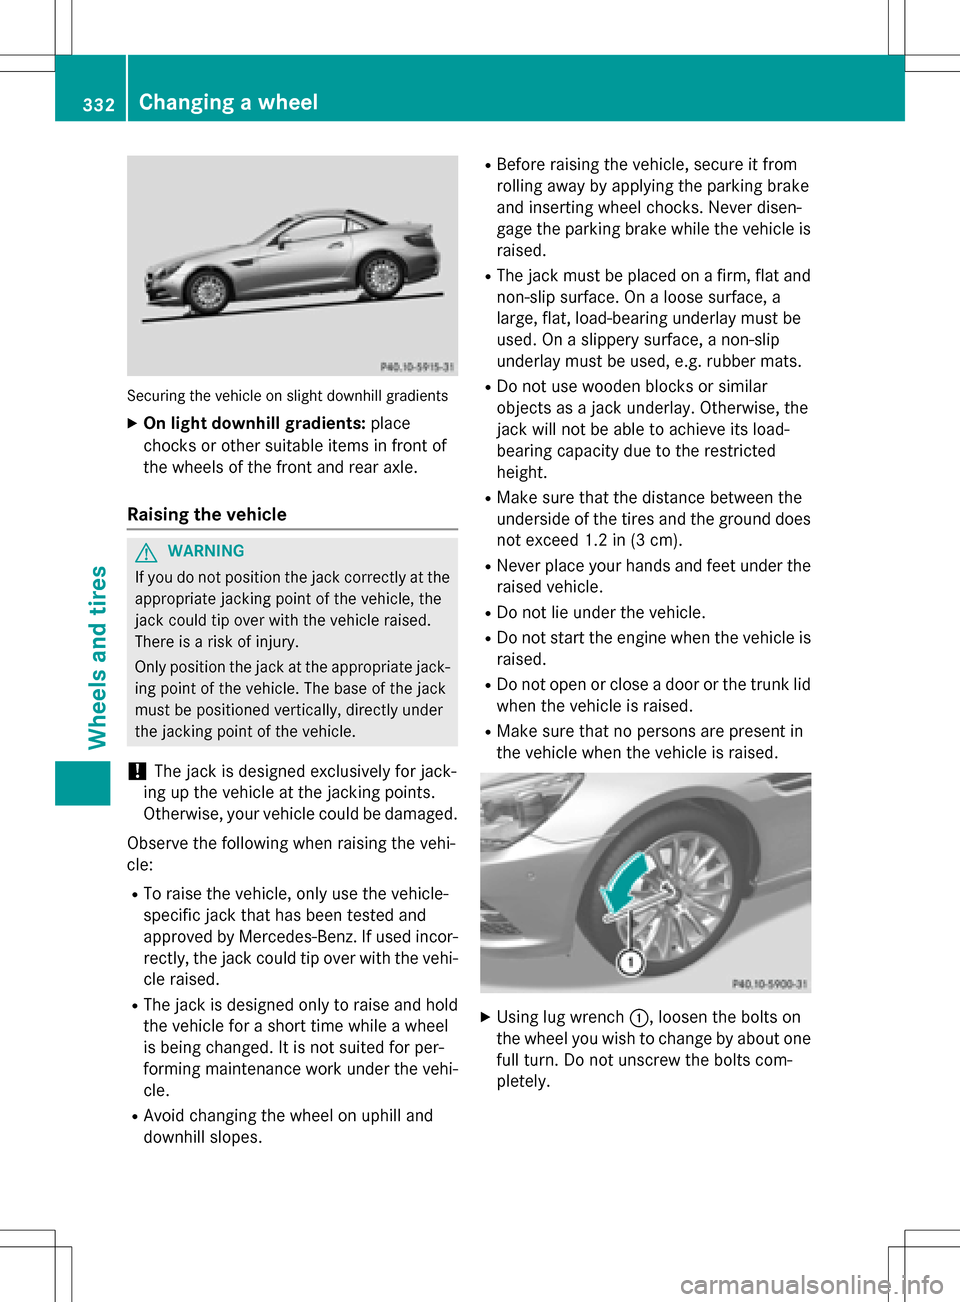
Securing the vehicle on slight downhill gradients
XOn light downhill gradients:place
chocks or other suitable items in front of
the wheels of the front and rear axle.
Raising the vehicle
GWARNING
If you do not position the jack correctly at the
appropriate jacking point of the vehicle, the
jack could tip over with the vehicle raised.
There is a risk of injury.
Only position the jack at the appropriate jack-
ing point of the vehicle. The base of the jack
must be positioned vertically, directly under
the jacking point of the vehicle.
!The jack is designed exclusively for jack-
ing up the vehicle at the jacking points.
Otherwise, your vehicle could be damaged.
Observe the following when raising the vehi-
cle:
RTo raise the vehicle, only use the vehicle-
specific jack that has been tested and
approved by Mercedes-Benz. If used incor-
rectly, the jack could tip over with the vehi- cle raised.
RThe jack is designed only to raise and hold
the vehicle for a short time while a wheel
is being changed. It is not suited for per-
forming maintenance work under the vehi-
cle.
RAvoid changing the wheel on uphill and
downhill slopes.
RBefore raising the vehicle, secure it from
rolling away by applying the parking brake
and inserting wheel chocks. Never disen-
gage the parking brake while the vehicle is
raised.
RThe jack must be placed on a firm, flat and
non-slip surface. On a loose surface, a
large, flat, load-bearing underlay must be
used. On a slippery surface, a non-slip
und erla
y must be used, e.g. rubber mats.
RDo not use wooden blocks or similar
objects as a jack underlay. Otherwise, the
jack will not be able to achieve its load-
bearing capacity due to the restricted
height.
RMake sure that the distance between the
underside of the tires and the ground does
not exceed 1.2 in (3 cm).
RNever place your hands and feet under the
raised vehicle.
RDo not lie under the vehicle.
RDo not start the engine when the vehicle is
raised.
RDo not open or close a door or the trunk lid
when the vehicle is raised.
RMake sure that no persons are present in
the vehicle when the vehicle is raised.
XUsing lug wrench :, loosen the bolts on
the wheel you wish to change by about one
full turn. Do not unscrew the bolts com-
pletely.
332Changing a wheel
Wheels and tires
Page 336 of 358
Mounting a new wheel
GWARNING
Oiled or greased wheel bolts or damaged
wheel bolts/hub threads can cause the wheel bolts to come loose. As a result, you could
lose a wheel while driving. There is a risk of
accident.
Never oil or grease wheel bolts. In the event of
damage to the threads, contact a qualified
specialist workshop immediately. Have the
damaged wheel bolts or hub threads
replaced/renewed. Do not continue driving.
GWARNING
If you tighten the wheel bolts or wheel nuts
when the vehicle is raised, the jack could tip
over. There is a risk of injury.
Only tighten the wheel bolts or wheel nuts
when the vehicle is on the ground.
Always pay attention to the instructions and
safety notes in the "Changing a wheel" sec-
tion (
Ypage 330).
Only use wheel bolts that have been designed for the wheel and the vehicle. For safety rea-
sons, Mercedes-Benz recommends that you
only use wheel bolts which have been
approved for Mercedes-Benz vehicles and the
respective wheel.
!To prevent damage to the paintwork, hold
the wheel securely against the wheel hub
while screwing in the first wheel bolt.
XClean the wheel and wheel hub contact
surfaces.
XSlide the wheel to be mounted onto the
alignment bolt and push it on.
XTighten the wheel bolts until they are fin-
ger-tight.
XUnscrew the alignment bolt.
XTighten the last wheel bolt until it is finger-
tight.
XVehicles with a collapsible spare wheel:
inflate the collapsible spare wheel
(
Ypage 340). Only then lower the vehicle.
Lowering the vehicle
GWARNING
The wheels could work loose if the wheel nuts and bolts are not tightened to the specified
tightening torque. There is a risk of accident.
Have the tightening torque immediately
checked at a qualified specialist workshop
after a wheel is changed.
XTurn the crank of the jack counter-clock-
wise until the vehicle is once again standing
firmly on the ground.
XPlace the jack to one side.
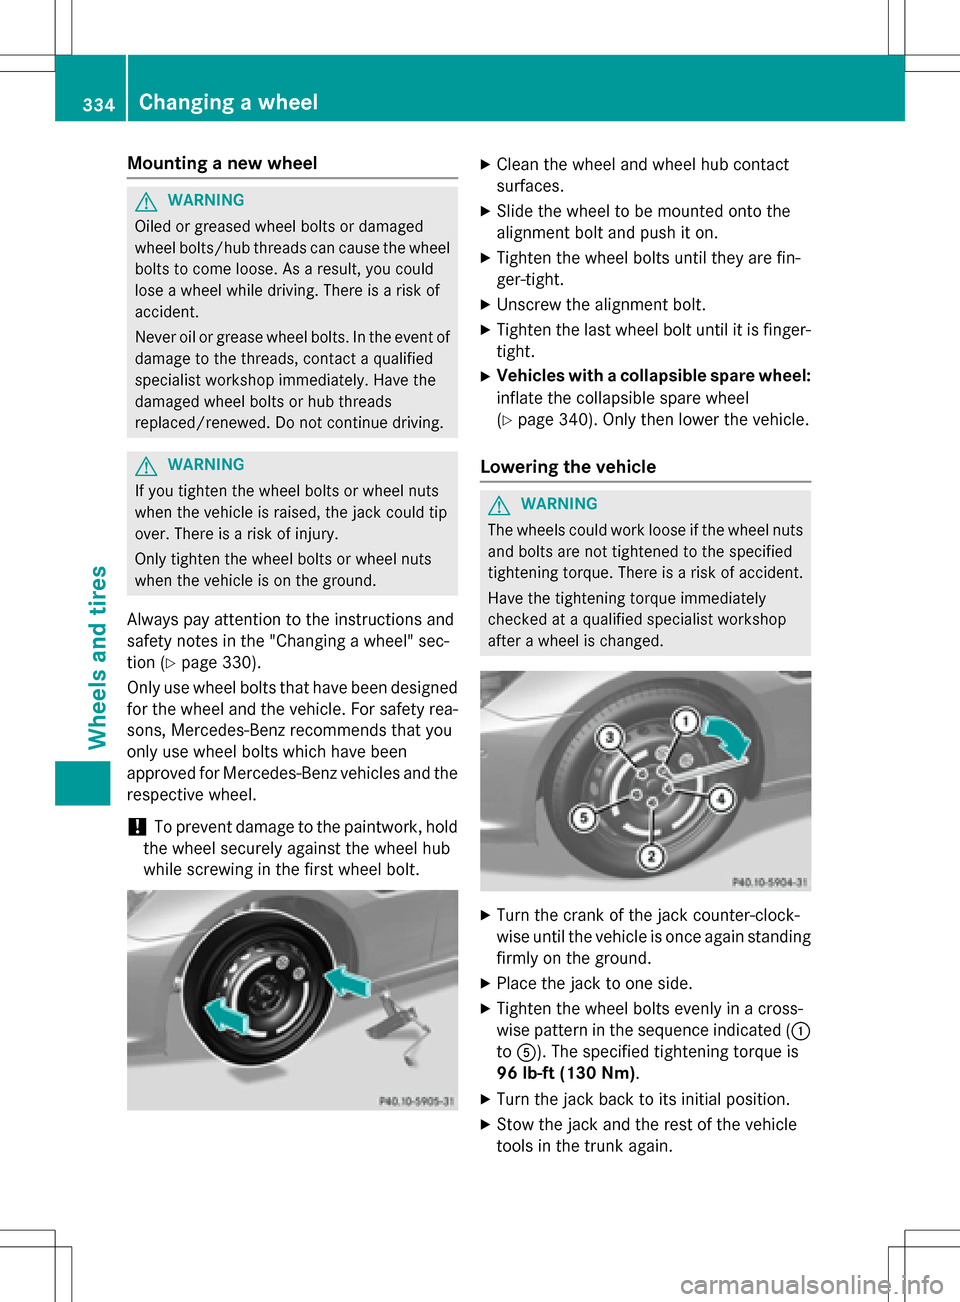
XTighten the wheel bolts evenly in a cross-
wise pattern in the sequence indicated ( :
to A). The specified tightening torque is
96 lb-ft (130 Nm).
XTurn the jack back to its initial position.
XStow the jack and the rest of the vehicle
tools in the trunk again.
334Changing a wheel
Wheels and tires
Page 337 of 358
XMercedes-AMG vehicles and vehicles
with AMG equipment:insert the cover
into the outer sill.
XCheck the tire pressure of the newly moun-
ted wheel and adjust it if necessary.
Observe the recommended tire pressure
(
Ypage 311).
iWhen you are driving with the collapsible
spare wheel mounted, the tire pressure
loss warning system or the tire pressure
monitor cannot function reliably. Only
restart the tire pressure loss warning sys-
tem or tire pressure monitor when the
defective wheel has been replaced with a
new wheel.
Vehicles with a tire pressure control
system: all installed wheels must be equip-
ped with functioning sensors.
Wheel and tire combinations
General notes
!
For safety reasons, Mercedes-Benz rec-
ommends that you only use tires and
wheels which have been approved by
Mercedes-Benz specifically for your vehi-
cle.
These tires have been specially adapted for
use with the control systems, such as ABS
or ESP
®, and are marked as follows:
RMO = Mercedes-Benz Original
RMOE = Mercedes-Benz Original Extended
(tires featuring run-flat characteristics)
RMO1 = Mercedes-Benz Original (only cer-
tain AMG tires)
Mercedes-Benz Original Extended tires
may only be used on wheels that have been
specifically approved by Mercedes-Benz.
Only use tires, wheels or accessories tes-
ted and approved by Mercedes-Benz. Cer-
tain characteristics, e.g. handling, vehicle
noise emissions or fuel consumption, may
otherwise be adversely affected. In addi-
tion, when driving with a load, tire dimen- sion variations could cause the tires to
come into contact with the bodywork and
axle components. This could result in dam-
age to the tires or the vehicle.
Mercedes-Benz accepts no liability for
damage resulting from the use of tires,
wheels or accessories other than those tes-
ted and approved.
Information on tires, wheels and approved
combinations can be obtained from any
qualified specialist workshop.
!Retreaded tires are neither tested nor rec-
ommended by Mercedes-Benz, since pre-
vious damage cannot always be detected
on retreaded tires. As a result, Mercedes-
Benz cannot guarantee vehicle safety if
retreaded tires are mounted. Do not mount
used tires if you have no information about
their previous usage.
Overview of abbreviations used in the follow-
ing tire tables:
RBA: both axles
RFA: front axle
RRA: rear axle
The recommended pressures for various
operating conditions can be found:
Ron the Tire and Loading Information placard
with the recommended tire pressures on
the B-pillar on the dri
ver's side
Rin the tire pressure table on the inside of the
fuel filler flap
Observe the notes on recommended tire
pressures under various operating conditions
(
Ypage 311).
Check tire pressures regularly, and only when
the tires are cold. Comply with the mainte-
nance recommendations of the tire manufac-
turer in the vehicle document wallet.
Notes on the vehicle equipment – always
equip the vehicle with:
Rwith tires of the same size on a given axle
(left and right)
Rthe same type of tires at a given time (sum-
mer tires, winter tires, MOExtended tires)
Wheel and tire combinations335
Wheels and tires
Z
Page 338 of 358
Exception: it is permissible to install a dif-
ferent type or make in the event of a flat
tire. Observe the "MOExtended tires (tires
with run-flat characteristics" section
(
Ypage 291).
Vehicles equipped with MOExtended tires are not equipped with a TIREFIT kit at the factory.
It is therefore recommended that you addi-
tionally equip your vehicle with a TIREFIT kit if
you mount tires that do not feature run-flat
properties, e.g. winter tires. A TIREFIT kit may
be obtained from a qualified specialist work-
shop.
iNot all wheel and tire combinations are
available at the factory for all countries.
iThe following pages contain information
on approved wheel rims and tire sizes for
equipping your vehicle with winter tires.
Winter tires are not available at the factory
as standard equipment or optional extras.
If you want to equip your vehicle with
approved winter tires, it may be necessary
to obtain wheel rims in the corresponding
size. The size of the approved winter tires
may differ from the standard tires. This is
dependent on the model and the equip-
ment installed at the factory.
The tire
s and wheel rims, as well as further
information, can be obtained at a qualified
specialist workshop.
336Wheel and tire combinations
Wheels and tires
Page 342 of 358
found on the wheel or under "Technical data"
(
Ypage 342).
An emergency spare wheel may also be
mounted against the direction of rotation.
Observe the time restriction on use as well as
the speed limitation specified on the emer-
gency spare wheel.
Replace the tires after six years at the latest,
regardless of wear. This also applies to the
emergency spare wheel.
iWhen you are driving with the collapsible
spare wheel mounted, the tire pressure
loss warning system or the tire pressure
monitor cannot function reliably. Only
restart the tire pressure loss warning sys-
tem or tire pressure monitor when the
defective wheel has been replaced with a
new wheel.
Vehicles with tire pressure monitor:
after mounting an emergency spare wheel,
the system may still display the tire pres-
sure of the removed wheel for a few
minutes. The value displayed for the moun-
ted emergency spare wheel is not the same
as the current tire pressure of the emer-
gency spare wheel.
Removing the emergency spare wheel
(Example)
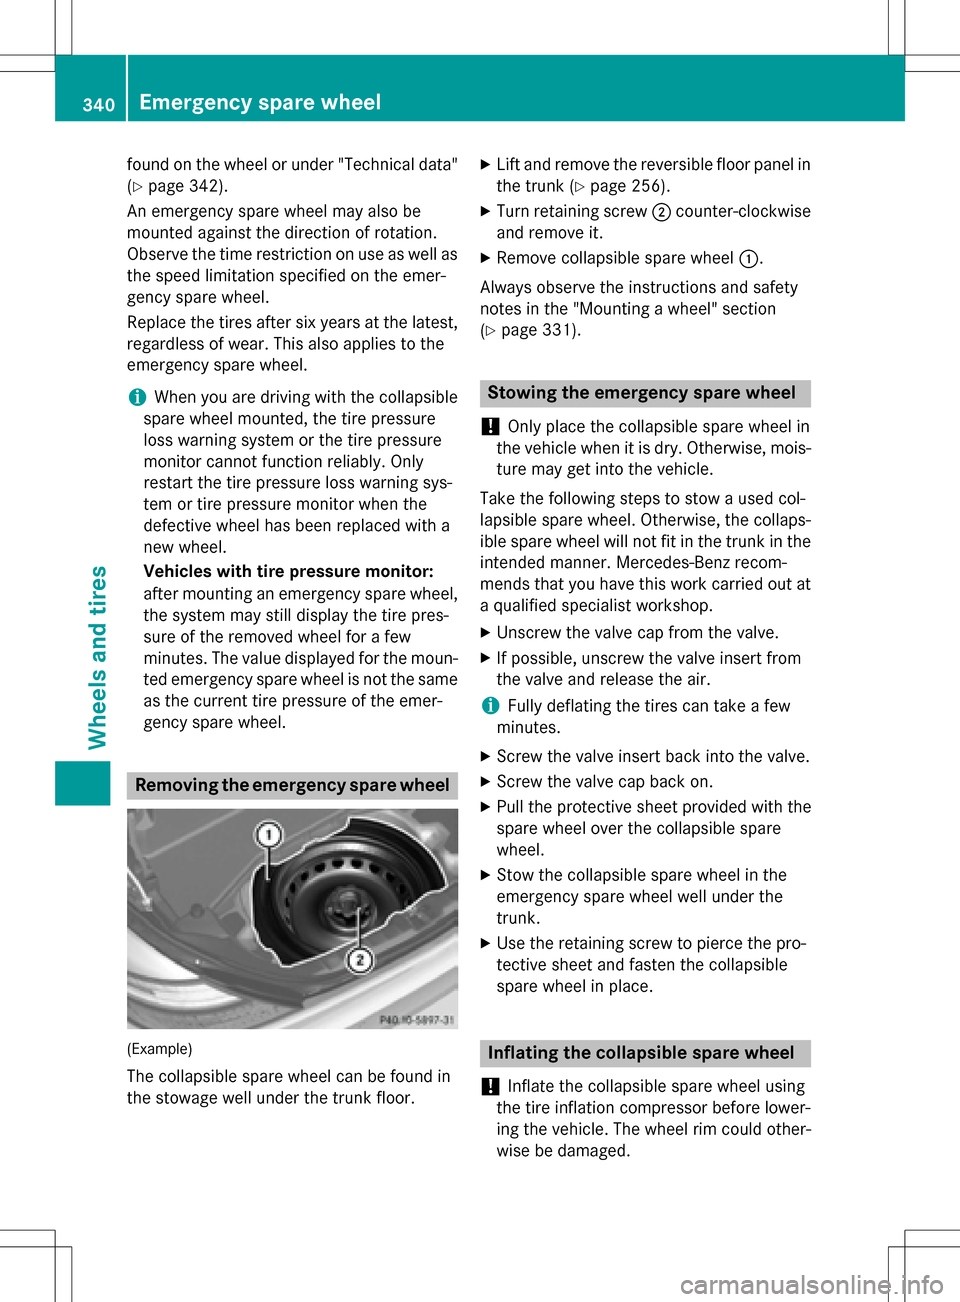
The collapsible spare wheel can be found in
the stowage well under the trunk floor.
XLift and remove the reversible floor panel in
the trunk (
Ypage 256).
XTurn retaining screw ;counter-clockwise
and remove it.
XRemove collapsible spare wheel :.
Always observe the instructions and safety
notes in the "Mounting a wheel" section
(
Ypage 331).
Stowing the emergency spare wheel
!
Only place the collapsible spare wheel in
the vehicle when it is dry. Otherwise, mois-
ture may get into the vehicle.
Take the following steps to stow a used col-
lapsible spare wheel. Otherwise, the collaps-
ible spare wheel will not fit in the trunk in the
intended manner. Mercedes-Benz recom-
mends that you have this work carried out at
a qualified specialist workshop.
XUnscrew the valve cap from the valve.
XIf possible, unscrew the valve insert from
the valve and release the air.
iFully deflating the tires can take a few
minutes.
XScrew the valve insert back into the valve.
XScrew the valve cap back on.
XPull the protective sheet provided with the
spare wheel over the collapsible spare
wheel.
XStow the collapsible spare wheel in the
emergency spare wheel well under the
trunk.
XUse the retaining screw to pierce the pro-
tective sheet and fasten the collapsible
spare wheel in place.
Inflating the collapsible spare wheel
!
Inflate the collapsible spare wheel using
the tire inflation compressor before lower-
ing the vehicle. The wheel rim could other-
wise be damaged.
340Emergency spare wheel
Wheels and tires
Page 343 of 358
!Do not operate the tire inflation compres-
sor for longer than ten minutes at a time
without a break. It may otherwise overheat.
The tire inflation compressor can be oper-
ated again once it has cooled down.
XMount the collapsible spare wheel as
described (
Ypage 331).
The collapsible spare wheel must be moun-
ted before it is inflated.
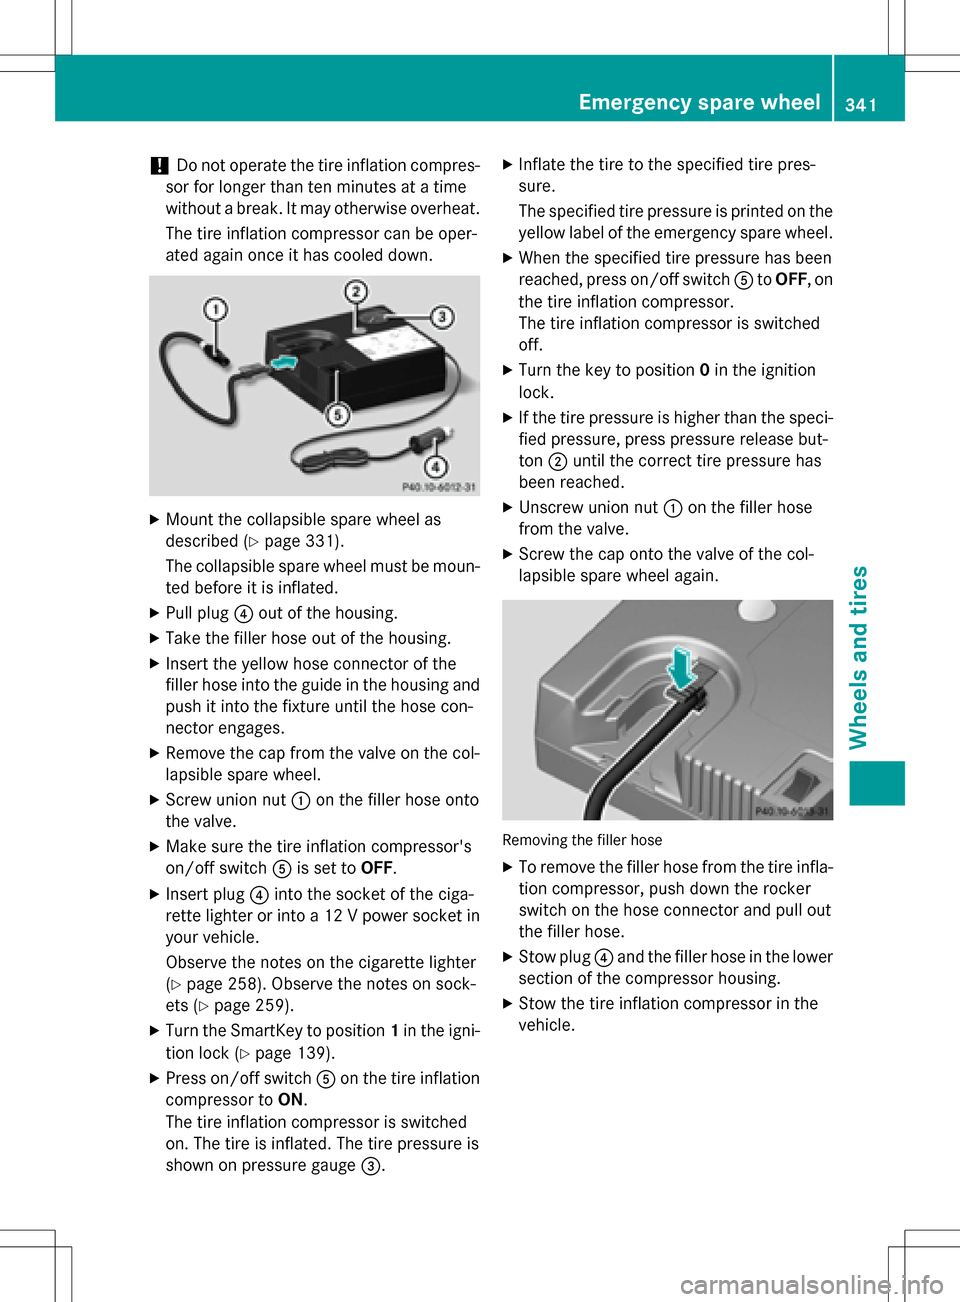
XPull plug ?out of the housing.
XTake the filler hose out of the housing.
XInsert the yellow hose connector of the
filler hose into the guide in the housing and
push it into the fixture until the hose con-
nector engages.
XRemove the cap from the valve on the col-
lapsible spare wheel.
XScrew union nut :on the filler hose onto
the valve.
XMake sure the tire inflation compressor's
on/off switch Ais set to OFF.
XInsert plug ?into the socket of the ciga-
rette lighter or into a 12 V power socket in
your vehicle.
Observe the notes on the cigarette lighter
(
Ypage 258). Observe the notes on sock-
ets (
Ypage 259).
XTurn the SmartKey to position 1in the igni-
tion lock (
Ypage 139).
XPress on/off switch Aon the tire inflation
compressor to ON.
The tire inflation compressor is switched
on. The tire is inflated. The tire pressure is
shown on pressure gauge =.
XInflate the tire to the specified tire pres-
sure.
The specified tire pressure is printed on the
yellow label of the emergency spare wheel.
XWhen the specified tire pressure has been
reached, press on/off switch AtoOFF , on
the tire inflation compressor.
The tire inflation compressor is switched
off.
XTurn the key to position 0in the ignition
lock.
XIf the tire pressure is higher than the speci- fied pressure, press pressure release but-
ton ;until the correct tire pressure has
been reached.
XUnscrew union nut :on the filler hose
from the valve.
XScrew the cap onto the valve of the col-
lapsible spare wheel again.
Removing the filler hose
XTo remove the filler hose from the tire infla-
tion compressor, push down the rocker
switch on the hose connector and pull out
the filler hose.
XStow plug ?and the filler hose in the lower
section of the compressor housing.
XStow the tire inflation compressor in the
vehicle.
Emergency spare wheel341
Wheels and tires
Z