check oil MERCEDES-BENZ SLK-Class 2016 R172 Owner's Manual
[x] Cancel search | Manufacturer: MERCEDES-BENZ, Model Year: 2016, Model line: SLK-Class, Model: MERCEDES-BENZ SLK-Class 2016 R172Pages: 358, PDF Size: 7.24 MB
Page 7 of 358
Authorizedworkshop
see Qualified specialist workshop
AUT O lights
Dis play message ............................ 227
see Lights
Aut oma tic car wash (care) ...............282
Automatic engine start (ECO start/
stop function) ....................................1 45
Automatic engine switch-off (ECO
start/stop function) .......................... 144
Automatic headlamp mode .............. 108
Automatic transmission
Accelerator pedal position ............. 151
Automatic drive program ...............1 53
Changing gear ............................... 151
Display message ............................ 236
Driving tips ....................................1 51
Emergency running mode .............. 157
Engaging the park position ............ 149
Kickdown ....................................... 152
Manual drive program .................... 153
Manual drive program (vehicles
with Sports package AMG) ............ 155
Oil temperature (on-board com-
puter, Mercedes-AMG vehicles) ..... 208
Overview ........................................ 148
Problem (malfunction) ................... 157
Program selector button ................ 152
Pulling away ................................... 142
Releasing the parking lock man-
ually ............................................... 157
Selector lever ................................ 148
Starting the engine ........................ 142
Steering wheel paddle shifters ...... 152
Transmission position display ........ 149
Transmission positions .................. 151
Automatic transmission emer-
gency mode ....................................... 157
B
Backup lamp
Changing bulbs .............................. 117
BAS (Brake Assist System) ................. 62
Battery (SmartKey)
Checking .......................................... 75
Important safety notes .................... 75
Replacing ......................................... 75 Battery (vehicle)
Charging ........................................ 298
Display message ............................ 228
Important safety notes .................. 296
Jump starting ................................. 299
Overview ........................................ 296
Belt
see Seat belts
Blind Spot Assist
Activating/deactivating ................. 203
Display message ............................ 231
Notes/function .............................. 188
Brake Assist
see BAS (Brake Assist System)
Brake fluid
Display message ............................ 218
Notes ............................................. 350
Brake force distribution
see EBD (electronic brake force
distribution)
Brake lamps
Display message ............................ 225
Brakes
ABS .................................................. 61
Adaptive Brake Assist ...................... 64
BAS .................................................. 62
Brake fluid (notes) ......................... 350
Display message ............................ 212
EBD .................................................. 69
High-performance brake system .... 167
Important safety notes .................. 165
Maintenance .................................. 166
Parking brake ................................ 161
Riding tips ...................................... 165
Warning lamp ................................. 243
Breakdown
Where will I find...? ........................ 290
see Flat tire
see Towing away
Brightness control (instrument
cluster lighting) ................................... 31
Bulbs
see Replacing bulbs
Index5
Page 11 of 358
EBD (electronic brake force distri-
bution)Display message ............................ 214
Function/notes ................................ 69
ECO display
Function/notes ............................ .164
On-board computer ....................... 198
ECO start/stop function
Automatic engine start .................. 145
Automatic engine switch-off .......... 144
Deactivating/activating ................. 145
General information ....................... 143
Important safety notes .................. 143
Introduction ................................... 143
Electronic Stability Program
see ESP
®(Electronic Stability Program)
Emergency
Automatic measures after an acci-
dent ................................................. 57
Emergency release
Driver's door ....................................8 0
Trunk ............................................... 82
Vehicle ............................................. 80
Emergency spare wheel
General notes ................................ 339
Important safety notes .................. 339
Removing ....................................... 340
Stowing .......................................... 340
Technical data ...............................3 42
Emergency Tensioning Devices
Activation ......................................... 54
Emissions control
Service and warranty information .... 22
Engine
Check Engine warning lamp ........... 249
Display message ............................ 227
ECO start/stop function ................ 143
Engine number ............................... 346
Irregular running ............................ 147
Jump-starting ................................. 299
Starting problems .......................... 147
Starting the engine with the
Sma
rtKey ....................................... 142
Starting with KEYLESS-GO ............. 142
Switching off .................................. 161
Tow-starting (vehicle) ..................... 303
Engine electronics
Notes ............................................. 344 Problem (malfunction) ................... 147
Engine oil
Adding ...........................................2 78
Additives ........................................ 349
Checking the oil level ..................... 277
Checking the oil level using the
dipstick .......................................... 277
Display message ............................ 229
Filling capacity ............................... 349
Notes about oil grades ................... 349
Notes on oil level/consumption .... 277
Temperature (on-board computer,
Mercedes-AMG vehicles) ...............2 08
Viscosity ........................................ 349
ESP
®(Electronic Stability Pro-
gram)
AMG menu (on-board computer) ... 208
Characteristics ................................. 66
Deactivating/activating (except
Mercedes‑ AMG vehicles) ................. 66
Deactivating/activating
(Mercedes‑AMG vehicles) ................ 67
Display message ............................ 212
Function/notes ................................ 65
General notes .................................. 65
Important safety information ........... 66
Warning lamp ................................. 245
ETS/4ETS (Electronic Traction Sys-
tem) ...................................................... 66
Exhaust check ................................... 164
Exhaust pipe (cleaning instruc-
tions) ..................................................2 85
Exterior lighting
Setting options .............................. 108
see Lights
Exterior mirrors
Adjusting ....................................... 103
Dipping (automatic) ....................... 104
Folding in when locking (on-board
computer) ...................................... 207
Folding in/out (automatically) ....... 104
Folding in/out (electrically) ........... 104
Out of position (troublesho oting) ... 104
Sto
ring settings (memory func-
tion) ............................................... 106
Storing the parking position .......... 105
Eyeglasses compartment ................. 255
Index9
Page 19 of 358
Downloading destinations
(COMAND) .....................................264
Downloading routes ....................... 267
Emergency call .............................. 261
General notes ................................ 259
Geo fencing ................................... 267
Locating a stolen vehicle ...............2 66
MB info call button ........................ 263
Remote vehicle locking .................. 265
Roadside Assistance button .......... 262
Search & Send ............................... 264
Self-test ......................................... 260
Speed alert ....................................2 67
System .......................................... 260
Triggering the vehicle alarm ........... 268
Vehicle Health Check .................... 266
Vehicle remote unlocking .............. 265
Telephone
Accepting a call (multifunction
steering wheel) .............................. 202
Display message ............................ 239
Menu (on-board computer) ............ 201
Number from the phone book ........2 02
Redialing ........................................ 202
Rejecting/ending a call ................. 202
Temperature
Coolant .......................................... 195
Coolant (on-board computer,
Mercedes-AMG vehicles) ...............2 08
Engine oil (on-board computer,
Mercedes-AMG vehicles) ...............2 08
Outside temperature ......................1 95
Setting (climate control) ................ 129
Transmission oil (on-board com-
puter, Mercedes-AMG vehicles) ..... 208
Time
see separate operating instructions
Timing (RACETIMER) ......................... 208
Tire pressure
Calling up (on-board computer) ..... 316
Checking manually ........................ 315
Display message ............................ 234
Maximum ....................................... 314
Not reached (TIREFIT) .................... 294
Notes ............................................. 313
Reached (TIREFIT) .......................... 294
Recommended ............................... 311 Tire pressure loss warning system
General notes ................................ 315
Important safe ty notes .................. 315
R
estarting ...................................... 315
Tire pressure monitor
Checking the tire pressure elec-
tronically ........................................ 318
Function/notes .............................3 16
General notes ................................ 316
Important safety notes .................. 316
Radio type approval for the tire
pressure monitor ........................... 319
Restarting ...................................... 318
Warning lamp ................................. 252
Warning message .......................... 318
TIREFIT kit .......................................... 292
Tire pressure not reached .............. 294
Tire pressure reached .................... 294
Tires
Aspect ratio (definition) ................. 329
Average weight of the vehicle
occupants (definition) .................... 328
Bar (definition) ............................... 328
Changing a wheel .......................... 330
Characteristics .............................. 327
Checking ........................................ 309
Curb weight (definition) ................. 329
Definition of terms ......................... 327
Direction of rotation ...................... 330
Display message ............................ 234
Distribution of the vehicle occu-
pants (definition) ............................ 330
DOT (Department of Transporta-
tion) (definition) ............................. 328
DOT, Tire Identification Number
(TIN) ............................................... 327
GAWR (Gross Axle Weight Rating)
(definition) ..................................... 328
General notes ................................ 335
GVW (Gross Vehicle Weight) (def-
inition) ........................................... 328
GVWR (Gross Vehicle Weight Rat-ing) (definition) .............................. 328
Important safety notes .................. 308
Increased vehicle weight due to
optional equipment (definition) ...... 328
Information on driving .................... 308
Kilopascal (kPa) (definition) ........... 328
Index17
Page 159 of 358
Problems with the transmission
ProblemPossible causes/consequences andMSolutions
The transmission has
problems shifting gear.The transmission is losing oil.
XHave the transmission checked at a qualified specialist work-
shop immediately.
The acceleration ability
is deteriorating.
The transmission no
longer changes gear.The transmission is in emergency mode.
7G-TRONIC:it is only possible to shift into secondgear and
reverse gear.
9G-TRONIC: it is only partly possible to engage the gears or the
transmission is in position N.
XStop the vehicle.
XShift the transmission to position P.
XSwitch off the engine.
XWait at least ten seconds before restarting the engine.
XShift the transmission to positionDor R.
7G-TRONIC: IfD is selected, the transmission shifts into sec-
ond gear, if Ris selected, the transmission shifts into reverse
gear.
XHave the transmission checked at a qualified specialist work-
shop immediately.
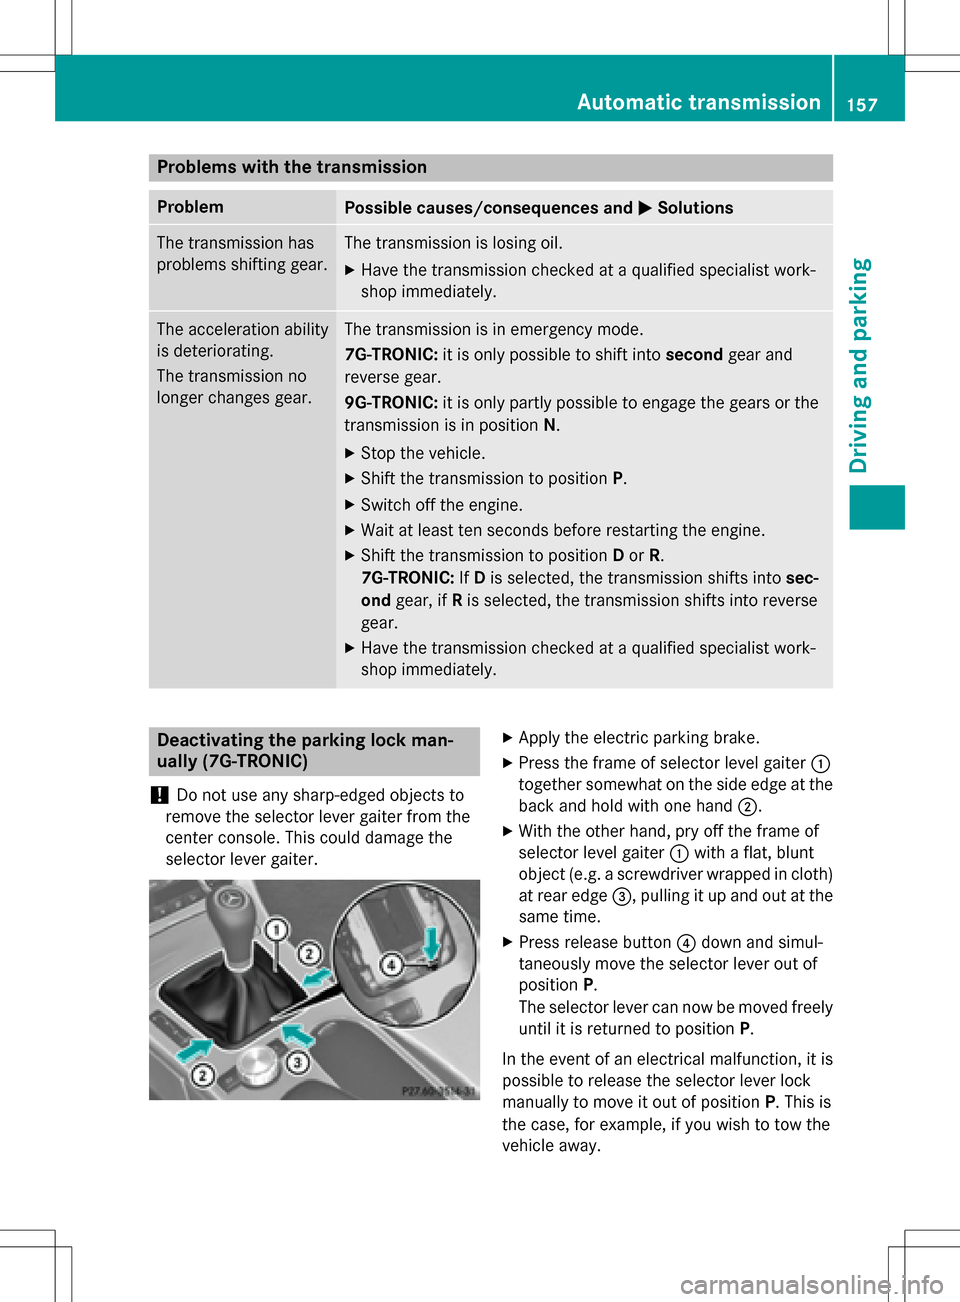
Deactivating the parking lock man-
ually (7G-TRONIC)
!
Do not use any sharp-edged objects to
remove the selector lever gaiter from the
center console. This could damage the
selector lever gaiter.
XApply the electric parking brake.
XPress the frame of selector level gaiter :
together somewhat on the side edge at the
back and hold with one hand ;.
XWith the other hand, pry off the frame of
selector level gaiter:with a flat, blunt
object (e.g. a screwdriver wrapped in cloth) at rear edge =, pulling it up and out at the
same time.
XPress release button ?down and simul-
taneously move the selector lever out of
position P.
The selector lever can now be moved freely
until it is returned to position P.
In the event of an electrical malfunction, it is
possible to release the selector lever lock
manually to move it out of position P. This is
the case, for example, if you wish to tow the
vehicle away.
Automatic transmission157
Driving and parking
Z
Page 231 of 358
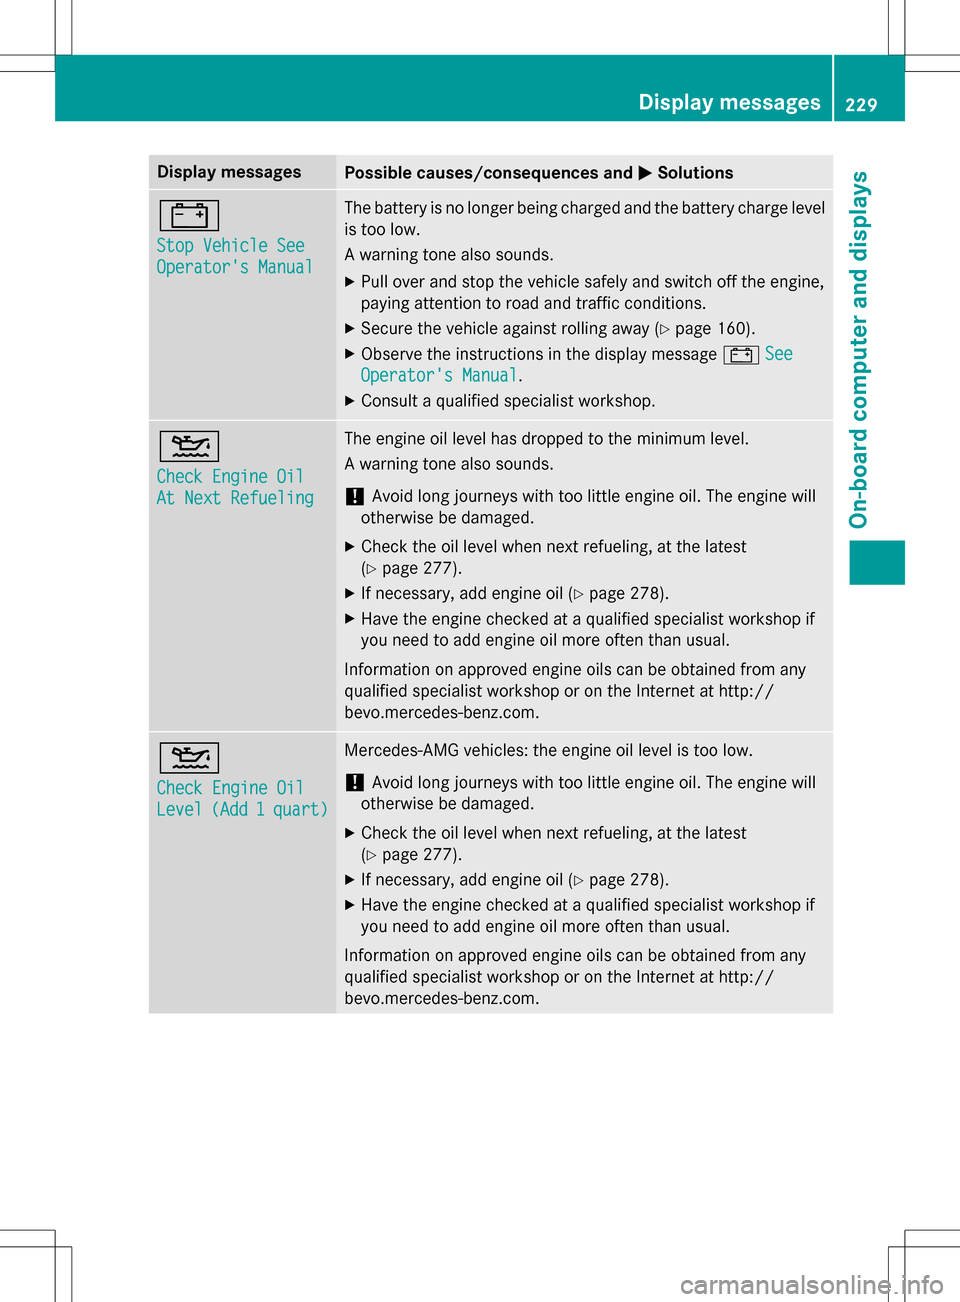
Display messagesPossible causes/consequences andMSolutions
#
StopVehicl eSee
Operator' sManual
The battery is no longer bein gcharged and th ebattery charg elevel
is to olow.
A warnin gtone also sounds.
XPull ove rand stop th evehicl esafely and switch of fth eengine,
payin gattention to roa dand traffic conditions.
XSecur eth evehicl eagainst rollin gaway (Ypage 160).
XObserv eth einstruction sin th edisplay message #See
Operator' sManual.
XConsult aqualified specialist workshop .
4
Check Engine Oil
At NextRefueling
The engin eoil level has dropped to th eminimum level.
A warnin gtone also sounds.
!Avoid lon gjourneys wit hto olittl eengin eoil. The engin ewill
otherwise be damaged.
XChec kth eoil level when next refueling, at th elatest
(
Ypage 277).
XIf necessary, add engin eoil (Ypage 278).
XHav eth eengin echecke dat aqualified specialist workshop if
you need to add engin eoil mor eofte nthan usual.
Information on approve dengin eoils can be obtained from any
qualified specialist workshop or on th eInternet at http:/ /
bevo.mercedes-benz.com.
4
Check Engine Oil
Level(Ad d1quart)
Mercedes-AMG vehicles: th eengin eoil level is to olow.
!Avoid lon gjourneys wit hto olittl eengin eoil. The engin ewill
otherwise be damaged.
XChec kth eoil level when next refueling, at th elatest
(
Ypage 277).
XIf necessary, add engin eoil (Ypage 278).
XHav eth eengin echecke dat aqualified specialist workshop if
you need to add engin eoil mor eofte nthan usual.
Information on approve dengin eoils can be obtained from any
qualified specialist workshop or on th eInternet at http:/ /
bevo.mercedes-benz.com.
Display messages22 9
On-board computer and displays
Z
Page 232 of 358
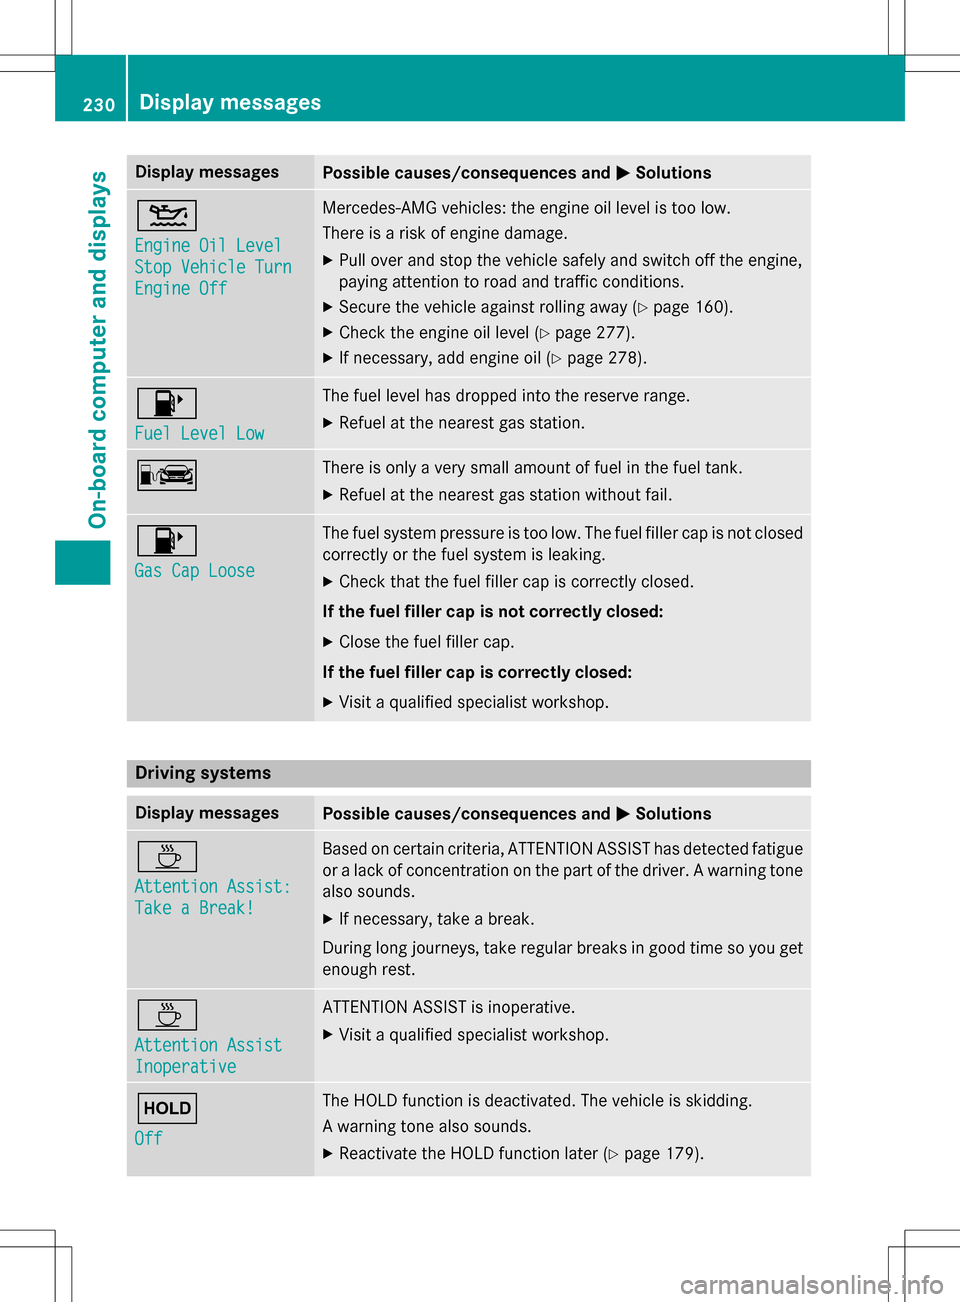
Display messagesPossible causes/consequences andMSolutions
4
Engine Oil Level
StopVehicl eTur n
Engine Off
Mercedes-AMG vehicles: th eengin eoil level is to olow.
There is aris kof engin edamage.
XPull ove rand stop th evehicl esafely and switch of fth eengine,
payin gattention to roa dand traffic conditions.
XSecur eth evehicl eagainst rollin gaway (Ypage 160).
XCheckth eengin eoil level (Ypage 277).
XIf necessary, add engin eoil (Ypage 278).
8
Fue lLevel Low
The fuel level has dropped into th ereserv erange.
XRefuel at th eneares tgas station .
CThere is only aver ysmall amount of fue lin th efuel tank.
XRefuel at th eneares tgas station without fail .
8
Gas Cap Loose
The fuel system pressur eis to olow. The fuel filler cap is no tclosed
correctl yor th efue lsystem is leaking.
XChec kthat th efuel filler cap is correctl yclosed .
If th efuel filler cap is not correctl yclosed :
XCloseth efuel filler cap .
If th efuel filler cap is correctl yclosed :
XVisitaqualified specialist workshop .
Driving systems
Display messagesPossible causes/consequences and MSolutions
À
Attention Assist:
Take a Break!
Based on certain criteria, ATTENTION ASSIST has detecte dfatigue
or alac kof concentration on th epart of th edriver . Awarnin gtone
also sounds.
XIf necessary, tak e abreak.
Durin glon gjourneys, tak eregular breaks in goo dtime so you get
enough rest.
À
Attention Assist
Inoperative
ATTENTION ASSIST is inoperative.
XVisit aqualified specialist workshop .
ë
Off
The HOLD function is deactivated. The vehicl eis skidding.
A warnin gtone also sounds.
XReactivat eth eHOLD function later (Ypage 179).
230Display messages
On-board computer and displays
Page 279 of 358
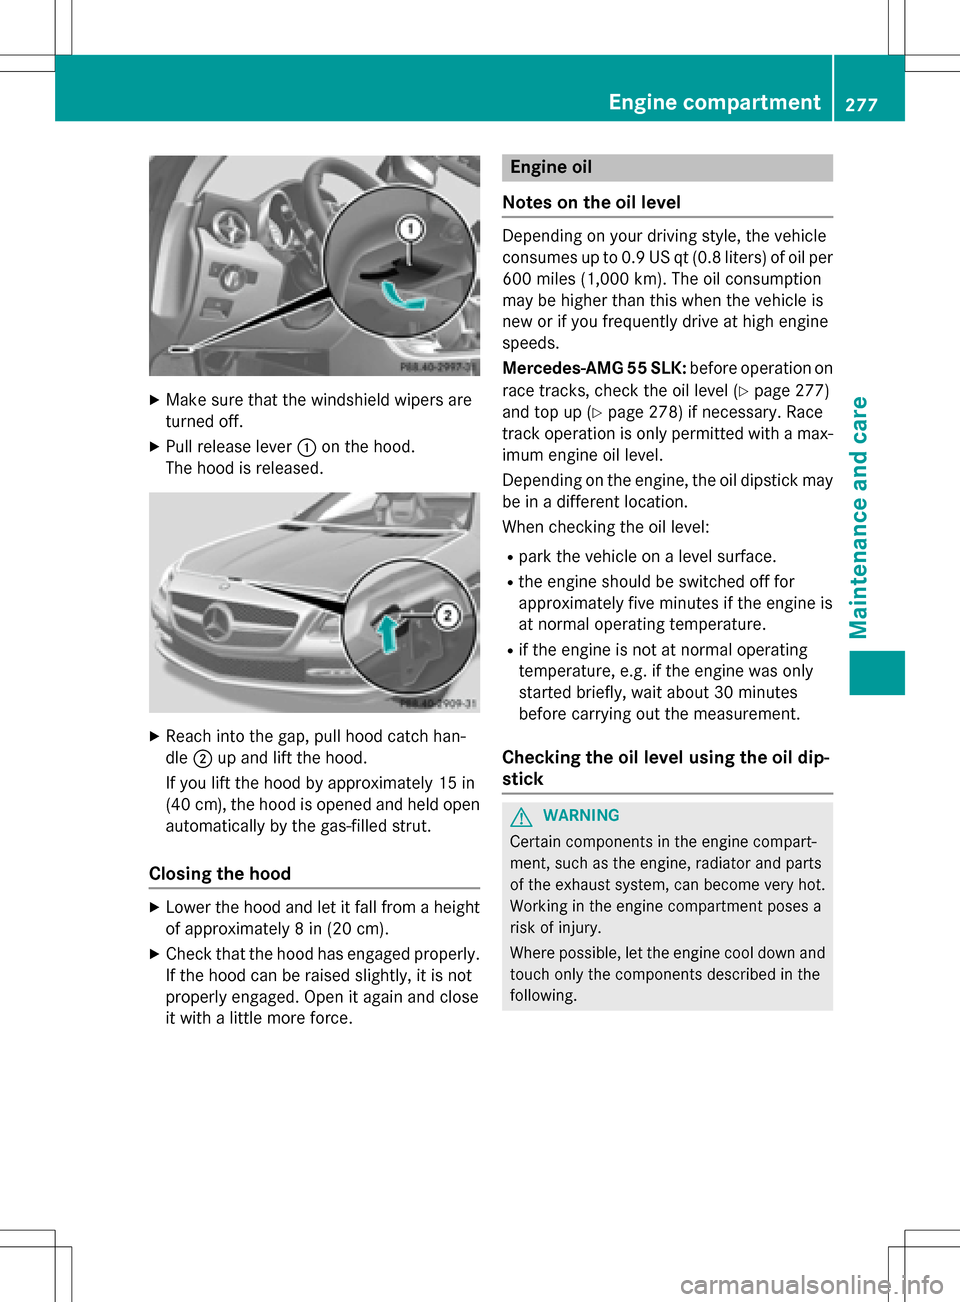
XMake sure that the windshield wipers are
turned off.
XPull release lever:on the hood.
The hood is released.
XReach into the gap, pull hood catch han-
dle ;up and lift the hood.
If you lift the hood by approximately 15 in
(40 cm), the hood is opened and held open automatically by the gas-filled strut.
Closing the hood
XLower the hood and let it fall from a height
of approximately 8 in (20 cm).
XCheck that the hood has engaged properly.
If the hood can be raised slightly, it is not
properly engaged. Open it again and close
it with a little more force.
Engine oil
Notes on the oil level
Depending on your driving style, the vehicle
consumes up to 0.9 US qt (0.8 liters) of oil per
600 miles (1,000 km). The oil consumption
may be higher than this when the vehicle is
new or if you frequently drive at high engine
speeds.
Mercedes-AMG 55 SLK: before operation on
race tracks, check the oil level (
Ypage 277)
and top up (
Ypage 278) if necessary. Race
track operation is only permitted with a max- imum engine oil level.
Depending on the engine, the oil dipstick may
be in a different location.
When checking the oil level:
Rpark the vehicle on a level surface.
Rthe engine should be switched off for
approximately five minutes if the engine is
at normal operating temperature.
Rif the engine is not at normal operating
temperature, e.g. if the engine was only
started briefly, wait about 30 minutes
before carrying out the measurement.
Checking the oil level using the oil dip-
stick
GWARNING
Certain components in the engine compart-
ment, such as the engine, radiator and parts
of the exhaust system, can become very hot.
Working in the engine compartment poses a
risk of injury.
Where possible, let the engine cool down and touch only the components described in the
following.
Engine compartment277
Maintenance and care
Z
Page 281 of 358
XReplacecap :on th efiller neck and tur n
clockwise .
Ensur ethat th ecap locks into plac e
securely.
XChec kth eoil level again wit hth eoil dip-
stick (
Ypage 277).
Further information on engin eoil
(
Ypage 349).
Checking and addin gother service
products
Checking coolant level
GWARNIN G
Certain component sin th eengin ecompart-
ment, suc has th eengine, radiato rand part s
of th eexhaust system, can become ver yhot .
Working in th eengin ecompartmen tposes a
ris kof injury.
Where possible, let th eengin ecool down and
touch only th ecomponent sdescribed in th e
following.
GWARNIN G
The engin ecoolin gsystem is pressurized, par-
ticularly when th eengin eis warm .Whe n
openin gth ecap ,you could be scalded by hot
coolan tsprayin gout .There is aris kof injury.
Let th eengin ecool down before openin gth e
cap .Wear eye and han dprotection when
openin gth ecap .Ope nth ecap slowly half a
tur nto allow pressur eto escape.
Exampl e
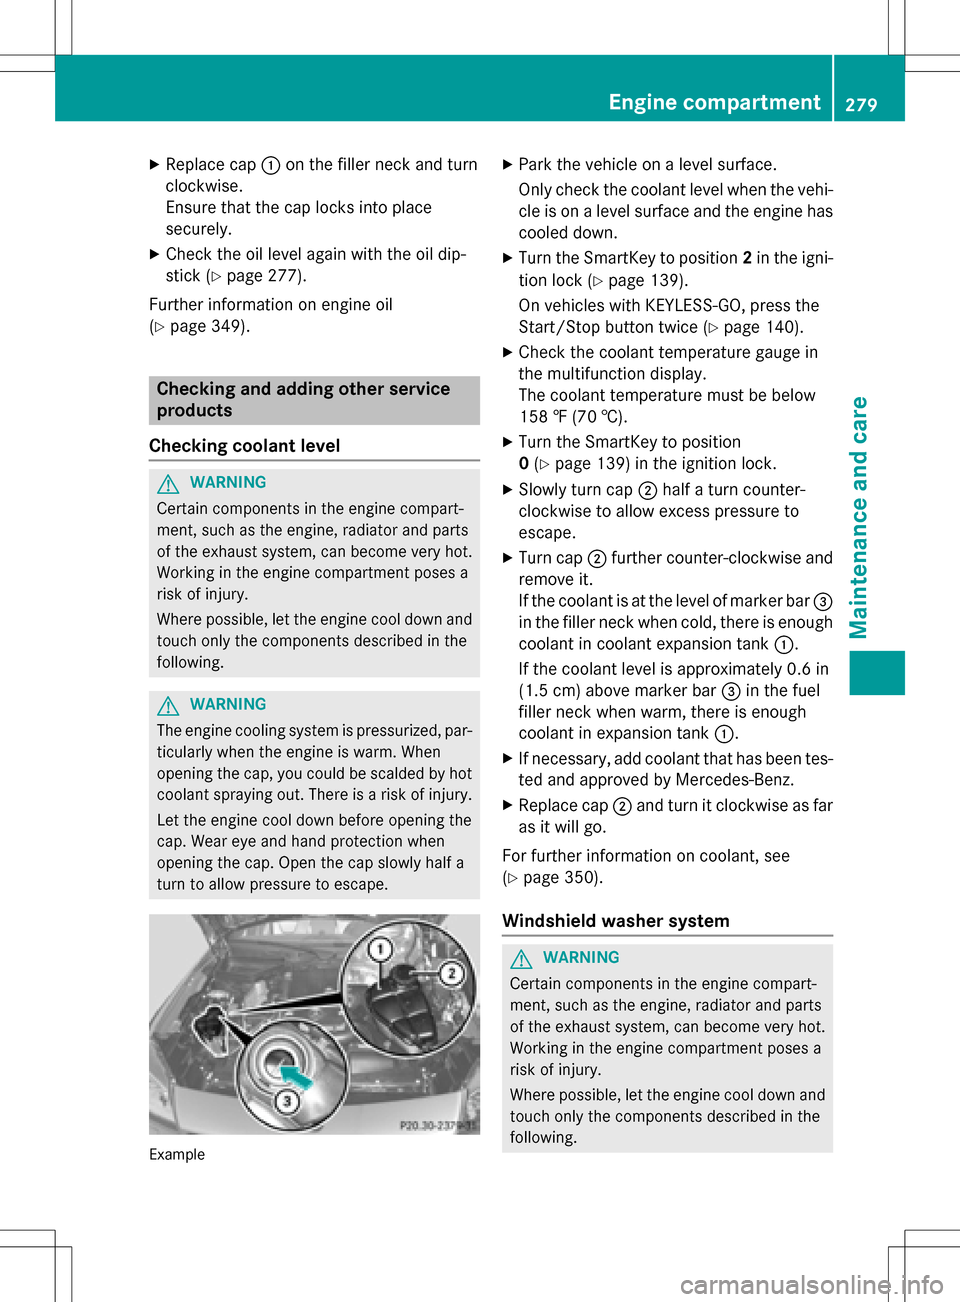
XPark thevehicl eon alevel surface.
Only chec kth ecoolan tlevel when th evehi-
cle is on alevel surfac eand th eengin ehas
cooled down .
XTurn theSmartKey to position 2in th eigni-
tion loc k (
Ypage 139).
On vehicles wit hKEYLESS-GO ,press th e
Start/Sto pbutto ntwice (
Ypage 140).
XCheckth ecoolan ttemperature gauge in
th emultifunction display.
The coolan ttemperature mus tbe belo w
15 8 ‡ (70 †).
XTurn th eSmartKey to position
0 (
Ypage 139) in th eignition lock.
XSlowly tur ncap ;half atur ncounter-
clockwise to allow excess pressur eto
escape.
XTurn cap ;further counter-clockwise and
remove it .
If th ecoolan tis at th elevel of marke rbar =
in th efiller neck when cold, there is enough
coolan tin coolan texpansion tan k:.
If th ecoolan tlevel is approximately 0. 6in
(1.5 cm ) above marker bar =in the fuel
filler neck when warm, there is enough
coolant in expansion tank :.
XIf necessary, add coolant that has been tes-
ted and approved by Mercedes-Benz.
XReplace cap;and turn it clockwise as far
as it will go.
For further information on coolant, see
(
Ypage 350).
Windshield washer system
GWARNING
Certain components in the engine compart-
ment, such as the engine, radiator and parts
of the exhaust system, can become very hot.
Working in the engine compartment poses a
risk of injury.
Where possible, let the engine cool downand
touch only the components describe d in the
foll owin g.
Engine compartment279
Maintenance and care
Z
Page 283 of 358
Displaying service messages
XSwitchon th eignition .
XPress th e= or; buttonon th esteer -
in g whee lto selec tth eServ.
menu.
XPress th e9 or: buttonto selec tth e
ASSYST PLU S
submenuand confirm by
pressing th ea button.
The servic edue dat eappears in th emulti-
function display.
Information about Service
Resetting th eASSYS TPLUS service
interva ldisplay
!If th eASSYST PLU Sservic einterval dis -
play has been inadvertentl yreset ,this set -
ting can be correcte dat aqualified special-
ist workshop .
Hav eservic ewor kcarrie dout as described
in th eMaintenance Booklet .Thi smay oth-
erwise lead to increase dwear and damage
to th emajor assemblies or th evehicle.
A qualified specialis tworkshop ,e.g. an
authorized Mercedes-Ben zCenter, will reset
th eASSYST PLU Sservic einterval display
after th eservic ewor khas been carrie dout .
You can also obtain further information on
maintenance work, fo rexample.
Specia lservice requirement s
The specifiedmaintenance interval take sonly
th enormal operation of th evehicle into
account. Under arduous operatin gcondition s
or increase dload on th evehicle, mainte -
nance wor kmus tbe carrie dout more fre-
quently, fo rexample:
Rregular city drivin gwit hfrequent intermedi-
at estops
Rif th evehicle is primarily used to trave l
short distances
Ruse in mountainous terrain or on poo rroad
surfaces
Rif th eengin eis ofte nlef tidlin gfo rlon gperi-
ods
Under these or similar conditions, have, fo r
example, th eair filter, engin eoil and oil filte r
replaced or changed more frequently. Under
arduous operatin gconditions, th etires mus t
be checke dmore often. Further information
can be obtained at aqualified specialist work-
shop, e.g. an authorized Mercedes-Ben zCen -
ter.
Drivin gabroad
An extensive Mercedes-Ben zServic enetwor k
is also available in other countries. You can
obtain further information from any author -
ized Mercedes-Ben zCenter.
Car e
Note son car e
HEnvironmental not e
Dispose of empty packagin gand cleanin g
cloths in an environmentally responsible man -
ner.
!Fo rcleanin gyour vehicle, do no tuse any
of th efollowing :
Rdry, rough or har dcloths
Rabrasiv ecleanin gagents
Rsolvents
Rcleanin gagents containin gsolvents
Do no tscrub .
Do no ttouch th esurfaces or protective
films wit hhar dobjects ,e.g. arin gor ic e
scraper. You could otherwise scratch or
damage th esurfaces and protective film.
!Do no tpar kth evehicle fo ran extended
period straight after cleanin git,particularly
after havin gcleaned th ewheels wit hwhee l
cleaner. Wheel cleaners could caus e
increase dcorrosion of th ebrake discs and
brake pads/linings. Fo rthis reason ,you
Care281
Maintenance and care
Z
Page 332 of 358
Traction
Traction is the result of friction between the
tires and the road surface.
Treadwear indicators
Narrow bars (tread wear bars) that are dis-
tributed over the tire tread. If the tire tread is
level with the bars, the wear limit ofáin
(1.6 mm) has been reached.
Occupant distribution
The distribution of occupants in a vehicle at
their designated seating positions.
Total load limit
Rated cargo and luggage load plus
68 kilograms (150 lb) multiplied by the num-
ber of seats in the vehicle.
Changing a wheel
Flat tire
The "Breakdown assistance" section
(
Ypage 291) contains information and notes
on how to deal with a flat tire. Information on driving with MOExtended tires in the event of
a flat tire can be found under "MOExtended
tires (tires with run-flat characteristics"
(
Ypage 291).
Rotating the wheels
GWARNING
Interchanging the front and rear wheels may
severely impair the driving characteristics if
the wheels or tires have different dimensions. The wheel brakes or suspension components
may also be damaged. There is a risk of acci-
dent.
Rotate front and rear wheels only if the wheels and tires are of the same dimensions.
!On vehicles equipped with a tire pressure
monitor, electronic components are loca-
ted in the wheel. Tire-mounting tools should not be used
near the valve. This could damage the elec-
tronic components.
Only have tires changed at a qualified spe-
cialist workshop.
Always pay attention to the instructions and
safety notes when changing a wheel
(
Ypage 331).
The wear patterns on the front and rear tires
differ, depending on the operating conditions.
Rotate the wheels before a clear wear pattern
has formed on the tires. Front tires typically
wear more on the shoulders and the rear tires
in the center.
On vehicles that have the same size front and
rear wheels, you can rotate the wheels
according to the intervals in the tire manu-
facturer's warranty book in your vehicle docu-
ments. If no warranty book is available, the
tires should be rotated every 3,
000 to
6,000 miles (5,000 to 10,000 km). Depending on tire wear, this may be required earlier. Do
not change the direction of wheel rotation.
Clean the contact surfaces of the wheel and
the brake disc thoroughly every time a wheel
is rotated. Check the tire pressure and, if nec-
essary, restart the tire pressure loss warning
system or the tire pressure monitor.
Direction of rotation
Tires with a specified direction of rotation
have additional benefits, e.g. if there is a risk
of hydroplaning. These advantages can only
be gained if the tires are installed correspond-
ing to the direction of rotation.
An arrow on the sidewall of the tire indicates
its correct direction of rotation.
Storing wheels
Store wheels that are not being used in a cool,
dry and preferably dark place. Protect the
tires from oil, grease, gasoline and diesel.
330Changing a wheel
Wheels and tires