sensor MERCEDES-BENZ SLK-CLASS ROADSTER 2012 User Guide
[x] Cancel search | Manufacturer: MERCEDES-BENZ, Model Year: 2012, Model line: SLK-CLASS ROADSTER, Model: MERCEDES-BENZ SLK-CLASS ROADSTER 2012Pages: 336, PDF Size: 24.02 MB
Page 60 of 336
automatically increase the braking force to a
level suitable for the traffic conditions.
If BAS PLUS demands particularly high
braking force, preventative passenger
protection measures (PRE-SAFE ®
) are
activated simultaneously.XKeep the brake pedal depressed until the
emergency braking situation is over.
ABS prevents the wheels from locking.
The brakes will work normally again if:
R you release the brake pedal.
R there is no longer any danger of a rear-end
collision.
R no obstacle is detected in front of your
vehicle.
BAS PLUS is then deactivated.
For BAS PLUS to assist you when driving, the
radar sensor system must be switched on and
operational; see "Radar sensor system" in the
index.
GWARNING
BAS PLUS cannot always clearly identify
objects and complex traffic situations. BAS
PLUS cannot intervene in these cases.
There is a risk of an accident. Always pay
careful attention to the traffic situation and be
ready to brake.
In particular, the detection of obstacles can
be impaired if there is:
R dirt on the sensors or anything else
covering the sensors
R snow or heavy rain
R interference by other radar sources
R the possibility of strong radar reflections,
for example in parking garages
R a narrow vehicle traveling in front, e.g. a
motorbike
R a vehicle traveling in front on a different line
GWARNING
BAS PLUS does not react:
R to people or animals
R to oncoming vehicles
R to crossing traffic
R in curves
As a result, BAS PLUS cannot intervene in
critical situations. There is a risk of an
accident. Always pay careful attention to the
traffic situation and be ready to brake.
Following damage to the front end of the
vehicle, have the configuration and operation
of the radar sensors checked at a qualified
specialist workshop. This also applies to
collisions at low speeds where there is no
visible damage to the front of the vehicle.
If BAS PLUS is not available due to a
malfunction in the radar sensor system, the
brake system remains available with full
brake boosting effect and BAS.
ESP ®
(Electronic Stability Program)
Important safety notes
i See the "Important safety notes" section
( Y page 56).
If ESP ®
detects that the vehicle is deviating
from the direction desired by the driver, one
or more wheels are braked to stabilize the
vehicle. If necessary, the engine output is also
modified to keep the vehicle on the desired
course within physical limits. ESP ®
assists
the driver when pulling away on wet or
slippery roads. ESP ®
can also stabilize the
vehicle during braking.
If ESP ®
intervenes, the ÷ ESP®
warning
lamp flashes in the instrument cluster.
58Driving safety systemsSafety
Page 65 of 336
braking. PRE-SAFE®
Brake cannot prevent a
collision without your intervention.
At speeds above approximately
20 mph (30 km/h), this function warns you
when you are rapidly approaching the vehicle
in front. An intermittent warning tone will
then sound and the · distance warning
lamp in the instrument cluster will light up.XBrake immediately in order to increase the
distance from the vehicle in front.
or
XTake evasive action provided it is safe to do
so.
At speeds of above approximately
20 mph (30 km/h), if the driver and front
passenger have fastened their seat belts,
PRE-SAFE ®
Brake can:
R brake the vehicle automatically at speeds
up to approximately 124 mph (200 km/h)
R trigger preventative occupant protection
measures (PRE-SAFE ®
) ( Y page 47)
Due to the nature of the system, particularly
complicated driving conditions may cause
unnecessary warnings or the unnecessary
intervention of PRE-SAFE ®
Brake. To stop the
braking action, you can either depress the
accelerator pedal further, activate kickdown
or release the brake pedal.
The braking action of PRE-SAFE ®
Brake is
ended automatically if:
R your speed drops below approximately
9 mph (15 km/h).
R you maneuver to avoid the obstacle.
R there is no longer any danger of a rear-end
collision.
R there is no longer an obstacle detected in
front of your vehicle.
i USA only: This device has been approved
by the FCC as a "Vehicular Radar System".
The radar sensor is intended for use in an
automotive radar system only. Removing,
altering or tampering with the device will
void any warranties, and is not permitted
by the FCC. Do not tamper with, alter, or
use in any non-approved way.
Any unauthorized modification to this
device could void the user's authority to
operate the equipment.
i Canada only: This device complies with
RSS-210 of Industry Canada. Operation is
subject to the following two conditions:
1. This device may not cause interference,
and
2. this device must accept any interference
received, including interference that may
cause undesired operation of the device.
Removal, tampering, or altering of the
device will void any warranties, and is not
permitted. Do not tamper with, alter, or use
in any non-approved way.
Any unauthorized modification to this
device could void the user's authority to
operate the equipment.
With the help of the radar sensor system,
PRE-SAFE ®
Brake can detect obstacles that
are in front of your vehicle for an extended
period of time.
At speeds up to approximately 40 mph
(70 km/h), PRE-SAFE ®
Brake can also react
to stationary obstacles, for example stopped
or parked vehicles.
If you approach an obstacle and PRE-SAFE ®
Brake detects a risk of collision, the system
will initially alert you both visually and
acoustically. If you do not brake or take
evasive action, the system will warn you by
automatically braking the vehicle gently. If
there is an increased risk of collision,
preventative passenger protection measures
(PRE-SAFE ®
) are activated (Y page 47). If the
risk of collision remains and you do not brake,
take evasive action or accelerate
significantly, the vehicle may perform
automatic emergency braking. Automatic
emergency braking is not performed until
immediately prior to an accident that can no
longer be avoided.Driving safety systems63SafetyZ
Page 66 of 336
GWARNING
Even if PRE-SAFE®
Brake slows the vehicle
before an imminent rear-end collision, the
system cannot avert a collision without the
intervention of the driver. There is a risk of an
accident. Brake according to the situation or
take evasive action. Delayed intervention by
the driver can lead to an accident.
GWARNING
PRE-SAFE ®
Brake cannot always detect
complex traffic situations properly.
In these cases, PRE-SAFE(R) Brake may:
R give an unnecessary warning and then
brake the vehicle
R neither give a warning nor intervene
There is a risk of an accident. Always pay
particular attention to the traffic situation and
be ready to brake, especially if PRE-SAFE(R)
Brake warns you. Terminate the intervention
in a non-critical driving situation.
In particular, the detection of obstacles can
be impaired if there is:
R dirt on the sensors or anything else
covering the sensors
R snow or heavy rain
R interference by other radar sources
R the possibility of strong radar reflections,
for example in parking garages
R a narrow vehicle traveling in front, e.g. a
motorbike
R a vehicle traveling in front on a different line
GWARNING
PRE-SAFE ®
Brake does not react:
R to people or animals
R to oncoming vehicles
R to crossing traffic
R in curves
As a result, PRE-SAFE ®
Brake cannot
intervene in critical situations. There is a risk
of an accident. Always pay careful attention
to the traffic situation and be ready to brake.
In order to maintain the appropriate distance
to the vehicle in front and thus prevent a
collision, you must apply the brakes yourself.XTo activate/deactivate: activate or
deactivate PRE-SAFE ®
Brake in the on-
board computer ( Y page 190).
The Ä symbol appears in the
multifunction display as long as the HOLD
function is not activated ( Y page 168).
On vehicles with Parking Guidance, the
Ä symbol is displayed when P is
engaged or is selected or if you drive faster
than 22 mph (35 km/h).
For PRE-SAFE ®
Brake to assist you when
driving, the radar sensor system must be
switched on ( Y page 194) and be
operational.
Following damage to the front end of the
vehicle, have the configuration and operation
of the radar sensors checked at a qualified
specialist workshop. This also applies to
collisions at low speeds where there is no
visible damage to the front of the vehicle.
Theft deterrent locking system
Immobilizer
The immobilizer prevents your vehicle from
being started without the correct SmartKey.
When leaving the vehicle, always take the
SmartKey with you and lock the vehicle. The
engine can be started by anyone with a valid
SmartKey that is left inside the vehicle.
XTo activate with the SmartKey: remove
the SmartKey from the ignition lock.XTo activate with KEYLESS-GO: switch the
ignition off and open the driver's door.XTo deactivate: switch on the ignition.
i
The immobilizer is always deactivated
when you start the engine.
In the event that the engine cannot be
started when the starter battery is fully
charged, the immobilizer may be faulty.
Contact an authorized Mercedes-Benz
64Theft deterrent locking systemSafety
Page 71 of 336
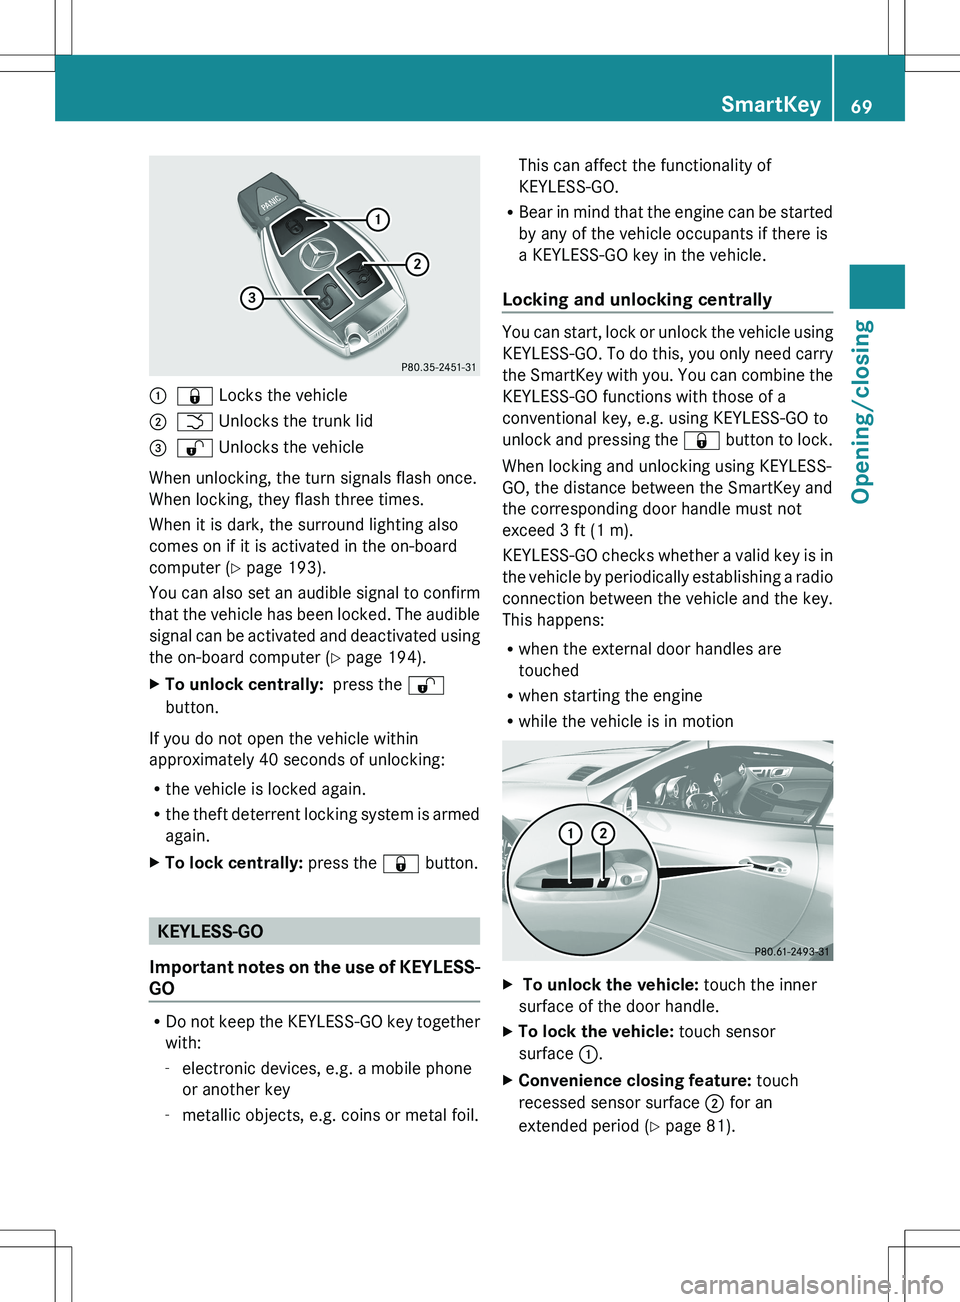
:& Locks the vehicle;F Unlocks the trunk lid=% Unlocks the vehicle
When unlocking, the turn signals flash once.
When locking, they flash three times.
When it is dark, the surround lighting also
comes on if it is activated in the on-board
computer ( Y page 193).
You can also set an audible signal to confirm
that the vehicle has been locked. The audible
signal can be activated and deactivated using
the on-board computer ( Y page 194).
XTo unlock centrally: press the %
button.
If you do not open the vehicle within
approximately 40 seconds of unlocking:
R the vehicle is locked again.
R the theft deterrent locking system is armed
again.
XTo lock centrally: press the & button.
KEYLESS-GO
Important notes on the use of KEYLESS-
GO
R Do not keep the KEYLESS-GO key together
with:
- electronic devices, e.g. a mobile phone
or another key
- metallic objects, e.g. coins or metal foil.
This can affect the functionality of
KEYLESS-GO.
R Bear in mind that the engine can be started
by any of the vehicle occupants if there is
a KEYLESS-GO key in the vehicle.
Locking and unlocking centrally
You can start, lock or unlock the vehicle using
KEYLESS-GO. To do this, you only need carry
the SmartKey with you. You can combine the
KEYLESS-GO functions with those of a
conventional key, e.g. using KEYLESS-GO to
unlock and pressing the & button to lock.
When locking and unlocking using KEYLESS-
GO, the distance between the SmartKey and
the corresponding door handle must not
exceed 3 ft (1 m).
KEYLESS-GO checks whether a valid key is in
the vehicle by periodically establishing a radio
connection between the vehicle and the key.
This happens:
R when the external door handles are
touched
R when starting the engine
R while the vehicle is in motion
X To unlock the vehicle: touch the inner
surface of the door handle.XTo lock the vehicle: touch sensor
surface :.XConvenience closing feature: touch
recessed sensor surface ; for an
extended period ( Y page 81).SmartKey69Opening/closingZ
Page 72 of 336
If you pull on the handle of the trunk lid, only
the trunk of the vehicle is unlocked.
Changing the settings of the locking
system
You can change the settings of the locking
system so that when unlocking, only the
driver's door, the lockable stowage
compartments in the vehicle interior and the
fuel filler flap are unlocked. This is useful if
you frequently travel on your own.
XTo change the setting: press and hold
down the % and & buttons
simultaneously for approximately
six seconds until the battery check lamp
flashes twice ( Y page 71).
i
If the setting of the locking system is
changed within the signal range of the
vehicle, pressing the & or % button
locks or unlocks the vehicle.
The SmartKey now functions as follows:
XTo unlock the driver's door: press the
% button once.XTo unlock centrally: press the %
button twice.XTo lock centrally: press the & button.
The KEYLESS-GO function is changed as
follows:
XTo unlock the driver's door: touch the
inner surface of the door handle on the
driver's door.XTo unlock centrally: touch the inner
surface of the front-passenger door handle.XTo lock centrally: touch the outer sensor
surface on one of the door handles.
Restoring the factory settings
XPress the % and & buttons
simultaneously for approximately
six seconds until the battery check lamp
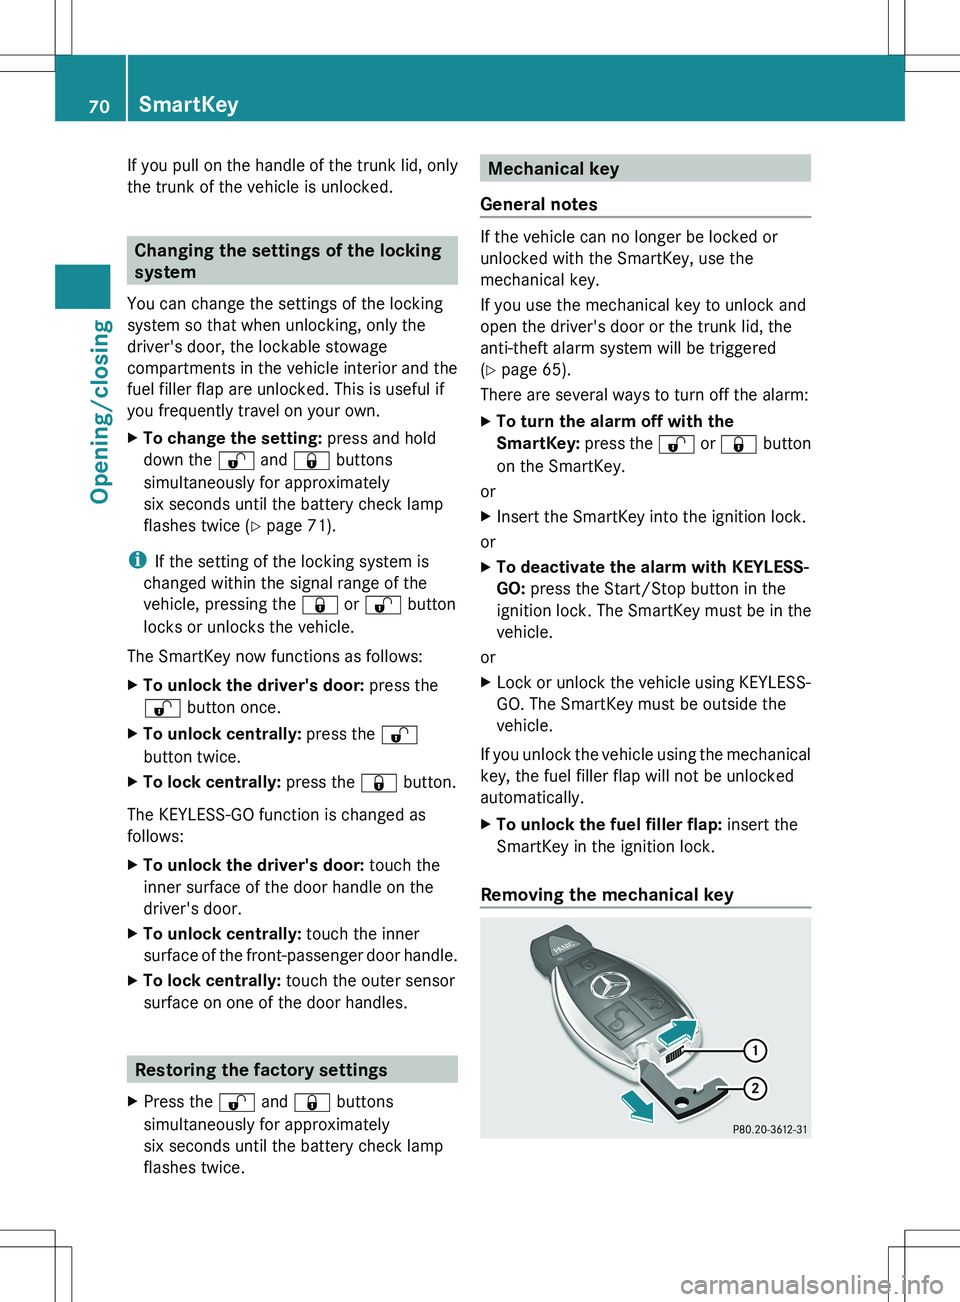
flashes twice.Mechanical key
General notes
If the vehicle can no longer be locked or
unlocked with the SmartKey, use the
mechanical key.
If you use the mechanical key to unlock and
open the driver's door or the trunk lid, the
anti-theft alarm system will be triggered
( Y page 65).
There are several ways to turn off the alarm:
XTo turn the alarm off with the
SmartKey: press the % or & button
on the SmartKey.
or
XInsert the SmartKey into the ignition lock.
or
XTo deactivate the alarm with KEYLESS-
GO: press the Start/Stop button in the
ignition lock. The SmartKey must be in the
vehicle.
or
XLock or unlock the vehicle using KEYLESS-
GO. The SmartKey must be outside the
vehicle.
If you unlock the vehicle using the mechanical
key, the fuel filler flap will not be unlocked
automatically.
XTo unlock the fuel filler flap: insert the
SmartKey in the ignition lock.
Removing the mechanical key
70SmartKeyOpening/closing
Page 83 of 336
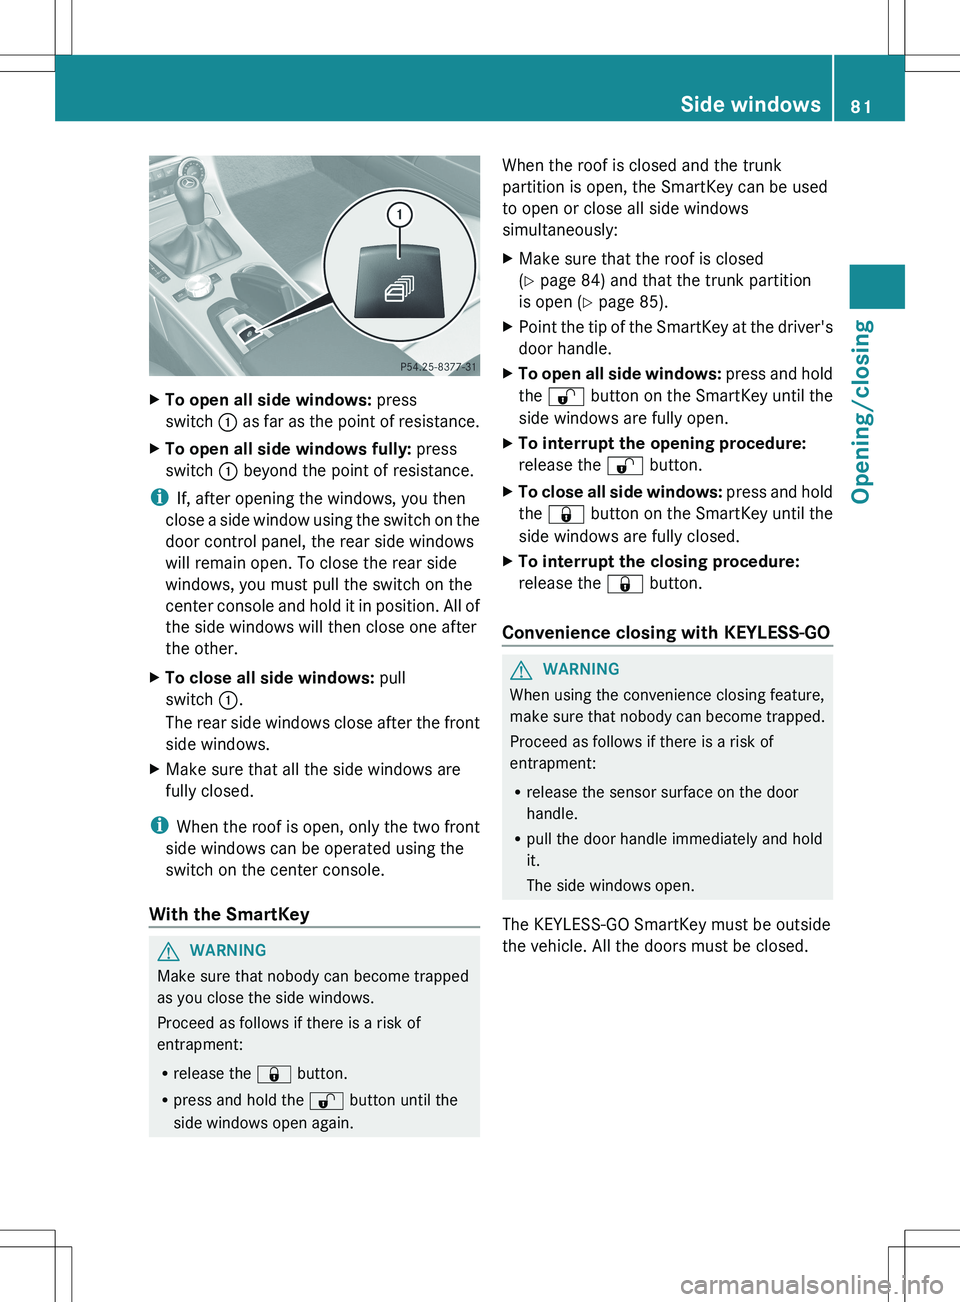
XTo open all side windows: press
switch : as far as the point of resistance.XTo open all side windows fully: press
switch : beyond the point of resistance.
i
If, after opening the windows, you then
close a side window using the switch on the
door control panel, the rear side windows
will remain open. To close the rear side
windows, you must pull the switch on the
center console and hold it in position. All of
the side windows will then close one after
the other.
XTo close all side windows: pull
switch :.
The rear side windows close after the front
side windows.XMake sure that all the side windows are
fully closed.
i When the roof is open, only the two front
side windows can be operated using the
switch on the center console.
With the SmartKey
GWARNING
Make sure that nobody can become trapped
as you close the side windows.
Proceed as follows if there is a risk of
entrapment:
R release the & button.
R press and hold the % button until the
side windows open again.
When the roof is closed and the trunk
partition is open, the SmartKey can be used
to open or close all side windows
simultaneously:XMake sure that the roof is closed
( Y page 84) and that the trunk partition
is open ( Y page 85).XPoint the tip of the SmartKey at the driver's
door handle.XTo open all side windows: press and hold
the % button on the SmartKey until the
side windows are fully open.XTo interrupt the opening procedure:
release the % button.XTo close all side windows: press and hold
the & button on the SmartKey until the
side windows are fully closed.XTo interrupt the closing procedure:
release the & button.
Convenience closing with KEYLESS-GO
GWARNING
When using the convenience closing feature,
make sure that nobody can become trapped.
Proceed as follows if there is a risk of
entrapment:
R release the sensor surface on the door
handle.
R pull the door handle immediately and hold
it.
The side windows open.
The KEYLESS-GO SmartKey must be outside
the vehicle. All the doors must be closed.
Side windows81Opening/closingZ
Page 84 of 336
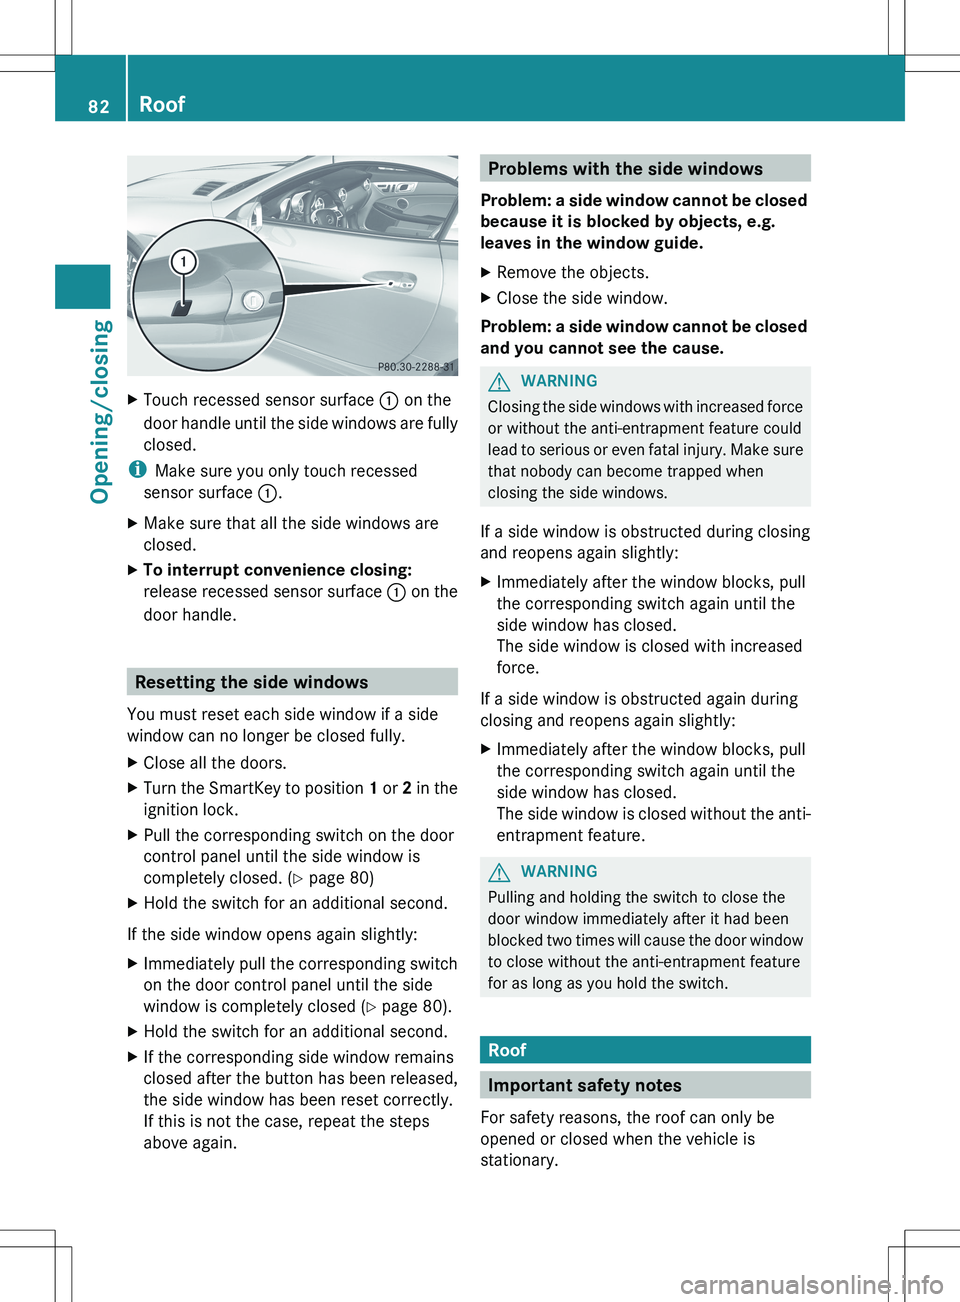
XTouch recessed sensor surface : on the
door handle until the side windows are fully
closed.
i Make sure you only touch recessed
sensor surface :.
XMake sure that all the side windows are
closed.XTo interrupt convenience closing:
release recessed sensor surface : on the
door handle.
Resetting the side windows
You must reset each side window if a side
window can no longer be closed fully.
XClose all the doors.XTurn the SmartKey to position 1 or 2 in the
ignition lock.XPull the corresponding switch on the door
control panel until the side window is
completely closed. ( Y page 80)XHold the switch for an additional second.
If the side window opens again slightly:
XImmediately pull the corresponding switch
on the door control panel until the side
window is completely closed ( Y page 80).XHold the switch for an additional second.XIf the corresponding side window remains
closed after the button has been released,
the side window has been reset correctly.
If this is not the case, repeat the steps
above again.Problems with the side windows
Problem: a side window cannot be closed
because it is blocked by objects, e.g.
leaves in the window guide.XRemove the objects.XClose the side window.
Problem: a side window cannot be closed
and you cannot see the cause.
GWARNING
Closing the side windows with increased force
or without the anti-entrapment feature could
lead to serious or even fatal injury. Make sure
that nobody can become trapped when
closing the side windows.
If a side window is obstructed during closing
and reopens again slightly:
XImmediately after the window blocks, pull
the corresponding switch again until the
side window has closed.
The side window is closed with increased
force.
If a side window is obstructed again during
closing and reopens again slightly:
XImmediately after the window blocks, pull
the corresponding switch again until the
side window has closed.
The side window is closed without the anti-
entrapment feature.GWARNING
Pulling and holding the switch to close the
door window immediately after it had been
blocked two times will cause the door window
to close without the anti-entrapment feature
for as long as you hold the switch.
Roof
Important safety notes
For safety reasons, the roof can only be
opened or closed when the vehicle is
stationary.
82RoofOpening/closing
Page 101 of 336
The exterior mirrors are automatically heated
if the rear window defroster is switched on
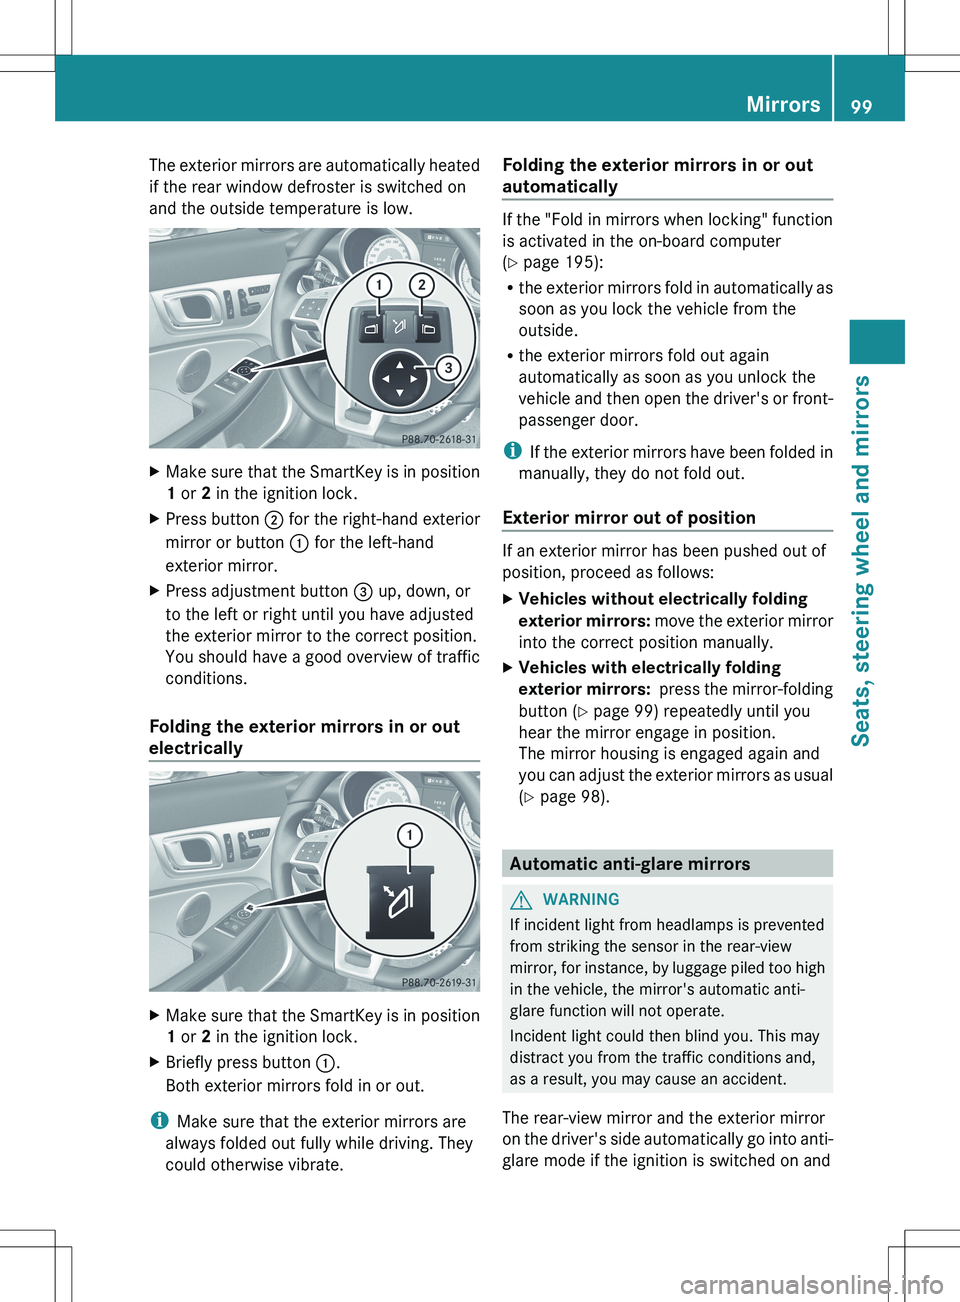
and the outside temperature is low.XMake sure that the SmartKey is in position
1 or 2 in the ignition lock.XPress button ; for the right-hand exterior
mirror or button : for the left-hand
exterior mirror.XPress adjustment button = up, down, or
to the left or right until you have adjusted
the exterior mirror to the correct position.
You should have a good overview of traffic
conditions.
Folding the exterior mirrors in or out
electrically
XMake sure that the SmartKey is in position
1 or 2 in the ignition lock.XBriefly press button :.
Both exterior mirrors fold in or out.
i Make sure that the exterior mirrors are
always folded out fully while driving. They
could otherwise vibrate.
Folding the exterior mirrors in or out
automatically
If the "Fold in mirrors when locking" function
is activated in the on-board computer
( Y page 195):
R the exterior mirrors fold in automatically as
soon as you lock the vehicle from the
outside.
R the exterior mirrors fold out again
automatically as soon as you unlock the
vehicle and then open the driver's or front-
passenger door.
i If the exterior mirrors have been folded in
manually, they do not fold out.
Exterior mirror out of position
If an exterior mirror has been pushed out of
position, proceed as follows:
XVehicles without electrically folding
exterior mirrors: move the exterior mirror
into the correct position manually.XVehicles with electrically folding
exterior mirrors: press the mirror-folding
button ( Y page 99) repeatedly until you
hear the mirror engage in position.
The mirror housing is engaged again and
you can adjust the exterior mirrors as usual
( Y page 98).
Automatic anti-glare mirrors
GWARNING
If incident light from headlamps is prevented
from striking the sensor in the rear-view
mirror, for instance, by luggage piled too high
in the vehicle, the mirror's automatic anti-
glare function will not operate.
Incident light could then blind you. This may
distract you from the traffic conditions and,
as a result, you may cause an accident.
The rear-view mirror and the exterior mirror
on the driver's side automatically go into anti-
glare mode if the ignition is switched on and
Mirrors99Seats, steering wheel and mirrorsZ
Page 102 of 336
incident light from headlamps strikes the
sensor in the rear-view mirror.
The mirrors do not go into anti-glare mode if
reverse gear is engaged or the interior lighting
is switched on.
Parking position for the exterior
mirror on the front-passenger side
Setting and storing the parking position
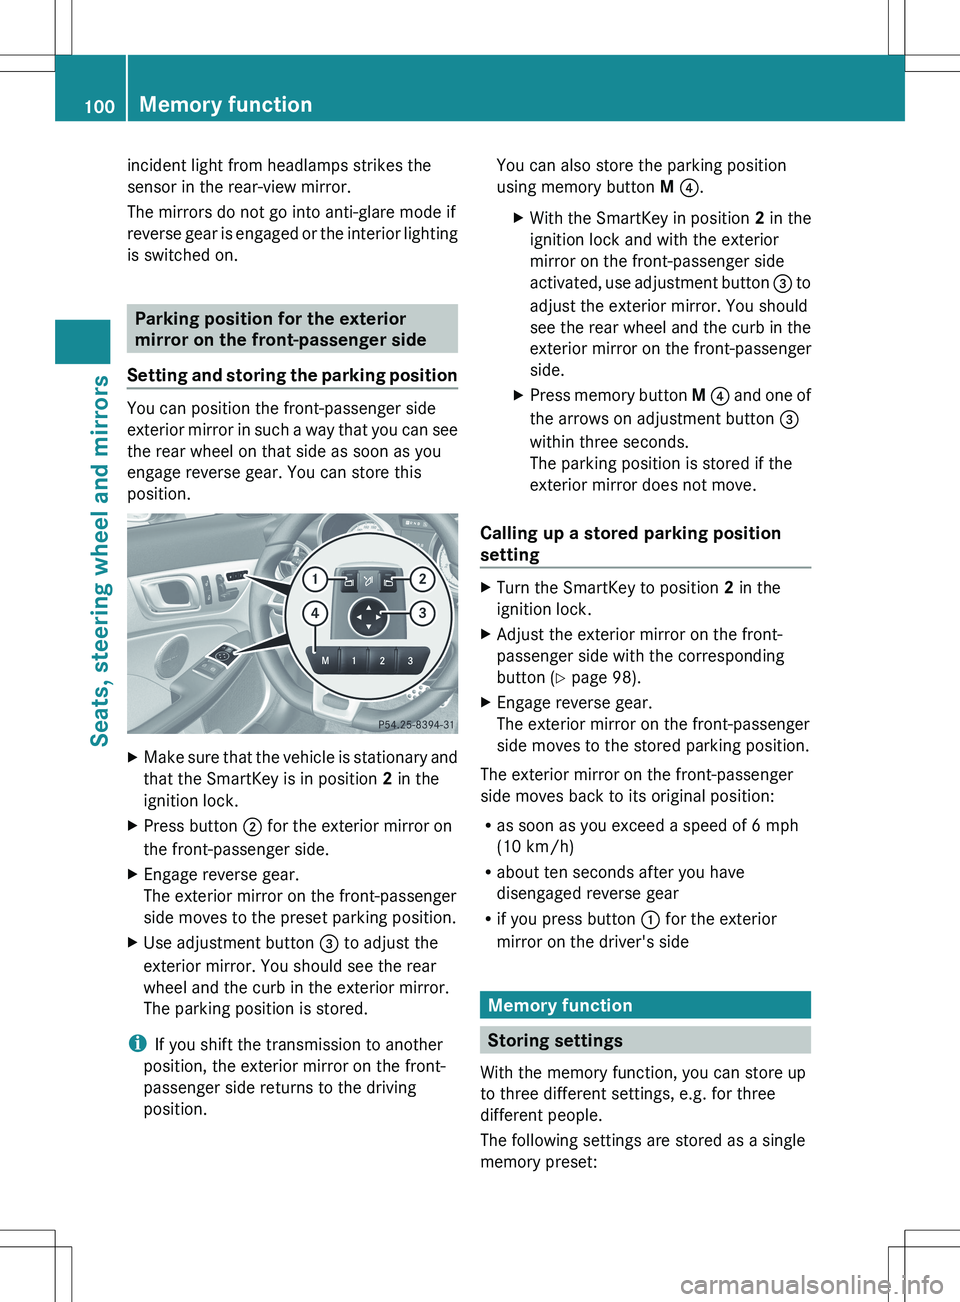
You can position the front-passenger side
exterior mirror in such a way that you can see
the rear wheel on that side as soon as you
engage reverse gear. You can store this
position.
XMake sure that the vehicle is stationary and
that the SmartKey is in position 2 in the
ignition lock.XPress button ; for the exterior mirror on
the front-passenger side.XEngage reverse gear.
The exterior mirror on the front-passenger
side moves to the preset parking position.XUse adjustment button = to adjust the
exterior mirror. You should see the rear
wheel and the curb in the exterior mirror.
The parking position is stored.
i If you shift the transmission to another
position, the exterior mirror on the front-
passenger side returns to the driving
position.
You can also store the parking position
using memory button M ? .XWith the SmartKey in position 2 in the
ignition lock and with the exterior
mirror on the front-passenger side
activated, use adjustment button = to
adjust the exterior mirror. You should
see the rear wheel and the curb in the
exterior mirror on the front-passenger
side.XPress memory button M ? and one of
the arrows on adjustment button =
within three seconds.
The parking position is stored if the
exterior mirror does not move.
Calling up a stored parking position
setting
XTurn the SmartKey to position 2 in the
ignition lock.XAdjust the exterior mirror on the front-
passenger side with the corresponding
button ( Y page 98).XEngage reverse gear.
The exterior mirror on the front-passenger
side moves to the stored parking position.
The exterior mirror on the front-passenger
side moves back to its original position:
R as soon as you exceed a speed of 6 mph
(10 km/h)
R about ten seconds after you have
disengaged reverse gear
R if you press button : for the exterior
mirror on the driver's side
Memory function
Storing settings
With the memory function, you can store up
to three different settings, e.g. for three
different people.
The following settings are stored as a single
memory preset:
100Memory functionSeats, steering wheel and mirrors
Page 115 of 336
Windshield wipers
Switching the windshield wipers on/
off
GWARNING
Wiper blades are components that are subject
to wear and tear. Replace the wiper blades
twice a year, preferably in the spring and fall.
Otherwise the windshield will not be wiped
properly. As a result, you may not be able to
observe surrounding traffic conditions and
could cause an accident.
! Do not operate the windshield wipers
when the windshield is dry, as this could
damage the wiper blades. Moreover, dust
that has collected on the windshield can
scratch the glass if wiping takes place when
the windshield is dry.
! If the windshield wipers leave smears on
the windshield after the vehicle has been
washed in an automatic car wash, wax or
other residues may be the reason for this.
Clean the windshield using washer fluid
after washing the vehicle in an automatic
car wash.
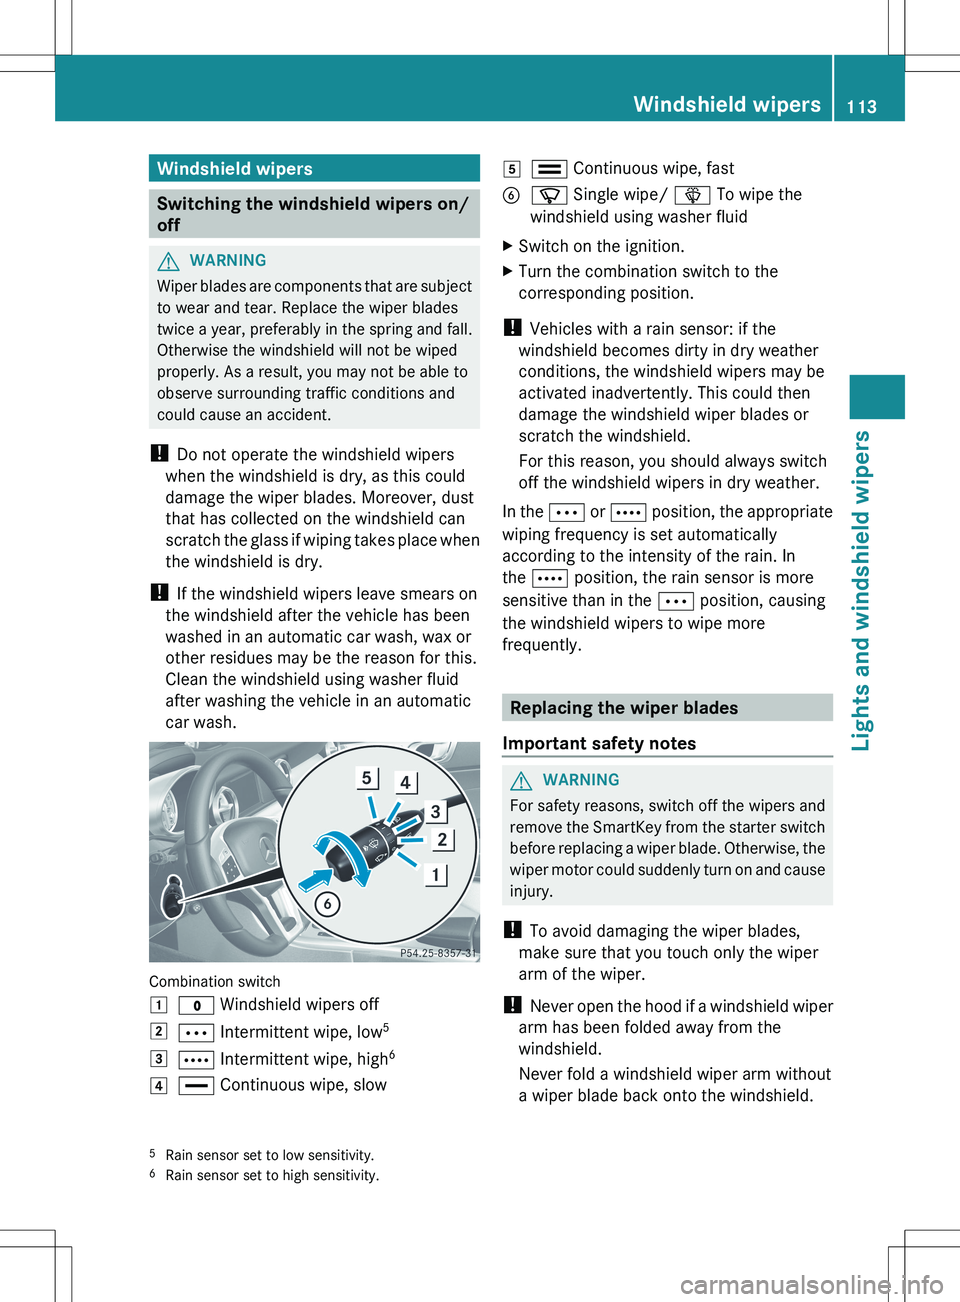
Combination switch
1$ Windshield wipers off2Ä Intermittent wipe, low 53Å
Intermittent wipe, high 64°
Continuous wipe, slow5¯ Continuous wipe, fastBí Single wipe/ î To wipe the
windshield using washer fluidXSwitch on the ignition.XTurn the combination switch to the
corresponding position.
! Vehicles with a rain sensor: if the
windshield becomes dirty in dry weather
conditions, the windshield wipers may be
activated inadvertently. This could then
damage the windshield wiper blades or
scratch the windshield.
For this reason, you should always switch
off the windshield wipers in dry weather.
In the Ä or Å position, the appropriate
wiping frequency is set automatically
according to the intensity of the rain. In
the Å position, the rain sensor is more
sensitive than in the Ä position, causing
the windshield wipers to wipe more
frequently.
Replacing the wiper blades
Important safety notes
GWARNING
For safety reasons, switch off the wipers and
remove the SmartKey from the starter switch
before replacing a wiper blade. Otherwise, the
wiper motor could suddenly turn on and cause
injury.
! To avoid damaging the wiper blades,
make sure that you touch only the wiper
arm of the wiper.
! Never open the hood if a windshield wiper
arm has been folded away from the
windshield.
Never fold a windshield wiper arm without
a wiper blade back onto the windshield.
5 Rain sensor set to low sensitivity.
6 Rain sensor set to high sensitivity.Windshield wipers113Lights and windshield wipersZ