MERCEDES-BENZ SLK-CLASS ROADSTER 2012 Owners Manual
Manufacturer: MERCEDES-BENZ, Model Year: 2012, Model line: SLK-CLASS ROADSTER, Model: MERCEDES-BENZ SLK-CLASS ROADSTER 2012Pages: 336, PDF Size: 24.02 MB
Page 211 of 336
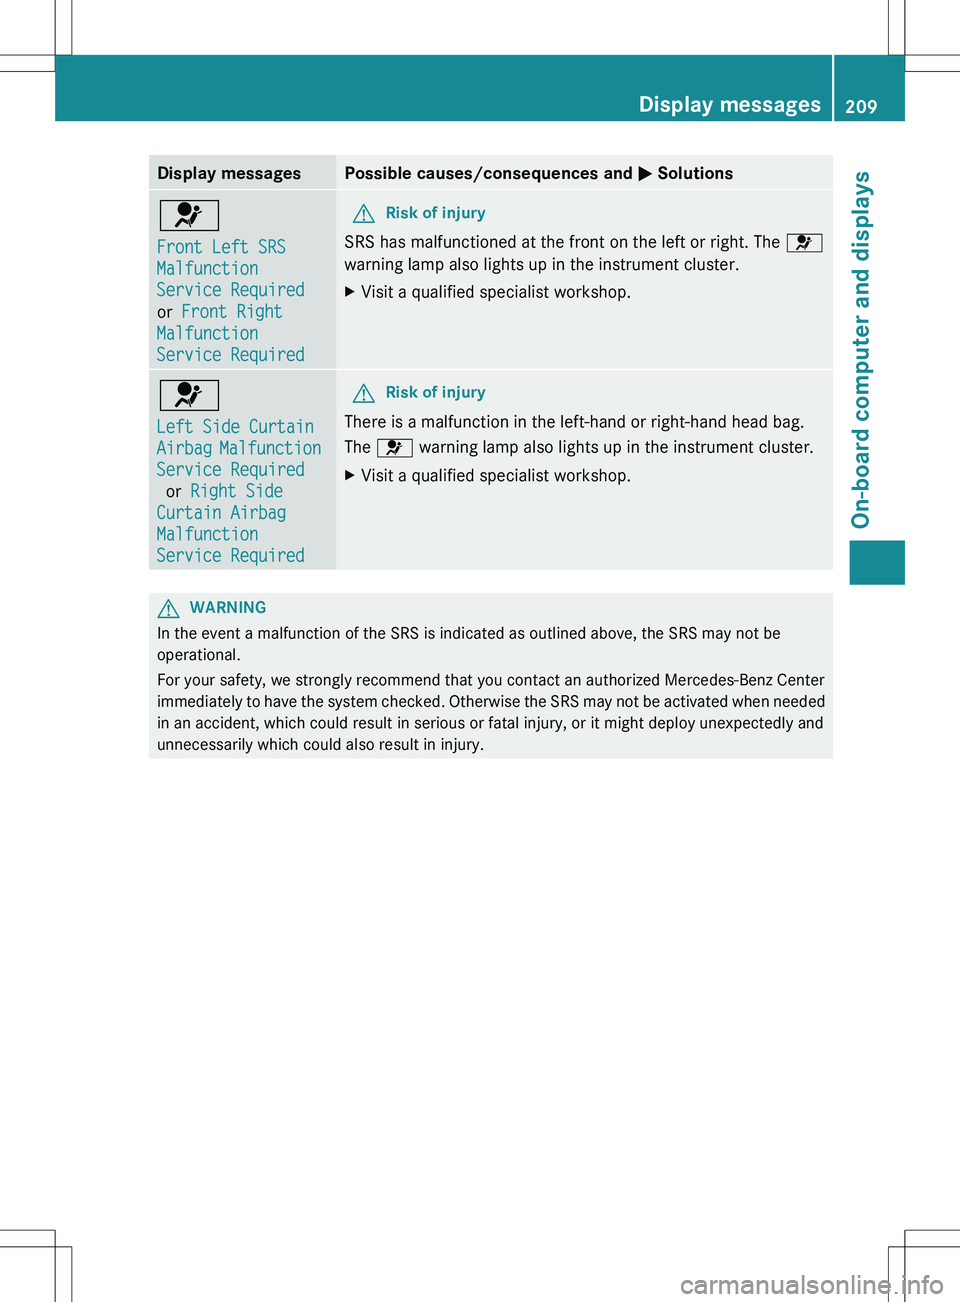
Display messagesPossible causes/consequences and M Solutions6
Front Left SRS
Malfunction
Service Required
or Front Right
Malfunction
Service RequiredGRisk of injury
SRS has malfunctioned at the front on the left or right. The 6
warning lamp also lights up in the instrument cluster.
XVisit a qualified specialist workshop.6
Left Side Curtain
Airbag Malfunction
Service Required
or Right Side
Curtain Airbag
Malfunction
Service RequiredGRisk of injury
There is a malfunction in the left-hand or right-hand head bag.
The 6 warning lamp also lights up in the instrument cluster.
XVisit a qualified specialist workshop.GWARNING
In the event a malfunction of the SRS is indicated as outlined above, the SRS may not be
operational.
For your safety, we strongly recommend that you contact an authorized Mercedes-Benz Center
immediately to have the system checked. Otherwise the SRS may not be activated when needed
in an accident, which could result in serious or fatal injury, or it might deploy unexpectedly and
unnecessarily which could also result in injury.
Display messages209On-board computer and displaysZ
Page 212 of 336
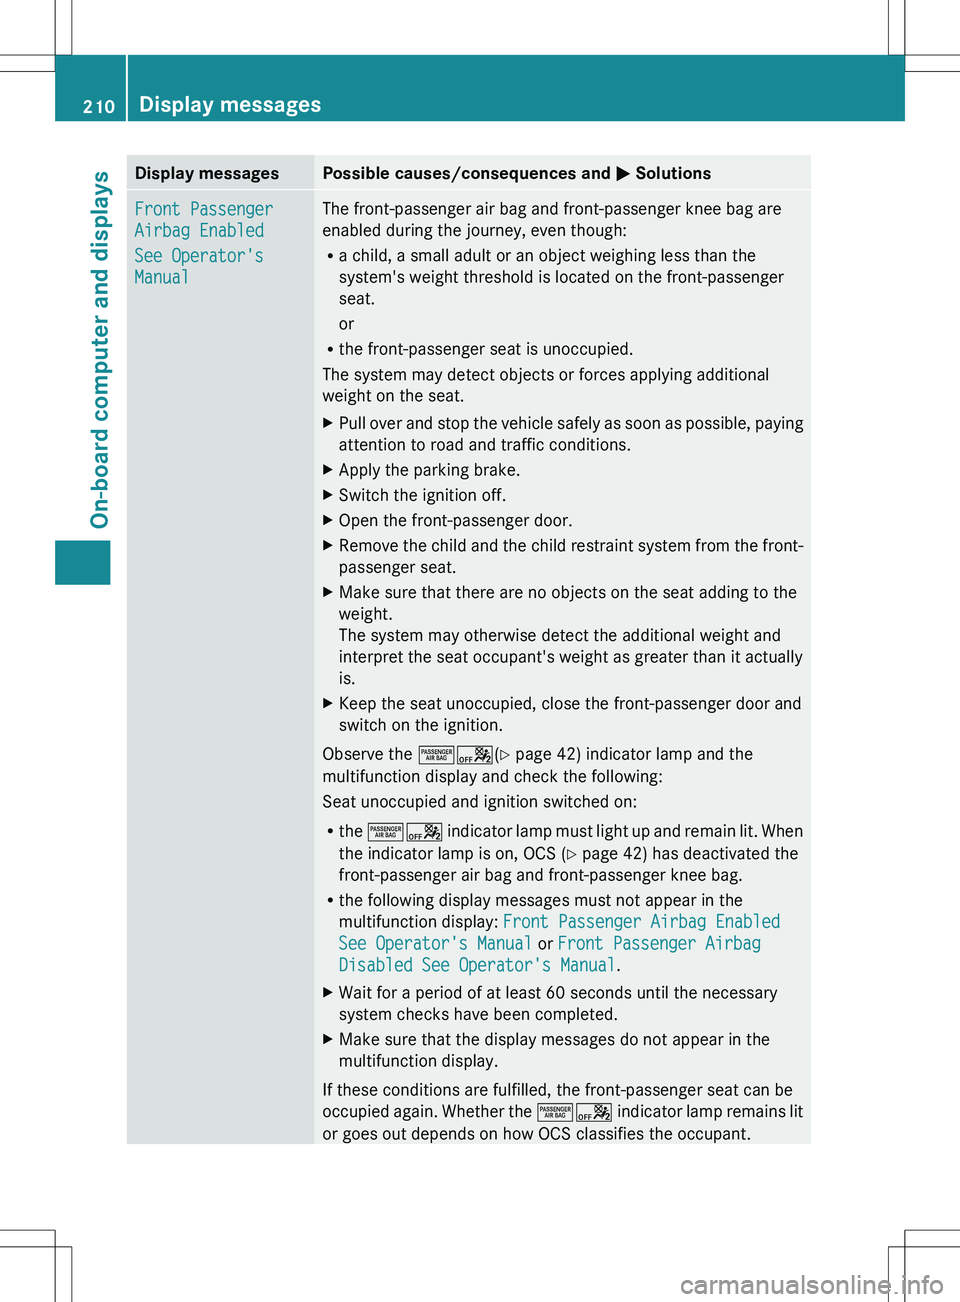
Display messagesPossible causes/consequences and M SolutionsFront Passenger
Airbag Enabled
See Operator's
ManualThe front-passenger air bag and front-passenger knee bag are
enabled during the journey, even though:
R a child, a small adult or an object weighing less than the
system's weight threshold is located on the front-passenger
seat.
or
R the front-passenger seat is unoccupied.
The system may detect objects or forces applying additional
weight on the seat.XPull over and stop the vehicle safely as soon as possible, paying
attention to road and traffic conditions.XApply the parking brake.XSwitch the ignition off.XOpen the front-passenger door.XRemove the child and the child restraint system from the front-
passenger seat.XMake sure that there are no objects on the seat adding to the
weight.
The system may otherwise detect the additional weight and
interpret the seat occupant's weight as greater than it actually
is.XKeep the seat unoccupied, close the front-passenger door and
switch on the ignition.
Observe the ^a(Y page 42) indicator lamp and the
multifunction display and check the following:
Seat unoccupied and ignition switched on:
R the ^a indicator lamp must light up and remain lit. When
the indicator lamp is on, OCS ( Y page 42) has deactivated the
front-passenger air bag and front-passenger knee bag.
R the following display messages must not appear in the
multifunction display: Front Passenger Airbag Enabled
See Operator's Manual or Front Passenger Airbag
Disabled See Operator's Manual .
XWait for a period of at least 60 seconds until the necessary
system checks have been completed.XMake sure that the display messages do not appear in the
multifunction display.
If these conditions are fulfilled, the front-passenger seat can be
occupied again. Whether the ^a indicator lamp remains lit
or goes out depends on how OCS classifies the occupant.
210Display messagesOn-board computer and displays
Page 213 of 336
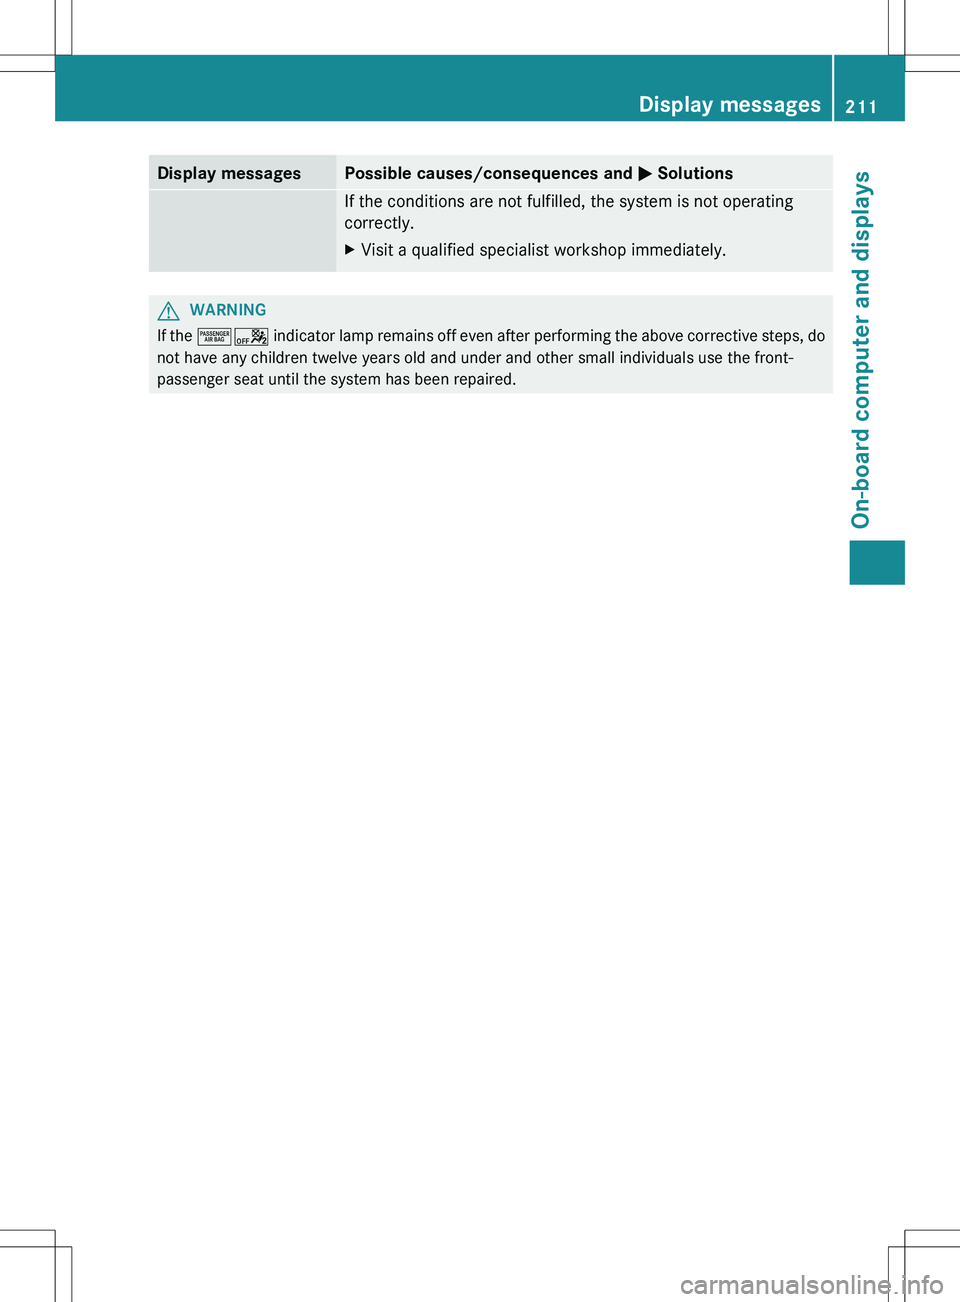
Display messagesPossible causes/consequences and M SolutionsIf the conditions are not fulfilled, the system is not operating
correctly.XVisit a qualified specialist workshop immediately.GWARNING
If the ^a indicator lamp remains off even after performing the above corrective steps, do
not have any children twelve years old and under and other small individuals use the front-
passenger seat until the system has been repaired.
Display messages211On-board computer and displaysZ
Page 214 of 336
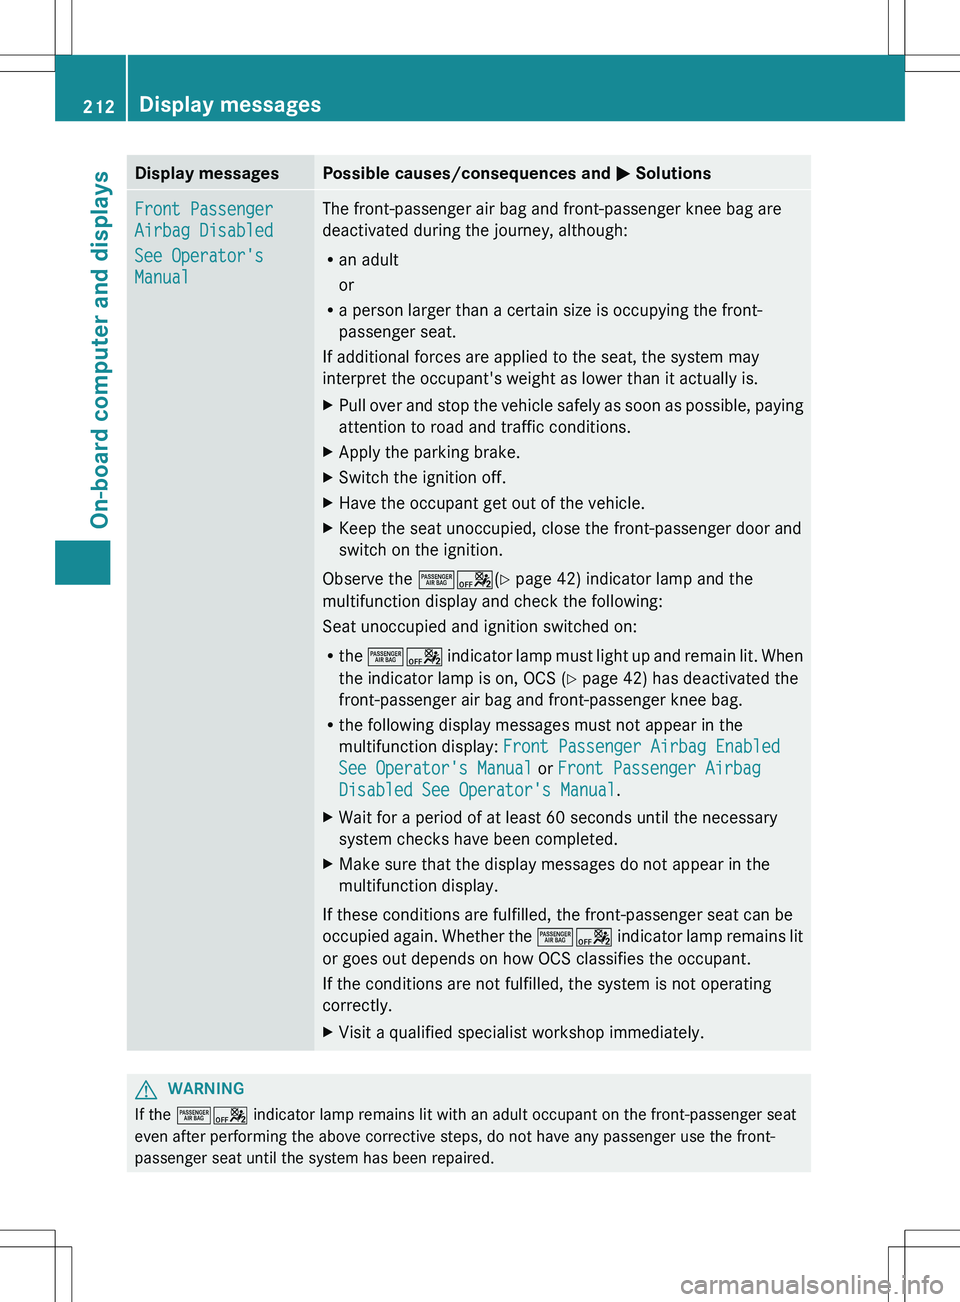
Display messagesPossible causes/consequences and M SolutionsFront Passenger
Airbag Disabled
See Operator's
ManualThe front-passenger air bag and front-passenger knee bag are
deactivated during the journey, although:
R an adult
or
R a person larger than a certain size is occupying the front-
passenger seat.
If additional forces are applied to the seat, the system may
interpret the occupant's weight as lower than it actually is.XPull over and stop the vehicle safely as soon as possible, paying
attention to road and traffic conditions.XApply the parking brake.XSwitch the ignition off.XHave the occupant get out of the vehicle.XKeep the seat unoccupied, close the front-passenger door and
switch on the ignition.
Observe the ^a(Y page 42) indicator lamp and the
multifunction display and check the following:
Seat unoccupied and ignition switched on:
R the ^a indicator lamp must light up and remain lit. When
the indicator lamp is on, OCS ( Y page 42) has deactivated the
front-passenger air bag and front-passenger knee bag.
R the following display messages must not appear in the
multifunction display: Front Passenger Airbag Enabled
See Operator's Manual or Front Passenger Airbag
Disabled See Operator's Manual .
XWait for a period of at least 60 seconds until the necessary
system checks have been completed.XMake sure that the display messages do not appear in the
multifunction display.
If these conditions are fulfilled, the front-passenger seat can be
occupied again. Whether the ^a indicator lamp remains lit
or goes out depends on how OCS classifies the occupant.
If the conditions are not fulfilled, the system is not operating
correctly.
XVisit a qualified specialist workshop immediately.GWARNING
If the ^a indicator lamp remains lit with an adult occupant on the front-passenger seat
even after performing the above corrective steps, do not have any passenger use the front-
passenger seat until the system has been repaired.
212Display messagesOn-board computer and displays
Page 215 of 336
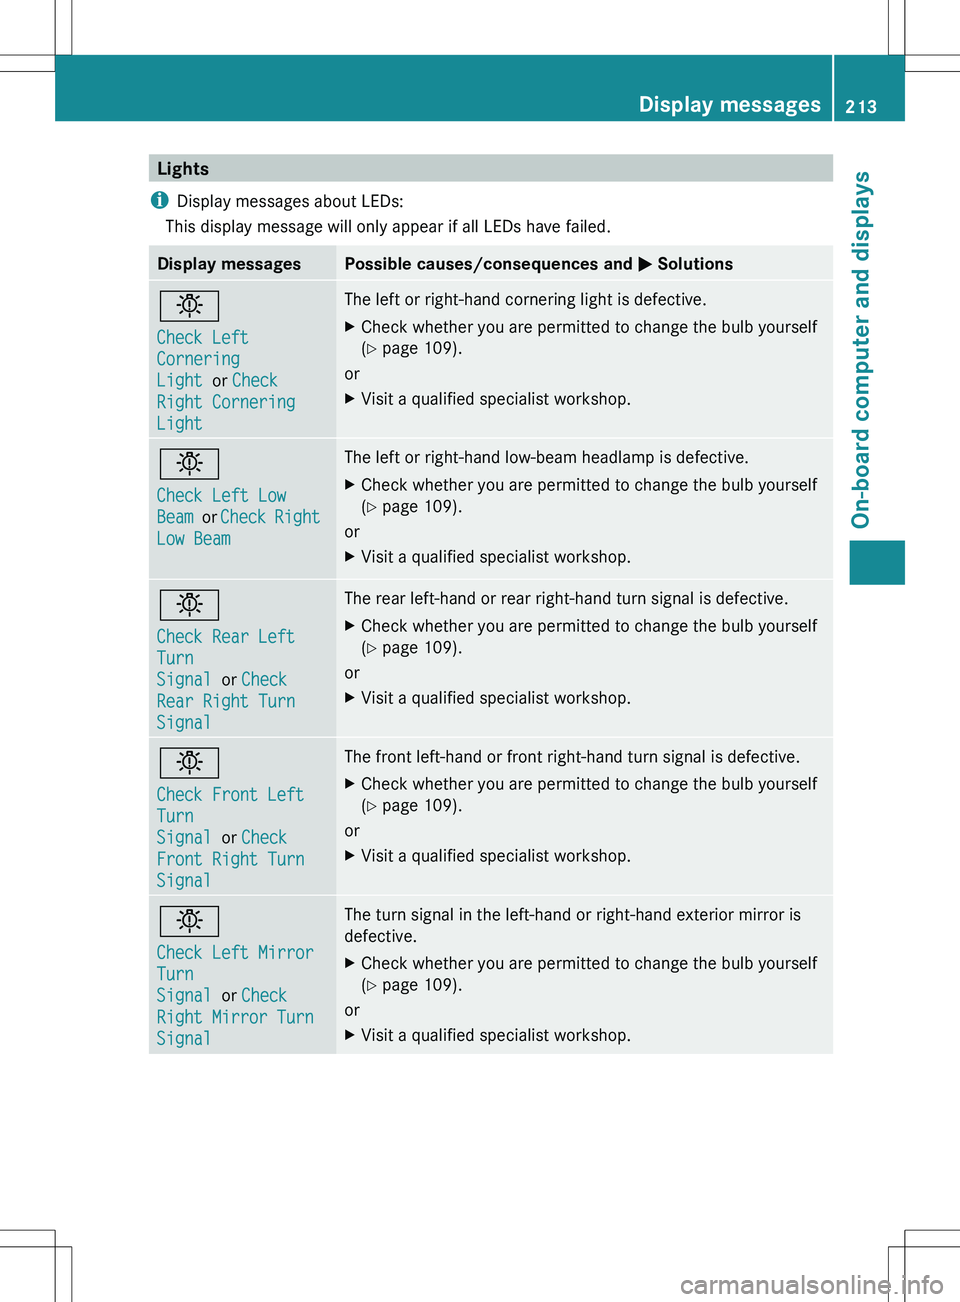
Lights
i Display messages about LEDs:
This display message will only appear if all LEDs have failed.Display messagesPossible causes/consequences and M Solutionsb
Check Left
Cornering
Light or Check
Right Cornering
LightThe left or right-hand cornering light is defective.XCheck whether you are permitted to change the bulb yourself
( Y page 109).
or
XVisit a qualified specialist workshop.b
Check Left Low
Beam or Check Right
Low BeamThe left or right-hand low-beam headlamp is defective.XCheck whether you are permitted to change the bulb yourself
( Y page 109).
or
XVisit a qualified specialist workshop.b
Check Rear Left
Turn
Signal or Check
Rear Right Turn
SignalThe rear left-hand or rear right-hand turn signal is defective.XCheck whether you are permitted to change the bulb yourself
( Y page 109).
or
XVisit a qualified specialist workshop.b
Check Front Left
Turn
Signal or Check
Front Right Turn
SignalThe front left-hand or front right-hand turn signal is defective.XCheck whether you are permitted to change the bulb yourself
( Y page 109).
or
XVisit a qualified specialist workshop.b
Check Left Mirror
Turn
Signal or Check
Right Mirror Turn
SignalThe turn signal in the left-hand or right-hand exterior mirror is
defective.XCheck whether you are permitted to change the bulb yourself
( Y page 109).
or
XVisit a qualified specialist workshop.Display messages213On-board computer and displaysZ
Page 216 of 336
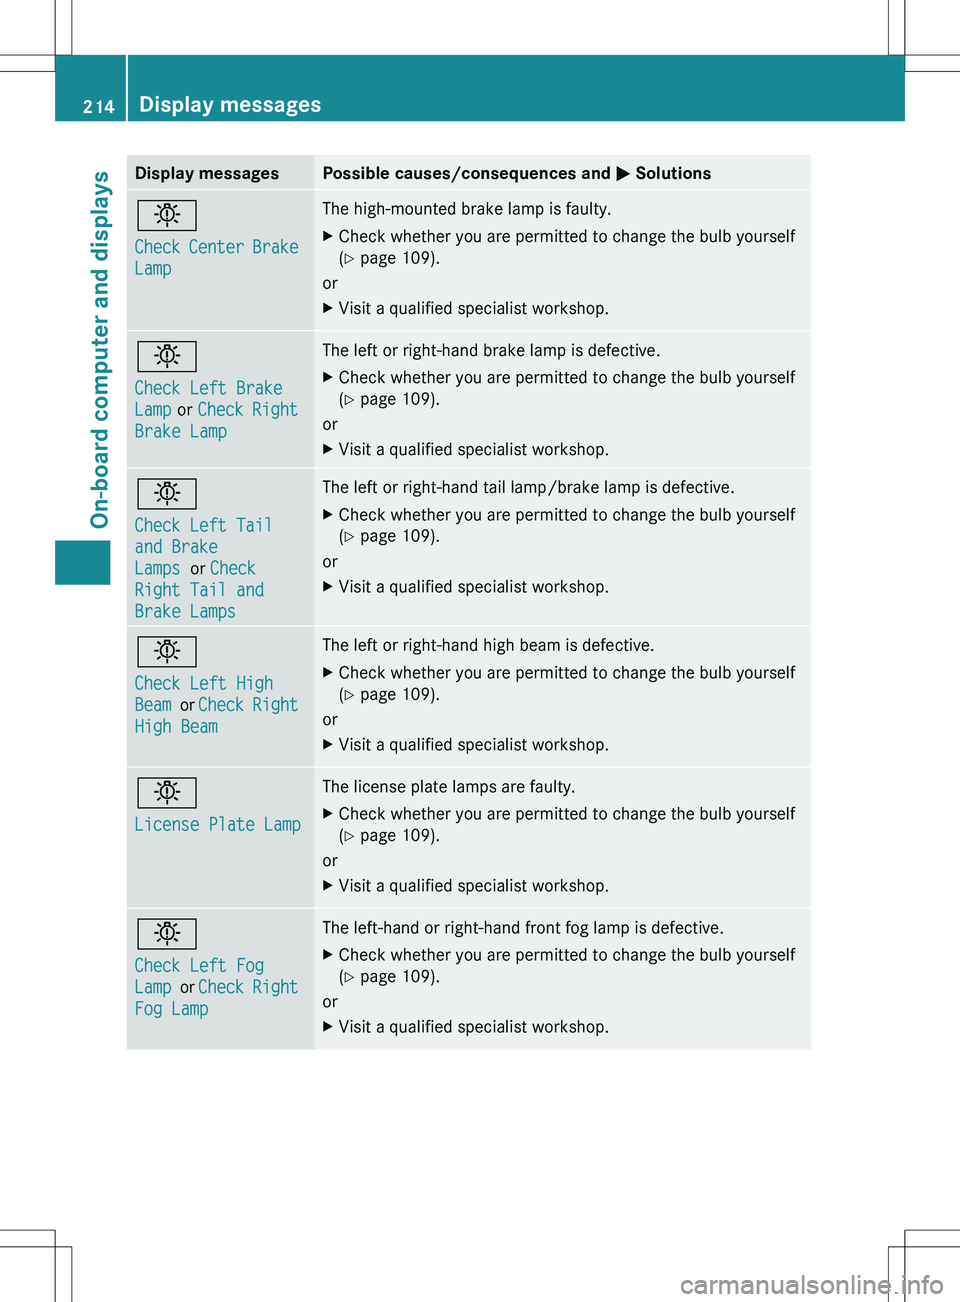
Display messagesPossible causes/consequences and M Solutionsb
Check Center Brake
LampThe high-mounted brake lamp is faulty.XCheck whether you are permitted to change the bulb yourself
( Y page 109).
or
XVisit a qualified specialist workshop.b
Check Left Brake
Lamp or Check Right
Brake LampThe left or right-hand brake lamp is defective.XCheck whether you are permitted to change the bulb yourself
( Y page 109).
or
XVisit a qualified specialist workshop.b
Check Left Tail
and Brake
Lamps or Check
Right Tail and
Brake LampsThe left or right-hand tail lamp/brake lamp is defective.XCheck whether you are permitted to change the bulb yourself
( Y page 109).
or
XVisit a qualified specialist workshop.b
Check Left High
Beam or Check Right
High BeamThe left or right-hand high beam is defective.XCheck whether you are permitted to change the bulb yourself
( Y page 109).
or
XVisit a qualified specialist workshop.b
License Plate LampThe license plate lamps are faulty.XCheck whether you are permitted to change the bulb yourself
( Y page 109).
or
XVisit a qualified specialist workshop.b
Check Left Fog
Lamp or Check Right
Fog LampThe left-hand or right-hand front fog lamp is defective.XCheck whether you are permitted to change the bulb yourself
( Y page 109).
or
XVisit a qualified specialist workshop.214Display messagesOn-board computer and displays
Page 217 of 336
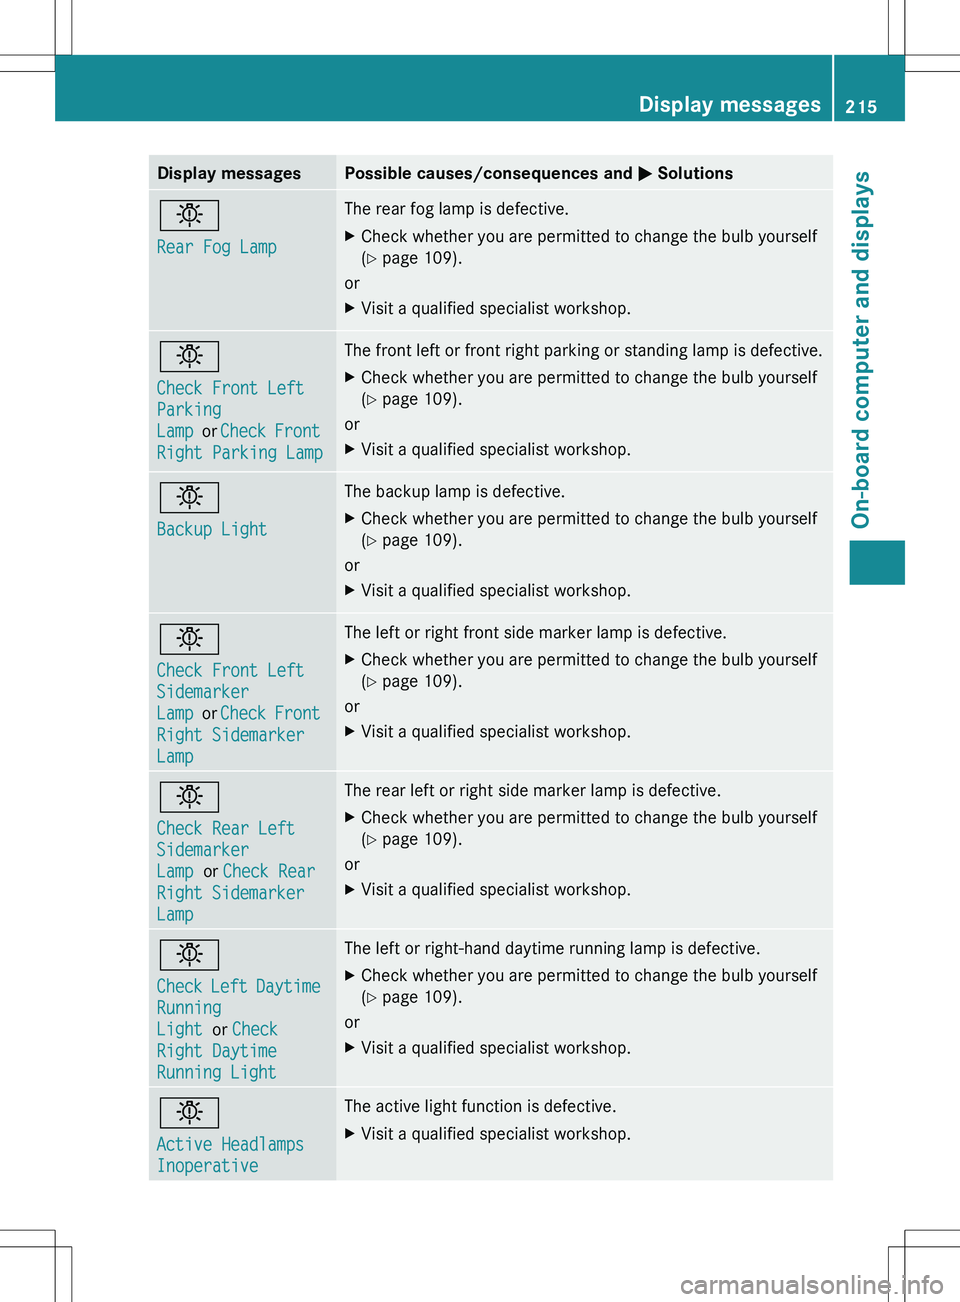
Display messagesPossible causes/consequences and M Solutionsb
Rear Fog LampThe rear fog lamp is defective.XCheck whether you are permitted to change the bulb yourself
( Y page 109).
or
XVisit a qualified specialist workshop.b
Check Front Left
Parking
Lamp or Check Front
Right Parking LampThe front left or front right parking or standing lamp is defective.XCheck whether you are permitted to change the bulb yourself
( Y page 109).
or
XVisit a qualified specialist workshop.b
Backup LightThe backup lamp is defective.XCheck whether you are permitted to change the bulb yourself
( Y page 109).
or
XVisit a qualified specialist workshop.b
Check Front Left
Sidemarker
Lamp or Check Front
Right Sidemarker
LampThe left or right front side marker lamp is defective.XCheck whether you are permitted to change the bulb yourself
( Y page 109).
or
XVisit a qualified specialist workshop.b
Check Rear Left
Sidemarker
Lamp or Check Rear
Right Sidemarker
LampThe rear left or right side marker lamp is defective.XCheck whether you are permitted to change the bulb yourself
( Y page 109).
or
XVisit a qualified specialist workshop.b
Check Left Daytime
Running
Light or Check
Right Daytime
Running LightThe left or right-hand daytime running lamp is defective.XCheck whether you are permitted to change the bulb yourself
( Y page 109).
or
XVisit a qualified specialist workshop.b
Active Headlamps
InoperativeThe active light function is defective.XVisit a qualified specialist workshop.Display messages215On-board computer and displaysZ
Page 218 of 336
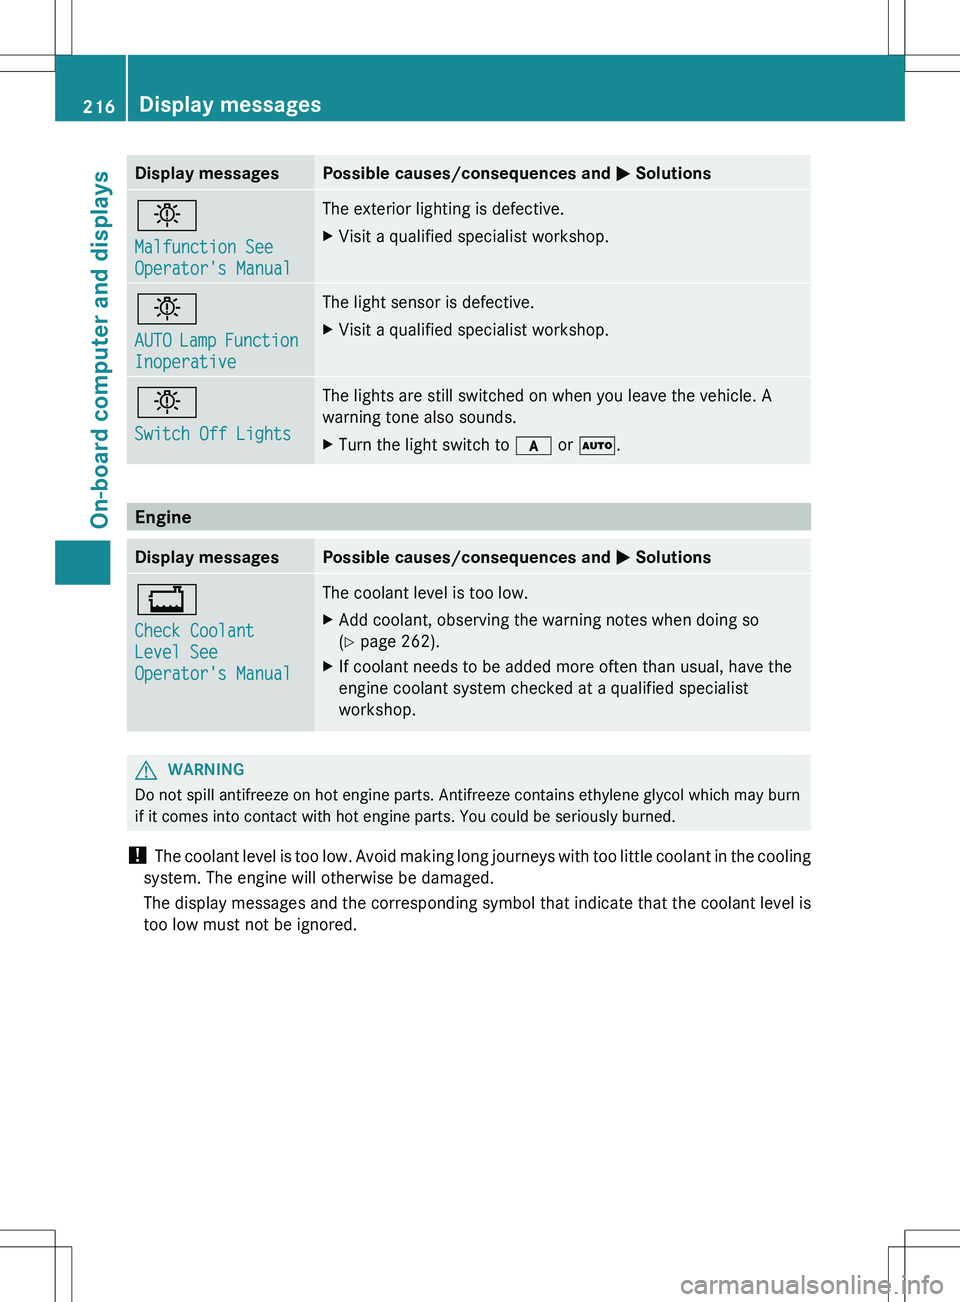
Display messagesPossible causes/consequences and M Solutionsb
Malfunction See
Operator's ManualThe exterior lighting is defective.XVisit a qualified specialist workshop.b
AUTO Lamp Function
InoperativeThe light sensor is defective.XVisit a qualified specialist workshop.b
Switch Off LightsThe lights are still switched on when you leave the vehicle. A
warning tone also sounds.XTurn the light switch to c or à .
Engine
Display messagesPossible causes/consequences and M Solutions+
Check Coolant
Level See
Operator's ManualThe coolant level is too low.XAdd coolant, observing the warning notes when doing so
( Y page 262).XIf coolant needs to be added more often than usual, have the
engine coolant system checked at a qualified specialist
workshop.GWARNING
Do not spill antifreeze on hot engine parts. Antifreeze contains ethylene glycol which may burn
if it comes into contact with hot engine parts. You could be seriously burned.
! The coolant level is too low. Avoid making long journeys with too little coolant in the cooling
system. The engine will otherwise be damaged.
The display messages and the corresponding symbol that indicate that the coolant level is
too low must not be ignored.
216Display messagesOn-board computer and displays
Page 219 of 336
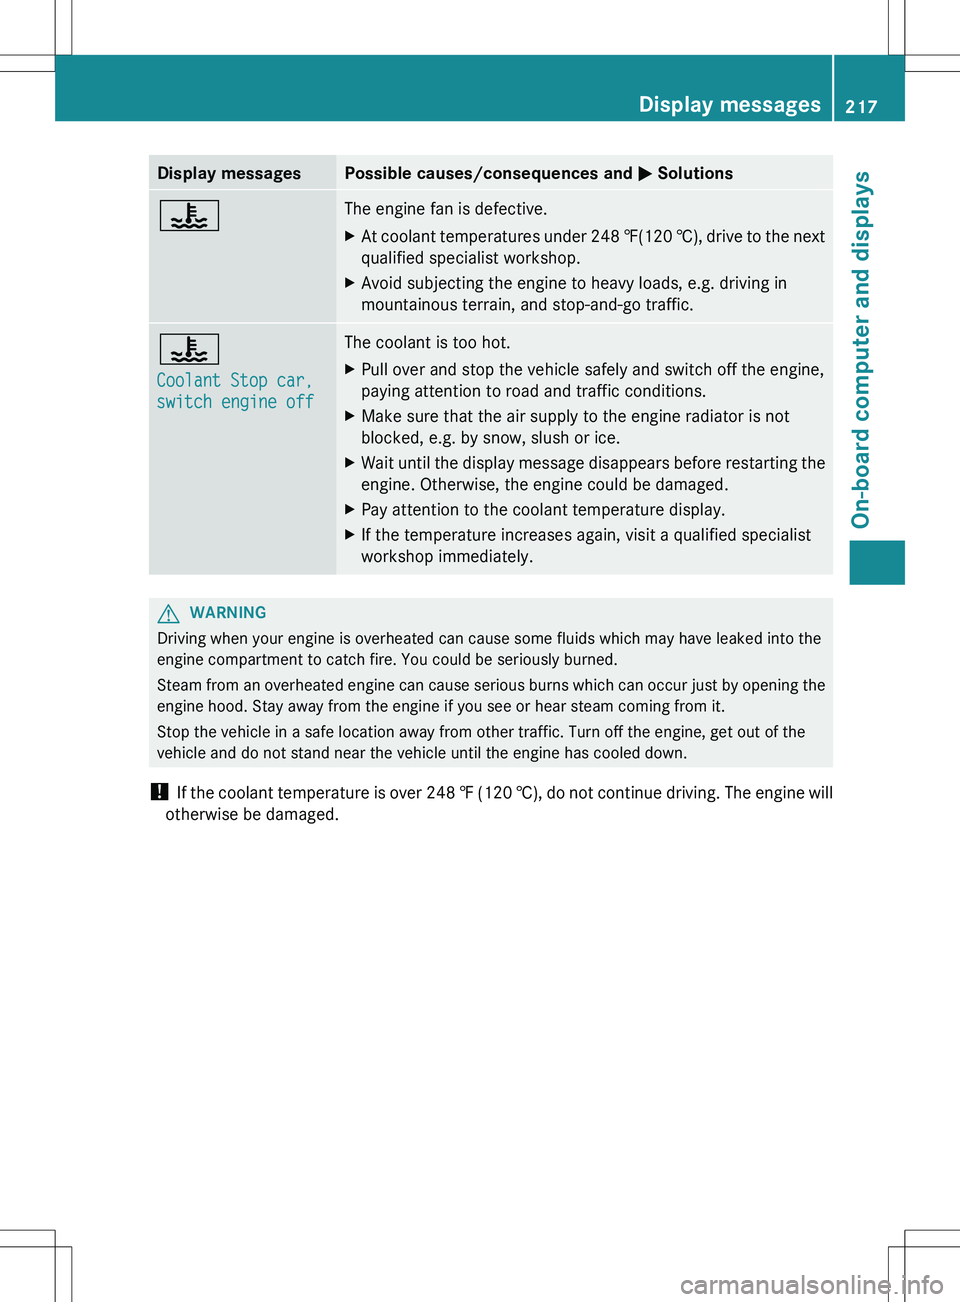
Display messagesPossible causes/consequences and M Solutions?The engine fan is defective.XAt coolant temperatures under 248 ‡(120 †), drive to the next
qualified specialist workshop.XAvoid subjecting the engine to heavy loads, e.g. driving in
mountainous terrain, and stop-and-go traffic.?
Coolant Stop car,
switch engine offThe coolant is too hot.XPull over and stop the vehicle safely and switch off the engine,
paying attention to road and traffic conditions.XMake sure that the air supply to the engine radiator is not
blocked, e.g. by snow, slush or ice.XWait until the display message disappears before restarting the
engine. Otherwise, the engine could be damaged.XPay attention to the coolant temperature display.XIf the temperature increases again, visit a qualified specialist
workshop immediately.GWARNING
Driving when your engine is overheated can cause some fluids which may have leaked into the
engine compartment to catch fire. You could be seriously burned.
Steam from an overheated engine can cause serious burns which can occur just by opening the
engine hood. Stay away from the engine if you see or hear steam coming from it.
Stop the vehicle in a safe location away from other traffic. Turn off the engine, get out of the
vehicle and do not stand near the vehicle until the engine has cooled down.
! If the coolant temperature is over 248 ‡ (120 †), do not continue driving. The engine will
otherwise be damaged.
Display messages217On-board computer and displaysZ
Page 220 of 336
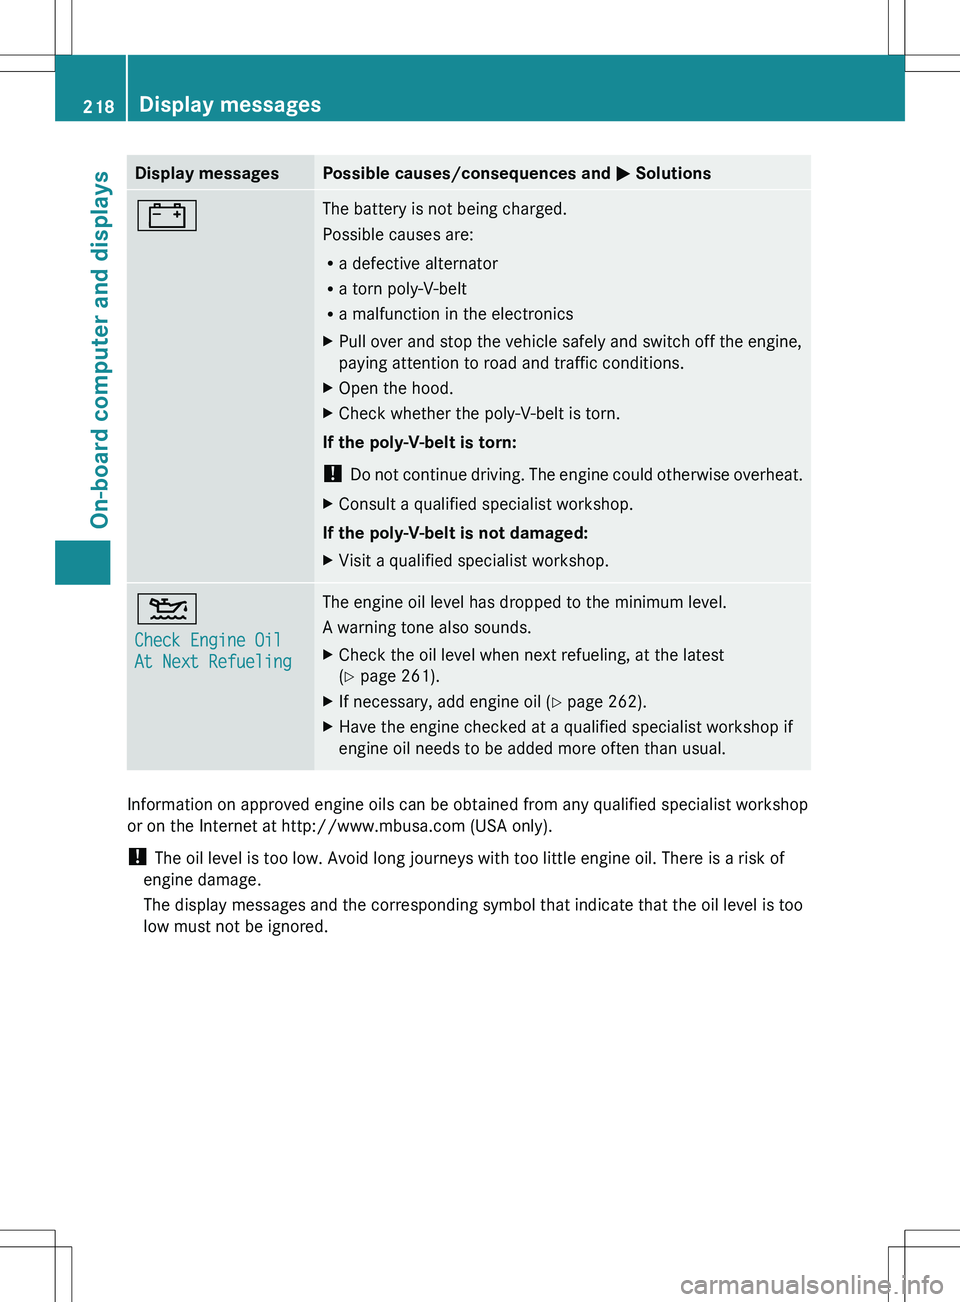
Display messagesPossible causes/consequences and M Solutions#The battery is not being charged.
Possible causes are:
R a defective alternator
R a torn poly-V-belt
R a malfunction in the electronicsXPull over and stop the vehicle safely and switch off the engine,
paying attention to road and traffic conditions.XOpen the hood.XCheck whether the poly-V-belt is torn.
If the poly-V-belt is torn:
! Do not continue driving. The engine could otherwise overheat.
XConsult a qualified specialist workshop.
If the poly-V-belt is not damaged:
XVisit a qualified specialist workshop.4
Check Engine Oil
At Next RefuelingThe engine oil level has dropped to the minimum level.
A warning tone also sounds.XCheck the oil level when next refueling, at the latest
( Y page 261).XIf necessary, add engine oil ( Y page 262).XHave the engine checked at a qualified specialist workshop if
engine oil needs to be added more often than usual.
Information on approved engine oils can be obtained from any qualified specialist workshop
or on the Internet at http://www.mbusa.com (USA only).
! The oil level is too low. Avoid long journeys with too little engine oil. There is a risk of
engine damage.
The display messages and the corresponding symbol that indicate that the oil level is too
low must not be ignored.
218Display messagesOn-board computer and displays