fog light MERCEDES-BENZ SLK-CLASS ROADSTER 2012 Owners Manual
[x] Cancel search | Manufacturer: MERCEDES-BENZ, Model Year: 2012, Model line: SLK-CLASS ROADSTER, Model: MERCEDES-BENZ SLK-CLASS ROADSTER 2012Pages: 336, PDF Size: 24.02 MB
Page 11 of 336
Switching off .................................. 150
Tow-starting (vehicle) ..................... 289
Engine electronics
Problem (malfunction) ...................138
Engine oil
Adding ........................................... 262
Additives ........................................ 327
Checking the oil level ..................... 261
Checking the oil level using the
dipstick .......................................... 261
Display message ............................ 218
Filling capacity ............................... 327
Notes about oil grades ................... 326
Notes on oil level/consumption ....261
Temperature (on-board computer) . 195
Viscosity ........................................ 327
ESP ®
(Electronic Stability
Program) AMG menu (on-board computer) ...196
Deactivating/activating (AMG
vehicles) .......................................... 60
Deactivating/activating (notes;
except AMG vehicles) ......................59
Display message ............................ 200
ETS .................................................. 59
Function/notes ................................ 58
Important safety information ...........58
Warning lamp ................................. 231
ETS (Electronic Traction System) ....... 59
Exhaust check ................................... 153
Exhaust tail pipe (cleaning
instructions) ...................................... 269
Exterior lighting see Lights
Exterior mirrors
Adjusting ......................................... 98
Dipping (automatic) .........................99
Folding in/out (automatically) .........99
Folding in/out (electrically) .............99
Folding in when locking (on-board
computer) ...................................... 195
Out of position (troubleshooting) .....99
Storing settings (memory
function) ........................................ 100
Storing the parking position ..........100
Eyeglasses compartment ................. 243F
Filler cap see Fuel filler flap
First-aid kit ......................................... 274
Flat tire Changing a wheel/mounting the
spare wheel ................................... 276
MOExtended run-flat system .........281
Preparing the vehicle .....................275
Raising the vehicle .........................277
see Emergency spare wheel
Floormat ............................................. 257
Front fog lamps ................................. 106
Display message ............................ 214
Switching on/off ........................... 106
Front windshield
see Windshield
Fuel
Additives ........................................ 326
Consumption statistics ..................185
Displaying the current
consumption .................................. 185
Displaying the range ......................185
Driving tips .................................... 152
Fuel gauge ....................................... 27
Grade (gasoline) ............................ 325
Important safety notes ..................325
Premium-grade unleaded gasoline . 325
Problem (malfunction) ...................149
Refueling ........................................ 146
Tank content/reserve fuel .............325
Fuel filler flap, opening/closing ....... 147
Fuel level Calling up the range (on-board
computer) ...................................... 185
Fuel tank
Capacity ........................................ 325
Problem (malfunction) ...................149
Fuse allocation chart (vehicle tool
kit) ...................................................... 274
Fuses Allocation chart ............................. 290
Before changing ............................. 290
Fuse box in the engine
compartment ................................. 290
Fuse box in the trunk .....................290
Important safety notes ..................289Index9
Page 12 of 336
G
Garage door opener Clearing the memory .....................257
Notes ............................................. 254
Opening/closing the garage door ..257
Programming (button in the rear-
view mirror) ................................... 255
Gear indicator (on-board
computer) .......................................... 195
Gear or selector lever (cleaning
guidelines) ......................................... 270
Genuine Mercedes-Benz parts ......... 322
Glove box ........................................... 242
H
Handbrake see Parking brake
Hazard warning lamps ...................... 108
Head bags Display message ............................ 209
Operation ......................................... 41
Headlamp cleaning system
Notes ............................................. 328
Headlamps
Adding fluid to cleaning system .....263
Cleaning system (function) ............107
Fogging up ..................................... 108
see Automatic headlamp mode
Head level heating (AIRSCARF) .......... 96
Head restraints Adjusting ......................................... 95
see NECK-PRO head restraints
Heating
see Climate control
High-beam headlamps
Changing bulbs .............................. 111
Display message ............................ 214
Switching on/off ........................... 107
Hill start assist .................................. 134
HOLD function Display message ............................ 219
Function/notes ............................. 168
Hood
Closing ........................................... 261
Display message ............................ 224
Opening ......................................... 260
Hydroplaning ..................................... 155
I
Ignition lock see Key positions
Immobilizer .......................................... 64
Indicator lamps see Warning and indicator lamps
Indicators
see Turn signals
Instrument cluster
Overview .......................................... 27
Settings ......................................... 191
Warning and indicator lamps ...........28
Instrument cluster lighting .............. 180
Instrument lighting see Instrument cluster lighting
Interior lighting ................................. 109
Automatic control ..........................109
Delayed switch-off (on-board
computer) ...................................... 193
Emergency lighting ........................109
Manual control ............................... 109
Overview ........................................ 109
Reading lamp ................................. 109
Setting the brightness of the
ambient lighting (on-board
computer) ...................................... 192
J
Jack Storage location ............................ 274
Using ............................................. 277
Jump starting (engine) ...................... 285
K
Key see SmartKey
KEYLESS-GO
Convenience closing feature ............81
Display message ............................ 226
Locking ............................................ 69
Start/Stop button .......................... 131
Starting the engine ........................133
Unlocking ......................................... 69
10Index
Page 13 of 336
Key positionsKEYLESS-GO .................................. 131
SmartKey ....................................... 131
Kickdown
Driving tips .................................... 142
Manual drive program ....................145
Knee bag .............................................. 40
L
Lamps see Warning and indicator lamps
Lap time (RACETIMER) ...................... 196
License plate lamp (display
message) ............................................ 214
Light function, active Display message ............................ 215
Lighting
see Lights
Lights
Activating/deactivating the
interior lighting delayed switch-off . 193
Automatic headlamp mode ............106
Cornering light function .................108
Display message ............................ 213
Driving abroad ............................... 104
Fog lamps ...................................... 106
Hazard warning lamps ...................108
High beam flasher .......................... 107
High-beam headlamps ...................107
Light switch ................................... 104
Low-beam headlamps ....................105
Rear fog lamp ................................ 106
Setting the brightness of the
ambient lighting (on-board
computer) ...................................... 192
Standing lamps .............................. 104
Switching the daytime running
lamps on/off (on-board
computer) ...................................... 192
Switching the daytime running
lamps on/off (switch) ....................105
Switching the exterior lighting
delayed switch-off on/off (on-
board computer) ............................ 193
Switching the surround lighting
on/off (on-board computer) ..........193
Turn signals ................................... 107
see Changing bulbs
see Interior lighting
Light sensor (display message) ....... 216
Locking see Central locking
Locking (doors)
Automatic ........................................ 75
Emergency locking ........................... 76
From inside (central locking
button) ............................................. 75
Locking centrally
see Central locking
Locking verification signal (on-
board computer) ............................... 194
Low-beam headlamps Changing bulbs .............................. 111
Display message ............................ 213
Setting for driving abroad
(symmetrical) ................................. 104
Switching on/off ........................... 105
Luggage cover
see Trunk partition
Lumbar support ................................... 95
M
M+S tires ............................................ 296
MAGIC SKY CONTROL ......................... 88
Maintenance see ASSYST PLUS service interval
display
Malfunction message
see Display messages
Manual transmission
Engaging reverse gear ...................139
Gear lever ...................................... 139
Pulling away ................................... 133
Shift recommendation ...................139
Starting the engine ........................133
Matte finish (cleaning
instructions) ...................................... 267
mbrace Call priority .................................... 252
Display message ............................ 207
Index11
Page 15 of 336
RACETIMER ................................... 196
Service menu ................................. 191
Settings menu ............................... 191
Standard display ............................ 185
Telephone menu ............................ 189
Trip menu ...................................... 185
Vehicle submenu ........................... 193
Video DVD operation .....................189
Operating safety
Diagnostics connection ...................23
Operating system
see On-board computer
Outside temperature display ........... 181
Overhead control panel ...................... 32
P
Paint code number ............................ 323
Paintwork (cleaning instructions) ... 267
Panic alarm .......................................... 55
Parcel net ........................................... 244
Parking ............................................... 149
Important safety notes ..................149
Parking brake ................................ 150
Position of exterior mirror, front-
passenger side ............................... 100
see PARKTRONIC
Parking aid
Parking Guidance ........................... 173
see Exterior mirrors
see PARKTRONIC
Parking brake
Display message ............................ 202
Electric parking brake ....................150
Parking Guidance
Display message ............................ 220
Important safety notes ..................173
Parking lamps (changing bulbs) ...... 112
PARKTRONIC Deactivating/activating .................172
Driving system ............................... 170
Function/notes ............................. 170
Important safety notes ..................170
Problem (malfunction) ...................173
Range of the sensors .....................170
Warning display ............................. 171
PASSENGER AIR BAG OFF indicator
lamp ...................................................... 42
Pedals ................................................. 152
Pivoting draft stop see AIRGUIDE
Plastic trim (cleaning instructions) . 269
Power washers .................................. 266
Power windows see Side windows
PRE-SAFE ®
(Preventive occupant
safety system) Display message ............................ 207
Operation ......................................... 47
PRE-SAFE ®
Brake
Activating/deactivating .................190
Display message ............................ 208
Function/notes ................................ 62
Warning lamp ................................. 237
Product information ............................ 20
Program selector button .................. 142
Pulling away Automatic transmission .................134
Manual transmission ...................... 133
Q
Qualified specialist workshop ........... 23
R
RACETIMER (on-board computer) .... 196
Radar sensor system Activating/deactivating .................194
Display message ............................ 220
Radio
Selecting a station .........................188
see separate operating instructions
Reading lamp ..................................... 109
Rear fog lamp Display message ............................ 215
Switching on/off ........................... 106
Rear lamps
see Lights
Rear-view mirror
Anti-glare (manual) ..........................98
Dipping (automatic) .........................99
Rear window defroster
Problem (malfunction) ...................125
Switching on/off ........................... 124
Index13
Page 107 of 336
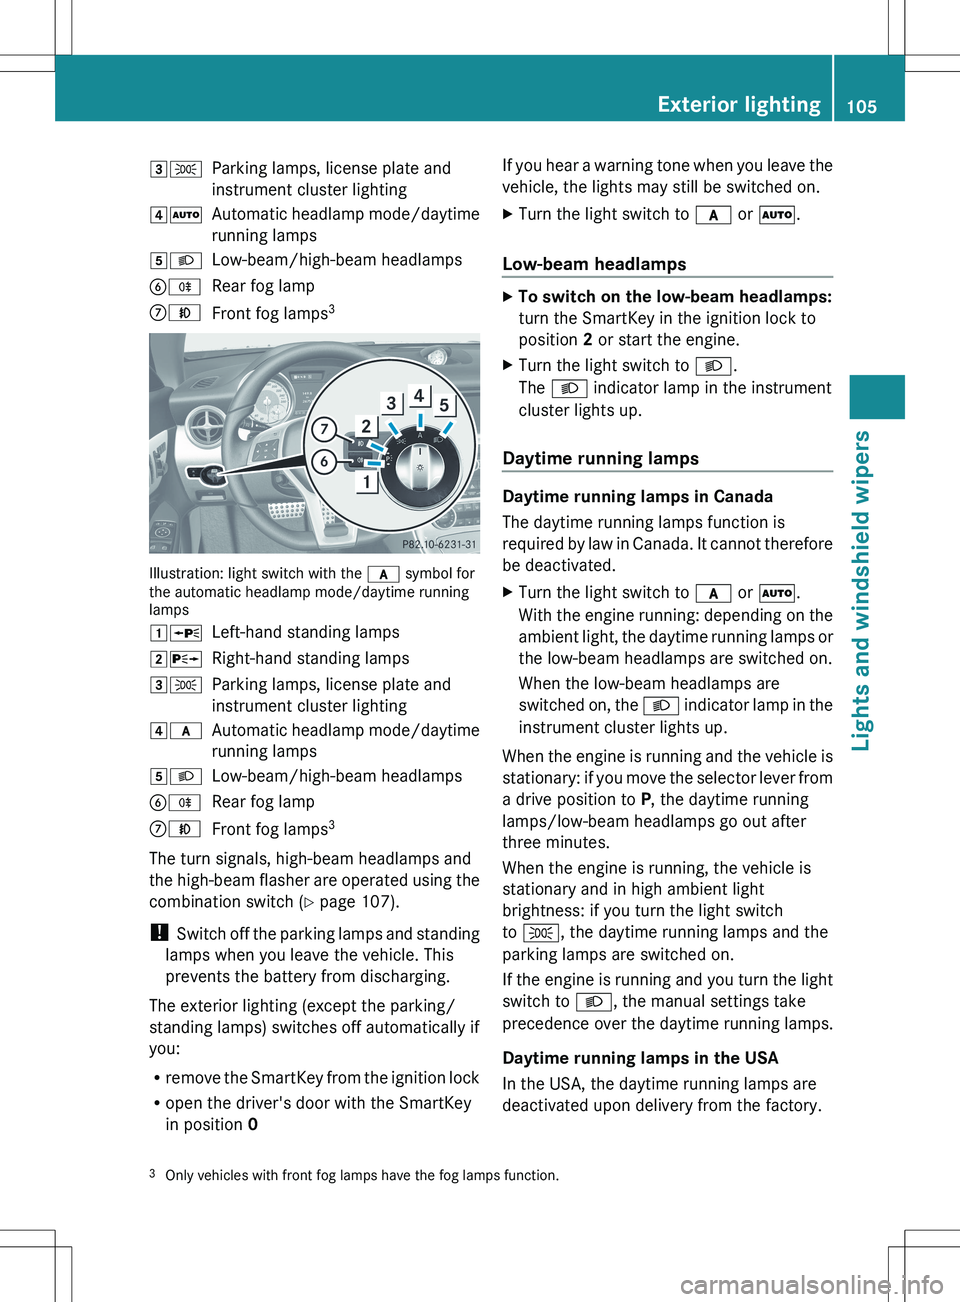
3TParking lamps, license plate and
instrument cluster lighting4 ÃAutomatic headlamp mode/daytime
running lamps5 LLow-beam/high-beam headlampsBRRear fog lampCNFront fog lamps 3
Illustration: light switch with the
c symbol for
the automatic headlamp mode/daytime running
lamps
1 WLeft-hand standing lamps2XRight-hand standing lamps3TParking lamps, license plate and
instrument cluster lighting4 cAutomatic headlamp mode/daytime
running lamps5 LLow-beam/high-beam headlampsBRRear fog lampCNFront fog lamps 3
The turn signals, high-beam headlamps and
the high-beam flasher are operated using the
combination switch ( Y page 107).
! Switch off the parking lamps and standing
lamps when you leave the vehicle. This
prevents the battery from discharging.
The exterior lighting (except the parking/
standing lamps) switches off automatically if
you:
R remove the SmartKey from the ignition lock
R open the driver's door with the SmartKey
in position 0
If you hear a warning tone when you leave the
vehicle, the lights may still be switched on.XTurn the light switch to c or à .
Low-beam headlamps
XTo switch on the low-beam headlamps:
turn the SmartKey in the ignition lock to
position 2 or start the engine.XTurn the light switch to L.
The L indicator lamp in the instrument
cluster lights up.
Daytime running lamps
Daytime running lamps in Canada
The daytime running lamps function is
required by law in Canada. It cannot therefore
be deactivated.
XTurn the light switch to c or à .
With the engine running: depending on the
ambient light, the daytime running lamps or
the low-beam headlamps are switched on.
When the low-beam headlamps are
switched on, the L indicator lamp in the
instrument cluster lights up.
When the engine is running and the vehicle is
stationary: if you move the selector lever from
a drive position to P, the daytime running
lamps/low-beam headlamps go out after
three minutes.
When the engine is running, the vehicle is
stationary and in high ambient light
brightness: if you turn the light switch
to T , the daytime running lamps and the
parking lamps are switched on.
If the engine is running and you turn the light
switch to L, the manual settings take
precedence over the daytime running lamps.
Daytime running lamps in the USA
In the USA, the daytime running lamps are
deactivated upon delivery from the factory.
3 Only vehicles with front fog lamps have the fog lamps function.Exterior lighting105Lights and windshield wipers
Page 108 of 336
XTo activate the daytime running
lamps: activate the daytime running lamps
function in the on-board computer
( Y page 192).XTurn the light switch to c or à .
With the engine running: depending on the
ambient light, the daytime running lamps or
the low-beam headlamps are switched on.
When the low-beam headlamps are
switched on, the L indicator lamp in the
instrument cluster lights up.
If the engine is running and you turn the light
switch to T or L , the manual settings
take precedence over the daytime running
lamps.
Automatic headlamp mode
XTo switch on automatic headlamp
mode: turn the light switch to c or
à .
SmartKey in position 1 in the ignition lock:
the parking lamps are switched on or off
automatically depending on the brightness
of the ambient light.
With the engine running: depending on the
brightness of the ambient light, the daytime
running lamps 4
or the low-beam headlamps
are switched on or off automatically.
When the low-beam headlamps are
switched on, the L indicator lamp in the
instrument cluster lights up.GWARNING
If the light switch is set to c or à , the
low-beam headlamps will not come on
automatically if it is foggy. This could
endanger you and others. Therefore, turn the
light switch to L in fog.
The automatic headlamp feature is only an
aid. The driver is responsible for the vehicle's
lighting at all times.
Front fog lamps
Only vehicles with front fog lamps have the
fog lamps function.
GWARNING
If you suspect that driving conditions will be
foggy, turn the light switch to L before you
start your journey. Your vehicle may
otherwise not be visible and you could
endanger yourself and others.
XTo switch on the front fog lamps: turn
the SmartKey in the ignition lock to position
2 or start the engine.XTurn the light switch to L or c or
à .XPress the N button.
The green N indicator lamp in the
instrument cluster lights up.XTo switch off the front fog lamps: press
the N button.
The green N indicator lamp in the
instrument cluster goes out.
i If you switch the engine off (SmartKey in
position 1 in the ignition lock) and then
restart it, the previous fog lamp settings are
restored.
Rear fog lamp
XTo switch on the rear fog lamp: turn the
SmartKey in the ignition lock to position 2
or start the engine.XTurn the light switch to L or c or
à .
If the light switch is set to c or à ,
the rear fog lamp only lights up if the low-
beam headlamps are on.4 Only if daytime running lamps have been activated via the on-board computer.106Exterior lightingLights and windshield wipers
Page 109 of 336
XPress the R button.
The yellow R indicator lamp in the
instrument cluster lights up.XTo switch off the rear fog lamp: press the
R button.
The yellow R indicator lamp in the
instrument cluster goes out.
i If you switch the engine off (SmartKey in
position 1 in the ignition lock) and then
restart it, the previous rear fog lamp
settings are restored.
Headlamp cleaning system
If the "Wipe with washer fluid" function is
operated five times ( Y page 113) while the
lights are on and the engine is running, the
headlamps are cleaned automatically. When
you switch off the ignition, the automatic
headlamp cleaning system is reset and
counting is resumed from 0.
Combination switch
Turn signals
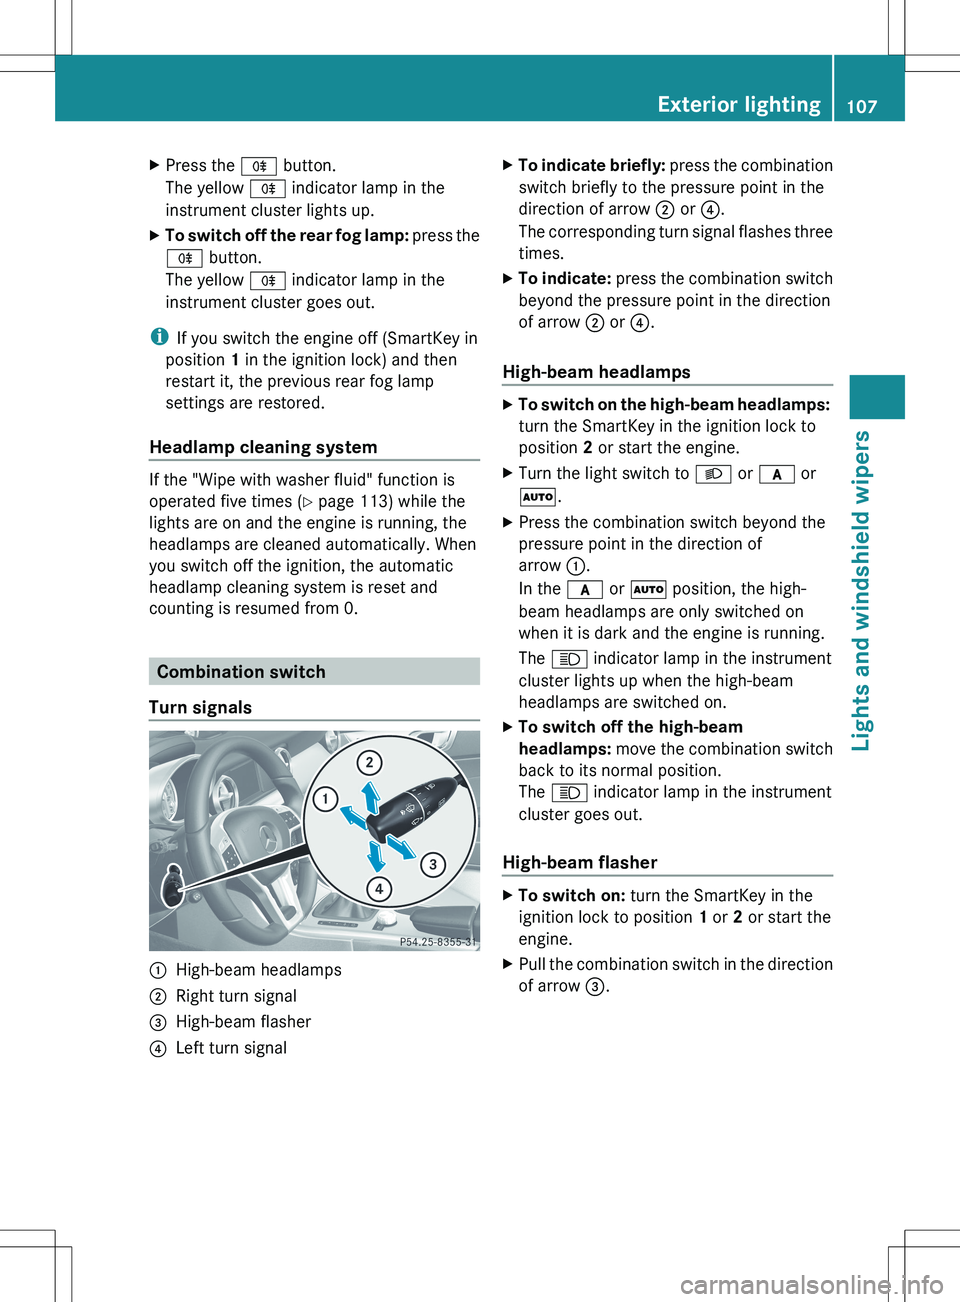
:High-beam headlamps;Right turn signal=High-beam flasher?Left turn signalXTo indicate briefly: press the combination
switch briefly to the pressure point in the
direction of arrow ; or ?.
The corresponding turn signal flashes three
times.XTo indicate: press the combination switch
beyond the pressure point in the direction
of arrow ; or ?.
High-beam headlamps
XTo switch on the high-beam headlamps:
turn the SmartKey in the ignition lock to
position 2 or start the engine.XTurn the light switch to L or c or
à .XPress the combination switch beyond the
pressure point in the direction of
arrow :.
In the c or à position, the high-
beam headlamps are only switched on
when it is dark and the engine is running.
The K indicator lamp in the instrument
cluster lights up when the high-beam
headlamps are switched on.XTo switch off the high-beam
headlamps: move the combination switch
back to its normal position.
The K indicator lamp in the instrument
cluster goes out.
High-beam flasher
XTo switch on: turn the SmartKey in the
ignition lock to position 1 or 2 or start the
engine.XPull the combination switch in the direction
of arrow =.Exterior lighting107Lights and windshield wipersZ
Page 110 of 336
Hazard warning lamps
The hazard warning lamps automatically
switch on if:
R an air bag is deployed.
R the vehicle is slowed down rapidly from a
speed of over 45 mph (70 km/h) and
comes to a halt.
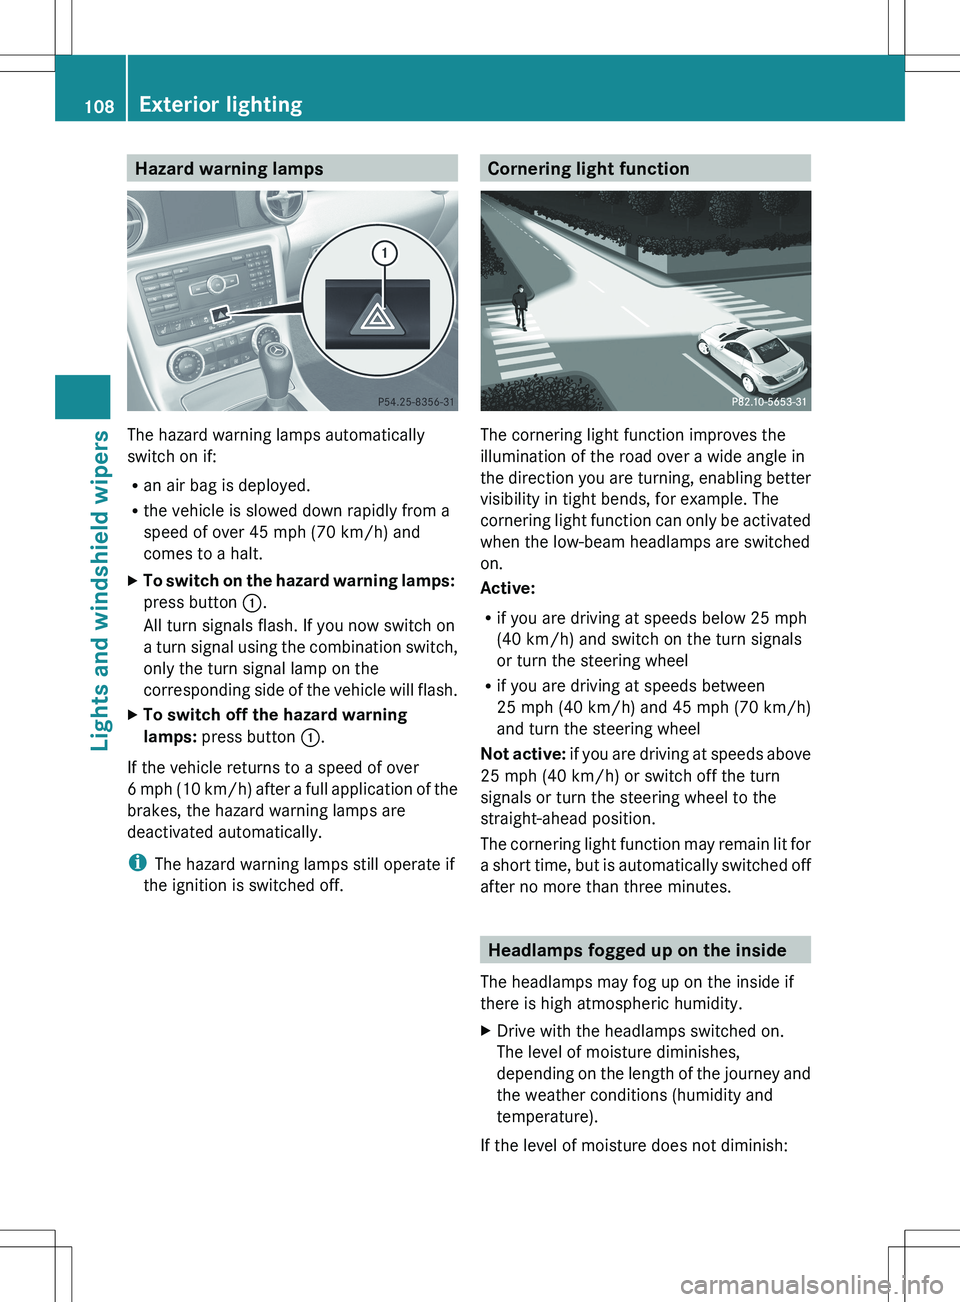
XTo switch on the hazard warning lamps:
press button :.
All turn signals flash. If you now switch on
a turn signal using the combination switch,
only the turn signal lamp on the
corresponding side of the vehicle will flash.XTo switch off the hazard warning
lamps: press button :.
If the vehicle returns to a speed of over
6 mph (10 km/h) after a full application of the
brakes, the hazard warning lamps are
deactivated automatically.
i The hazard warning lamps still operate if
the ignition is switched off.
Cornering light function
The cornering light function improves the
illumination of the road over a wide angle in
the direction you are turning, enabling better
visibility in tight bends, for example. The
cornering light function can only be activated
when the low-beam headlamps are switched
on.
Active:
R if you are driving at speeds below 25 mph
(40 km/h) and switch on the turn signals
or turn the steering wheel
R if you are driving at speeds between
25 mph (40 km/h) and 45 mph (70 km/h)
and turn the steering wheel
Not active: if you are driving at speeds above
25 mph (40 km/h) or switch off the turn
signals or turn the steering wheel to the
straight-ahead position.
The cornering light function may remain lit for
a short time, but is automatically switched off
after no more than three minutes.
Headlamps fogged up on the inside
The headlamps may fog up on the inside if
there is high atmospheric humidity.
XDrive with the headlamps switched on.
The level of moisture diminishes,
depending on the length of the journey and
the weather conditions (humidity and
temperature).
If the level of moisture does not diminish:
108Exterior lightingLights and windshield wipers
Page 120 of 336
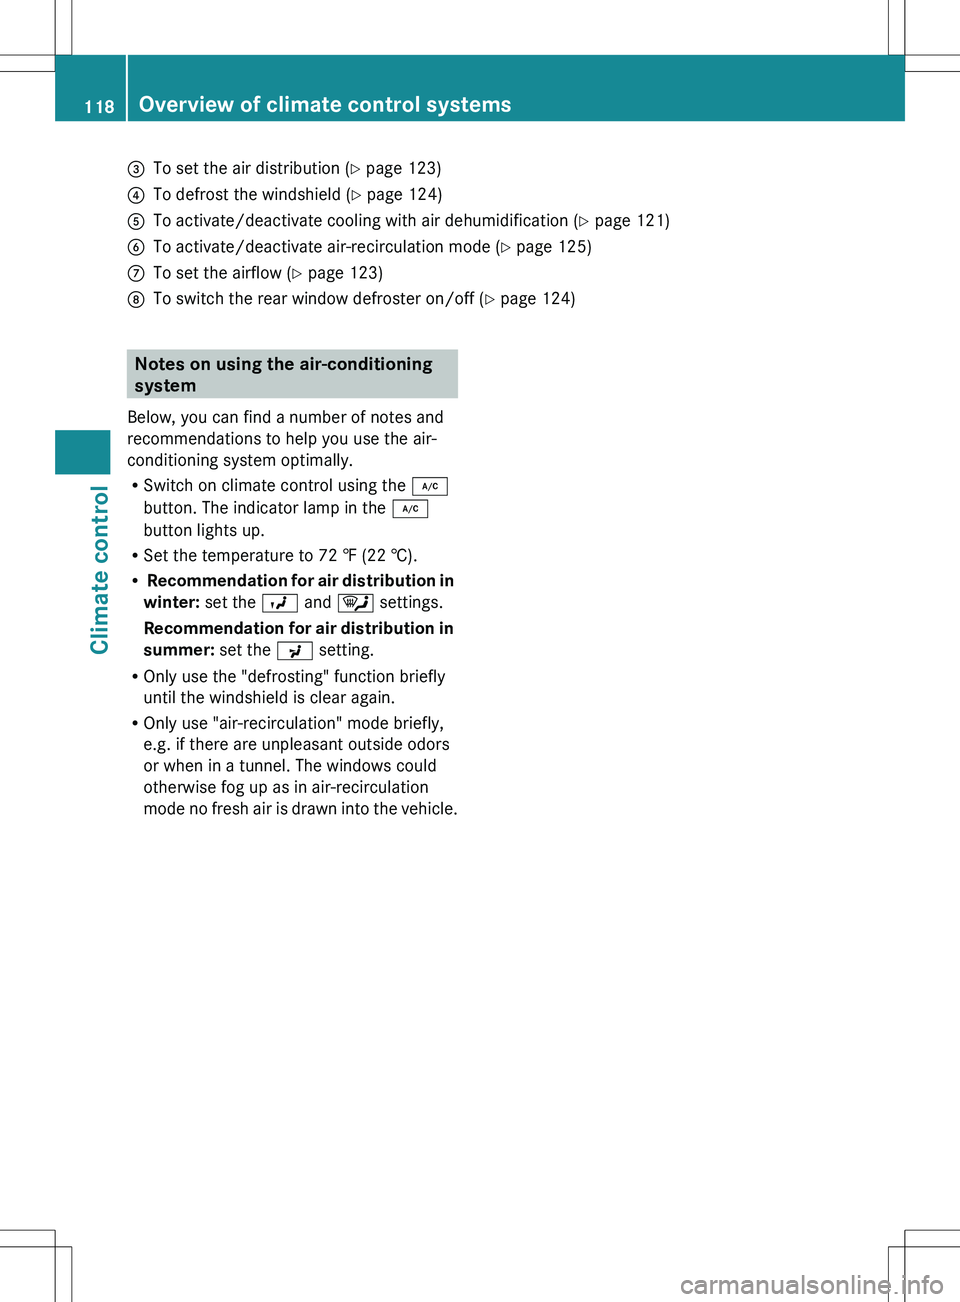
=To set the air distribution (Y page 123)?To defrost the windshield ( Y page 124)ATo activate/deactivate cooling with air dehumidification ( Y page 121)BTo activate/deactivate air-recirculation mode ( Y page 125)CTo set the airflow ( Y page 123)DTo switch the rear window defroster on/off ( Y page 124)Notes on using the air-conditioning
system
Below, you can find a number of notes and
recommendations to help you use the air-
conditioning system optimally.
R Switch on climate control using the ¿
button. The indicator lamp in the ¿
button lights up.
R Set the temperature to 72 ‡ (22 †).
R Recommendation for air distribution in
winter: set the O and ¯ settings.
Recommendation for air distribution in
summer: set the P setting.
R Only use the "defrosting" function briefly
until the windshield is clear again.
R Only use "air-recirculation" mode briefly,
e.g. if there are unpleasant outside odors
or when in a tunnel. The windows could
otherwise fog up as in air-recirculation
mode no fresh air is drawn into the vehicle.118Overview of climate control systemsClimate control
Page 122 of 336
USA only
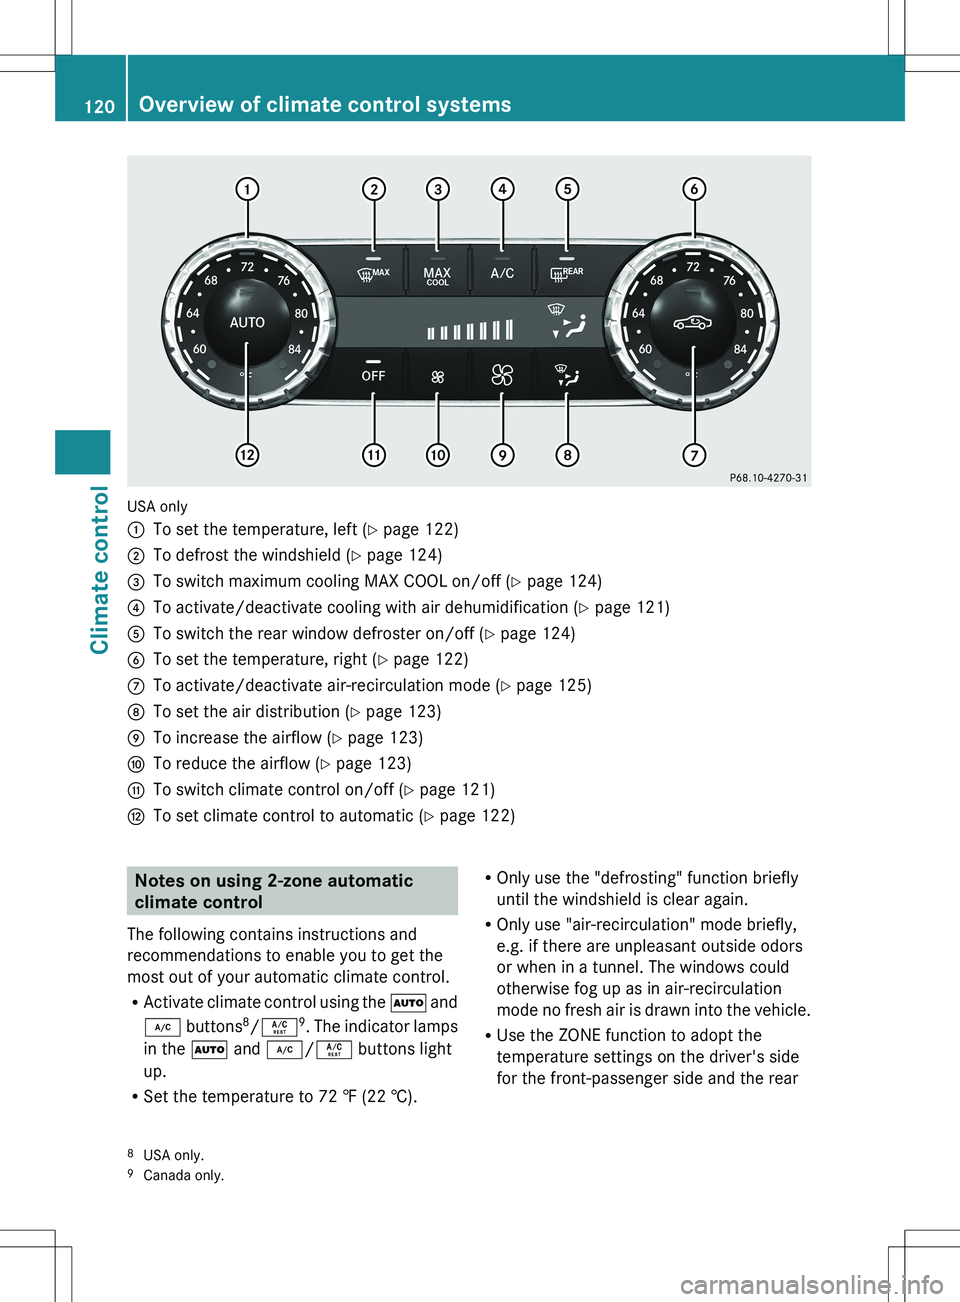
:To set the temperature, left (Y page 122);To defrost the windshield ( Y page 124)=To switch maximum cooling MAX COOL on/off ( Y page 124)?To activate/deactivate cooling with air dehumidification ( Y page 121)ATo switch the rear window defroster on/off ( Y page 124)BTo set the temperature, right ( Y page 122)CTo activate/deactivate air-recirculation mode ( Y page 125)DTo set the air distribution ( Y page 123)ETo increase the airflow ( Y page 123)FTo reduce the airflow ( Y page 123)GTo switch climate control on/off ( Y page 121)HTo set climate control to automatic ( Y page 122)Notes on using 2-zone automatic
climate control
The following contains instructions and
recommendations to enable you to get the
most out of your automatic climate control.
R Activate climate control using the à and
¿ buttons 8
/ Á 9
. The indicator lamps
in the à and ¿ /Á buttons light
up.
R Set the temperature to 72 ‡ (22 †).ROnly use the "defrosting" function briefly
until the windshield is clear again.
R Only use "air-recirculation" mode briefly,
e.g. if there are unpleasant outside odors
or when in a tunnel. The windows could
otherwise fog up as in air-recirculation
mode no fresh air is drawn into the vehicle.
R Use the ZONE function to adopt the
temperature settings on the driver's side
for the front-passenger side and the rear8 USA only.
9 Canada only.120Overview of climate control systemsClimate control