roof MERCEDES-BENZ SLK-CLASS ROADSTER 2014 Owners Manual
[x] Cancel search | Manufacturer: MERCEDES-BENZ, Model Year: 2014, Model line: SLK-CLASS ROADSTER, Model: MERCEDES-BENZ SLK-CLASS ROADSTER 2014Pages: 356, PDF Size: 48.94 MB
Page 8 of 356
Notes
............................................. 279
Paint .............................................. 281
Plastic trim .................................... 284
Power washer ................................ 281
Roof lining ...................................... 285
Seat belt ........................................ 285
Seat cover ..................................... 285
Sensors ......................................... 283
Steering wheel ............................... 284
Trim pieces .................................... 284
Washing by hand ........................... 280
Wheels ........................................... 282
Windows ........................................ 282
Wiper blades .................................. 282
Wooden trim .................................. 284
Car keys
see SmartKey
Car wash (care) ................................. 280
CD player/CD changer (on-board
computer) .......................................... 198
Center console Lower section .................................. 33
Upper section .................................. 32
Central locking
Automatic locking (on-board
computer) ...................................... 205
Locking/unlocking (SmartKey) ........70
Changing bulbs
High-beam headlamps ...................116
Low-beam headlamps ....................116
Reversing lamps ............................ 117
Side marker lamps (rear) ...............116
Turn signals (front) ......................... 117
Children
In the vehicle ................................... 55
Restraint systems ............................ 55
Special seat belt retractor ...............58
Cigarette lighter ................................ 258
Cleaning Mirror turn signal ........................... 283
Climate control
Air-conditioning system .................123
Automatic climate control (dual-
zone) .............................................. 125
Controlling automatically ...............129
Cooling with air dehumidification ..127
Defrosting the windows .................131
Defrosting the windshield ..............131Important safety notes
..................122
Indicator lamp ................................ 129
Information on using dual-zone
automatic climate control ..............126
Maximum cooling .......................... 131
Notes on using the air-
conditioning system ....................... 124
Overview of systems ......................122
Problems with cooling with air
dehumidification ............................ 129
Problem with the rear window
defroster ........................................ 133
Refrigerant ..................................... 349
Refrigerant filling capacity .............349
Setting the air distribution .............130
Setting the airflow .........................130
Setting the air vents ......................134
Setting the temperature ................129
Switching air-recirculation mode
on/off ............................................ 133
Switching on/off ........................... 127
Switching residual heat on/off ......133
Switching the rear window
defroster on/off ............................ 131
Switching the ZONE function on/
off .................................................. 130
Cockpit
Overview .......................................... 28
see Instrument cluster
Collapsible spare wheel
Inflating ......................................... 338
see Emergency spare wheel
COMAND display
Cleaning ......................................... 284
Combination switch ..........................110
Compass Calibrating ..................................... 272
Calling up ....................................... 271
Setting ........................................... 271
Consumption statistics (on-board
computer) .......................................... 195
Convenience closing feature ..............84
Convenience opening feature see Side windows
Coolant (engine)
Checking the level .........................277
Display message ............................ 225
Filling capacity ............................... 3486
Index
Page 16 of 356
Protection of the environment
General notes .................................. 20
Pulling away
Automatic transmission .................142
Manual transmission ..................... .142 Q
Qualified specialist workshop ...........24 R
RACETIMER (on-board computer) ....207
Radar sensor system Activating/deactivating .................205
Display message ............................ 228
Radio
Selecting a station .........................198
Radio-wave reception/
transmission in the vehicle Declaration of conformity ................24
Reading lamp ..................................... 113
Rear fog lamp Display message ............................ 223
Switching on/off ........................... 110
Rear lamps
see Lights
Rear-view mirror
Anti-glare (manual) ........................103
Dipping (automatic) .......................104
Rear window defroster
Problem (malfunction) ...................133
Switching on/off ........................... 132
Refrigerant (air-conditioning
system)
Important safety notes ..................349
Refueling
Fuel gauge ....................................... 29
Important safety notes ..................156
Refueling proces s.......................... 157
see Fuel
Releasing the parking lock
manually (automatic transmission) 156
Remote control Programming (garage door opener) 268 Replacing bulbs
Important safety notes ..................114
Overview of bulb type s.................. 115
Removing/replacing the cover
(front wheel arch) .......................... 115
Reporting safety defects ....................25
Reserve (fuel tank) see Fuel
Reserve fuel
Display message ............................ 227
Warning lamp ................................. 248
see Fuel
Residual heat (climate control) ........133
Restraint system see SRS (Supplemental Restraint
System)
Reverse gear
Engaging (automatic transmission) 149
Engaging (manual transmission) ....148
Reversible floor panel (trunk) ..........256
Reversing feature Side windows ................................... 82
Trunk lid .......................................... .79
Reversing lamps (display message) 223
Roadside Assistance (breakdown) ....22
Roof Display message ............................ 237
Important safety notes ....................86
Opening/closing (with roof switch) .. 87
Opening/closing (with SmartKey) ....88
Overview .......................................... 86
Problem (malfunction) .....................93
Relocking ......................................... 88
Roof carrier ........................................ 256
Roof lining and carpets (cleaning
guidelines) ......................................... 285
Roof switch .......................................... 87 S
Safety Children in the vehicle .....................55
Child restraint systems ....................55
Occupant Classification System
(OCS) ............................................... 45
Safety system
see Driving safety systems 14
Index
Page 17 of 356
Seat belts
Adjusting the driver's and front-
passenger seat belt .........................53
Belt force limiters ............................ 55
Cleaning ......................................... 285
Correct usage .................................. 52
Emergency Tensioning Devices ....... .55
Fastening ......................................... 53
Important safety guidelines .............51
Releasing ......................................... 54
Safety guidelines ............................. 39
Switching belt adjustment on/off
(on-board computer) ......................206
Warning lamp ................................. 240
Warning lamp (function) ................... 54
Seats
Adjusting (electrically) .....................98
Adjusting (manually). .......................98
Adjusting the 4-way lumbar
support ............................................ 99
Adjusting the head restraint ............99
Cleaning the cover .........................285
Correct driver's seat position ........... 96
Important safety notes ....................97
Overview .......................................... 97
Seat heating problem ....................100
Storing settings (memory function) 105
Switching AIRSCARF on/off ..........100
Switching seat heating on/off .........99
Selector lever
Cleaning ......................................... 284
Sensors (cleaning instructions) .......283
Service menu (on-board computer) .201
Service products Brake fluid ..................................... 347
Coolant (engine) ............................ 347
Engine oil ....................................... 346
Fuel ................................................ 344
Important safety notes ..................344
Refrigerant (air-conditioning
system) .......................................... 349
Washer fluid .................................. .348
Settings
Factory (on-board computer) .........202
On-board computer .......................202
Setting the air distribution ...............130
Setting the airflow ............................130
SETUP (on-board computer) .............207Side impact air bag
.............................43
Side marker lamp Changing bulbs (rear) ....................116
Side marker lamp (display
message) ............................................ 223
Side windows Cleaning ......................................... 282
Convenience closing feature ............84
Important safety information ...........82
Opening/closing (all) .......................83
Opening/closing (front) ...................82
Overview .......................................... 82
Problem (malfunction) .....................86
Resetting ......................................... 84
SmartKey
Changing the battery .......................73
Changing the programming .............71
Checking the battery .......................73
Convenience opening feature ..........83
Display message ............................ 238
Door central locking/unlocking .......70
Important safety notes ....................70
Loss ................................................. 75
Mechanical key ................................ 72
Opening/closing the roof ................88
Overview .......................................... 70
Positions (ignition lock) .................139
Problem (malfunction) .....................75
Starting the engine ........................142
Snow chains ...................................... 309
Sockets Center console .............................. 259
General notes ................................ 258
Under the armrest .........................259
Spare wheel
Stowing .......................................... 338
see Emergency spare wheel
Specialist workshop ............................ 24
Special seat belt retractor .................. 58
Speed, controlling see Cruise control
Speedometer
Activating/deactivating the
additional speedometer .................203
Digital ............................................ 196
In the Instrument cluster .................29
Segments ...................................... 193
Selecting the unit of measurement 202 Index
15
Page 22 of 356
Protection of the environment
General notes
H
Environmental note
Daimler's declared policy is one of
comprehensive environmental protection.
The objectives are for the natural resources
that form the basis of our existence on this
planet to be used sparingly and in a manner
that takes the requirements of both nature
and humanity into account.
You too can help to protect the environment
by operating your vehicle in an
environmentally responsible manner.
Fuel consumption and the rate of engine,
transmission, brake and tire wear are affected
by these factors:
R operating conditions of your vehicle
R your personal driving style
You can influence both factors. You should
bear the following in mind:
Operating conditions:
R avoid short trips as these increase fuel
consumption.
R always make sure that the tire pressures
are correct.
R do not carry any unnecessary weight.
R remove roof racks once you no longer need
them.
R a regularly serviced vehicle will contribute
to environmental protection. You should
therefore adhere to the service intervals.
R always have service work carried out at a
qualified specialist workshop.
Personal driving style:
R do not depress the accelerator pedal when
starting the engine.
R do not warm up the engine when the vehicle
is stationary.
R drive carefully and maintain a safe distance
from the vehicle in front.
R avoid frequent, sudden acceleration and
braking. R
change gear in good time and use each gear
only up to Ôof its maximum engine speed.
R switch off the engine in stationary traffic.
R keep an eye on the vehicle's fuel
consumption. Environmental concerns and
recommendations
Wherever the operating instructions require
you to dispose of materials, first try to
regenerate or re-use them. Observe the
relevant environmental rules and regulations
when disposing of materials. In this way you
will help to protect the environment. Genuine Mercedes-Benz parts
H
Environmental note
Daimler AG also supplies reconditioned major
assemblies and parts which are of the same
quality as new parts. They are covered by the
same Limited Warranty entitlements as new
parts.
! Air bags and Emergency Tensioning
Devices, as well as control units and
sensors for these restraint systems, may be
installed in the following areas of your
vehicle:
R doors
R door pillars
R door sills
R seats
R cockpit
R instrument cluster
R center console
Do not install accessories such as audio
systems in these areas. Do not carry out
repairs or welding. You could impair the
operating efficiency of the restraint
systems. 20
Introduction
Page 35 of 356
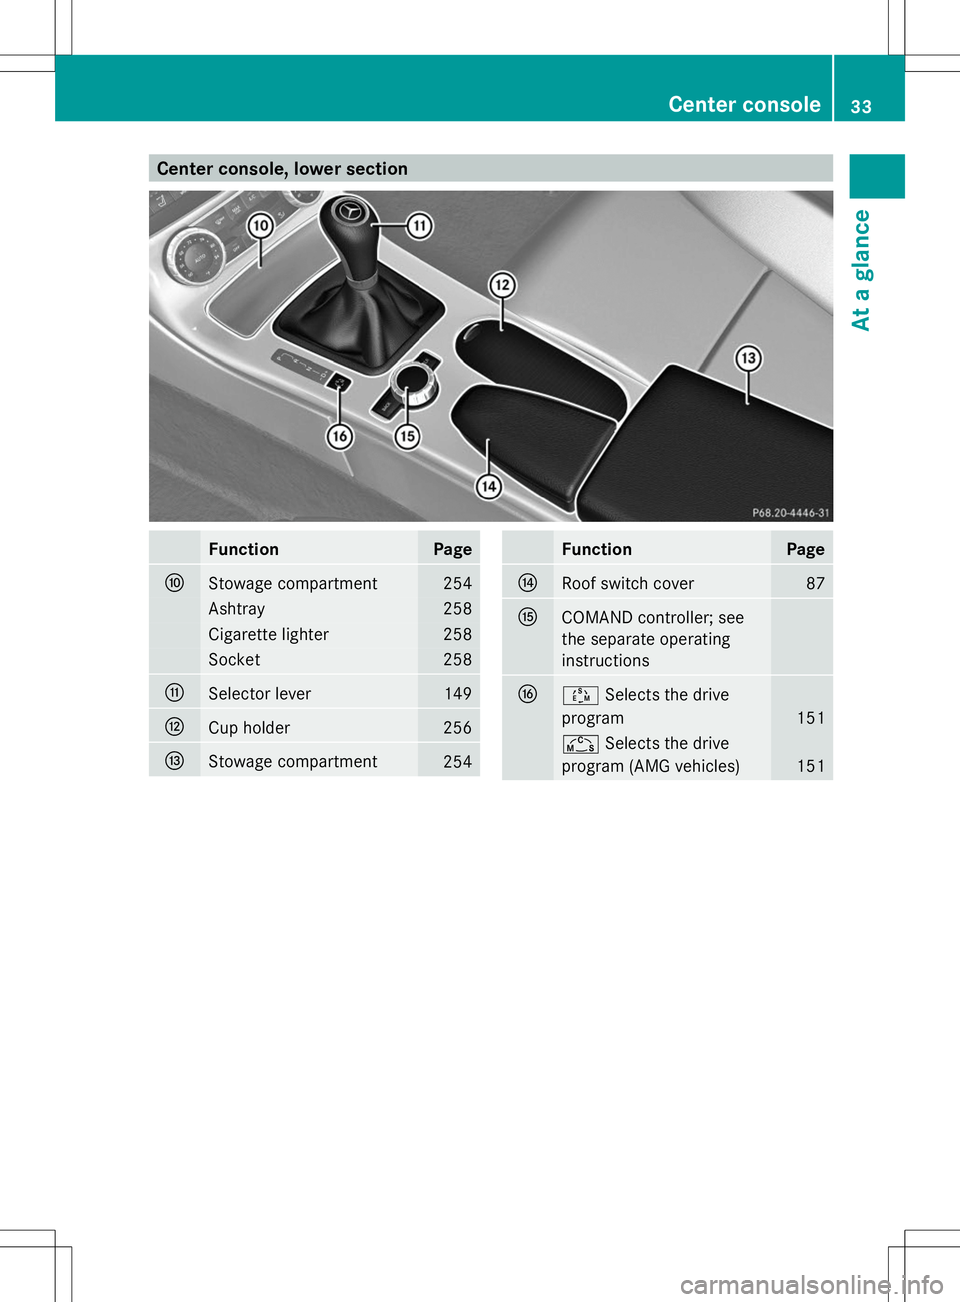
Center console, lower section
Function Page
F
Stowage compartment 254
Ashtray 258
Cigarette lighter 258
Socket 258
G
Selector lever 149
H
Cup holder 256
I
Stowage compartment
254 Function Page
J
Roof switch cover 87
K
COMAND controller; see
the separate operating
instructions
L
Ú
Selects the drive
program 151
Ñ
Selects the drive
program (AMG vehicles) 151Center console
33At a glance
Page 42 of 356
R
Do not install additional trim material, seat
covers, badges, etc. to the:
-padded steering wheel boss
- knee bag covers
- front-passenger air bag cover
- outer side of front seat bolsters
- outer seat bolsters of the rear bench seat
backrest
- roof frame trim
R Do not install additional electrical/
electronic equipment on or near SRS
components and wiring.
R Keep the area between the air bags and
occupants free of objects (e.g. packages,
handbags, umbrellas etc.).
R Do not hang any objects such as coat
hangers on the coat hooks or the grab
handle above the door. These items may be
thrown around in the vehicle and cause
head and other injuries when the window
curtain air bag is deployed.
R Air bag system components will be hot after
an air bag has inflated. Do not touch them.
R Never rest your feet on the dashboard or
the seat. Always keep both feet on the floor
in front of the seat.
R Improper repair work on the SRS creates a
risk of rendering the SRS inoperative or
causing unintended air bag deployment.
Work on the SRS must therefore only be
performed by qualified technicians.
Consult an authorized Mercedes-Benz
Center.
R For your protection and the protection of
others, when scrapping the air bag unit or
ETD, our safety instructions must be
followed. These are available from any
authorized Mercedes-Benz Center.
R Given the considerable deployment speed,
required inflation volume, and the material
of the air bags, there is the possibility of
abrasions or other, potentially more serious
injuries resulting from air bag deployment. If you sell your vehicle, Mercedes-Benz
strongly recommends that you inform the
subsequent owner that the vehicle is
equipped with SRS. Also, refer them to the
applicable section in the Operator's Manual. Air bags
Important safety notes G
WARNING
Using unsuitable seat covers could restrict or
even prevent deployment of the air bags
integrated into the seats. Consequently, the
air bags cannot protect vehicle occupants as
they are designed to do. In addition, the
function of the air bag deactivation system
could be restricted. This poses an increased
risk of injury or even fatal injury.
You should only use seat covers that have
been approved for the respective seat by
Mercedes-Benz. G
WARNING
The air bag parts are hot after the airbag has
been deployed. There is a risk of injury.
Do not touch the air bag parts. Have the
deployed air bags replaced at a qualified
specialist workshop as soon as possible. G
WARNING
Air bags are designed to reduce the incidence
of injuries and fatalities in certain situations:
R frontal impacts (driver's and front-
passenger front air bags and knee bags)
R side impacts (side impact air bags and head
bags)
R rollover (head bags)
However, no system available today can
completely eliminate injuries and fatalities.
When the air bags are deployed, a small
amount of powder is released. The powder
generally does not constitute a health hazard
and does not indicate that there is a fire in the
vehicle. In order to prevent potential 40
Occupant safetySafety
Page 71 of 356
Useful information
..............................70
SmartKey ............................................. 70
Doors .................................................... 76
Trunk .................................................... 79
Side windows ...................................... 82
Roof ...................................................... 86 69Opening and closing
Page 81 of 356
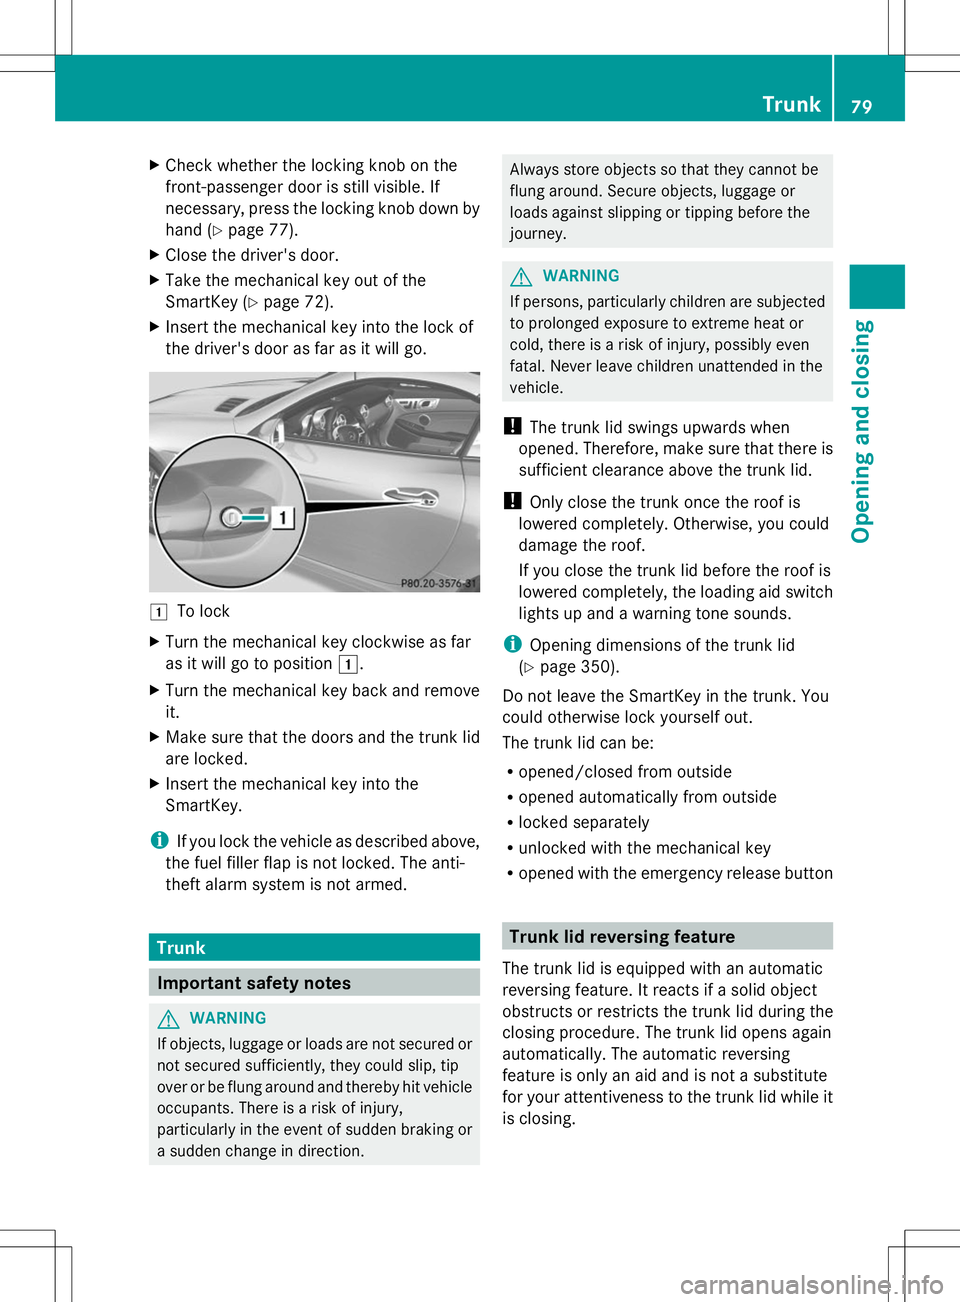
X
Check whether the locking knob on the
front-passenger door is still visible. If
necessary, press the locking knob down by
hand (Y page 77).
X Close the driver's door.
X Take the mechanical key out of the
SmartKey (Y page 72).
X Insert the mechanical key into the lock of
the driver's door as far as it will go. 1
To lock
X Turn the mechanical key clockwise as far
as it will go to position 1.
X Turn the mechanical key back and remove
it.
X Make sure that the doors and the trunk lid
are locked.
X Insert the mechanical key into the
SmartKey.
i If you lock the vehicle as described above,
the fuel filler flap is not locked. The anti-
theft alarm system is not armed. Trunk
Important safety notes
G
WARNING
If objects, luggage or loads are not secured or
not secured sufficiently, they could slip, tip
over or be flung around and thereby hit vehicle
occupants. There is a risk of injury,
particularly in the event of sudden braking or
a sudden change in direction. Always store objects so that they cannot be
flung around. Secure objects, luggage or
loads against slipping or tipping before the
journey.
G
WARNING
If persons, particularly children are subjected
to prolonged exposure to extreme heat or
cold, there is a risk of injury, possibly even
fatal. Never leave children unattended in the
vehicle.
! The trunk lid swings upwards when
opened. Therefore, make sure that there is
sufficient clearance above the trunk lid.
! Only close the trunk once the roof is
lowered completely. Otherwise, you could
damage the roof.
If you close the trunk lid before the roof is
lowered completely, the loading aid switch
lights up and a warning tone sounds.
i Opening dimensions of the trunk lid
(Y page 350).
Do not leave the SmartKey in the trunk. You
could otherwise lock yourself out.
The trunk lid can be:
R opened/closed from outside
R opened automatically from outside
R locked separately
R unlocked with the mechanical key
R opened with the emergency release button Trunk lid reversing feature
The trunk lid is equipped with an automatic
reversing feature. It reacts if a solid object
obstructs or restricts the trunk lid during the
closing procedure. The trunk lid opens again
automatically. The automatic reversing
feature is only an aid and is not a substitute
for your attentiveness to the trunk lid while it
is closing. Trunk
79Opening and closing Z
Page 85 of 356
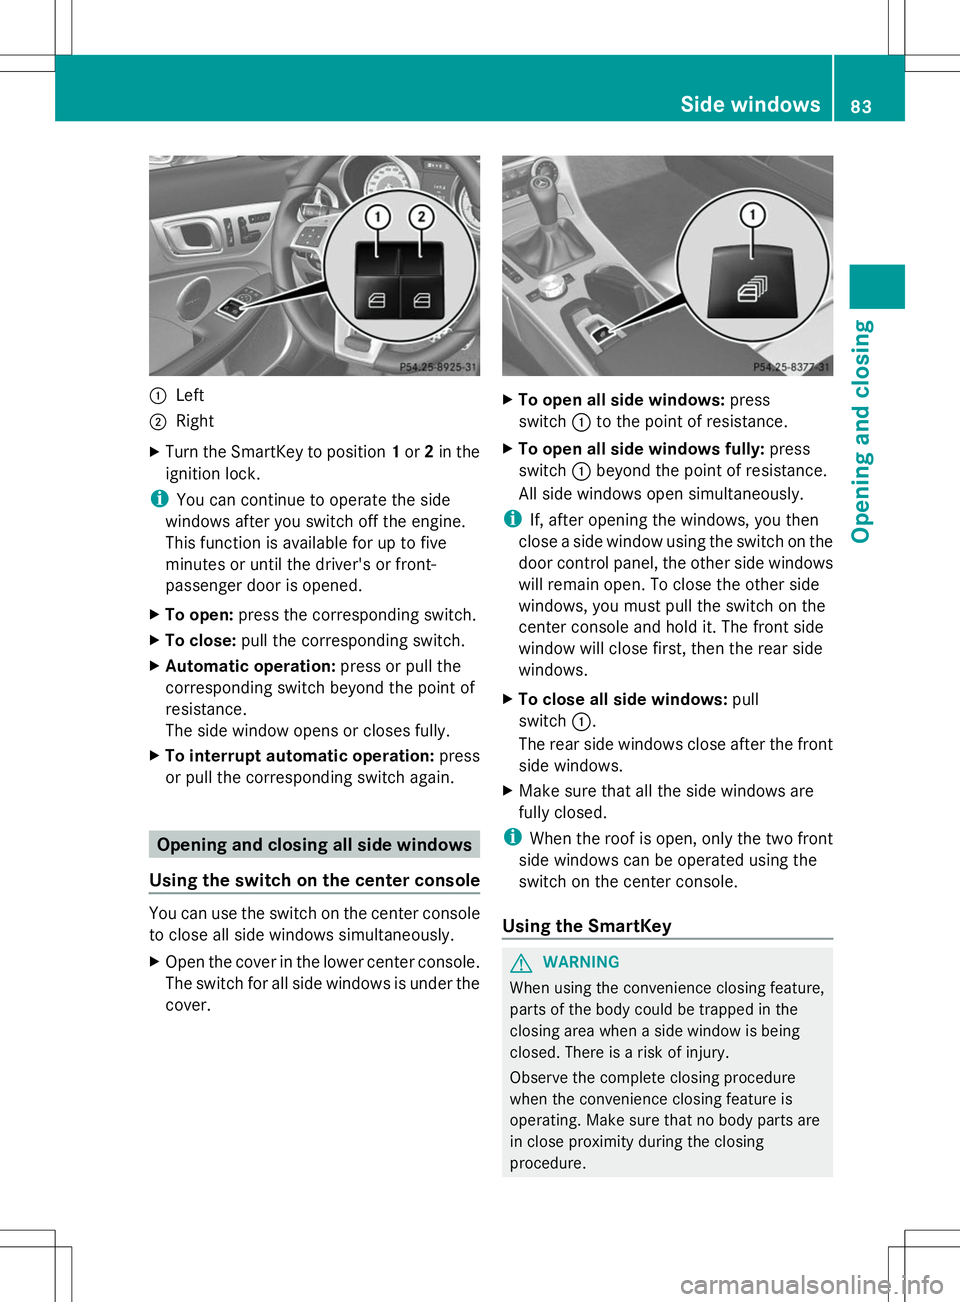
:
Left
; Right
X Turn the SmartKey to position 1or 2in the
ignition lock.
i You can continue to operate the side
windows after you switch off the engine.
This function is available for up to five
minutes or until the driver's or front-
passenger door is opened.
X To open: press the corresponding switch.
X To close: pull the corresponding switch.
X Automatic operation: press or pull the
corresponding switch beyond the point of
resistance.
The side window opens or closes fully.
X To interrupt automatic operation: press
or pull the corresponding switch again. Opening and closing all side windows
Using the switch on the center console You can use the switch on the center console
to close all side windows simultaneously.
X Open the cover in the lower center console.
The switch for all side windows is under the
cover. X
To open all side windows: press
switch :to the point of resistance.
X To open all side windows fully: press
switch :beyond the point of resistance.
All side windows open simultaneously.
i If, after opening the windows, you then
close a side window using the switch on the
door control panel, the other side windows
will remain open. To close the other side
windows, you must pull the switch on the
center console and hold it. The front side
window will close first, then the rear side
windows.
X To close all side windows: pull
switch :.
The rear side windows close after the front
side windows.
X Make sure that all the side windows are
fully closed.
i When the roof is open, only the two front
side windows can be operated using the
switch on the center console.
Using the SmartKey G
WARNING
When using the convenience closing feature,
parts of the body could be trapped in the
closing area when a side window is being
closed. There is a risk of injury.
Observe the complete closing procedure
when the convenience closing feature is
operating. Make sure that no body parts are
in close proximity during the closing
procedure. Side windows
83Opening and closing Z
Page 86 of 356
If someone is trapped:
X
Release the &button immediately.
X Press and hold the %button until the
side windows open again.
You can use the SmartKey to open or close
all side windows simultaneously.
X Close the roof (Y page 87).
X Open the trunk partition (Y page 88).
X Vehicles without KEYLESS-GO: point the
tip of the SmartKey at the door handle on
the driver's door.
X Vehicles with KEYLESS-GO: the
SmartKey must be within 6 ft (2 m) of the
vehicle.
X To open all side windows: press
the % button on the SmartKey until the
side windows are fully opened.
X To interrupt the opening procedure:
release the %button.
X To close all side windows: press the
& button on the SmartKey until the side
windows are fully closed.
X To interrupt the closing procedure:
release the &button.
Convenience closing with KEYLESS-GO G
WARNING
When using the convenience closing feature,
parts of the body could be trapped in the
closing area when a side window is being
closed. There is a risk of injury.
Observe the complete closing procedure
when the convenience closing feature is
operating. Make sure that no body parts are
in close proximity during the closing
procedure.
If someone is trapped:
X Release the recessed sensor surface on the
door handle immediately.
X Pull the door handle immediately and hold
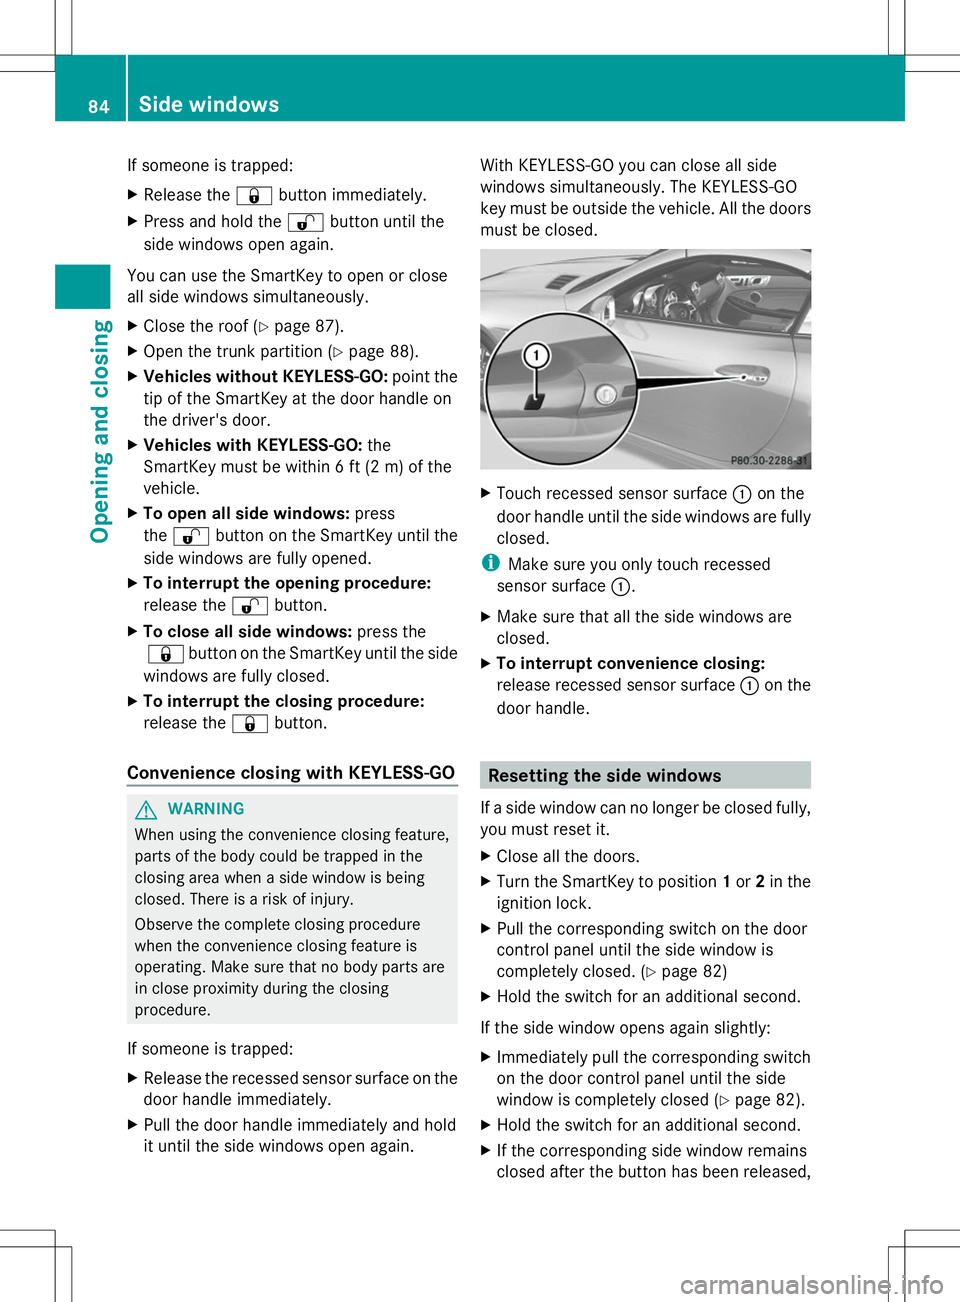
it until the side windows open again. With KEYLESS-GO you can close all side
windows simultaneously. The KEYLESS-GO
key must be outside the vehicle. All the doors
must be closed.
X
Touch recessed sensor surface :on the
door handle until the side windows are fully
closed.
i Make sure you only touch recessed
sensor surface :.
X Make sure that all the side windows are
closed.
X To interrupt convenience closing:
release recessed sensor surface :on the
door handle. Resetting the side windows
If a side window can no longer be closed fully,
you must reset it.
X Close all the doors.
X Turn the SmartKey to position 1or 2in the
ignition lock.
X Pull the corresponding switch on the door
control panel until the side window is
completely closed. (Y page 82)
X Hold the switch for an additional second.
If the side window opens again slightly:
X Immediately pull the corresponding switch
on the door control panel until the side
window is completely closed (Y page 82).
X Hold the switch for an additional second.
X If the corresponding side window remains
closed after the button has been released, 84
Side windowsOpening and closing