spare tire location MERCEDES-BENZ SLK-CLASS ROADSTER 2015 Owners Manual
[x] Cancel search | Manufacturer: MERCEDES-BENZ, Model Year: 2015, Model line: SLK-CLASS ROADSTER, Model: MERCEDES-BENZ SLK-CLASS ROADSTER 2015Pages: 358, PDF Size: 40.28 MB
Page 188 of 358

Use Parking Guidance for parking spaces: Rthat are parallel to the direction of travel
R that are on straight roads, not bends
R that are on the same level as the road, i.e.
not on the pavement, for example. Parking
Guidance may not detect flat curbs
Parking tips:
R On narrow roads, drive as close to the park-
ing space as possible.
R Parking spaces that are littered or over-
grown might be identified or measured
incorrectly.
R Parking spaces that are partially occupied
by trailer drawbars might not be identified
as such or be measured incorrectly.
R Snowfall or heavy rain may lead to a parking
space being measured inaccurately.
R Pay attention to the PARKTRONIC(Y page 183) warning messages during the
parking procedure.
R When transporting a load which protrudes
from your vehicle, you must not use Parking
Guidance.
R Never use Parking Guidance with snow
chains or an emergency spare wheel moun-
ted.
R Make sure that the tire pressures are
always correct. This has a direct effect on
the steering instructions.
R The way your vehicle is positioned in the
parking space after parking is dependent
on various factors. These include the posi-
tion and shape of the vehicles parked in
front and behind it and the conditions of the
location. In some cases, Parking Guidance
may guide you too far or not far enough into
a parking space. In some cases, it may also
lead you across or onto the curb. If neces-
sary, cancel the parking procedure with
Parking Guidance.Detecting parking spaces
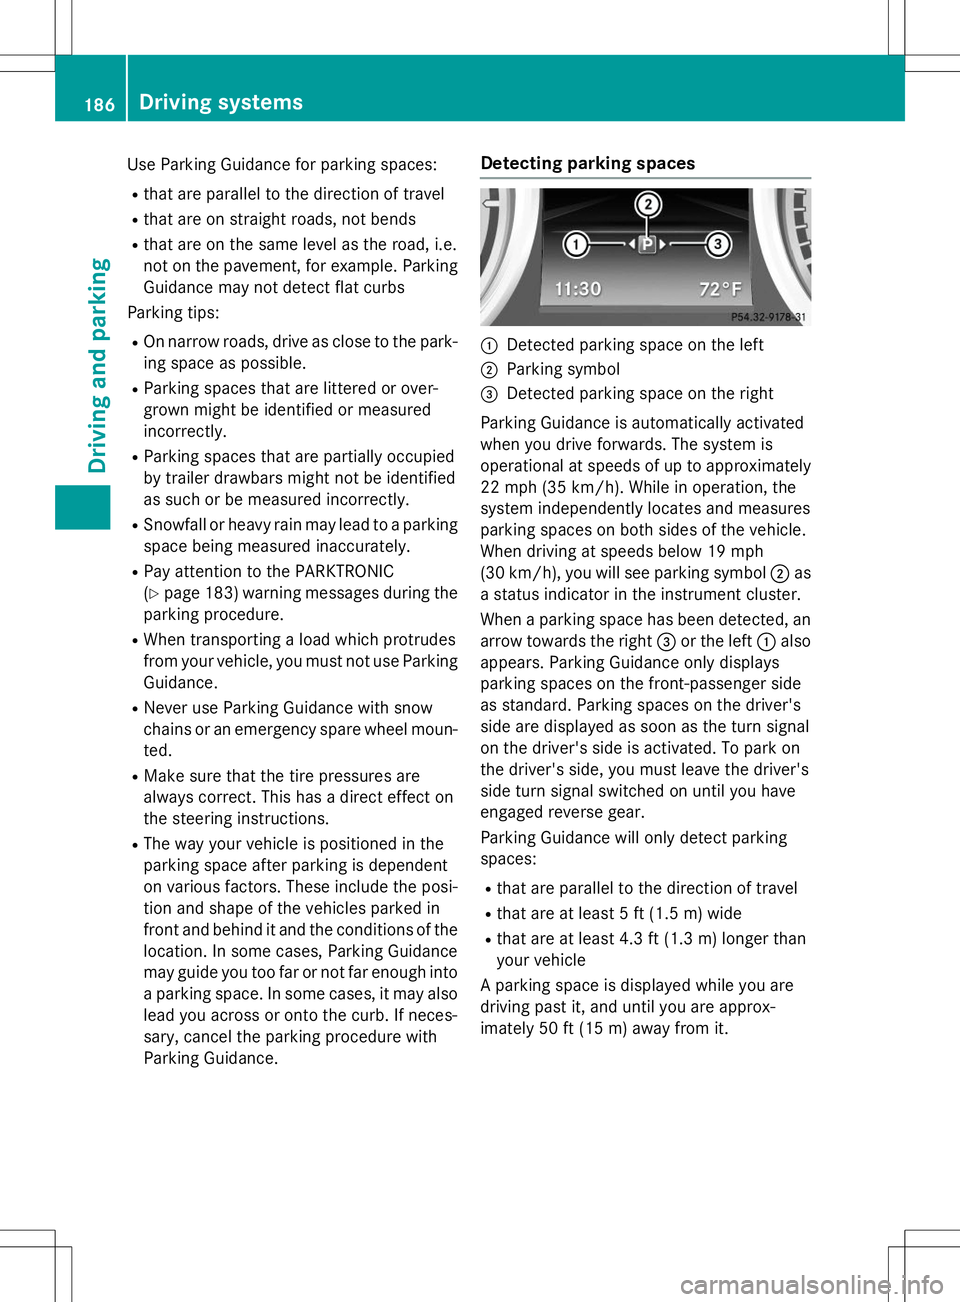
:Detected parking space on the left
;Parking symbol
=Detected parking space on the right
Parking Guidance is automatically activated
when you drive forwards. The system is
operational at speeds of up to approximately
22 mph (35 km/h). While in operation, the
system independently locates and measures
parking spaces on both sides of the vehicle.
When driving at speeds below 19 mph
(30 km/h), you will see parking symbol ;as
a status indicator in the instrument cluster.
When a parking space has been detected, an arrow towards the right =or the left :also
appears. Parking Guidance only displays
parking spaces on the front-passenger side
as standard. Parking spaces on the driver's
side are displayed as soon as the turn signal
on the driver's side is activated. To park on
the driver's side, you must leave the driver's
side turn signal switched on until you have
engaged reverse gear.
Parking Guidance will only detect parking spaces:
R that are parallel to the direction of travel
R that are at least 5 ft (1.5 m) wide
R that are at least 4.3 ft (1.3 m) longer than
your vehicle
A parking space is displayed while you are
driving past it, and until you are approx-
imately 50 ft (15 m) away from it.
186Driving systems
Driving and parking
Page 296 of 358

Useful information
iThis Operator's Manual describes all
models and all standard and optional equip- ment of your vehicle available at the time of
publication of the Operator's Manual.
Country-specific differences are possible.
Please note that your vehicle may not be
equipped with all features described. This
also applies to safety-related systems and
functions.
iRead the information on qualified special-
ist workshops ( Ypage 25).
Where will I find...?
Vehicle tool kit
General notes
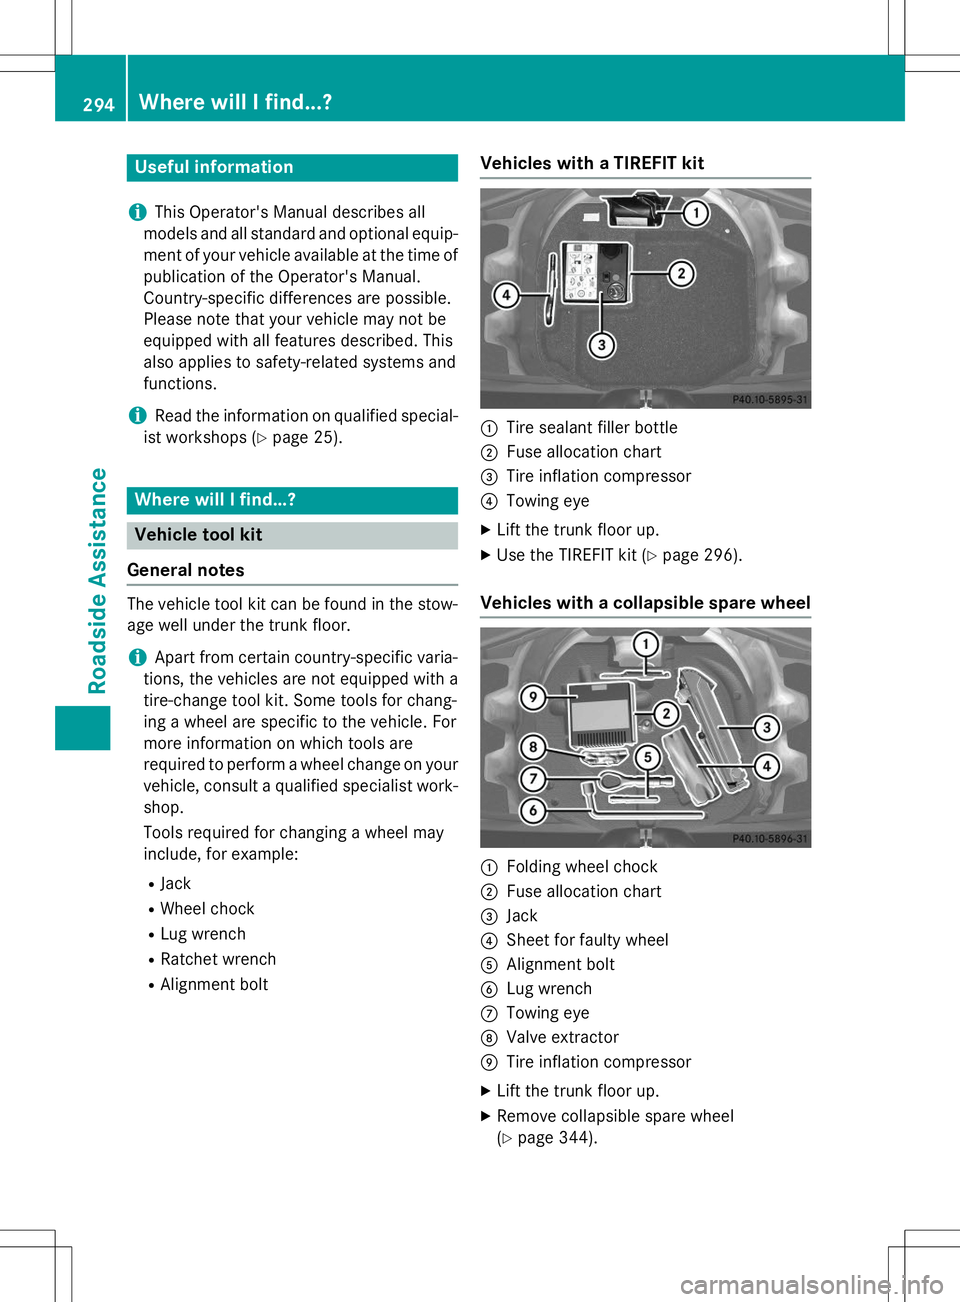
The vehicle tool kit can be found in the stow- age well under the trunk floor.
iApart from certain country-specific varia-
tions, the vehicles are not equipped with a
tire-change tool kit. Some tools for chang-
ing a wheel are specific to the vehicle. For
more information on which tools are
required to perform a wheel change on your
vehicle, consult a qualified specialist work-shop.
Tools required for changing a wheel may
include, for example:
R Jack
R Wheel chock
R Lug wrench
R Ratchet wrench
R Alignment bolt
Vehicles with a TIREFIT kit
:Tire sealant filler bottle
;Fuse allocation chart
=Tire inflation compressor
?Towing eye
X Lift the trunk floor up.
X Use the TIREFIT kit ( Ypage 296).
Vehicles with a collapsible spare wheel
:Folding wheel chock
;Fuse allocation chart
=Jack
?Sheet for faulty wheel
AAlignment bolt
BLug wrench
CTowing eye
DValve extractor
ETire inflation compressor
X Lift the trunk floor up.
X Remove collapsible spare wheel (Y page 344).
294Where will I find...?
Roadside Assistance
Page 315 of 358

curbs, speed humps or similar elevations, tryto do so slowly and at an obtuse angle. Oth-
erwise, the tires, particularly the sidewalls,
may be damaged.
Regular checking of wheels and tires
GWARNING
Damaged tires can cause tire inflation pres-
sure loss. As a result, you could lose control ofyour vehicle. There is a risk of accident.
Check the tires regularly for signs of damage
and replace any damaged tires immediately.
Regularly check the wheels and tires of your
vehicle for damage at least once a month, as well as after driving off-road or on rough
roads. Damaged wheels can cause a loss of
tire pressure. Pay particular attention to dam-
age such as:
R cuts in the tires
R punctures
R tears in the tires
R bulges on tires
R deformation or severe corrosion on wheels
Regularly check the tire tread depth and the
condition of the tread across the whole width of the tire ( Ypage 313). If necessary, turn the
front wheels to full lock in order to inspect the
inner side of the tire surface.
All wheels must have a valve cap to protect
the valve against dirt and moisture. Do not
mount anything onto the valve other than the standard valve cap or other valve caps
approved by Mercedes-Benz for your vehicle.
Do not use any other valve caps or systems,
e.g. tire pressure monitoring systems.
Regularly check the pressure of all the tires
particularly prior to long trips. Adjust the tire pressure as necessary ( Ypage 315).
Observe the notes on the emergency spare
wheel ( Ypage 343). The service life of tires depends, among other
things, on the following factors:
R Driving style
R Tire pressure
R Distance covered
Notes on tire tread
GWARNING
Insufficient tire tread will reduce tire traction.
The tire is no longer able to dissipate water.
This means that on wet road surfaces, the risk
of hydroplaning increases, in particular where speed is not adapted to suit the driving con-
ditions. There is a risk of accident.
If the tire pressure is too high or too low, tires
may exhibit different levels of wear at differ-
ent locations on the tire tread. Thus, you
should regularly check the tread depth and
the condition of the tread across the entire
width of all tires.
Minimum tire tread depth for:
R Summer tires: âin (3 mm)
R M+S tires: ãin (4 mm)
For safety reasons, replace the tires before
the legally prescribed limit for the minimum
tire tread depth is reached.
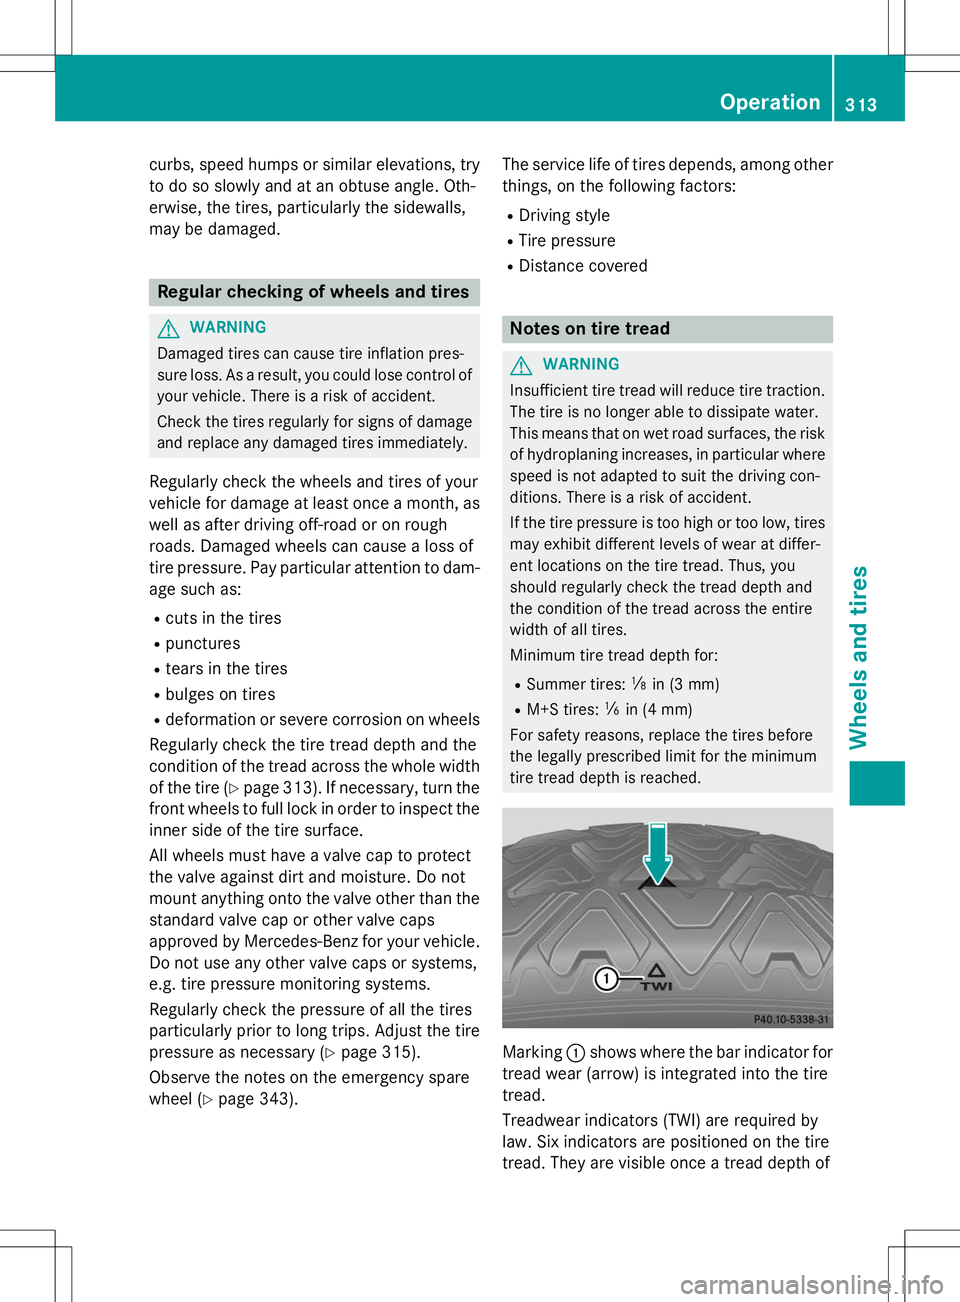
Marking :shows where the bar indicator for
tread wear (arrow) is integrated into the tire
tread.
Treadwear indicators (TWI) are required by
law. Six indicators are positioned on the tire
tread. They are visible once a tread depth of
Operation313
Wheels and tires
Z
Page 324 of 358

than those shown by the on-board computer.In this case, do not reduce the tire pressures.
The operation of the tire pressure monitor can
be affected by interference from radio trans-
mitting equipment (e.g. radio headphones,
two-way radios) that may be being operated
in or near the vehicle.
Checking the tire pressure electroni-
cally
X Make sure that the SmartKey is in position
2 in the ignition lock ( Ypage 139).
X Press the =or; button on the steer-
ing wheel to select the
Serv.menu.
X Press the 9or: button to select
Tire Pressure.
X Press the abutton.
The current tire pressure of each tire is
shown in the multifunction display.
If the vehicle has been parked for over
20 minute s,the
Tire pressure will be
displayed after driving a few
minutesmessage appears.
After a teach-in process, the tire pressure
monitor automatically detects new wheels or new sensors. As long as a clear allocation of
the tire pressure value to the individual
wheels is not possible, the
Tire Pressure
Monitor Activedisplay message is shown
instead of the tire pressure display. The tire
pressures are already being monitored.
iIf an emergency spare wheel is mounted,
the system may continue to show the tire
pressure of the wheel that has been
removed for a few minutes. If this occurs,
note that the value displayed for the posi-
tion where the spare wheel is mounted is
not the same as the current tire pressure of
the emergency spare wheel.
Tire pressure monitor warning mes-
sages
If the tire pressure monitor detects a pressure loss in one or more tires, a warning message
is shown in the multifunction display and the yellow tire pressure monitor warning lamp
comes on.
R If the
Please Correct Tire Pressure
message appears in the multifunction dis-
play, the tire pressure in at least one tire is
too low and must be corrected at the next
opportunity.
R If the
CheckTiresmessage appears in the
multifunction display, the tire pressure in
one or more tires has dropped significantly and the tires must be checked.
R If the
Warning Tire Malfunction
appears in the multifunction display, the
tire pressure in one or more tires has drop-
ped suddenly and the tires must be
checked.
Observe the instructions and safety notes in
the display messages in the "Tires" section( Y page 236).
iIf the wheel positions on the vehicle are
rotated, the tire pressures may be dis-
played for the wrong positions for a short
time. This is rectified after a few minutes of driving, and the tire pressures are displayedfor the correct positions.
Restarting the tire pressure monitor
When you restart the tire pressure monitor, allexisting warning messages are deleted and
the warning lamp goes out. The monitor uses
the currently set tire pressures as the refer-
ence values for monitoring. In most cases, the
tire pressure monitor will automatically
detect the new reference values after you
have changed the tire pressure. However, you
can also define reference values manually as described here. The tire pressure monitor
then monitors the new tire pressure values.
X Set the tire pressure to the value recom-
mended for the corresponding driving sit-
322Tire pressure
Wheels and tires