turn signal MERCEDES-BENZ SLK-CLASS ROADSTER 2015 Owners Manual
[x] Cancel search | Manufacturer: MERCEDES-BENZ, Model Year: 2015, Model line: SLK-CLASS ROADSTER, Model: MERCEDES-BENZ SLK-CLASS ROADSTER 2015Pages: 358, PDF Size: 40.28 MB
Page 8 of 358
Carsee Vehicle
Car key
see SmartKey
Care
Car wash ........................................ 286 Carpet s .......................................... 292
Disp lay .......................................... .290
Exhaust pipe .................................. 289
Exterior lights ................................ 289
Gear or selector lever .................... 290
Interior .......................................... .290
Matte finish ................................... 288
Notes ............................................. 285
Paint .............................................. 287
Plastic trim ................................... .290
Power washer ................................ 287
Roof lining ...................................... 292
Seat belt ........................................ 291
Seat cover ..................................... 291
Sensors ......................................... 289
Steering wheel ............................... 290
Trim pieces ................................... .290
Washing by hand ........................... 286
Wheels .......................................... .288
Windows ........................................ 288
Wiper blades .................................. 289
Wooden trim .................................. 290
CD player/CD changer (on-board
computer) .......................................... 201
Center console
Lower section .................................. 35
Upper section .................................. 34
Central locking
Automatic locking (on-board com-
puter) ............................................. 206
Locking/unlocking (SmartKey) ....... .72
Changing bulbs
High-beam headlamps .................. .116
Low-beam headlamps .................... 116
Reversing lamps ............................ 117
Side marker lamps (rear) .............. .116
Turn signals (front) ......................... 116
Child
Restraint system .............................. 59
Child seat
Forward-facing restraint system ...... 60
On the front-passenger sea t............ 60 Rearward-facing restraint system .... 60
Children
In the vehicl e................................... 57
Special seat belt retractor ............... 58
Cigarette lighter ................................ 262
Cleaning
Mirror turn signal ........................... 289
Climate control
Air-conditioning system ................. 123
Automatic climate control (dual-
zone) .............................................. 125
Controlling automaticall y............... 129
Cooling with air dehumidification .. 127
Defrosting the window s................. 131
Defrosting the windshield .............. 131
General notes ................................ 122
Indicator lamp ................................ 129
Information about using auto-
matic climate control ..................... 126
Maximum cooling .......................... 131
Notes on using the air-condition-
ing system ..................................... 124
Overview of systems ...................... 122
Problem with the rear window
defroster ........................................ 133
Problems with cooling with air
dehumidification ............................ 129
Refrigerant ..................................... 354
Refrigerant filling capacity ............. 354
Setting the air distribution ............. 130
Setting the air vents ...................... 134
Setting the airflow ......................... 130
Setting the temperature ................ 129
Switching air-recirculation modeon/of f............................................ 133
Switching on/of f........................... 127
Switching residual heat on/off ...... 133
Switching the rear window
defroster on/of f............................ 132
Switching the ZONE function on/
off .................................................. 130
Cockpit
Overview .......................................... 30
see Instrument cluster
Collapsible spare wheel
Inflating ......................................... 344
see Emergency spare wheel
6Index
Page 13 of 358
Indicatorssee Turn signals
Instrument cluster
Overview .......................................... 31
Warning and indicator lamps .......... .32
Instrument cluster lighting .............. 194
Interior lighting
Automatic control .......................... 113
Delayed switch-off (on-board
computer) ...................................... 206
Emergency lighting ........................ 114
Manual control .............................. .114
Overview ........................................ 113
Reading lamp ................................. 113
Setting the brightness of the
ambient lighting (on-board com-
puter) ............................................. 205
J
Jack
Storage location ............................ 294
Using ............................................. 336
Jump starting (engine) ......................303
K
Key positions
KEYLESS-GO .................................. 140
SmartKey ....................................... 139
KEYLESS-GO
Convenience closing feature ............ 85
Display message ............................ 242
Locking ............................................ 73
Removing the Start/Stop button ... 141
Start/Stop button .......................... 140
Starting the engine ........................ 142
Unlocking ......................................... 73
Kickdown
Driving tips ................................... .153
Manual drive program .................... 157
Knee bag .............................................. 47
L
Lamps
see Warning and indicator lamps
Lane Keeping Assist
Activating/deactivating ................. 204 Display message ............................ 232
Function/informatio
n.................... 190
Lap time (RACETIMER) ...................... 209
License plate lamp (display mes-
sage) ................................................... 226
Light function, active
Display message ............................ 227
Light sensor (display message) ....... 228
Lights
Activating/deactivating the inte-
rior lighting delayed switch-off ....... 206
Active light function ....................... 112
Automatic headlamp mod e............ 108
Cornering light function ................. 111
Fog lamps ...................................... 109
Fogged up headlamp s.................... 113
Hazard warning lamps ................... 111
High beam flashe r.......................... 111
High-beam headlamp s................... 110
Light switch ................................... 108
Low-beam headlamp s.................... 109
Parking lamps ................................ 110
Rear fog lamp ................................ 110
Setting the brightness of the
ambient lighting (on-board com-
puter) ............................................. 205
Standing lamps .............................. 110
Switching the daytime running
lamps on/off (on-board com-
puter) ............................................. 205
Switching the exterior lighting
delayed switch-off on/off (on-
board computer) ............................ 206
Switching the surround lighting
on/off (on-board computer) .......... 206
Turn signals ................................... 110
see Interior lighting
see Replacing bulbs
Locking
see Central locking
Locking (doors)
Automatic ........................................ 79
Emergency locking ........................... 80
From inside (central locking but-
ton) .................................................. 79
Locking centrally
see Central locking
Index11
Page 20 of 358
Overview ........................................312
PSI (pounds per square inch) (def-
inition) .......................................... .333
Replacing ....................................... 334
Service life ..................................... 314
Sidewall (definition) ....................... 333
Speed rating (definition) ................ 332
Storing .......................................... .334
Structure and characteristics
(definition) ..................................... 331
Summer tires ................................. 314
Temperature .................................. 327
TIN (Tire Identification Number)
(definition) ..................................... 333
Tire bead (definition) ..................... .333
Tire pressure (definition) ................ 333
Tire pressures (recommended) ...... 332
Tire size (data) ............................... 339
Tire size designation, load-bearing capacity, speed rating .................... 328
Tire tread ....................................... 313
Tire tread (definition) ..................... 333
Total load limit (definition) ............. 334
Traction ......................................... 327
Traction (definition) ....................... 334
Tread wea r..................................... 327
Uniform Tire Quality Grading
Standards ...................................... 326
Uniform Tire Quality Grading
Standards (definition) .................... 332
Wear indicator (definition) ............. 334
Wheel and tire combination ........... 341
Wheel rim (definition) .................... 332
see Flat tire
Tow-starting
Emergency engine starting ............ 307
Important safety notes .................. 305
Installing the towing eye ................ 306
Removing the towing eye ............... 306
Towing away
Important safety guidelines ........... 305
Installing the towing eye ................ 306
Removing the towing eye ............... 306
With both axles on the ground ....... 306
With the rear axle raised ................ 307
Transmission
Selector lever ................................ 151
see Automatic transmission see Manual transmission
Transporting the vehicle .................. 307
Trim pieces (cleaning instruc-
tions) .................................................. 290
Trip computer (on-board com-puter) .................................................. 197
Trip odometer
Calling up ....................................... 197
Resetting (on-board computer) ...... 198
Trunk
Emergency release .......................... 82
Important safety notes .................... 80
Locking separately ........................... 82
Opening (automatically from out-
side) ................................................. 82
Opening/closing (manually from
outside) ............................................ 81
Overview .......................................... 80
Trunk lid
Display message ............................ 240
Opening dimensions ...................... 355
Opening/closing .............................. 80
Trunk load (maximum) ...................... 355
Trunk partition
Display message ............................ 241
General notes .................................. 89
Opening/closing .............................. 90
Turn signals
Changing bulbs (front) ................... 116
Display message ............................ 225
Switching on/of f........................... 110
Type identification plate
see Vehicle identification plate
U
UnlockingEmergency unlocking ....................... 80
From inside the vehicle (central
unlocking button) ............................. 79
V
Vanity mirror (in the sun visor) ........ 262
Vehicle
Correct use ...................................... 26
Data acquisition ............................... 27
Display message ............................ 238
18Index
Page 34 of 358
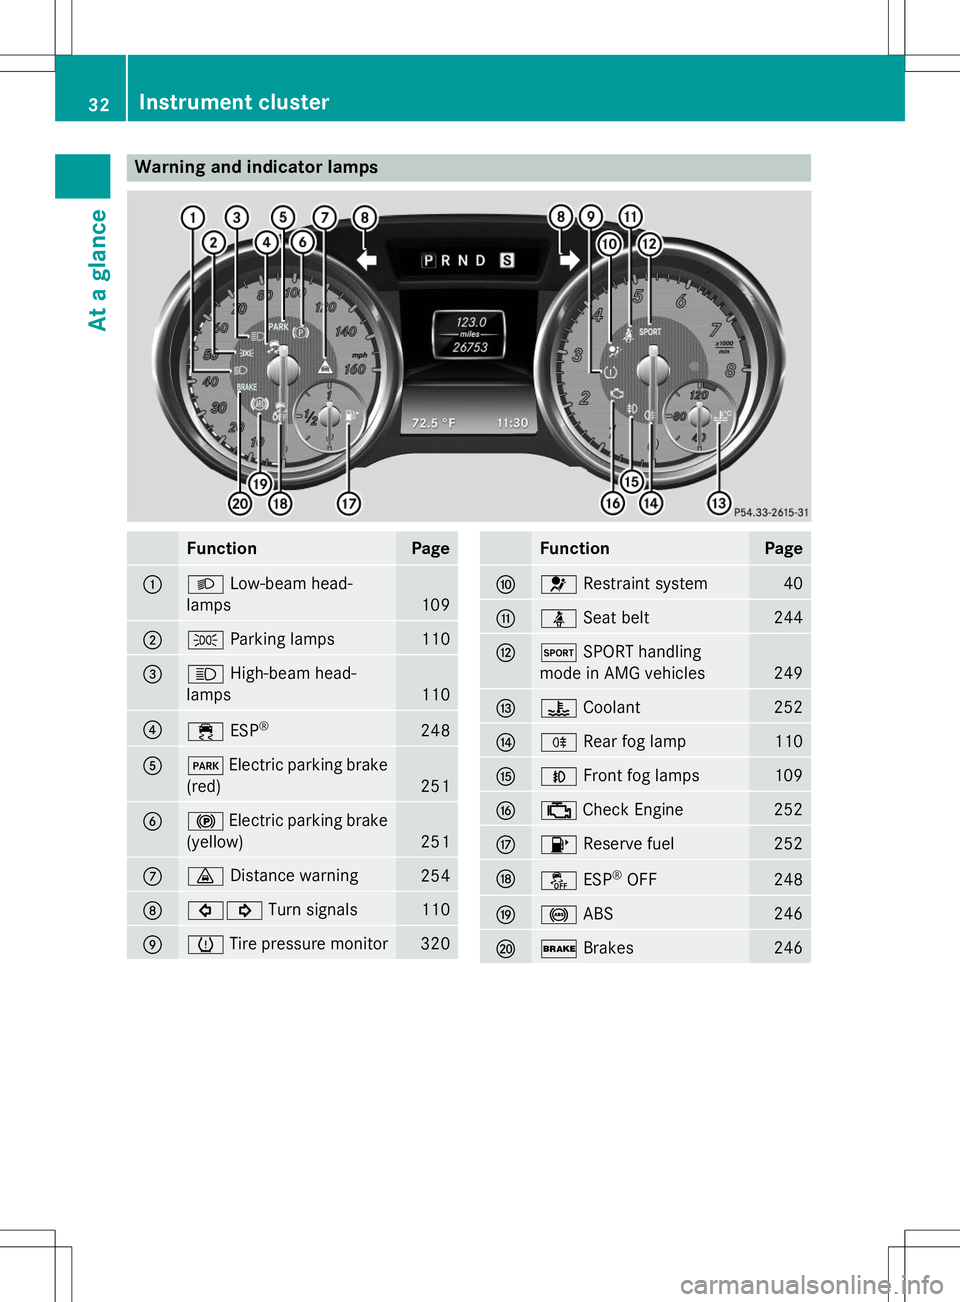
Warning and indicator lamps
FunctionPage
:LLow-beam head-
lamps
109
;T Parking lamps110
=KHigh-beam head-
lamps
110
?÷ ESP®248
AF
Electric parking brake
(red)
251
B! Electric parking brake
(yellow)
251
C· Distance warning254
D#! Turn signals110
EhTire pressure monitor320
FunctionPage
F6 Restraint system40
GüSeat belt244
HMSPORT handling
mode in AMG vehicles
249
I? Coolant252
JRRear fog lamp110
KNFront fog lamps109
L;Check Engine252
M8 Reserve fuel252
NåESP®
OFF248
O! ABS246
P$Brakes246
32Instrument cluster
At a glance
Page 75 of 358
The SmartKey centrally locks/unlocks:R the doors
R the trunk lid
R the stowage compartment in the center
console
R the fuel filler flap
The turn signals flash once when unlocking
and three times when locking.
You can also set an audible signal to confirm that the vehicle has been locked. The audible
signal can be activated and deactivated using the on-board computer ( Ypage 207).
When it is dark, the surround lighting also
comes on if it is activated in the on-board
computer ( Ypage 206).
KEYLESS-GO
General notes
Bear in mind that the engine can be started by
any of the vehicle occupants if there is a KEY- LESS-GO key in the vehicle.
Locking/unlocking centrally
You can start, lock or unlock the vehicle using
KEYLESS-GO. To do this, you only need carry
the SmartKey with you. You can combine the functions of KEYLESS-GO with those of a con-
ventional SmartKey. Unlock the vehicle by
using KEYLESS-GO, for instance, and lock it
using the &button on the SmartKey.
When locking or unlocking with KEYLESS-GO,
the distance between the key and the corre-
sponding door handle must not be greater
than 3 ft (1 m).
A check which periodically establishes a radio
connection between the vehicle and the
SmartKey determines whether a valid Smart- Key is in the vehicle. This occurs, for example:
R when the external door handles aretouched
R when starting the engine
R while the vehicle is in motion
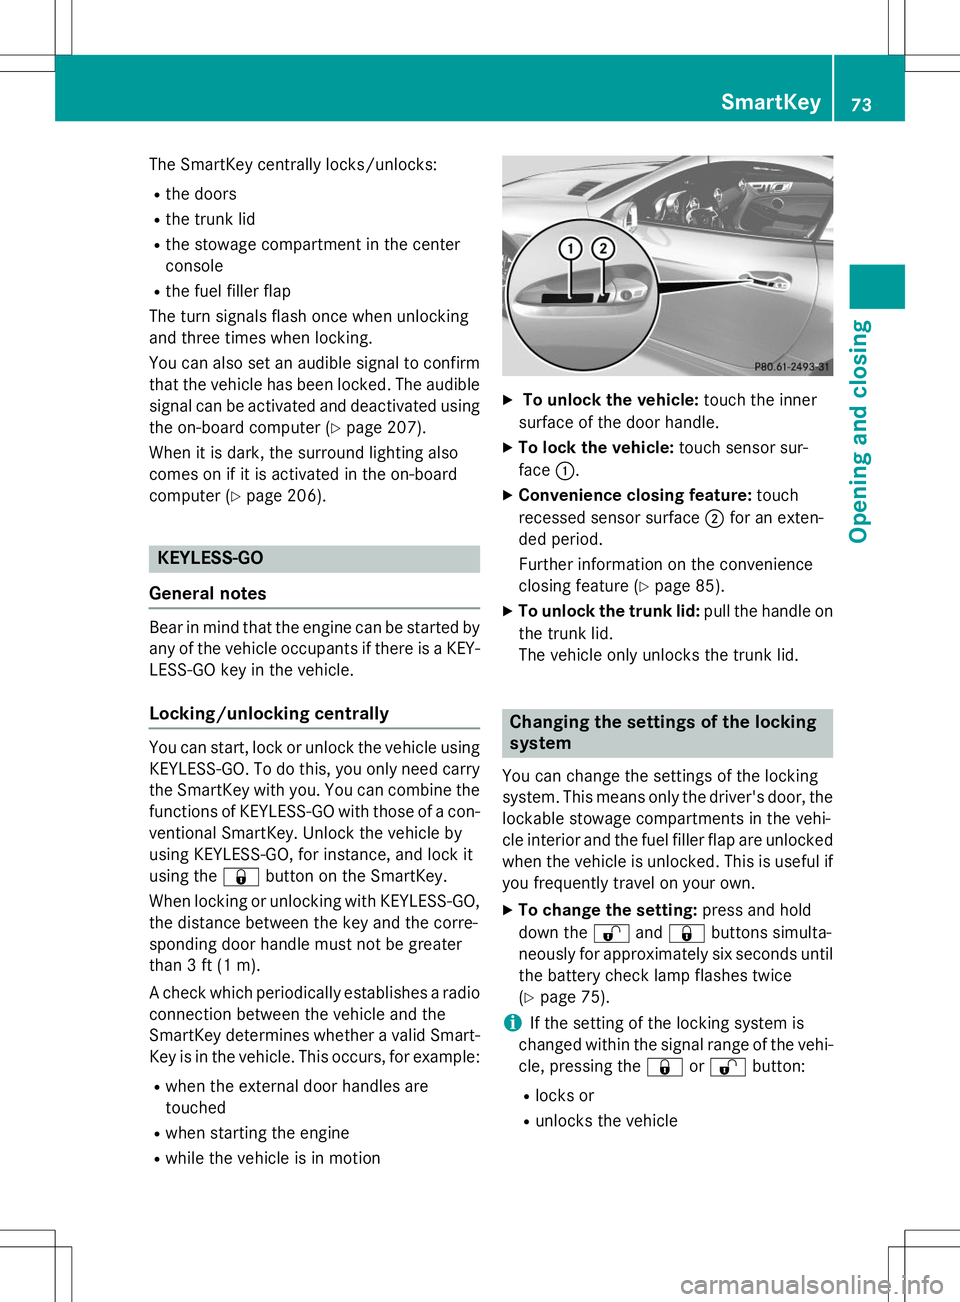
X To unlock the vehicle: touch the inner
surface of the door handle.
X To lock the vehicle: touch sensor sur-
face :.
X Convenience closing feature: touch
recessed sensor surface ;for an exten-
ded period.
Further information on the convenience
closing feature ( Ypage 85).
X To unlock the trunk lid: pull the handle on
the trunk lid.
The vehicle only unlocks the trunk lid.
Changing the settings of the locking system
You can change the settings of the locking
system. This means only the driver's door, the
lockable stowage compartments in the vehi-
cle interior and the fuel filler flap are unlocked when the vehicle is unlocked. This is useful if
you frequently travel on your own.
X To change the setting: press and hold
down the %and& buttons simulta-
neously for approximately six seconds until the battery check lamp flashes twice( Y page 75).
iIf the setting of the locking system is
changed within the signal range of the vehi- cle, pressing the &or% button:
R locks or
R unlocks the vehicle
SmartKey73
Opening and closing
Z
Page 112 of 358
XPress the Nbutton.
The green Nindicator lamp in the instru-
ment cluster lights up.
X To switch off the front fog lamps: press
the N button.
The green Nindicator lamp in the instru-
ment cluster goes out.
Only vehicles with front fog lamps have the
fog lamps function.
Rear fog lamp
The rear fog lamp improves visibility of your
vehicle for the traffic behind in the event of
thick fog. Please take note of the country-
specific regulations for the use of rear foglamps. X To switch on the rear fog lamps: turn the
SmartKey in the ignition lock to position 2
or start the engine.
X Turn the light switch to Lorà .
X Press the Rbutton.
The yellow Rindicator lamp in the
instrument cluster lights up.
X To switch off the rear fog lamp: press the
R button.
The yellow Rindicator lamp in the
instrument cluster goes out.
Parking lamps
!If the battery has been excessively dis-
charged, the parking lamps or standing
lamps are automatically switched off to
enable the next engine start. Always park
your vehicle safely and sufficiently lit
according to legal standards. Avoid the
continuous use of the Tparking lamps
for several hours. If possible, switch on theX right or the Wleft standing lamp.
X To switch on: turn the light switch to T.
The green Tindicator lamp in the instru-
ment cluster lights up.
Standing lamps
Switching on the standing lamps ensures the corresponding side of the vehicle is illumina- ted. X
To switch on the standing lamps: the
SmartKey is not in the ignition lock or it is in position 0.
X Turn the light switch to W(left-hand side
of the vehicle) or X(right-hand side of
the vehicle).
Combination switch
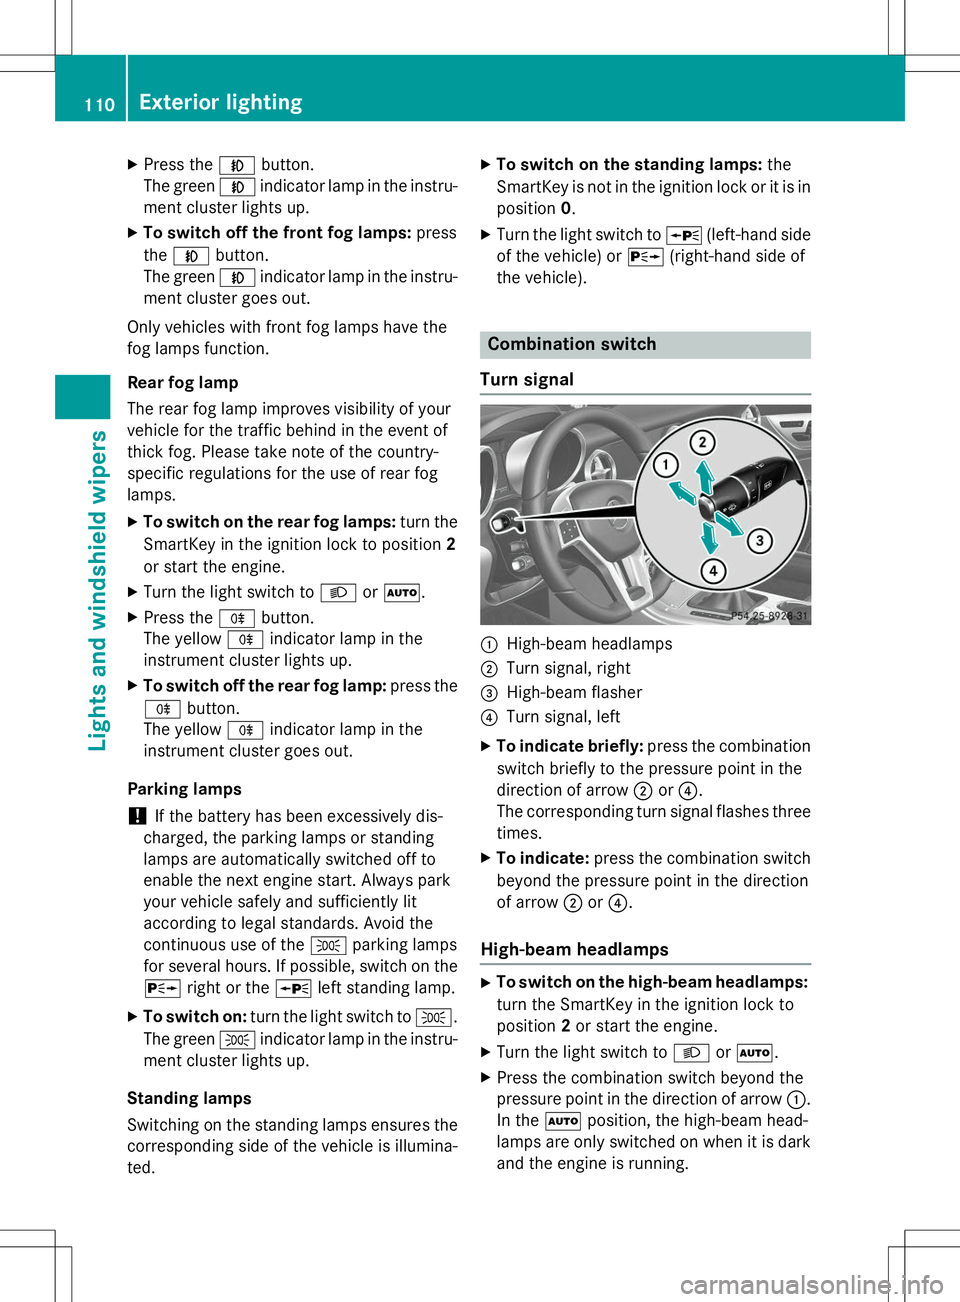
Turn signal
:High-beam headlamps
;Turn signal, right
=High-beam flasher
?Turn signal, left
X To indicate briefly: press the combination
switch briefly to the pressure point in the
direction of arrow ;or? .
The corresponding turn signal flashes three
times.
X To indicate: press the combination switch
beyond the pressure point in the direction
of arrow ;or? .
High-beam headlamps
X
To switch on the high-beam headlamps:
turn the SmartKey in the ignition lock to position 2or start the engine.
X Turn the light switch to Lorà .
X Press the combination switch beyond the
pressure point in the direction of arrow :.
In the Ãposition, the high-beam head-
lamps are only switched on when it is dark
and the engine is running.
110Exterior lighting
Lights and windshield wipers
Page 113 of 358
TheK indicator lamp in the instrument
cluster lights up when the high-beam head-
lamps are switched on.
X To switch off the high-beam head-
lamps: move the combination switch back
to its normal position. The K indicator lamp in the instrument
cluster goes out.
Vehicles with Adaptive Highbeam Assist:
when Adaptive Highbeam Assist is active, it
controls activation of the high-beam head-
lamps ( Ypage 112).
High-beam flasher
X
To switch on: turn the SmartKey in the
ignition lock to position 1or 2or start the
engine.
X Pull the combination switch in the direction
of arrow =.
Hazard warning lamps
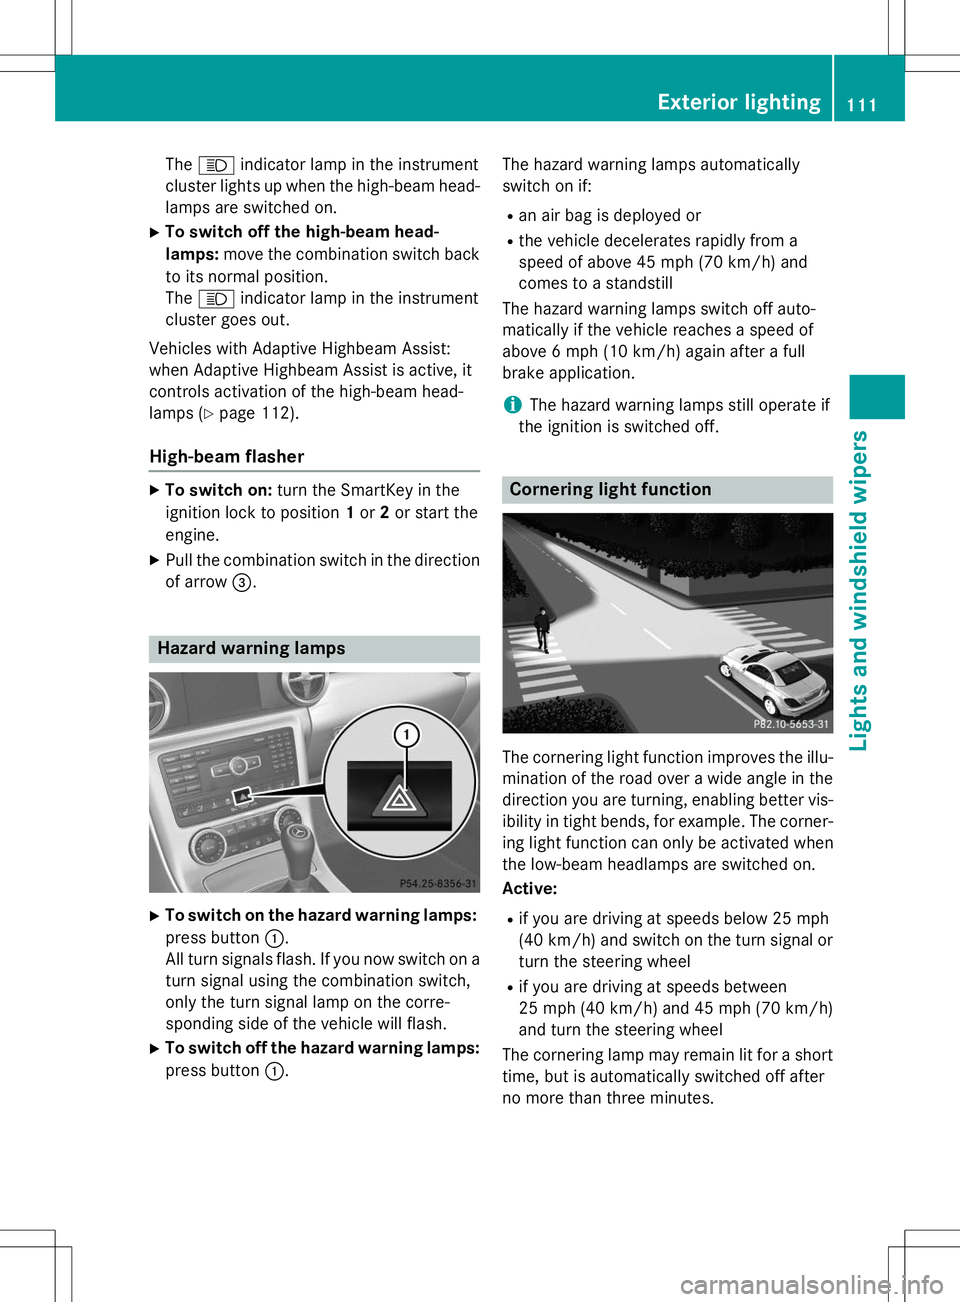
X
To switch on the hazard warning lamps:
press button :.
All turn signals flash. If you now switch on a turn signal using the combination switch,
only the turn signal lamp on the corre-
sponding side of the vehicle will flash.
X To switch off the hazard warning lamps:
press button :. The hazard warning lamps automatically
switch on if:
R an air bag is deployed or
R the vehicle decelerates rapidly from a
speed of above 45 mph (70 km/h) and
comes to a standstill
The hazard warning lamps switch off auto-
matically if the vehicle reaches a speed of
above 6 mph (10 km/ h)again after a full
brake application.
iThe hazard warning lamps still operate if
the ignition is switched off.
Cornering light function
The cornering light function improves the illu-
mination of the road over a wide angle in the direction you are turning, enabling better vis-
ibility in tight bends, for example. The corner- ing light function can only be activated when
the low-beam headlamps are switched on.
Active: R if you are driving at speeds below 25 mph
(40 km/h) and switch on the turn signal or
turn the steering wheel
R if you are driving at speeds between
25 mph (40 km/h) and 45 mph (70 km/h)
and turn the steering wheel
The cornering lamp may remain lit for a short
time, but is automatically switched off after
no more than three minutes.
Exterior lighting111
Lights and windshield wipers
Z
Page 117 of 358
If you require assistance changing bulbs, con-
sult a qualified specialist workshop.
If the new bulb still does not light up, consult a qualified specialist workshop.
Bulbs and lamps are an important aspect of
vehicle safety. You must therefore make sure
that these function correctly at all times.
Have the headlamp setting checked regularly.
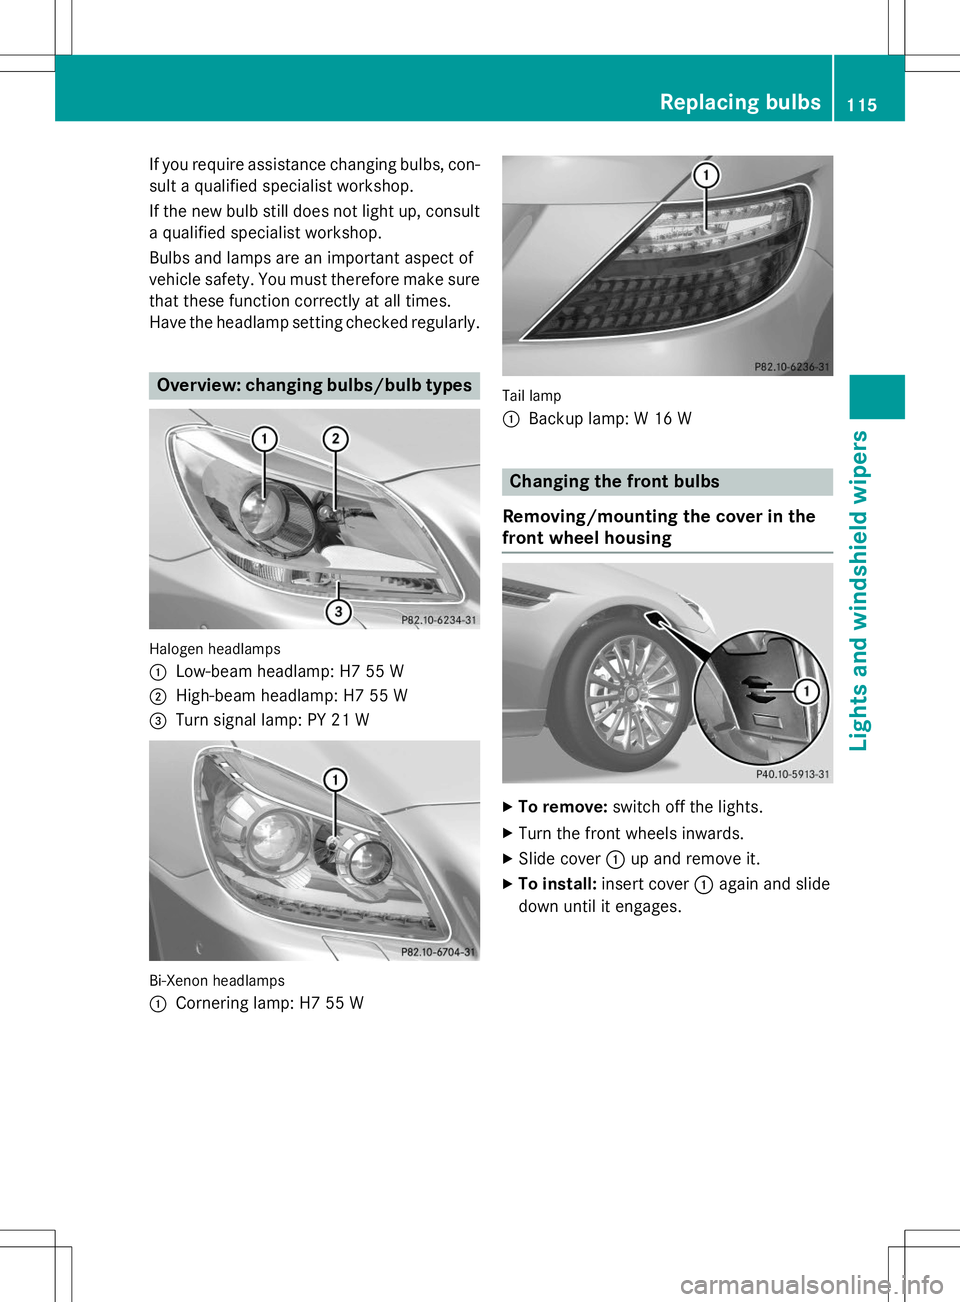
Overview: changing bulbs/bulb types
Halogen headlamps :
Low-beam headlamp: H7 55 W
;High-beam headlamp: H7 55 W
=Turn signal lamp: PY 21 W
Bi-Xenon headlamps :
Cornering lamp: H7 55 W
Tail lamp :
Backup lamp: W 16 W
Changing the front bulbs
Removing/mounting the cover in the
front wheel housing
X To remove: switch off the lights.
X Turn the front wheels inwards.
X Slide cover :up and remove it.
X To install: insert cover :again and slide
down until it engages.
Replacing bulbs115
Lights and windshield wipers
Z
Page 118 of 358
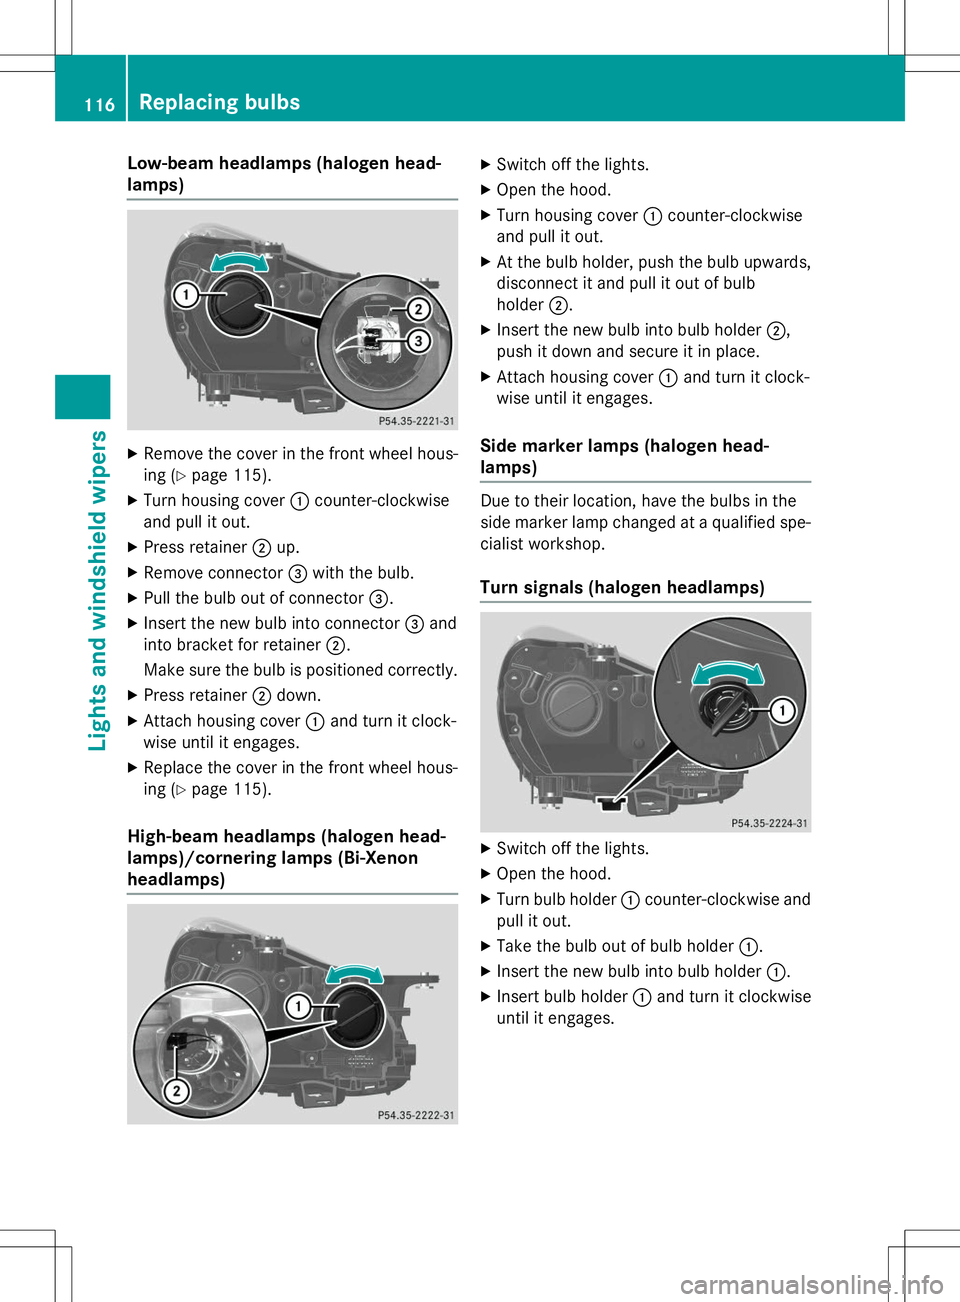
Low-beam headlamps (halogen head-
lamps)
XRemove the cover in the front wheel hous-
ing ( Ypage 115).
X Turn housing cover :counter-clockwise
and pull it out.
X Press retainer ;up.
X Remove connector =with the bulb.
X Pull the bulb out of connector =.
X Insert the new bulb into connector =and
into bracket for retainer ;.
Make sure the bulb is positioned correctly.
X Press retainer ;down.
X Attach housing cover :and turn it clock-
wise until it engages.
X Replace the cover in the front wheel hous-
ing ( Ypage 115).
High-beam headlamps (halogen head-
lamps)/cornering lamps (Bi-Xenon
headlamps)
X
Switch off the lights.
X Open the hood.
X Turn housing cover :counter-clockwise
and pull it out.
X At the bulb holder, push the bulb upwards,
disconnect it and pull it out of bulb
holder ;.
X Insert the new bulb into bulb holder ;,
push it down and secure it in place.
X Attach housing cover :and turn it clock-
wise until it engages.
Side marker lamps (halogen head-
lamps)
Due to their location, have the bulbs in the
side marker lamp changed at a qualified spe-
cialist workshop.
Turn signals (halogen headlamps)
X Switch off the lights.
X Open the hood.
X Turn bulb holder :counter-clockwise and
pull it out.
X Take the bulb out of bulb holder :.
X Insert the new bulb into bulb holder :.
X Insert bulb holder :and turn it clockwise
until it engages.
116Replacing bulbs
Lights and windshield wipers
Page 164 of 358
To ensure that the vehicle is secured againstrolling away unintentionally:
R the electric parking brake must be applied.
R on vehicles with manual transmission,
engage first gear or reverse gear.
R on vehicles with automatic transmission,
the transmission must be in park position P
and the transmission position display in the
multifunction display must show P.
R the SmartKey must be removed from the
ignition lock.
R the front wheels must be turned towards
the curb on steep uphill or downhill gradi-
ents.
Switching off the engine
Important safety notes
GWARNING
The automatic transmission switches to neu-
tral position Nwhen you switch off the engine.
The vehicle may roll away. There is a risk of an
accident.
After switching off the engine, always switch
to parking position P. Prevent the parked vehi-
cle from rolling away by applying the parkingbrake.
Vehicles with manual transmission
X Shift to either first gear or reverse gear R.
X Turn the SmartKey to position 0in the igni-
tion lock and remove it.
The immobilizer is activated.
X Apply the electric parking brake.
Vehicles with automatic transmission
XApply the electric parking brake.
X Shift the transmission to position P. Using the SmartKey
X Turn the SmartKey to position 0in the igni-
tion lock and remove it.
The immobilizer is activated.
iThe SmartKey can only be removed if the
transmission is in position P.
Using KEYLESS-GO
X Press the Start/Stop button ( Ypage 140).
The engine stops and all the indicator
lamps in the instrument cluster go out.
iWhen the driver's door is closed, this cor-
responds to key position 1. When the driv-
er's door is open, this corresponds to key position 0: "Key removed".
If you try to switch off the engine when the
transmission is not in position P, a message
appears in the multifunction display. A signalsounds.
Electric parking brake
General notes
GWARNING
If you leave children unsupervised in the vehi- cle, they could set it in motion by, for example:
R release the parking brake.
R shift the automatic transmission out of park position Por shift manual transmission into
neutral.
R start the engine.
In addition, they may operate vehicle equip-
ment and become trapped. There is a risk of
an accident and injury.
When leaving the vehicle, always take the
SmartKey with you and lock the vehicle. Never
leave children unsupervised in the vehicle.
162Parking
Driving and parking