bonnet MERCEDES-BENZ SLK ROADSTER 2008 Owners Manual
[x] Cancel search | Manufacturer: MERCEDES-BENZ, Model Year: 2008, Model line: SLK ROADSTER, Model: MERCEDES-BENZ SLK ROADSTER 2008Pages: 273, PDF Size: 4.42 MB
Page 7 of 273
4Removing/fitting . . . . . . . . . . . . .
.232
Vehicle battery . . . . . . . . . . . . . . . .230
Voltage (on-board computer) . . . . . .97
Belt force limiters
Activation . . . . . . . . . . . . . . . . . . . . .39
Belt tensioners
Activation . . . . . . . . . . . . . . . . . . . . .39
Belt warnin g. . . . . . . . . . . . . . . . . . . . .71
Bonne t
Bonnet catch . . . . . . . . . . . . . . . . .151
Display message . . . . . . . . . . . . . .179
Opening/closing . . . . . . . . . . . . . .150
Bonnet release lever
Release lever . . . . . . . . . . . . . . . . .151
Boot
Emergency release . . . . . . . . . . . . .211
Locking separatel y.. . . . . . . . . . . . .59
Opening/closing . . . . . . . . . . . . . . .58
Boot li d
Display message . . . . . . . . . . . . . .179
Boot separator . . . . . . . . . . . . . . . . . .134
Display message . . . . . . . . . . . . . .181
Brake
Warning lamp . . . . . . . . . . . . . . . . .194
Brake Assist
see BAS
Brake fluid . . . . . . . . . . . . . . . . . . . . .260
Display message . . . . . . . . . . . . . .180
Brake lamps
Display message . . . . . . . . . . . . . .184 Brake syste
m
Display message . . . . . . . . . . . . . .180
Bulb
Dipped-beam headlamps . . . . . . . .215
Licence plate lamp . . . . . . . . . . . . .217
Main-beam headlamps . . . . . . . . . .216
Parking lamp . . . . . . . . . . . . . . . . .216
Rear foglamp . . . . . . . . . . . . . . . . .216
Replacing . . . . . . . . . . . . . . . .215, 216
Reversing lamp . . . . . . . . . . . . . . .216
Side lamp . . . . . . . . . . . . . . . . . . . .216
Turn signal lamp . . . . . . . . . . . . . . .216
see Lamp
Bulbs
Overview . . . . . . . . . . . . . . . . . . . .214 C
Calling up a malfunction see Message memory men u
Car e. . . . . . . . . . . . . . . . . . . . . . . . . . .166
Automatic car wash . . . . . . . . . . . .166
Headlamps . . . . . . . . . . . . . . . . . . .168
High-pressure cleaners . . . . . . . . .167
Parktroni c.. . . . . . . . . . . . . . . . . .169
Plastic trim . . . . . . . . . . . . . . . . . . .168
Rear window . . . . . . . . . . . . . . . . .168
Side windows . . . . . . . . . . . . . . . . .168
CD player/CD changer
Operating (on-board computer) . . . .99 Central locking
Automatic locking (on-board com -
puter) . . . . . . . . . . . . . . . . . . . . . . .105
Key . . . . . . . . . . . . . . . . . . . . . . . . . .56
Central locking/unlocking button . ..5 7
Central unlocking Key . . . . . . . . . . . . . . . . . . . . . . . . . .56
Centre console
Lower section . . . . . . . . . . . . . . . . . .31
Upper section . . . . . . . . . . . . . . . . . .29
Changing a wheel
see Flat tyr e
Children
In the vehicle . . . . . . . . . . . . . . . . . .44
Restraint systems . . . . . . . . . . . . . .44
Child seat
Automatic recognition . . . . . . . . . . .46
Automatic recognition (malfunc-
tion) . . . . . . . . . . . . . . . . . . . . . . . .192
Recommendations . . . . . . . . . . . . . .48
Suitable positions . . . . . . . . . . . . . .47
Cigarette lighter . . . . . . . . . . . . . . . .141
Cockpit Overview . . . . . . . . . . . . . . . . . . . . .20
Collapsible emergency spare wheel
Stowage . . . . . . . . . . . . . . . . . . . . .229
Collapsible wheel
Pumping up . . . . . . . . . . . . . . . . . .228
Technical data . . . . . . . . . . . . . . . .252 Index
171_AKB; 3; 4, en-GB
vpfaff7,
2007-11-13T10:50:25+01:00 - Seite
4
Page 22 of 273
Exterior view
19Function Pag
e 1 Boot
Opening and closing 58
2 Rear window heatin
g 130
3 Fuel filler fla
p 148
Fuel requirements 149
4 Doors
Opening and closing 56
Opening/closing in an
emergency
210
5 Exterior mirrors
66
6 Roof
Opening and closin
g 132
Draught stop 135
Boot separator 134
7 Cleaning the windows
16
7 8 Windscreen wipers
78 Function Page
9 Opening the bonnet
150
Engine oil 151
Coolant 154
Vehicle battery 230
a Front lights
215
b Towing
234
c Headlamp cleaning system
76
d Wheels and tyres
155
Tyre pressure loss warning
system
158
Flat tyre 218
Vehicle tool kit 172
Spare wheel* 172,
225 e Rear lights
21
6 f Towing
234 At a glance
* optional
171_AKB; 3; 4, en-GB
vpfaff7,
2007-11-13T10:50:25+01:00 - Seite 19
Page 24 of 273
Cockpit
21Function Page
1
Automatic transmission*
:
steering wheel gearshift
paddles* 88
2 Multi-function steering
wheel
28
3 Horn
4 Instrument cluster
24
5 Overhead control panel
32
6
Parktronic* warning dis-
play
116
7 Opens the glove compart-
ment
138
8 Centre console
29
9 Ignition lock
59
a Adjusts the steering whee
l
manually 64 Function Page
b Adjusts the steering whee
l
electrically* 64
Switches steering wheel
heating* on/off 64
c Adjusts the headlamp
range
76
d Opens the bonnet
150
e Opens/closes the side win-
dows
79
f Light switch
73
g Combination switch with:
• Main-beam headlamps 75
• Turn signals 75
• Windscreen wiper
s 78
h Opens the door
57 Function Page
j Cruise control lever:
• Cruise control 10
9 • Speedtronic 11
2 At a glance
* optional
171_AKB; 3; 4, en-G
B
vpfaff7, 2007-11-13T10:50:25+01:00 - Seite 21
Page 26 of 273
Cockpit
23Function Page
1 Overhead control panel
32
2
Parktronic* warning dis-
play
116
3 Cruise control lever:
• Cruise control 10
9 • Speedtronic 11
2 4 Instrument cluster
5 Horn
6 Multi-function steering
wheel
28
7
Automatic transmission*
:
steering wheel gearshift
paddles* 88
8 Opens the door
9 Light switch
73
a Adjusts the headlamp
range
76 Functio
n Page
b Opens/closes the side win-
dows
79
c Opens the bonnet
150
d Ignition lock
59
e Adjusts the steering whee
l
manually f Adjusts the steering whee
l
electrically* Switches the steering
wheel heating* on/off g Combination switch with:
• Main-beam headlamps 75
• Turn signals 75
• Windscreen wiper
s 78
h Centre console
29
j Opens the glove compart-
ment 138 At a glance
* optional
171_AKB; 3; 4, en-GB
vpfaff7,
2007-11-13T10:50:25+01:00 - Seite 23
Page 43 of 273
Occupant safet
y40
ess is pre-emptive in nature as the airbag
must be deployed during – and not at the end
of – the collision
.
i Airbags are not deployed in all types of
accidents. They are controlled by comple x
sensor technology and evaluation logic.
This process is pre-emptive in nature as
airbag deployment must take place during
the impact and must be adapted to provide
calculated, additional protection for the
vehicle occupants. Not all airbags are
deployed in an accident.
The different airbag systems work inde-
pendently of each other. However, each
individual system depends on the type of
accident determined by the control system
in the first stages of the collision (head-on
collision, side impact, rear-end collision
and overturn) and the extent of the acci-
dent (in particular, the vehicle's rate of
deceleration or acceleration).
The rate of vehicle deceleration or accelera-
tion and the direction of the force are basi-
cally determined by:
R the distribution of forces during the colli -
sion
R the collision angle R
the deformation characteristics of the vehi-
cle
R the characteristics of the object with which
the vehicle has collided, e.g. the other vehi-
cle
Factors which can only be seen and measured
after the collision has taken place do not play
a decisive role in the deployment of an airbag,
nor do they provide an indication of it.
The vehicle may be deformed significantly ,
e. g. on the bonnet or the wing, without an
airbag being deployed. This happens if only
parts which are relatively easily deformed are
affected and the necessary deceleration does
not occur. Conversely, airbags may be
deployed even though the vehicle suffers only
minor deformations. This is the case if, for
example, very rigid vehicle parts such as lon-
gitudinal body members are affected and suf-
ficient deceleration occurs as a result.
Belt tensioners, belt force limiter s The seat belts are fitted with belt tensioners.
!
Do not engage the seat belt tongue in the
buckle on the front-passenger seat if the
seat is not occupied. Otherwise the belt
tensioner could be activated in an emer-
gency. If the seat belt is also equipped with a belt
force limiter, the force exerted by the seat
belt on the seat occupant is reduced.
Belt tensioners tighten the seat belts in an
accident, pulling them close against the body.
i
Belt tensioners do not correct incorrect
seat positions or incorrectly fastened sea t
belts.
Belt tensioners do not pull occupants back
towards the backrest.
The belt force limiters are synchronised with
the front airbags, which spread the forces
exerted by the belt force limiters on the occu-
pant over a greater area.
When the ignition is switched on, the belt ten -
sioner is triggered:
R only if the restraint systems are operational
(the 1 warning lamp lights up after th e
ignition is switched on and goes out onc e
the engine is running)( Ypage 39)
R for each three-point seat belt in the front of
the vehicle when the belt tongue is
engaged in the buckle
R In the event of a head-on or rear-end colli-
sion if the vehicle decelerates or acceler-
ates rapidly in a longitudinal direction
during the initial stages of the collision Safety
171_AKB; 3; 4, en-GB
vpfaff7,
2007-11-13T10:50:25+01:00 - Seite 40
Page 131 of 273
Air conditionin
g128 Adjusting the air vents
G
Risk of injury
Very hot or very cold air can flow from the
air vents. This could cause burns or frost-
bite to bare skin in the immediate vicinity
of the vents. Keep bare skin away from
these air outlets. If necessary, direct the
airflow away to a different area of the vehi-
cle interior.
Please observe the following notes to ensure
that the air can flow freely through the ai r
vents:
R Keep the air inlet between the windscree n
and the bonnet free of deposits, such as ice
and snow, to guarantee the supply of fresh
air into the vehicle interior.
R Never cover the vents or air inlet and outlet
grilles in the vehicle interior.
i Position the sliders for the centre air
vents in the central position to provide vir-
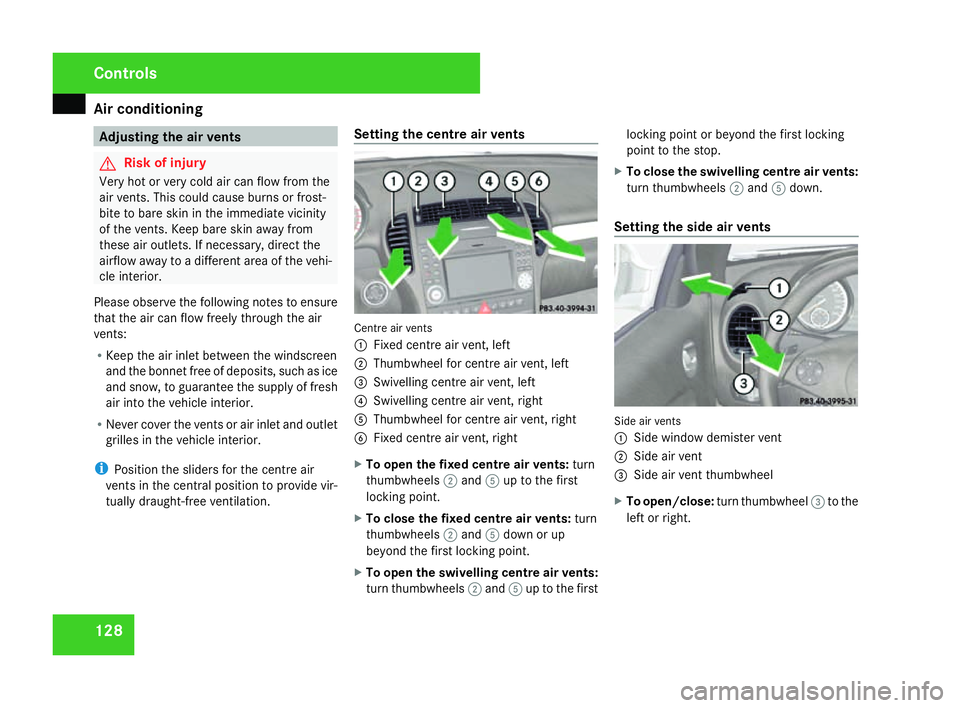
tually draught-free ventilation. Setting the centre air vents Centre air vent
s
1 Fixed centre air vent, left
2 Thumbwheel for centre air vent, left
3 Swivelling centre air vent, left
4 Swivelling centre air vent, right
5 Thumbwheel for centre air vent, right
6 Fixed centre air vent, right
X To open the fixed centre air vents :tur n
thumbwheels 2and 5up to the first
locking point.
X To close the fixed centre air vents :tur n
thumbwheels 2and 5down or up
beyond the first locking point .
X To open the swivelling centre air vents :
turn thumbwheels 2and 5up to the first locking point or beyond the first lockin
g
point to the stop.
X To close the swivelling centre air vents :
turn thumbwheels 2and 5down.
Setting the side air vents Side air vent
s
1 Side window demister vent
2 Side air vent
3 Side air vent thumbwhee l
X To open/close: turn thumbwheel 3to the
left or right. Controls
171_AKB; 3; 4, en-G
B
vpfaff7, 2007-11-13T10:50:25+01:00 - Seite 128
Page 153 of 273
Engine compartment
150formance and increase petrol consump-
tion. You must avoid driving at full throttle.
! In emergencies, only when the recom-
mended fuel is not available, you may also
use standard unleaded petrol, 91 RON/
82.5 MON. However, using this fuel result s
in considerably higher petrol consumption
and significantly reduced performance.
Avoid driving at full throttle, and only drive
in drive program C.
If no fuel other than regular petrol fuel 91
RON/82.5 MON or a lower grade is per-
manently available, you should have the
vehicle adapted to run on this fuel by the
local after-sales service. Engine compartment
Bonnet
G
Risk of accident
Do not pull the release lever while the vehi-
cle is in motion. The bonnet could other-
wise open.
Opening G
Risk of injury
There is a risk of injury if the bonnet is open,
even if the engine is not running.
Some engine components can become
very hot.
To avoid the risk of burns, only touch thos e
components described in the Owner’s Man-
ual and observe the relevant safety notes. G
Risk of injury
The radiator fan between the radiator and
the engine can start automatically, even if
the key has been removed from the ignition
lock. For this reason you must not reach
into the turning area of the fan. You could
otherwise sustain an injury . The electronic ignition system uses high
voltage. For this reason you must never
touch components of the ignition system
(ignition coil, ignition cable, spark plug con-
nector or test socket) when:
R
the engine is running
R the engine is being started
R the ignition is switched on and the engine
is being cranked by hand
X Make sure that the windscreen wipers are
switched off. G
Risk of injury
The windscreen wipers and wiper rod s
could be set in motion.
When the bonnet is open, you or others
could be injured by the wiper rods.
Make sure that the windscreen wipers are
switched off and that the key has bee n
pulled out of the ignition lock before open-
ing the bonnet. Operation
171_AKB; 3; 4, en-GB
vpfaff7,
2007-11-13T10:50:25+01:00 - Seite 150
Page 154 of 273
Engine compartment
151
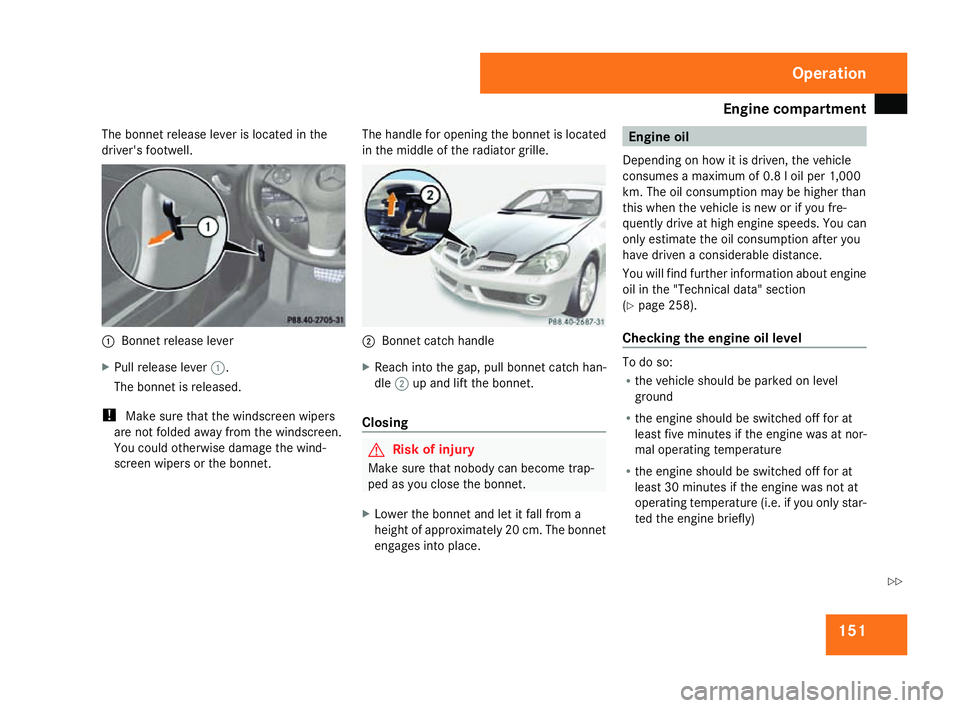
The bonnet release lever is located in th
e
driver's footwell. 1
Bonnet release lever
X Pull release lever 1.
The bonnet is released.
! Make sure that the windscreen wipers
are not folded away from the windscreen.
You could otherwise damage the wind-
screen wipers or the bonnet. The handle for opening the bonnet is located
in the middle of the radiator grille. 2
Bonnet catch handl e
X Reach into the gap, pull bonnet catch han-
dle 2up and lift the bonnet.
Closing G
Risk of injury
Make sure that nobody can become trap-
ped as you close the bonnet.
X Lower the bonnet and let it fall from a
height of approximately 20 cm. The bonnet
engages into place. Engine oil
Depending on how it is driven, the vehicle
consumes a maximum of 0.8 l oil per 1,000
km. The oil consumption may be higher than
this when the vehicle is new or if you fre-
quently drive at high engine speeds. You can
only estimate the oil consumption after you
have driven a considerable distance.
You will find further information about engine
oil in the "Technical data" section
( Y page 258).
Checking the engine oil level To do so:
R
the vehicle should be parked on leve l
ground
R the engine should be switched off for at
least five minutes if the engine was at nor -
mal operating temperature
R the engine should be switched off for at
least 30 minutes if the engine was not at
operating temperature (i.e. if you only star-
ted the engine briefly ) Operation
171_AKB; 3; 4, en-GB
vpfaff7,
2007-11-13T10:50:25+01:00 - Seite 151 Z
Page 171 of 273
Car
e 168
X
Turn the key to position 1in the ignition
lock (Y page 59).
X Set the windscreen wipers to position Ion
the combination switch (Y page 78).
X Turn the key to position 0or remove it when
the wiper arms are vertical (Y page 59).
! Only fold the windscreen wipers away
from the windscreen when vertical, other -
wise you will damage the bonnet .
X Fold the wiper arms away from the wind-
screen until you feel them engage.
X Clean the windscreen and the wiper blades .
X Fold the windscreen wipers back agai n
before the ignition is switched on.
! Do not clean the wiper blades too often,
as otherwise the coating may come off.
This could cause wiper noise.
Cleaning the windows !
Do not use dry cloths, abrasive products,
solvents or cleaning agents containing sol-
vents to clean the inside of the windows.
Clean the insides of the windows with a
damp cloth or commercially-available glass
cleaner. Avoid touching the inside of the rear windscreen and the side windows with
hard objects, e.g. ice scrapers or rings. You
could otherwise cause damage to the win-
dows, rear window heating or aerial on the
rear window.
i Anti-glare film retrofitted to the insides of
the windows could interfere with radio or
mobile phone reception, especially if it is
conductive or metal-coated film. Informa -
tion about anti-glare film can be obtained
from any Mercedes-Benz Service Centre.
Cleaning the headlamps X
Clean the headlamp lenses with a wet
sponge.
! Only use washer fluid which is suitable
for plastic lenses. Unsuitable washer fluid
could damage the plastic lenses of th e
headlamps.
Therefore, do not use the following:
R dry cloths
R abrasive cleaning agents
R solvents
R cleaning agents containing solvent You could otherwise scratch or damage the
surface of the lenses
.
Plastic trim !
Do not use dry, coarse or hard cloths and
do not scrub. Doing so will scratch or dam-
age the surfaces.
X Wipe plastic parts with a damp, lint-free
cloth (e.g. a microfibre cloth).
X Light soiling: use a low-foaming soap (e.g .
a light liquid hand soap) diluted in water.
X Heavy soiling: use a cleaning agent that is
solvent-free and non-corrosive. Mercedes-
Benz recommends that you use a
Mercedes-Benz cleaning product for this
purpose.
Cleaning the steering wheel boss and
dashboard X
Moisten a clean lint-free cloth with water.
X Clean the plastic parts and the dashboard.
X If particularly dirty, use a mild detergent. Operation
171_AKB; 3; 4, en-GB
vpfaff7,
2007-11-13T10:50:25+01:00 - Seite 168
Page 182 of 273
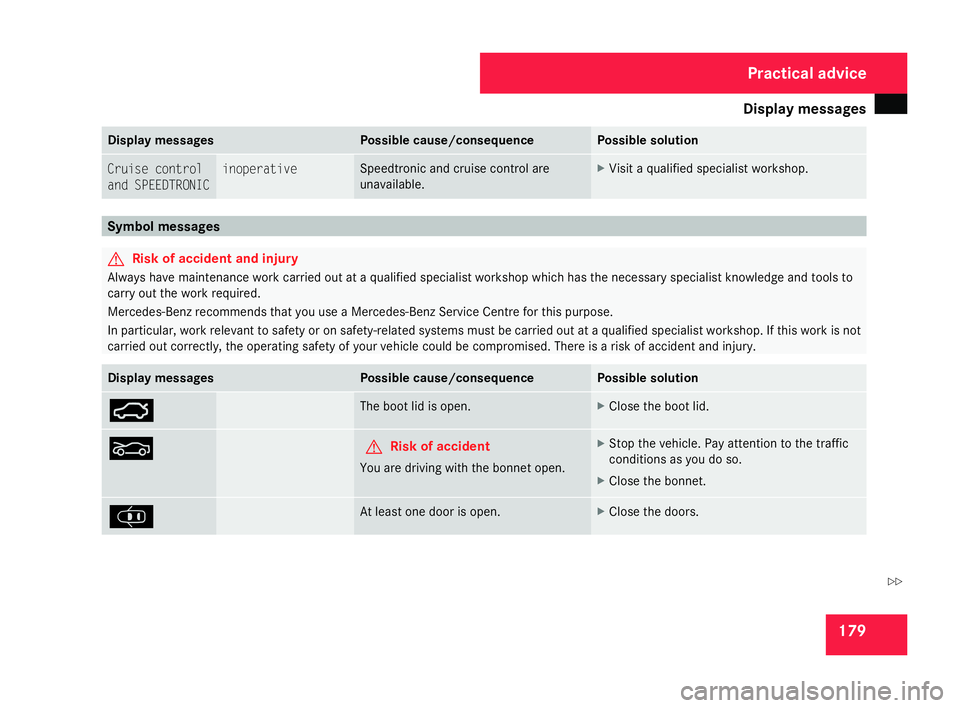
Display
messages 17
9 Display messages Possible cause/consequence Possible solution
Cruise contro
l
and SPEEDTRONIC inoperative Speedtronic and cruise control are
unavailable. X
Visit a qualified specialist workshop. Symbol messages
G
Risk of accident and injury
Always have maintenance work carried out at a qualified specialist workshop which has the necessary specialist knowledge and tools to
carry out the work required .
Mercedes-Benz recommends that you use a Mercedes-Benz Service Centre for this purpose.
In particular, work relevant to safety or on safety-related systems must be carried out at a qualified specialist workshop. If this work is not
carried out correctly, the operating safety of your vehicle could be compromised. There is a risk of accident and injury. Display messages Possible cause/consequence Possible solution
Ê The boot lid is open. X
Close the boot lid. O G
Risk of accident
You are driving with the bonnet open. X
Stop the vehicle. Pay attention to the traffic
conditions as you do so.
X Close the bonnet. J At least one door is open. X
Close the doors. Practical advice
171_AKB; 3; 4, en-GB
vpfaff7,
2007-11-13T10:50:25+01:00 - Seite 17
9 Z