buttons MERCEDES-BENZ SLK ROADSTER 2008 Owners Manual
[x] Cancel search | Manufacturer: MERCEDES-BENZ, Model Year: 2008, Model line: SLK ROADSTER, Model: MERCEDES-BENZ SLK ROADSTER 2008Pages: 273, PDF Size: 4.42 MB
Page 14 of 273
11
Speedometer
Digital speedometer (on-board
computer) . . . . . . . . . . . . . . . . . . . .96
Setting the unit (on-board com-
puter) . . . . . . . . . . . . . . . . . . . . . . .102
Speedtronic . . . . . . . . . . . . . . . . . . . .112
Display message . . . . . . . . . . . . . .179
Permanent . . . . . . . . . . . . . . . . . . .114
Variabl e.. . . . . . . . . . . . . . . . . . . .113
SRS (Supplemental Restraint Sys-
tem) . . . . . . . . . . . . . . . . . . . . . . . . . . . .39
warning lamp . . . . . . . . . . . . . . . . . .39
Standard display (on-board com-
puter) . . . . . . . . . . . . . . . . . . . . . . . . . .95
Station see Radio
Status line (on-board computer) . . ..92
Selecting the display . . . . . . . . . . .103
Steering wheel
Adjusting . . . . . . . . . . . . . . . . . .63, 64
Buttons (on-board computer) . . . . . .91
Storing settings . . . . . . . . . . . . . . . .68
Steering wheel gearshift paddles . ..8 8
Steering wheel heating . . . . . . . . . . ..64
Stowage compartment . . . . . . . . . ..138
Armrest (under) . . . . . . . . . . . . . . .138
Centre console . . . . . . . . . . . . . . . .139
Glove compartment . . . . . . . . . . . .138
Stowage compartments
Overview . . . . . . . . . . . . . . . . . . . . .34 Stowage space
Cup holder . . . . . . . . . . . . . . . . . . .136
Rear wall . . . . . . . . . . . . . . . . . . . .139
Stowage well
Boot floor (underneath) . . . . . . . . .137
Submenu (on-board computer) . . ..1 01
Instrument cluster . . . . . . . . . . . . .102
Lighting . . . . . . . . . . . . . . . . . . . . .102
Vehicle . . . . . . . . . . . . . . . . . . . . . .102
Sun viso r. . . . . . . . . . . . . . . . . . . . . . .140
Supplemental Restraint Syste m
see SRS
Supplemental Restraint System (SRS)
Display message . . . . . . . . . . . . . .178
Warning lamp . . . . . . . . . . . . . . . . .194
Surround lighting
Switching on/off (on-board com-
puter) . . . . . . . . . . . . . . . . . . . . . . .104
Switching off the alarm
ATA . . . . . . . . . . . . . . . . . . . . . . . . . .53 T
Tail lamps Display message . . . . . . . . . . . . . .186
Tank capacity . . . . . . . . . . . . . . . . . . .255
Tank content Calling up the range (on-board
computer) . . . . . . . . . . . . . . . . . . .107 Technical data
Acceleration . . . . . . . . . . . . . . . . . .245
Engine . . . . . . . . . . . . . . . . . . . . . .244
Speed . . . . . . . . . . . . . . . . . . . . . . .245
Tyres . . . . . . . . . . . . . . . . . . . . . . .247
Vehicle dimensions . . . . . . . . . . . .253
Vehicle weights . . . . . . . . . . . . . . .253
Wheels . . . . . . . . . . . . . . . . . . . . . .247
Telephone
see Mobile phone
Temperature
Engine oil (on-board computer) . . . .96
Outside temperature . . . . . . . . . . . .91
Thermatic
Malfunction indicator lamp . . . . . .191
Thermotroni c
Malfunction indicator lamp . . . . . .191
Third brake lamp
Display message . . . . . . . . . . . . . .184
Tightening torque . . . . . . . . . . . . . ..229
Time Lap time (on-board computer) . . . . .97
Setting (on-board computer) . . . . .103
Setting the time (on-board com-
puter) . . . . . . . . . . . . . . . . . . . . . . .103
Timer (on-board computer) . . . . . . . ..97
TIREFIT kit Using . . . . . . . . . . . . . . . . . . . . . . .219
Total distance recorder . . . . . . . . . . ..95
Resetting the trip meter . . . . . . . . . .90 Index
171_AKB; 3; 4, en-G
B
vpfaff7, 2007-11-13T10:50:25+01:00 - Seite 11
Page 32 of 273
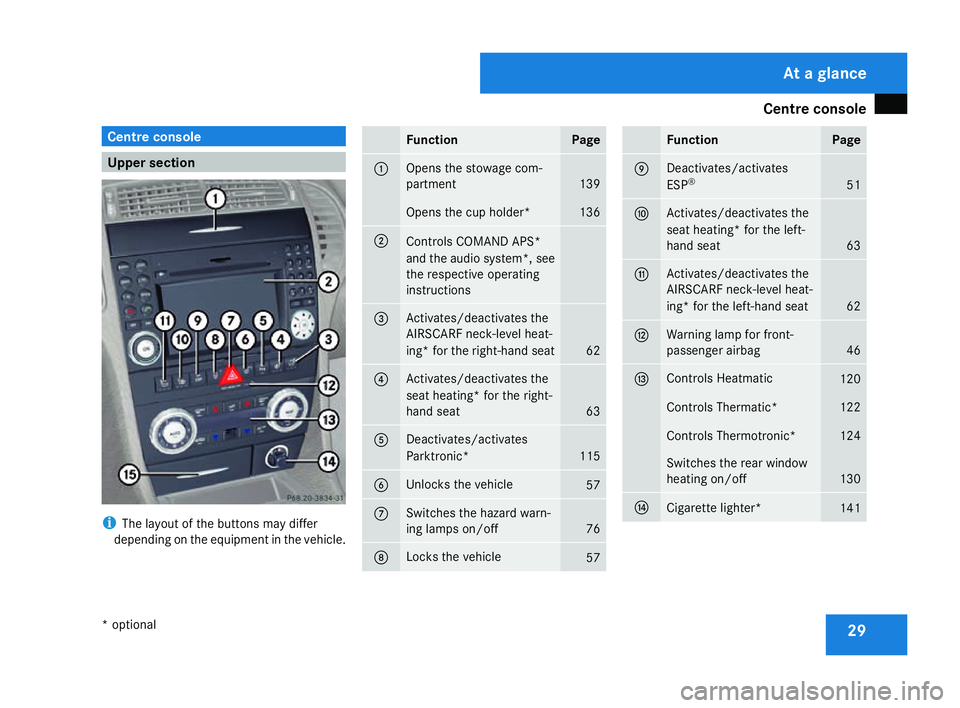
Centre console
29Centre console
Upper section
i
The layout of the buttons may differ
depending on the equipment in the vehicle. Function Page
1 Opens the stowage com-
partment
139
Opens the cup holder* 136
2
Controls COMAND APS
*
and the audio system*, see
the respective operating
instructions 3 Activates/deactivates the
AIRSCARF neck-level heat
-
ing* for the right-hand seat 62
4 Activates/deactivates the
seat heating* for the right-
hand seat
63
5 Deactivates/activates
Parktronic*
115
6 Unlocks the vehicl
e 57
7 Switches the hazard warn-
ing lamps on/off
76
8 Locks the vehicle
57 Functio
n Page
9 Deactivates/activates
ESP
® 51
a Activates/deactivates the
seat heating* for the left-
hand seat
63
b Activates/deactivates the
AIRSCARF neck-level heat
-
ing* for the left-hand seat 62
c Warning lamp for front-
passenger airbag
46
d Controls Heatmatic
120
Controls Thermatic
* 122
Controls Thermotronic* 124
Switches the rear window
heating on/of
f 130
e
Cigarette lighter*
141At a glance
* optional
171_AKB; 3; 4, en-GB
vpfaff7
, 2007-11-13T10:50:25+01:00 - Seite 29
Page 34 of 273
Centre console
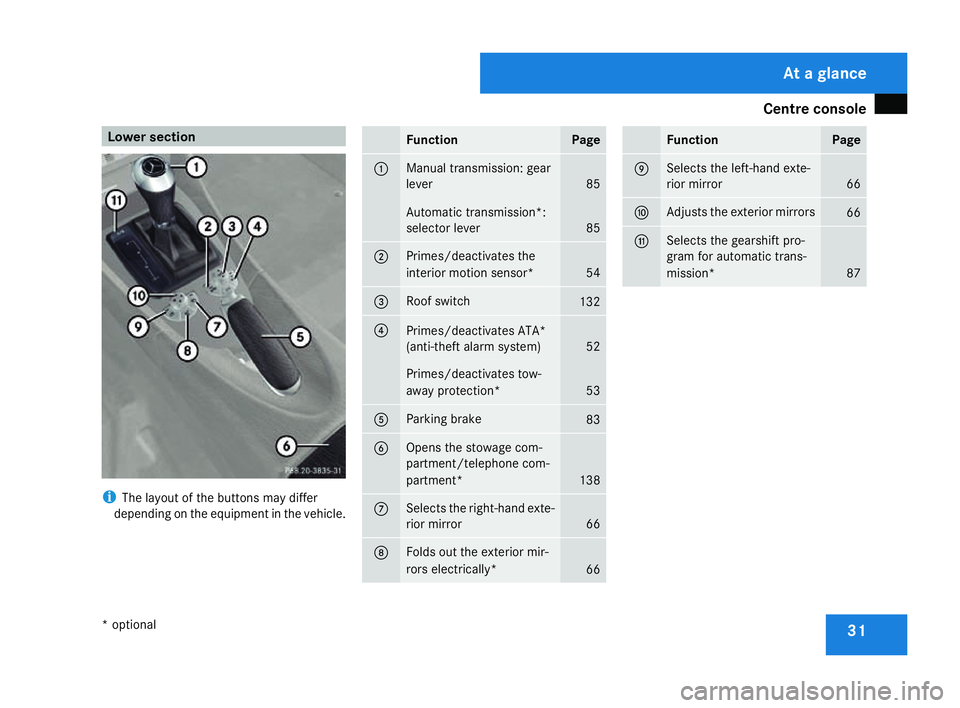
31Lower section
i
The layout of the buttons may differ
depending on the equipment in the vehicle. Function Page
1 Manual transmission: gear
lever
85
Automatic transmission*
:
selector lever 85
2 Primes/deactivates the
interior motion sensor*
54
3 Roof switch
132
4
Primes/deactivates ATA*
(anti-theft alarm system)
52
Primes/deactivates tow-
away protection*
53
5 Parking brake
83
6 Opens the stowage com-
partment/telephone com-
partment*
138
7 Selects the right-hand exte
-
rior mirro r 66
8 Folds out the exterior mir-
rors electrically
* 66 Function Pag
e 9 Selects the left-hand exte
-
rior mirro r 66
a Adjusts the exterior mirrors
66
b Selects the gearshift pro-
gram for automatic trans-
mission*
87At a glance
* optiona l
171_AKB; 3; 4, en-GB
vpfaff7,
2007-11-13T10:50:25+01:00 - Seite 31
Page 35 of 273
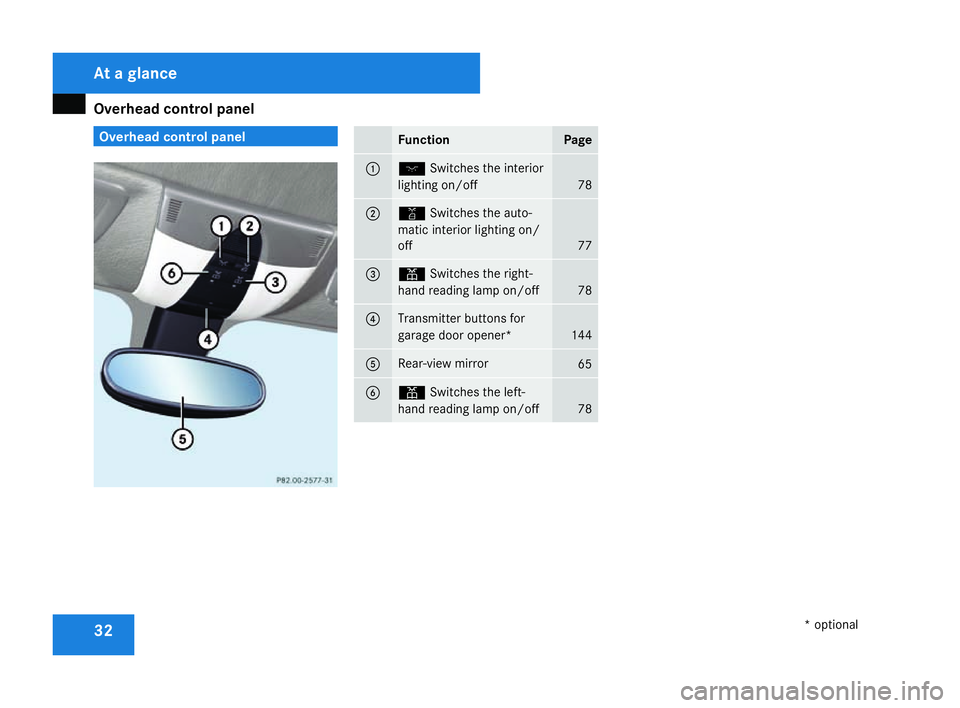
Overhead control panel
32 Overhead control panel
Function Page
1 ð
Switches the interior
lighting on/off 78
2 ¡
Switches the auto-
matic interior lighting on/
off 77
3 X
Switches the right-
hand reading lamp on/off 78
4 Transmitter buttons for
garage door opener*
144
5 Rear-view mirror
65
6 X
Switches the left-
hand reading lamp on/off 78At a glance
* optional
171_AKB; 3; 4, en-GB
vpfaff7,
2007-11-13T10:50:25+01:00 - Seite 32
Page 59 of 273
Opening and closing
56 Opening and closing
Key
The vehicle's equipment includes two keys
with remote control. Each key contains an
emergency key element .
The key is configured at the factory to cen-
trally lock and unlock the following:
R the doors
R the boot li d
R the fuel filler flap
R the glove compartment
R the stowage compartment in the centr e
console G
Risk of accident
Never leave children unsupervised in the
vehicle. They could open a door from the
inside, even if it has been locked, or star t
the vehicle if the key is left in it. They could
endanger themselves and others. Yo u
should therefore take the key with you
when leaving the vehicle, even if you are
only leaving it for a short time. 1
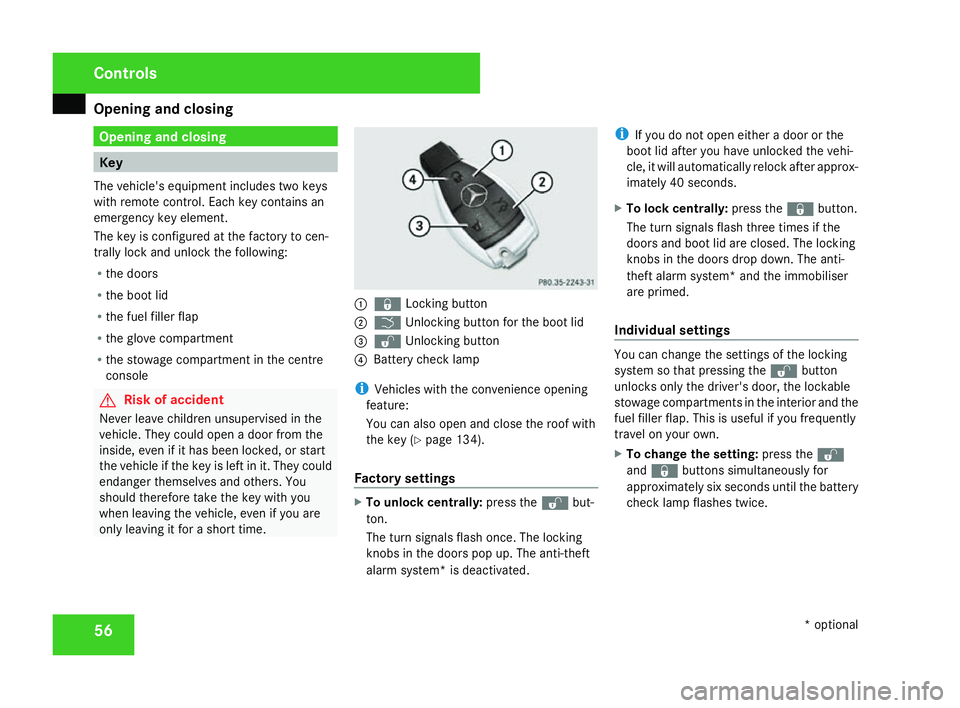
j Locking button
2 i Unlocking button for the boot lid
3 k Unlocking button
4 Battery check lamp
i Vehicles with the convenience opening
feature:
You can also open and close the roof with
the key (Y page 134).
Factory settings X
To unlock centrally :press the kbut-
ton .
The turn signals flash once. The lockin g
knobs in the doors pop up. The anti-theft
alarm system* is deactivated .i
If you do not open either a door or the
boot lid after you have unlocked the vehi-
cle, it will automatically relock after approx-
imately 40 seconds.
X To lock centrally :press the jbutton.
The turn signals flash three times if the
doors and boot lid are closed. The locking
knobs in the doors drop down. The anti-
theft alarm system* and the immobiliser
are primed.
Individual settings You can change the settings of the locking
system so that pressing the
kbutton
unlocks only the driver's door, the lockable
stowage compartments in the interior and the
fuel filler flap. This is useful if you frequently
travel on your own.
X To change the setting: press thek
and j buttons simultaneously for
approximately six seconds until the battery
check lamp flashes twice. Controls
* optional
171_AKB; 3; 4, en-GB
vpfaff7,
2007-11-13T10:50:25+01:00 - Seite 56
Page 60 of 273
Opening and closing
57
The key now functions as follows:
X
To unlock the driver's door: press the
k button once.
X To unlock centrally :press the kbut-
ton twice.
X To lock centrally :press the jbutton.
Restoring the factory settings X
Press the kandj buttons simulta-
neously for approximately six seconds until
the battery check lamp flashes twice. Opening the doors from the inside
You can open a door from the inside at any
time, even if it has been locked. 1
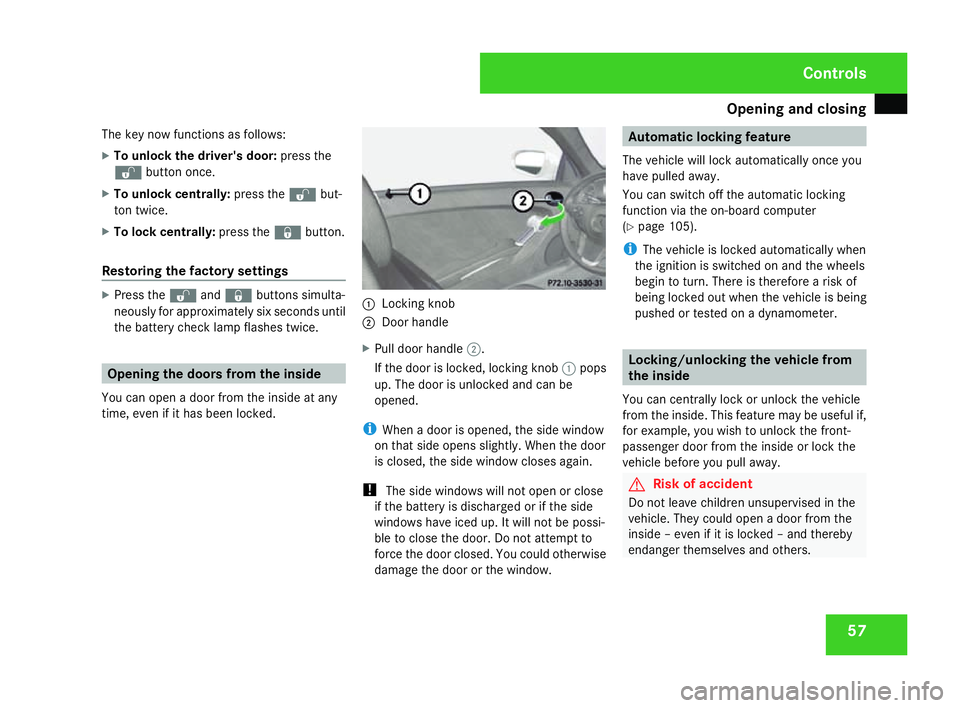
Locking knob
2 Door handl e
X Pull door handle 2.
If the door is locked, locking knob 1pops
up. The door is unlocked and can be
opened.
i When a door is opened, the side window
on that side opens slightly. When the door
is closed, the side window closes again.
! The side windows will not open or close
if the battery is discharged or if the side
windows have iced up. It will not be possi-
ble to close the door. Do not attempt to
force the door closed. You could otherwise
damage the door or the window. Automatic locking feature
The vehicle will lock automatically once you
have pulled away .
You can switch off the automatic locking
function via the on-board computer
( Y page 105).
i The vehicle is locked automatically when
the ignition is switched on and the wheels
begin to turn. There is therefore a risk of
being locked out when the vehicle is being
pushed or tested on a dynamometer. Locking/unlocking the vehicle from
the inside
You can centrally lock or unlock the vehicle
from the inside. This feature may be useful if,
for example, you wish to unlock the front-
passenger door from the inside or lock the
vehicle before you pull away. G
Risk of accident
Do not leave children unsupervised in the
vehicle. They could open a door from the
inside – even if it is locked – and thereby
endanger themselves and others. Control
s
171_AKB; 3; 4, en-GB
vpfaff7,
2007-11-13T10:50:25+01:00 - Seite 57
Page 68 of 273
Mirrors
65Easy-entry/exit feature*
The easy-entry/exit feature makes getting in
and out of your vehicle easier.
The steering wheel swings upwards whe n
you:
R remove the key from the ignition lock
R open the driver's door when the key is in
the ignition lock or in position 1.
The steering wheel is moved automatically to
the position previously set when the key is
inserted into the ignition lock with the driver's
door closed. G
Risk of injury
Make sure that nobody can become trap -
ped when you activate the easy-entry/exit
feature.
If there is a risk of becoming trapped, stop
the adjustment procedure. To halt the pro-
cedure:
R press the steering-column adjustment
switc h
R press one of the memory function posi-
tion buttons
The steering column stops moving immedi-
ately. Never leave children unsupervised in the
vehicle. They could open the driver's door
and thereby unintentionally activate the
easy-entry feature and become trapped.
The most recent position of the steering
wheel is stored when you switch off the igni-
tion or when you store a memory position
( Y page 68).
You can activate and deactivate the easy-
entry/exit feature via the on-board computer
( Y page 106). Mirrors
Rear-view mirror
X Adjust the rear-view mirror by hand so yo u
have a good overview of the traffic condi-
tions.
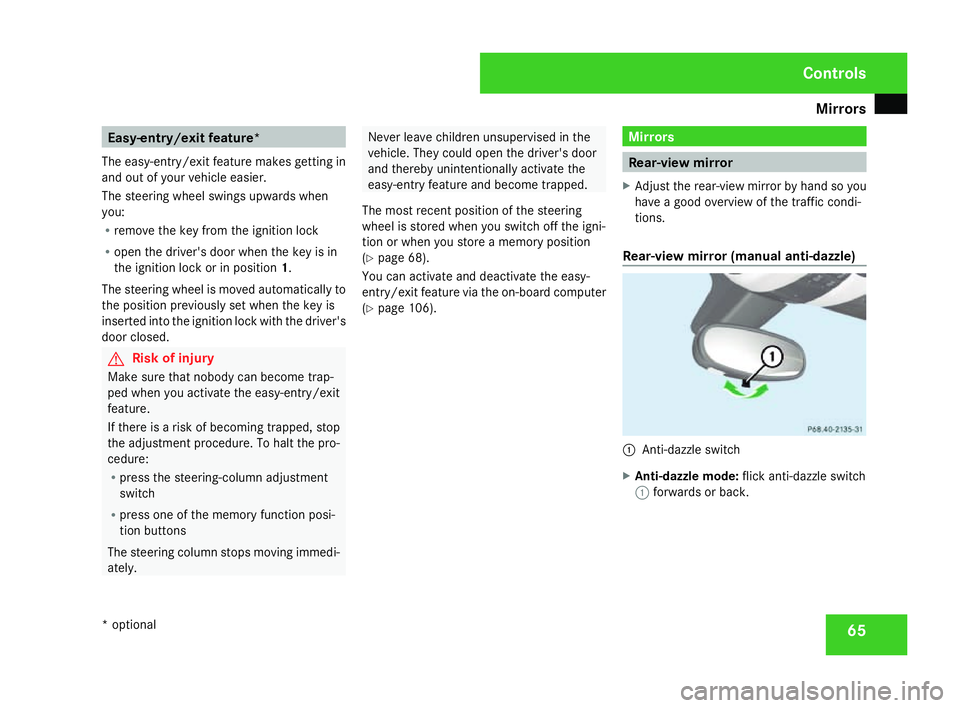
Rear-view mirror (manual anti-dazzle) 1
Anti-dazzle switch
X Anti-dazzle mode: flick anti-dazzle switch
1 forwards or back. Controls
* optional
171_AKB; 3; 4, en-GB
vpfaff7,
2007-11-13T10:50:25+01:00 - Seite 65
Page 94 of 273
On-board computer
91Outside temperature displa
yG
Risk of accident
The road surface may be icy, especially in
wooded areas or on bridges, even if tem-
peratures are just above freezing point. The
vehicle could skid if you fail to adapt your
driving style. You should therefore always
adapt your driving style and speed to suit
the weather conditions .
There is a short delay before a change in out-
side temperature is displayed. On-board computer
Points to remember
The on-board computer is activated as soon
as you turn the key to position 1in the ignition
lock. You can use the on-board computer to
call up information relating to your vehicle
and to make and/or adjust settings.
You can call up the next service due date,
select the display language for the instrumen t
cluster and set other functions. G
Risk of accident
Only use the on-board computer when roa d
and traffic conditions permit. You would
otherwise be distracted and unable to con-
centrate properly on driving, and could
cause an accident.
The on-board computer shows information in
the multi-function display. Multi-function steering wheel
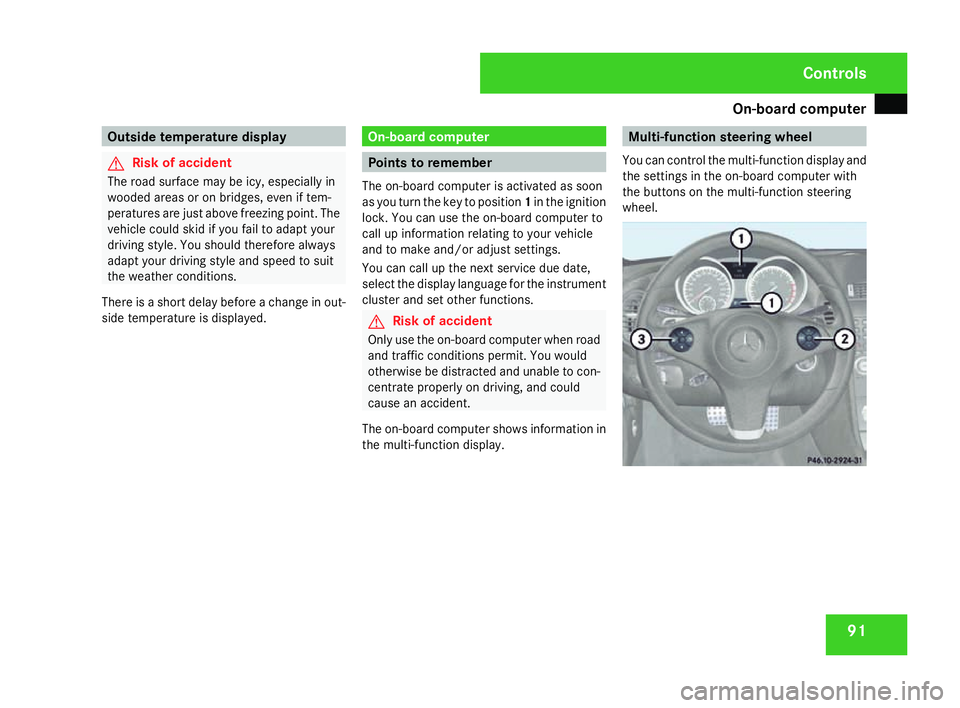
You can control the multi-function display and
the settings in the on-board computer wit h
the buttons on the multi-function steering
wheel. Controls
171_AKB; 3; 4, en-G
B
vpfaff7, 2007-11-13T10:50:25+01:00 - Seite 91
Page 98 of 273
On-board computer
95Function
1 Standard display
menu
( Y page 95)
R Total distance recorder
(Y page 95)
R Tyre pressure loss warning sys-
tem* (Y page 158 )
R Coolant temperature (Y page 96)
R Digital speedometer or outside tem-
perature (Y page 96)
R ASSYST PLUS service displa y
( Y page 165 )
R Engine oil level* (Y page 151 ) 2
AMG
* menu (Y page 96) 3
Audio*/DVD*
menu(Y page 98)
R Radio station (Y page 99)
R Audio drive or media**
(Y page 99)
R DVD video* (Y page 99) Function
4
Navigation
* menu (NAV)
( Y page 100 ) 5
Message memory
menu10
(fault and
warning messages) (Y page 100 ) 6 Settings
menu(Y page 101 )
R Resetting to factory setting s
( Y page 101 )
R Selecting a submenu (Y page 101 ) 7 Trip computer
menu(Y page 107 )
R Consumption statistics
(Y page 107 )
R Range (Y page 107 ) 8
Telephon
e* menu (Y page 108 ) This is what the displays look like when you
scroll through the menus.
The generic terms in the table overview are
intended to help you navigate through the
menus. The terms themselves are not alway
s
displayed in the multi-function display. Depending on the audio system fitted, the
Audio*,
Navigation* and Telephone*
menus are slightly different. The examples
given in this Owner's Manual apply to vehicles
equipped with COMAND APS*. Standard display menu
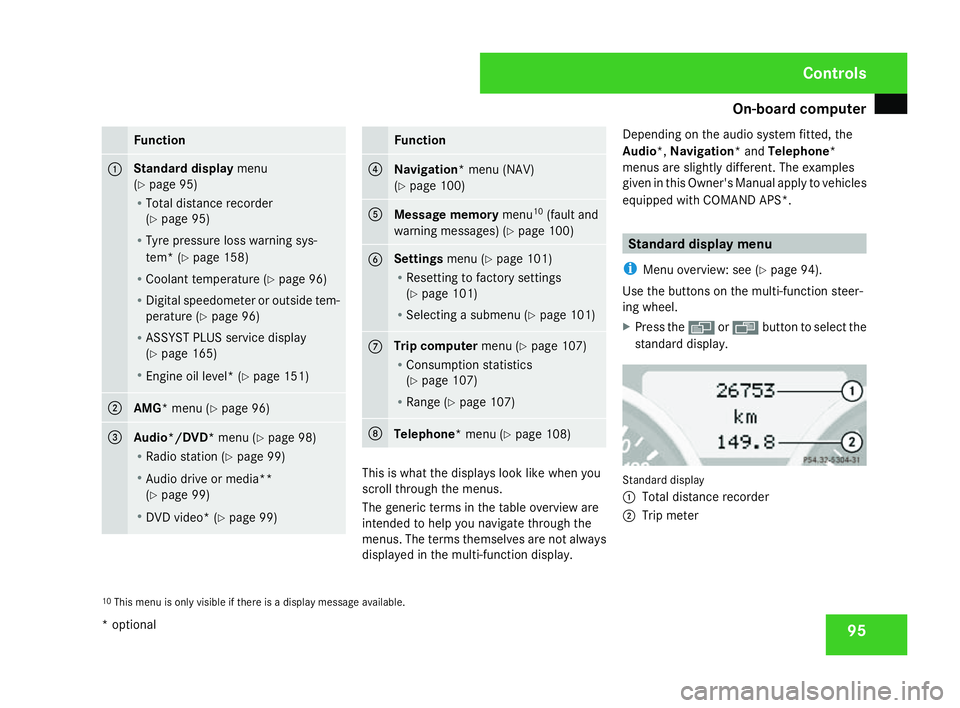
i Menu overview: see (Y page 94).
Use the buttons on the multi-function steer -
ing wheel.
X Press the èor· button to select the
standard display. Standard display
1
Total distance recorder
2 Trip meter
10 This menu is only visible if there is a display message available. Controls
* optional
171_AKB; 3; 4, en-GB
vpfaff7,
2007-11-13T10:50:25+01:00 - Seite 95
Page 99 of 273
On-board computer
96
You can select the following functions in the
Basic display
menu by pressing the jor
k button:
R tyre pressure loss warning sys-
tem* (Y page 158 )
R coolant temperature
R digital speedometer or outside tempera-
ture
R ASSYST PLUS service displa y
( Y page 165 )
R engine oil level* (Y page 151 )
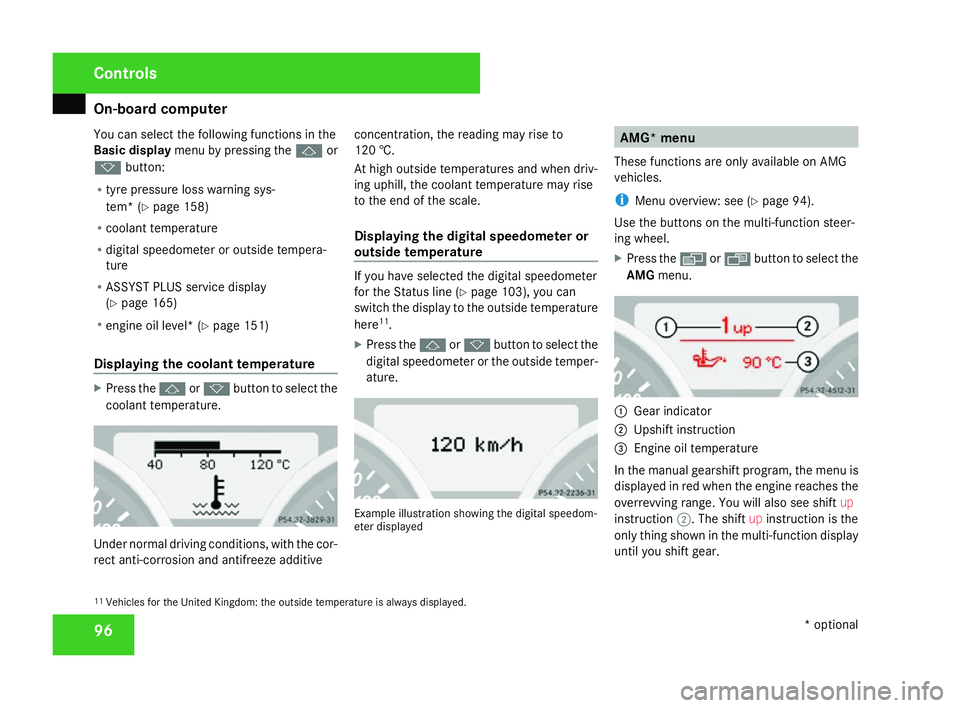
Displaying the coolant temperatur eX
Press the jork button to select the
coolant temperature. Under normal driving conditions, with the cor-
rect anti-corrosion and antifreeze additive concentration, the reading may rise to
120 †.
At high outside temperatures and when driv-
ing uphill, the coolant temperature may rise
to the end of the scale.
Displaying the digital speedometer or
outside temperatur
e If you have selected the digital speedometer
for the Status line
(Y page 103), you can
switch the display to the outside temperature
here 11
.
X Press the jork button to select the
digital speedometer or the outside temper -
ature. Example illustration showing the digital speedom
-
eter displayed AMG* menu
These functions are only available on AMG
vehicles.
i Menu overview: see (Y page 94).
Use the buttons on the multi-function steer -
ing wheel.
X Press the èor· button to select the
AMG menu. 1
Gear indicator
2 Upshift instruction
3 Engine oil temperatur e
In the manual gearshift program, the menu is
displayed in red when the engine reaches the
overrevving range. You will also see shift up
instruction 2. The shift upinstruction is the
only thing shown in the multi-function display
until you shift gear.
11 Vehicles for the United Kingdom: the outside temperature is always displayed. Control
s
* optional
171_AKB; 3; 4, en-GB
vpfaff7,
2007-11-13T10:50:25+01:00 - Seite 96