change key battery MERCEDES-BENZ SLK ROADSTER 2008 Owners Manual
[x] Cancel search | Manufacturer: MERCEDES-BENZ, Model Year: 2008, Model line: SLK ROADSTER, Model: MERCEDES-BENZ SLK ROADSTER 2008Pages: 273, PDF Size: 4.42 MB
Page 7 of 273
4Removing/fitting . . . . . . . . . . . . .
.232
Vehicle battery . . . . . . . . . . . . . . . .230
Voltage (on-board computer) . . . . . .97
Belt force limiters
Activation . . . . . . . . . . . . . . . . . . . . .39
Belt tensioners
Activation . . . . . . . . . . . . . . . . . . . . .39
Belt warnin g. . . . . . . . . . . . . . . . . . . . .71
Bonne t
Bonnet catch . . . . . . . . . . . . . . . . .151
Display message . . . . . . . . . . . . . .179
Opening/closing . . . . . . . . . . . . . .150
Bonnet release lever
Release lever . . . . . . . . . . . . . . . . .151
Boot
Emergency release . . . . . . . . . . . . .211
Locking separatel y.. . . . . . . . . . . . .59
Opening/closing . . . . . . . . . . . . . . .58
Boot li d
Display message . . . . . . . . . . . . . .179
Boot separator . . . . . . . . . . . . . . . . . .134
Display message . . . . . . . . . . . . . .181
Brake
Warning lamp . . . . . . . . . . . . . . . . .194
Brake Assist
see BAS
Brake fluid . . . . . . . . . . . . . . . . . . . . .260
Display message . . . . . . . . . . . . . .180
Brake lamps
Display message . . . . . . . . . . . . . .184 Brake syste
m
Display message . . . . . . . . . . . . . .180
Bulb
Dipped-beam headlamps . . . . . . . .215
Licence plate lamp . . . . . . . . . . . . .217
Main-beam headlamps . . . . . . . . . .216
Parking lamp . . . . . . . . . . . . . . . . .216
Rear foglamp . . . . . . . . . . . . . . . . .216
Replacing . . . . . . . . . . . . . . . .215, 216
Reversing lamp . . . . . . . . . . . . . . .216
Side lamp . . . . . . . . . . . . . . . . . . . .216
Turn signal lamp . . . . . . . . . . . . . . .216
see Lamp
Bulbs
Overview . . . . . . . . . . . . . . . . . . . .214 C
Calling up a malfunction see Message memory men u
Car e. . . . . . . . . . . . . . . . . . . . . . . . . . .166
Automatic car wash . . . . . . . . . . . .166
Headlamps . . . . . . . . . . . . . . . . . . .168
High-pressure cleaners . . . . . . . . .167
Parktroni c.. . . . . . . . . . . . . . . . . .169
Plastic trim . . . . . . . . . . . . . . . . . . .168
Rear window . . . . . . . . . . . . . . . . .168
Side windows . . . . . . . . . . . . . . . . .168
CD player/CD changer
Operating (on-board computer) . . . .99 Central locking
Automatic locking (on-board com -
puter) . . . . . . . . . . . . . . . . . . . . . . .105
Key . . . . . . . . . . . . . . . . . . . . . . . . . .56
Central locking/unlocking button . ..5 7
Central unlocking Key . . . . . . . . . . . . . . . . . . . . . . . . . .56
Centre console
Lower section . . . . . . . . . . . . . . . . . .31
Upper section . . . . . . . . . . . . . . . . . .29
Changing a wheel
see Flat tyr e
Children
In the vehicle . . . . . . . . . . . . . . . . . .44
Restraint systems . . . . . . . . . . . . . .44
Child seat
Automatic recognition . . . . . . . . . . .46
Automatic recognition (malfunc-
tion) . . . . . . . . . . . . . . . . . . . . . . . .192
Recommendations . . . . . . . . . . . . . .48
Suitable positions . . . . . . . . . . . . . .47
Cigarette lighter . . . . . . . . . . . . . . . .141
Cockpit Overview . . . . . . . . . . . . . . . . . . . . .20
Collapsible emergency spare wheel
Stowage . . . . . . . . . . . . . . . . . . . . .229
Collapsible wheel
Pumping up . . . . . . . . . . . . . . . . . .228
Technical data . . . . . . . . . . . . . . . .252 Index
171_AKB; 3; 4, en-GB
vpfaff7,
2007-11-13T10:50:25+01:00 - Seite
4
Page 59 of 273
Opening and closing
56 Opening and closing
Key
The vehicle's equipment includes two keys
with remote control. Each key contains an
emergency key element .
The key is configured at the factory to cen-
trally lock and unlock the following:
R the doors
R the boot li d
R the fuel filler flap
R the glove compartment
R the stowage compartment in the centr e
console G
Risk of accident
Never leave children unsupervised in the
vehicle. They could open a door from the
inside, even if it has been locked, or star t
the vehicle if the key is left in it. They could
endanger themselves and others. Yo u
should therefore take the key with you
when leaving the vehicle, even if you are
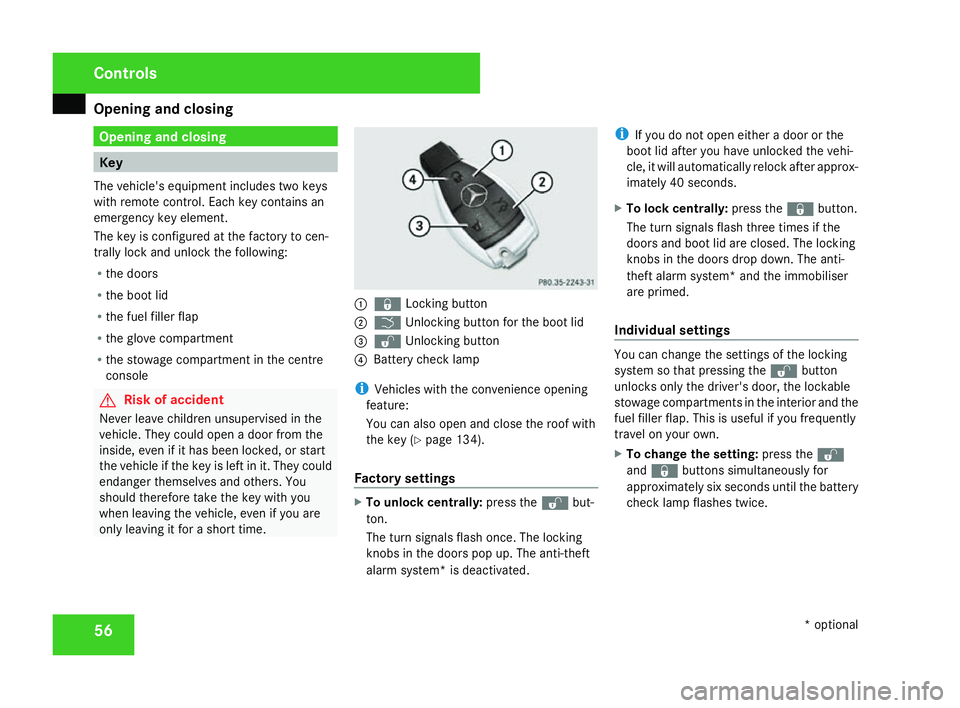
only leaving it for a short time. 1
j Locking button
2 i Unlocking button for the boot lid
3 k Unlocking button
4 Battery check lamp
i Vehicles with the convenience opening
feature:
You can also open and close the roof with
the key (Y page 134).
Factory settings X
To unlock centrally :press the kbut-
ton .
The turn signals flash once. The lockin g
knobs in the doors pop up. The anti-theft
alarm system* is deactivated .i
If you do not open either a door or the
boot lid after you have unlocked the vehi-
cle, it will automatically relock after approx-
imately 40 seconds.
X To lock centrally :press the jbutton.
The turn signals flash three times if the
doors and boot lid are closed. The locking
knobs in the doors drop down. The anti-
theft alarm system* and the immobiliser
are primed.
Individual settings You can change the settings of the locking
system so that pressing the
kbutton
unlocks only the driver's door, the lockable
stowage compartments in the interior and the
fuel filler flap. This is useful if you frequently
travel on your own.
X To change the setting: press thek
and j buttons simultaneously for
approximately six seconds until the battery
check lamp flashes twice. Controls
* optional
171_AKB; 3; 4, en-GB
vpfaff7,
2007-11-13T10:50:25+01:00 - Seite 56
Page 76 of 273
Light
s 73Lights
Light switch
For reasons of safety, Mercedes-Benz recom-
mends that you drive with the lights switched
on even during the daytime. In some coun -
tries, daytime use of headlamps varies due to
legal requirements and self-imposed obliga -
tions. In these countries, dipped-beam head -
lamps are switched on when the ignition is
switched on.
i If you drive in countries in which traffic
drives on the opposite side of the road to
the country where the vehicle is registered ,
oncoming traffic may be dazzled by the
asymmetrical dipped-beam headlamps.
Have the headlamps changed to symmet-
rical dipped beam when driving in these
countries. You can obtain information
about this from any Mercedes-Benz Servic e
Centre. $
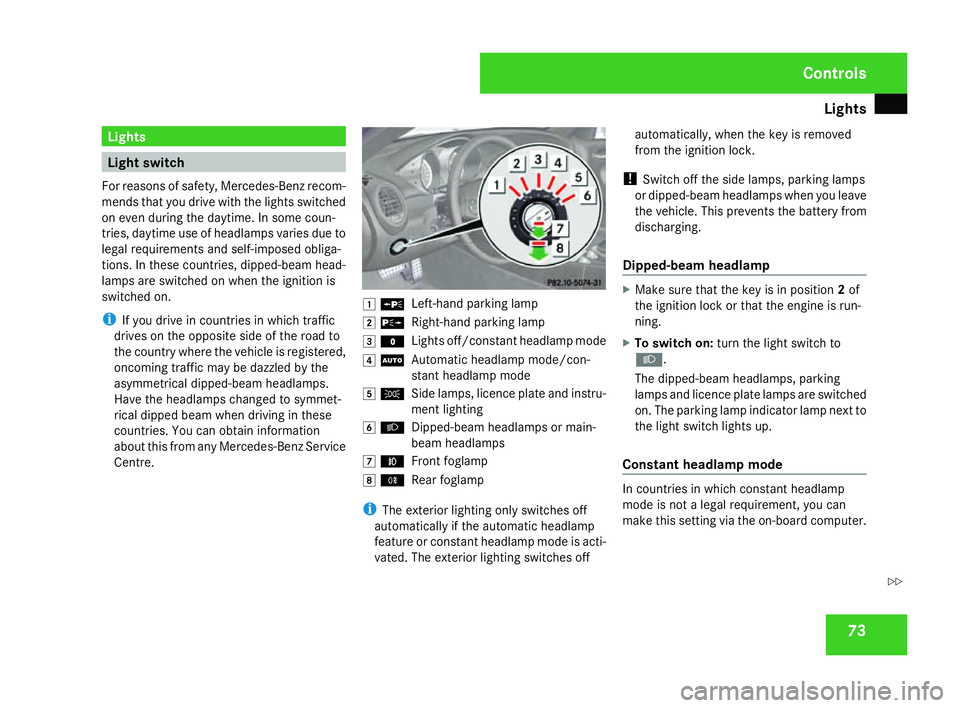
a
Left-hand parking lamp
% g
Right-hand parking lamp
& M
Lights off/constant headlamp mode
( U
Automatic headlamp mode/con-
stant headlamp mod e
) C
Side lamps, licence plate and instru-
ment lighting
* B
Dipped-beam headlamps or main-
beam headlamps
, ¥
Front foglamp
. †
Rear foglamp
i The exterior lighting only switches off
automatically if the automatic headlamp
feature or constant headlamp mode is acti-
vated. The exterior lighting switches off automatically, when the key is removed
from the ignition lock.
! Switch off the side lamps, parking lamps
or dipped-beam headlamps when you leave
the vehicle. This prevents the battery from
discharging.
Dipped-beam headlam p X
Make sure that the key is in position 2of
the ignition lock or that the engine is run-
ning.
X To switch on :turn the light switch to
B .
The dipped-beam headlamps, parking
lamps and licence plate lamps are switched
on. The parking lamp indicator lamp next to
the light switch lights up.
Constant headlamp mode In countries in which constant headlamp
mode is not a legal requirement, you can
make this setting via the on-board computer
. Cont
rols
171_AKB; 3; 4, en-GB
vpfaff7,
2007-11-13T10:50:25+01:00 - Seite 73 Z
Page 84 of 273
Driving and pa
rking 81
X
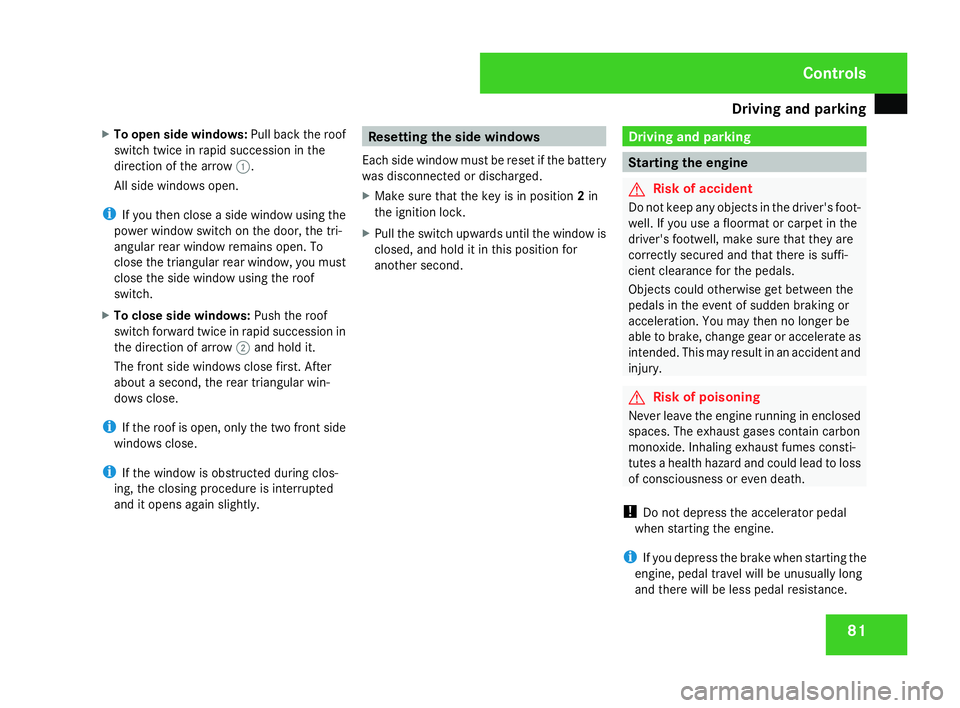
To open side windows :Pull back the roof
switch twice in rapid succession in the
direction of the arrow 1.
All side windows open.
i If you then close a side window using the
power window switch on the door, the tri-
angular rear window remains open. To
close the triangular rear window, you must
close the side window using the roof
switch.
X To close side windows :Push the roof
switch forward twice in rapid succession in
the direction of arrow 2and hold it.
The front side windows close first. Afte r
about a second, the rear triangular win-
dows close.
i If the roof is open, only the two front side
windows close.
i If the window is obstructed during clos-
ing, the closing procedure is interrupted
and it opens again slightly. Resetting the side windows
Each side window must be reset if the battery
was disconnected or discharged.
X Make sure that the key is in position 2in
the ignition lock .
X Pull the switch upwards until the window is
closed, and hold it in this position for
another second. Driving and parking
Starting the engine
G
Risk of accident
Do not keep any objects in the driver's foot-
well. If you use a floormat or carpet in the
driver's footwell, make sure that they are
correctly secured and that there is suffi-
cient clearance for the pedals.
Objects could otherwise get between the
pedals in the event of sudden braking or
acceleration. You may then no longer be
able to brake, change gear or accelerate as
intended. This may result in an accident and
injury . G
Risk of poisoning
Never leave the engine running in enclose d
spaces. The exhaust gases contain carbon
monoxide. Inhaling exhaust fumes consti-
tutes a health hazard and could lead to loss
of consciousness or even death.
! Do not depress the accelerator pedal
when starting the engine.
i If you depress the brake when starting the
engine, pedal travel will be unusually long
and there will be less pedal resistance. Controls
171_AKB; 3; 4, en-GB
vpfaff7,
2007-11-13T10:50:25+01:00 - Seite 81
Page 210 of 273
Troubleshooting
20
7 Key
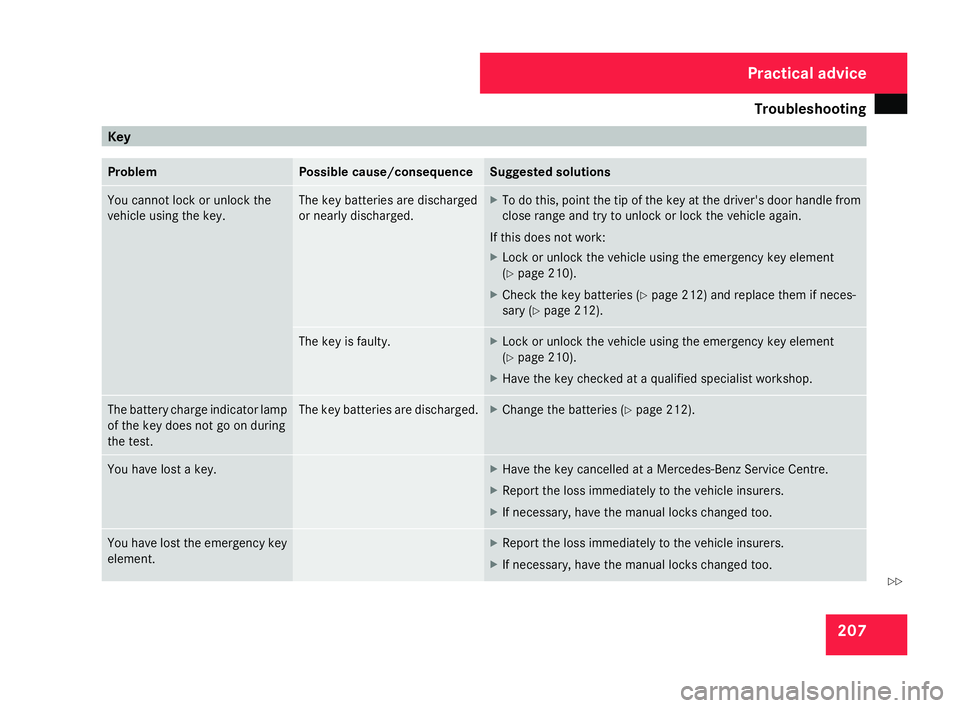
Problem Possible cause/consequence Suggested solutions
You cannot lock or unlock th
e
vehicle using the key. The key batteries are discharged
or nearly discharged. X
To do this, point the tip of the key at the driver's door handle from
close range and try to unlock or lock the vehicle again.
If this does not work:
X Lock or unlock the vehicle using the emergency key element
(Y page 210).
X Check the key batteries (Y page 212) and replace them if neces-
sary (Y page 212). The key is faulty. X
Lock or unlock the vehicle using the emergency key element
(Y page 210).
X Have the key checked at a qualified specialist workshop .The battery charge indicator lamp
of the key does not go on during
the test. The key batteries are discharged. X
Change the batteries (Y page 212). You have lost a key. X
Have the key cancelled at a Mercedes-Benz Service Centre.
X Report the loss immediately to the vehicle insurers .
X If necessary, have the manual locks changed too. You have lost the emergency key
element. X
Report the loss immediately to the vehicle insurers .
X If necessary, have the manual locks changed too. Practical advice
171_AKB; 3; 4, en-GB
vpfaff7,
2007-11-13T10:50:25+01:00 - Seite 207 Z
Page 216 of 273
Changing the bulbs
213
X
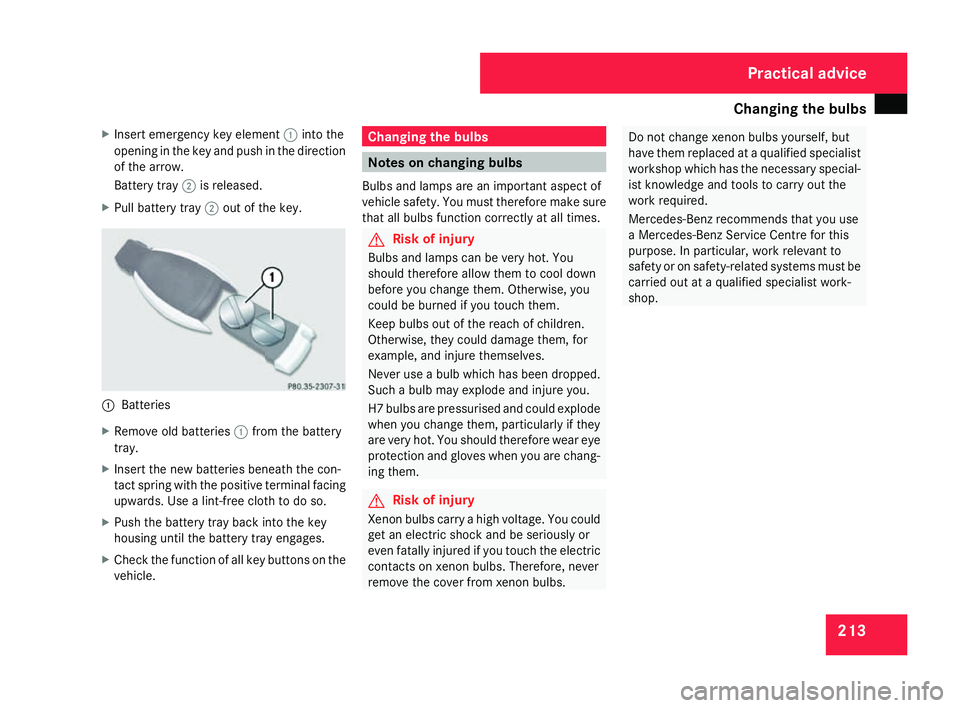
Insert emergency key element 1into the
opening in the key and push in the direction
of the arrow.
Battery tray 2is released .
X Pull battery tray 2out of the key. 1
Batterie s
X Remove old batteries 1from the battery
tray .
X Insert the new batteries beneath the con-
tact spring with the positive terminal facing
upwards. Use a lint-free cloth to do so.
X Push the battery tray back into the key
housing until the battery tray engages.
X Check the function of all key buttons on th e
vehicle. Changing the bulbs
Notes on changing bulbs
Bulbs and lamps are an important aspect of
vehicle safety. You must therefore make sur e
that all bulbs function correctly at all times . G
Risk of injury
Bulbs and lamps can be very hot. Yo u
should therefore allow them to cool down
before you change them. Otherwise, you
could be burned if you touch them.
Keep bulbs out of the reach of children.
Otherwise, they could damage them, for
example, and injure themselves.
Never use a bulb which has been dropped.
Such a bulb may explode and injure you.
H7 bulbs are pressurised and could explode
when you change them, particularly if they
are very hot. You should therefore wear eye
protection and gloves when you are chang-
ing them. G
Risk of injury
Xenon bulbs carry a high voltage. You could
get an electric shock and be seriously or
even fatally injured if you touch the electri c
contacts on xenon bulbs. Therefore, neve r
remove the cover from xenon bulbs . Do not change xenon bulbs yourself, bu
t
have them replaced at a qualified specialist
workshop which has the necessary special-
ist knowledge and tools to carry out the
work required.
Mercedes-Benz recommends that you use
a Mercedes-Benz Service Centre for this
purpose. In particular, work relevant to
safety or on safety-related systems must be
carried out at a qualified specialist work-
shop. Practical advice
171_AKB; 3; 4, en-GB
vpfaff7,
2007-11-13T10:50:25+01:00 - Seite 213