charging MERCEDES-BENZ SLK ROADSTER 2008 Owners Manual
[x] Cancel search | Manufacturer: MERCEDES-BENZ, Model Year: 2008, Model line: SLK ROADSTER, Model: MERCEDES-BENZ SLK ROADSTER 2008Pages: 273, PDF Size: 4.42 MB
Page 6 of 273
31, 2, 3 ...
7G–TRONIC . . . . . . . . . . . . . . . . . . . . . .86 A
ABS (Anti-lock Braking System ). . . . .50
Display message . . . . . . . . . . . . . .176
Warning lamp . . . . . . . . . . . . . . . . .193
Acceleratio n
Technical data . . . . . . . . . . . . . . . .245
Accident
Notes . . . . . . . . . . . . . . . . . . . . . . .199
Active Service Syste m
see ASSYST PLUS
Airbag
Activation . . . . . . . . . . . . . . . . . . . . .39
Control unit . . . . . . . . . . . . . . . . . . .39
Driver's . . . . . . . . . . . . . . . . . . . . . . .42
Front . . . . . . . . . . . . . . . . . . . . . . . .42
Front passenger . . . . . . . . . . . . . . . .42
Head/thorax airbags . . . . . . . . . . . .43
PASSENGER AIRBAG OFF warning
lamp . . . . . . . . . . . . . . . . . . . . . . .191
System . . . . . . . . . . . . . . . . . . . . . . .41
Air conditioning
2-zone Thermatic . . . . . . . . . . . . . .122
Activating/deactivating air-recir-
culation mode . . . . . . . . . . . . . . . .131
Activating/deactivating auxiliary
heating/ventilatio n.. . . . . . . . . ..132 Air-recirculation mode with con-
venience opening/closing feature
.131
Controlling automatically . . . . . . . .127
Cooling with air dehumidification . .126
Demisting the windscreen . . . . . . .130
Heatmatic . . . . . . . . . . . . . . . . . . .120
Malfunction indicator lamp . . . . . .191
Misted up windows . . . . . . . . . . . .130
Rear window heating . . . . . . . . . . .130
Setting the air distribution . . . . . . .129
Setting the airflow . . . . . . . . . . . . .129
Setting the air vents . . . . . . . . . . . .128
Setting the temperature . . . . . . . . .127
Thermotronic . . . . . . . . . . . . . . . . .124
see Climate control
Air-conditionin g
Activating/deactivating . . . . . . . . .126
AIRSCARF neck-level heatin g. . . . . . .62
Antifreeze concentratio n. . . . . . . . .260
Anti-lock braking syste m
see ABS
Anti-theft alarm system
see ATA
Anti-theft systems . . . . . . . . . . . . . . ..52
Ashtra y. . . . . . . . . . . . . . . . . . . . . . . .140
ASSYST PLU S. . . . . . . . . . . . . . . . . . .165
ATA (anti-theft alarm system) . . . . ..52
Switching off the alarm . . . . . . . . . .53
Audible warning signa l. . . . . . . . . . .197 AUTO lights
Display message . . . . . . . . . . . . . .183
Automatic car wash . . . . . . . . . . . ..166
Automatic transmission Changing gear yoursel f.. . . . . . . . .86
Display in the speedomete r.. . . . ..85
Display message . . . . . . . . . . . . . .177
Driving tips . . . . . . . . . . . . . . . . . . . .87
Emergency running mod e.. . . . . .203
Malfunction . . . . . . . . . . . . . . . . . .203
One-touch gearshifting . . . . . . . . . . .86
Program selector button . . . . . . . . .87
Releasing the parking lock man -
ually . . . . . . . . . . . . . . . . . . . . . . . .212
Selector lever positions . . . . . . . . . .85
Shift ranges . . . . . . . . . . . . . . . . . . .86
Axle load, maximum permissibl e
. . . . . . . . . . . . . . . . . . . . . . . . . .253, 254 B
BAS (Brake Assist) . . . . . . . . . . . . . . ..50
Battery Changing (key) . . . . . . . . . . . . . . . .212
Charging . . . . . . . . . . . . . . . . . . . . .232
Checking (key ).. . . . . . . . . . . . . . .212
Check lamp (key ).. . . . . . . . . . . . .212
Disconnecting . . . . . . . . . . . . . . . .231
Display message . . . . . . . . . . . . . .180
Maintenance (vehicle ).. . . . . . . ..230
Reconnecting . . . . . . . . . . . . . . . . .232 Index
171_AKB; 3; 4, en-GB
vpfaff7,
2007-11-13T10:50:25+01:00 - Seite
3
Page 76 of 273
Light
s 73Lights
Light switch
For reasons of safety, Mercedes-Benz recom-
mends that you drive with the lights switched
on even during the daytime. In some coun -
tries, daytime use of headlamps varies due to
legal requirements and self-imposed obliga -
tions. In these countries, dipped-beam head -
lamps are switched on when the ignition is
switched on.
i If you drive in countries in which traffic
drives on the opposite side of the road to
the country where the vehicle is registered ,
oncoming traffic may be dazzled by the
asymmetrical dipped-beam headlamps.
Have the headlamps changed to symmet-
rical dipped beam when driving in these
countries. You can obtain information
about this from any Mercedes-Benz Servic e
Centre. $
a
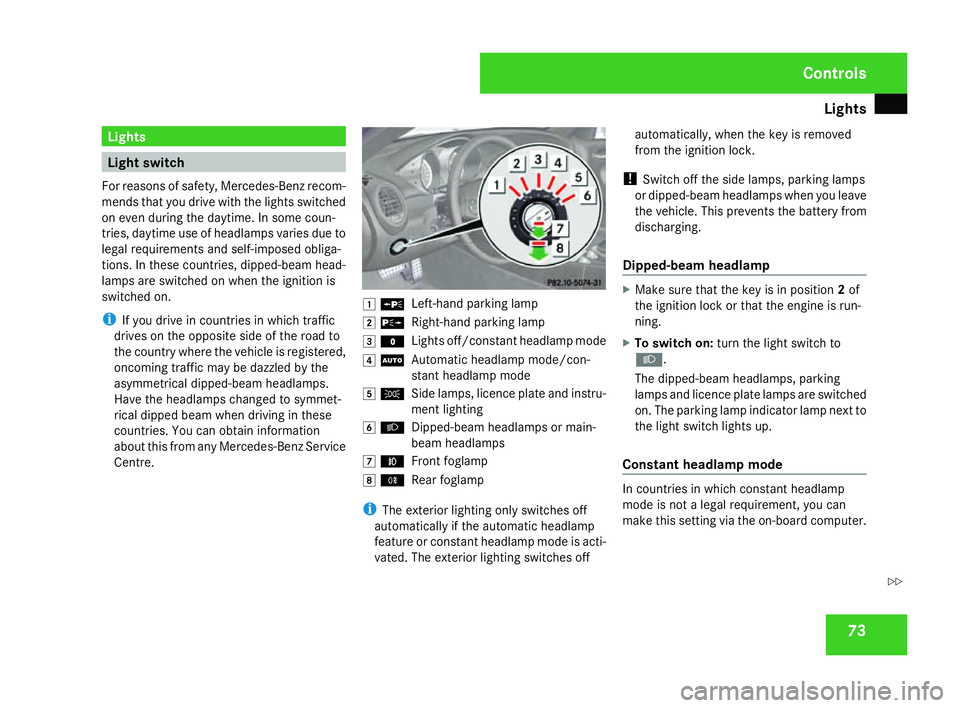
Left-hand parking lamp
% g
Right-hand parking lamp
& M
Lights off/constant headlamp mode
( U
Automatic headlamp mode/con-
stant headlamp mod e
) C
Side lamps, licence plate and instru-
ment lighting
* B
Dipped-beam headlamps or main-
beam headlamps
, ¥
Front foglamp
. †
Rear foglamp
i The exterior lighting only switches off
automatically if the automatic headlamp
feature or constant headlamp mode is acti-
vated. The exterior lighting switches off automatically, when the key is removed
from the ignition lock.
! Switch off the side lamps, parking lamps
or dipped-beam headlamps when you leave
the vehicle. This prevents the battery from
discharging.
Dipped-beam headlam p X
Make sure that the key is in position 2of
the ignition lock or that the engine is run-
ning.
X To switch on :turn the light switch to
B .
The dipped-beam headlamps, parking
lamps and licence plate lamps are switched
on. The parking lamp indicator lamp next to
the light switch lights up.
Constant headlamp mode In countries in which constant headlamp
mode is not a legal requirement, you can
make this setting via the on-board computer
. Cont
rols
171_AKB; 3; 4, en-GB
vpfaff7,
2007-11-13T10:50:25+01:00 - Seite 73 Z
Page 145 of 273
Features
142 relating to the possible health risk posed by
electromagnetic fields.
i In order to ensure optimum signal quality
for mobile phones and to minimise mutual
interference between the vehicle electron -
ics and mobile phones, Mercedes-Benz rec -
ommends the use of an approved exterior
aerial. An exterior aerial conducts the elec-
tromagnetic fields generated by a wireless
device to the exterior of the vehicle; the
field strength within the vehicle interior is
lower than in a vehicle that does not have
an exterior aerial.
i There are various mobile phone bracket s
that may be fitted to your vehicle; in some
cases these are country-specific. You can
obtain these mobile phone brackets from a
qualified specialist workshop, e.g. a
Mercedes-Benz Service Centre. The func-
tions and services available when you use
the phone depend on your mobile phone
model and service provider.
The mobile phone bracket is in the armrest.
X Open the telephone compartment
(Y page 138). Inserting the mobile phone into the
mobile phone bracket If the mobile phone is inserted into the mobile
phone bracket, you can only speak to the per-
son you are calling using the hands-free sys-
tem.
! Do not attempt to remove the mobile
phone and the telephone bracket together.
You could otherwise damage the mobile
phone bracket.
X Remove the cover of the aerial plug from
the back of the mobile phone and keep it in
a safe place. Example illustration
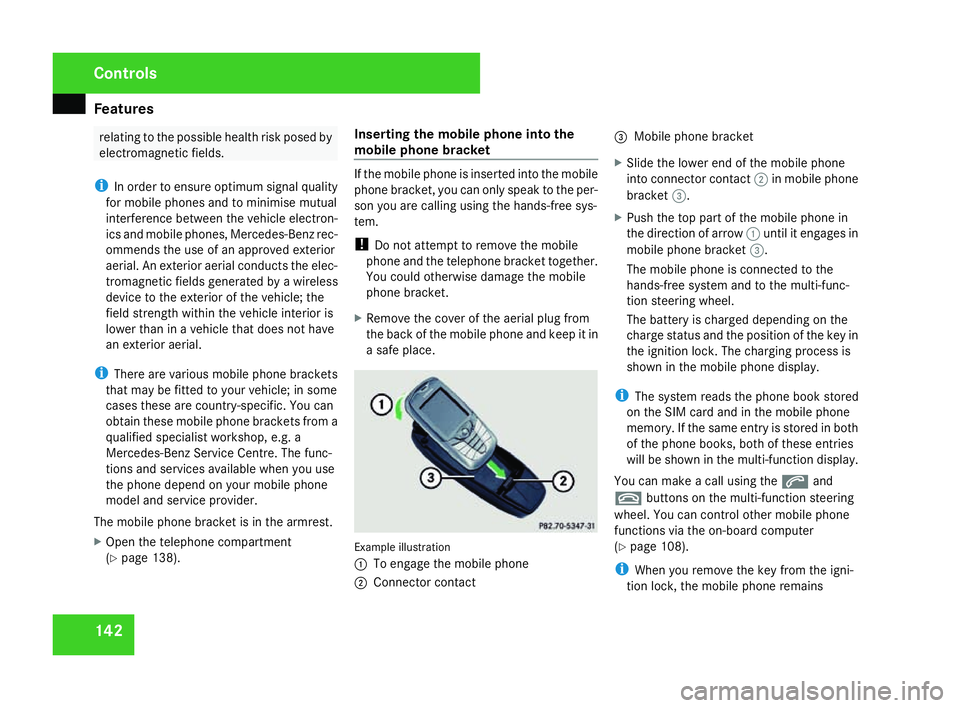
1 To engage the mobile phone
2 Connector contact 3
Mobile phone bracket
X Slide the lower end of the mobile phone
into connector contact 2in mobile phon e
bracket 3.
X Push the top part of the mobile phone in
the direction of arrow 1until it engages in
mobile phone bracket 3.
The mobile phone is connected to the
hands-free system and to the multi-func-
tion steering wheel.
The battery is charged depending on the
charge status and the position of the key in
the ignition lock. The charging process is
shown in the mobile phone display .
i The system reads the phone book stored
on the SIM card and in the mobile phone
memory. If the same entry is stored in both
of the phone books, both of these entries
will be shown in the multi-function display .
You can make a call using the sand
t buttons on the multi-function steering
wheel. You can control other mobile phone
functions via the on-board computer
( Y page 108).
i When you remove the key from the igni-
tion lock, the mobile phone remains Controls
171_AKB; 3; 4, en-GB
vpfaff7
, 2007-11-13T10:50:25+01:00 - Seite 142
Page 234 of 273
Battery
23
1 step out of the vehicle first and touch the
bodywork.
R Do not wipe the battery using a cloth. Th e
battery may explode as a result of elec-
trostatic charge or through the creation
of sparks .
! Switch the engine off and remove the key
before unscrewing or disconnecting the
terminal clamps from the battery. You may
otherwise destroy electronic components
such as the alternator.
Have the battery checked and, if neces-
sary, replaced at a qualified specialist
workshop, e.g. a Mercedes-Benz Service
Centre, every two years or at least every
20,000 km.
i Mercedes-Benz recommends that you
have all work involving the battery, e.g.
removing, charging and replacing, carried
out at a qualified specialist workshop, e.g.
a Mercedes-Benz Service Centre.
Installation location of the battery Your vehicle is equipped with a battery in the
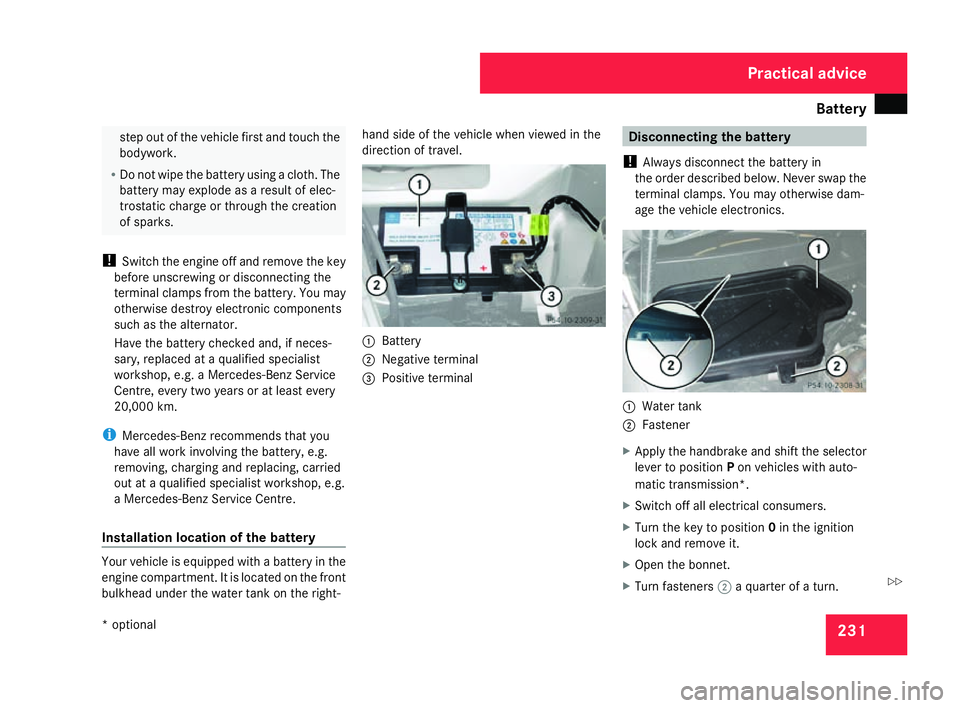
engine compartment. It is located on the front
bulkhead under the water tank on the right- hand side of the vehicle when viewed in the
direction of travel.
1
Battery
2 Negative terminal
3 Positive terminal Disconnecting the battery
! Always disconnect the battery in
the order described below. Never swap the
terminal clamps. You may otherwise dam-
age the vehicle electronics. 1
Water tank
2 Fastener
X Apply the handbrake and shift the selecto r
lever to position Pon vehicles with auto-
matic transmission*.
X Switch off all electrical consumers .
X Turn the key to position 0in the ignition
lock and remove it.
X Open the bonnet.
X Turn fasteners 2a quarter of a turn. Practical advice
* optional
171_AKB; 3; 4, en-GB
vpfaff7,
2007-11-13T10:50:25+01:00 - Seite 23
1 Z
Page 235 of 273
Battery
23
2
X
Remove water tank 1.
X Remove the negative terminal clamp from
the battery.
X Remove the cover from the positive termi-
nal clamp.
X Remove the positive terminal clamp from
the battery.
X Disconnect the breather hose .Removing the battery
X Disconnect the battery (Y page 231).
X Loosen the bolt which holds the battery in
place.
X Remove the battery. Charging and fitting the batter
y G
Risk of injury
Only charge the installed battery with a bat-
tery charger which has been tested and
approved by Mercedes-Benz. These battery
chargers allow the battery to be charge d
while it is still installed. Otherwise, the vehi -
cle's electronic system may be damaged.
Only charge the battery in a well-ventilate d
area. As the battery is being charged, gases
can escape and generate minor explosions.
This may injure you and other persons or
cause damage to the paintwork or acid cor-
rosion on the vehicle .
You can obtain information about battery
chargers which allow the battery to be
charged when still installed from a qualified
specialist workshop, e.g. a Mercedes-Ben z
Service Centre. G
Risk of injury
There is a risk of acid burns during the
charging process due to the gases which
escape from the battery. Do not lean ove r
the battery during the charging process.
! Only use battery chargers with a maxi-
mum charging voltage of 14.8 V. X
Charge the battery. Observe the notes in
the operating instructions for your battery
charger.
X Refit the charged battery.
To do this, follow the steps described in
"Removing the battery" (Y page 232) in
reverse order. G
Risk of injury
Battery acid is caustic. Avoid contact with
the skin, eyes or clothing . Reconnecting the battery
! Always reconnect the battery in the
sequence described below. Never swap the
terminal clamps. You may otherwise dam-
age the vehicle electronics.
X Switch off all electrical consumers .
X Connect the positive terminal clamp and
secure the cover .
X Connect the negative terminal clamp.
X Connect the breather hose. Make sure that
a cell cap is fitted between the battery and
the breather hose. Practical advice
171_AKB; 3; 4, en-GB
vpfaff7,
2007-11-13T10:50:25+01:00 - Seite 23
2