winter tyres MERCEDES-BENZ SLK ROADSTER 2008 Owners Manual
[x] Cancel search | Manufacturer: MERCEDES-BENZ, Model Year: 2008, Model line: SLK ROADSTER, Model: MERCEDES-BENZ SLK ROADSTER 2008Pages: 273, PDF Size: 4.42 MB
Page 16 of 273
13
Windscreen washer system
. . . . . ..260
Windscreen wipers . . . . . . . . . . . . . ..78
Cleaning . . . . . . . . . . . . . . . . . . . . .167
Malfunction . . . . . . . . . . . . . . . . . .205
Replacing the wiper blades . . . . . .217
Winter drivin g. . . . . . . . . . . . . .160, 161
Winter tyres . . . . . . . . . . . . . . . . . . . .160
Limiting the speed (on-board com-
puter) . . . . . . . . . . . . . . . . . . . . . . .114 Index
171_AKB; 3; 4, en-GB
vpfaff7,
2007-11-13T10:50:25+01:00 - Seite 13
Page 115 of 273
Driving sys
tems 11
2
Making fine adjustments in 1 km/h
increments X
Briefly press the cruise control lever up
1 for a higher speed or down 4for a
lower speed.
The last speed stored is increased or
reduced.
Deactivating cruise control There are several ways to deactivate cruise
control:
X
Briefly press the cruise control lever for-
wards 6.
or
X Brake .
or
X Briefly press the cruise control lever in the
direction of arrow 5.
Variable Speedtronic is selected. LIM indi-
cator lamp 2in the cruise control lever
lights up.
Cruise control is automatically deactivated if,
for example:
R you apply the handbrake
R you are driving at less than 30 km/h R
ESP ®
is intervening or you deactivat e
ESP ®
R you depress the clutch pedal for more than
seven seconds on vehicles with a manual
transmissio n
R you move the selector lever to Nin vehicles
with automatic transmission* while drivin g
i The last speed stored is cleared when you
switch off the engine. Speedtronic
Speedtronic brakes automatically so that you
do not exceed the set speed. On long and
steep downhill gradients, especially if the
vehicle is laden, you must shift to a lower gear
in good time or select shift range 1,2 or 3in
vehicles with automatic transmission*. In this
way you will make use of the braking effect of
the engine, which relieves the load on the
brake system and prevents the brakes fro m
overheating and wearing too quickly. If you
need additional braking, depress the brake
pedal repeatedly rather than continuously. G
Risk of accident
Never depress the brake pedal continu -
ously while the vehicle is in motion, e.g.
never cause the brakes to rub by applying
constant slight pedal pressure. This causes
the brake system to overheat, increases
the braking distance and can lead to the
brakes failing completely. G
Risk of accident
Do not change down for additional engine
braking on a slippery road surface. Thi s
could cause the drive wheels to lose thei r
grip and the vehicle could skid.
You can set a variable or permanent limit
speed:
R Variable for speed limits, e.g. in built-up
areas (Y page 113 )
R Permanent for long-term speed restric-
tions, e.g. for driving on winter tyres
( Y page 114 ) G
Risk of accident
Speedtronic is only an aid designed to
assist driving. You are responsible for the
vehicle's speed and for braking in goo d
time. Controls
* optional
171_AKB; 3; 4, en-G
B
vpfaff7, 2007-11-13T10:50:25+01:00 - Seite 112
Page 117 of 273
Driving sys
tems 11
4
Storing the current speed You can use the cruise control lever to limit
the speed to any speed above 30 km/hw
hile
the engine is running.
X Briefly press the cruise control lever up
1 or down 4.
The current speed is stored. You will see
the stored speed in the multi-function dis-
play.
Resuming the last speed stored X
Briefly pull the cruise control lever towards
you 3.
Adjustment in 10 km/h increment sX
Briefly press the cruise control lever up
1 for a higher speed or down 4for a
lower speed.
or
X Keep the cruise control lever pressed until
the desired speed is set. Press the cruise
control lever, up 1for a higher speed or
down 4for a lower speed. Making fine adjustments in 1 km/h
increments X
For a higher speed: briefly pull the cruise
control lever towards you 3.
or
X Keep the cruise control lever pulled
towards you 3until the desired speed is
set .
Deactivating variable Speedtronic There are several ways to deactivate variable
Speedtronic:
X
Briefly press the cruise control lever for-
wards 6.
or
X Briefly press the cruise control lever in the
direction of arrow 5.
LIM indicator lamp 2in the cruise control
lever goes out. Variable Speedtronic is
deactivated.
Cruise control is selected.
Variable Speedtronic is deactivated automat-
ically when you depress the accelerator pedal
beyond the pressure point (kickdown), but
only if your current speed does not differ by more than 20 km/h from the stored speed.
You will hear a warning tone if this is the case. G
Risk of accident
It is not possible to deactivate variabl e
Speedtronic by braking.
i The last speed stored is cleared when you
switch off the engine.
Permanent Speedtronic You can use the on-board computer to limit
the speed permanently to a value between
160 km/h (e.g. for driving with winter tyres)
and the maximum speed.
Shortly before the stored speed is reached, it
is shown in the multi-function display .
You cannot exceed the stored limit speed,
even if you depress the accelerator pedal
beyond the pressure point (kickdown).
Setting permanent Speedtronic
X Press the èor· button to select the
Settings menu(Y page 101).
X Press the jbutton to call up the selec-
tion of submenus. Controls
171_AKB; 3; 4, en-GB
vpfaff7,
2007-11-13T10:50:25+01:00 - Seite 114
Page 118 of 273
Driving sys
tems 11
5
X
Press the æorç button to select the
Vehicl esubmenu.
X Press the jbutton to select Speed
limit (winter tyres) .X
Press the æorç button to select the
desired setting.
The following settings can be selected:
R Off
Permanent Speedtronic is deactivated.
R A limit speed between 240 km/hand
160 km/h by increments of 10 km/h
X To select a different display, press the
j ,è orÿ button . Parktronic*
G
Risk of acciden
t
Parktronic is only an aid and may not detect
all obstacles. It does not relieve you of the
responsibility to pay attention.
You are always responsible for safety and
must continue to pay attention to your
immediate surroundings when parking and
manoeuvring. You could otherwise endan-
ger yourself and others. G
Risk of injury
Make sure that no persons or animals ar e
in the manoeuvring range. Otherwise, they
could be injured.
Parktronic is an electronic parking aid. It indi-
cates visually and audibly the distance
between your vehicle and an object.
Parktronic is automatically activated when
you switch on the ignition and release the
handbrake.
Parktronic is deactivated at speeds above
18 km/h. It is reactivated at lower speeds.
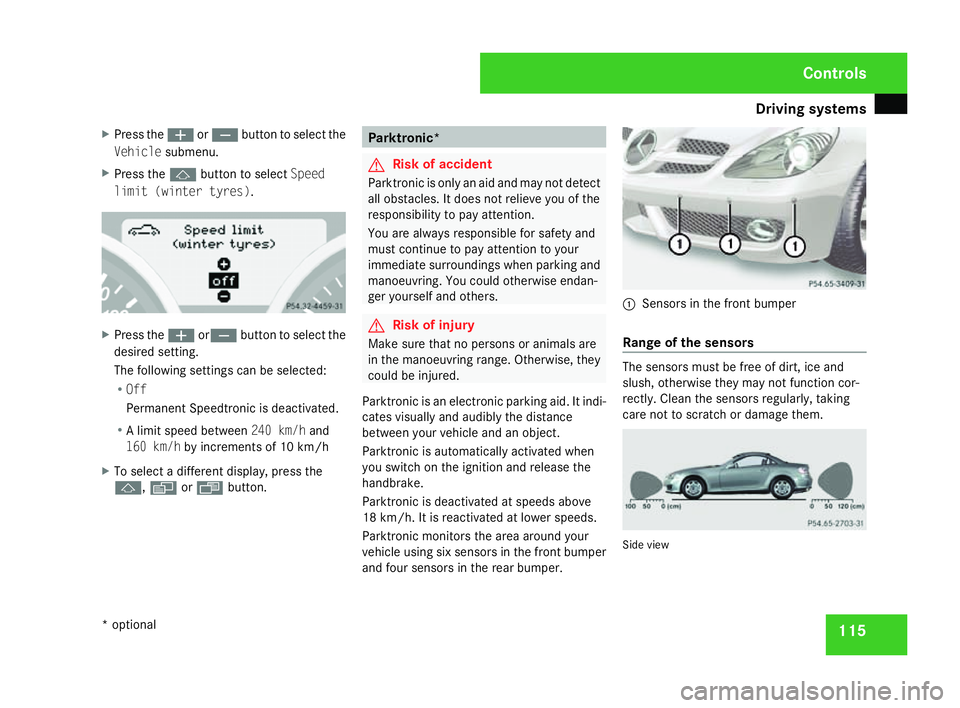
Parktronic monitors the area around your
vehicle using six sensors in the front bumper
and four sensors in the rear bumper. 1
Sensors in the front bumpe r
Range of the sensors The sensors must be free of dirt, ice and
slush, otherwise they may not function cor-
rectly. Clean the sensors regularly, taking
care not to scratch or damage them
. Side vie
w Controls
* optional
171_AKB; 3; 4, en-GB
vpfaff7,
2007-11-13T10:50:25+01:00 - Seite 11
5
Page 150 of 273
147
The first 1,500 km
............................148
Refuelling .......................................... .148
Engine compartment ........................150
Tyres and wheels .............................. 155
Winter driving ................................... 160
Driving tips ........................................ 162
Driving abroad .................................. .164
Service ............................................... 165
Care .................................................... 166 Operation
171_AKB; 3; 4, en-GB
vpfaff7
, 2007-11-13T10:50:25+01:00 - Seite 147
Page 158 of 273
Tyres and wheels
15
5
X
Add windscreen washer concentrate to the
washer fluid all year round. G
Risk of fire
Windscreen washer concentrate is highly
flammable. Fire, naked flames and smoking
are prohibited when windscreen washe r
concentrate is being handled.
Use
R a windscreen washer fluid additive
such as MB Summerwash to preven t
smearing (for temperatures above freez-
ing).
R a windscreen washer fluid additive wit h
antifreeze properties such as MB Winter-
wash (if there is a risk of frost).
X Mix the windscreen washer fluid in a con-
tainer beforehand. Adapt the mixing ratio
to the outside temperatures.
! Only use windscreen washer fluid which
is suitable for plastic lamp lenses. Unsuit-
able windscreen washer fluid could dam-
age the plastic lamp lenses of the head-
lamps. X
To open: pull cap1upwards by the tab .
X To close: press cap 1onto the filler neck
until it clicks into place. Tyres and wheels
Points to remember
! For safety reasons, Mercedes-Benz rec-
ommends that you only use tyres and
wheels which have been approved by
Mercedes-Benz specifically for your vehi-
cle. These tyres have been specially adap-
ted for use with the control systems, such
as ABS or ESP ®
, and are marked as follows:
R MO = Mercedes-Benz Original
R MOE = Mercedes-Benz Original Extended
(with run-flat characteristics)*
Mercedes-Benz Original Extended tyres*
should only be used on wheels that have
been specifically approved by Mercedes-
Benz.
If you use other tyres and wheels,
Mercedes-Benz cannot accept any respon-
sibility for damage that may result from
this. Further information about tyres,
wheels and approved combinations can be
obtained from any Mercedes-Benz Service
Centre.
If you use tyres other than those tested and
recommended for Mercedes-Benz vehi-
cles, characteristics such as handling, vehi-
cle noise emissions and fuel consumption Operation
* optional
171_AKB; 3; 4, en-GB
vpfaff7,
2007-11-13T10:50:25+01:00 - Seite 155 Z
Page 160 of 273
Tyres and wheels
15
7
cate that the wheels or tyres are damaged.
If you suspect that a tyre is defective,
reduce your speed and stop the vehicle as
soon as possible to check the wheels and
tyres for damage. Hidden tyre damag e
could also be causing the unusual handling
characteristics. If you find no signs of dam-
age, have the wheels and tyres inspected
at a specialist workshop, for example at a
Mercedes-Benz Service Centre.
R When parking your vehicle, make sure that
the tyres do not get deformed by the kerb
or other obstacles. If it is necessary to drive
over kerbs, speed humps or similar, try to
do so slowly and at an obtuse angle. Oth-
erwise, the tyres, particularly the sidewalls,
could get damaged. Direction of rotation
Direction of rotation Tyres with a specified direction of rotation
have additional benefits, e.g. if there is a risk
of aquaplaning. You will only gain these ben-
efits if the correct direction of rotation is
observed.
An arrow on the sidewall of the tyre indicates
its correct direction of rotation.
i You may fit a spare tyre *against th e
direction of rotation. Tyre tread
G
Risk of accident
Bear in mind that:
R tyre grip decreases rapidly on wet roads
when the tread depth is less than 3 mm.
You should thus replace tyres that have
insufficient tread.
R winter tyres should be replaced when th e
tread depth is 4 mm or less because oth - erwise they no longer provide adequate
grip.
R the tread on a tyre may not wear evenly .
You should thus regularly check the tread
depth and the condition of the tread
across the entire width of all tyres. If nec -
essary, turn the steering wheel so that
you can see the tyre tread more easily.
You could otherwise lose control of the
vehicle and cause an accident due to the
reduced grip of the tyres on the road. Tyre pressures
G
Risk of accident
Tyre pressure that is either too high or too
low has a negative effect on the vehicle’ s
active safety, which could lead you to caus e
an accident. You should therefore regularly
check the pressure of all your tyres (includ -
ing the spare tyre*), particularly prior to
long trips, and correct the pressure as nec -
essary.
To test tyre pressure, use a suitable pressure
gauge. The outer appearance of a tyre does
not permit any reliable conclusion about the
tyre pressure. Operation
* optional
171_AKB; 3; 4, en-GB
vpfaff7
, 2007-11-13T10:50:25+01:00 - Seite 157 Z
Page 163 of 273
Winter driving
160 Interchanging the wheels
G
Risk of accident
Interchange the front and rear wheels only
if they have the same dimensions: for exam-
ple size, offset, etc.
After every wheel interchange/change,
have the tightening torque checked at a
qualified specialist workshop that has the
necessary specialist knowledge and tools
to carry out the work required. Mercedes-
Benz recommends that you use a
Mercedes-Benz Service Centre for this pur-
pose. In particular, work relevant to safety
or on safety-related systems must be car-
ried out at a qualified specialist workshop.
The wheels could work loose if they are not
tightened to a torque of 110 Nm.
For safety reasons, Mercedes-Benz recom -
mends that you only use wheel bolts of the
correct size which have been approved for
Mercedes-Benz vehicles.
The wheels may be interchanged every 5,000
km to 10,000 km depending on the degree of
tyre wear, provided that the vehicle has the
same size front and rear tyres. Do not reverse
the direction of tyre rotation.
The wear patterns on the front and rear tyres
differ depending on the operating conditions. Interchange the wheels before a clear wear
pattern has formed on the tyres. The fron
t
tyres typically wear more on the shoulders
and the rear tyres in the centre.
Clean the contact surfaces of the wheel and
the brake disc thoroughly every time a whee l
is changed. Check the tyre pressure and, if
necessary, restart the tyre pressure loss
warning system*. Winter driving
Introduction to winter operation
Have your vehicle winterproofed at a qualified
specialist workshop, e.g. at a Mercedes-Ben z
Service Centre, at the onset of winter. Winter tyres
Use winter tyres at temperatures below +7 °
C and on snow or ice-covered roads. Only
then can the effect of the ABS and ES P®
driv-
ing systems be ensured in winter too.
Use winter tyres of the same make and tread
on all wheels to maintain safe handling char-
acteristics. G
Risk of accident
You must replace winter tyres with a trea d
depth of less than 4 mm immediately. They
are no longer suitable for winter use, in par-
ticular because they do not provide suffi-
cient grip. This could cause you to lose
control of your vehicle and cause an acci-
dent .
Always observe the maximum permitted
speed specified for the winter tyres you have
fitted. If you fit winter tyres which have a
lower maximum permitted speed than that of Operation
* optional
171_AKB; 3; 4, en-GB
vpfaff7,
2007-11-13T10:50:25+01:00 - Seite 160
Page 164 of 273
Winter driving
161
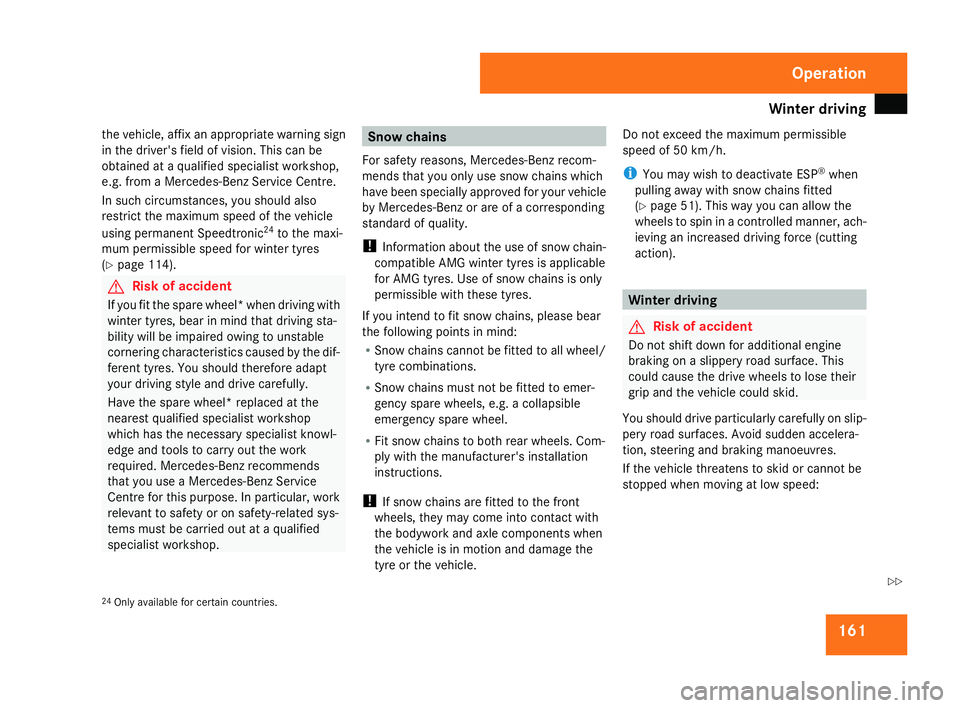
the vehicle, affix an appropriate warning sign
in the driver's field of vision. This can be
obtained at a qualified specialist workshop,
e.g. from a Mercedes-Benz Service Centre.
In such circumstances, you should also
restrict the maximum speed of the vehicle
using permanent Speedtronic 24
to the maxi-
mum permissible speed for winter tyres
( Y page 114). G
Risk of accident
If you fit the spare wheel* when driving with
winter tyres, bear in mind that driving sta-
bility will be impaired owing to unstable
cornering characteristics caused by the dif-
ferent tyres. You should therefore adap t
your driving style and drive carefully.
Have the spare wheel* replaced at th e
nearest qualified specialist workshop
which has the necessary specialist knowl-
edge and tools to carry out the work
required. Mercedes-Benz recommends
that you use a Mercedes-Benz Service
Centre for this purpose. In particular, work
relevant to safety or on safety-related sys-
tems must be carried out at a qualified
specialist workshop . Snow chains
For safety reasons, Mercedes-Benz recom-
mends that you only use snow chains which
have been specially approved for your vehicle
by Mercedes-Benz or are of a correspondin g
standard of quality.
! Information about the use of snow chain-
compatible AMG winter tyres is applicable
for AMG tyres. Use of snow chains is only
permissible with these tyres.
If you intend to fit snow chains, please bear
the following points in mind:
R Snow chains cannot be fitted to all wheel /
tyre combinations.
R Snow chains must not be fitted to emer-
gency spare wheels, e.g. a collapsibl e
emergency spare wheel.
R Fit snow chains to both rear wheels. Com-
ply with the manufacturer's installation
instructions.
! If snow chains are fitted to the front
wheels, they may come into contact with
the bodywork and axle components whe n
the vehicle is in motion and damage the
tyre or the vehicle. Do not exceed the maximum permissibl
e
speed of 50 km/h.
i You may wish to deactivate ES P®
when
pulling away with snow chains fitted
( Y page 51). This way you can allow the
wheels to spin in a controlled manner, ach-
ieving an increased driving force (cutting
action). Winter driving
G
Risk of accident
Do not shift down for additional engine
braking on a slippery road surface. Thi s
could cause the drive wheels to lose thei r
grip and the vehicle could skid.
You should drive particularly carefully on slip-
pery road surfaces. Avoid sudden accelera-
tion, steering and braking manoeuvres.
If the vehicle threatens to skid or cannot be
stopped when moving at low speed:
24 Only available for certain countries. Operation
171_AKB; 3; 4, en-GB
vpfaff7,
2007-11-13T10:50:25+01:00 - Seite 161 Z
Page 250 of 273
Tyres and wheels
24
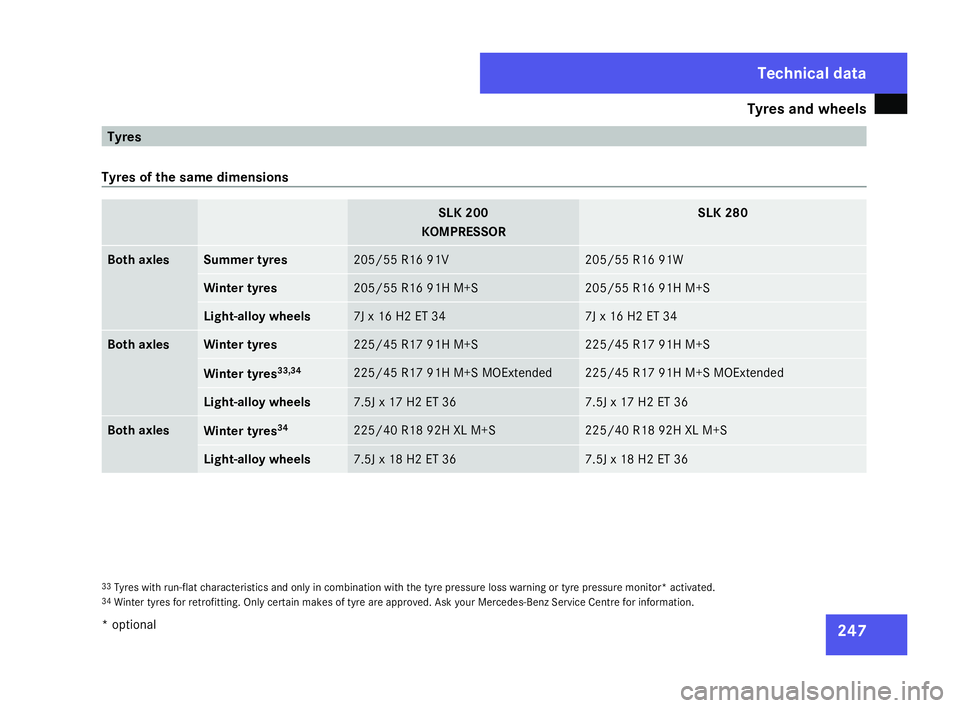
7 Tyre
s
Tyres of the same dimensions SLK 20
0
KOMPRESSOR SLK 280
Both axles Summer tyres 205/55 R16 91
V 205/55 R16 91W
Winter tyres 205/55 R16 91H M+S 205/55 R16 91H M+S
Light-alloy wheels 7J x 16 H2 ET 34 7J x 16 H2 ET 34
Both axle
s Winter tyres 225/45 R17 91H M+S 225/45 R17 91H M+S
Winter tyres
33,34 225/45 R17 91H M+S MOExtended 225/45 R17 91H M+S MOExtended
Light-alloy wheels 7.5J x 17 H2 ET 36 7.5J x 17 H2 ET 36
Both axle
s Winter tyres
34 225/40 R18 92H XL M+S 225/40 R18 92H XL M+S
Light-alloy wheels 7.5J x 18 H2 ET 36 7.5J x 18 H2 ET 36
33
Tyres with run-flat characteristics and only in combination with the tyre pressure loss warning or tyre pressure monitor* activated.
34 Winter tyres for retrofitting. Only certain makes of tyre are approved. Ask your Mercedes-Benz Service Centre for information. Technical data
* optiona l
171_AKB; 3; 4, en-GB
vpfaff7,
2007-11-13T10:50:25+01:00 - Seite 247