HID MERCEDES-BENZ SLK ROADSTER 2012 Owners Manual
[x] Cancel search | Manufacturer: MERCEDES-BENZ, Model Year: 2012, Model line: SLK ROADSTER, Model: MERCEDES-BENZ SLK ROADSTER 2012Pages: 321, PDF Size: 6.9 MB
Page 7 of 321
1, 2, 3 ...
12 Vsocket
see Socket A
ABS (Anti-lock Braking System) Display message ............................ 200
Function/notes ................................ 54
Important safety notes ....................54
Warning lamp ................................. 226
Activating/deactivating air-recir-
culation mode .................................... 121
Activating/deactivating cooling
with air dehumidification .................117
Active light function .........................104
Active Service Syste mPLUS
see ASSYS TPLUS service interval
display
ADAPTIVE BRAKE .................................59
Adaptive brake lamps .........................56
Additional speedometer ...................191
Additives (engine oil) ........................308
Adjusting the headlamp range .........102
Airbag Headbag .......................................... 43
Airbags
Front airbag (driver, front
passenger )....................................... 41
Important safety guidelines .............40
Sidebag ............................................ 42
Triggering ......................................... 39
Air-conditioning system
see Climate control
AIRGUIDE ............................................. 84
Air pressure see Tyre pressure
AIRSCARF
Problem (malfunction) .....................92
Setting the vents ........................... 123
Switching on/off .............................. 91
Airv ents
Important safet ynotes .................. 122
Setting ........................................... 122
Setting the AIRSCARF vents ..........123
Setting the centre air vents ...........123 Setting the side air vents
...............123
Switching AIRSCARF on/off ............91
Alarm system
see ATA (Anti-Theft Alarm system)
Alertness Assistant
see ATTENTION ASSIST
Ambient lighting (on-board com-
puter) ................................................. .192
AMG menu (on-board computer) .....195
Anti-glare film .................................... 246
Anti-loc kBraking System
see ABS (Anti-lock Braking System)
Anti-Theft Alarm system
see ATA (Anti-Theft Alarm system)
Aquaplaning ....................................... 150
Ashtray ............................................... 240
Assistance menu (on-board com-
puter) ................................................. .189
ASSYST PLUS see ASSYST PLUS service interval
display
ASSYST PLUS service interval dis-
play
Displaying service messages .........253
Hiding service messages ...............253
Notes ............................................. 253
Service messages ..........................252
ATA (Anti-Theft Alarm system)
Activating/deactivating ...................61
Function .......................................... .61
Interior motion sensor .....................62
Switching off the alarm ....................61
Tow-away protection ........................ 62
ATTENTIO NASSIST
Activating/deactivating .................190
Display message ............................ 213
Function/notes ............................. 173
Audio menu (on-board computer) ....186
Authorised workshop see Qualified specialist workshop
AUTO lights
Display message ............................ 211
see Lights
Automatic engine start (ECO start/
stop function) .................................... 132
Automatic engine switch-off (ECO
start/stop function) ..........................1314
Index
Page 10 of 321
Switching on/of
f........................... 117
Switching residual hea ton/off ......122
Switching the rear window heat-
ing on/off ...................................... 120
Switching the ZONE function on/
off .................................................. 119
THERMOTRONIC (2-zone) auto-
matic climate control .....................116
Cockpit
Overview .......................................... 26
see Instrument cluster
Collapsible emergency spare
wheel
see Emergency spare wheel
COMAND Online
see separate operating instructions
Combination switch ..........................103
Constant headlamp mode see Daytime driving lamps
Consumption statistics (on-board
computer) .......................................... 183
Convenience closing feature ..............77
Convenience opening/closing (air-
recirculation mode) ........................... 121
Convenience opening feature see Side windows
Coolan t(engine)
Checkin gthe level ......................... 251
Display message ............................ 211
Notes ............................................. 308
Temperature (on-board computer) .195
Temperature gauge ........................ 178
Warning lamp ................................. 231
Cooling
see Climate control
Cornering light function
Function/notes ............................. 104
Cornering light function (display
message) ............................................ 208
Crash-responsive emergency light-
ing ....................................................... 106
Cruise control Cruise control leve r....................... 151
Deactivating ................................... 153
Display message ............................ 217
Driving system ............................... 151
Important safety notes ..................151LIM indicator lamp
.........................151
Selecting ........................................ 152
Setting aspeed .............................. 153
Storing and maintaining current
speed ............................................. 152
Cup holder ......................................... 239 D
Dashboard see Cockpit
Data
see Technical data
Daytime driving lights
Display message ............................ 210
Switching on/off (on-board com-
puter) ............................................. 191
Switching on/off (switch) ..............101
Dealership
see Qualified specialist workshop
Delaye dswitch-off
Exterio rlighting (on-board com-
puter )............................................. 192
Interior lighting .............................. 193
Diagnostics connection ......................22
Diesel ................................................. .305
Diesel particle filter ..........................148
Digital speedometer .........................184
Dipped-beam headlamps Changing bulbs .............................. 108
Display message ............................ 208
Setting for driving abroad (sym-
metrical) ........................................ 100
Setting for driving on the right/
left ................................................. 192
Switching on/off ........................... 101
Display (cleaning instructions) ........257
Display message General information .......................199
Hiding (on-board computer) ...........199
KEYLESS-GO .................................. 222
Display messages
ASSYST PLUS service interval dis-
play................................................ 252
Calling up (on-board computer) .....199
Driving systems ............................. 213
Engine ............................................ 211
Key ................................................ 222 Index
7
Page 34 of 321
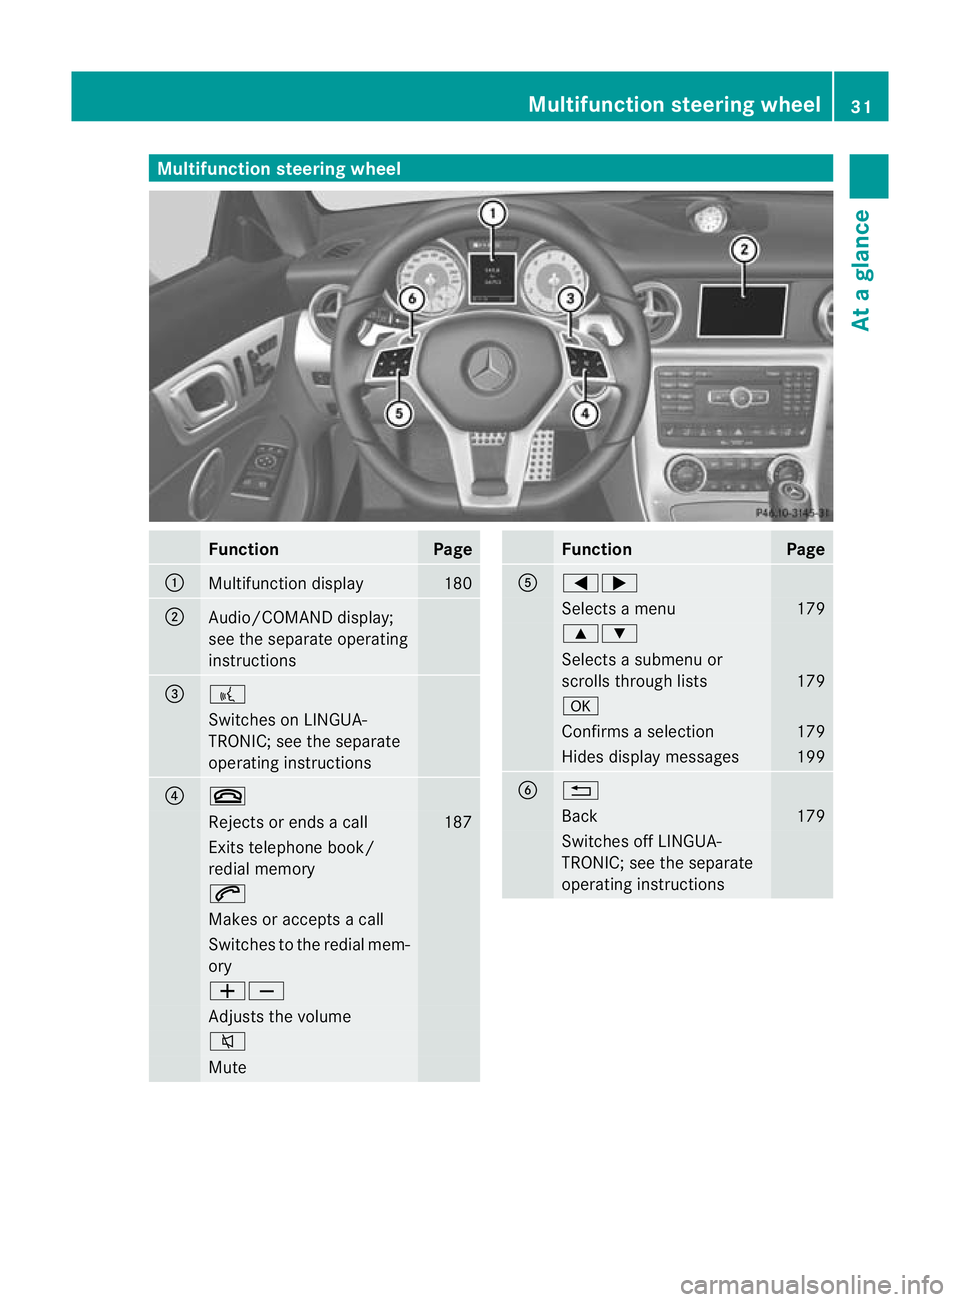
Multifunction steering wheel
Function Page
:
Multifunction display 180
;
Audio/COMAND display;
see the separate operating
instructions
=
?
Switches on LINGUA-
TRONIC; see the separate
operating instructions
?
~
Rejects or ends a call 187
Exits telephone book/
redial memory
6
Makes or accepts a call
Switches to the redial mem-
ory
WX
Adjusts the volume
8
Mute Function Page
A
=;
Selects a menu 179
9:
Selects a submenu or
scrolls through lists
179
a
Confirms a selection 179
Hides display messages 199
B
%
Back 179
Switches off LINGUA-
TRONIC; see the separate
operating instructionsMultifunction steering wheel
31At a glance
Page 178 of 321
R
the traffi csigns are poorly illuminated.
R there are ambiguous traffic signs, for
instance near roadworks or on multi-lane
roads.
Traffic signs always have priority over the
Speed Limit Assist display. Speed Limit Assist
cannot detect road and traffic conditions. It is
not a substitute for attentive driving.
Always pay attention to traffic conditions and
your surroundings. Otherwise, you may fail to
recognise dangers in time, cause an accident
and injure yourself and others.
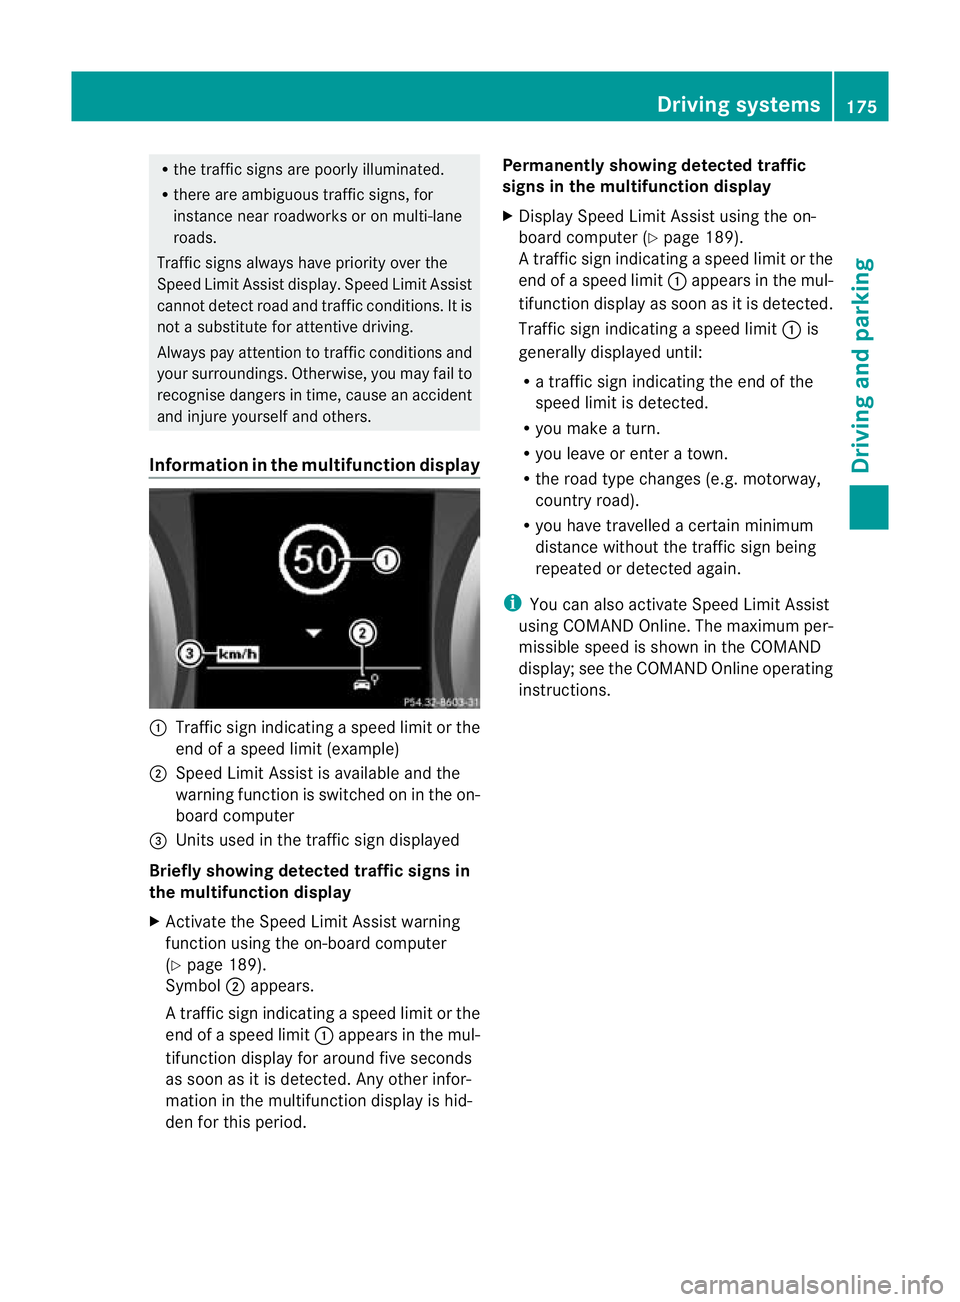
Information in the multifunction display :
Traffic sign indicating aspeed limit or the
end of a speed limit (example)
; Speed Limit Assist is available and the
warning function is switched on in the on-
board computer
= Units used in the traffic sign displayed
Briefly showing detected traffic signs in
the multifunction display
X Activate the Speed Limit Assist warning
function using the on-board computer
(Y page 189).
Symbol ;appears.
At raffic sign indicating a speed limi torthe
end of a speed limit :appears in the mul-
tifunction display for around five seconds
as soon as it is detected. Any other infor-
mation in the multifunction display is hid-
den for this period. Permanently showing detected traffic
signs in the multifunction display
X
Display Speed Limit Assist using the on-
board computer (Y page 189).
At raffic sign indicating a speed limi torthe
end of a speed limit :appears in the mul-
tifunction display as soon as it is detected.
Traffic sign indicating a speed limit :is
generally displayed until:
R a traffic sign indicating the end of the
speed limit is detected.
R you make a turn.
R you leave or enter a town.
R the road type changes (e.g. motorway,
country road).
R you have travelled a certain minimum
distance without the traffic sign being
repeated or detected again.
i You can also activate Speed Limit Assist
using COMAND Online. The maximum per-
missible speed is shown in the COMAND
display; see the COMAND Online operating
instructions. Driving systems
175Driving and parking Z
Page 183 of 321
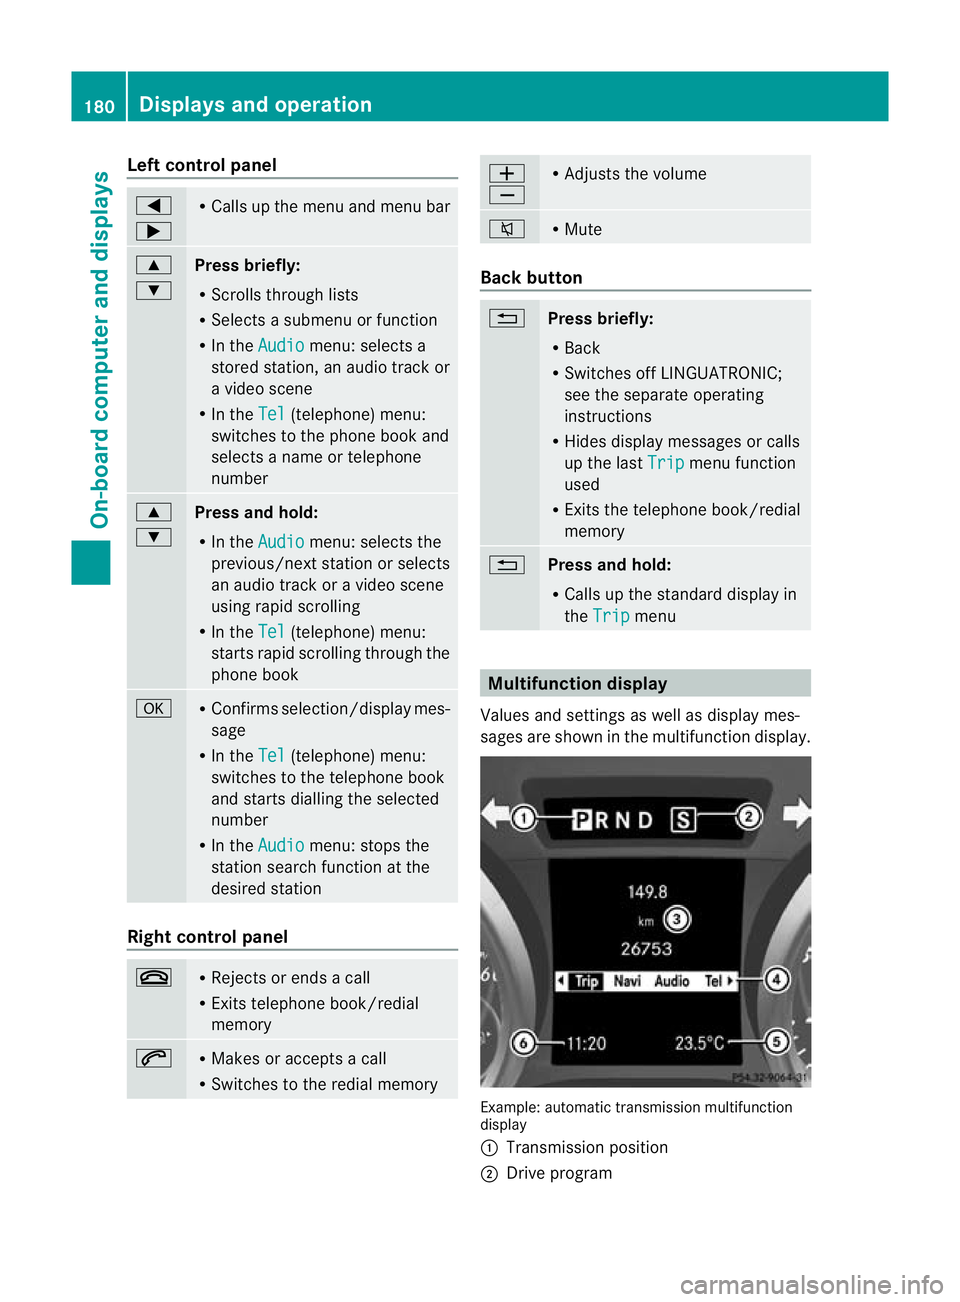
Left control panel
=
; R
Calls up the menu and menu bar 9
:
Press briefly:
R
Scrolls through lists
R Selects a submenu or function
R In the Audio menu: selects a
stored station, an audio track or
a video scene
R In the Tel (telephone) menu:
switches to the phone book and
selects a name or telephone
number 9
:
Press and hold:
R
In the Audio menu: selects the
previous/nex tstation or selects
an audio track or a video scene
using rapid scrolling
R In the Tel (telephone) menu:
starts rapid scrolling through the
phone book a R
Confirms selection/display mes-
sage
R In the Tel (telephone) menu:
switches to the telephone book
and starts dialling the selected
number
R In the Audio menu: stops the
station search function at the
desired station Right control panel
~ R
Rejects or ends a call
R Exits telephone book/redial
memory 6 R
Makes or accepts a call
R Switches to the redial memory W
X R
Adjusts the volume 8 R
Mute Back button
%
Press briefly:
R
Back
R Switches off LINGUATRONIC;
see the separate operating
instructions
R Hides display messages or calls
up the last Trip menu function
used
R Exits the telephone book/redial
memory %
Press and hold:
R
Calls up the standard display in
the Trip menu
Multifunction display
Values and settings as well as display mes-
sages are shown in the multifunctio ndisplay. Example: automatic transmission multifunction
display
:
Transmission position
; Drive program 180
Displays and operationOn-board computer and displays
Page 202 of 321
Display messages
General notes
Display messages appear in th emultifunction display.
Display messages with graphic displays may be shown in simplified for minthe Owner's Manual
and may differ from the messages shown in the multifunction display.
Please respond in accordance with the display messages and follow the additional notes in
this Owner's Manual.
Certain display messages are accompanied by an audible warning tone or a continuous tone. Hides display messages
You can hide some display messages with a low priority.
X Press the aor% button on the steering wheel to hide the display message.
The display message is cleared.
Display messages with a high priority are shown in red.
You cannot hide display messages of the highest priority. The multifunction display shows
these messages continuously until the causes for the messages have been remedied. Message memory
The on-board computer saves certain display messages. You can call up the display messages
in the message memory.
X Press the =or; button on the steering wheel and select the Serv. menu.
If there are display messages, the multifunction displays hows, for example,2 messages .
X Press the 9or: button to select the entry, e.g. 2 messages .
X Confirm with a.
X Press the 9or: button to scroll through the display messages.
When the ignition is switched off, all display messages are deleted apart from some high-
priority display messages. Once the causes of the high-priority display messages have been
rectified, the corresponding display messages are also deleted. Display messages
199On-board computer and displays Z
Page 256 of 321
Maintaining the time-dependent service
schedule:
X
Note down the service due date displayed
in the multifunction display before discon-
necting the battery.
or
X Subtract the battery disconnection periods
from the service date shown on the display
after reconnecting the battery.
Hiding aservice message X
Press the %ora button on the steer-
ing wheel.
Displaying service messages X
Switch on the ignition.
X Press =or; on the steering wheel
to selec tthe Serv. menu.
X Press 9or: to select the ASSYST PLUS submenu and press
ato confirm.
The service due date appears in the multi-
function display.
Points to remember Resetting the ASSYST PLUS service inter-
val display
Aq ualified specialist workshop, e.g. a
Mercedes-Ben zService Centre, will reset the
ASSYST PLUS service interval display after
the necessary service work has been carried
out.
You can obtain further information, e.g.
regarding service work, from a Mercedes-
Benz Service Centre or directly from
Mercedes-Benz.
! If the ASSYST PLUS service interval dis-
play has been inadvertently reset, this set-
ting can be corrected at a Mercedes-Benz
Service Centre.
Have service work carried out as described
in the Service Booklet. This may otherwise lead to increased wear and damage to the
major assemblies or the vehicle.
Driving abroad
An extensive Mercedes-Benz Service network
is also available in other countries. The
Service Hotline's curren ttelephone numbers
for use when you are abroad are to be found
in the "Mercedes-BenzS ervice24h" section
of the Service Booklet. Care
Notes on care
Regular care of your vehicle is a condition for
retaining the quality in the long term.
Use care products and cleaning agents rec-
ommended and approved by Mercedes-Benz.
! For cleaning your vehicle, do not use any
of the following:
R dry, rough or hard cloths
R abrasive cleaning agents
R solvents
R cleaning agents containing solvents
Do not scrub.
Do not touch the surfaces or protective
films with hard objects, e.g. a ring or ice
scraper. You could otherwise scratch or
damage the surfaces and protective film. H
Environmental note
Dispose of empty packaging and cleaning
cloths in an environmentally responsible man-
ner.
! Do not park up the vehicle for an extended
period straight after cleaning it, particularly
after having cleaned the wheels with wheel
cleaner. Wheel cleaners could cause
increased corrosion of the brake discs and
brake pads/linings. For this reason, you
should drive for a few minutes after clean-
ing. Braking heats the brake discs and the
brake pads/linings, thus drying them. The
vehicle can then be parked up. Care
253Maintenance and care Z
Page 290 of 321
wheels and tyres for damage. Hidde
ntyre
damage could also be causing the unusual
handling characteristics. If you find no
signs of damage, have the tyres and wheels
checked at a qualified specialist workshop.
R Whe nparking your vehicle ,make sure that
the tyres do no tget deformed by the kerb
or other obstacles. If it is necessary to drive
over kerbs, speed humps or similar eleva-
tions, try to do so slowly and at an obtuse
angle. Otherwise, the tyres, particularly the
sidewalls, can get damaged. Notes on regularly inspecting wheels
and tyres G
WARNING
Damaged tyres can cause tyre inflation pres-
sure loss. As a result, you could lose control
of your vehicle. There is a risk of accident.
Check the tyres regularly for signs of damage
and replace any damaged tyres immediately.
R Regularly chec kthe wheels and tyres of
your vehicle for damage (e.g. cuts, punctu-
res, tears, bulges on tyres and deformation,
cracks or severe corrosion on wheels), at
least every 14days, as well as after driving
off-road or on rough roads. Damaged
wheels can cause a loss of tyre pressure.
R Regularly check the tyre tread depth and
the condition of the tread across the whole
width of the tyre (Y page 287). If neces-
sary, turn the front wheels to full lock in
order to inspect the inner side of the tyre
surface.
R All wheels must have a valve cap to protect
the valve against dirt and moisture. Do not
fit anything onto the valve (such as tyre
pressure monitoring systems) other than
the standard valve cap or other valve caps
approved by Mercedes-Ben zfor your vehi-
cle.
R Regularly check the pressure of all the tyres
including the emergency spare wheel or the
spare wheel, particularly prior to long trips, and correc
tthe pressure as necessary
(Y page 289). Tyre tread
G
WARNING
Insufficient tyre tread will reduce tyre trac-
tion. The tyre is no longer able to dissipate
water. This means that on wet road surfaces,
the risk of aquaplaning increases, in particular
where speed is not adapted to suit the driving
conditions. There is a risk of accident.
If the tyre pressure is too high or too low, tyres
may exhibit different levels of wear at differ-
ent locations on the tyre tread. Thus, you
should regularly check the tread depth and
the condition of the tread across the entire
width of all tyres.
Minimum tyre tread depth for:
R summer tyres: 3 mm
R M+S tyres: 4 mm
For safety reasons, replace the tyres before
the legally prescribed limit for the minimum
tyre tread depth is reached.. Notes on selecting, fitting and replac-
ing tyres
R Only fit tyres and wheels of the same type
and make.
R Only fit tyres of the correct size onto the
wheels.
R After fittingn ew tyres, run them in at mod-
erate speeds for the first 100 km, as they
only reach their full performance after this
distance.
R Do not drive with tyres which have too little
tread depth, as this significantly reduces
the traction on wet roads (aquaplaning).
R Replace the tyres after six years at the lat-
est, regardless of wear. This also applies to
the emergency spare wheel/spare wheel. Operation
287Wheels and tyres Z