interior lights MERCEDES-BENZ SLK ROADSTER 2012 Owners Manual
[x] Cancel search | Manufacturer: MERCEDES-BENZ, Model Year: 2012, Model line: SLK ROADSTER, Model: MERCEDES-BENZ SLK ROADSTER 2012Pages: 321, PDF Size: 6.9 MB
Page 7 of 321
1, 2, 3 ...
12 Vsocket
see Socket A
ABS (Anti-lock Braking System) Display message ............................ 200
Function/notes ................................ 54
Important safety notes ....................54
Warning lamp ................................. 226
Activating/deactivating air-recir-
culation mode .................................... 121
Activating/deactivating cooling
with air dehumidification .................117
Active light function .........................104
Active Service Syste mPLUS
see ASSYS TPLUS service interval
display
ADAPTIVE BRAKE .................................59
Adaptive brake lamps .........................56
Additional speedometer ...................191
Additives (engine oil) ........................308
Adjusting the headlamp range .........102
Airbag Headbag .......................................... 43
Airbags
Front airbag (driver, front
passenger )....................................... 41
Important safety guidelines .............40
Sidebag ............................................ 42
Triggering ......................................... 39
Air-conditioning system
see Climate control
AIRGUIDE ............................................. 84
Air pressure see Tyre pressure
AIRSCARF
Problem (malfunction) .....................92
Setting the vents ........................... 123
Switching on/off .............................. 91
Airv ents
Important safet ynotes .................. 122
Setting ........................................... 122
Setting the AIRSCARF vents ..........123
Setting the centre air vents ...........123 Setting the side air vents
...............123
Switching AIRSCARF on/off ............91
Alarm system
see ATA (Anti-Theft Alarm system)
Alertness Assistant
see ATTENTION ASSIST
Ambient lighting (on-board com-
puter) ................................................. .192
AMG menu (on-board computer) .....195
Anti-glare film .................................... 246
Anti-loc kBraking System
see ABS (Anti-lock Braking System)
Anti-Theft Alarm system
see ATA (Anti-Theft Alarm system)
Aquaplaning ....................................... 150
Ashtray ............................................... 240
Assistance menu (on-board com-
puter) ................................................. .189
ASSYST PLUS see ASSYST PLUS service interval
display
ASSYST PLUS service interval dis-
play
Displaying service messages .........253
Hiding service messages ...............253
Notes ............................................. 253
Service messages ..........................252
ATA (Anti-Theft Alarm system)
Activating/deactivating ...................61
Function .......................................... .61
Interior motion sensor .....................62
Switching off the alarm ....................61
Tow-away protection ........................ 62
ATTENTIO NASSIST
Activating/deactivating .................190
Display message ............................ 213
Function/notes ............................. 173
Audio menu (on-board computer) ....186
Authorised workshop see Qualified specialist workshop
AUTO lights
Display message ............................ 211
see Lights
Automatic engine start (ECO start/
stop function) .................................... 132
Automatic engine switch-off (ECO
start/stop function) ..........................1314
Index
Page 10 of 321
Switching on/of
f........................... 117
Switching residual hea ton/off ......122
Switching the rear window heat-
ing on/off ...................................... 120
Switching the ZONE function on/
off .................................................. 119
THERMOTRONIC (2-zone) auto-
matic climate control .....................116
Cockpit
Overview .......................................... 26
see Instrument cluster
Collapsible emergency spare
wheel
see Emergency spare wheel
COMAND Online
see separate operating instructions
Combination switch ..........................103
Constant headlamp mode see Daytime driving lamps
Consumption statistics (on-board
computer) .......................................... 183
Convenience closing feature ..............77
Convenience opening/closing (air-
recirculation mode) ........................... 121
Convenience opening feature see Side windows
Coolan t(engine)
Checkin gthe level ......................... 251
Display message ............................ 211
Notes ............................................. 308
Temperature (on-board computer) .195
Temperature gauge ........................ 178
Warning lamp ................................. 231
Cooling
see Climate control
Cornering light function
Function/notes ............................. 104
Cornering light function (display
message) ............................................ 208
Crash-responsive emergency light-
ing ....................................................... 106
Cruise control Cruise control leve r....................... 151
Deactivating ................................... 153
Display message ............................ 217
Driving system ............................... 151
Important safety notes ..................151LIM indicator lamp
.........................151
Selecting ........................................ 152
Setting aspeed .............................. 153
Storing and maintaining current
speed ............................................. 152
Cup holder ......................................... 239 D
Dashboard see Cockpit
Data
see Technical data
Daytime driving lights
Display message ............................ 210
Switching on/off (on-board com-
puter) ............................................. 191
Switching on/off (switch) ..............101
Dealership
see Qualified specialist workshop
Delaye dswitch-off
Exterio rlighting (on-board com-
puter )............................................. 192
Interior lighting .............................. 193
Diagnostics connection ......................22
Diesel ................................................. .305
Diesel particle filter ..........................148
Digital speedometer .........................184
Dipped-beam headlamps Changing bulbs .............................. 108
Display message ............................ 208
Setting for driving abroad (sym-
metrical) ........................................ 100
Setting for driving on the right/
left ................................................. 192
Switching on/off ........................... 101
Display (cleaning instructions) ........257
Display message General information .......................199
Hiding (on-board computer) ...........199
KEYLESS-GO .................................. 222
Display messages
ASSYST PLUS service interval dis-
play................................................ 252
Calling up (on-board computer) .....199
Driving systems ............................. 213
Engine ............................................ 211
Key ................................................ 222 Index
7
Page 15 of 321
Convenience opening feature
..........77
Display message ............................ 222
Door central locking/unlocking .......66
Emergency key element ................... 68
Loss ................................................. 70
Modifying the programming .............67
Opening/closing the roof ................80
Positions (ignition lock) .................127
Problem (malfunction) .....................70
Starting the engine ........................129
KEYLESS-GO
Convenience closing ........................77
Display message ............................ 222
Locking ............................................ 67
Start/Stop button .......................... 127
Starting the engine ........................129
Unlocking ......................................... 67
Keyp ositions
Key ................................................ 127
KEYLESS GO .................................. 127
Kickdown
Driving tips .................................... 138
Manual drive program ....................141 L
Lamps see Warning and indicator lamps
Lap time (RACETIMER) ......................196
Licence plate lamp (display mes-
sage) ................................................... 210
Lighting see Lights
Lights
Activating/deactivating the Intel-
ligent Ligh tSystem ........................ 191
Activating/deactivating the inte-
rior lighting delayed switch-off .......193
Active light function .......................104
Automatic headlamp mode ............101
Cornering light function .................104
Dipped-bea mheadlamps ............... 101
Display message ............................ 208
Driving abroad ............................... 100
Foglamps ....................................... 101
Foglamps (extended range) ...........105
Hazard warning lamps ...................103
Headlamp flasher ........................... 103 Headlamp range
............................ 102
Ligh tswitc h................................... 100
Main-beam headlamps ................... 103
Motorway mode ............................. 104
Parking lamps ................................ 100
Rea rfoglamp ................................. 102
Setting the ambient lighting
brightness (on-board computer) ....192
Switching the daytime driving
lights on/off (on-board computer) .191
Switching the daytime driving
lights on/off (switch) .....................101
Switching the exterio rlighting
delayed switch-off on/off (on-
board computer )............................ 192
Switching the surround lighting
on/off (on-board computer) ..........192
Turn signals ................................... 103
see Changing bulbs
see Interior lighting
Light sensor (display message) .......211
LIM indicator lamp Cruise control ................................ 151
DISTRONI CPLUS ........................... 157
Variabl eSPEEDTRONIC .................154
Limiting the speed
see SPEEDTRONIC
Locking
see Centra llocking
Locking (doors)
Automatic ........................................ 72
Emergency locking ........................... 73
From inside (central locking but-
ton) .................................................. 72
Locking centrally
see Centra llocking
Locking verification signal (on-
board computer) ............................... 193
Luggage cover see Boot separator
Luggage net ....................................... 238
Lumbar support ................................... 90 M
M+S tyres ........................................... 288
MAGIC SKY CONTROL .........................8412
Index
Page 42 of 321
tentionally. For this reason, never make any
modifications to the restraint systems.
Therefore, you must not tampe rwith elec-
tronic components or their software. SRS (Supplemental Restraint System)
Introduction SRS consists of:
R
the 6 SRS warning lamp
R airbags
R airbag control unit (with crash sensors)
R belt tensioners
R belt force limiters
SRS reduces the risk of occupants coming
into contact with the vehicle's interior in the
event of an accident. It can also reduce the
effect of the forces to which occupants are
subjected during an accident.
SRS warning lamp SRS functions are checked regularly when
you switch on the ignition and when the
engine is running. Therefore, malfunctions
can be detected in good time.
The 6 SRS warning lamp in the instrument
cluster lights up when the ignition is switched
on. It goes out no later than a few seconds
after the engine is started. G
WARNING
If SRS is malfunctioning, individual systems
may be triggered unintentionally or might not
be triggered in the event of an accident with
a high rate of vehicle deceleration.
A malfunction has occurred if:
R the 6 SRS warning lamp does not light
up when the ignition is switched on.
R the engine is running and the 6SRS
warning lamp does not go out after a few
seconds.
R the engine is running and the 6SRS
warning lamp lights up again. In this case, have SRS checked immediately
at a qualified specialist workshop.
Triggering of belt tensioners, belt force
limiters and airbags During the firs
tstage of a collision, the airbag
control uni tevaluates important physical
data relating to vehicle deceleratio noraccel-
eration, such as:
R duration
R direction
R magnitude
Based on the evaluation of this data, the air-
bag control uni tpre-emptively triggers the
beltt ensioners in the first stage.
i The belt tensioners can only be triggered
if the seat belt tongues are correctly
engaged in the seat belt buckles.
If there is an even higher rate of vehicle decel-
eration or acceleration in a longitudinal direc-
tion, the fron tairbags are also deployed.
Your vehicle has adaptive, two-stage front air-
bags. The airbag control unit evaluates vehi-
cle deceleration or acceleration in the event
of a collision. In the firs tdeployment stage,
the fron tairbag is filled with enough propel-
lant gas to reduce the risk of injuries. The
front airbag is fully deployed if a second
deploymen tthreshold is exceeded within a
few milliseconds.
The belt tensioner and airbag triggering
thresholds are variable and are adapted to the
rate of deceleration or acceleration of the
vehicle. This process is pre-emptive in nature.
The triggering process must take place in
good time at the start of the collision.
i Airbags are not deployed in all types of
accidents. Also, not all airbags are
deployed together in an accident. The dif-
ferent airbag systems work independently
of each other. Occupant safety
39Safety Z
Page 50 of 321
Bel
ttensioners do not pull vehicle occupants
back towards the backrest.
If the seat belt is also fitted with a belt force
limiter and this is triggered, the force exerted
by the seat belt on the vehicle occupan tis
reduced.
The beltf orce limiters are synchronised with
the front airbags. They take on a part of the
deceleration force, resulting in the force exer-
ted on the occupant being distributed over a
greater area.
The belt tensioners can only be activated
when:
R the ignition is switched on.
R the restraint systems are operational; see
"SRS warning lamp" (Y page 39).
R the belt tongue is engaged in the buckle on
each of the three-point seat belts.
R the front-passenger seat is occupied and
the belt tongue is engaged in the buckle on
the front-passenger side.
The belt tensioners are triggered depending
on the type and severity of an accident:
R if, in the event of a head-on or rear-end col-
lision, the vehicle decelerates or acceler-
ates rapidly in a longitudinal direction dur-
ing the initial stages of the impact
R if, in the event of a side impact, the vehicle
is subjected to high lateral acceleration/
deceleration
R if in certain situations where the vehicle
overturns and the system determines that
it can provide additional protection
If the airbags are deployed, you will hear a
bang, and a small amount of powder may also
be released. Only in rare cases will the bang
affect your hearing. The powder that is
released generally does not constitute a
health hazard. The 6SRS warning lamp
lights up. G
WARNING
If the seat belt tensioners have been trig-
gered, they provide no additional protection
in the event of another accident. Therefore, have belt tensioners which have been trig-
gered replaced at a qualified specialist work-
shop.
Comply with safety regulations when dispos-
ing of belt tensioners. Any Mercedes-Benz
Service Centre can provide details of these
regulations.
! If the front-passenger seat is not occu-
pied, do not engage the seat belt tongue in
the buckle on the front-passenger seat.
Otherwise, the belt tensioner could be trig-
gered in the event of an accident. Children in the vehicle
Child restraint systems
Important safety notes G
WARNING
To reduce the risk of serious or even fatal
injury to the child in the event of a sudden
change in direction, braking or an accident:
R children less than 1.50 m tall and under
twelve years of age must always be secured
in special child restraint systems on the
front-passenger seat. This is necessary
because the seat belts are not designed for
children.
R you must move the front-passenger seat as
far back as possible if you secure a forward-
facing child restraint system without trans-
ponder for automatic child seat recognition
to the front-passenger seat.
R children must never travel sitting on the lap
of another occupant. Due to the forces
which occur in the event of a sudden
change of direction, heavy braking or an
accident, it would not be possible to
restrain the child. The child could be thrown
against parts of the vehicle interior and be
seriously or even fatally injured. Children in the vehicle
47Safety Z
Page 65 of 321
X
To prime: lock the vehicle with the key or
KEYLESS-GO.
Indicato rlamp :flashes. The alarm sys-
te mi s primed after approximately
15 seconds.
X To switch off: unlock the vehicle with the
key or KEYLESS-GO.
X To stop the alarm using the key: insert
the key into the ignition lock.
The alarm is switched off.
or
X Press the %or& button on the key.
The alarm is switched off.
X To stop the alarm using KEYLESS-GO:
grasp the outside door handle. The key
must be outside the vehicle.
The alarm is switched off.
or
X Press the Start/Stop button on the dash-
board. The key must be inside the vehicle.
The alarm is switched off. Tow-away protection
An audible and visual alarm is triggered if your
vehicle's angle of inclination is altered while
tow-away protection is primed. This occurs if
the vehicle is jacked up on one side, for exam-
ple.
X To prime: lock the vehicle with the key or
KEYLESS-GO.
Tow-away protection is primed after
approximately 30 seconds.
X To switch off: unlock the vehicle with the
key or KEYLESS-GO.
Tow-away protection is switched off auto-
matically. To prevent a false alarm, deactivate tow-away
protection manually if your vehicle:
R
is being transported
R is being loaded onto a ferry or car trans-
porter, for example
R is parked on a movable surface, e.g. in a
split-level garage
Deactivating:
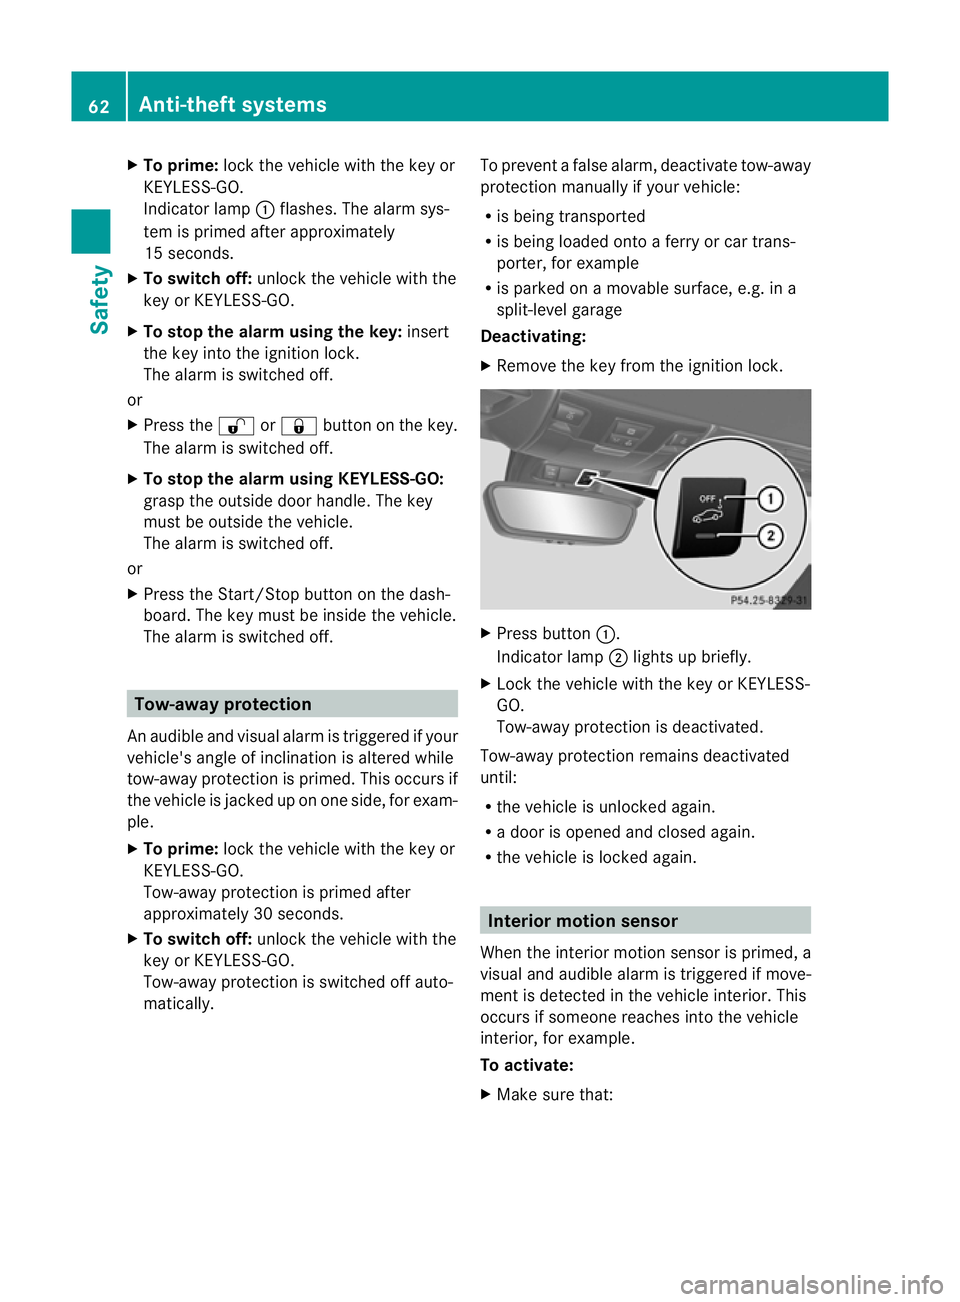
X Remove the key from the ignition lock. X
Press button :.
Indicator lamp ;lights up briefly.
X Lock the vehicle with the key or KEYLESS-
GO.
Tow-away protection is deactivated.
Tow-away protection remains deactivated
until:
R the vehicle is unlocked again.
R a door is opened and closed again.
R the vehicle is locked again. Interior motion sensor
When the interior motion sensor is primed, a
visual and audible alarm is triggered if move-
ment is detected in the vehicle interior. This
occurs if someone reaches into the vehicle
interior, for example.
To activate:
X Make sure that: 62
Anti-theft systemsSafety
Page 102 of 321
Useful information
............................100
Exterior lighting ................................ 100
Interior lighting ................................. 105
Replacing bulbs ................................. 106
Windscreen wipers ...........................109 99Lights and windscreen wipers
Page 108 of 321

Motorway mode increases the range of the
beam.
Active:
R if you are driving at speeds above
110 km/h and do not make any large steer-
ing movements for 1000 m
R if you are driving at speeds above
130 km/h
Not active: if you are driving at speeds below
80 km/h following activation.
Extended range foglamps The extended range foglamps reduce the
glare experienced by the driver and improve
the illumination of the edge of the carriage-
way.
Active: if you are driving at speeds below
70 km/h and you switch on the rear foglamp
Not active: if you are driving at speeds above
100 km/h or if you switch off the rear foglamp
following activation Headlamps misted up on the inside
The headlamps may mist up on the inside if
there is high atmospheric humidity.
X Drive with the headlamps switched on.
The level of moisture diminishes, depend-
ing on the length of the journey and the
weather conditions (humidity and temper-
ature).
If the level of moisture does not diminish: X
Have the headlamps checked at a qualified
specialist workshop. Interior lighting
Overview of interior lighting
Overhead control panel
:
p To switch the left-hand reading lamp
on/off
; | To switch the automatic interior
lighting control on/off
= p To switch the right-hand reading
lamp on/off
? c To switch the interior lighting on/off Interior lighting control
Important notes In order to prevent the vehicle's battery from
discharging, the interior lighting functions are
automatically deactivated after some time
except for when the key is in position
2in the
ignition lock.
The colour and brightness of the ambient
lighting may be set using the on-board com-
puter (Y page 192).
Automatic interior lighting control X
To switch on/off: press the|button.
When the automatic interior lighting con-
trol is activated, the button is flush with the
overhead control panel. Interior lighting
105Lights and windscreen wipers Z
Page 109 of 321
The interior lighting automatically switches
on if you:
R unlock the vehicle
R open a door
R remove the key from the ignition lock
The interior light is activated for a short while
when the key is removed from the ignition
lock. You can activat ethis delayed switch-off
using the on-board computer (Y page 193).
Manual interior lighting control X
To switch the interior lighting on/off:
press the cbutton.
X To switch the reading lamps on/off:
press the pbutton. Crash-responsive emergency lighting
The interior lighting is activated automatically
if the vehicle is involved in an accident.
X To switch off the crash-responsive
emergency lighting: press the hazard
warning lamp button.
or
X Lock and then unlock the vehicle using the
key. Replacing bulbs
Important safety notes
Xenon bulbs G
DANGER
Xenon bulbs are under high voltage. If you
touch the electrical contacts of a xenon bulb,
you could suffer an electric shock and be seri-
ously or even fatally injured. For this reason,
do not remove the cover of xenon bulbs.
Do not change the xenon bulbs yourself, but
have them replaced at a qualified workshop.
If your vehicle is equipped with xenon bulbs,
you can recognise this by the following: the cone of light from the xenon bulbs moves
from the top to the bottom and back again
when you start the engine. For this to be
observed, the lights must be switched on
before starting the engine.
Bulbs and lamps are an important aspect of
vehicle safety. You must therefore make sure
that these function correctly at all times.
Have the headlamp setting checked regularly.
Other bulbs
There are bulbs other than the xenon bulbs
that you cannot replace. Replace only the
bulbs listed (Y
page 107). Have the bulbs that
you cannot replace yourself changed at a
qualified specialist workshop.
If you require assistance changing bulbs, con-
sult a qualified specialist workshop.
Do not touch the glass tube of new bulbs with
your bare hands. Even minor contamination
can burn into the glass surface and reduce
the service life of the bulbs. Always use a lint-
free cloth or only touch the base of the bulb
when fitting.
Only use bulbs of the correct type.
If the new bulb still does not light up, consult
a qualified specialist workshop.
Bulbs and lamps are an important aspect of
vehicle safety. You must therefore make sure
that these function correctly at all times.
Have the headlamp setting checked regularly. G
WARNING
Bulbs and lamps can be very hot. You should
therefore allow them to cool down before you
change them. Otherwise, you could be burned
if you touch them.
Keep bulbs out of the reach of children. Oth-
erwise, they could damage the bulbs, for
example, and injure themselves.
Never use a bulb which has been dropped.
Such a bulb may break or even explode and
injure you.
Halogen bulbs are pressurised and can
explode when you change them, particularly
if they are very hot. You should therefore wear 106
Replacing bulbsLights and windscreen wipers
Page 120 of 321
partment as well. The indicator lamp in the
á button goes out.
R Use the residual heat function if you want
to heat or ventilate the vehicle interior
when the ignition is switched off. The resid-
ual heat function can only be activated or
deactivated with the ignition switched off. Operating the climate control system
Switching climate control on/off
Important information i
When climate control is switched off, the
air supply and air circulation are also
switched off. Only select this setting
briefly. Otherwise, the windows may mist
up.
i Switch on climate control primarily using
the à button (Y page 118).
Activating/deactivating Air-conditioning system
X
To activate: turn airflow control
C(Y page 115) clockwise to the desired
position (except position 0).
X To deactivate: turn airflow control
C(Y page 115) anti-clockwise to position
0. THERMOTRONIC automatic climate con-
trol
X
Turn the key to position 2in the ignition
lock.
X To activate: press theÃbutton.
The indicator lamp in the Ãbutton lights
up. Airflow and air distribution are set to
automatic mode.
or
X Press the ^button.
The indicator lamp in the ^button goes
out. The previously selected settings come
into effect again.
X To switch off: press the^button.
The indicator lamp in the ^button lights
up. Activating/deactivating the cooling
with air dehumidification function
Important information The cooling with air dehumidification function
is only available when the engine is running.
The air inside the vehicle is cooled and dehu-
midified according to the temperature selec-
ted.
G
WARNING
If the "cooling with air dehumidification" func-
tion is deactivated, the air inside the vehicle
will not be cooled (during warm weather) or
dehumidified. The windows could mist up
more quickly. This may preven tyou from
observing the traffic conditions, thereby caus-
ing an accident.
Condensation may drip from the underside of
the vehicle when THERMOTRONIC is in cool-
ing mode. This is normal and not a sign that
there is a malfunction.
Depending on the equipment level, the con-
trol panel has either the Ábutton or the
¿ button.
i The cooling with air dehumidification
function uses refrigerant R134a. This cool- Operating the climate control system
117Climate control Z