snow chains MERCEDES-BENZ SLK ROADSTER 2012 Owners Manual
[x] Cancel search | Manufacturer: MERCEDES-BENZ, Model Year: 2012, Model line: SLK ROADSTER, Model: MERCEDES-BENZ SLK ROADSTER 2012Pages: 321, PDF Size: 6.9 MB
Page 12 of 321
Running-in tips ..............................
.126
Snow chains .................................. 289
Symmetrical dipped bea m............. 100
Tyr egrip ........................................ 150
Wet road surface ........................... 149
DVD audio (on-board computer) ......186
Dynamic handling package Function/notes ............................. 164 E
EASY-ENTRY feature Activating/deactivating .................194
Function/notes ................................ 93
EASY-EXIT feature
Crash-responsive ............................. 93
Function/notes ................................ 93
Switching on/off ........................... 194
EBD (electronic brake force distri-
bution)
Display message ............................ 202
Function/notes ................................ 59
ECO start/stop function
Deactivating/activating .................132
General information .......................131
Important safety notes ..................130
Electrical fuses
see Fuses
Electronic brake force distribution
see EBD (electronic brake force
distribution)
Electronic Brake force Distribution
see EBD (Electronic Brake force
Distribution)
Electronic Stability Program
see ESP ®
(Electroni cStability Program)
Electronic Traction System
see ETS (Electronic Traction System)
Emergenc ykey
Unlocking the driver's door ..............73
Emergency key element
Function/notes ................................ 68
Locking vehicle ................................ 73
Emergency release
Driver's door .................................... 73Emergency spare wheel
Inflating the collapsible spare
wheel ............................................. 270
Notes/data .................................... 297
Storage location ............................ 262
Stowing .......................................... 262
Emergency unlocking
Boot ................................................. 75
Vehicle ............................................. 73
Engine
Display message ............................ 211
ECO start/stop function ................130
Engine number ............................... 303
Jump-starting ................................. 277
Running irregularl y......................... 134
Starting problems ..........................134
Starting the engine with the key ....129
Starting with KEYLESS GO .............129
Stopping ........................................ 146
Tow-starting (vehicle) ..................... 281
Warning lamp (engine diagnos-
tics) ............................................... 231
Engine electronics
Notes ............................................. 301
Problem (fault) ............................... 134
Engine oil
Additives ........................................ 308
Checking the oil level ..................... 250
Checking the oil level using the
dipstick .......................................... 250
Display message ............................ 212
Filling capacity ............................... 307
Notes about oil grades ................... 307
Notes on oil level/consumption ....250
Temperature (on-board computer) .195
Topping up ..................................... 250
Viscosity ........................................ 308
Environmental protection
Note ................................................ .20
Returning an end-of-life vehicle .......20
ESP ®
(Electronic Stability Pro-
gram) AMG menu (on-board computer) ...196
Deactivating/activating (AMG
vehicles) .......................................... 57
Deactivating/activating (notes;
except AMG vehicles) ......................56
Display message ............................ 200 Index
9
Page 19 of 321
Settings
Factory (on-board computer) .........195
On-board computer .......................190
Setting the air distribution ...............119
Setting the airflow ............................119
SETUP (on-board computer) .............196
Short journeys (diesel particle fil-
ter) ...................................................... 148
Sidebag ................................................ 42
Side windows Convenience closing ........................77
Important safety notes ....................75
Opening/closing (front) ...................76
Opening/closing all. ........................76
Problem (malfunction) .....................78
resetting .......................................... 77
Snow chains ...................................... 289
Socket Centre console .............................. 241
Points to observe before use .........241
Under the armrest .........................241
Spare wheel
Storage location ............................ 262
Storing ........................................... 262
see Emergency spare wheel
Specialist workshop ............................ 22
Spectacles compartment .................237
Speed, controlling see Cruise control
Spee dLimit Assist
Activating/deactivating the warn-
ing function .................................... 189
Displayin g...................................... 189
Display message ............................ 213
Display message in the multifunc-
tion displa y.................................... 175
Important safety notes ..................174
Speedometer
Activating/deactivating the addi-
tional speedometer ........................191
Digita l............................................ 184
In the Instrument cluster .................28
Segments ...................................... 179
Selecting the unit of measure-
ment .............................................. 190
see Instrument cluster SPEEDTRONIC
Deactivating variabl e..................... 155
Display message ............................ 216
Function/notes ............................. 153
Important safety notes ..................153
LIM indicator lamp .........................154
Permanent ..................................... 156
Selecting ........................................ 154
Storing the current spee d.............. 155
Variabl e......................................... 154
SPORT handling mode
Activating/deactivating (AMG
vehicles) .......................................... 57
Warning lamp ................................. 229
SRS (Supplemental Restraint Sys-
tem)
Display message ............................ 207
Introduction ..................................... 39
Warning lamp ................................. 230
Warning lamp (function) ................... 39
Starting (engine) ................................ 128
Station see Radio
Steering (display message) ..............221
Steering wheel Adjusting (electrically). ....................93
Adjusting (manually). .......................92
Button overview ............................... 31
Cleaning ......................................... 258
Gearshift paddles ........................... 139
Important safety notes ....................92
Storing settings (memory func-
tion) ................................................. 96
Steering wheel gearshift paddles ....139
Stopwatch (RACETIMER) ................... 196
Stowage areas ................................... 236
Stowage compartment Spectacles compartment ...............237
Stowage compartments
Armrest (front) ............................... 237
Armrest (under) ............................. 237
Centre console .............................. 237
Cuph older..................................... 239
Door ............................................... 238
Glove compartment .......................236
Important safety information .........236
Luggage net ................................... 238
Rea rwall........................................ 23816
Index
Page 22 of 321
Windows
Cleaning ......................................... 256
see Side windows
Windscreen
Demisting ...................................... 120
Windscreen washe rfluid
see Windscreen washer system
Windscreen washer system .............252
Notes ............................................. 309
Windscreen wipers
Problem (malfunction) ...................111
Replacing the wiper blades ............110
Switching on/off ........................... 109
Winter operation
Important safety notes ..................288
Radiator cover ............................... 250
Slippery road surfaces ...................151
Snow chains .................................. 289
Winter tyres
Limiting the speed (on-board com-
puter) ............................................. 193
M+S tyres ...................................... 288
Wiper blades
Cleaning ......................................... 256
Important safety notes ..................110
Wooden trim (cleaning instruc-
tions) .................................................. 258
Workshop see Qualified specialist workshop Index
19
Page 57 of 321
i
Please note that the driving safety sys-
tems described only work as effectively as
possible when there is adequate contact
between the tyres and the road surface.
Pay particular attention to the information
regarding tyres, recommended minimum
tyre tread depths etc. in the "Wheels and
tyres" section (Y page 286).
In wintry driving conditions, always use
winter tyres (M+S tyres) and if necessary,
snow chains. Only in this way will the driv-
ing safety systems described in this section
work as effectively as possible. ABS (Anti-lock Braking System)
Important safety notes i
Observe the "Importan tsafety notes" sec-
tion (Y page 53).
AB Sr egulates brake pressure in such a way
that the wheels do not lock when you brake.
This allows you to continue steering the vehi-
cle when braking.
ABS works from a speed of about 8 km/h
upwards, regardless of road-surface condi-
tions. ABSw orks on slippery surfaces, even
when you only brake gently. G
WARNING
If ABS is faulty, the wheels could lock when
braking. This limits the steerability of the vehi-
cle when braking and the braking distance
may increase.
If ABS is deactivated due to a malfunction,
then BAS and ESP are also deactivated. There
is an increased risk of your vehicle skidding in
certain situations.
You should always adapt your driving style to
suit the prevailing road and weather condi-
tions.
Brakes If ABS intervenes when braking, you will feel
a pulsing in the brake pedal. X
If ABS intervenes: continue to depress the
brake pedal with force until the braking sit-
uation is over.
X To make a full brake application:
depress the brake pedal with full force.
The pulsating brake pedal can be an indica-
tion of hazardous road conditions and func-
tions as a reminder to take extra care while
driving. G
WARNING
Do not depress the brake pedal several times
in quick succession (pumping). Pumping the
brake pedal reduces the braking effect .You
might otherwise not be able to stop the vehi-
cle in time and could cause an accident.
Depress the brake pedal firmly and smoothly. BAS (Brake Assist System)
i Observe the "Important safety notes" sec-
tion (Y page 53).
BAS operates in emergency braking situa-
tions. If you depress the brake pedal quickly,
BAS automatically boosts the braking force,
thus shortening the stopping distance.
X Keep the brake pedal firmly depressed until
the emergency braking situation is over.
ABS prevents the wheels from locking.
The brakes will function as usual once you
release the brake pedal. BAS is deactivated. G
WARNING
If BAS has malfunctioned, the braking system
remains available with full brake boosting
effect. However, braking force is not auto-
matically increased in emergency braking sit-
uations and the stopping distance may
increase. BAS PLUS (Brake Assist System Plus)
BAS PLUS is only available on vehicles with
DISTRONIC PLUS. 54
Driving safety systemsSafety
Page 60 of 321
Example: if ESP
®
was deactivated before
the engine was switched off, ESP ®
remains
deactivated when the engine is switched on
again.
It may be best to deactivate ESP ®
in the fol-
lowing situations:
R when using snow chains
R in deep snow
R on sand or gravel G
WARNING
Activate ESP ®
as soo nas the situations
described above no longer apply.E SP®
will
otherwise not be able to stabilise the vehicle
if the vehicle starts to skid or a wheel starts
to spin.
If you deactivate ESP ®
:
R ESP ®
no longer improves driving stability.
R engine torque is not limited and the drive
wheels are able to spin. The spinning of the
wheels results in a cutting action for better
traction.
R traction control is still activated.
R ESP ®
still provides support when you
brake.
If ESP ®
is deactivated and one or more wheels
star tto spin, the ÷ESP®
warning lamp in
the instrument cluster flashes. In such situa-
tions, ESP ®
will not stabilise the vehicle. X
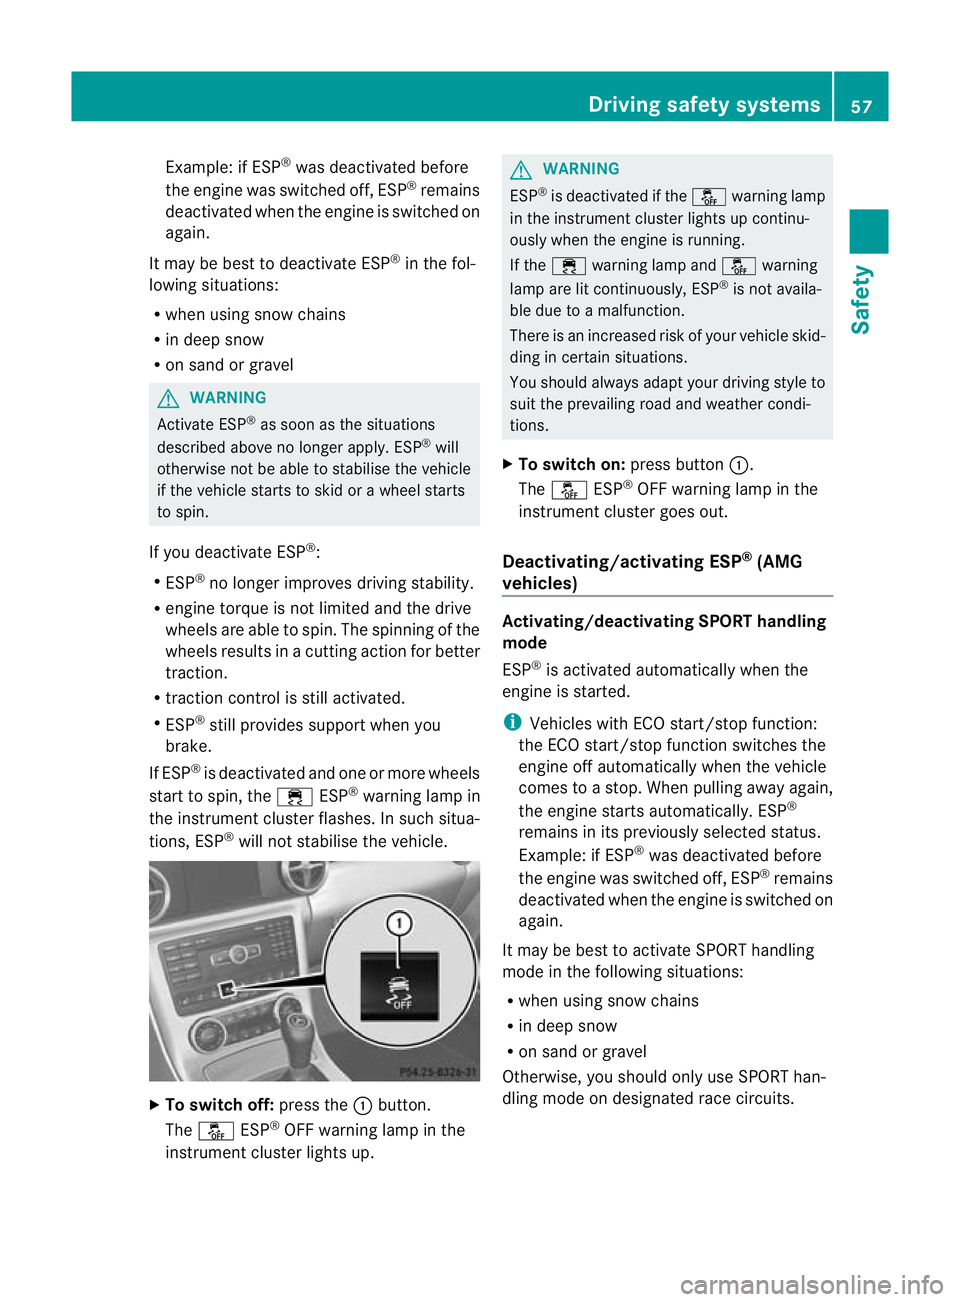
To switch off: press the:button.
The å ESP®
OFF warning lamp in the
instrument cluster lights up. G
WARNING
ESP ®
is deactivated if the åwarning lamp
in the instrument cluster lights up continu-
ously when the engine is running.
If the ÷ warning lamp and åwarning
lamp are lit continuously, ESP ®
is not availa-
ble due to a malfunction.
There is an increased risk of your vehicle skid-
ding in certain situations.
You should always adapt your driving style to
suit the prevailing road and weather condi-
tions.
X To switch on: press button:.
The å ESP®
OFF warning lamp in the
instrument cluster goes out.
Deactivating/activating ESP ®
(AMG
vehicles) Activating/deactivating SPORT handling
mode
ESP
®
is activated automatically when the
engine is started.
i Vehicles with ECO start/stop function:
the ECO start/stop function switches the
engine off automatically when the vehicle
comes to a stop. When pulling away again,
the engine starts automatically. ESP ®
remains in its previously selected status.
Example: if ESP ®
was deactivated before
the engine was switched off, ESP ®
remains
deactivated when the engine is switched on
again.
It may be best to activate SPORT handling
mode in the following situations:
R when using snow chains
R in deep snow
R on sand or gravel
Otherwise, you should only use SPORT han-
dling mode on designated race circuits. Driving safety systems
57Safety Z
Page 61 of 321
G
WARNING
Deactivate SPORT handling mode and acti-
vate ESP ®
as soon as the situations described
above no longer apply.O therwise, SPORT
handling mode will only be able to stabilise
the vehicle to a limited degree if the vehicle
starts to skid or a whee lstarts to spin.
When SPORT handling mode is activated:
R ESP ®
only improves driving stability to a
limited degree.
R engine torque is only restricted to a limited
degree and the drive wheels are able to
spin. The spinning of the wheels results in
a cutting action for better traction.
R traction control is still activated.
R ESP ®
still provides support when you brake
firmly.
If SPORT handling mode is activated and one
or more wheels start to spin, the ÷ESP®
warning lamp in the instrument cluster
flashes. ESP ®
only stabilises the vehicle to a
limited degree. X
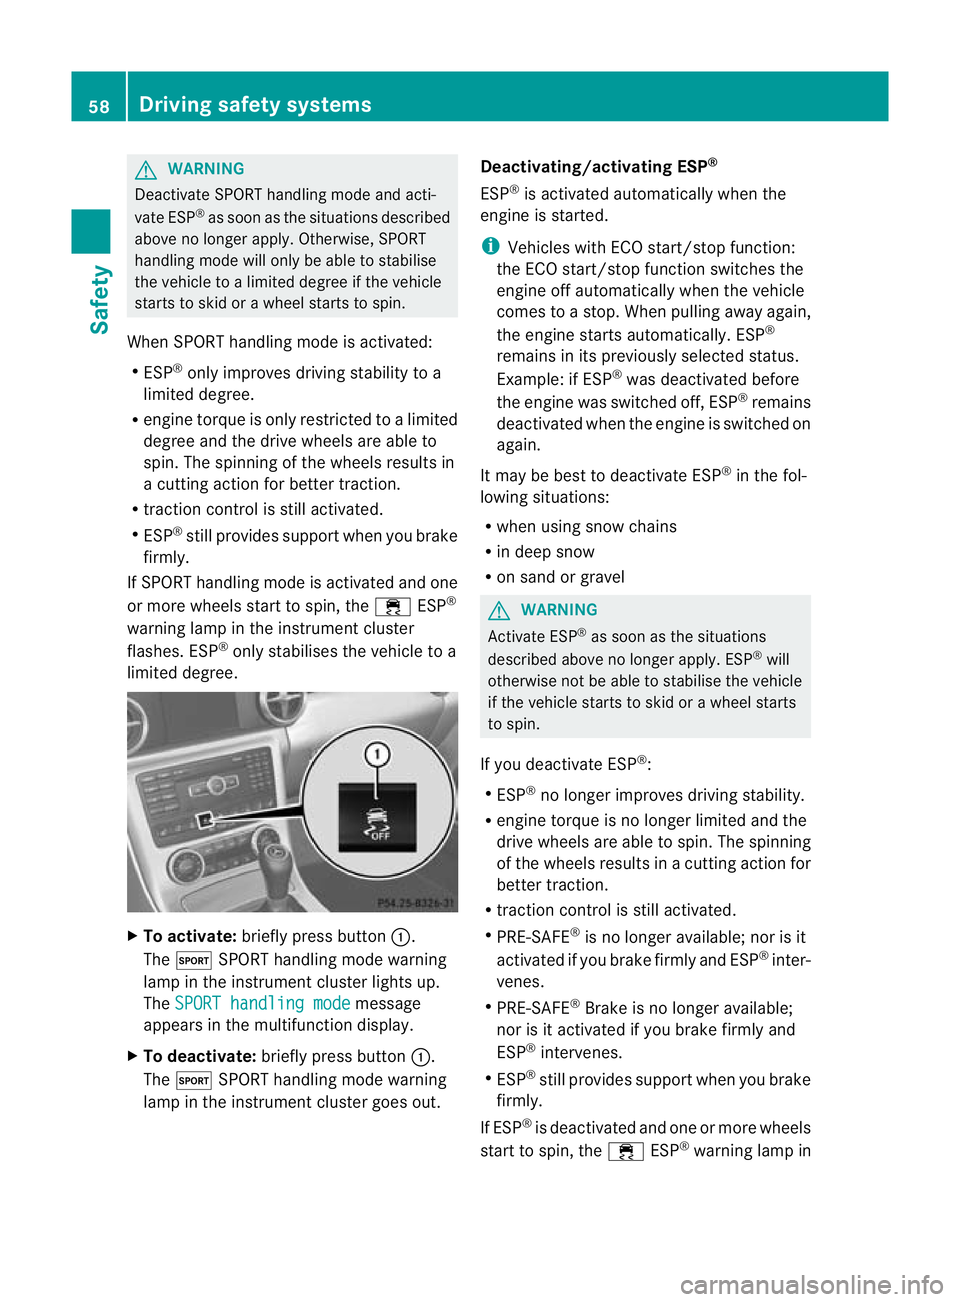
To activate: briefly press button :.
The M SPORT handling mode warning
lamp in the instrument cluster lights up.
The SPORT handling mode message
appears in the multifunctio ndisplay.
X To deactivate: briefly press button :.
The M SPORT handling mode warning
lamp in the instrumen tcluster goes out. Deactivating/activating ESP
®
ESP ®
is activated automatically when the
engine is started.
i Vehicles with ECO start/stop function:
the ECO start/stop function switches the
engine off automatically when the vehicle
comes to a stop. When pulling away again,
the engine starts automatically. ESP ®
remains in its previously selected status.
Example: if ESP ®
was deactivated before
the engine was switched off, ESP ®
remains
deactivated when the engine is switched on
again.
It may be best to deactivate ESP ®
in the fol-
lowing situations:
R when using snow chains
R in deep snow
R on sand or gravel G
WARNING
Activate ESP ®
as soon as the situations
described above no longer apply. ESP ®
will
otherwise not be able to stabilise the vehicle
if the vehicle starts to skid or a wheel starts
to spin.
If you deactivate ESP ®
:
R ESP ®
no longer improves driving stability.
R engine torque is no longer limited and the
drive wheels are able to spin .The spinning
of the wheels results in a cutting action for
better traction.
R traction control is still activated.
R PRE-SAFE ®
is no longer available; nor is it
activated if you brake firmly and ESP ®
inter-
venes.
R PRE-SAFE ®
Brake is no longer available;
nor is it activated if you brake firmly and
ESP ®
intervenes.
R ESP ®
still provides support when you brake
firmly.
If ESP ®
is deactivated and one or more wheels
start to spin, the ÷ESP®
warning lamp in 58
Driving safety systemsSafety
Page 154 of 321
Slippery road surfaces
G
WARNING
Do not shift down for additional engine brak-
ing on a slippery road surface. This could
cause the drive wheels to lose their grip and
the vehicle could skid.
You should drive particularly carefully on slip-
pery road surfaces. Avoid sudden accelera-
tion, steering and braking manoeuvres.
If the vehicle threatens to skid or cannot be
stopped when moving at low speed:
X Vehicles with manual transmission:
shift to neutral.
X Vehicles with automatic transmission:
shift the transmission to position N.
X Try to bring the vehicle under control by
using corrective steering.
i For more information on driving with
snow chains, see (Y page 289). Driving systems
Cruise control
Important safety notes Cruise control maintains a constant road
speed for you. It brakes automatically in order
to avoid exceeding the set speed. On long and
steep downhill gradients, especially if the
vehicle is laden, you must shift to a lower gear
in time. On vehicles with automatic transmis-
sion, select shift range 1,2or 3.B y doing so,
you will make use of th ebraking effect of the
engine. This relieves the loadont he brake
system and prevents the brakes from over-
heating and wearing too quickly. G
WARNING
Do not change down for additional engine
braking on a slippery road surface. This could
cause the drive wheels to lose their grip and
the vehicle could skid. Use cruise control only if road and traffic con-
ditions make it appropriate to maintain a
steady speed for a prolonged period. You can
store any road speed above 30 km/h. G
WARNING
Cruise control cannot take account of road
and traffic conditions.
Always pay attention to traffic conditions
even when cruise control is activated.
Cruise control is only an aid designed to assist
driving. You are responsible for the vehicle's
speed and for braking in good time. G
WARNING
Do not use cruise control
R in traffic conditions that do not allow you to
drive at a constant speed (e.g. heavy traffic
or winding roads). You may otherwise
cause an accident.
R on slippery roads. The drive wheels may
lose their grip when braking or accelerating
and the vehicle may skid.
R when there is low visibility, e.g. due to fog,
heavy rain or snow.
Cruise control lever You can operate cruise control and variable
SPEEDTRONIC with the cruise control lever.
The LIM indicator lamp on the cruise control
lever indicates which system you have selec-
ted:
R
LIM indicator lamp off: cruise control is
selected.
R LIM indicator lamp on: variable SPEED-
TRONIC is selected. Driving systems
151Driving and parking Z
Page 174 of 321
might therefore issue steering instructions
too soon. This may lead to a collision. For this
reason, you should avoid using Parking Guid-
ance in such situations. G
WARNING
Make sure that no persons or animals are in
the manoeuvring range. Otherwise, they
could be injured.
When PARKTRONIC is deactivated, Parking
Guidance is also unavailable.
Use Parking Guidance for parking spaces:
R that are parallel to the directio noftravel
R that are on straight roads, not bends
R that are on the same level as the road, i.e.
not on the pavement, for example. Parking
Guidance may not detect flat kerbs
Parking tips:
R on narrow roads, drive as closely as possi-
ble pastt he parking space.
R parking spaces that are littered, overgrown
or partially occupied by trailer drawbars
might be identified incorrectly or not at all.
R snowfall or heavy rain may lead to a parking
space being measured inaccurately.
R pay attention to the PARKTRONIC
(Y page 168) warning messages during the
parking procedure.
R when transporting a load which protrudes
from your vehicle, you must not use Parking
Guidance.
R never use Parking Guidance with snow
chains or an emergency spare wheel fitted.
R make sure that the tyre pressures are
always correct.T his hasadirec teffect on
the steering instructions.
R the way you rvehicle is positioned in the
parking space after parkin gis dependent
on various factors. These include the posi-
tion and shape of the vehicles parked in
front and behind it and the conditions of the
location. In some cases, Parking Guidance
may guide you too far or not far enough into
a parking space. In some cases, it may also lead you across or onto the kerb. If neces-
sary, cancel the parking procedure with
Parking Guidance.
! If unavoidable, you should drive over
obstacles such as kerbs slowly and not at
a sharp angle. Otherwise, you may damage
the wheels or tyres.
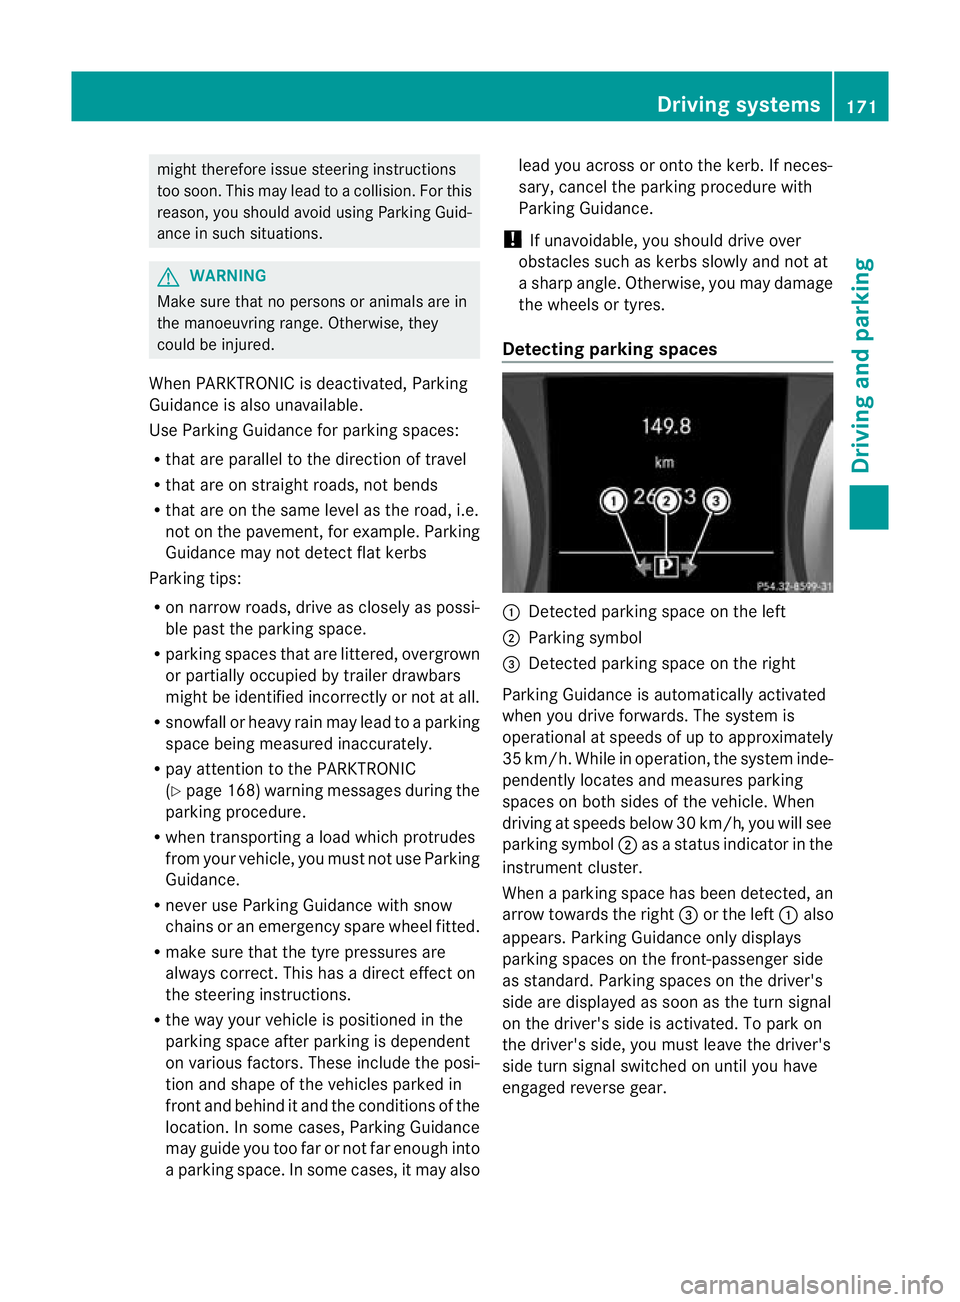
Detecting parking spaces :
Detected parking space on the left
; Parking symbol
= Detected parking space on the right
Parking Guidance is automatically activated
when you drive forwards. The system is
operational at speeds of up to approximately
35 km/h. While in operation, the system inde-
pendently locates and measures parking
spaces on both sides of the vehicle. When
driving at speeds below 30 km/h, you will see
parking symbol ;as a status indicator in the
instrument cluster.
When a parking space has been detected, an
arrow towards the right =or the left :also
appears. Parking Guidance only displays
parking spaces on the front-passenger side
as standard. Parking spaces on the driver's
side are displayed as soon as the turn signal
on the driver's side is activated. To park on
the driver's side, you must leave the driver's
side turn signal switched on until you have
engaged reverse gear. Driving systems
171Driving and parking Z
Page 292 of 321
When you have fitted M+S tyres:
X
Check the tyre pressures (Y page 289).
X Restart the tyre pressure loss warning sys-
tem (Y page 291).
After fitting a spare wheel or an emergency
spare wheel, do not drive faster than
80 km/h. G
WARNING
The wheel/tyre dimensions and the tyre type
of the spare wheel/emergency spare wheel
and the wheel to be replaced may differ. Fit-
ting a spare wheel/emergency spare wheel
may severely impair the driving characteris-
tics. There is a risk of accident.
To preven thazardous situations:
R Adap tyour driving style accordingly and
drive carefully.
R Never fit more than one spare wheel/emer-
gency spare wheel if the dimesions are dif-
ferent to those of the wheel being replaced.
R Only use a spare wheel/emergency spare
wheel briefly if the dimesions are different
to those of the wheel being replaced.
R Do not switch off ESP ®
.
R Have the spare wheel/emergency spare
wheel in question replaced at the nearest
qualified specialist workshop. Make sure
that the wheel/tyre dimensions and tyre
type are correct. Snow chains
For safety reasons, Mercedes-Benz recom-
mends that you only use snow chains that
have been specially approved for your vehicle
by Mercedes-Benz, or that are of a corre-
sponding standard of quality. If you intend to fit snow chains, please bear
the following points in mind:
R
snow chains cannot be fitted to all wheel-
tyre combinations. Permissible wheel-tyre
combinations (Y page 295).
R snow chains must not be fitted to the emer-
gency spare wheel, e.g. a collapsible emer-
gency spare wheel.
R fit snow chains only in pairs and only to the
rear wheels. Observe the manufacturer's
installation instructions.
! Vehicles with steel wheels: if you wish
to fit snow chains to steel wheels, make
sure that you remove the respective
wheels' hubcaps first. The hubcaps may
otherwise be damaged.
Do not exceed the maximum permissible
speed of 50 km/h.
i You may wish to deactivate
ESP ®
(Y page 56) when pulling away with
snow chains fitted. This way you can allow
the wheels to spin in a controlled manner,
achieving an increased driving force (cut-
ting action). Tyre pressure
Tyre pressure specifications
G
WARNING
Tyres with too low or too high tyre pressure
contain the following hazards:
R they can burst, in particular if the vehicle is
heavily laden or when driven at high
speeds.
R the tyres can wear excessively and/or
unevenly, which can severely impair tyre
traction.
R the driving, steering and braking character-
istics may be severely impaired.
There is a risk of accident. Tyre pressure
289Wheels and tyres
Z
Page 294 of 321
warm tyres and only correct it if it is too low
for the current operating conditions.
Driving with tyre pressure that is too high or
too low can:
R shorten the service life of the tyres
R cause increased tyre damage
R have a negative effect on handling charac-
teristics and thus the driving safety (e.g .by
causing aquaplaning)
i The tyre pressure values given for low
loads are minimum values which offe ryou
good ride comfor tcharacteristics.
However, you can also use the values given
for higher loads. These are permissible and
will not adversely affect the running of the
vehicle. H
Environmental note
Check the tyre pressure regularly, at least
every 14 days.
For speeds up to 210 km/h the values given
on the tyre pressure information label (fuel
filler flap) may be reduced by 30 kPa (0.3 bar,
4p si) without a reduction in safety.
This improves the ride comfort of your vehi-
cle; however, the fuel consumption may
increase slightly. Tyre pressure loss warning system
Important safety notes While the vehicle is in motion, the tyre pres-
sure loss warning system monitors the set
tyre pressure using the rotational speed of
the wheels. This enables the system to detect
significant pressure loss in a tyre. If the speed
of rotation of a wheel changes as a result of
a loss of pressure, a corresponding warning
message will appearint he multifunction dis-
play.
The tyre pressure warning system does not
warn you of an incorrectly set tyre pressure.
Observe the notes on the recommended tyre
pressure (Y page 289). The tyre pressure loss warning system does
not replace the need to regularly check your
vehicle's tyre pressures, since an even loss of
pressure on several tyres at the same time
cannot be detected by the tyre pressure loss
warning system.
The tyre pressure monitor is not able to warn
you of a sudden loss of pressure, e.g. if the
tyre is penetrated by a foreign object. In the
event of a sudden loss of pressure, bring the
vehicle to a halt by braking carefully. Avoid
abrupt steering manoeuvres.
The function of the tyre pressure loss warning
system is limited or delayed if:
R
snow chains are fitted to your vehicle's
tyres.
R road conditions are wintry.
R you are driving on sand or gravel.
R you adopt a very sporty driving style (cor-
nering at high speeds or driving with high
rates of acceleration).
R you are driving with a heavy load (in the
vehicle or on the roof).
Restarting the tyre pressure loss warn-
ing system Restart the tyre pressure loss warning system
if you have:
R
changed the tyre pressure
R changed the wheels or tyres
R fitted new wheels or tyres
X Before restarting, consult the table of tyre
pressures on the inside of the fuel filler flap
to ensure that the tyre pressure in all four
tyres is set correctly for the respective
operating conditions.
The tyre pressure loss warning system can
only give reliable warnings if you have set
the correct tyre pressure. If an incorrect
tyre pressure is set, these incorrectv alues
will be monitored.
X Observe the notes in the section on tyre
pressures ( Ypage 289). Tyre pressure
291Wheels and tyres Z