low beam MERCEDES-BENZ SLK250 2012 R172 User Guide
[x] Cancel search | Manufacturer: MERCEDES-BENZ, Model Year: 2012, Model line: SLK250, Model: MERCEDES-BENZ SLK250 2012 R172Pages: 334, PDF Size: 4.26 MB
Page 176 of 334
G
WARNING
Objects located above the height range of
Parking Guidance will not be detected when
the parking space is measured. These objects
are not taken into account when the parking
procedure is calculated, e.g. overhanging
loads, tail sections or loading ramps of goods
vehicles. Under some circumstances, Parking
Guidance might therefore issu esteering
instructions too soon. Thi smay lead to a
collision .For this reason, you should avoid
using Parking Guidance in such situations. G
WARNING
Make sure that no persons or animals are in
the maneuvering range. Otherwise, they
could be injured.
! Pay particular attention to low objects or
objects with flat surfaces, such as trailer
drawbars, posts, cross beams and curbs.
These types of objects cannot be detected
by Parking Guidance and may damage the
vehicle.
When PARKTRONIC is deactivated, Parking
Guidance is also unavailable.
Use Parking Guidance for parking spaces:
R that are parallel to the direction of travel
R that are on straight roads, not bends
R that are on the same level as the road, i.e.
not on the pavement, for example. Parking
Guidance may not detect flat curbs
Parking tips:
R on narrow roads, drive past the parking
space as close as possible.
R parking spaces that are littered, overgrown
or partially occupied by trailer drawbars
might be identified incorrectly or not at all.
R snowfall or heavy rain may lead to a parking
space being measured inaccurately.
R pay attention to the PARKTRONIC
(Y page 171) warning messages during the
parking procedure. R
when transporting a load which protrudes
from your vehicle, you must not use Parking
Guidance.
R never use Parking Guidance with snow
chains or an emergency spare wheel
mounted.
R make sure that the tire pressures are
always correct. This has adirec teffect on
the steering instructions.
R the way you rvehicle is positioned in the
parking space after parkin gis dependent
on various factors. These include the
position and shape of the vehicles parked
in front and behind it and the conditions of
the location. In some cases, Parking
Guidance may guide you too far or not far
enough into a parking space. In some
cases, it may also lead you across or onto
the curb. If necessary, cancel the parking
procedure with Parking Guidance.
! If unavoidable, you should drive over
obstacles such as curbs slowly and not at
a sharp angle. Otherwise, you may damage
the wheels or tires.
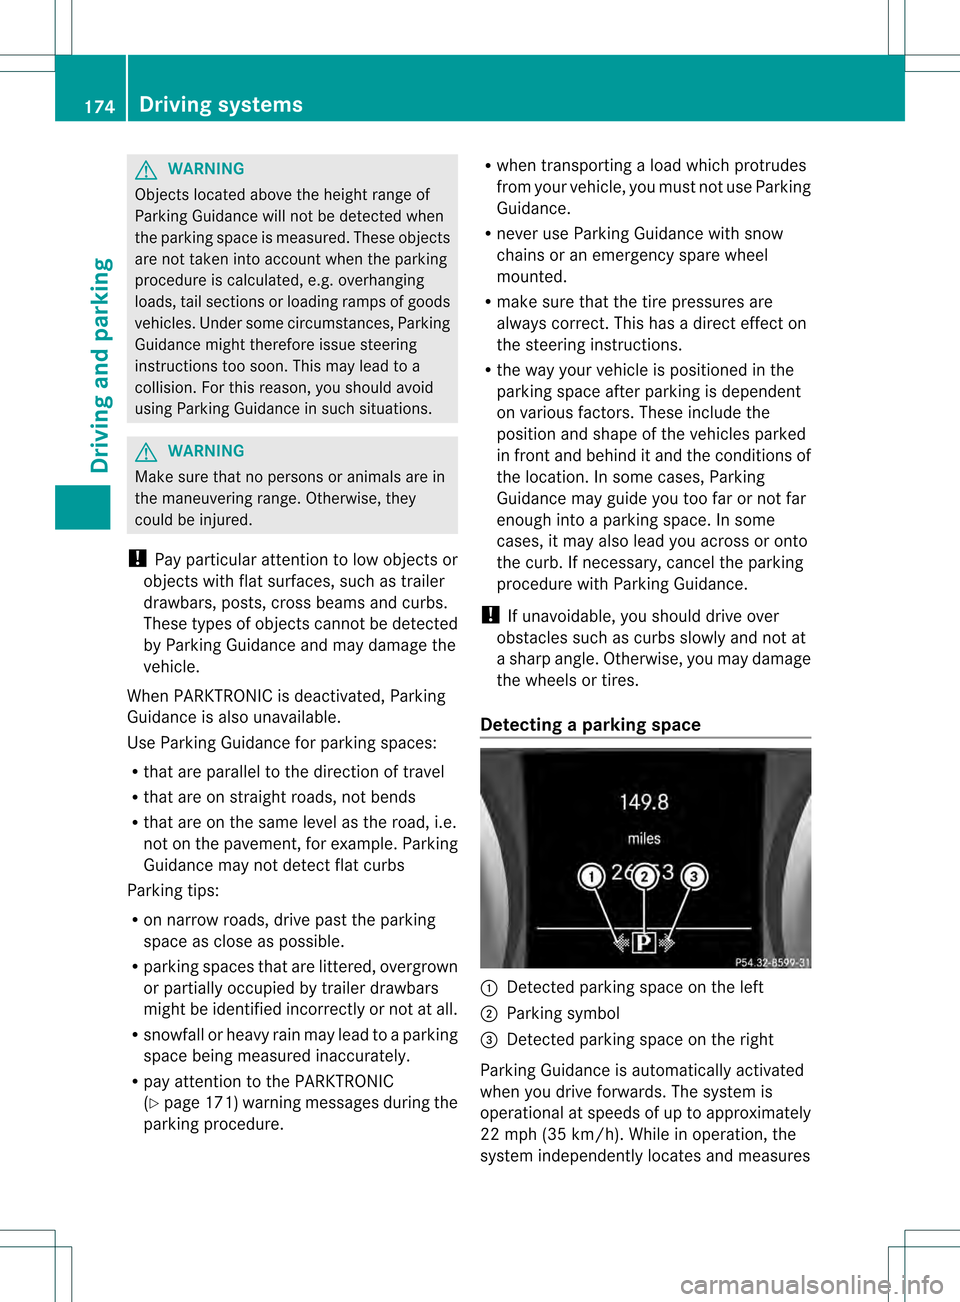
Detecting aparking space 0002
Detected parking space on the left
0003 Parking symbol
0023 Detected parking space on the right
Parking Guidance is automatically activated
whe nyou drive forwards. The system is
operational at speeds of up to approximately
22 mph (35 km/h). While in operation, the
system independently locates and measures 174
Driving systemsDriving and parking
Page 194 of 334
X
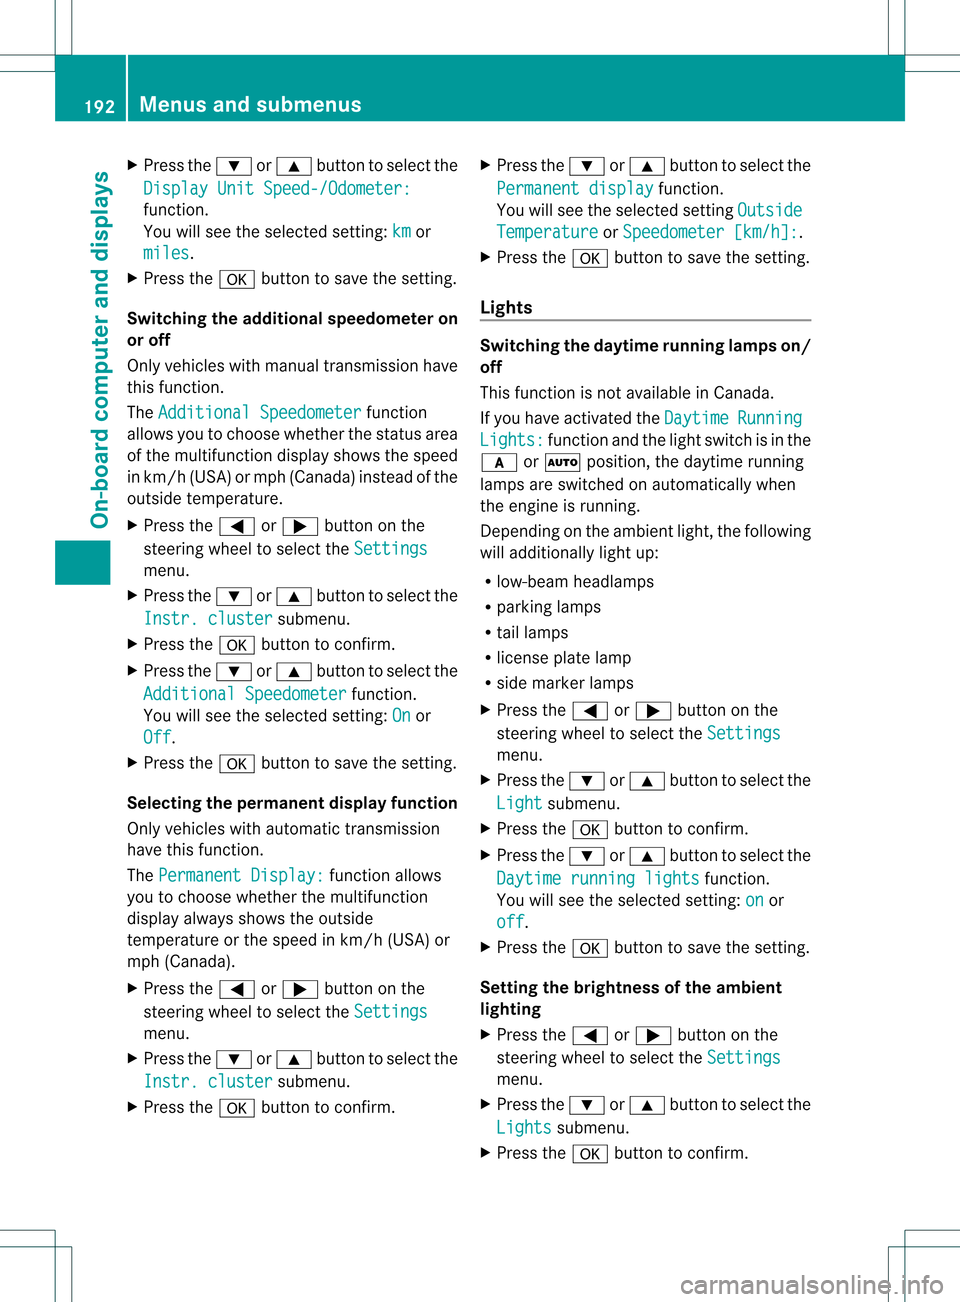
Press the 0004or0003 button to select the
Display Unit Speed-/Odometer: function.
You will see the selected setting:
km or
miles .
X Press the 000Cbutton to save the setting.
Switching the additional speedometer on
or off
Only vehicles with manual transmission have
this function.
The Additional Speedometer function
allows you to choose whether the status area
of the multifunction display shows the speed
in km/h( USA) or mph (Canada) instead of the
outside temperature.
X Press the 0002or0005 button on the
steering wheel to select the Settingsmenu.
X Press the 0004or0003 button to select the
Instr. cluster submenu.
X Press the 000Cbutton to confirm.
X Press the 0004or0003 button to select the
Additional Speedometer function.
You will see the selected setting: On or
Off .
X Press the 000Cbutton to save the setting.
Selecting the permanent display function
Only vehicles with automatic transmission
have this function.
The Permanent Display: function allows
you to choose whether the multifunction
display always shows the outside
temperature or the speed in km/h (USA) or
mph (Canada).
X Press the 0002or0005 button on the
steering wheel to select the Settingsmenu.
X Press the 0004or0003 button to select the
Instr. cluster submenu.
X Press the 000Cbutton to confirm. X
Press the 0004or0003 button to select the
Permanent display function.
You will see the selected setting Outside Temperature or
Speedometer [km/h]: .
X Press the 000Cbutton to save the setting.
Lights Switching the daytime running lamps on/
off
This function is not available in Canada.
If you have activated the
Daytime Running
Lights: function and the light switch is in the
0008 or0005 position, the daytime running
lamps are switched on automatically when
the engine is running.
Depending on the ambient light, the following
will additionally light up:
R low-beamh eadlamps
R parking lamps
R tail lamps
R license plate lamp
R side marker lamps
X Press the 0002or0005 button on the
steering wheel to select the Settings menu.
X Press the 0004or0003 button to select the
Light submenu.
X Press the 000Cbutton to confirm.
X Press the 0004or0003 button to select the
Daytime running lights function.
You will see the selected setting: on or
off .
X Press the 000Cbutton to save the setting.
Setting the brightness of the ambient
lighting
X Press the 0002or0005 button on the
steering wheel to select the Settings menu.
X Press the 0004or0003 button to select the
Lights submenu.
X Press the 000Cbutton to confirm. 192
Menus and submenusOn-board computer and displays
Page 195 of 334
X
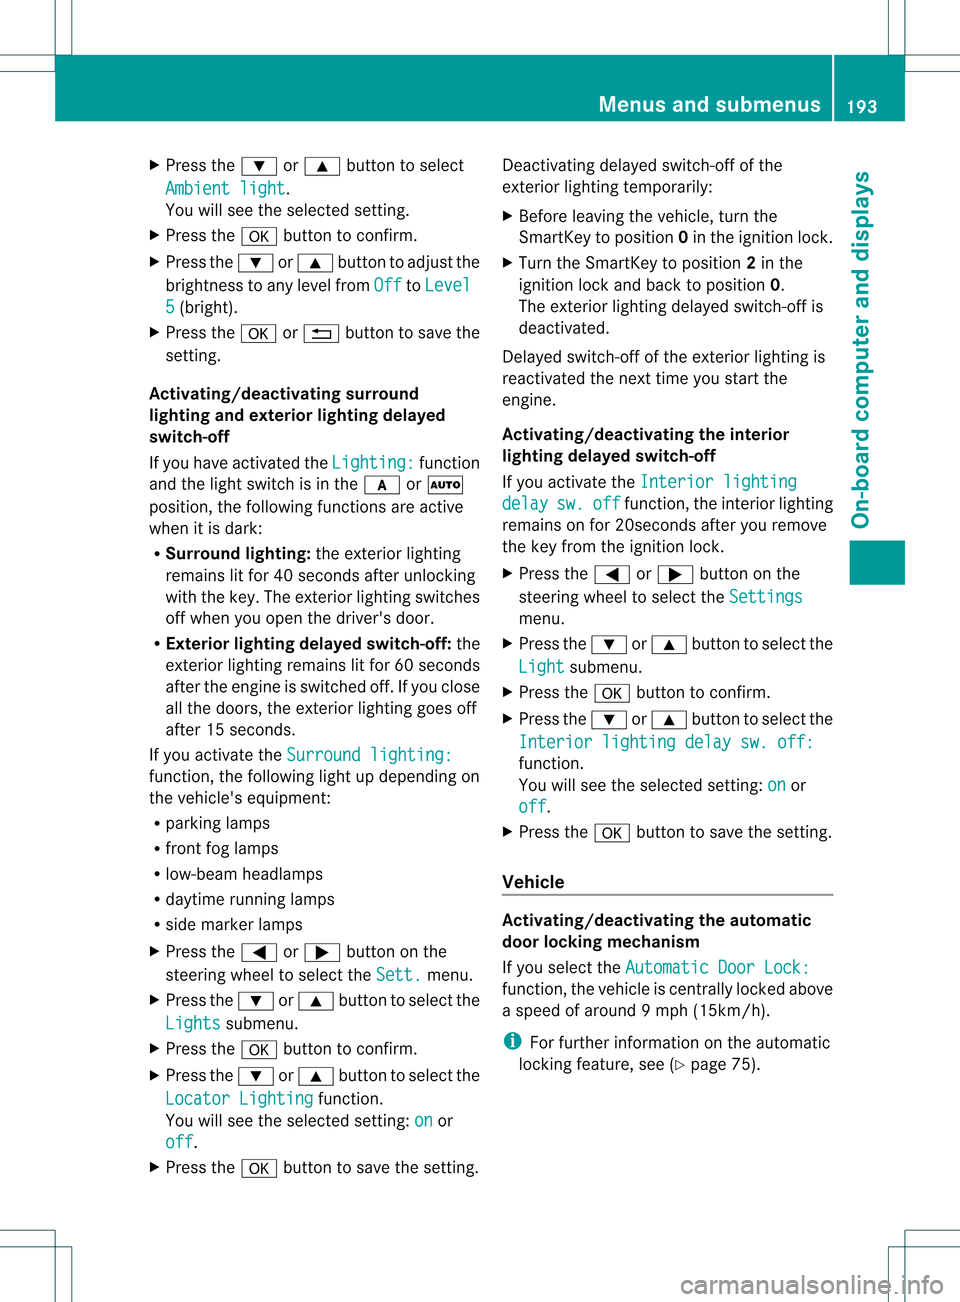
Press the 0004or0003 button to select
Ambient light .
You will see the selected setting.
X Press the 000Cbutton to confirm.
X Press the 0004or0003 button to adjust the
brightness to any level from Off to
Level 5 (bright).
X Press the 000Cor0001 button to save the
setting.
Activating/deactivating surround
lighting and exterior lighting delayed
switch-off
If you have activated the Lighting: function
and the light switch is in the 0008or0005
position, the following functions are active
when it is dark:
R Surround lighting: the exterior lighting
remains lit for 40 seconds after unlocking
with the key. The exterior lighting switches
off when you open the driver's door.
R Exterior lighting delayed switch-off: the
exterior lighting remains lit for 60 seconds
after the engine is switched off. If you close
all the doors, the exterior lighting goes off
after 15 seconds.
If you activate the Surround lighting: function, the following light up depending on
the vehicle's equipment:
R
parking lamps
R front fog lamps
R low-beam headlamps
R daytime running lamps
R side marker lamps
X Press the 0002or0005 button on the
steering wheel to select the Sett. menu.
X Press the 0004or0003 button to select the
Lights submenu.
X Press the 000Cbutton to confirm.
X Press the 0004or0003 button to select the
Locator Lighting function.
You will see the selected setting: on or
off .
X Press the 000Cbutton to save the setting. Deactivating delayed switch-off of the
exterior lighting temporarily:
X
Before leaving the vehicle, turn the
SmartKey to position 0in the ignition lock.
X Turn the SmartKey to position 2in the
ignition lock and back to position 0.
The exterior lighting delayed switch-off is
deactivated.
Delayed switch-off of the exterior lighting is
reactivated the next time you start the
engine.
Activating/deactivating the interior
lighting delayed switch-off
If you activate the Interior lighting delay sw. off function, the interior lighting
remains on for 20seconds after you remove
the key from the ignition lock.
X Press the 0002or0005 button on the
steering wheel to select the Settings menu.
X Press the 0004or0003 button to select the
Light submenu.
X Press the 000Cbutton to confirm.
X Press the 0004or0003 button to select the
Interior lighting delay sw. off: function.
You will see the selected setting:
on or
off .
X Press the 000Cbutton to save the setting.
Vehicle Activating/deactivating the automatic
door locking mechanism
If you select the
Automatic Door Lock: function, the vehicle is centrally locked above
a speed of around
9mph (15km/h).
i For further information on the automatic
locking feature, see (Y page 75). Menus and submenus
193On-board computer and displays Z
Page 215 of 334
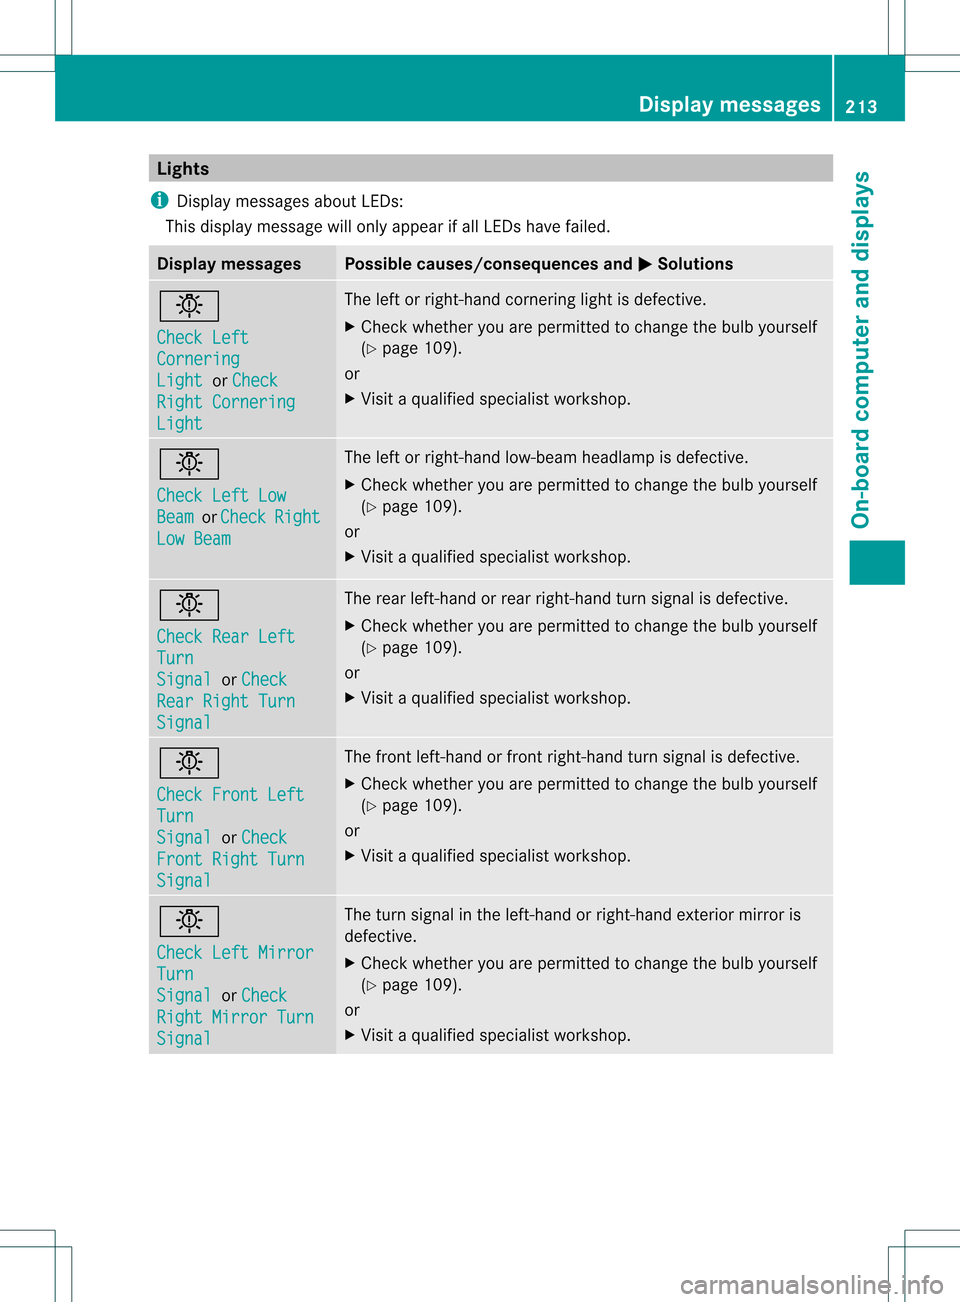
Lights
i Display messages about LEDs:
This display message will only appear if all LEDs have failed. Displa
ymessages Possible causes/consequences and
0001 Solutions
0001
Check Left
Cornering
Light or
Check Right Cornering
Light The left or right-hand cornering light is defective.
X
Chec kwhether you are permitted to change the bulb yourself
(Y page 109).
or
X Visit a qualified specialist workshop. 0001
Check Left Low
Beam or
Check Right
Low Beam The left or right-hand low-beam headlamp is defective.
X
Check whether you are permitted to change the bulb yourself
(Y page 109).
or
X Visit a qualified specialist workshop. 0001
Check Rear Left
Turn
Signal or
Check Rear Right Turn
Signal The rear left-hand or rear right-hand turn signal is defective.
X
Check whether you are permitted to change the bulb yourself
(Y page 109).
or
X Visit a qualified specialist workshop. 0001
Check Front Left
Turn
Signal or
Check Front Right Turn
Signal The front left-hand or front right-hand turn signal is defective.
X
Check whether you are permitted to change the bulb yourself
(Y page 109).
or
X Visit a qualified specialist workshop. 0001
Check Left Mirror
Turn
Signal or
Check Right Mirror Turn
Signal The turn signal in the left-hand or right-hand exterior mirror is
defective.
X
Check whether you are permitted to change the bulb yourself
(Y page 109).
or
X Visit a qualified specialist workshop. Display messages
213On-board computer and displays Z