roof MERCEDES-BENZ SLK250 2012 R172 Owner's Manual
[x] Cancel search | Manufacturer: MERCEDES-BENZ, Model Year: 2012, Model line: SLK250, Model: MERCEDES-BENZ SLK250 2012 R172Pages: 334, PDF Size: 4.26 MB
Page 7 of 334
Pulling away
................................... 134
Releasing the parking lock
manually ........................................ 146
Selector leve r................................ 140
Shift range s................................... 143
Starting the engine ........................133
Steering wheel paddle shifters ......142
Transmission position displa y........ 140
Transmission positions ..................141
Automatic transmission
emergency mode ............................... 146 B
Back support see Lumbar support
Backup lamp
Changing bulbs .............................. 112
Display message ............................ 215
BAS (Brake Assist System) .................57
Basic settings see Settings
BAS PLUS (Brake Assist System
PLUS) .................................................... 57
Battery (SmartKey) Checking .......................................... 71
Important safety notes ....................71
Replacing ......................................... 71
Battery (vehicle)
Charging ........................................ 283
Display message ............................ 218
Important safety notes ..................282
Jump starting ................................. 285
Belt
see Seat belts
Bottle holder ...................................... 246
Brake Assist System see BAS (Brake Assist System)
Brake fluid
Display message ............................ 206
Notes ............................................. 327
Brake fluid level ................................ 263
Brake lamps Display message ............................ 214
Brakes
ABS .................................................. 56
BAS .................................................. 57
BAS PLUS ........................................ 57Brake fluid (notes)
.........................327
Display message ............................ 200
Driving tips .................................... 153
High-performance brake system ....154
Important safety notes ..................153
Maintenance .................................. 154
Parking brake ................................ 150
Warning lamp ................................. 229
Breakdown
see Flat tire
see Towing away/tow-starting
Bulbs
see Changing bulbs C
California Important notice for retail
customers and lessees ....................21
Calling up a malfunction
see Display messages
Capacities
see Technical data
Car
see Vehicle
Care
Carpets .......................................... 271
Car wash ........................................ 265
Display ........................................... 269
Exterior lights ................................ 268
Gea rors electo rlever .................... 270
Interior ........................................... 269
Matte finish ................................... 267
Notes ............................................. 265
Paint .............................................. 267
Plastic trim .................................... 269
Power washer ................................ 266
Roof lining ...................................... 271
Seat bel t........................................ 270
Seat cover ..................................... 270
Sensors ......................................... 269
Steering wheel ............................... 270
Tai lpipes ....................................... 269
Trim pieces .................................... 270
Washing by hand ........................... 266
Wheels ........................................... 266
Windows ........................................ 268 Index
5
Page 16 of 334
Refueling
Fuelgauge ....................................... 27
Important safety notes ..................146
Refueling proces s.......................... 147
see Fuel
Releasing the parking lock
manually (automatic
transmission) ..................................... 146
Remote control Garage door opene r....................... 254
Programming (garage door
opener) .......................................... 255
Reserve (fuel tank)
see Fuel
Reserve fuel
Display message ............................ 219
Warning lamp ................................. 234
see Fuel
Residual heat (climate control) ........125
Restraint system see SRS (Supplemental Restraint
System)
Reverse gear
Engaging (automatic
transmission) ................................. 140
Engaging (manual transmission) ....139
Reversible floor panel (trunk) ..........244
Roadside Assistance (breakdown) ....21
Roof Display message ............................ 225
Important safety notes ....................82
Opening/closing (with roof
switch) ............................................. 84
Opening/closing (with SmartKey) ....84
Problem (malfunction) .....................86
Relocking ......................................... 85
Roof carrier ........................................ 245
Roof lining and carpets (cleaning
guidelines) ......................................... 271
Roof switch .......................................... 83
Route (navigation) see Route guidance (navigation)
Route guidance (navigation) ............186 S
Safety Childre ninthe vehicle ..................... 53
Child restraint systems ....................53
Occupant Classification System
(OCS) ............................................... 42
Overview of occupant safety
systems ........................................... 36
Safety systems
see Driving safety systems
Seat belts
Adjusting the driver's and front-
passenger sea tbelt ......................... 51
Belt force limiters ............................ 52
Cleaning ......................................... 270
Correct usage .................................. 49
Emergency Tensioning Devices ....... .52
Fastening ......................................... 50
Important safety guidelines .............48
Releasing ......................................... 51
Safety guidelines ............................. 37
Specia lseat belt retractor ...............55
Switching belt adjustment on/off
(on-board computer) ......................194
Warning lamp ................................. 228
Warning lamp (function) ................... 51
Seats
Adjusting (electrically). ....................94
Adjusting (manually )........................ 94
Adjusting the 4-way lumbar
support ............................................ 95
Adjusting the head restraint ............95
Cleaning the cover .........................270
Correct driver's seat position ........... 92
Important safety notes ....................93
Seat heating problem ......................96
Storing settings (memory
function) ........................................ 100
Switching AIRSCARF on/off ............96
Switching sea theating on/off .........95
Sensors (cleaning instructions) .......269
Service Center see Qualified specialist workshop
Service interval display
Displaying service messages .........264
Hiding service messages ...............264 14
Index
Page 17 of 334
Notes
............................................. 264
Service messages ..........................264
Service menu (on-board computer) .191
Service products Brake fluid ..................................... 327
Coolant (engine) ............................ 327
Engine oil ....................................... 326
Fuel ................................................ 325
Important safety notes ..................324
Washer fluid .................................. .328
Settings
Factory (on-board computer) .........195
On-board computer .......................191
Setting the air distribution ...............123
Setting the airflow ............................123
SETUP (on-board computer) .............196
Side impact air bag .............................40
Side marker lamp (display
message) ............................................ 215
Side windows Convenience closing feature ............81
Important safety information ...........80
Opening/closing (all) .......................80
Opening/closing (front) ...................80
Problem (malfunction) .....................82
Resetting ......................................... 82
SmartKey
Changing the battery .......................71
Changing the programming .............70
Checking the battery .......................71
Convenience opening feature ..........81
Display message ............................ 226
Door central locking/unlocking .......68
Important safety notes ....................68
Loss ................................................. 73
Mechanical key ................................ 70
Opening/closing the roof ................84
Positions (ignition lock) .................131
Problem (malfunction) .....................73
Starting the engine ........................133
Snow chains ...................................... 297
Sockets Center console .............................. 248
Points to observe before use .........247
Under the armrest .........................248
Spare wheel
Notes/data .................................... 318Storage location
............................ 274
Stowing .......................................... 275
see Emergency spare wheel
Specialist workshop ............................ 23
Speed, controlling see Cruise control
Speedometer
Activating/deactivating the
additional speedometer .................192
Digita l............................................ 186
In the Instrument cluster .................27
Segments ...................................... 181
Selecting the unit of
measurement ................................ 191
see Instrument cluster
SPORT handling mode
Activating/deactivating (AMG
vehicles) .......................................... 60
Warning lamp ................................. 232
SRS (Supplemental Restraint
System)
Display message ............................ 208
Introduction ..................................... 36
Warning lamp ................................. 233
Warning lamp (function) ................... 36
Standing lamps
Changing bulbs .............................. 112
Display message ............................ 215
Switching on/off ........................... 104
Starting (engine) ................................ 132
Station see Radio
Steering (display message) ..............225
Steering wheel Adjusting (electrically). ....................97
Adjusting (manually). .......................97
Button overview ............................... 29
Buttons (on-board
computer) ...................................... 181
Cleaning ......................................... 270
Important safety notes ....................96
Paddle shifters ............................... 142
Storing settings (memory
function) ........................................ 100
Steering wheel paddle shifters ........142
Stopwatch (RACETIMER) ................... 196
Stowage areas ................................... 242 Index
15
Page 33 of 334
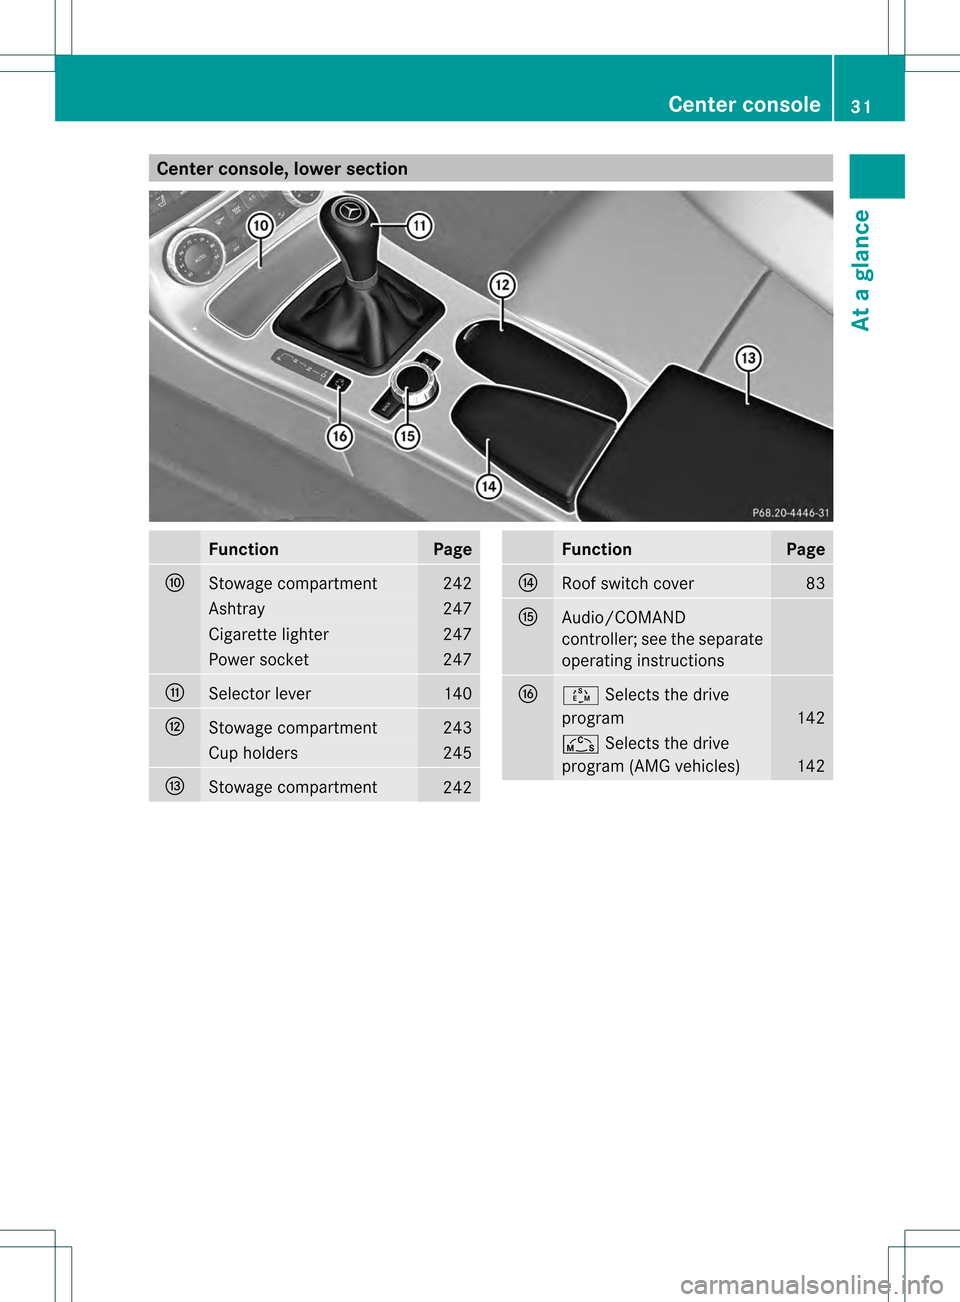
Center console, lower section
Function Page
0017
Stowage compartment 242
Ashtray 247
Cigarette lighter 247
Power socket 247
0018
Selector lever 140
0019
Stowage compartment 243
Cup holders 245
001A
Stowage compartment
242 Function Page
001B
Roof switch cover 83
001C
Audio/COMAND
controller; see the separate
operating instructions
001E
0004
Selects the drive
program 142
0001
Selects the drive
program (AMG vehicles) 142Center console
31At a glance
Page 69 of 334
Useful information
..............................68
SmartKey ............................................. 68
Doors .................................................... 74
Trunk .................................................... 77
Side windows ...................................... 80
Roof ...................................................... 82 67Opening/closing
Page 79 of 334
i
If you lock the vehicle as described above,
the fuel filler flap is not locked. The anti-
theft alarm system is not armed. Trunk
Important safety notes
Do not leave the SmartKey in the trunk. You
could otherwise lock yourself out. G
WARNING
When leaving the vehicle, always remove the
SmartKey from the ignition lock. Always take
the SmartKey with you and lock the vehicle.
Do not leave childre nunsupervised in the
vehicle, eve nifthey are secured in a child
restraint system, and do not give them access
to an unlocked vehicle. Achild's unsupervised
access to a vehicle could result in an accident
and/or serious personal injury. They could:
R injure themselves on vehicle parts
R be seriously or fatally injured by extreme
heat or cold
R injure themselves or have an accident with
vehicle equipment that may still be in
operation even after the SmartKey has
been removed from the ignition, such as the
seat adjustment, steering wheel
adjustment or memory function.
If children open a door, they could cause
severe or even fatal injury to other persons; if
they get out of the vehicle, they could injure
themselves when doing so or be seriously or
even fatally injured by any passing traffic.
Do not expose the child restraint system to
direct sunlight. The child restraint system's
metal parts, for example, could become very
hot, and a child could be burned on these
parts. G
WARNING
Do not carry heavy or hard objects in the
passenger compartmentort runk unless they
are firmly secured in place. Unsecured or improperly positioned cargo
increases a child's risk of injury in the event
of
R
strong braking maneuvers
R sudden changes of direction
R an accident G
WARNING
Make sure the trunk lid is closed when the
engine is running and while driving. Among
other dangers, deadly carbon monoxide (CO)
gases may enter the vehicle interior resulting
in unconsciousness and death.
! The trunk lid swings upwards when
opened .Therefore, make sure that there is
sufficient clearance above the trunk lid.
To open the trunk lid completely, a minimum
clearance of 5.90 ft (1.80 m) above the
ground is necessary.
The trunk lid can be:
R opened and closed manually from outside
R opened automatically from outside
R locked separately
R unlocked with the mechanical key
R opened with the emergency release button Opening and closing manually
Opening You can only unlock the trunk lid when the
vehicle is stationary and the roof is fully
opened or closed.
X
Press the 0010button on the SmartKey. Trunk
77Opening/closing Z
Page 83 of 334
X
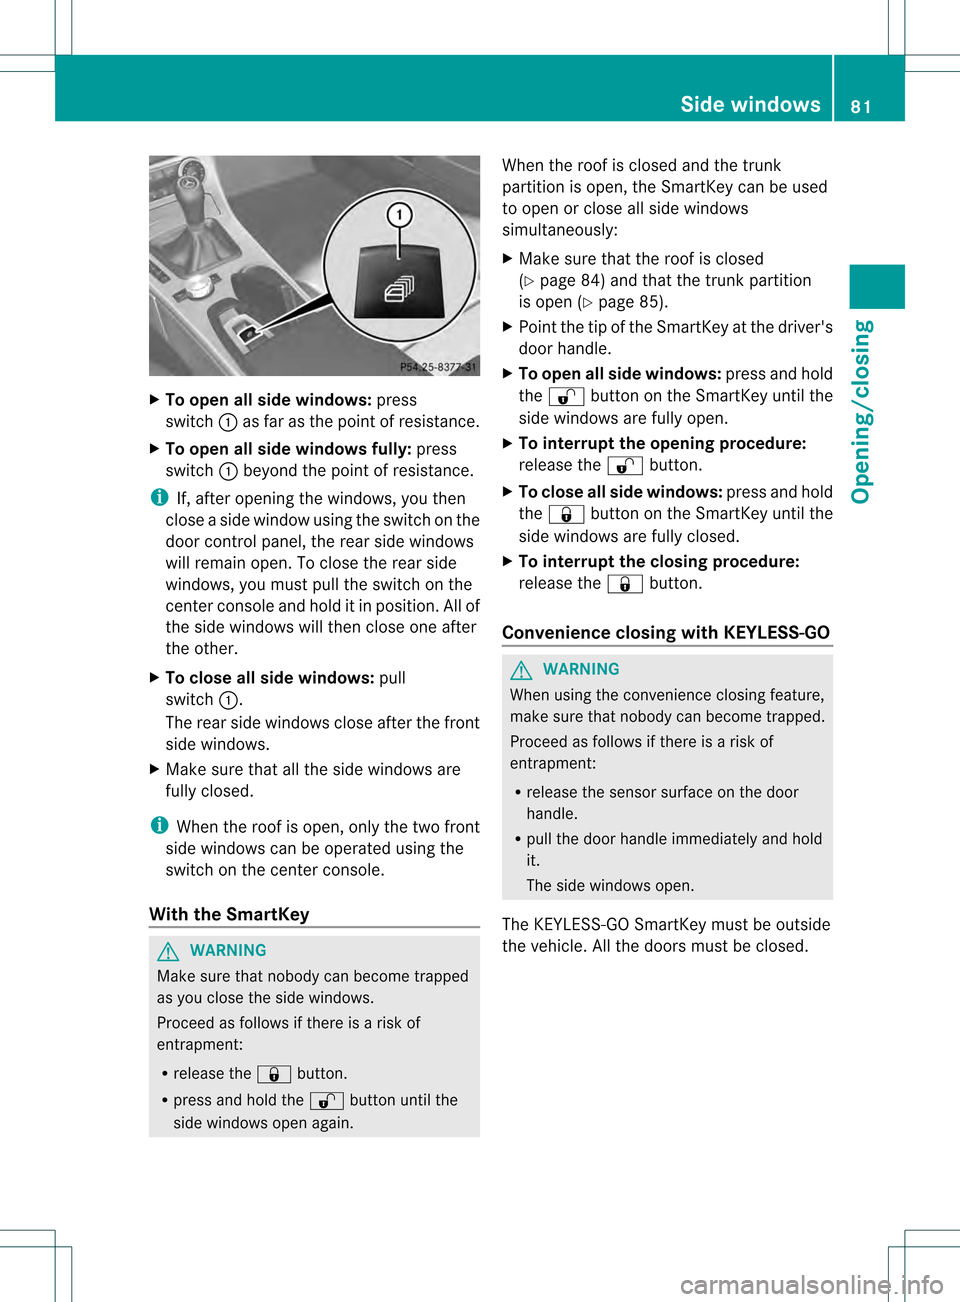
To open all side windows: press
switch 0002as fa ras the point of resistance.
X To open all side windows fully: press
switch 0002beyond the point of resistance.
i If, after opening the windows, you then
close a side window using the switch on the
door control panel, the rear side windows
will remain open. To close the rear side
windows, you must pull the switch on the
center console and hold it in position. All of
the side windows will then close one after
the other.
X To close all side windows: pull
switch 0002.
The rear side windows close after the front
side windows.
X Make sure that all the side windows are
fully closed.
i When the roof is open, only the two front
side windows can be operated using the
switch on the center console.
With the SmartKey G
WARNING
Make sure that nobody can become trapped
as you close the side windows.
Proceed as follows if there is a risk of
entrapment:
R release the 000Fbutton.
R press and hold the 0010button until the
side windows open again. When the roof is closed and the trunk
partition is open, the SmartKey can be used
to open or close all side windows
simultaneously:
X
Make sure that the roof is closed
(Y page 84) and that the trunk partition
is open (Y page 85).
X Point the tip of the SmartKey at the driver's
door handle.
X To open all side windows: press and hold
the 0010 button on the SmartKey until the
side windows are fully open.
X To interrupt the opening procedure:
release the 0010button.
X To close all side windows: press and hold
the 000F button on the SmartKey until the
side windows are fully closed.
X To interrupt the closing procedure:
release the 000Fbutton.
Convenience closing with KEYLESS-GO G
WARNING
When using the convenience closing feature,
make sure that nobody can become trapped.
Proceed as follows if there is a risk of
entrapment:
R release the sensor surface on the door
handle.
R pull the door handle immediately and hold
it.
The side windows open.
The KEYLESS-GO SmartKey must be outside
the vehicle. All the doors must be closed. Side windows
81Opening/closing Z
Page 84 of 334
X
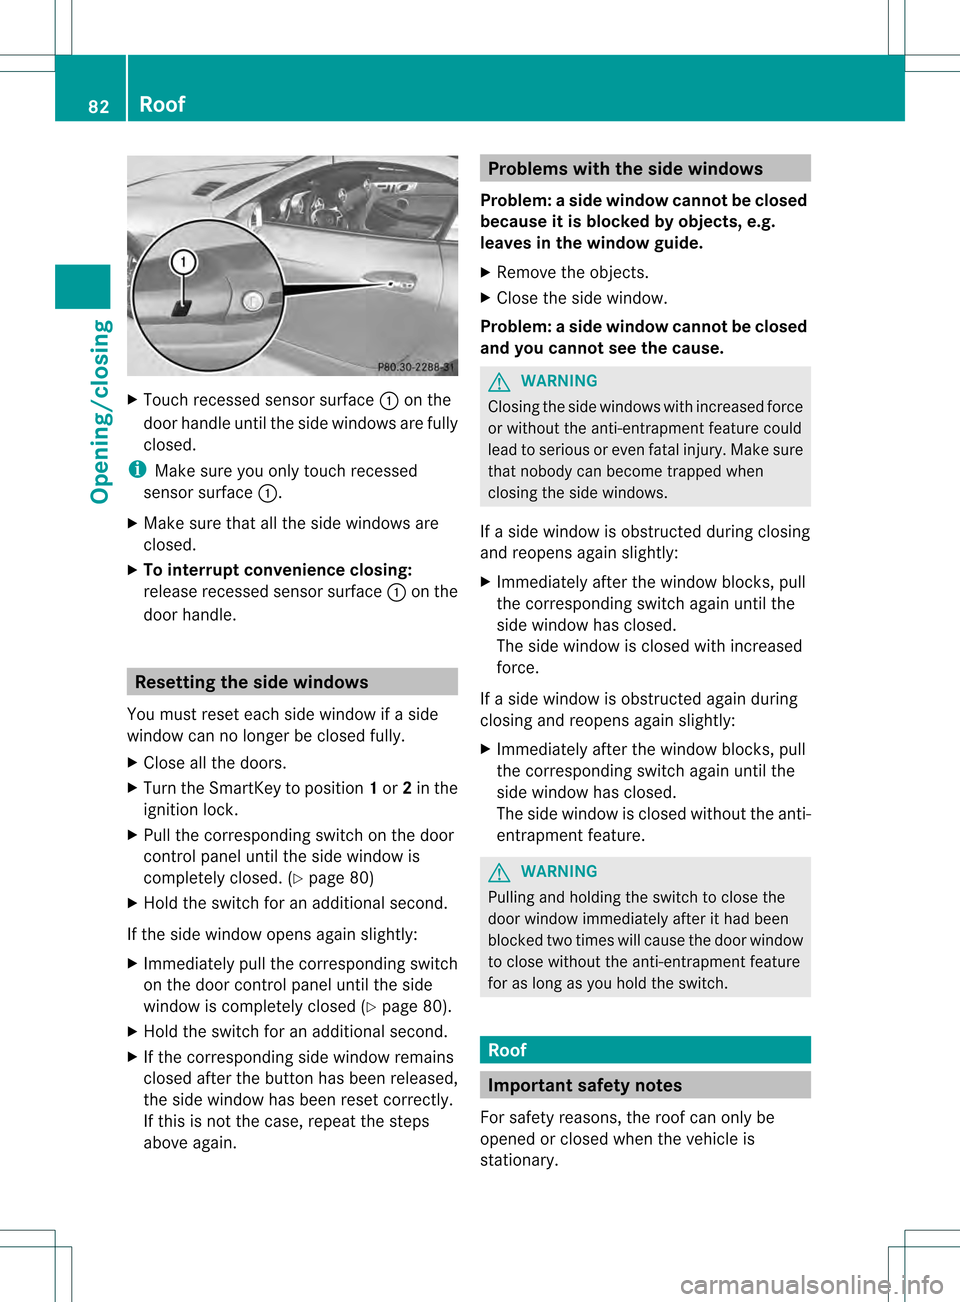
Touch recessed sensor surface 0002on the
door handle until the side windows are fully
closed.
i Make sure you only touch recessed
sensor surface 0002.
X Make sure that all the side windows are
closed.
X To interrupt convenience closing:
release recessed sensor surface 0002on the
door handle. Resetting the side windows
You must reset each side window if a side
window can no longer be closed fully.
X Close all the doors.
X Turn the SmartKey to position 1or 2in the
ignition lock.
X Pull the corresponding switch on the door
control panel until the side window is
completely closed. (Y page 80)
X Hold the switch for an additional second.
If the side window opens again slightly:
X Immediately pull the corresponding switch
on the door control panel until the side
window is completely closed (Y page 80).
X Hold the switch for an additional second.
X If the corresponding side window remains
closed after the button has been released,
the side window has been reset correctly.
If this is not the case, repeat the steps
above again. Problems with the side windows
Problem: aside window cannot be closed
because it is blocked by objects, e.g.
leaves in the window guide.
X Remove the objects.
X Close the side window.
Problem :aside window cannot be closed
and you cannot see the cause. G
WARNING
Closing the side windows with increased force
or without the anti-entrapment feature could
lead to serious or even fatal injury. Make sure
that nobody can become trapped when
closing the side windows.
If a side window is obstructed during closing
and reopens again slightly:
X Immediately afte rthe window blocks, pull
the corresponding switch again until the
side window has closed.
The side window is closed with increased
force.
If a side window is obstructed again during
closing and reopens again slightly:
X Immediately after the window blocks, pull
the corresponding switch again until the
side window has closed.
The side window is closed without the anti-
entrapment feature. G
WARNING
Pulling and holding the switch to close the
door window immediately after it had been
blocked two times will cause the door window
to close without the anti-entrapment feature
for as long as you hold the switch. Roof
Important safety notes
For safety reasons, the roof can only be
opened or closed when the vehicle is
stationary. 82
RoofOpening/closing
Page 85 of 334
G
WARNING
Only drive with the roof fully open or closed.
If the roof does not open or close fully, the
roof hydraulics are depressurized and the soft
top is lowered:
R after about seven minutes if the ignitio nis
switched on
R after about 15 seconds if the ignition is
switched off
Aw arning tone sounds shortly beforehand.
The 0008 symbol and the Retractable Roof Lowering message appears in the
multifunction display.
Lock the roof again before driving on.
Otherwise, the unlocked roo fcould open
during the journey and cause you to lose
control of your vehicle. You or other persons
could be injured as a result. G
WARNING
Closing the roof manually is a complex,
technically challenging procedure.
Attempting to manually close the roof may
cause damage to the roof and/or injury.
For this reason, the manual closing process
should only be carried out at a qualified
specialist workshop.
! Never sit on the rear shelf or store heavy
objects there. You will otherwise damage
the roof and the rear shelf of your vehicle.
! Do not forget that the weather can
change abruptly. Make certain that the roof
is closed when you leave the vehicle. The
vehicle electronics can be damaged if
water enters the vehicle interior.
! When opening and closing the roof, make
sure that:
R there is sufficient upward clearance, as
the roof swings upwards.
R there is sufficient clearance behind the
vehicle, as the trunk lid swings
backwards beyond the bumper.
R the trunk is only loaded to below the
trunk partition. R
the trunk partition is not pushed up by
the load.
R the trunk partition is closed.
R the trunk lid is closed.
R the outside temperature is above
+5 ‡ (−15 †).
You could otherwise damage the roof,
trunk and other parts of the vehicle.
i Make sure that the roof and rear window
are clean and dry before opening the roof.
Otherwise, water or dirt could enter the
vehicle interior or trunk. Opening and closing with the roof
switch
Important safety notes G
WARNING
Before operating the retractable hardtop
(vario-roof), make sure there is no danger of
anyone being injured by the moving parts
(retractable hardtop, roof frame, and trunk
lid).
Hands must never be placed near the roof
frame, upper windshield area, hardtop, shelf
behind roll bars, or trunk lid while the
retractable hardtop is being raised or
lowered. Serious personal injury may occur.
If potential danger exists, release the
retractable hardtop switch or the 0010or
000F button on the SmartKey. This
immediately interrupts the raising or lowering
procedure. You can then operate the
retractable hardtop switch or press the
0010 or000F button on the SmartKey to raise
or lower the retractable hardtop away from
the danger zone. Roof
83Opening/closing Z
Page 86 of 334

Opening and closing
X
Close the trun kpartition (Y page 85).
X Close the trunk lid.
X Turn the SmartKey to position 2in the
ignition lock.
X Open the cover on the lower sectio nofthe
center console.
Roof switch 0002is located under the cover.
X To open: pull roof switch 0002until the roof
has been fully retracted into the trunk and
the Vario-Roof in Operation message
disappears from the multifunction display.
All of the side windows open.
X To close: press roof switch 0002until the roof
is fully closed and the Vario-Roof inOperation message disappears from the
multifunction display.
All of the side windows open.
X To close all side windows, pull the switch
under the cover on the center console
(Y page 80).
i If you operate the roof switch and the
Trunk partition Open message appears
in the multifunction display, the trunk
partition has not been closed correctly. Opening and closing with the
SmartKey
Important safety notes G
WARNING
Before operating the retractable hardtop
(vario-roof), make sure there is no danger of
anyone being injured by the moving parts
(retractable hardtop, roof frame, and trunk
lid).
Hands must never be placed near the roof
frame, upper windshield area, hardtop, shelf
behind roll bars, or trunk lid while the
retractable hardtop is being raised or
lowered. Serious personal injury may occur.
If potential danger exists, release the
retractable hardtop switch or the 0010or
000F button on the SmartKey. This
immediately interrupts the raising or lowering
procedure. You can then operate the
retractable hardtop switch or press the
0010 or000F button on the SmartKey to raise
or lower the retractable hardtop away from
the danger zone.
Opening and closing i
The SmartKey must be close to the
driver's door handle.
X Close the trunk partition (Y page 85).
X Close the trunk lid.
X Point the tip of the SmartKey at the driver's
door handle.
X To open: press and hold the 0010button
on the SmartKey until the roof is fully
opened.
The roof and the rear side windows open.
The front side windows close.
X To interrupt the opening procedure:
release the 0010button.
X To open the front side windows: press
and hold the 0010button on the SmartKey
again. 84
RoofOpening/closing