warning MERCEDES-BENZ SLK320 2000 R170 User Guide
[x] Cancel search | Manufacturer: MERCEDES-BENZ, Model Year: 2000, Model line: SLK320, Model: MERCEDES-BENZ SLK320 2000 R170Pages: 273
Page 72 of 273
69 Instrument cluster
Te ch n ica l
data Instruments
and controlsOperationDrivingInstrument
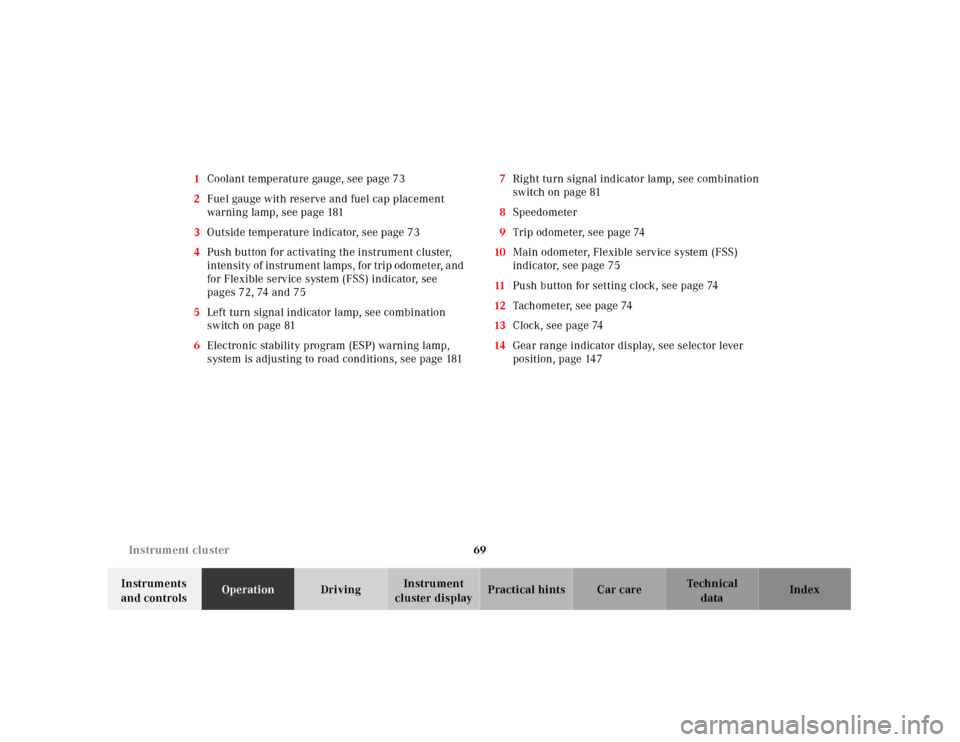
cluster displayPractical hints Car care Index 1Coolant temperature gauge, see page 73
2Fuel gauge with reserve and fuel cap placement
warning lamp, see page 181
3Outside temperature indicator, see page 73
4Push button for activating the instrument cluster,
intensity of instrument lamps, for trip odometer, and
for Flexible service system (FSS) indicator, see
pages 72, 74 and 75
5Left turn signal indicator lamp, see combination
switch on page 81
6Electronic stability program (ESP) warning lamp,
system is adjusting to road conditions, see page 1817Right turn signal indicator lamp, see combination
switch on page 81
8Speedometer
9Trip odometer, see page 74
10Main odometer, Flexible service system (FSS)
indicator, see page 75
11Push button for setting clock, see page 74
12Tachometer, see page 74
13Clock, see page 74
14Gear range indicator display, see selector lever
position, page 147
Page 76 of 273
73 Instrument cluster
Te ch n ica l
data Instruments
and controlsOperationDrivingInstrument
cluster displayPractical hints Car care Index Coolant temperature gauge
During severe operating conditions and stop-and-go city
traf f ic, th e coola nt tempera ture may rise close to th e red
marking.
The engine should not be operated with the coolant
temperature in the red zone. Doing so may cause
serious engine damage which is not covered by the
Mercedes-Benz Limited Warranty.Outside temperature indicator
The temperature sensor is located in the front bumper
area. Due to its location, the sensor can be affected by
road or engine heat during idling or slow driving. This
means that the accuracy of the displayed temperature
can only be verified by comparison to a thermometer
placed next to the sensor, not by comparison to external
displays (e.g. bank signs etc.).
Adaptation to ambient temperature takes place in steps
and depends on the prevailing driving conditions (stop-
and-go or moderate, constant driving) and amount of
temperature change.
Wa r n i n g !
• Driving when your engine is badly overheated
can cause some fluids which may have leaked
into the engine compartment to catch fire. You
could be seriously burned.• Steam from an overheated engine can cause
serious burns and can occur just by opening
the engine hood. Stay away from the engine if
you see or hear steam coming from it.Turn off the engine, get out of the vehicle and do
not stand near the vehicle until it cools down.
Wa r n i n g !
The outside temperature indicator is not designed
to serve as an Ice-Warning Device and is therefore
unsuitable for that purpose. Indicated
temperatures just above the freezing point do not
guarantee that the road surface is free of ice.
Page 78 of 273
75 Flexible service system
Te ch n ica l
data Instruments
and controlsOperationDrivingInstrument
cluster displayPractical hints Car care Index Flexible service system (FSS)
(service indicator)
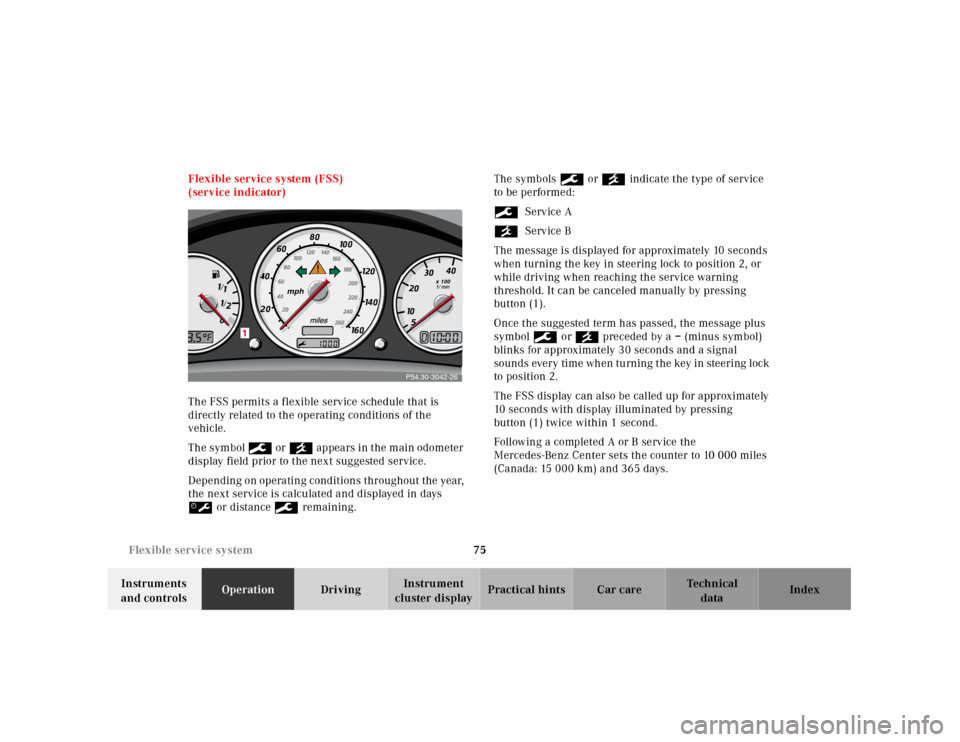
The FSS permits a flexible service schedule that is
directly related to the operating conditions of the
vehicle.
The symbol 9 or ´ appea rs in t he m ain odometer
display field prior to the next suggested service.
Depending on operating conditions throughout the year,
the next service is calculated and displayed in days
š or distance 9 remaining.The symbols 9 or ´ indicate the type of service
to be performed:
9Service A
´Service B
The message is displayed for approximately 10 seconds
when turning the key in steering lock to position 2, or
while driving when reaching the service warning
threshold. It can be canceled manually by pressing
button (1).
Once the suggested term has passed, the message plus
symbol 9 or ´ preceded by a – (minus symbol)
blinks for approximately 30 seconds and a signal
sounds every time when turning the key in steering lock
to position 2.
The FSS display can also be called up for approximately
10 seconds with display illuminated by pressing
button (1) twice within 1 second.
Following a completed A or B service the
Mercedes-Benz Center sets the counter to 10 000 miles
(Canada: 15 000 km) and 365 days.
P54.30-2722-26
mph
x 100
/ /
0
1
P54.30-3042-26
Page 81 of 273
78 Checking engine oil level
Te ch n ica l
data Instruments
and controlsOperationDrivingInstrument
cluster displayPractical hints Car care Index
Notes:
If the symbols : and I are continuously
illuminated after pressing button “1” on the instrument
cluster twice and there is no change in the odometer
display field or the low engine oil level warning lamp
comes on, a malfunction has occurred to the system.
Perform the engine oil level check with the dipstick.
If no oil leaks are noted continue to drive to the nearest
Mercedes-Benz Center to have the system checked.Engine oil consumption
Engine oil consumption checks should only be made
after the break-in period. During the break-in period,
higher oil consumption may be noticed and is normal.
Frequent driving at high engine speeds results in
increased consumption.
Page 82 of 273
79 Exterior lamp switch
Te ch n ica l
data Instruments
and controlsOperationDrivingInstrument
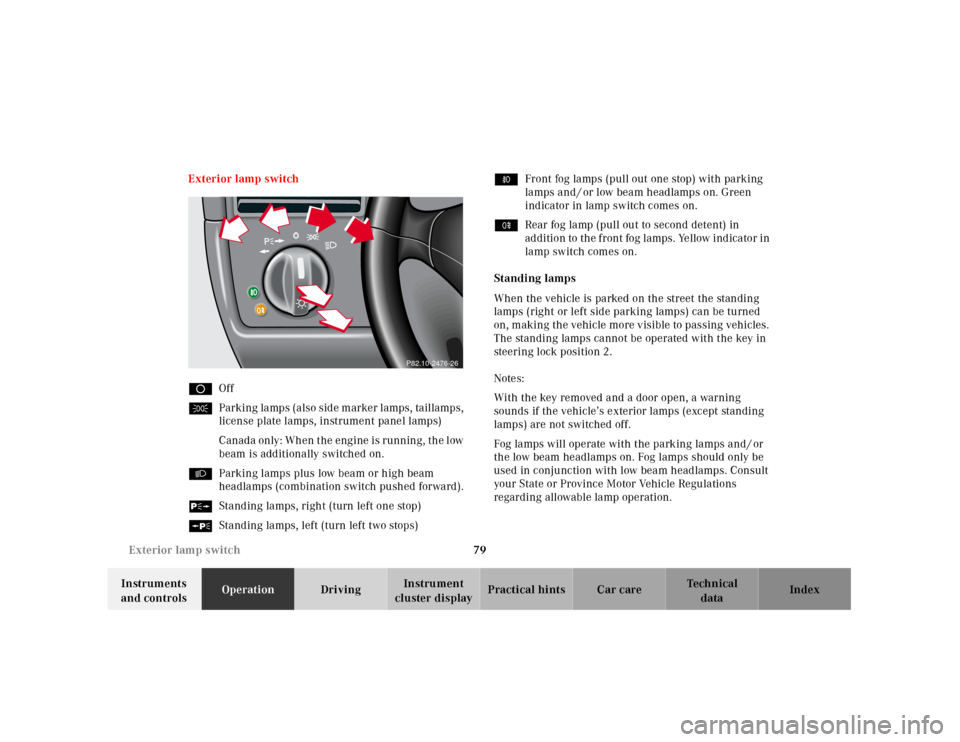
cluster displayPractical hints Car care Index Exterior lamp switch
DOff
CParking lamps (also side marker lamps, taillamps,
license plate lamps, instrument panel lamps)
Canada only: When the engine is running, the low
beam is additionally switched on.
BParking lamps plus low beam or high beam
headlamps (combination switch pushed forward).
ˆStanding lamps, right (turn left one stop)
‚Standing lamps, left (turn left two stops)‡Front fog lamps (pull out one stop) with parking
lamps and / or low beam headlamps on. Green
indicator in lamp switch comes on.
†Rear fog lamp (pull out to second detent) in
addition to the front fog lamps. Yellow indicator in
lamp switch comes on.
Standing lamps
When the vehicle is parked on the street the standing
lamps (right or left side parking lamps) can be turned
on, making the vehicle more visible to passing vehicles.
The standing lamps cannot be operated with the key in
steering lock position 2.
Notes:
With the key removed and a door open, a warning
sounds if the vehicle’s exterior lamps (except standing
lamps) are not switched off.
Fog lamps will operate with the parking lamps and / or
the low beam headlamps on. Fog lamps should only be
used in conjunction with low beam headlamps. Consult
your State or Province Motor Vehicle Regulations
regarding allowable lamp operation.
P82.10-2476-26
Page 86 of 273
83 Hazard warning flasher
Te ch n ica l
data Instruments
and controlsOperationDrivingInstrument
cluster displayPractical hints Car care Index Windshield wipers smear
If the windshield wipers smear the windshield, even
during rain, activate the washer system as often as
necessary. The fluid in the washer reservoir should be
mixed in the correct ratio.
Blocked windshield wipers
If the windshield wipers become blocked (for example,
due to snow), switch off the wipers.
For safety reasons before removing ice or snow, remove
key from steering lock. Remove blockage.
Activate combination switch again (key in steering lock
position 1).Hazard warning flasher switch
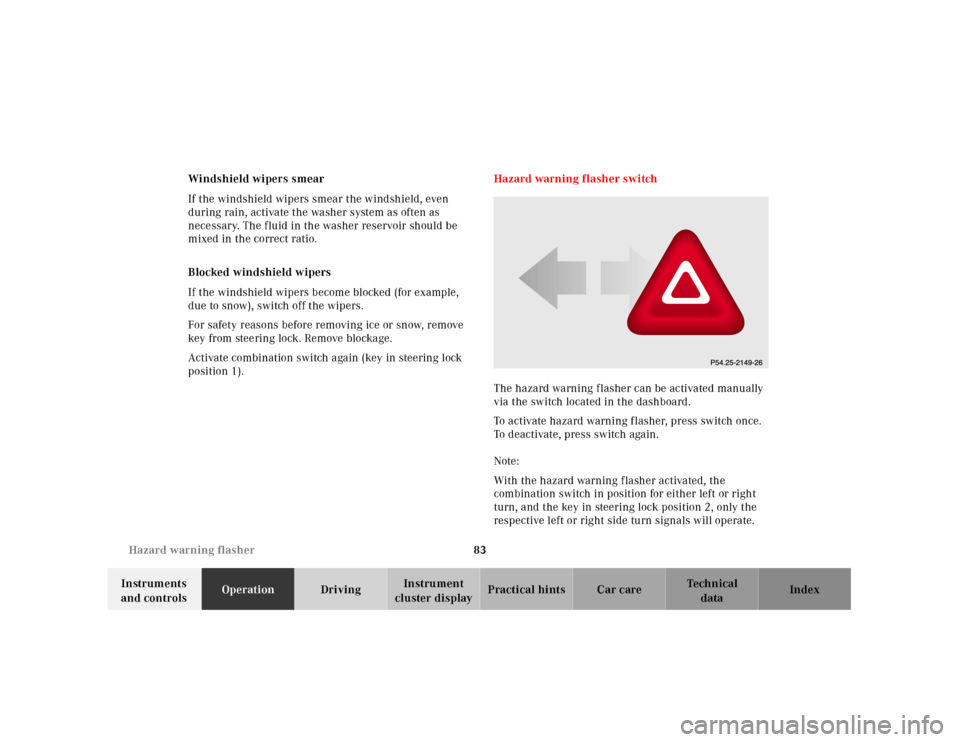
The hazard warning f lasher can be activated manually
via the switch located in the dashboard.
To activate hazard warning flasher, press switch once.
To deactivate, press switch again.
Note:
With the hazard warning flasher activated, the
combination switch in position for either left or right
turn, and the key in steering lock position 2, only the
respective left or right side turn signals will operate.
Page 127 of 273
124 Retractable hardtop
Te ch n ica l
data Instruments
and controlsOperationDrivingInstrument
cluster displayPractical hints Car care Index
If the hardtop switch is held or is released and slid
forward again within approximately 30 seconds, the
door windows will close.
However, the door windows can also be closed / opened
later on. Slide hardtop switch twice forward / backward
and hold.For safety reasons, the hardtop cannot be raised while
driving. However, if the hardtop is not completely locked
after raising it, you can then lock it while driving by
pushing the hardtop switch forward.
If t he ind ica tor lamp in th e h ardtop switch bl inks slowly
while activating the switch,
•the battery voltage may be insufficient – start
engine and let run while activating switch,
•the system may be overloaded (for example after
lowering or raising the hardtop approximately
5 consecutive times) - after approximately
10 minutes the hardtop switch may be activated
again.
I f t h e i nd ic a tor l a mp c on t in u e s to b l in k , l oc k t h e h a rd top
manually, see page 226.
Have the system checked at your authorized
Mercedes-Benz Center as soon as possible.
Wa r n i n g !
The hardtop is not fully closed and locked:
• if the indicator lamp in the hardtop switch
does not go out (key in steering lock
position 2),
• if the indicator lamp blinks, and a warning
sounds for 10 seconds when starting to drive.Stop the vehicle and before continuing to drive,
close and lock the hardtop:
The key should be in steering lock position 2.
Slide the hardtop switch forward.To prevent possible accidents, drive the vehicle
only with the hardtop either completely closed and
locked, or fully lowered into its storage
compartment.
Page 144 of 273
141 Steering lock
Te ch n ica l
data Instruments
and controlsOperationDrivingInstrument
cluster displayPractical hints Car care Index Notes:
A warning sounds when the driver’s door is opened
while the key is in steering lock position 1 or 0.
With the engine at idle speed, the charging rate of the
alternator (output) is limited.
It is therefore recommended that you turn off
unnecessary electrical consumers while driving in stop-
a nd-go tra ff ic. This preca ution h elps to avoid d ra ining of
the battery.
Unnecessary strain on the battery and charging system
may be minimized by turning off the following power
consumers, for example: Heated seats, rear window
defroster.Caution!
To prevent accelerated battery discharge and a possible
dead battery, always remove the key from the steering
lock. Do not leave the key in steering lock position 0.
Page 156 of 273
153 Parking brake
Te ch n ica l
data Instruments
and controlsOperationDrivingInstrument
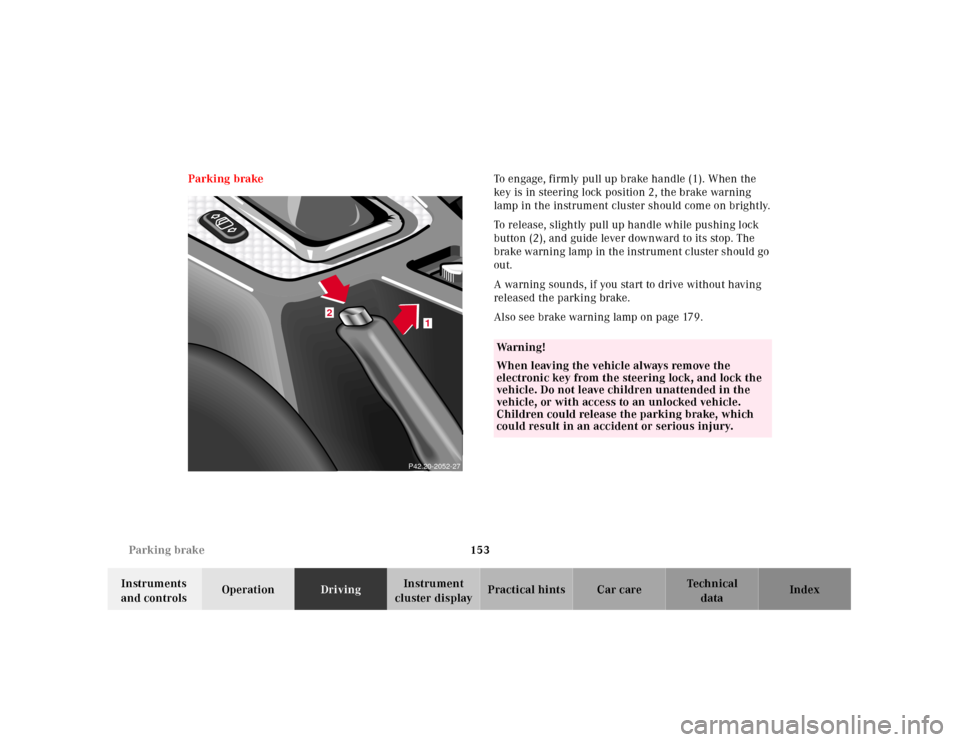
cluster displayPractical hints Car care Index Parking brakeTo engage, firmly pull up brake handle (1). When the
key is in steering lock position 2, the brake warning
lamp in the instrument cluster should come on brightly.
To release, slightly pull up handle while pushing lock
button (2), and guide lever downward to its stop. The
brake warning lamp in the instrument cluster should go
out.
A warning sounds, if you start to drive without having
released the parking brake.
Also see brake warning lamp on page 179.
P42.20-2052-27
2
1
Wa r n i n g !
When leaving the vehicle always remove the
electronic key from the steering lock, and lock the
vehicle. Do not leave children unattended in the
vehicle, or with access to an unlocked vehicle.
Children could release the parking brake, which
could result in an accident or serious injury.
Page 158 of 273
155 Driving instructions
Te ch n ica l
data Instruments
and controlsOperationDrivingInstrument
cluster displayPractical hints Car care Index Power assistance
BrakesThe condition of the parking brake system is checked
each time the vehicle is in the shop for the required
maintenance service.
If the parking brake is released and the brake warning
lamp in the instrument cluster stays on, the brake f luid
level in the reservoir is too low.
Brake pad wear or a leak in the system may be the
reason for low brake f luid in the reservoir.
Have the brake system inspected at an authorized
Mercedes-Benz Center immediately.
Al l checks and service work on the brake system shoul d
be carried out by an authorized Mercedes-Benz Center.
Install only brake pads and brake fluid recommended by
Mercedes-Benz.
Wa r n i n g !
When the engine is not running, the brake and
steering systems are without power assistance.
Under these circumstances, a much greater effort is
necessary to stop or steer the vehicle.Wa r n i n g !
After driving in heavy rain for some time without
applying the brakes or through water deep enough
to wet brake components, the first braking action
may be somewhat reduced and increased pedal
pressure may be necessary to obtain expected
braking effect. Be sure to maintain a safe distance
from vehicles in front.Resting your foot on the brake pedal will cause
excessive and premature wear of the brake pads.It can also result in the brakes overheating thereby
significantly reducing their effectiveness. It may
not be possible to stop the vehicle in sufficient time
to avoid an accident.
Wa r n i n g !
If other than recommended brake pads are
installed, or other than recommended brake fluid
is used, t he braking properties of th e vehic le can be
degraded to an extent that safe braking is
substantially impaired. This could result in an
accident.