glove box MERCEDES-BENZ SLK350 2010 R171 Owner's Manual
[x] Cancel search | Manufacturer: MERCEDES-BENZ, Model Year: 2010, Model line: SLK350, Model: MERCEDES-BENZ SLK350 2010 R171Pages: 312, PDF Size: 5.75 MB
Page 11 of 312
Glove box
........................................... 174
Gross Axle Weight Rating see GAWR
Gross Vehicle Weight
see GVW
Gross Vehicle Weight Rating
see GVWR
GVW (Gross Vehicle Weight) ............218
GVWR (Gross Vehicle Weight
Rating) ................................................ 218H
Halogen headlamps see Headlamps
Hard plastic trim items, cleaning ....231
Hazard warning flasher ....................... 74
Headlamp cleaning system ................ 74
Headlamps
Active Bi-Xenon headlamps ............. 71
Automatic headlamp mode .............. 71
Bi-Xenon .................................. 71, 269
Cleaning lenses ............................. 229
Cleaning system .............................. 74
Daytime running lamp mode ............72
Delayed shut-off ............................ 107
Halogen ......................................... 269
High-beam flasher ............................ 74
High-beam headlamps .....................74
Low-beam headlamps ...................... 71
Replacing bulbs ............................. 267
Switch .............................................. 71
Headliner, cleaning and care of .......231
Head restraints .................................... 62
Adjustment ...................................... 62
Head-thorax air bags ........................... 36
Heated steering wheel ........................67
Height adjustment
Seats ............................................... 62
High-beam flasher ............................... 74
High-beam headlamps ................74, 269
Indicator lamp .................................. 26
High-performance brake system .....223
Hood ................................................... 192
Messages in the multifunction
display ........................................... 245
Horn ...................................................... 25
Hydroplaning ..................................... 224 I
Identification labels ..........................292
Identification number, vehicle
(VIN) ................................................... 293
Ignition ........................................... 61, 80
Immobilizer .......................................... 51
Infant and child restraint systems see Children in the vehicle
Inflation pressure
see Tires, Inflation pressure
Inside door handle ........................30, 58
Instrument cluster ........................26, 92
Illumination ...................................... 93
Lamps ............................................ 256
Multifunction display .......................95
Instrument lighting
see Instrument cluster, Illumination
Instrument panel
see Instrument cluster
Instruments and controls
see Cockpit
Interfere with radio reception .......... 141
Interior lighting ................................... 75
Delayed shut-off ............................ 107
Emergency lighting .......................... 76
Reading lamps ................................. 75
Interior rear view mirror .....................68
Auto-dimming rear view mirrors ....... 69
Interior storage spaces
see Storage compartments
Intermittent wiping ............................. 76
Rain sensor ...................................... 76
iPod ®
(media interface) ....................139 J
Jack ..................................................... 235
Jump starting ..................................... 283 K
Key, Mechanical
Loss of ............................................. 58
Replacing
......................................... 58 Index
9 171_AKB; 3; 60, en-US
d2ureepe,
Version: 2.11.8.1 2009-05-11T16:00:23+02:00 - Seite 9
Page 27 of 312
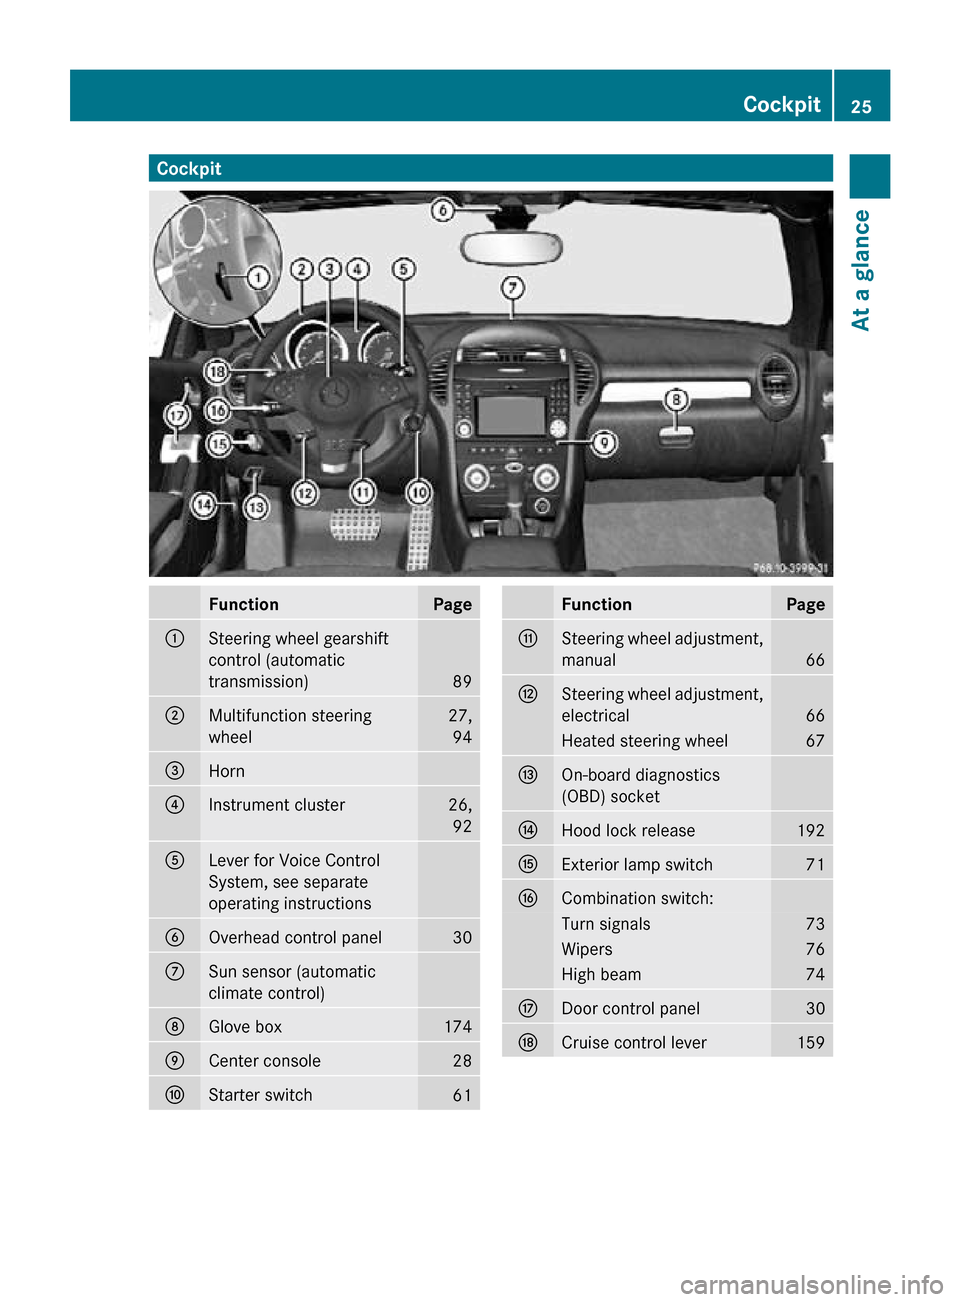
Cockpit
Function Page
:
Steering wheel gearshift
control (automatic
transmission)
89
;
Multifunction steering
wheel 27,
94 =
Horn
?
Instrument cluster 26,
92 A
Lever for Voice Control
System, see separate
operating instructions
B
Overhead control panel 30
C
Sun sensor (automatic
climate control)
D
Glove box 174
E
Center console 28
F
Starter switch
61 Function Page
G
Steering wheel adjustment,
manual
66
H
Steering wheel adjustment,
electrical
66
Heated steering wheel 67
I
On-board diagnostics
(OBD) socket
J
Hood lock release 192
K
Exterior lamp switch 71
L
Combination switch:
Turn signals 73
Wipers 76
High beam 74
M
Door control panel 30
N
Cruise control lever 159Cockpit
25At a glance
171_AKB; 3; 60, en-US
d2ureepe, Version: 2.11.8.1 2009-05-11T16:00:23+02:00 - Seite 25 Z
Page 38 of 312
Driver and passenger front air bags and knee
bags are deployed
R
in the event of certain frontal impacts
R if the system determines that air bag
deployment can offer additional protection
to that provided by the seat belt
R depending on whether the respective seat
belt is in use
R independently of the head-thorax air bags
The front air bags in this vehicle have been
designed to inflate in two stages. This allows
the air bags to have different rates of inflation.
The rate of inflation is based on the vehicle
deceleration rate as assessed by the air bag
control unit.
The passenger front air bag deployment is
additionally influenced by the passenger’s
weight category as identified by the Occupant
Classification System (OCS) ( Y page 37).
The lighter the passenger-side occupant, the
higher the vehicle deceleration rate required
for second stage inflation of the passenger
front air bag.
The air bags will not deploy in impacts which
do not exceed the system’s preset
deployment thresholds. You will then be
protected by the fastened seat belts.
The front air bags will not deploy in the event
of a rollover unless the vehicle’s rate of
longitudinal deceleration or acceleration
exceeds the preset deployment threshold for
the front air bags.
The passenger air bag will only be deployed if
R the system, based on OCS weight sensor
readings, detects that the passenger seat
is occupied
R the 04 indicator lamp in the
center console is not lit (Y page 37)
R the impact exceeds a preset deployment
threshold Knee bags
The knee bags are designed to provide
increased protection for the driver and
passenger against the risk of injuries to the
knees, thighs and lower legs.
Driver side knee bag ? is located on the
driver side lower instrument panel. Passenger
side knee bag = is located on the passenger
side below the glove box. They are designed
to operate together with the front air bags in
certain frontal impacts if the system
determines that air bag deployment can offer
additional protection to that provided by the
seat belt. The knee bags operate best in
conjunction with properly positioned and
fastened seat belts.
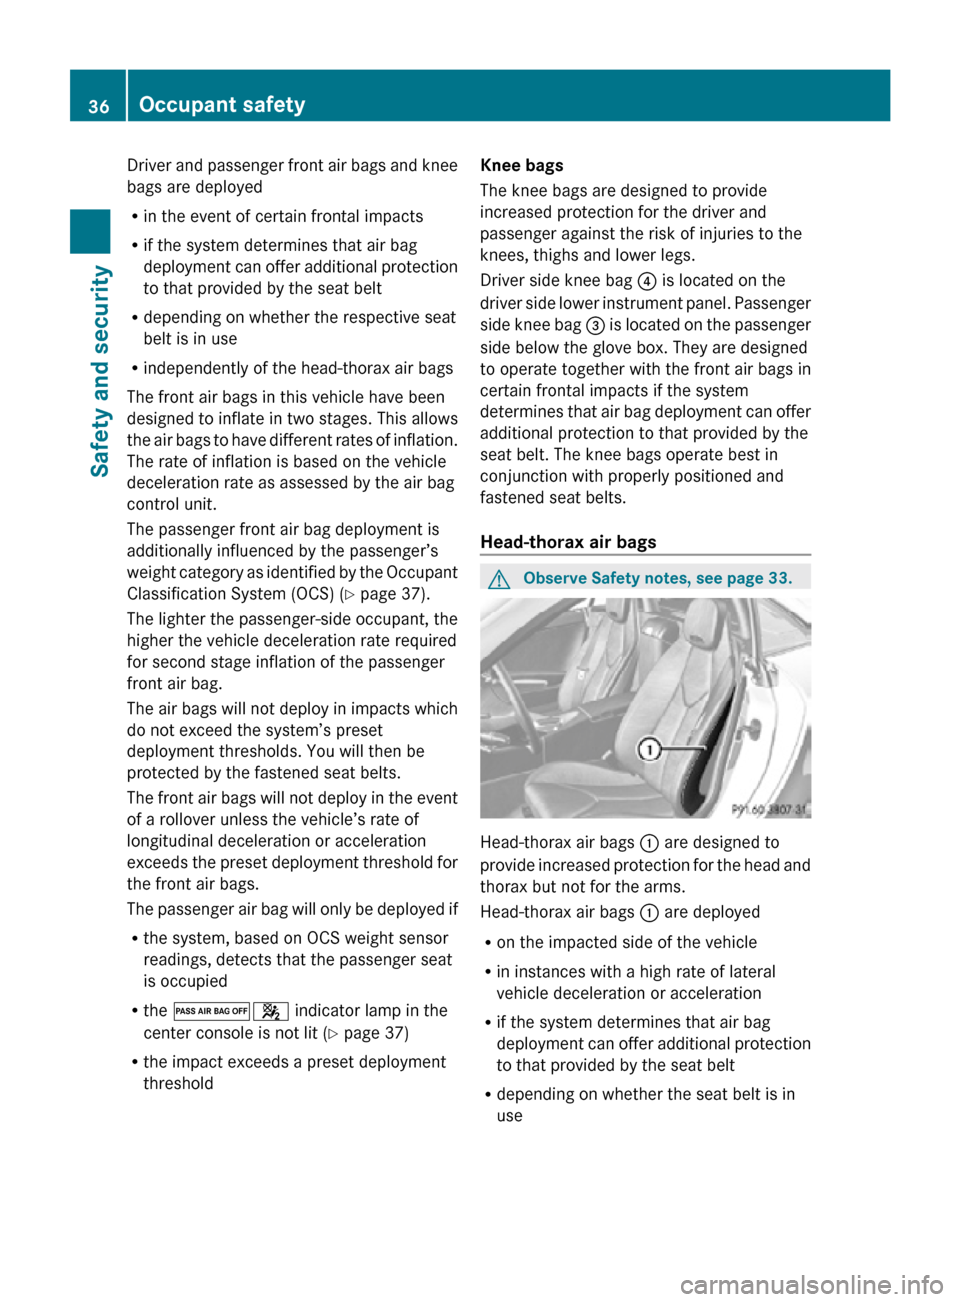
Head-thorax air bags G
Observe Safety notes, see page 33. Head-thorax air bags
: are designed to
provide increased protection for the head and
thorax but not for the arms.
Head-thorax air bags : are deployed
R on the impacted side of the vehicle
R in instances with a high rate of lateral
vehicle deceleration or acceleration
R if the system determines that air bag
deployment can offer additional protection
to that provided by the seat belt
R depending on whether the seat belt is in
use 36
Occupant safetySafety and security
171_AKB; 3; 60, en-US
d2ureepe,
Version: 2.11.8.1 2009-05-11T16:00:23+02:00 - Seite 36
Page 53 of 312
!
Avoid spinning of a drive wheel for an
extended period with the ESP ®
switched
off. This may cause serious damage to the
drivetrain which is not covered by the
Mercedes-Benz Limited Warranty.
Switching on the ESP ®X
Press ESP ®
switch : until the ESP ®
warning lamp d in the instrument
cluster goes out.
You are now again in normal driving mode
with the ESP ®
switched on. Anti-theft systems
Immobilizer
The immobilizer prevents unauthorized
persons from starting your vehicle.
When leaving the vehicle, always take the
SmartKey with you and lock the vehicle. The
engine can be started by anyone with a valid
SmartKey that is left inside the vehicle.
Activating X
Remove the SmartKey from the starter
switch.
Deactivating X
Switch on the ignition.
i Starting the engine will also deactivate
the immobilizer.
In the event that the engine cannot be
started (yet the vehicle’s battery is
charged), the system is not operational.
Contact an authorized Mercedes-Benz
Center
or call 1-800-FOR-MERCedes (in the
USA) or 1-800-387-0100 (in Canada). Anti-theft alarm system
Once the alarm system has been armed, a
visual and audible alarm is triggered when
someone opens
R a door
R the trunk
R the hood
R the glove box
R the storage compartment under the
armrest
The alarm will stay on even if the activating
element, a door, for example, is closed
immediately.
The
alarm system will also be triggered when
R the vehicle is raised (tow-away alarm)
R the vehicle is opened with the mechanical
key
R a door is opened from the inside
R the trunk is opened with the emergency
release button
To cancel the alarm after it has been
triggered, see “Canceling the alarm”
(Y page 53).
i If the alarm stays on for more than
30 seconds, the Tele Aid system initiates a
call to the Customer Assistance Center
automatically. The Tele Aid system will
initiate the call provided that
R you have subscribed to the Tele Aid
service
R the Tele Aid service has been activated
properly
R the necessary mobile phone, power
supply and GPS coverage are available Anti-theft systems
51
Safety and security
171_AKB; 3; 60, en-US
d2ureepe, Version: 2.11.8.1 2009-05-11T16:00:23+02:00 - Seite 51 Z
Page 58 of 312
Vehicle equipment
i This Operator’s Manual describes all
features, standard or optional, potentially
available for your vehicle at the time of
purchase. Please be aware that your
vehicle might not be equipped with all
features described in this manual. Locking and unlocking
Notes
G
Observe Safety notes, see page 45.
When unlocking or locking the vehicle with
the SmartKey an acoustic signal sounds. The
acoustic signal is activated at the factory. If
you wish to deactivate the feature, or adjust
its signal volume, contact an authorized
Mercedes-Benz Center.
When unlocking the vehicle, all turn signal
lamps flash once. An acoustic signal sounds
once, and the locking knobs in the doors
move up. The anti-theft alarm system is
disarmed.
When locking the vehicle, all turn signal lamps
flash three times. An acoustic signal sounds
three times, and the locking knobs in the
doors move down. The anti-theft alarm
system is armed.
All doors and the trunk must be closed.
If you cannot lock or unlock the vehicle with
the SmartKey, the batteries in the SmartKey
are discharged, the SmartKey is
malfunctioning, or the vehicle battery is
drained.
X Check the batteries in the SmartKey
(Y page 57) and replace them if
necessary.
X Use the mechanical key to unlock the
driver’s door and the trunk (Y page 264). X
Use the mechanical key to lock the vehicle
(Y page 265).
X Have the vehicle battery and the vehicle
battery connections checked at an
authorized Mercedes-Benz Center.
If the SmartKey is malfunctioning, contact
Roadside Assistance or an authorized
Mercedes-Benz Center. SmartKey
Your vehicle comes supplied with two
SmartKeys, each with remote control and a
removable mechanical key.
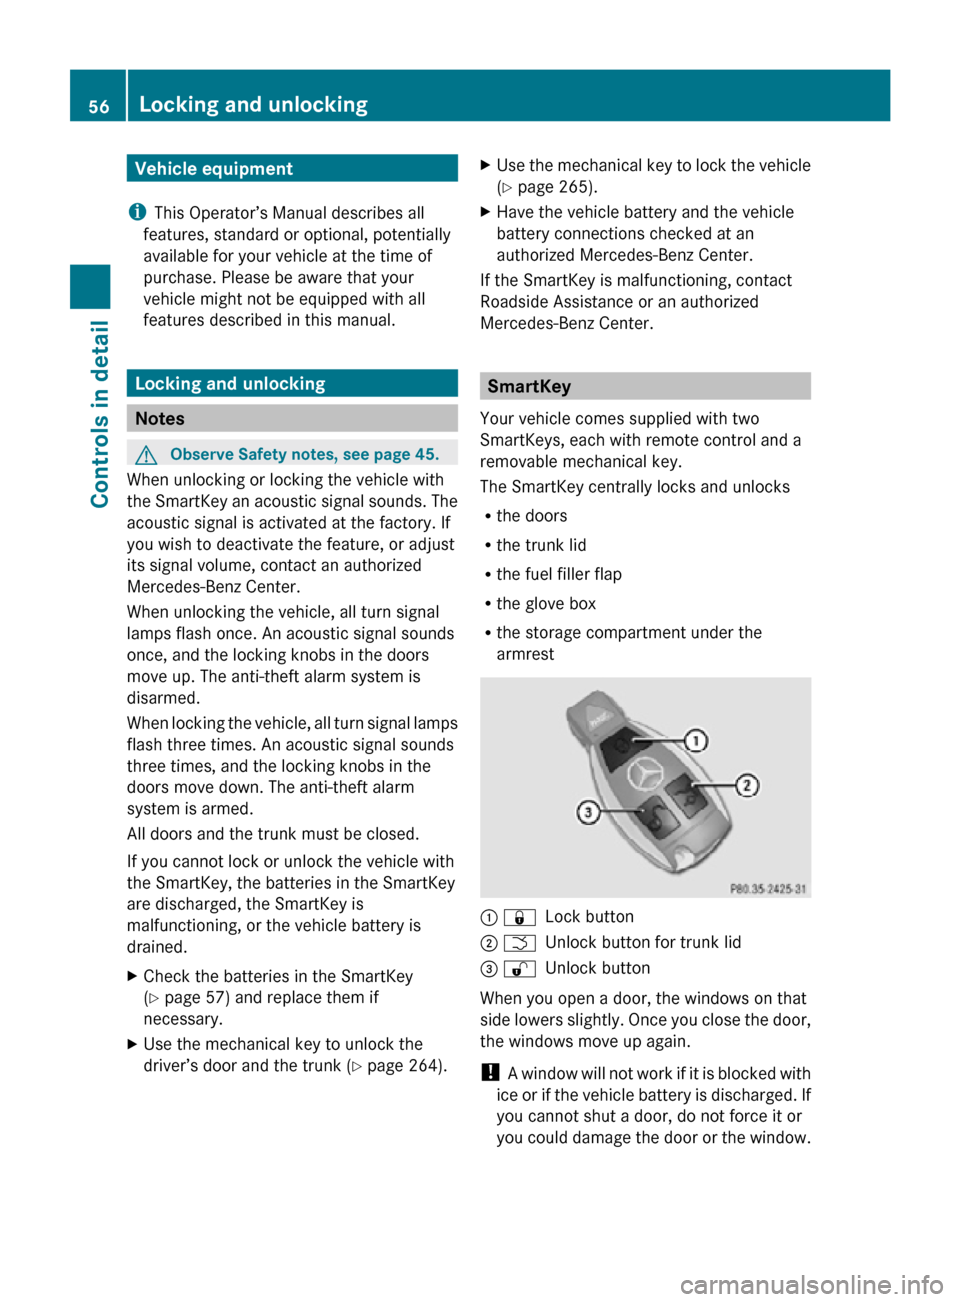
The SmartKey centrally locks and unlocks
R the doors
R the trunk lid
R the fuel filler flap
R the glove box
R the storage compartment under the
armrest : &
Lock button
; F Unlock button for trunk lid
= % Unlock button
When you open a door, the windows on that
side lowers slightly. Once you close the door,
the windows move up again.
! A window will not work if it is blocked with
ice or if the vehicle battery is discharged. If
you cannot shut a door, do not force it or
you could damage the door or the window. 56
Locking and unlockingControls in detail
171_AKB; 3; 60, en-US
d2ureepe,
Version: 2.11.8.1 2009-05-11T16:00:23+02:00 - Seite 56
Page 61 of 312
When you open a door, the windows on that
side lowers slightly. Once you close the
door, the windows move up again.
! A window will not work if it is blocked with
ice or if the vehicle battery is discharged. If
you cannot shut a door, do not force it or
you could damage the door or the window.
Fix whatever is affecting the window before
trying to shut the door. Automatic central locking
You can switch the automatic central locking
on or off using the control system
(Y page 108).
The doors and the trunk lock automatically
when the vehicle is set into motion.
You can open a locked door from the inside.
Open door only when conditions are safe to
do so.
The doors are designed to unlock
automatically after an accident if the force of
the impact exceeds a preset threshold.
The vehicle locks automatically when the
ignition is switched on and the wheels are
turning at a vehicle speed of above 9 mph
(15 km/h). You could therefore lock yourself
out when the vehicle is pushed or towed or is
on a test stand. Locking and unlocking from the inside
G
Observe Safety notes, see page 45.
You can lock or unlock the vehicle from the
inside using the central locking or unlocking
switch. This can be useful, for example, if you
want to lock the vehicle before starting to
drive.
The central locking or unlocking switch does
not lock or unlock the fuel filler flap or the
interior storage compartments, such as the
glove box. X
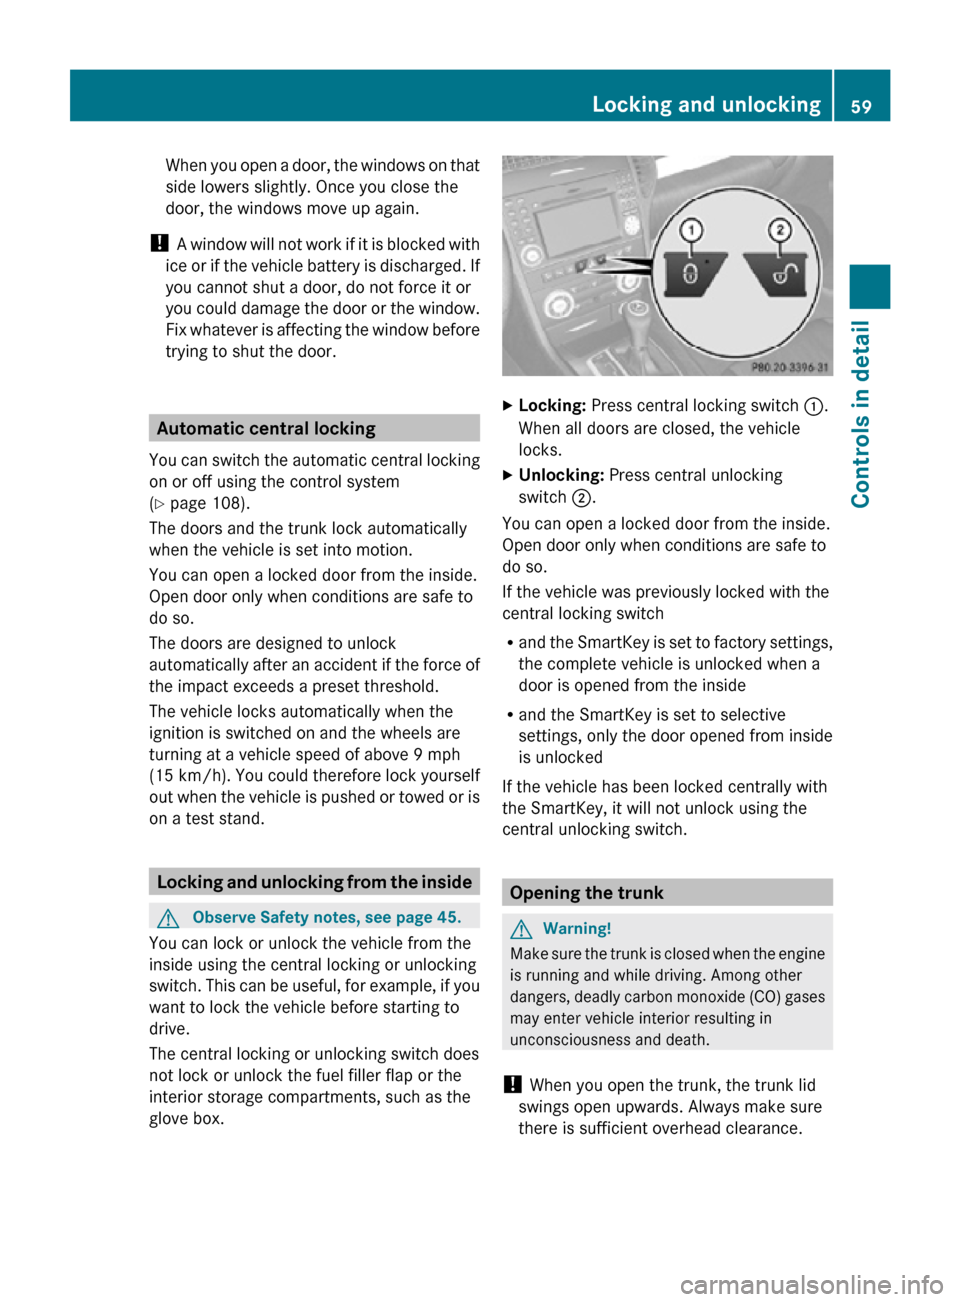
Locking: Press central locking switch :.
When all doors are closed, the vehicle
locks.
X Unlocking: Press central unlocking
switch ;.
You can open a locked door from the inside.
Open door only when conditions are safe to
do so.
If the vehicle was previously locked with the
central locking switch
R and the SmartKey is set to factory settings,
the complete vehicle is unlocked when a
door is opened from the inside
R and the SmartKey is set to selective
settings, only the door opened from inside
is unlocked
If the vehicle has been locked centrally with
the SmartKey, it will not unlock using the
central unlocking switch. Opening the trunk
G
Warning!
Make sure the trunk is closed when the engine
is running and while driving. Among other
dangers, deadly carbon monoxide (CO) gases
may enter vehicle interior resulting in
unconsciousness and death.
! When you open the trunk, the trunk lid
swings open upwards. Always make sure
there is sufficient overhead clearance. Locking and unlocking
59Controls in detail
171_AKB; 3; 60, en-US
d2ureepe, Version: 2.11.8.1 2009-05-11T16:00:23+02:00 - Seite 59 Z
Page 143 of 312
on USB Device SubClasses of storage
medium are available from the manufacturer
of the device.
Supported file formats on USB storage
media
The following file formats are supported:
R
mp3: CBR, VBR (up to 320 kbit/s)
R wma: CBR, VBR (up to 320 kbit/s)
R m4a: low complexity (LC) codec
R playlists: m3u, pls
ID3 Tags (version 1.x, 2.3, 2.4) and WMA tags
in ASCII and UTF16 coding are supported to
display meta data during playback.
Connecting external audio devices G
Observe Safety notes, see page 139.
! External devices that you take into the
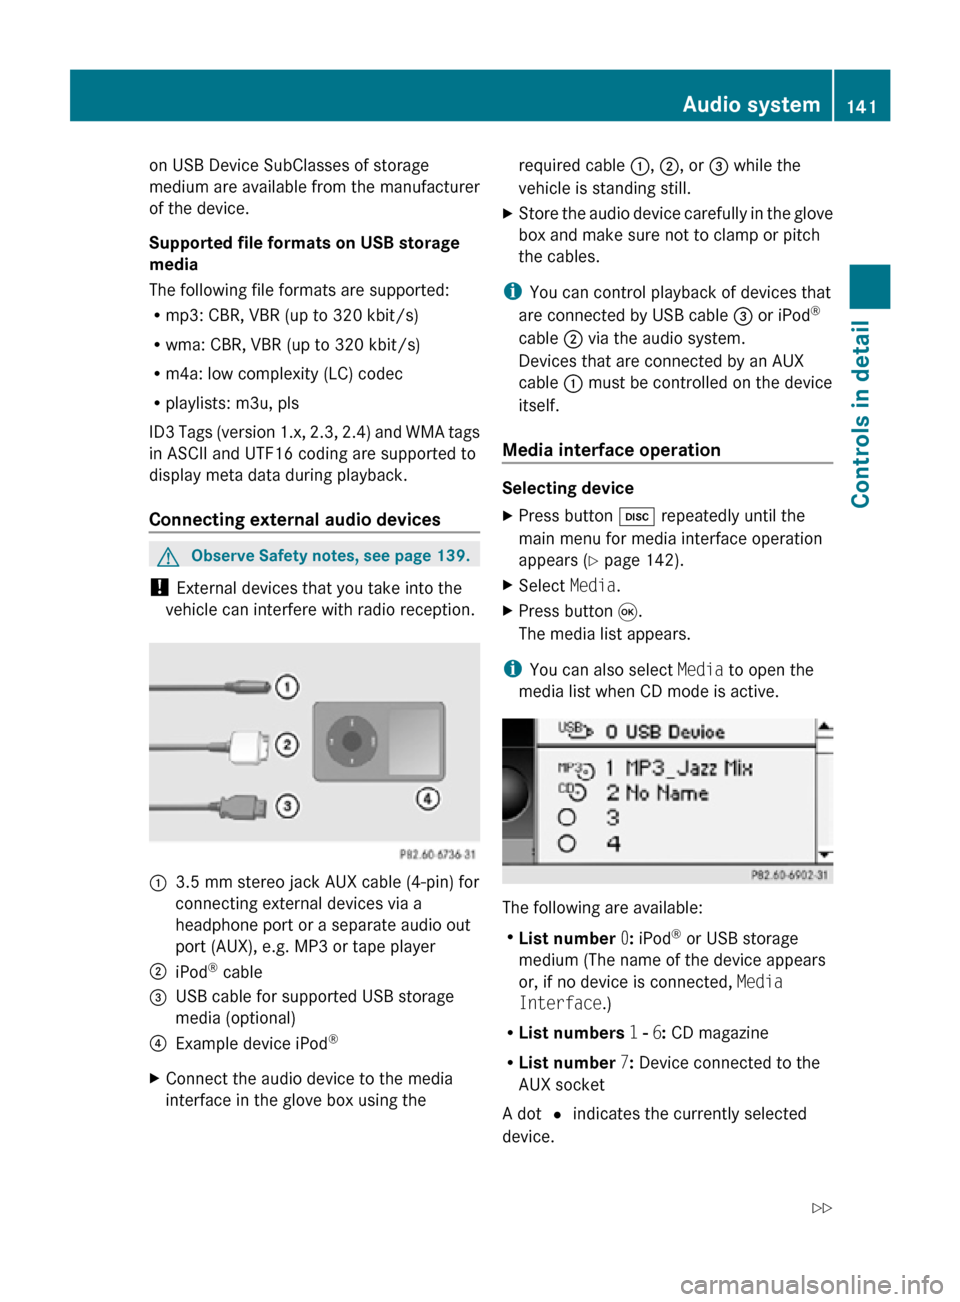
vehicle can interfere with radio reception. :
3.5 mm stereo jack AUX cable (4-pin) for
connecting external devices via a
headphone port or a separate audio out
port (AUX), e.g. MP3 or tape player
; iPod ®
cable
= USB cable for supported USB storage
media (optional)
? Example device iPod ®
X Connect the audio device to the media
interface in the glove box using the required cable
:, ;, or = while the
vehicle is standing still.
X Store the audio device carefully in the glove
box and make sure not to clamp or pitch
the cables.
i You can control playback of devices that
are connected by USB cable = or iPod ®
cable ; via the audio system.
Devices that are connected by an AUX
cable : must be controlled on the device
itself.
Media interface operation Selecting device
X
Press button h repeatedly until the
main menu for media interface operation
appears ( Y page 142).
X Select Media.
X Press button 9.
The media list appears.
i You can also select Media to open the
media list when CD mode is active. The following are available:
R
List number 0: iPod ®
or USB storage
medium (The name of the device appears
or, if no device is connected, Media
Interface.)
R List numbers 1 - 6: CD magazine
R List number 7: Device connected to the
AUX socket
A dot # indicates the currently selected
device. Audio system
141Controls in detail
171_AKB; 3; 60, en-US
d2ureepe, Version: 2.11.8.1 2009-05-11T16:00:23+02:00 - Seite 141 Z
Page 177 of 312
Glove box
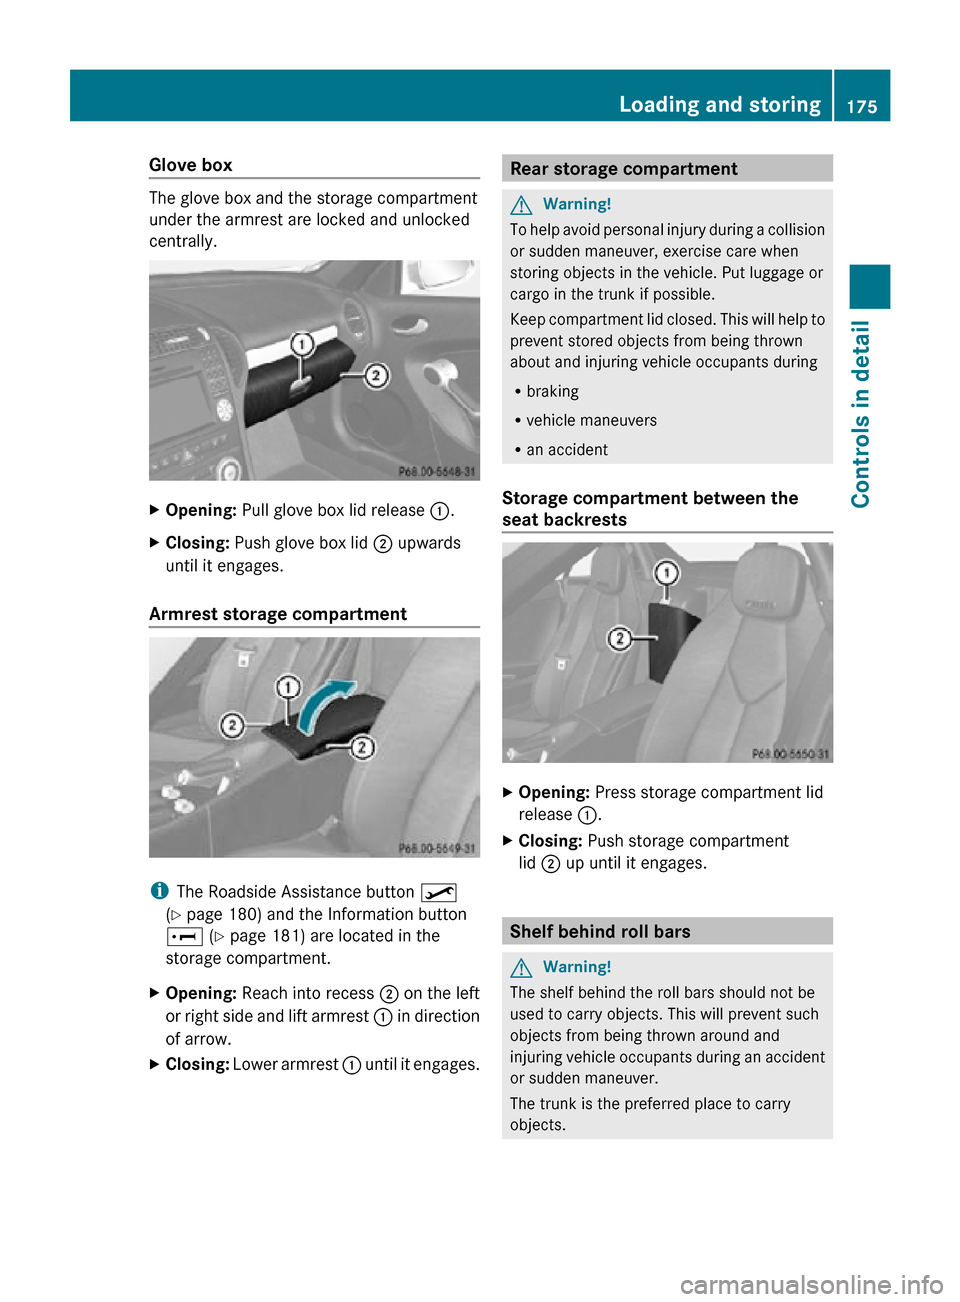
The glove box and the storage compartment
under the armrest are locked and unlocked
centrally.
X
Opening: Pull glove box lid release :.
X Closing: Push glove box lid ; upwards
until it engages.
Armrest storage compartment i
The Roadside Assistance button º
(Y page 180) and the Information button
E (Y page 181) are located in the
storage compartment.
X Opening: Reach into recess ; on the left
or right side and lift armrest : in direction
of arrow.
X Closing: Lower armrest : until it engages. Rear storage compartment
G
Warning!
To help avoid personal injury during a collision
or sudden maneuver, exercise care when
storing objects in the vehicle. Put luggage or
cargo in the trunk if possible.
Keep compartment lid closed. This will help to
prevent stored objects from being thrown
about and injuring vehicle occupants during
R braking
R vehicle maneuvers
R an accident
Storage compartment between the
seat backrests X
Opening: Press storage compartment lid
release :.
X Closing: Push storage compartment
lid ; up until it engages. Shelf behind roll bars
G
Warning!
The shelf behind the roll bars should not be
used to carry objects. This will prevent such
objects from being thrown around and
injuring vehicle occupants during an accident
or sudden maneuver.
The trunk is the preferred place to carry
objects. Loading and storing
175Controls in detail
171_AKB; 3; 60, en-US
d2ureepe, Version: 2.11.8.1 2009-05-11T16:00:23+02:00 - Seite 175 Z