wheel MERCEDES-BENZ SLK55AMG 2010 R171 Owner's Guide
[x] Cancel search | Manufacturer: MERCEDES-BENZ, Model Year: 2010, Model line: SLK55AMG, Model: MERCEDES-BENZ SLK55AMG 2010 R171Pages: 312, PDF Size: 5.75 MB
Page 71 of 312
the passenger-side exterior rear view
mirror.
The indicator lamp in the respective button
comes on for approximately 10 seconds.
If you do not make adjustments to the
selected exterior rear view mirror within
10 seconds, the indicator lamp goes out.
You will then have to select the desired
exterior rear view mirror again before
adjustments can be made. Adjustments
can only be made with the indicator lamp
for the respective exterior rear view mirror
button illuminated.
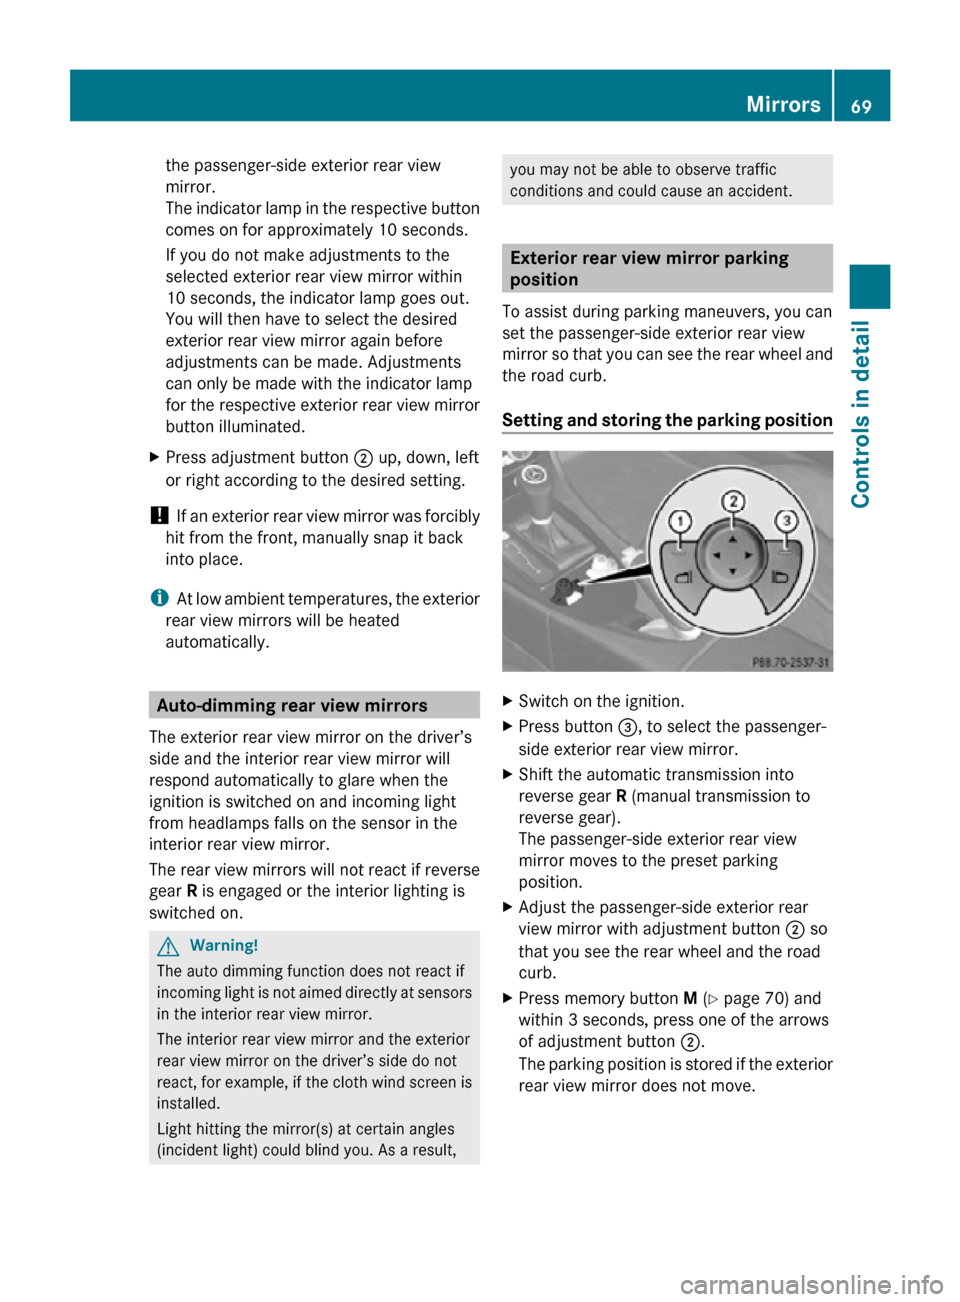
X Press adjustment button ; up, down, left
or right according to the desired setting.
! If an exterior rear view mirror was forcibly
hit from the front, manually snap it back
into place.
i At low ambient temperatures, the exterior
rear view mirrors will be heated
automatically. Auto-dimming rear view mirrors
The exterior rear view mirror on the driver’s
side and the interior rear view mirror will
respond automatically to glare when the
ignition is switched on and incoming light
from headlamps falls on the sensor in the
interior rear view mirror.
The rear view mirrors will not react if reverse
gear R is engaged or the interior lighting is
switched on. G
Warning!
The auto dimming function does not react if
incoming light is not aimed directly at sensors
in the interior rear view mirror.
The interior rear view mirror and the exterior
rear view mirror on the driver’s side do not
react, for example, if the cloth wind screen is
installed.
Light hitting the mirror(s) at certain angles
(incident light) could blind you. As a result, you may not be able to observe traffic
conditions and could cause an accident.
Exterior rear view mirror parking
position
To assist during parking maneuvers, you can
set the passenger-side exterior rear view
mirror so that you can see the rear wheel and
the road curb.
Setting and storing the parking position X
Switch on the ignition.
X Press button =, to select the passenger-
side exterior rear view mirror.
X Shift the automatic transmission into
reverse gear R (manual transmission to
reverse gear).
The passenger-side exterior rear view
mirror moves to the preset parking
position.
X Adjust the passenger-side exterior rear
view mirror with adjustment button ; so
that you see the rear wheel and the road
curb.
X Press memory button M (Y page 70) and
within 3 seconds, press one of the arrows
of adjustment button ;.
The parking position is stored if the exterior
rear view mirror does not move. Mirrors
69Controls in detail
171_AKB; 3; 60, en-US
d2ureepe, Version: 2.11.8.1 2009-05-11T16:00:23+02:00 - Seite 69 Z
Page 72 of 312
Calling up the parking position
X
Switch on the ignition.
X Press button ;, to select the passenger-
side exterior rear view mirror.
X Shift the automatic transmission into
reverse gear R (manual transmission to
reverse gear).
The passenger-side exterior rear view
mirror moves to the stored parking
position.
The passenger-side exterior rear view mirror
returns to its previously stored driving
position
R 10 seconds after you have put the gear
selector lever out of reverse gear R (manual
transmission out of reverse)
R immediately once your vehicle exceeds a
speed of approximately 6 mph (10 km/h)
R immediately when you press button : to
select the driver’s side exterior rear view
mirror Memory function
Notes
With the memory function you can store up
to three different configurations per front
seat.
Each memory position button on the driver’s
side can store all of the following settings:
R Seat position
R Steering wheel position
R Exterior rear view mirrors’ position G
Warning!
Do not activate the memory function while
driving. Activating the memory function while
driving could cause the driver to lose control
of the vehicle.
Each memory position button on the
passenger side can store the setting of the
seat position. Storing positions into memory
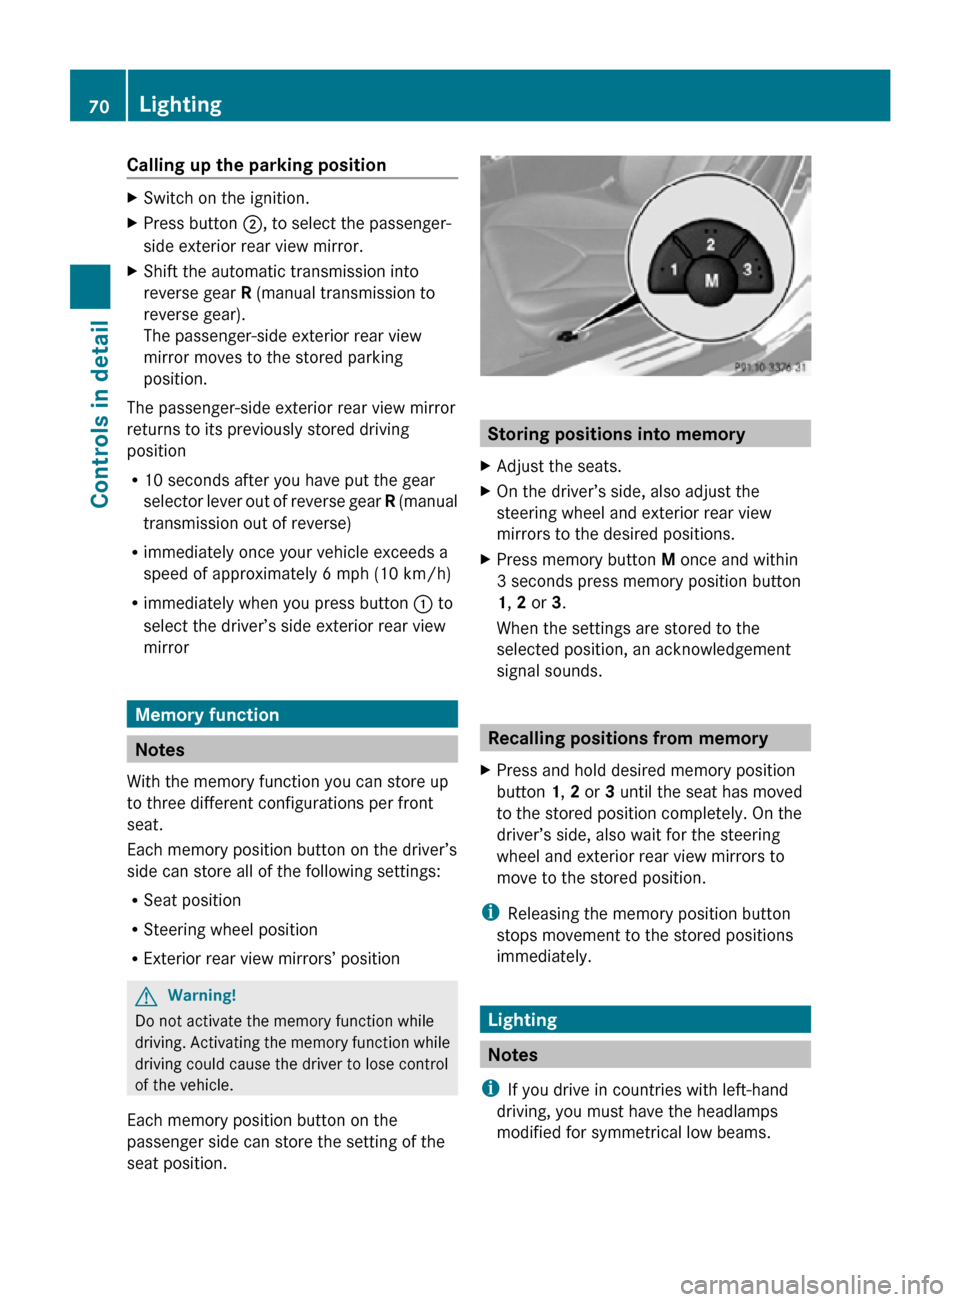
X Adjust the seats.
X On the driver’s side, also adjust the
steering wheel and exterior rear view
mirrors to the desired positions.
X Press memory button M once and within
3 seconds press memory position button
1, 2 or 3.
When the settings are stored to the
selected position, an acknowledgement
signal sounds. Recalling positions from memory
X Press and hold desired memory position
button 1, 2 or 3 until the seat has moved
to the stored position completely. On the
driver’s side, also wait for the steering
wheel and exterior rear view mirrors to
move to the stored position.
i Releasing the memory position button
stops movement to the stored positions
immediately. Lighting
Notes
i If you drive in countries with left-hand
driving, you must have the headlamps
modified for symmetrical low beams. 70
LightingControls in detail
171_AKB; 3; 60, en-US
d2ureepe,
Version: 2.11.8.1 2009-05-11T16:00:23+02:00 - Seite 70
Page 75 of 312
USA only
With the exterior lamp switch in position
$ or
Ã, you cannot switch on the high-
beam headlamps.
The high-beam flasher is available at all times.
X For nighttime driving turn the exterior lamp
switch to position L to permit activation
of the high-beam headlamps.
When the engine is running, and you turn the
exterior lamp switch to position T or
L, the manual headlamp mode has
priority over the daytime running lamp mode.
The corresponding exterior lamps come on
(Y page 71).
Fog lamps Fog lamps cannot be switched on with the
exterior lamp switch in position Ã.
G
Warning!
In low ambient lighting or foggy conditions,
only switch from position à to L with
the vehicle at a standstill in a safe location.
Switching from à to L will briefly
switch off the headlamps. Doing so while
driving in low ambient lighting conditions may
result in an accident.
Fog lamps will operate with the parking lamps
and/or the low-beam headlamps on. Fog
lamps should only be used in conjunction with
low-beam headlamps. Consult your State or
Province Motor Vehicle Regulations
regarding permissible lamp operation.
X Turn the exterior lamp switch to position
T or L (Y page 71).
X Switching on front fog lamps: Pull out the
exterior lamp switch to first stop.
The green indicator lamp N in the
exterior lamp switch comes on. X
Switching on rear fog lamp: Pull out the
exterior lamp switch to second stop.
The rear fog lamp, the front fog lamps, the
green N and the yellow indicator lamp
R in the exterior lamp switch come on.
X Switching off front fog lamps/rear fog
lamp: Push in the exterior lamp switch to
its stop.
Locator lighting and night security
illumination Locator lighting and night security
illumination are described in the “Control
system” section, see “Switching locator
lighting on or off” (Y page 106) and
“Switching night security illumination
(Headlamps delayed shut-off feature) on or
off” (Y page 107). Combination switch
Turn signals
X
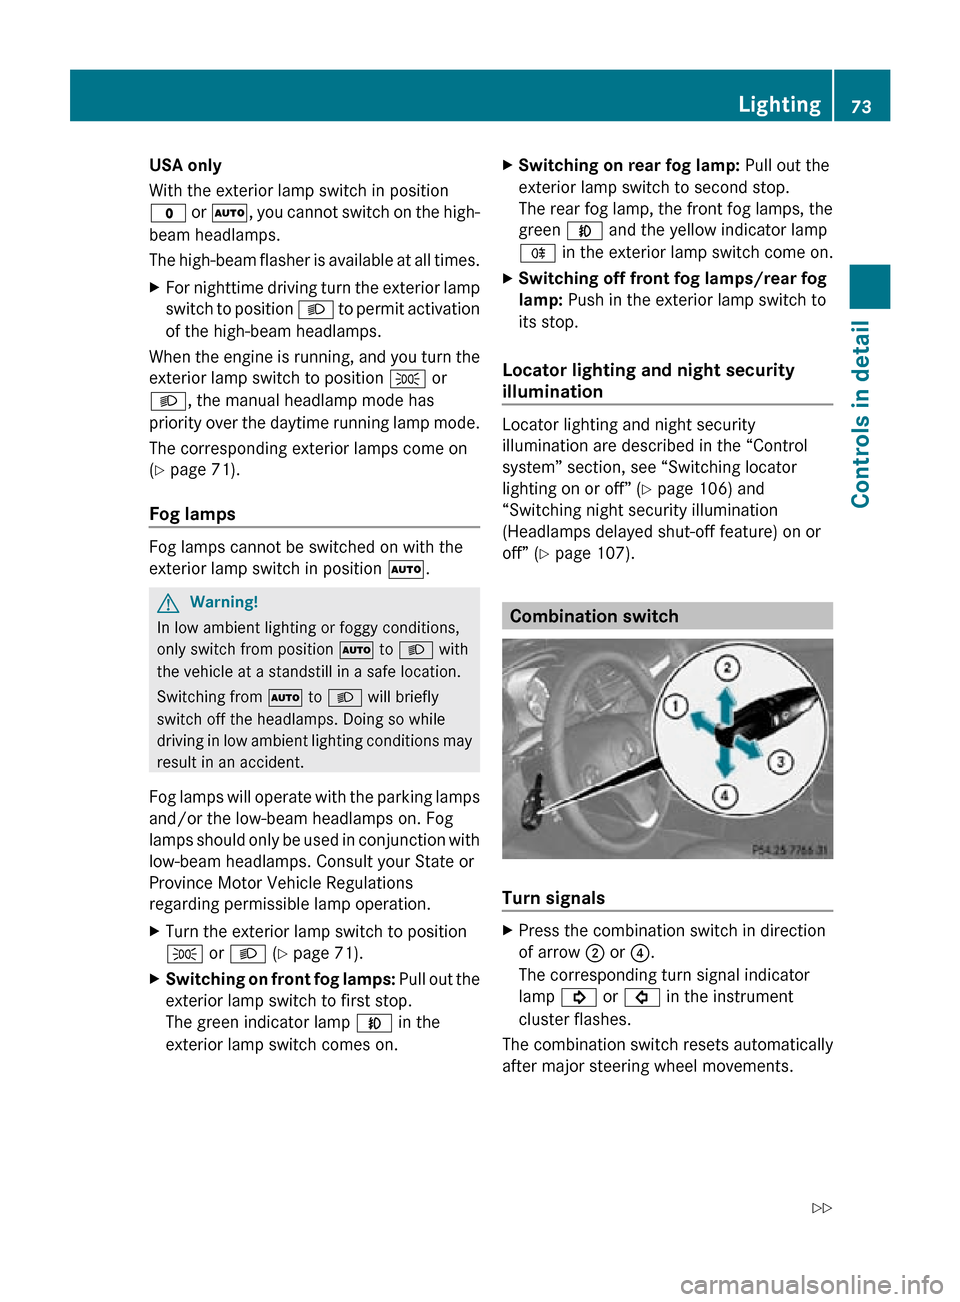
Press the combination switch in direction
of arrow ; or ?.
The corresponding turn signal indicator
lamp ! or # in the instrument
cluster flashes.
The combination switch resets automatically
after major steering wheel movements. Lighting
73Controls in detail
171_AKB; 3; 60, en-US
d2ureepe, Version: 2.11.8.1 2009-05-11T16:00:23+02:00 - Seite 73 Z
Page 77 of 312
Corner-illuminating front fog lamps
The corner-illuminating front fog lamps
improve illumination of the area in the
direction into which you are turning.
The corner-illuminating front fog lamps will
only operate
R in low ambient lighting conditions
R at vehicle speeds below 25 mph
(40 km/h)
R with the front fog lamps switched off
R when the engine is running
Switching on X
Turn the exterior lamp switch to position
L or Ã.
or
X Activate the daytime running lamp mode
(Y page 72).
X Switch on the left or right turn signal,
depending on whether you are turning left
or right.
The respective front fog lamp comes on. If
you have switched on the turn signal for
one side but turn the steering wheel in the
other direction, the corner-illuminating
front fog lamp on the side of the turn signal
comes on.
or
X Turn the steering wheel in the desired
direction.
Driving forward: The front fog lamp on the
side of your steering direction comes on.
Driving in reverse: The front fog lamp
opposite to your steering direction comes
on.
The corner-illuminating front fog lamps will
come on automatically depending on the
steering angle, even if you did not switch on
either turn signal. If the corner-illuminating
front fog lamps came on automatically, they
will also go out automatically depending on
the steering angle and vehicle speed. The corner-illuminating front fog lamps
temporarily come on on both sides of the
vehicle if you turn the steering wheel in one
direction and then again in the other direction
shortly thereafter.
The corner-illuminating front fog lamp
remains lit for a short time only. It then goes
out automatically.
Switching off
X
Switch off the left or right turn signal.
or
X Steer straight ahead.
i There may be a brief delay before the
corner-illuminating front fog lamps go out. Interior lighting
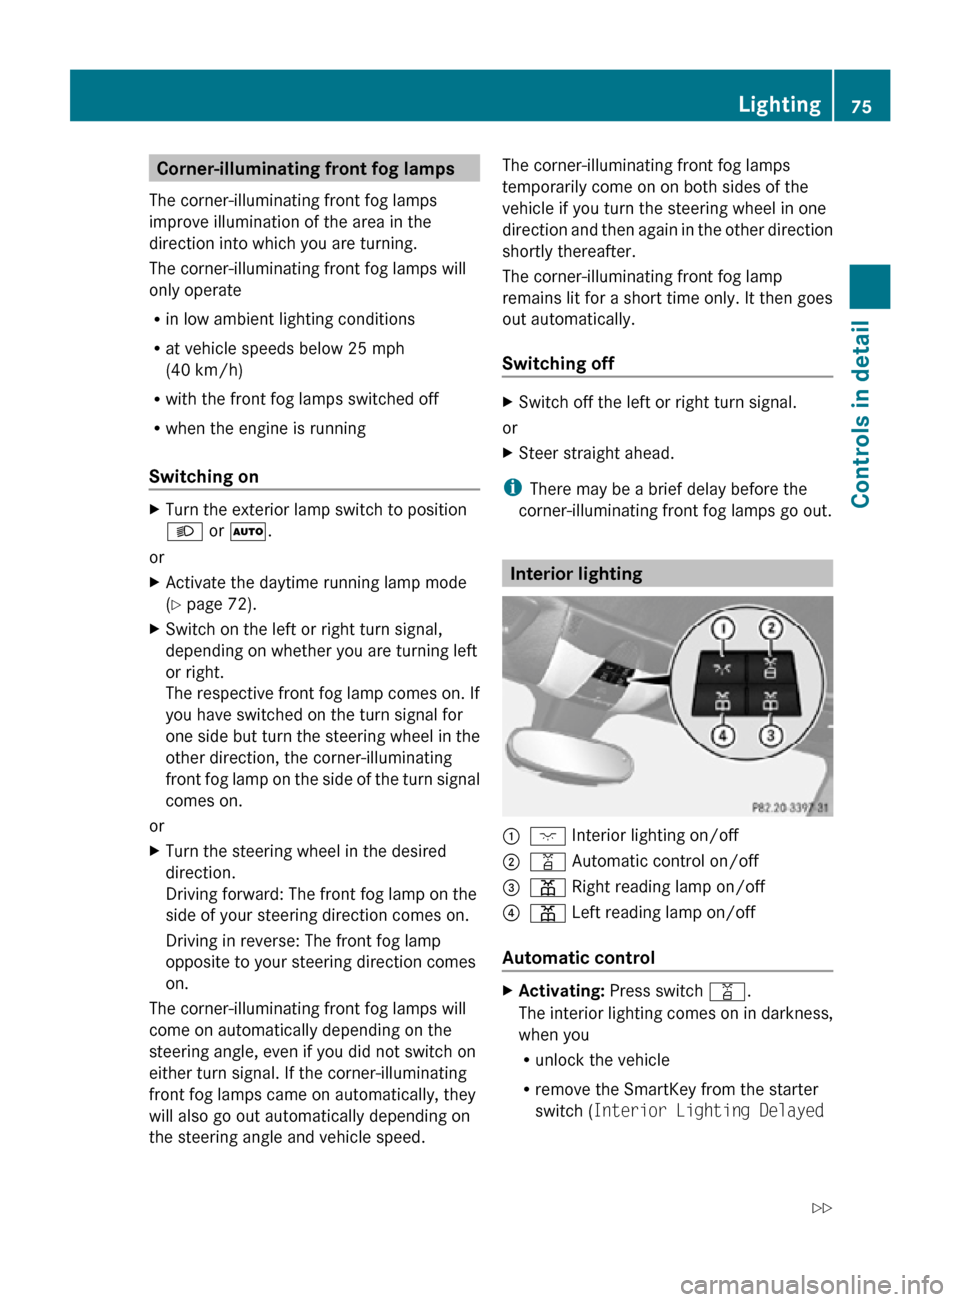
:
c Interior lighting on/off
; q Automatic control on/off
= p Right reading lamp on/off
? p Left reading lamp on/off
Automatic control X
Activating: Press switch q.
The interior lighting comes on in darkness,
when you
R
unlock the vehicle
R remove the SmartKey from the starter
switch ( Interior Lighting Delayed Lighting
75Controls in detail
171_AKB; 3; 60, en-US
d2ureepe, Version: 2.11.8.1 2009-05-11T16:00:23+02:00 - Seite 75 Z
Page 83 of 312
The engine does not start. You can hear
the starter.
There could be a malfunction in the engine
electronics or in the fuel supply system.
X
Turn the SmartKey in the starter switch to
position 0 and repeat the starting
procedure.
If the engine does not start after several
starting attempts:
X Contact an authorized Mercedes-Benz
Center or call Roadside Assistance.
The engine does not start. You cannot
hear the starter.
The battery may not be charged sufficiently.
X Get a jump start (Y page 283).
If the engine will not start despite a jump
start:
X Contact an authorized Mercedes-Benz
Center or call Roadside Assistance.
The starter has been exposed to excessive
temperatures.
X Let the starter cool for about 2 minutes.
X Repeat the starting procedure.
If the engine does not start after several
starting attempts:
X Contact an authorized Mercedes-Benz
Center or call Roadside Assistance. Driving off
G
Warning!
On slippery road surfaces, never downshift in
order to obtain braking action. This could
result
in drive wheel slip and reduced vehicle
control. Your vehicle’s ABS will not prevent
this type of loss of control.
! Do not run a cold engine at high engine
speeds. Running a cold engine at high
engine speeds may shorten the service life of the engine. This is not covered by the
Mercedes-Benz Limited Warranty.
! If an acoustic warning sounds and the
message Release Parking Brake
appears in the multifunction display when
driving off, you have forgotten to release
the parking brake.
Release the parking brake.
! Avoid
spinning of a drive wheel. This may
cause serious damage to the drivetrain
which is not covered by the Mercedes-Benz
Limited Warranty.
! Simultaneously depressing the
accelerator pedal and applying the brakes
reduces engine performance and causes
premature brake and drivetrain wear which
is not covered by the Mercedes-Benz
Limited Warranty.
i Once the vehicle is in motion, the
automatic central locking function engages
and the locking knobs in the doors move
down.
The automatic central locking function can
be switched off ( Y page 108).
Manual transmission X
Depress the brake pedal.
X Fully depress the clutch pedal.
! Only shift the manual transmission into
reverse
gear R when the vehicle is stopped.
Otherwise the manual transmission could
be damaged.
X Shift the manual transmission into 1st
gear
or reverse gear R.
X If engaged, release the parking brake.
X Release the brake pedal.
X Simultaneously slowly release the clutch
pedal
and carefully depress the accelerator
pedal. Driving and parking
81
Controls in detail
171_AKB; 3; 60, en-US
d2ureepe, Version: 2.11.8.1 2009-05-11T16:00:23+02:00 - Seite 81 Z
Page 85 of 312
If no damage on major assemblies, fuel
system, and engine mount can be
determined:
X
Start the engine in the usual manner. Parking
G
Warning!
Do not park this vehicle in areas where
combustible materials such as grass, hay or
leaves can come into contact with the hot
exhaust system. These materials could be
ignited and cause a vehicle fire.
Vehicle movement can cause serious
personal injury or damage to the vehicle or
the vehicle drivetrain. Therefore, always do
the following before turning off the engine and
leaving the vehicle:
R Keep right foot on the brake pedal.
R Engage the parking brake.
R Manual transmission: Shift the manual
transmission into 1st gear or reverse gear
R.
R Automatic transmission: Shift the
automatic transmission into park position
P.
R Slowly release the brake pedal.
R When parked on an incline, always turn the
front wheels towards the road curb.
R Turn the SmartKey in the starter switch to
position 0 and remove the SmartKey from
the starter switch.
R Take the SmartKey with you and lock the
vehicle when leaving. G
Warning!
Manual transmission:
Wait until the vehicle is stationary before
removing the SmartKey from the starter
switch. The vehicle cannot be steered when
the SmartKey is removed from the starter
switch. Parking brake G
Warning!
Engaging the parking brake while the vehicle
is in motion can cause the rear wheels to lock
up. You could lose control of the vehicle and
cause an accident. In addition, the vehicle’s
brake lights do not light up when the parking
brake is engaged. G
Warning!
When leaving the vehicle, always remove the
SmartKey from the starter switch, take it with
you, and lock the vehicle. Do not leave
children unattended in the vehicle, or with
access to an unlocked vehicle. Children could
release the parking brake and/or shift the
automatic transmission out of park position
P (manual transmission: shift into the neutral
position), either of which could result in an
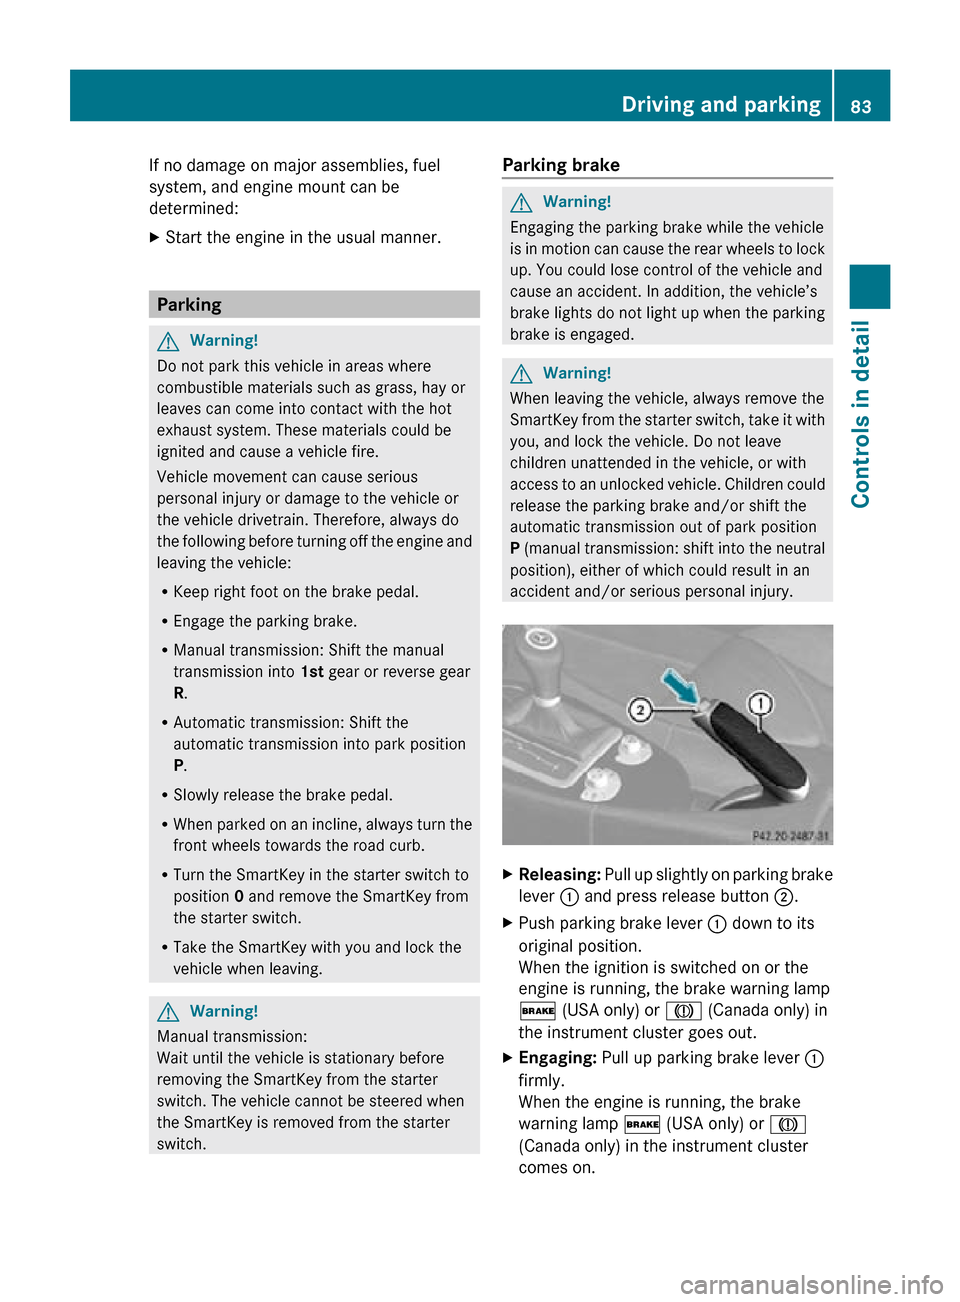
accident and/or serious personal injury. X
Releasing: Pull up slightly on parking brake
lever : and press release button ;.
X Push parking brake lever : down to its
original position.
When the ignition is switched on or the
engine is running, the brake warning lamp
$ (USA only) or J (Canada only) in
the instrument cluster goes out.
X Engaging: Pull up parking brake lever :
firmly.
When the engine is running, the brake
warning lamp $ (USA only) or J
(Canada only) in the instrument cluster
comes on. Driving and parking
83Controls in detail
171_AKB; 3; 60, en-US
d2ureepe, Version: 2.11.8.1 2009-05-11T16:00:23+02:00 - Seite 83 Z
Page 86 of 312
Turning off the engine
G
Warning!
Do not turn off the engine before the vehicle
has come to a complete stop. With the engine
not running, there is no power assistance for
the brake and steering systems. In this case,
it is important to keep in mind that a
considerably higher degree of effort is
necessary to brake and steer the vehicle.
X Manual transmission: Shift the manual
transmission into 1st gear or reverse gear
R.
X Automatic transmission: Shift the
automatic transmission into park position
P.
X Engage the parking brake.
i Always engage the parking brake in
addition to shifting the automatic
transmission into park position P (manual
transmission: shifting into 1st gear or
reverse gear R).
X Turn the SmartKey in the starter switch to
position 0.
X Remove the SmartKey from the starter
switch.
The immobilizer is activated.
Automatic transmission:
The SmartKey can only be removed from the
starter switch with the automatic
transmission in park position P. Manual transmission
Introduction
For information on driving with a manual
transmission, see “Driving and parking”
(Y page 79). G
Warning!
Make sure absolutely no objects are
obstructing the pedals’ range of movement.
Keep the driver’s footwell clear of all obstacles. If there are any floormats or
carpets in the footwell, make sure the pedals
still have sufficient clearance.
During sudden driving or braking maneuvers
the objects could get caught between or
under the pedals. You could then no longer
brake or accelerate. This could lead to
accidents and injury.
G
Warning!
When working on the vehicle, engage the
parking brake and shift the manual
transmission into 1st gear or reverse gear R.
Otherwise the vehicle could roll away which
could result in an accident and/or serious
personal injury.
! Allow the engine to warm up under low
load use. Do not place full load on the
engine until the operating temperature has
been reached.
Avoid spinning of a drive wheel for an
extended period when driving off on
slippery road surfaces.
This may cause serious damage to the
engine and the drivetrain which is not
covered by the Mercedes-Benz Limited
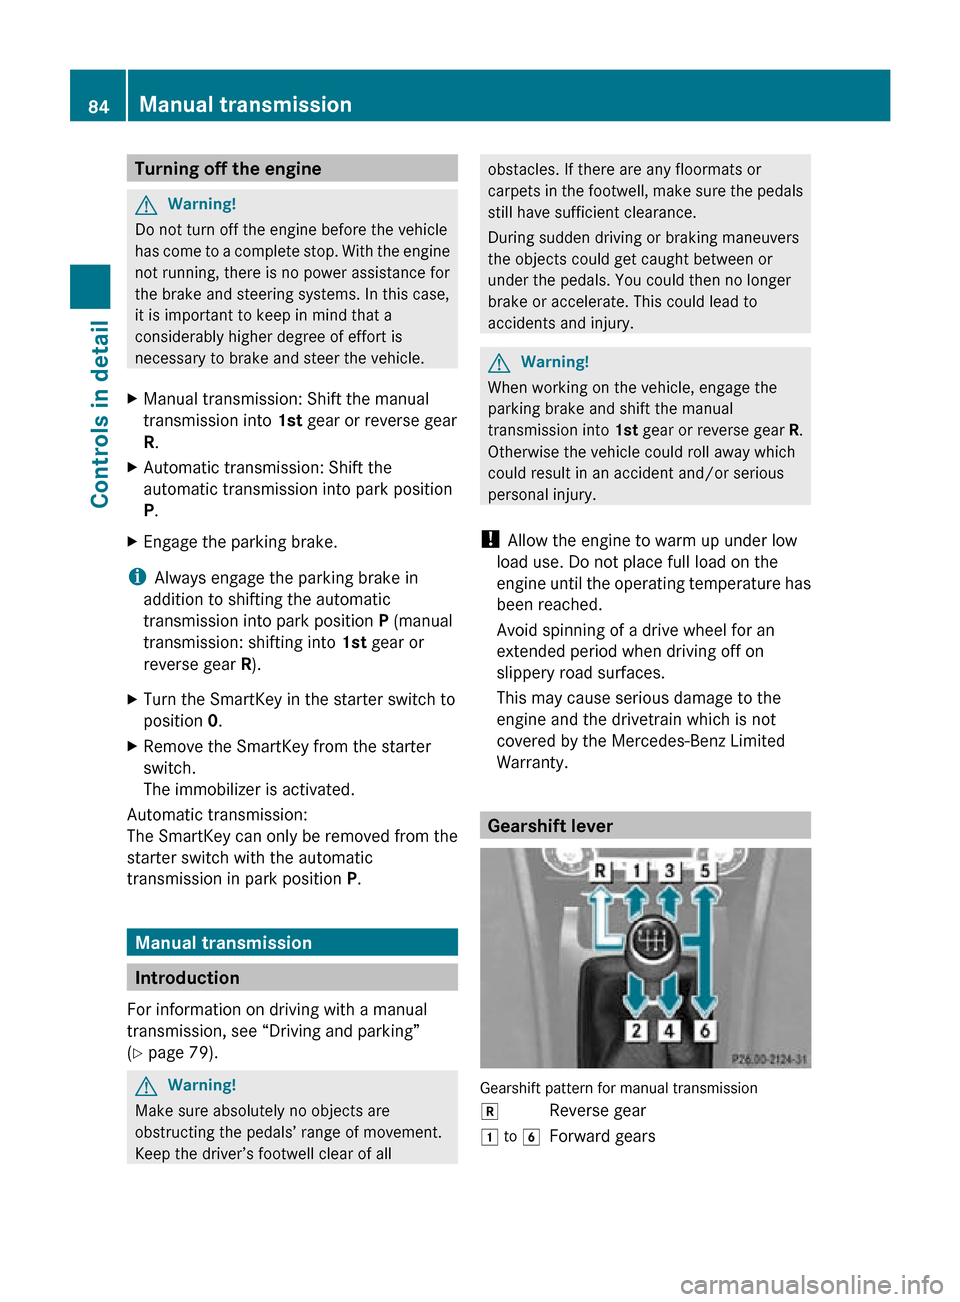
Warranty. Gearshift lever
Gearshift pattern for manual transmission
k
Reverse gear
1 to 6 Forward gears 84
Manual transmissionControls in detail
171_AKB; 3; 60, en-US
d2ureepe,
Version: 2.11.8.1 2009-05-11T16:00:23+02:00 - Seite 84
Page 87 of 312
G
Warning!
On slippery road surfaces, never downshift in
order to obtain braking action. This could
result
in drive wheel slip and reduced vehicle
control. Your vehicle’s ABS will not prevent
this type of loss of control.
! When you are shifting the manual
transmission into the 5th or 6th gear,
make sure you move the gearshift lever to
the right. Otherwise, you could accidentally
shift into the 3rd or 4th gear and damage
the manual transmission.
Downshifting gears leading to overrevving
the engine can result in engine damage that
is not covered by the Mercedes-Benz
Limited Warranty.
Never hold the vehicle stopped on a hill by
using the clutch pedal. The clutch may be
damaged which is not covered by the
Mercedes-Benz Limited Warranty.
! Avoid driving at excessive engine speeds.
This may result in serious engine damage
that is not covered by the Mercedes-Benz
Limited Warranty.
Shift gear in a timely manner.
Shifting into reverse gear R !
Only shift the manual transmission into
reverse
gear R when the vehicle is stopped.
Otherwise the manual transmission could
be damaged.
X Stop the vehicle completely.
X Fully depress the clutch pedal.
X Shift the manual transmission into the
neutral position (no gear selected).
X Move the gearshift lever to the left until you
feel a certain resistance.
X Push the gearshift lever past this resistance
and hold.
X Move the gearshift lever forward to select
reverse gear R. Automatic transmission
Introduction
For information on driving with an automatic
transmission, see “Driving and parking”
(Y page 79). G
Warning!
Make sure absolutely no objects are
obstructing the pedals’ range of movement.
Keep the driver’s footwell clear of all
obstacles. If there are any floormats or
carpets
in the footwell, make sure the pedals
still have sufficient clearance.
During sudden driving or braking maneuvers
the objects could get caught between or
under the pedals. You could then no longer
brake or accelerate. This could lead to
accidents and injury.
! Allow the engine to warm up under low
load use. Do not place full load on the
engine until the operating temperature has
been reached.
Avoid spinning of a drive wheel for an
extended period when driving off on
slippery road surfaces.
This may cause serious damage to the
engine and the drivetrain which is not
covered by the Mercedes-Benz Limited
Warranty.
i During the brief warm-up, transmission
upshifting is delayed. This allows the
catalytic converter to heat up more quickly
to operating temperature. Automatic transmission
85
Controls in detail
171_AKB; 3; 60, en-US
d2ureepe, Version: 2.11.8.1 2009-05-11T16:00:23+02:00 - Seite 85 Z
Page 91 of 312
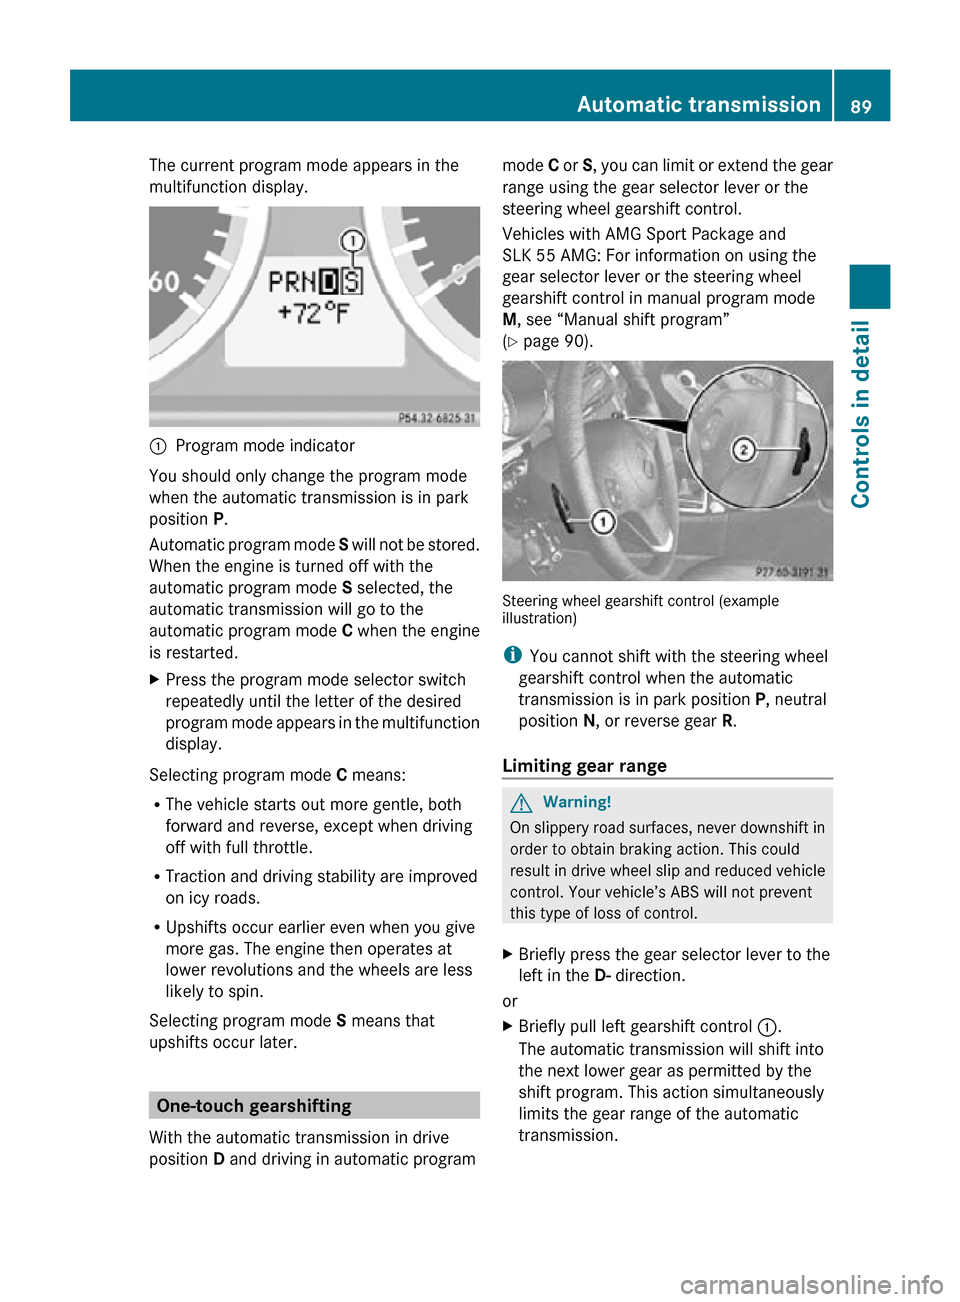
The current program mode appears in the
multifunction display.
:
Program mode indicator
You should only change the program mode
when the automatic transmission is in park
position P.
Automatic program mode S will not be stored.
When the engine is turned off with the
automatic program mode S selected, the
automatic transmission will go to the
automatic program mode C when the engine
is restarted.
X Press the program mode selector switch
repeatedly until the letter of the desired
program mode appears in the multifunction
display.
Selecting program mode C means:
R The vehicle starts out more gentle, both
forward and reverse, except when driving
off with full throttle.
R Traction and driving stability are improved
on icy roads.
R Upshifts occur earlier even when you give
more gas. The engine then operates at
lower revolutions and the wheels are less
likely to spin.
Selecting program mode S means that
upshifts occur later. One-touch gearshifting
With the automatic transmission in drive
position D and driving in automatic program mode
C or S, you can limit or extend the gear
range using the gear selector lever or the
steering wheel gearshift control.
Vehicles with AMG Sport Package and
SLK 55 AMG: For information on using the
gear selector lever or the steering wheel
gearshift control in manual program mode
M, see “Manual shift program”
(Y page 90). Steering wheel gearshift control (example
illustration)
i
You cannot shift with the steering wheel
gearshift control when the automatic
transmission is in park position P, neutral
position N, or reverse gear R.
Limiting gear range G
Warning!
On slippery road surfaces, never downshift in
order to obtain braking action. This could
result in drive wheel slip and reduced vehicle
control. Your vehicle’s ABS will not prevent
this type of loss of control.
X Briefly press the gear selector lever to the
left in the D- direction.
or
X Briefly pull left gearshift control :.
The automatic transmission will shift into
the next lower gear as permitted by the
shift program. This action simultaneously
limits the gear range of the automatic
transmission. Automatic transmission
89Controls in detail
171_AKB; 3; 60, en-US
d2ureepe, Version: 2.11.8.1 2009-05-11T16:00:23+02:00 - Seite 89 Z
Page 92 of 312
i
To avoid overrevving the engine when
downshifting, the automatic transmission
will not shift into a lower gear if the engine’s
maximum speed would be exceeded.
Extending gear range X
Briefly press the gear selector lever to the
right in the D+ direction.
or
X Briefly pull right gearshift control ;.
The automatic transmission will shift into
the next higher gear as permitted by the
shift program. This action simultaneously
extends the gear range of the automatic
transmission.
i If you press on the accelerator pedal
when the engine has reached the
revolution limit of the current gear range,
the automatic transmission will upshift
beyond any gear range limit selected.
Canceling gear range limit X
Press and hold the gear selector lever to
the right in the D+ direction until D
reappears in the multifunction display.
or
X Pull and hold right gearshift control ; until
D reappears in the multifunction display.
The automatic transmission will shift from
the current gear range directly into drive
position D.
Shifting into optimal gear range X
Press and hold the gear selector lever to
the left in the D- direction.
or
X Pull and hold left gearshift control :.
The automatic transmission will select the
gear range suited for optimal acceleration
and deceleration automatically. This will
involve shifting down one or more gears. Manual shift program
The manual shift program is available on
vehicles with AMG Sport Package and on
SLK 55 AMG only.
Manual program mode M differs with regard
to spontaneity, response time, and shifting
smoothness from automatic program mode
S.
In manual program mode M, system-
controlled automatic gearshifting is switched
off. You need to change the gears by manually
upshifting or downshifting using the gear
selector lever or the steering wheel gearshift
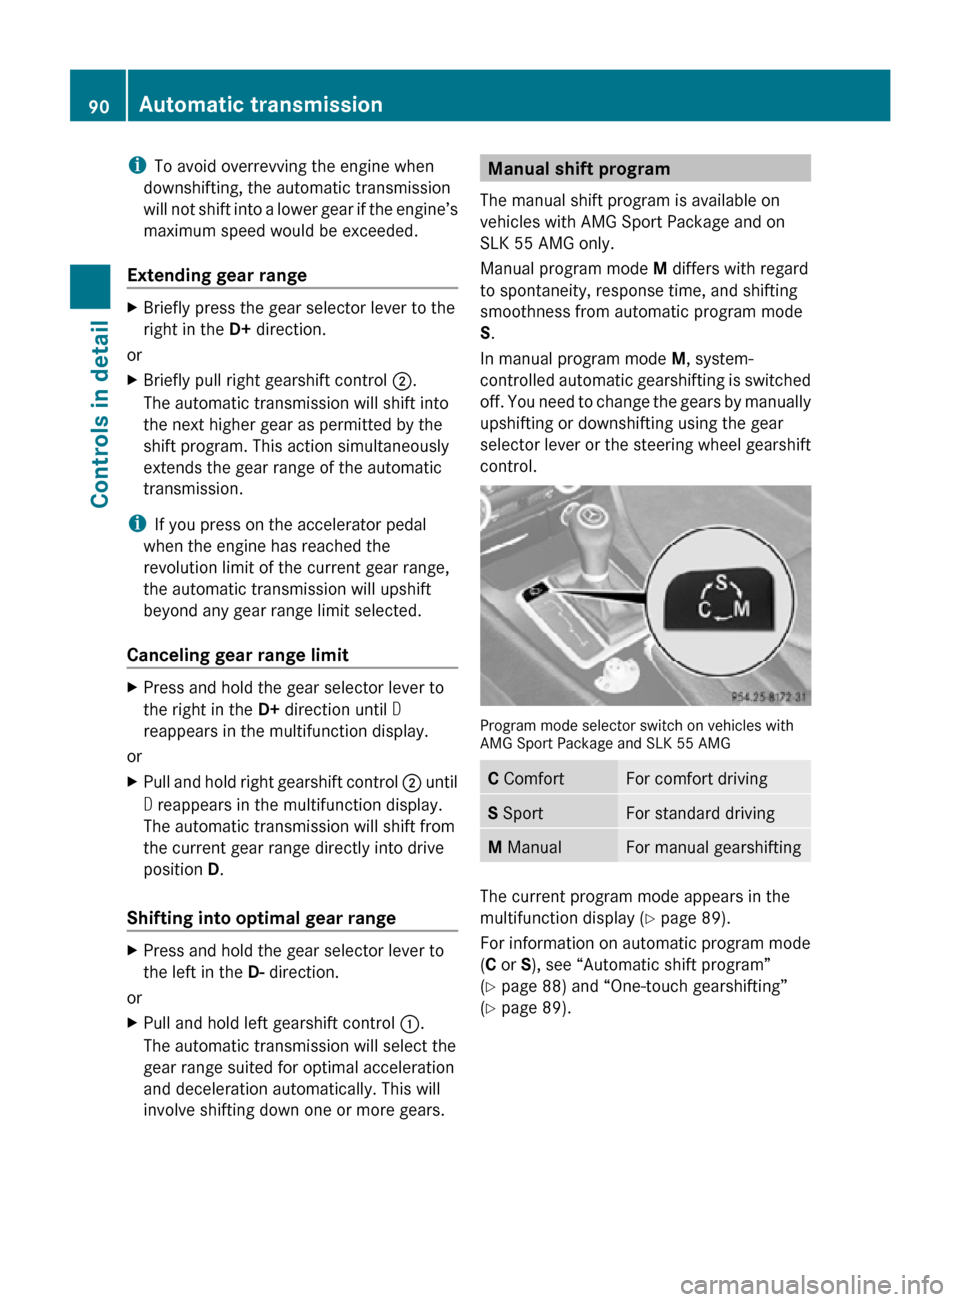
control. Program mode selector switch on vehicles with
AMG Sport Package and SLK 55 AMG
C Comfort For comfort driving
S Sport For standard driving
M Manual For manual gearshifting
The current program mode appears in the
multifunction display (
Y page 89).
For information on automatic program mode
(C or S), see “Automatic shift program”
(Y page 88) and “One-touch gearshifting”
(Y page 89). 90
Automatic transmissionControls in detail
171_AKB; 3; 60, en-US
d2ureepe,
Version: 2.11.8.1 2009-05-11T16:00:23+02:00 - Seite 90