MERCEDES-BENZ SLS 2011 C197 Owner's Manual
Manufacturer: MERCEDES-BENZ, Model Year: 2011, Model line: SLS, Model: MERCEDES-BENZ SLS 2011 C197Pages: 436, PDF Size: 20.86 MB
Page 291 of 436
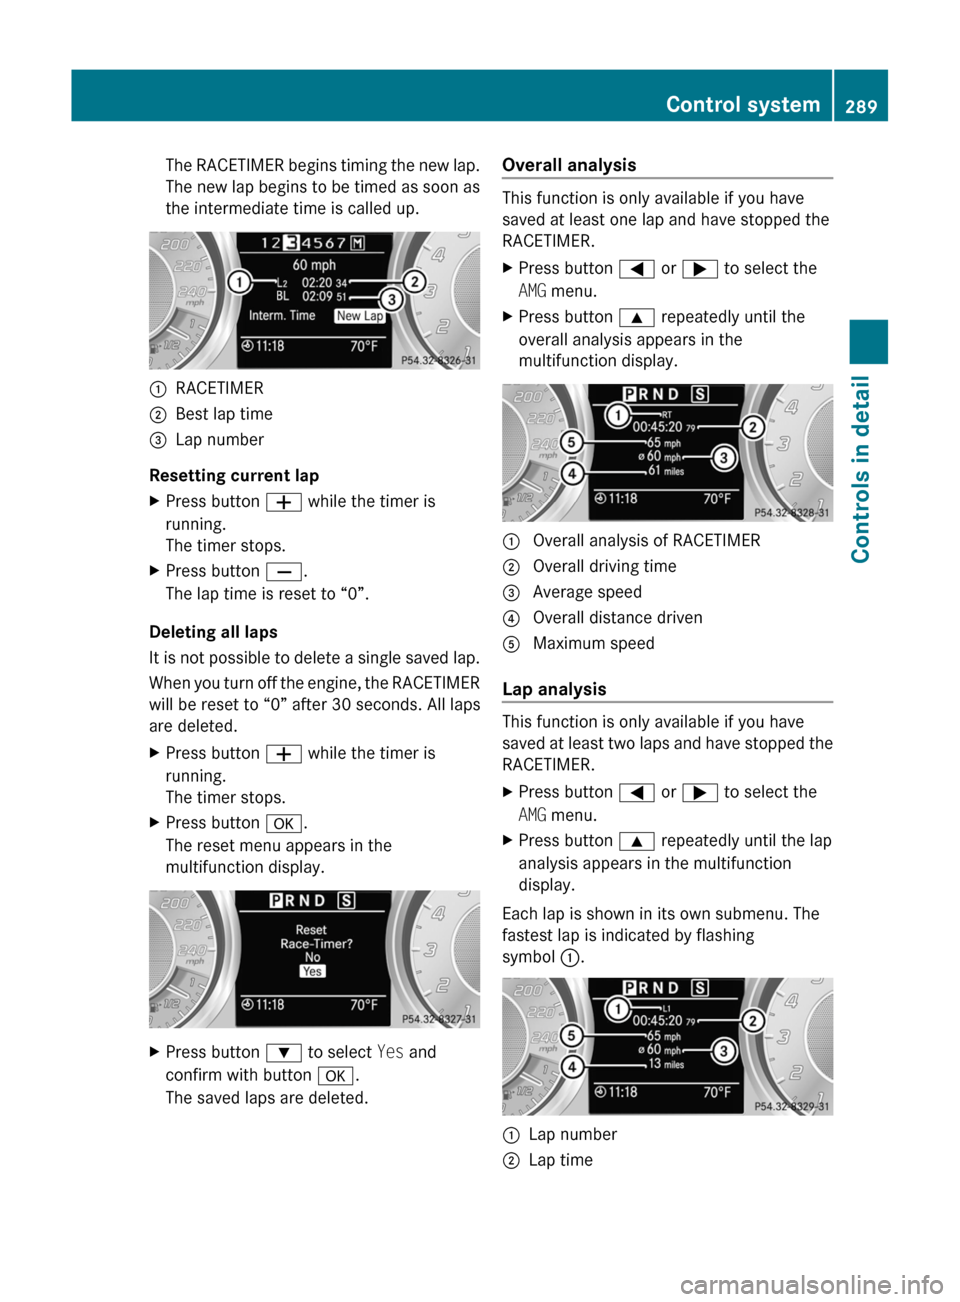
The RACETIMER begins timing the new lap.
The new lap begins to be timed as soon as
the intermediate time is called up.:RACETIMER;Best lap time=Lap number
Resetting current lap
XPress button W while the timer is
running.
The timer stops.XPress button X.
The lap time is reset to “0”.
Deleting all laps
It is not possible to delete a single saved lap.
When you turn off the engine, the RACETIMER
will be reset to “0” after 30 seconds. All laps
are deleted.
XPress button W while the timer is
running.
The timer stops.XPress button a.
The reset menu appears in the
multifunction display.XPress button : to select Yes and
confirm with button a.
The saved laps are deleted.Overall analysis
This function is only available if you have
saved at least one lap and have stopped the
RACETIMER.
XPress button = or ; to select the
AMG menu.XPress button 9 repeatedly until the
overall analysis appears in the
multifunction display.: Overall analysis of RACETIMER; Overall driving time= Average speed? Overall distance drivenA Maximum speed
Lap analysis
This function is only available if you have
saved at least two laps and have stopped the
RACETIMER.
XPress button = or ; to select the
AMG menu.XPress button 9 repeatedly until the lap
analysis appears in the multifunction
display.
Each lap is shown in its own submenu. The
fastest lap is indicated by flashing
symbol :.
:Lap number;Lap timeControl system289Controls in detailBA 197 USA, CA Edition A 2011; 1; 27, en-UShereepeVersion: 3.0.3.52010-03-24T15:31:10+01:00 - Seite 289Z
Page 292 of 436
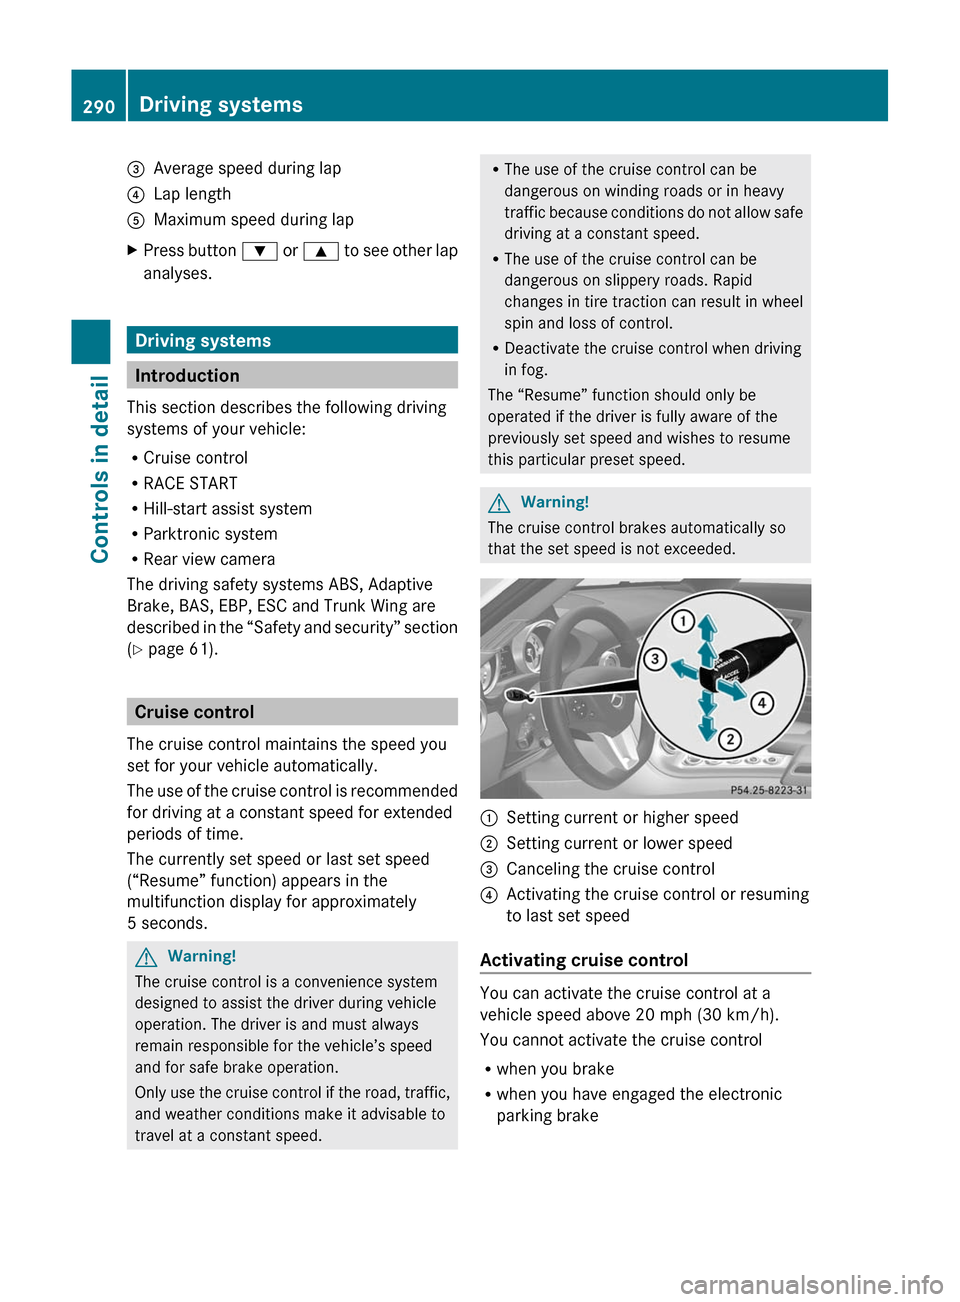
=Average speed during lap?Lap lengthAMaximum speed during lapXPress button : or 9 to see other lap
analyses.
Driving systems
Introduction
This section describes the following driving
systems of your vehicle:
R Cruise control
R RACE START
R Hill-start assist system
R Parktronic system
R Rear view camera
The driving safety systems ABS, Adaptive
Brake, BAS, EBP, ESC and Trunk Wing are
described in the “Safety and security” section
( Y page 61).
Cruise control
The cruise control maintains the speed you
set for your vehicle automatically.
The use of the cruise control is recommended
for driving at a constant speed for extended
periods of time.
The currently set speed or last set speed
(“Resume” function) appears in the
multifunction display for approximately
5 seconds.
GWarning!
The cruise control is a convenience system
designed to assist the driver during vehicle
operation. The driver is and must always
remain responsible for the vehicle’s speed
and for safe brake operation.
Only use the cruise control if the road, traffic,
and weather conditions make it advisable to
travel at a constant speed.
R The use of the cruise control can be
dangerous on winding roads or in heavy
traffic because conditions do not allow safe
driving at a constant speed.
R The use of the cruise control can be
dangerous on slippery roads. Rapid
changes in tire traction can result in wheel
spin and loss of control.
R Deactivate the cruise control when driving
in fog.
The “Resume” function should only be
operated if the driver is fully aware of the
previously set speed and wishes to resume
this particular preset speed.GWarning!
The cruise control brakes automatically so
that the set speed is not exceeded.
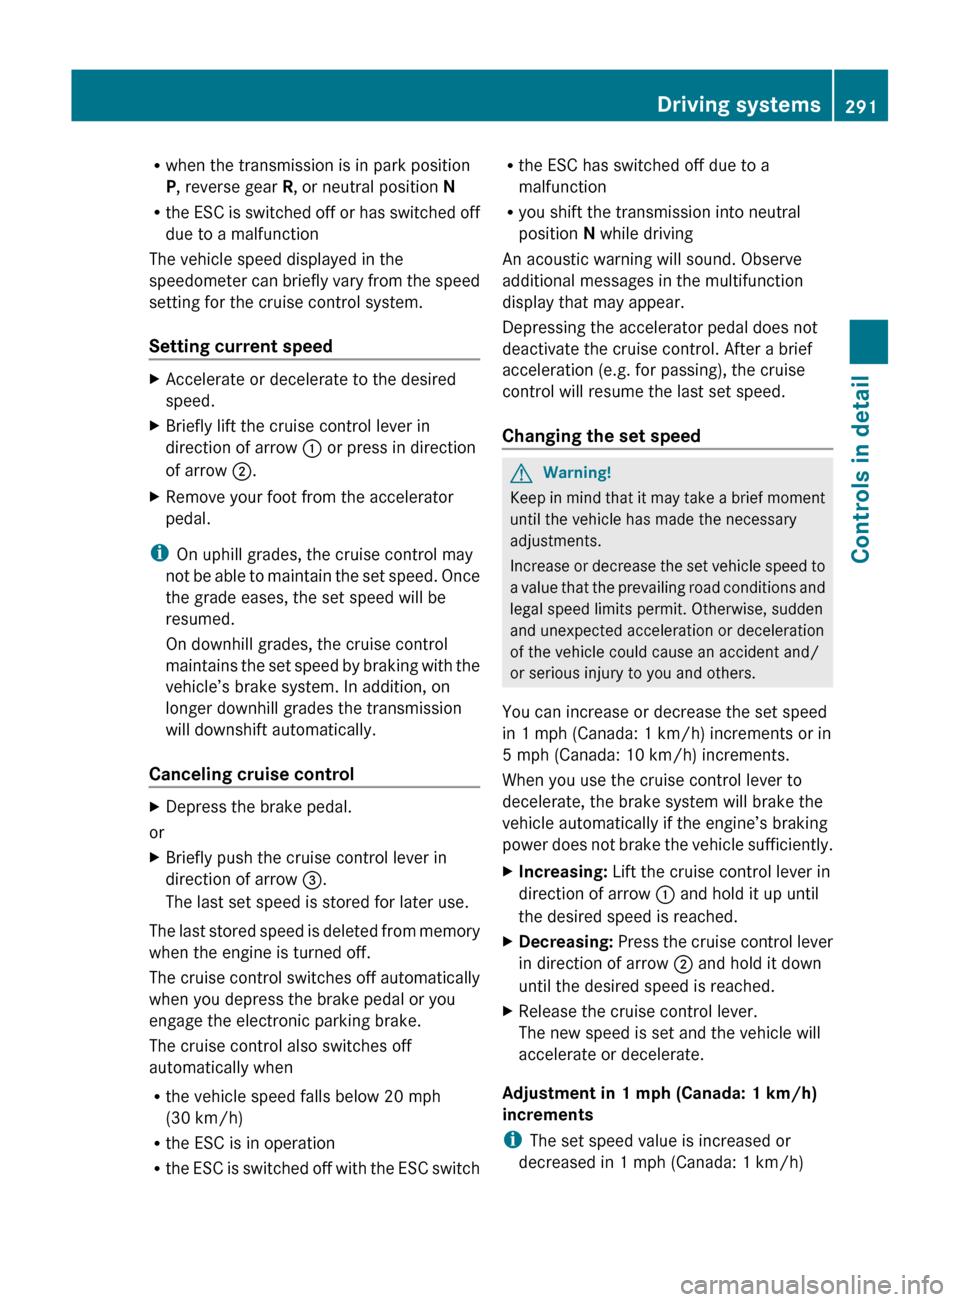
:Setting current or higher speed;Setting current or lower speed=Canceling the cruise control?Activating the cruise control or resuming
to last set speed
Activating cruise control
You can activate the cruise control at a
vehicle speed above 20 mph (30 km/h).
You cannot activate the cruise control
R when you brake
R when you have engaged the electronic
parking brake
290Driving systemsControls in detail
BA 197 USA, CA Edition A 2011; 1; 27, en-UShereepeVersion: 3.0.3.52010-03-24T15:31:10+01:00 - Seite 290
Page 293 of 436
Rwhen the transmission is in park position
P , reverse gear R, or neutral position N
R the ESC is switched off or has switched off
due to a malfunction
The vehicle speed displayed in the
speedometer can briefly vary from the speed
setting for the cruise control system.
Setting current speed XAccelerate or decelerate to the desired
speed.XBriefly lift the cruise control lever in
direction of arrow : or press in direction
of arrow ;.XRemove your foot from the accelerator
pedal.
i On uphill grades, the cruise control may
not be able to maintain the set speed. Once
the grade eases, the set speed will be
resumed.
On downhill grades, the cruise control
maintains the set speed by braking with the
vehicle’s brake system. In addition, on
longer downhill grades the transmission
will downshift automatically.
Canceling cruise control
XDepress the brake pedal.
or
XBriefly push the cruise control lever in
direction of arrow =.
The last set speed is stored for later use.
The last stored speed is deleted from memory
when the engine is turned off.
The cruise control switches off automatically
when you depress the brake pedal or you
engage the electronic parking brake.
The cruise control also switches off
automatically when
R the vehicle speed falls below 20 mph
(30 km/h)
R the ESC is in operation
R the ESC is switched off with the ESC switch
Rthe ESC has switched off due to a
malfunction
R you shift the transmission into neutral
position N while driving
An acoustic warning will sound. Observe
additional messages in the multifunction
display that may appear.
Depressing the accelerator pedal does not
deactivate the cruise control. After a brief
acceleration (e.g. for passing), the cruise
control will resume the last set speed.
Changing the set speed GWarning!
Keep in mind that it may take a brief moment
until the vehicle has made the necessary
adjustments.
Increase or decrease the set vehicle speed to
a value that the prevailing road conditions and
legal speed limits permit. Otherwise, sudden
and unexpected acceleration or deceleration
of the vehicle could cause an accident and/
or serious injury to you and others.
You can increase or decrease the set speed
in 1 mph (Canada: 1 km/h) increments or in
5 mph (Canada: 10 km/h) increments.
When you use the cruise control lever to
decelerate, the brake system will brake the
vehicle automatically if the engine’s braking
power does not brake the vehicle sufficiently.
XIncreasing: Lift the cruise control lever in
direction of arrow : and hold it up until
the desired speed is reached.XDecreasing: Press the cruise control lever
in direction of arrow ; and hold it down
until the desired speed is reached.XRelease the cruise control lever.
The new speed is set and the vehicle will
accelerate or decelerate.
Adjustment in 1 mph (Canada: 1 km/h)
increments
i The set speed value is increased or
decreased in 1 mph (Canada: 1 km/h)
Driving systems291Controls in detailBA 197 USA, CA Edition A 2011; 1; 27, en-UShereepeVersion: 3.0.3.52010-03-24T15:31:10+01:00 - Seite 291Z
Page 294 of 436
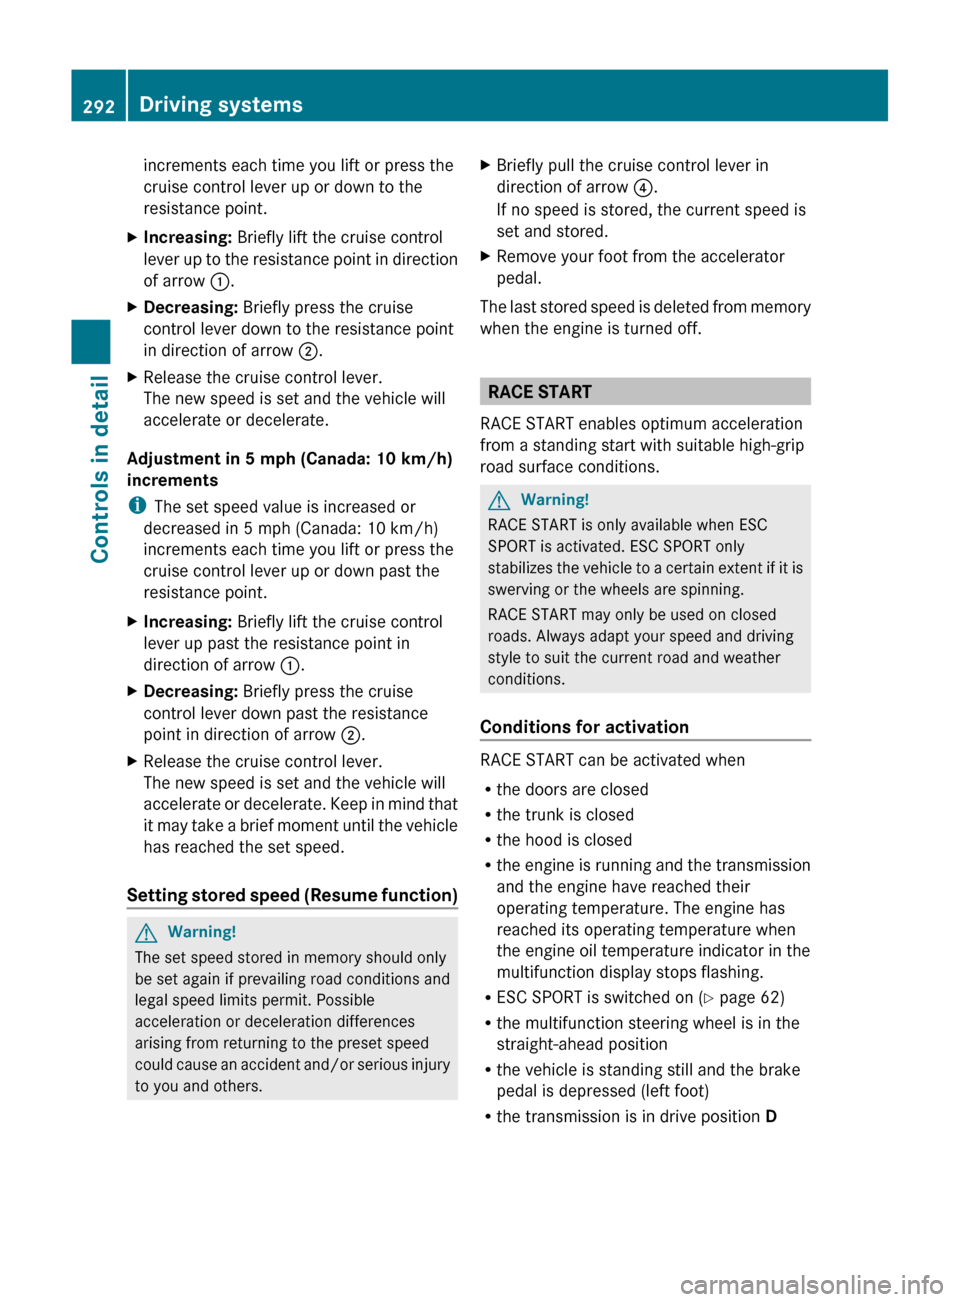
increments each time you lift or press the
cruise control lever up or down to the
resistance point.XIncreasing: Briefly lift the cruise control
lever up to the resistance point in direction
of arrow :.XDecreasing: Briefly press the cruise
control lever down to the resistance point
in direction of arrow ;.XRelease the cruise control lever.
The new speed is set and the vehicle will
accelerate or decelerate.
Adjustment in 5 mph (Canada: 10 km/h)
increments
i The set speed value is increased or
decreased in 5 mph (Canada: 10 km/h)
increments each time you lift or press the
cruise control lever up or down past the
resistance point.
XIncreasing: Briefly lift the cruise control
lever up past the resistance point in
direction of arrow :.XDecreasing: Briefly press the cruise
control lever down past the resistance
point in direction of arrow ;.XRelease the cruise control lever.
The new speed is set and the vehicle will
accelerate or decelerate. Keep in mind that
it may take a brief moment until the vehicle
has reached the set speed.
Setting stored speed (Resume function)
GWarning!
The set speed stored in memory should only
be set again if prevailing road conditions and
legal speed limits permit. Possible
acceleration or deceleration differences
arising from returning to the preset speed
could cause an accident and/or serious injury
to you and others.
XBriefly pull the cruise control lever in
direction of arrow ?.
If no speed is stored, the current speed is
set and stored.XRemove your foot from the accelerator
pedal.
The last stored speed is deleted from memory
when the engine is turned off.
RACE START
RACE START enables optimum acceleration
from a standing start with suitable high-grip
road surface conditions.
GWarning!
RACE START is only available when ESC
SPORT is activated. ESC SPORT only
stabilizes the vehicle to a certain extent if it is
swerving or the wheels are spinning.
RACE START may only be used on closed
roads. Always adapt your speed and driving
style to suit the current road and weather
conditions.
Conditions for activation
RACE START can be activated when
R the doors are closed
R the trunk is closed
R the hood is closed
R the engine is running and the transmission
and the engine have reached their
operating temperature. The engine has
reached its operating temperature when
the engine oil temperature indicator in the
multifunction display stops flashing.
R ESC SPORT is switched on ( Y page 62)
R the multifunction steering wheel is in the
straight-ahead position
R the vehicle is standing still and the brake
pedal is depressed (left foot)
R the transmission is in drive position D
292Driving systemsControls in detail
BA 197 USA, CA Edition A 2011; 1; 27, en-UShereepeVersion: 3.0.3.52010-03-24T15:31:10+01:00 - Seite 292
Page 295 of 436
Activating RACE STARTXDepress the brake pedal with your left foot
and keep it depressed.XTurn the program mode selector dial
clockwise ( Y page 267) until the RS lamp
on the dial comes on.
The message RACE START Confirm:
Paddle UP Cancel: Paddle DOWN
appears in the multifunction display.
i When the activation conditions are not
fulfilled anymore, RACE START is canceled.
The message RACE START Canceled
appears in the multifunction display.
XTo cancel: Pull left steering wheel gearshift
control ( Y page 267).
or
XTo confirm: Pull right steering wheel
gearshift control ( Y page 267).
The message RACE START Available
Depress gas pedal. appears in the
multifunction display.
i If you do not depress the accelerator
pedal within a few seconds, RACE START is
canceled. The message RACE START Not
Possible See Operator’s Manual
appears in the multifunction display.
XDepress the accelerator pedal fully.
The engine speed increases.
The message RACE START Release
brake to start appears in the
multifunction display.
i If you do not release the brake pedal
within a few seconds, RACE START is
canceled. The message RACE START
Canceled appears in the multifunction
display.
XTake your foot off the brake pedal while
keeping the accelerator pedal depressed.
The vehicle pulls away at maximum
acceleration.
The message RACE START Active appears
in the multifunction display.
RACE START deactivates at a vehicle speed
of approximately 30 mph
(Canada: 50 km/h). The transmission
switches to program mode S+. ESC SPORT
remains switched on.
RACE START is canceled immediately if you
release the accelerator pedal while RACE
START is active or when the activation
conditions are not fulfilled anymore. The
message RACE START Not Possible See
Operator’s Manual appears in the
multifunction display.
i If RACE START is used repeatedly in a
short period of time, it is only available
again after having driven the vehicle a
certain distance.
Hill-start assist system
On uphill grades, the hill-start assist system
maintains the pressure in the brake system
for approximately 1 second after you have
released the brake pedal. Therefore, you can
start off smoothly without the vehicle moving
immediately after releasing the brake pedal.
GWarning!
The hill-start assist system is not designed to
function as a parking brake. It does not
prevent the vehicle from moving when parked
on an incline.
Always engage the electronic parking brake
in addition to shifting the transmission into
park position P.
XDepress the brake pedal.XShift the transmission into drive position
D or reverse gear R.XRelease the brake pedal.XCarefully depress the accelerator pedal.
The hill-start assist system is inactive
R when starting off on a level road or downhill
grades
R with the transmission in neutral position N
R with the electronic parking brake engaged
R if the ESC has switched off due to a
malfunction
Driving systems293Controls in detailBA 197 USA, CA Edition A 2011; 1; 27, en-UShereepeVersion: 3.0.3.52010-03-24T15:31:10+01:00 - Seite 293Z
Page 296 of 436
Parktronic system
The Parktronic system is an electronic
parking aid with ultrasonic sensors designed
to assist the driver during parking maneuvers.
The Parktronic system indicates the relative
distance between the vehicle and an obstacle
visually and audibly.
The Parktronic system is activated
automatically when
Ryou switch on the ignition
and
Ryou release the electronic parking brake
or
Ryou start the engine
and
Rshift the transmission into drive position
D, reverse gear R, or neutral position N
The Parktronic system deactivates at speeds
above approximately 11 mph (18 km/h). At
lower speeds, the Parktronic system
activates again.
The Parktronic system also deactivates when
you shift the transmission into park position
P or engage the electronic parking brake and
turn off the engine.
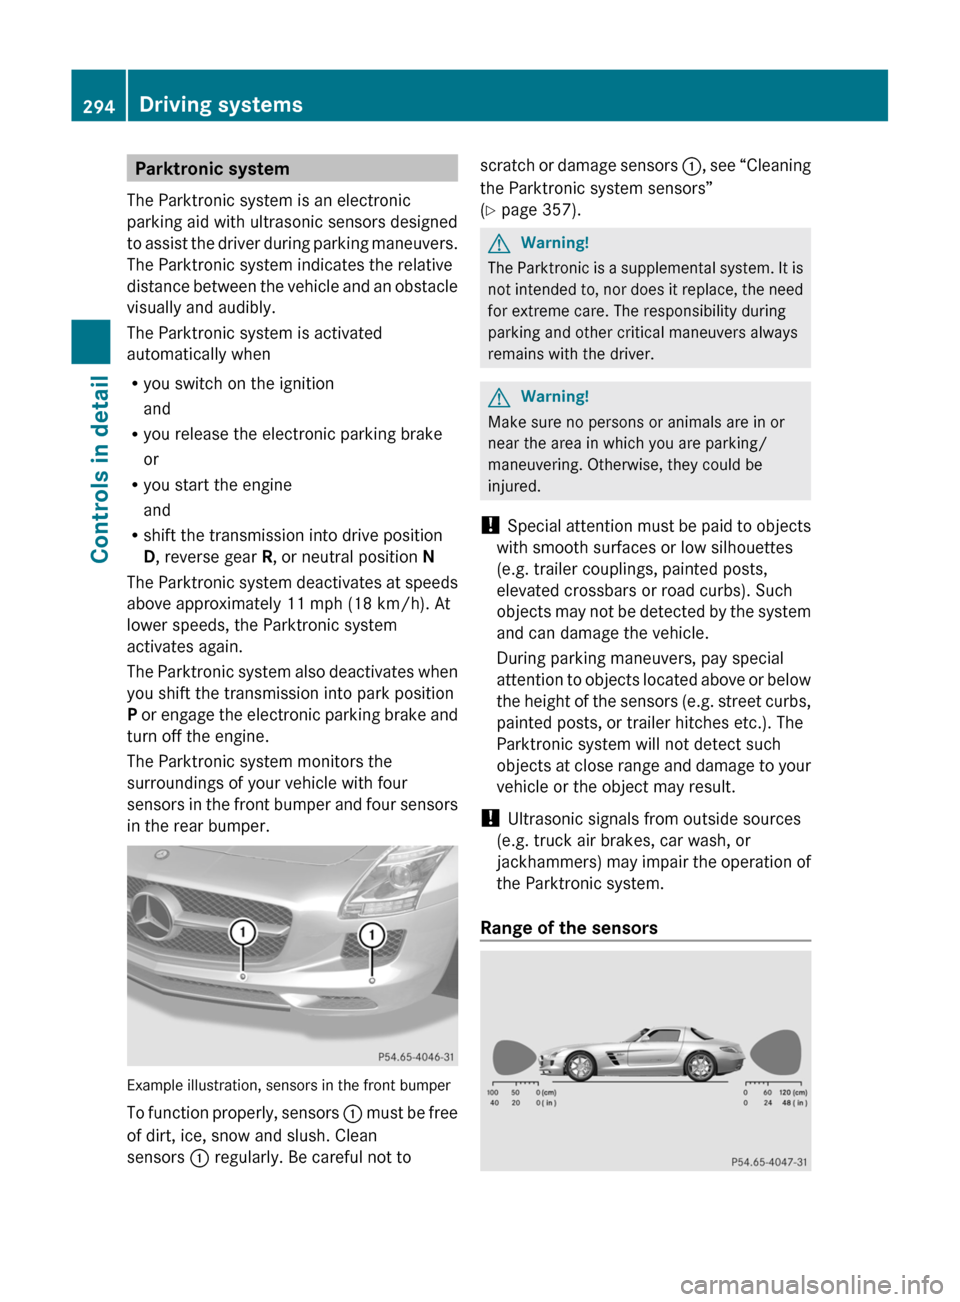
The Parktronic system monitors the
surroundings of your vehicle with four
sensors in the front bumper and four sensors
in the rear bumper.
Example illustration, sensors in the front bumper
To function properly, sensors : must be free
of dirt, ice, snow and slush. Clean
sensors : regularly. Be careful not to
scratch or damage sensors :, see “Cleaning
the Parktronic system sensors”
(Y page 357).
GWarning!
The Parktronic is a supplemental system. It is
not intended to, nor does it replace, the need
for extreme care. The responsibility during
parking and other critical maneuvers always
remains with the driver.
GWarning!
Make sure no persons or animals are in or
near the area in which you are parking/
maneuvering. Otherwise, they could be
injured.
! Special attention must be paid to objects
with smooth surfaces or low silhouettes
(e.g. trailer couplings, painted posts,
elevated crossbars or road curbs). Such
objects may not be detected by the system
and can damage the vehicle.
During parking maneuvers, pay special
attention to objects located above or below
the height of the sensors (e.g. street curbs,
painted posts, or trailer hitches etc.). The
Parktronic system will not detect such
objects at close range and damage to your
vehicle or the object may result.
! Ultrasonic signals from outside sources
(e.g. truck air brakes, car wash, or
jackhammers) may impair the operation of
the Parktronic system.
Range of the sensors
294Driving systemsControls in detail
BA 197 USA, CA Edition A 2011; 1; 27, en-UShereepeVersion: 3.0.3.52010-03-24T15:31:10+01:00 - Seite 294
Page 297 of 436
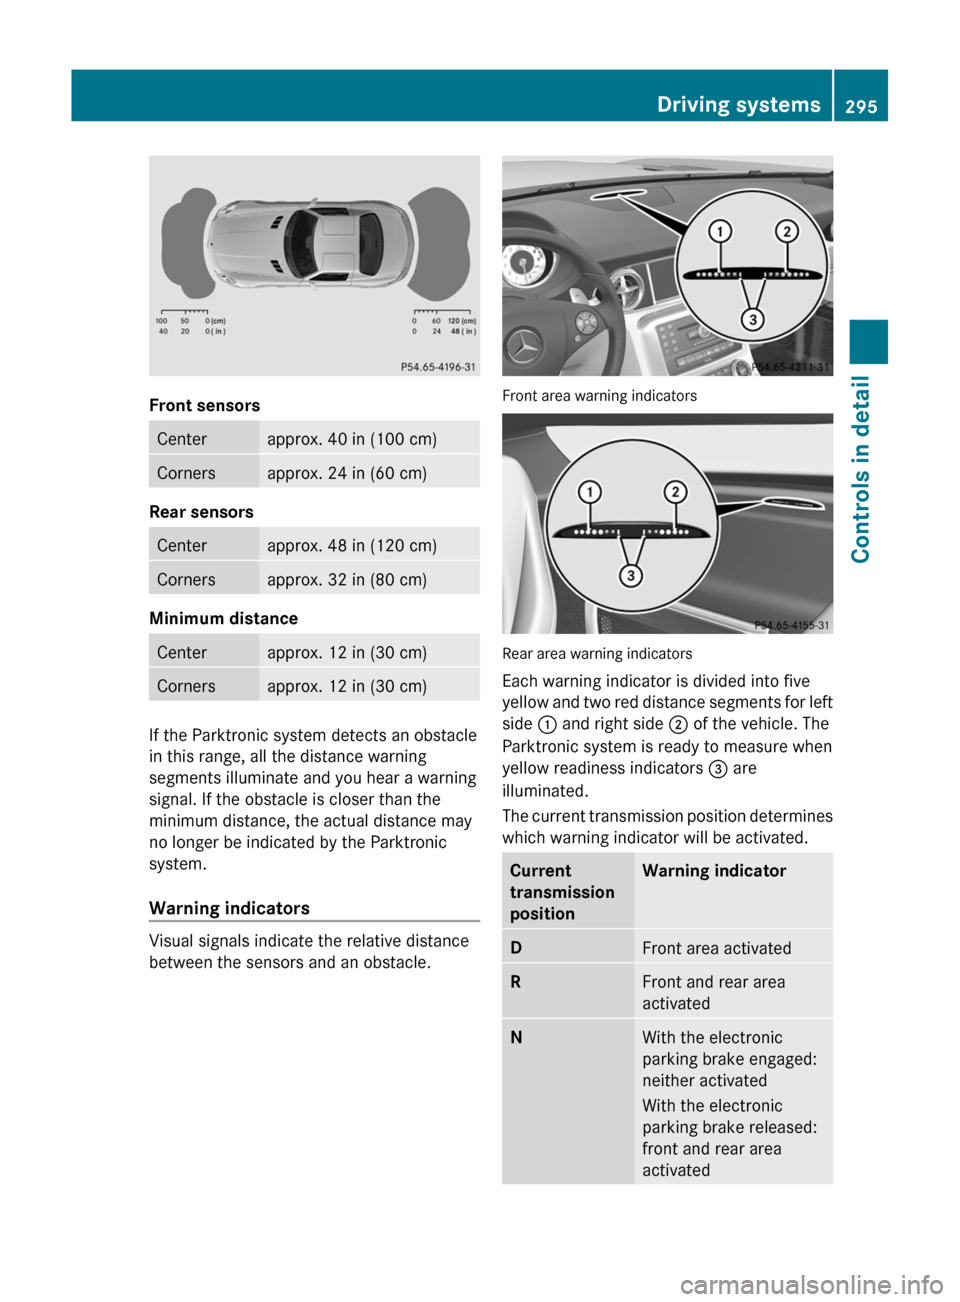
Front sensors
Centerapprox. 40 in (100 cm)Cornersapprox. 24 in (60 cm)
Rear sensors
Centerapprox. 48 in (120 cm)Cornersapprox. 32 in (80 cm)
Minimum distance
Centerapprox. 12 in (30 cm)Cornersapprox. 12 in (30 cm)
If the Parktronic system detects an obstacle
in this range, all the distance warning
segments illuminate and you hear a warning
signal. If the obstacle is closer than the
minimum distance, the actual distance may
no longer be indicated by the Parktronic
system.
Warning indicators
Visual signals indicate the relative distance
between the sensors and an obstacle.
Front area warning indicators
Rear area warning indicators
Each warning indicator is divided into five
yellow and two red distance segments for left
side : and right side ; of the vehicle. The
Parktronic system is ready to measure when
yellow readiness indicators = are
illuminated.
The current transmission position determines
which warning indicator will be activated.
Current
transmission
position
Warning indicatorDFront area activatedRFront and rear area
activated
NWith the electronic
parking brake engaged:
neither activated
With the electronic
parking brake released:
front and rear area
activated
Driving systems295Controls in detailBA 197 USA, CA Edition A 2011; 1; 27, en-UShereepeVersion: 3.0.3.52010-03-24T15:31:10+01:00 - Seite 295Z
Page 298 of 436
As your vehicle approaches an object, one or
more distance segments will illuminate,
depending on the distance. When the seventh
distance segment illuminates, you have
reached the minimum distance.
RFront area: An intermittent acoustic
warning will sound as the first red distance
segment illuminates and a constant
acoustic warning lasting a maximum of
2 seconds will sound for the second red
distance segment. The signal is canceled
when the transmission is shifted into park
position P.
RRear area: An intermittent acoustic
warning will sound as the first red distance
segment illuminates and a constant
acoustic warning lasting a maximum of
2 seconds will sound for the second red
distance segment. The signal is canceled
when the transmission is shifted into drive
position D or park position P.
Switching the Parktronic system on/off
The Parktronic system switches on
automatically when the ignition is switched
on.
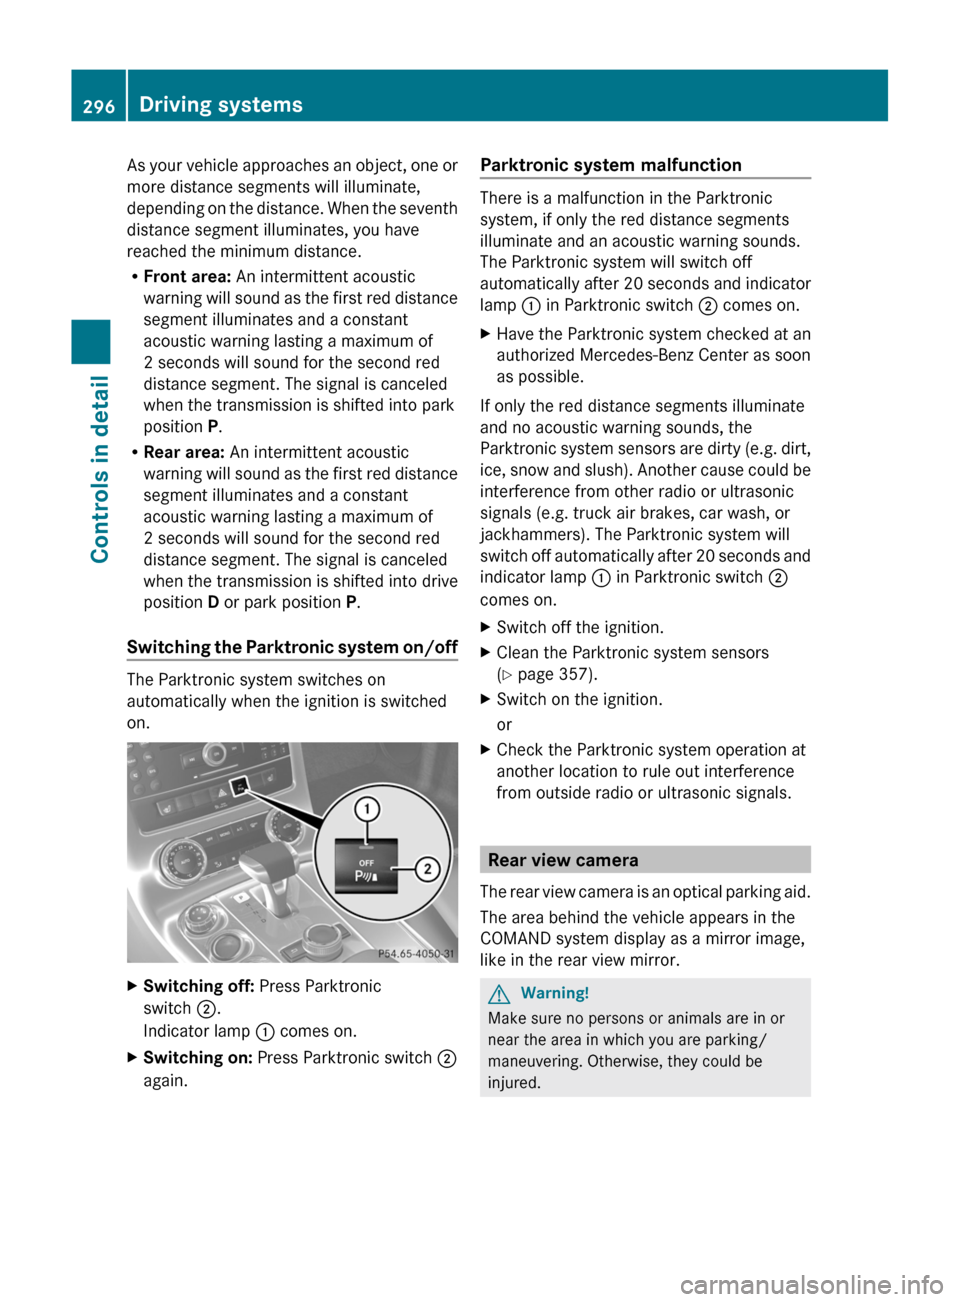
XSwitching off: Press Parktronic
switch ;.
Indicator lamp : comes on.
XSwitching on: Press Parktronic switch ;
again.
Parktronic system malfunction
There is a malfunction in the Parktronic
system, if only the red distance segments
illuminate and an acoustic warning sounds.
The Parktronic system will switch off
automatically after 20 seconds and indicator
lamp : in Parktronic switch ; comes on.
XHave the Parktronic system checked at an
authorized Mercedes-Benz Center as soon
as possible.
If only the red distance segments illuminate
and no acoustic warning sounds, the
Parktronic system sensors are dirty (e.g. dirt,
ice, snow and slush). Another cause could be
interference from other radio or ultrasonic
signals (e.g. truck air brakes, car wash, or
jackhammers). The Parktronic system will
switch off automatically after 20 seconds and
indicator lamp : in Parktronic switch ;
comes on.
XSwitch off the ignition.XClean the Parktronic system sensors
(Y page 357).
XSwitch on the ignition.
or
XCheck the Parktronic system operation at
another location to rule out interference
from outside radio or ultrasonic signals.
Rear view camera
The rear view camera is an optical parking aid.
The area behind the vehicle appears in the
COMAND system display as a mirror image,
like in the rear view mirror.
GWarning!
Make sure no persons or animals are in or
near the area in which you are parking/
maneuvering. Otherwise, they could be
injured.
296Driving systemsControls in detail
BA 197 USA, CA Edition A 2011; 1; 27, en-UShereepeVersion: 3.0.3.52010-03-24T15:31:10+01:00 - Seite 296
Page 299 of 436
GWarning!
The rear view camera is only an aid and may
display obstacles
R from a distorted perspective
R inaccurately
R may not display obstacles at all
The rear view camera does not relieve you of
the responsibility to be cautious. Take care
and pay careful attention. The rear view
camera may not show objects which are
R very close to the rear bumper
R under the rear bumper
You are responsible for safety at all times and
must continue to pay attention to the
immediate surroundings when parking and
maneuvering. This includes the area behind,
in front of, and beside the vehicle. Otherwise
you could endanger yourself and/or others.
GWarning!
The rear view camera either will not function
or will not function to its full capability if
R the trunk lid is open
R it is raining very hard, snowing or foggy
R it is night or you are parking/maneuvering
your vehicle in an area where it is very dark
R the camera is exposed to a very bright white
light
R the immediate surroundings are
illuminated with fluorescent light (the
COMAND system display can flicker)
R there is a sudden change in temperature,
e.g. if you drive into a heated garage from
the cold (lens condensation)
R the camera lens is dirty or covered
R the rear of your vehicle is damaged
In this case, have the position and setting
of the camera checked by a qualified
specialist workshop. Mercedes-Benz
recommends that you contact a Mercedes-
Benz Center for this purpose.
Do not use the rear view camera in these
situations. Otherwise you could injure
yourself or others and/or damage property
including your vehicle while parking/
maneuvering.
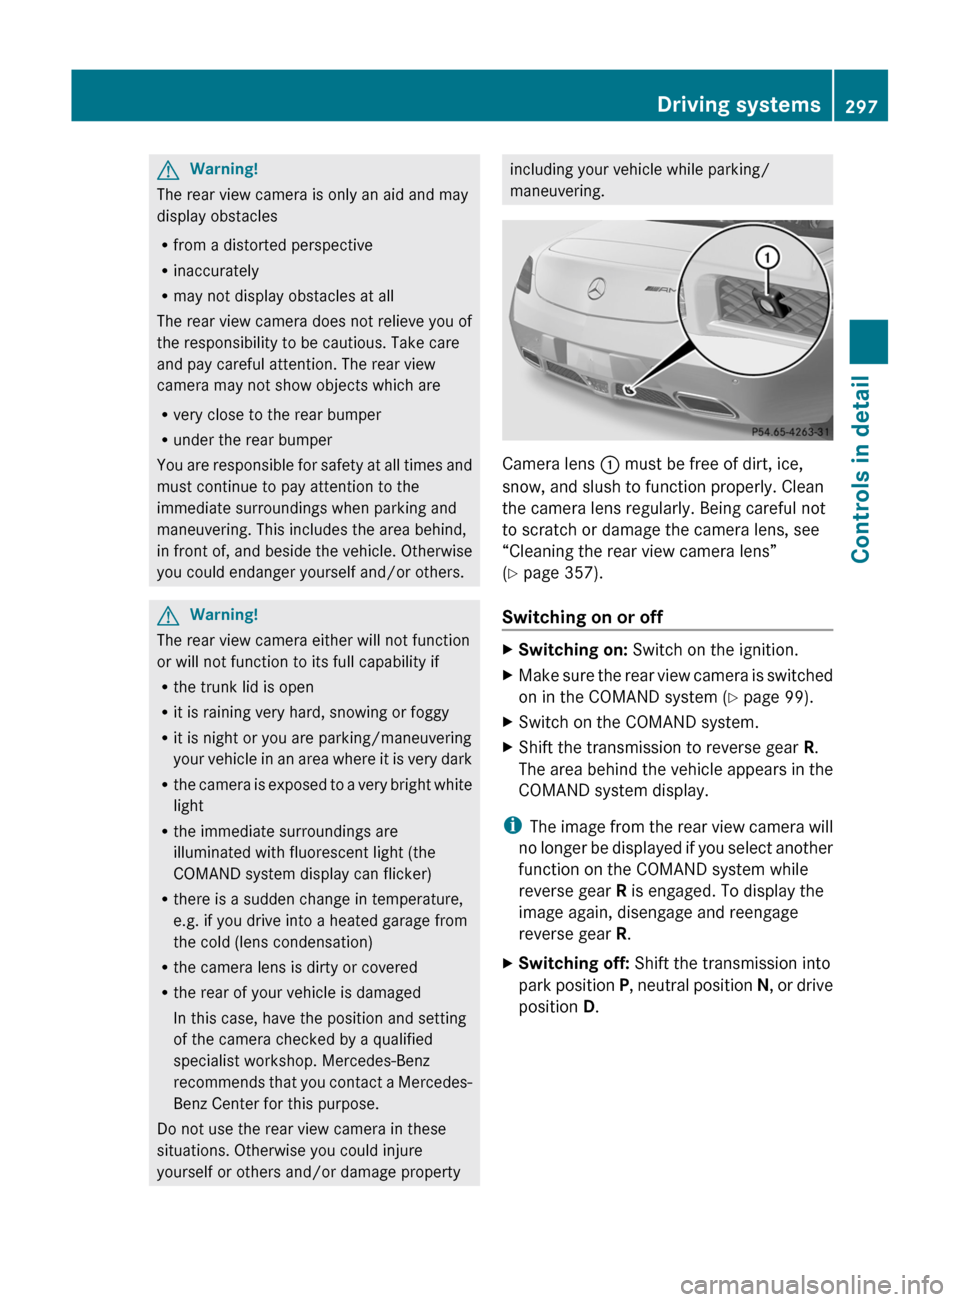
Camera lens : must be free of dirt, ice,
snow, and slush to function properly. Clean
the camera lens regularly. Being careful not
to scratch or damage the camera lens, see
“Cleaning the rear view camera lens”
( Y page 357).
Switching on or off
XSwitching on: Switch on the ignition.XMake sure the rear view camera is switched
on in the COMAND system ( Y page 99).XSwitch on the COMAND system.XShift the transmission to reverse gear R.
The area behind the vehicle appears in the
COMAND system display.
i The image from the rear view camera will
no longer be displayed if you select another
function on the COMAND system while
reverse gear R is engaged. To display the
image again, disengage and reengage
reverse gear R.
XSwitching off: Shift the transmission into
park position P, neutral position N, or drive
position D.Driving systems297Controls in detailBA 197 USA, CA Edition A 2011; 1; 27, en-UShereepeVersion: 3.0.3.52010-03-24T15:31:10+01:00 - Seite 297Z
Page 300 of 436
Climate control system
Control panel
Dual-zone automatic climate control
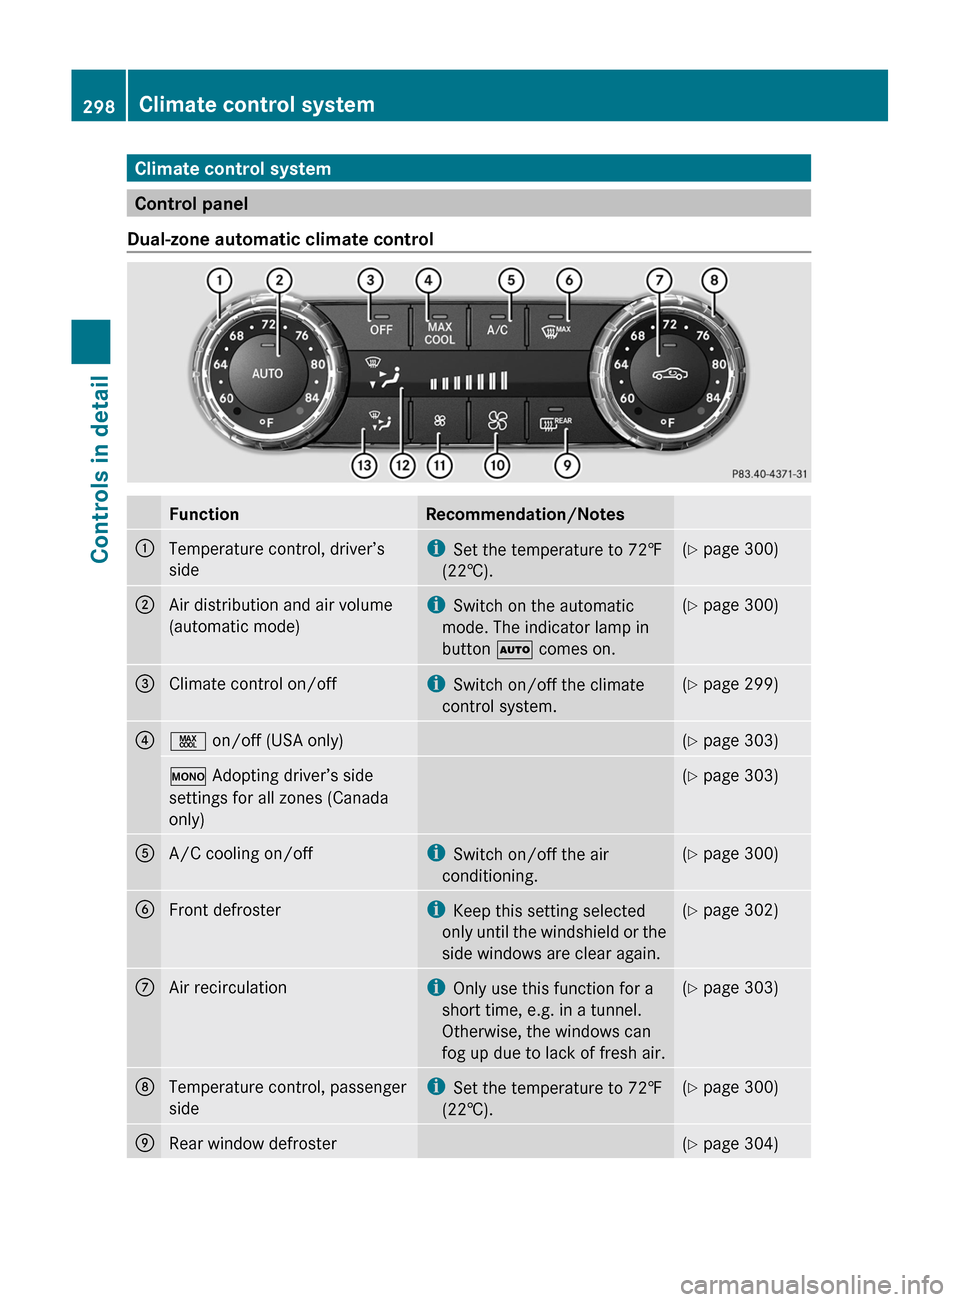
FunctionRecommendation/Notes:Temperature control, driver’s
sidei Set the temperature to 72‡
(22†).( Y page 300);Air distribution and air volume
(automatic mode)i Switch on the automatic
mode. The indicator lamp in
button à comes on.(Y page 300)=Climate control on/offi
Switch on/off the climate
control system.( Y page 299)?Ù on/off (USA only)(Y page 303)º Adopting driver’s side
settings for all zones (Canada
only)( Y page 303)AA/C cooling on/offi
Switch on/off the air
conditioning.( Y page 300)BFront defrosteri
Keep this setting selected
only until the windshield or the
side windows are clear again.( Y page 302)CAir recirculationi
Only use this function for a
short time, e.g. in a tunnel.
Otherwise, the windows can
fog up due to lack of fresh air.( Y page 303)DTemperature control, passenger
sidei Set the temperature to 72‡
(22†).( Y page 300)ERear window defroster(Y page 304)298Climate control systemControls in detail
BA 197 USA, CA Edition A 2011; 1; 27, en-UShereepeVersion: 3.0.3.52010-03-24T15:31:10+01:00 - Seite 298