warning lights MERCEDES-BENZ SLS AMG COUPE 2012 Owner's Manual
[x] Cancel search | Manufacturer: MERCEDES-BENZ, Model Year: 2012, Model line: SLS AMG COUPE, Model: MERCEDES-BENZ SLS AMG COUPE 2012Pages: 288, PDF Size: 18.46 MB
Page 101 of 288
Keep bulbs out of the reach of children.
Otherwise, they could damage the bulbs, for
example, and injure themselves.
Never use a bulb which has been dropped.
Such a bulb may break or even explode and
injure you.
Halogen bulbs are pressurized and can
explode when you change them, particularly
if they are very hot. You should therefore wear
eye protection and gloves when you are
changing them.
Changing the front bulbs
You cannot replace the bulbs at the front
yourself. Contact a qualified specialist
workshop which has the necessary specialist
knowledge and tools to carry out the work
required. Mercedes-Benz recommends that
you use an authorized Mercedes-Benz Center
for this purpose.
Changing the rear bulbs
License plate lamps
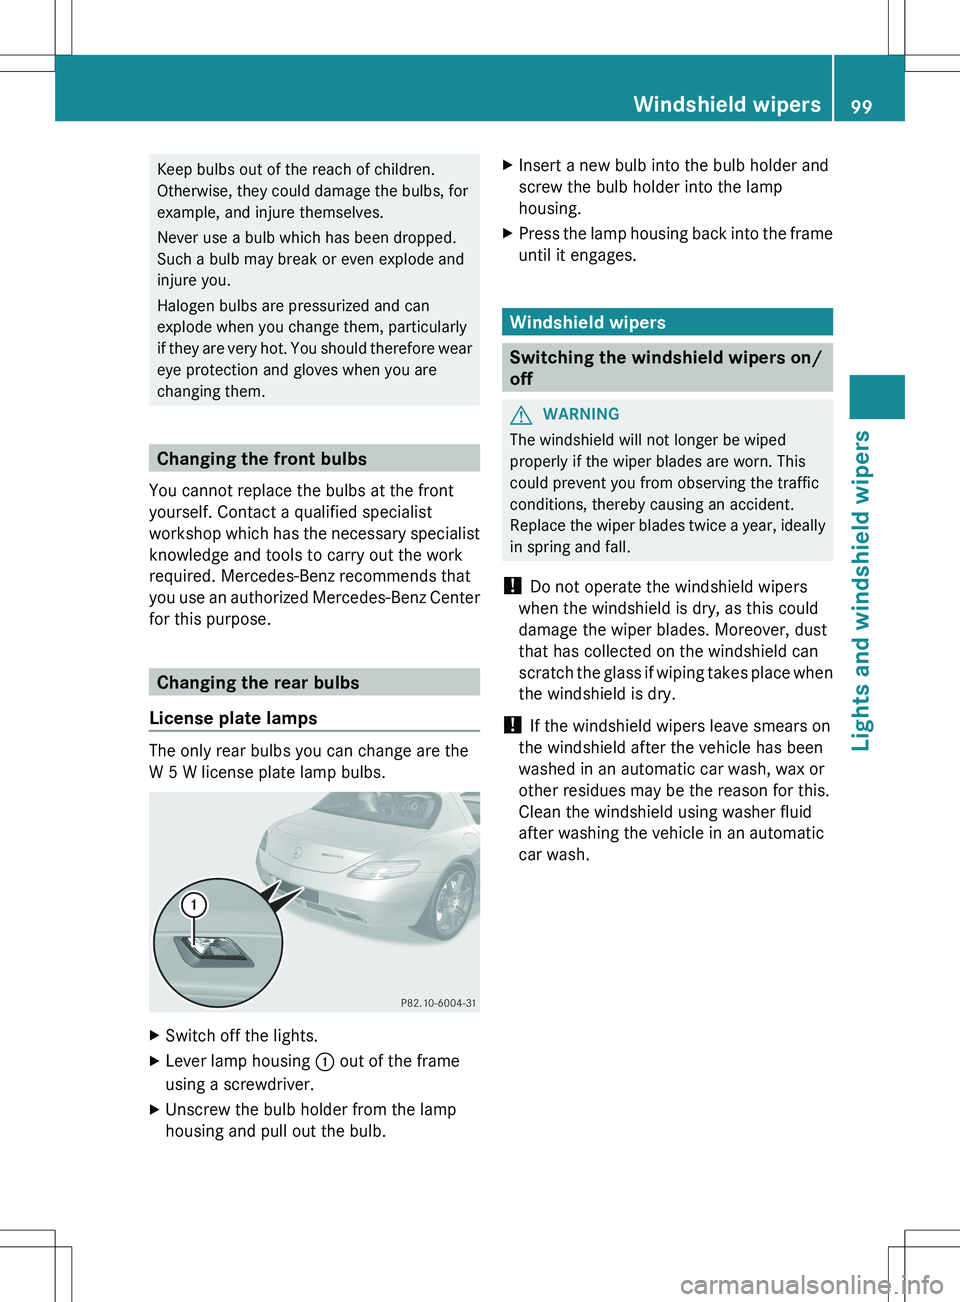
The only rear bulbs you can change are the
W 5 W license plate lamp bulbs.
XSwitch off the lights.XLever lamp housing : out of the frame
using a screwdriver.XUnscrew the bulb holder from the lamp
housing and pull out the bulb.XInsert a new bulb into the bulb holder and
screw the bulb holder into the lamp
housing.XPress the lamp housing back into the frame
until it engages.
Windshield wipers
Switching the windshield wipers on/
off
GWARNING
The windshield will not longer be wiped
properly if the wiper blades are worn. This
could prevent you from observing the traffic
conditions, thereby causing an accident.
Replace the wiper blades twice a year, ideally
in spring and fall.
! Do not operate the windshield wipers
when the windshield is dry, as this could
damage the wiper blades. Moreover, dust
that has collected on the windshield can
scratch the glass if wiping takes place when
the windshield is dry.
! If the windshield wipers leave smears on
the windshield after the vehicle has been
washed in an automatic car wash, wax or
other residues may be the reason for this.
Clean the windshield using washer fluid
after washing the vehicle in an automatic
car wash.
Windshield wipers99Lights and windshield wipersZ
Page 102 of 288
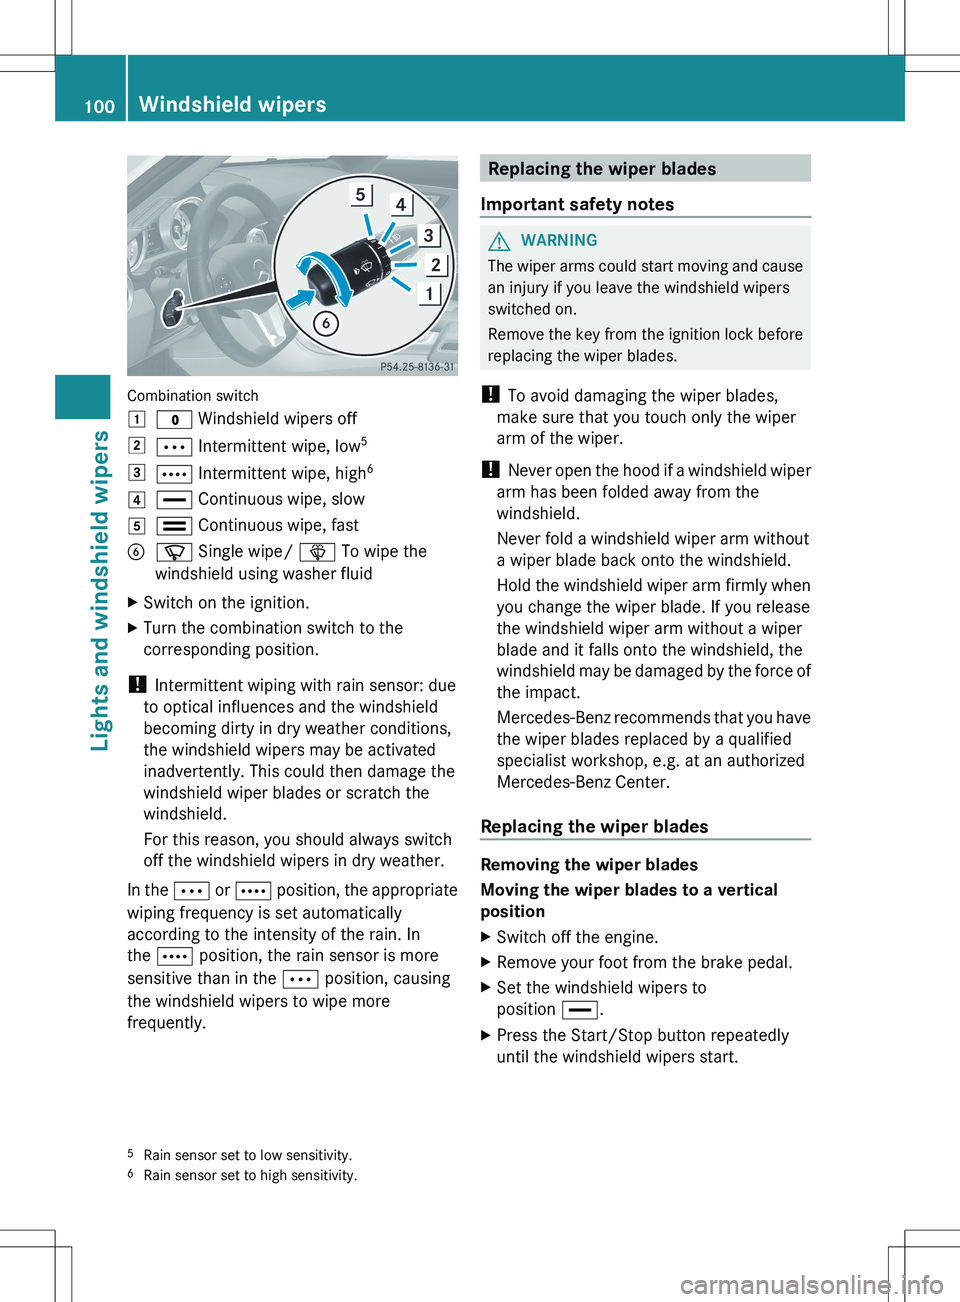
Combination switch
1$ Windshield wipers off2Ä Intermittent wipe, low 53Å
Intermittent wipe, high 64°
Continuous wipe, slow5¯ Continuous wipe, fastBí Single wipe/ î To wipe the
windshield using washer fluidXSwitch on the ignition.XTurn the combination switch to the
corresponding position.
! Intermittent wiping with rain sensor: due
to optical influences and the windshield
becoming dirty in dry weather conditions,
the windshield wipers may be activated
inadvertently. This could then damage the
windshield wiper blades or scratch the
windshield.
For this reason, you should always switch
off the windshield wipers in dry weather.
In the Ä or Å position, the appropriate
wiping frequency is set automatically
according to the intensity of the rain. In
the Å position, the rain sensor is more
sensitive than in the Ä position, causing
the windshield wipers to wipe more
frequently.
Replacing the wiper blades
Important safety notesGWARNING
The wiper arms could start moving and cause
an injury if you leave the windshield wipers
switched on.
Remove the key from the ignition lock before
replacing the wiper blades.
! To avoid damaging the wiper blades,
make sure that you touch only the wiper
arm of the wiper.
! Never open the hood if a windshield wiper
arm has been folded away from the
windshield.
Never fold a windshield wiper arm without
a wiper blade back onto the windshield.
Hold the windshield wiper arm firmly when
you change the wiper blade. If you release
the windshield wiper arm without a wiper
blade and it falls onto the windshield, the
windshield may be damaged by the force of
the impact.
Mercedes-Benz recommends that you have
the wiper blades replaced by a qualified
specialist workshop, e.g. at an authorized
Mercedes-Benz Center.
Replacing the wiper blades
Removing the wiper blades
Moving the wiper blades to a vertical
position
XSwitch off the engine.XRemove your foot from the brake pedal.XSet the windshield wipers to
position °.XPress the Start/Stop button repeatedly
until the windshield wipers start.5 Rain sensor set to low sensitivity.
6 Rain sensor set to high sensitivity.100Windshield wipersLights and windshield wipers
Page 108 of 288
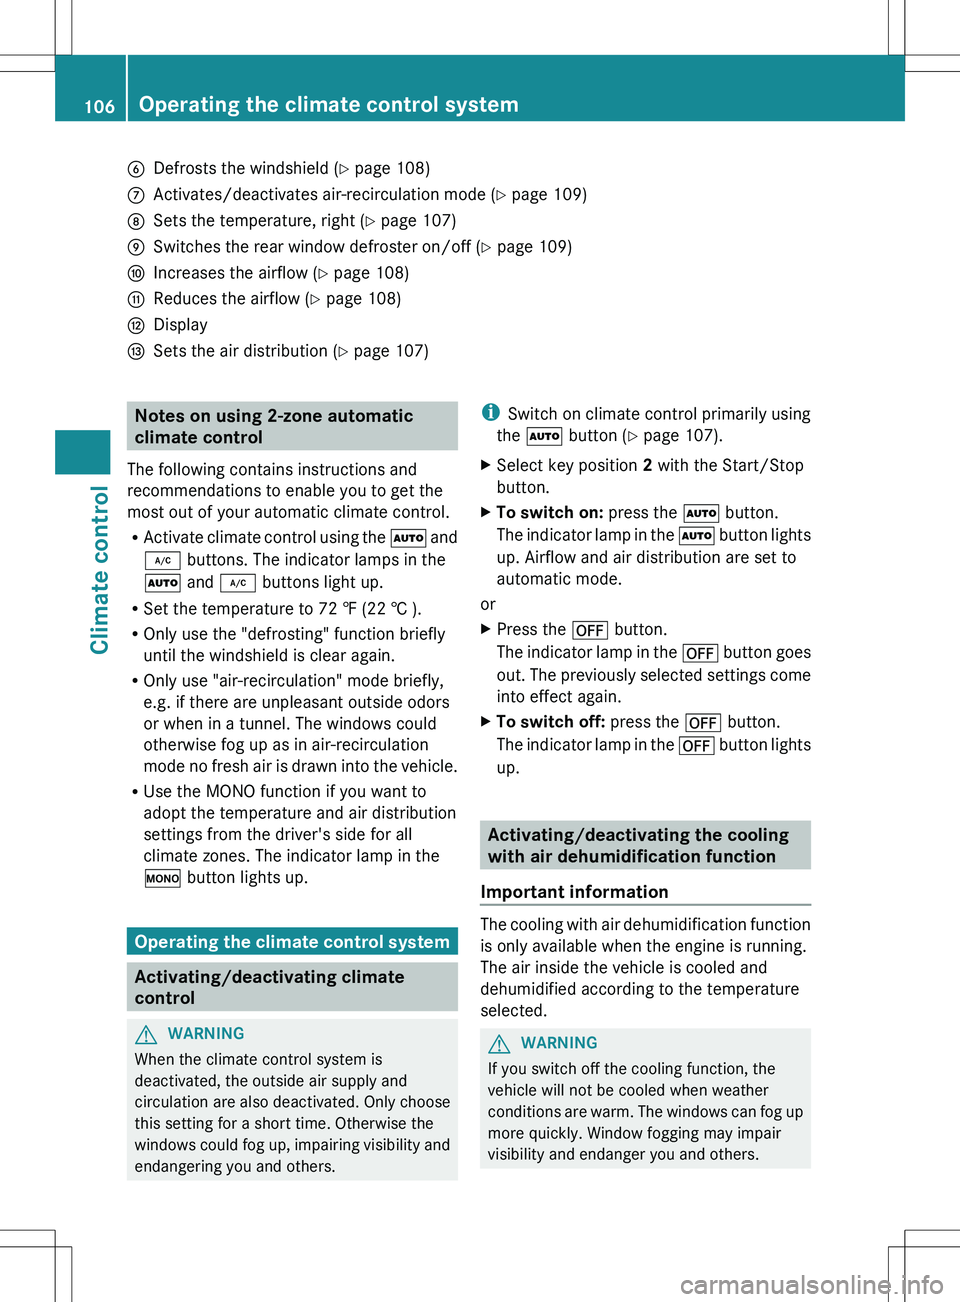
BDefrosts the windshield (Y page 108)CActivates/deactivates air-recirculation mode ( Y page 109)DSets the temperature, right ( Y page 107)ESwitches the rear window defroster on/off ( Y page 109)FIncreases the airflow ( Y page 108)GReduces the airflow ( Y page 108)HDisplayISets the air distribution ( Y page 107)Notes on using 2-zone automatic
climate control
The following contains instructions and
recommendations to enable you to get the
most out of your automatic climate control.
R Activate climate control using the à and
¿ buttons. The indicator lamps in the
à and ¿ buttons light up.
R Set the temperature to 72 ‡ (22 † ).
R Only use the "defrosting" function briefly
until the windshield is clear again.
R Only use "air-recirculation" mode briefly,
e.g. if there are unpleasant outside odors
or when in a tunnel. The windows could
otherwise fog up as in air-recirculation
mode no fresh air is drawn into the vehicle.
R Use the MONO function if you want to
adopt the temperature and air distribution
settings from the driver's side for all
climate zones. The indicator lamp in the
º button lights up.
Operating the climate control system
Activating/deactivating climate
control
GWARNING
When the climate control system is
deactivated, the outside air supply and
circulation are also deactivated. Only choose
this setting for a short time. Otherwise the
windows could fog up, impairing visibility and
endangering you and others.
i Switch on climate control primarily using
the à button ( Y page 107).XSelect key position 2 with the Start/Stop
button.XTo switch on: press the à button.
The indicator lamp in the à button lights
up. Airflow and air distribution are set to
automatic mode.
or
XPress the ^ button.
The indicator lamp in the ^ button goes
out. The previously selected settings come
into effect again.XTo switch off: press the ^ button.
The indicator lamp in the ^ button lights
up.
Activating/deactivating the cooling
with air dehumidification function
Important information
The cooling with air dehumidification function
is only available when the engine is running.
The air inside the vehicle is cooled and
dehumidified according to the temperature
selected.
GWARNING
If you switch off the cooling function, the
vehicle will not be cooled when weather
conditions are warm. The windows can fog up
more quickly. Window fogging may impair
visibility and endanger you and others.
106Operating the climate control systemClimate control
Page 109 of 288
Condensation may drip from the underside of
the vehicle when it is in cooling mode.
Activating/deactivatingXTo activate: press the ¿ button.
The indicator lamp in the ¿ button lights
up.XTo switch off: press the ¿ button.
The indicator lamp in the ¿ button goes
out. The cooling with air dehumidification
function has a delayed switch-off feature.
Problems with the cooling with air
dehumidification function
When you press the ¿ button, the
indicator lamp in the button flashes three
times or remains off. You can no longer switch
on the cooling with air dehumidification
function.
XConsult a qualified specialist workshop.
Setting climate control to automatic
GWARNING
If you switch off the cooling function, the
vehicle will not be cooled when weather
conditions are warm. The windows can fog up
more quickly. Window fogging may impair
visibility and endanger you and others.
In automatic mode, the set temperature is
controlled automatically. The system
automatically regulates the temperature of
the dispensed air, the airflow and the air
distribution.
Automatic mode will achieve optimal
operation if cooling with air dehumidification
is also activated. If desired, cooling with air
dehumidification can be deactivated.
XSelect key position 2 with the Start/Stop
button.XSet the desired temperature.XTo activate: press the à button.
The indicator lamp in the à button lights
up. Automatic air distribution and airflow
are activated.XTo switch off: press the à button.
The indicator lamp in the à button goes
out. Automatic air distribution and airflow
are deactivated.
Setting the temperature
Different temperatures can be set for the
driver's and front-passenger sides.
XSelect key position 2 with the Start/Stop
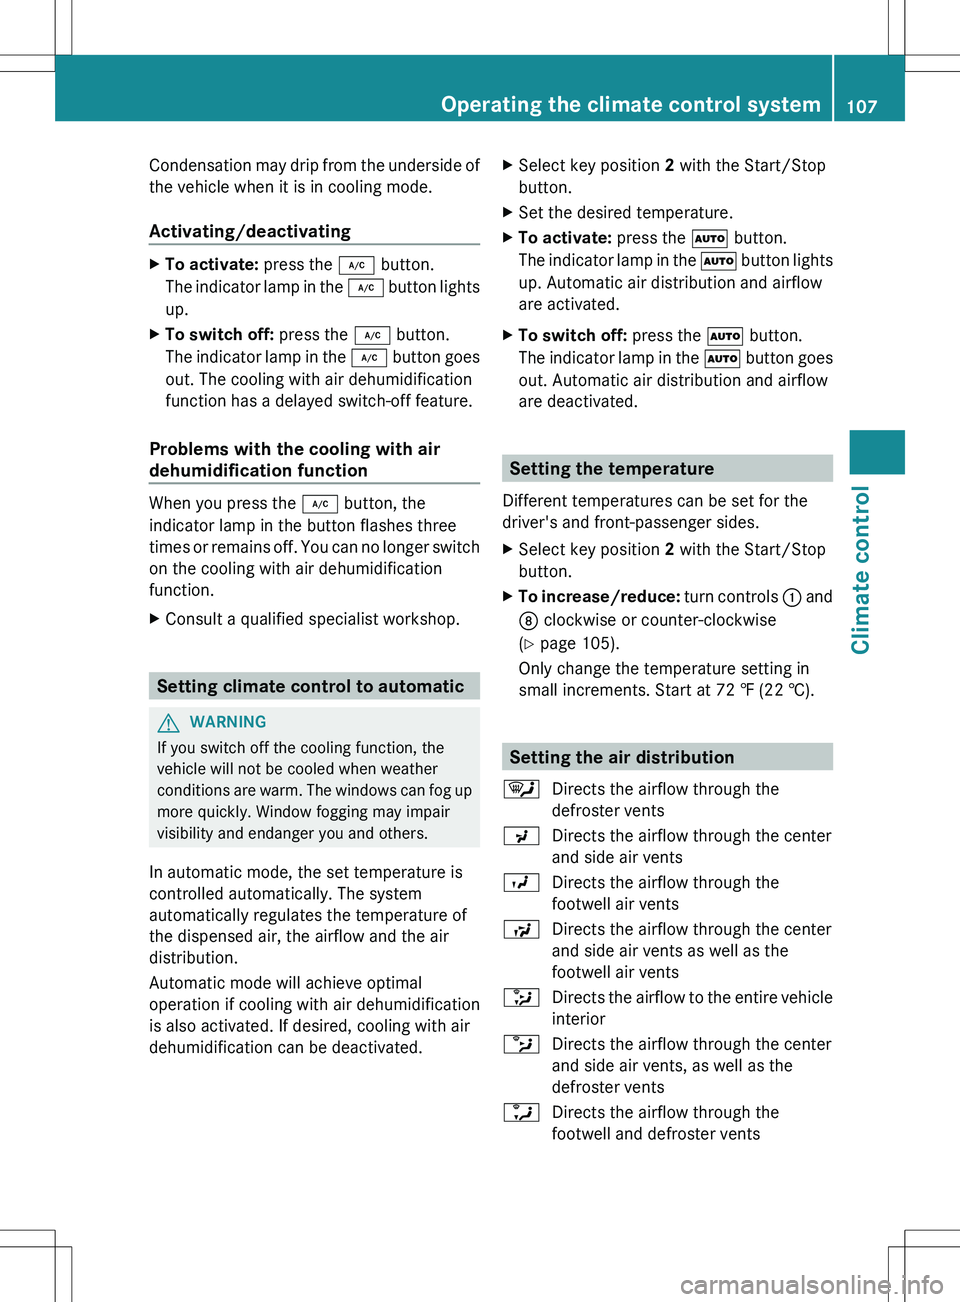
button.XTo increase/reduce: turn controls : and
D clockwise or counter-clockwise
( Y page 105).
Only change the temperature setting in
small increments. Start at 72 ‡ (22 †).
Setting the air distribution
¯Directs the airflow through the
defroster ventsPDirects the airflow through the center
and side air ventsODirects the airflow through the
footwell air ventsSDirects the airflow through the center
and side air vents as well as the
footwell air vents_Directs the airflow to the entire vehicle
interiorbDirects the airflow through the center
and side air vents, as well as the
defroster ventsaDirects the airflow through the
footwell and defroster ventsOperating the climate control system107Climate controlZ
Page 111 of 288
Defrosting the windows
Windows fogged up on the insideXActivate the cooling with air
dehumidification function.XActivate automatic mode.XIf the windows continue to fog up, activate
the defrosting function.
Windows fogged up on the outside
XActivate the windshield wipers.XPress the _ button repeatedly until the
O or P symbol appears in the
display.
i You should only select this setting until
the windshield is clear again.
Rear window defroster
Activating/deactivating
GWARNING
Any accumulation of snow and ice should be
removed from the rear window before driving.
Visibility could otherwise be impaired,
endangering you and others.
The rear window defroster has a high current
draw. You should therefore switch it off as
soon as the window is clear. It otherwise
switches off automatically after several
minutes.
If the battery voltage is too low, the rear
window defroster may switch off.
XSelect SmartKey position 2 with the Start/
Stop button.XPress the ¤ button.
The indicator lamp in the ¤ button lights
up or goes out.Problems with the rear window
defroster
The rear window defroster has deactivated
prematurely or cannot be activated. The on-
board voltage is too low because too many
electrical consumers are switched on.
XSwitch off any consumers that are not
required, e.g. seat heating or interior
lighting.
When the battery is sufficiently charged,
the rear window defroster is activated
again automatically.
Activating/deactivating air-
recirculation mode
You can deactivate the flow of fresh air if
unpleasant odors are entering the vehicle
from outside. The air already inside the
vehicle will then be recirculated.
GWARNING
Fogged windows impair visibility,
endangering you and others. If the windows
begin to fog on the inside, switching off the
air recirculation mode immediately should
clear interior window fogging. If interior
window fogging persists, make sure the air
conditioning is activated, or press the ¬
button.
XSelect SmartKey position 2 with the Start/
Stop button.XTo activate: press the g button.
The indicator lamp in the g button lights
up.
i Air-recirculation mode is activated
automatically at high outside
temperatures. When air-recirculation mode
is activated automatically, the indicator
lamp in the g button is not lit.
Outside air is added after about 30
minutes.
Operating the climate control system109Climate controlZ
Page 133 of 288
Applying/releasing manually
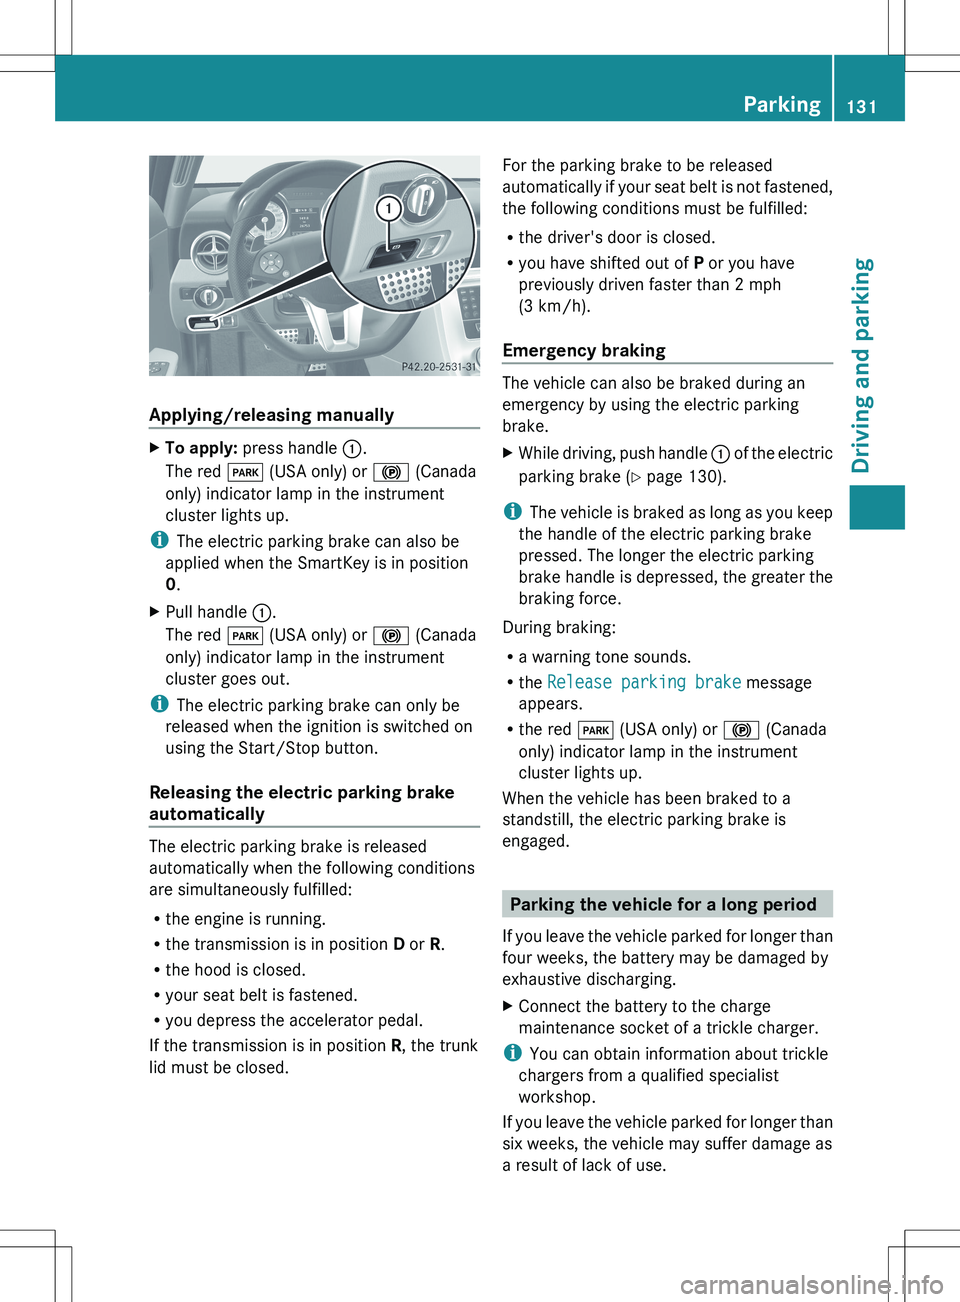
XTo apply: press handle :.
The red F (USA only) or ! (Canada
only) indicator lamp in the instrument
cluster lights up.
i The electric parking brake can also be
applied when the SmartKey is in position
0 .
XPull handle :.
The red F (USA only) or ! (Canada
only) indicator lamp in the instrument
cluster goes out.
i The electric parking brake can only be
released when the ignition is switched on
using the Start/Stop button.
Releasing the electric parking brake
automatically
The electric parking brake is released
automatically when the following conditions
are simultaneously fulfilled:
R the engine is running.
R the transmission is in position D or R.
R the hood is closed.
R your seat belt is fastened.
R you depress the accelerator pedal.
If the transmission is in position R, the trunk
lid must be closed.
For the parking brake to be released
automatically if your seat belt is not fastened,
the following conditions must be fulfilled:
R the driver's door is closed.
R you have shifted out of P or you have
previously driven faster than 2 mph
(3 km/h).
Emergency braking
The vehicle can also be braked during an
emergency by using the electric parking
brake.
XWhile driving, push handle : of the electric
parking brake ( Y page 130).
i
The vehicle is braked as long as you keep
the handle of the electric parking brake
pressed. The longer the electric parking
brake handle is depressed, the greater the
braking force.
During braking:
R a warning tone sounds.
R the Release parking brake message
appears.
R the red F (USA only) or ! (Canada
only) indicator lamp in the instrument
cluster lights up.
When the vehicle has been braked to a
standstill, the electric parking brake is
engaged.
Parking the vehicle for a long period
If you leave the vehicle parked for longer than
four weeks, the battery may be damaged by
exhaustive discharging.
XConnect the battery to the charge
maintenance socket of a trickle charger.
i You can obtain information about trickle
chargers from a qualified specialist
workshop.
If you leave the vehicle parked for longer than
six weeks, the vehicle may suffer damage as
a result of lack of use.
Parking131Driving and parkingZ
Page 136 of 288
attention to the traffic conditions. This will
warm up the brake discs, thereby drying them
more quickly and protecting them against
corrosion.
Limited braking performance on salt-
treated roadsGWARNING
The layer of salt on the brake discs and the
brake pads/linings may cause a delay in the
braking effect, resulting in a significantly
longer braking distance, which could lead to
an accident.
To avoid this danger, you should:
R occasionally brake carefully, without
putting other road users at risk, when you
are driving on salted roads. This helps to
remove any salt that may have started to
build up on the brake discs and the brake
pads/linings.
R maintain a greater distance to the vehicle
ahead and drive with particular care.
R carefully apply the brakes at the end of a
trip and immediately after commencing a
new trip, so that salt residues are removed
from the brake discs.
Servicing the brakes
GWARNING
If brake pads or brake fluid other than those
recommended are used, the braking
properties of the vehicle can be degraded to
an extent that safe braking is substantially
impaired. This could result in an accident.
GWARNING
Make sure that you do not endanger other
road users when you apply the brakes.
! If the red brake warning lamp lights up in
the instrument cluster and you hear a
warning tone while the engine is running,
the brake fluid level may be too low.
Observe additional warning messages in
the multifunction display.
The brake fluid level may be too low due to
brake pad wear or leaking brake lines.
Have the brake system checked
immediately. This work should be carried
out at an authorized Mercedes-Benz
Center.
! As the ESP ®
system operates
automatically, the engine and the ignition
must be switched off (the SmartKey must
be in position 0 or 1 in the ignition lock or
the Start/Stop button must be in position
0 or 1) if:
R the electric parking brake is tested using
a brake dynamometer.
R the vehicle is towed with one axle raised.
Braking triggered automatically by ESP ®
may seriously damage the brake system.
All checks and maintenance work on the
brake system must be carried out at a
qualified specialist workshop. Have this work
carried out at an authorized Mercedes-Benz
Center.
Have the brake pads replaced and the brake
fluid renewed at a qualified specialist
workshop, e.g. an authorized Mercedes-Benz
Center.
If your brake system is subject only to
moderate loads, you should test the
functionality of your brakes at regular
intervals by pressing firmly on the brake pedal
at high speeds. This improves the grip of the
brake pads.
You can find a description of Brake Assist
(BAS) on ( Y page 55).
AMG high-performance composite
brake systemGWARNING
New vehicle brake pads and discs, and
replacement brake pads and discs may take
several hundred miles of driving until they
provide optimum braking efficiency. Until that
time, you may need to use increased brake
pedal pressure while braking. Please be aware
134Driving tipsDriving and parking
Page 140 of 288
vehicle's speed to the last speed stored
after you have finished overtaking.
Making adjustments in 1 mph
incrementsXBriefly press the cruise control lever to the
pressure point, up : for a higher speed or
down ; for a lower speed.
The last speed stored is increased or
reduced.
Making adjustments in 10 mph
increments
XBriefly press the cruise control lever
beyond the pressure point, up : for a
higher speed or down ; for a lower speed.
The last speed stored is increased or
reduced.
Deactivating cruise control
There are several ways to deactivate cruise
control:
XBriefly press the cruise control lever
forwards =.
or
XBrake.
Cruise control is automatically deactivated if:
R you press the electric parking brake
handle.
R you are driving below 20 mph (30 km/h).
R ESP ®
intervenes or you deactivate ESP ®
.
R you shift the transmission to N while the
vehicle is in motion.
If cruise control is deactivated, you will hear
a warning tone. The Cruise control Off
message is displayed in the multifunction
display for approximately five seconds.
i The last speed stored is cleared when you
switch off the engine.
AMG adaptive sport suspension
system
General notes
The electronically controlled damping system
works continuously. This improves driving
safety and ride comfort.
The damping is tuned individually to each
wheel and depends on:
R your driving style, e.g. sporty
R the road surface condition, e.g. bumps
R your individual selection of Sport, Sport +
or Comfort
If you select Sport or Sport + mode and
restart the engine, the suspension setting
reverts to Comfort mode.
Sport mode
The firmer suspension tuning in Sport mode
ensures even better contact with the road.
Select this mode when employing a sporty
driving style, e.g. on winding country roads.
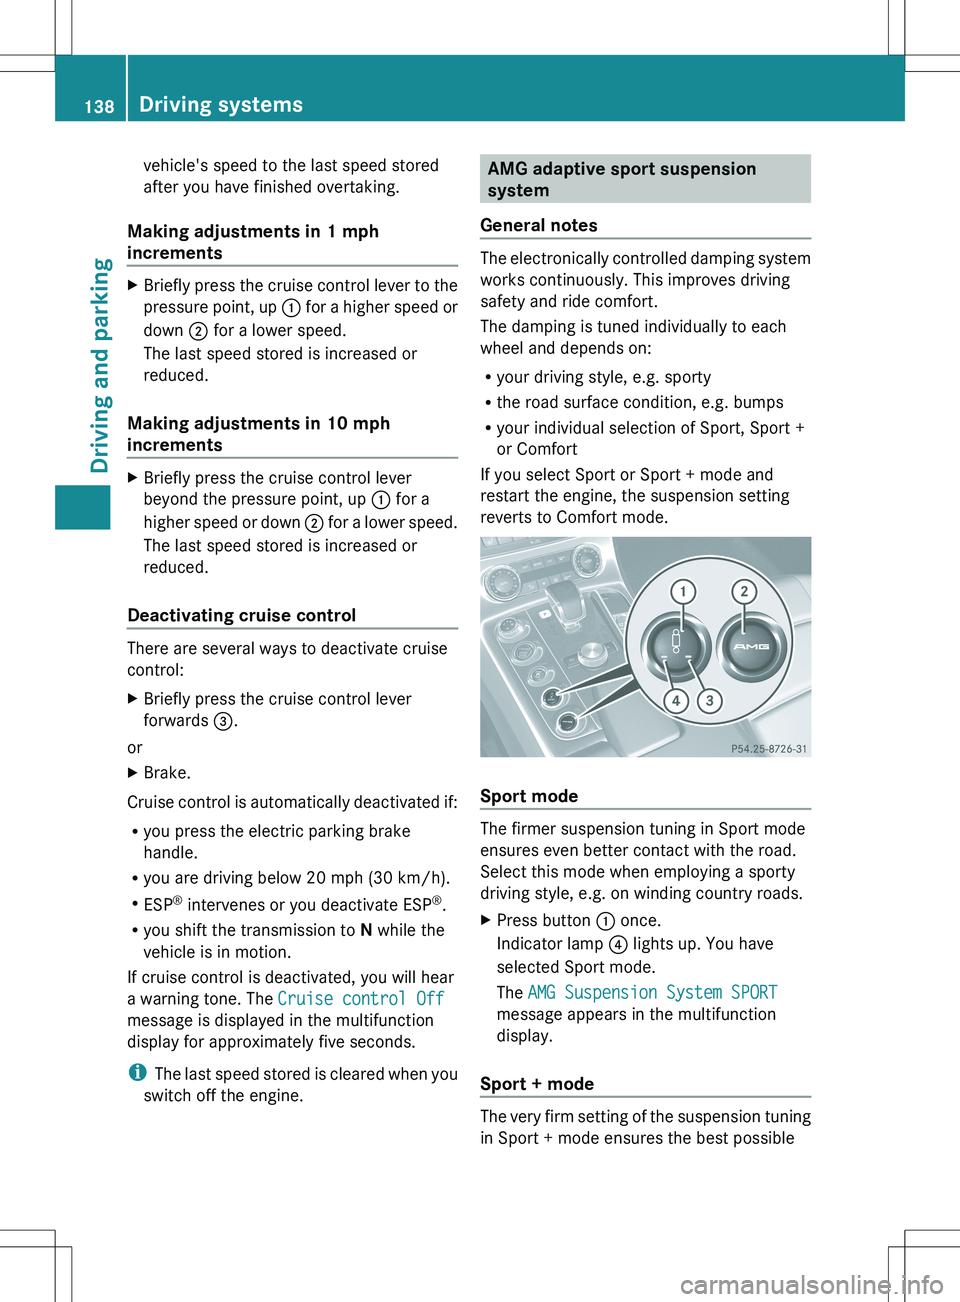
XPress button : once.
Indicator lamp ? lights up. You have
selected Sport mode.
The AMG Suspension System SPORT
message appears in the multifunction
display.
Sport + mode
The very firm setting of the suspension tuning
in Sport + mode ensures the best possible
138Driving systemsDriving and parking
Page 141 of 288
contact with the road. Select this mode only
when driving on race circuits.
If indicator lamps = and ? are off:XPress button : twice.
Indicator lamps = and ? light up. You
have selected Sport + mode.
The AMG Suspension System SPORT +
message appears in the multifunction
display.
If indicator lamp ? lights up:
XPress button : once.
The second indicator lamp = lights up. You
have selected Sport + mode.
The AMG Suspension System SPORT +
message appears in the multifunction
display.
Comfort mode
In comfort mode, the driving characteristics
of your vehicle are more comfortable. Select
this mode if you favor a more comfortable
driving style, but also when driving fast on
straight roads, e.g. freeways.
XPress button : repeatedly until indicator
lamps = and ? go out.
You have selected Comfort mode.
The AMG Suspension System COMFORT
message appears in the multifunction
display.
Storing and calling up settings
Once the suspension tuning and drive
program have been selected, you can store
and call up your settings using AMG
button ;.
XTo store: press AMG button ; until you
hear a tone.XTo call up: press AMG button ;.
The stored suspension tuning and drive
program are selected.XTo display: briefly press AMG button ;.
Your selection appears in the multifunction
display.
PARKTRONIC
Important safety notes
GWARNING
The PARKTRONIC is a supplemental system.
It is not intended to, nor does it replace, the
need for extreme care. The responsibility
during parking and other critical maneuvers
always remains with the driver.
GWARNING
Make sure no persons or animals are in or
near the area in which you are parking/
maneuvering. Otherwise, they could be
injured.
PARKTRONIC is an electronic parking aid with
ultrasonic sensors. It indicates visually and
audibly the distance between your vehicle
and an object.
PARKTRONIC is activated automatically when
you:
R switch on the ignition
R release the electric parking brake
PARKTRONIC is deactivated at speeds above
11 mph (18 km/h). It is reactivated at lower
speeds.
PARKTRONIC monitors the area around your
vehicle using four sensors in the front bumper
and four sensors in the rear bumper.
Driving systems139Driving and parkingZ
Page 143 of 288
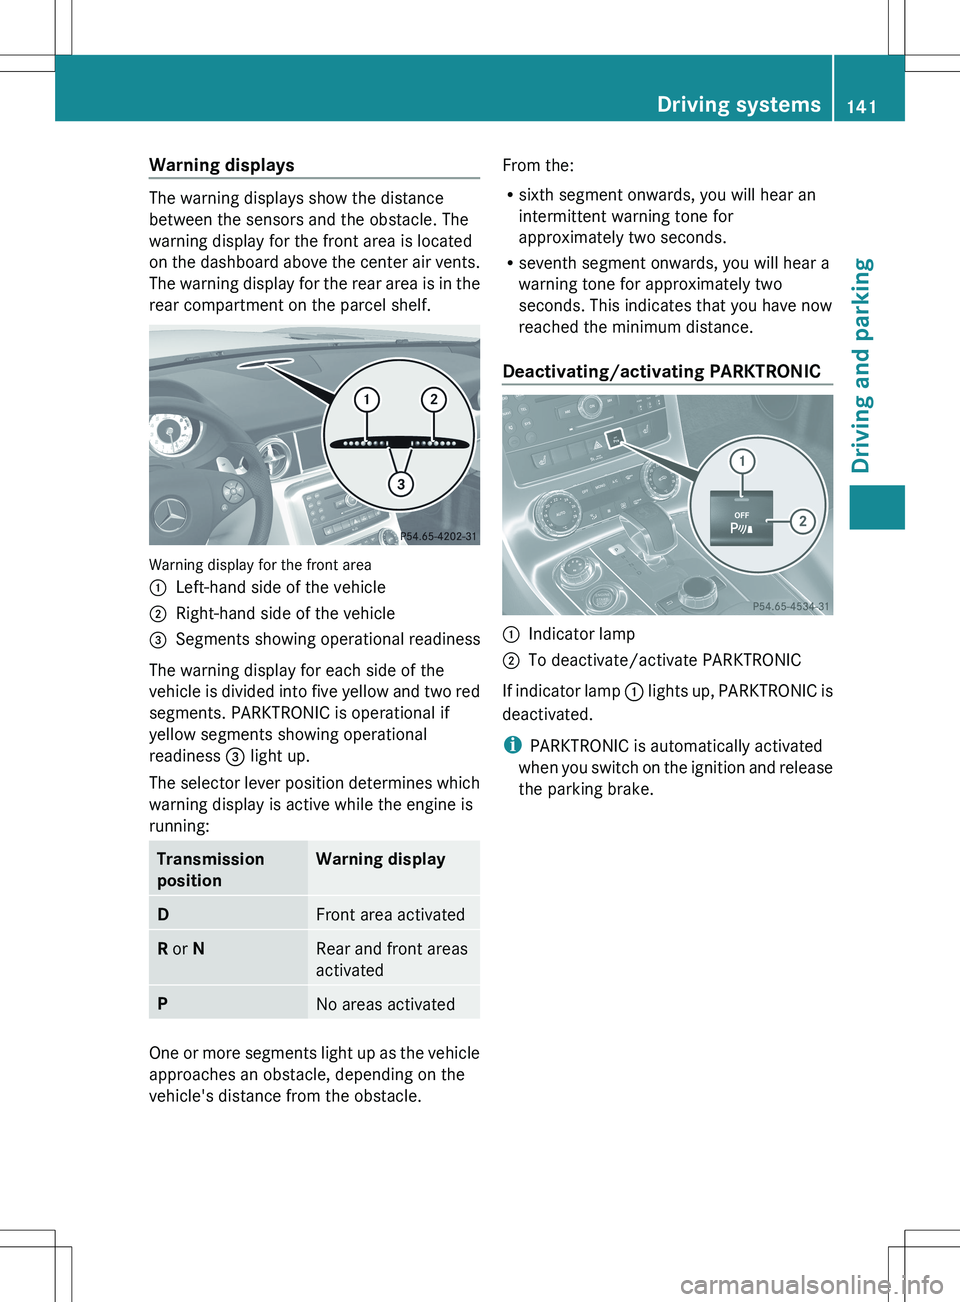
Warning displays
The warning displays show the distance
between the sensors and the obstacle. The
warning display for the front area is located
on the dashboard above the center air vents.
The warning display for the rear area is in the
rear compartment on the parcel shelf.
Warning display for the front area
:Left-hand side of the vehicle;Right-hand side of the vehicle=Segments showing operational readiness
The warning display for each side of the
vehicle is divided into five yellow and two red
segments. PARKTRONIC is operational if
yellow segments showing operational
readiness = light up.
The selector lever position determines which
warning display is active while the engine is
running:
Transmission
positionWarning displayDFront area activatedR or NRear and front areas
activatedPNo areas activated
One or more segments light up as the vehicle
approaches an obstacle, depending on the
vehicle's distance from the obstacle.
From the:
R sixth segment onwards, you will hear an
intermittent warning tone for
approximately two seconds.
R seventh segment onwards, you will hear a
warning tone for approximately two
seconds. This indicates that you have now
reached the minimum distance.
Deactivating/activating PARKTRONIC:Indicator lamp;To deactivate/activate PARKTRONIC
If indicator lamp : lights up, PARKTRONIC is
deactivated.
i PARKTRONIC is automatically activated
when you switch on the ignition and release
the parking brake.
Driving systems141Driving and parkingZ