radio MERCEDES-BENZ SLS AMG COUPE 2012 Owners Manual
[x] Cancel search | Manufacturer: MERCEDES-BENZ, Model Year: 2012, Model line: SLS AMG COUPE, Model: MERCEDES-BENZ SLS AMG COUPE 2012Pages: 288, PDF Size: 18.46 MB
Page 2 of 288
Symbols
Registered trademarks:
R Bluetooth ®
is a registered trademark of
Bluetooth SIG Inc.
R DTS is a registered trademark of DTS, Inc.
R Dolby and MLP are registered trademarks
of DOLBY Laboratories.
R BabySmart™, ESP ®
and PRE-SAFE ®
are
registered trademarks of Daimler AG.
R HomeLink ®
is a registered trademark of
Prince.
R iPod ®
and iTunes ®
are registered
trademarks of Apple Inc.
R Logic 7 ®
is a registered trademark of
Harman International Industries.
R Microsoft ®
and Windows media ®
are
registered trademarks of Microsoft
Corporation.
R SIRIUS is a registered trademark of Sirius
XM radio Inc.
R HD Radio is a registered trademark of
iBiquity Digital Corporation.
R Gracenote ®
is a registered trademark of
Gracenote, Inc.
R ZAGATSurvey ®
and related brands are
registered trademarks of ZagatSurvey,
LLC.
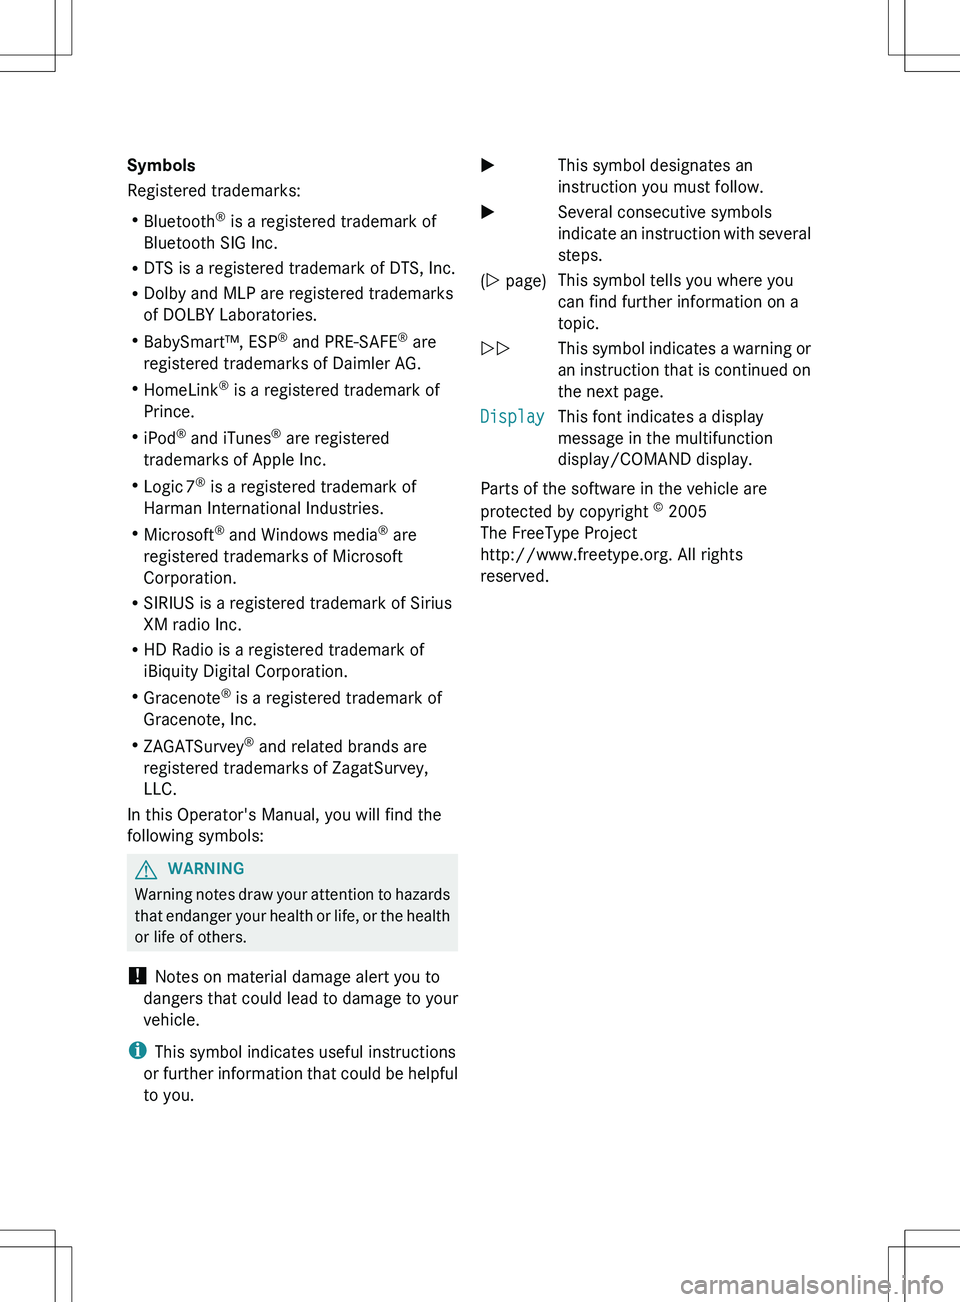
In this Operator's Manual, you will find the
following symbols:GWARNING
Warning notes draw your attention to hazards
that endanger your health or life, or the health
or life of others.
! Notes on material damage alert you to
dangers that could lead to damage to your
vehicle.
i This symbol indicates useful instructions
or further information that could be helpful
to you.
XThis symbol designates an
instruction you must follow.XSeveral consecutive symbols
indicate an instruction with several
steps.( Y page)This symbol tells you where you
can find further information on a
topic.YYThis symbol indicates a warning or
an instruction that is continued on
the next page.DisplayThis font indicates a display
message in the multifunction
display/COMAND display.
Parts of the software in the vehicle are
protected by copyright ©
2005
The FreeType Project
http://www.freetype.org. All rights
reserved.
Page 14 of 288
Product information ............................ 18
Program selector ............................... 122
Pulling away ...................................... 117
Q
Qualified specialist workshop ........... 21
R
RACE START ....................................... 123
RACETIMER (on-board computer) .... 161
Radio Selecting a station .........................154
see separate operating instructions
Reading lamp ....................................... 97
Rear spoiler Display message ............................ 189
Extending/retracting .....................210
Problem ......................................... 212
Rear view camera
Cleaning instructions .....................228
Function/notes ............................. 142
Rear-view mirror
Anti-glare (manual) ..........................89
Dipping (automatic) .........................90
Rear window defroster
Problem (malfunction) ...................109
Switching on/off ........................... 109
Refueling
Fuel gauge ....................................... 27
Important safety notes ..................127
Refueling process ..........................127
see Fuel
Remote control
Garage door opener .......................212
Reporting safety defects .................... 22
Reserve (fuel tank) see Fuel
Reserve fuel
Display message ............................ 179
Warning lamp ................................. 195
see Fuel
Restraint system
see SRS (Supplemental Restraint
System)
Roadside Assistance (breakdown) .... 19
Roof
see Soft top
Route
see Route guidance (navigation)
Route guidance (navigation) ............ 153
S
Safety Children in the vehicle .....................51
Child restraint systems ....................51
Occupant Classification System
(OCS) ............................................... 42
Overview of occupant safety
systems ........................................... 36
Safety systems
see Driving safety systems
Seat belts
Belt force limiters ............................ 50
Cleaning ......................................... 229
Correct usage .................................. 48
Emergency Tensioning Devices ........ 50
Fastening ......................................... 49
Important safety guidelines .............47
Releasing ......................................... 49
Safety guidelines ............................. 37
Special seat belt retractor ...............53
Warning lamp ................................. 191
Warning lamp (function) ................... 49
Seats
Adjusting (electrically) .....................86
Adjusting lumbar support ................86
Cleaning the cover .........................229
Correct driver's seat position ........... 84
Important safety notes ....................85
Seat heating problem ......................87
Storing settings (memory
function) .......................................... 91
Switching AIRSCARF on/off ............87
Switching seat heating on/off .........86
Selector lever
Positions ........................................ 119
Sensors (cleaning instructions) ....... 228
Service Center see Qualified specialist workshop
Service interval display
Displaying service messages .........222
Hiding service messages ...............222
12Index
Page 69 of 288

Problems with the SmartKeyProblemPossible causes/consequences and M SolutionsYou cannot lock or
unlock the vehicle
using the SmartKey.The SmartKey battery is discharged or nearly discharged.XPoint the tip of the SmartKey at the driver's door handle from
close range and try to unlock or lock the vehicle again.
If this does not work:
XUnlock the vehicle using the mechanical key ( Y page 65).XCheck the SmartKey battery and replace it if necessary
( Y page 66).The SmartKey is faulty.XLock or unlock the vehicle using the mechanical key
( Y page 65).XHave the SmartKey checked at a qualified specialist workshop.You have lost a
SmartKey.XHave the SmartKey canceled at an authorized Mercedes-Benz
Center.XReport the loss immediately to the vehicle insurers.XIf necessary, have the locks changed as well.You have lost the
mechanical key.XReport the loss immediately to the vehicle insurers.XIf necessary, have the locks changed as well.The engine cannot be
started using KEYLESS-
GO. The SmartKey is in
the vehicle.A door is open. Therefore, the SmartKey cannot be detected as
easily.XClose the door and try to start the vehicle again.There is interference from a powerful source of radio waves.XStart your vehicle with the SmartKey in the ignition lock.SmartKey67Opening/closingZ
Page 144 of 288
Problems with PARKTRONICProblemPossible causes/consequences and M SolutionsOnly the red segments
in the PARKTRONIC
warning displays are lit.
You also hear a warning
tone for approximately
two seconds.
PARKTRONIC is
deactivated after
approximately
20 seconds, and the
indicator lamp in the
PARKTRONIC button
lights up.PARKTRONIC has malfunctioned and has switched off.XIf problems persist, have PARKTRONIC checked at a qualified
specialist workshop.Only the red segments
in the PARKTRONIC
warning displays are lit.
PARKTRONIC is
deactivated after
approximately 20
seconds.The PARKTRONIC sensors are dirty or there is interference.XClean the PARKTRONIC sensors ( Y page 228).XSwitch the ignition back on.The problem may be caused by an external source of radio or
ultrasound waves.XSee if PARKTRONIC functions in a different location.Rear view camera
Important safety notes
The rear view camera is an optical parking aid.
It shows the area behind your vehicle in the
COMAND display.
GWARNING
Make sure no persons or animals are in or
near the area in which you are parking/
maneuvering. Otherwise, they could be
injured.
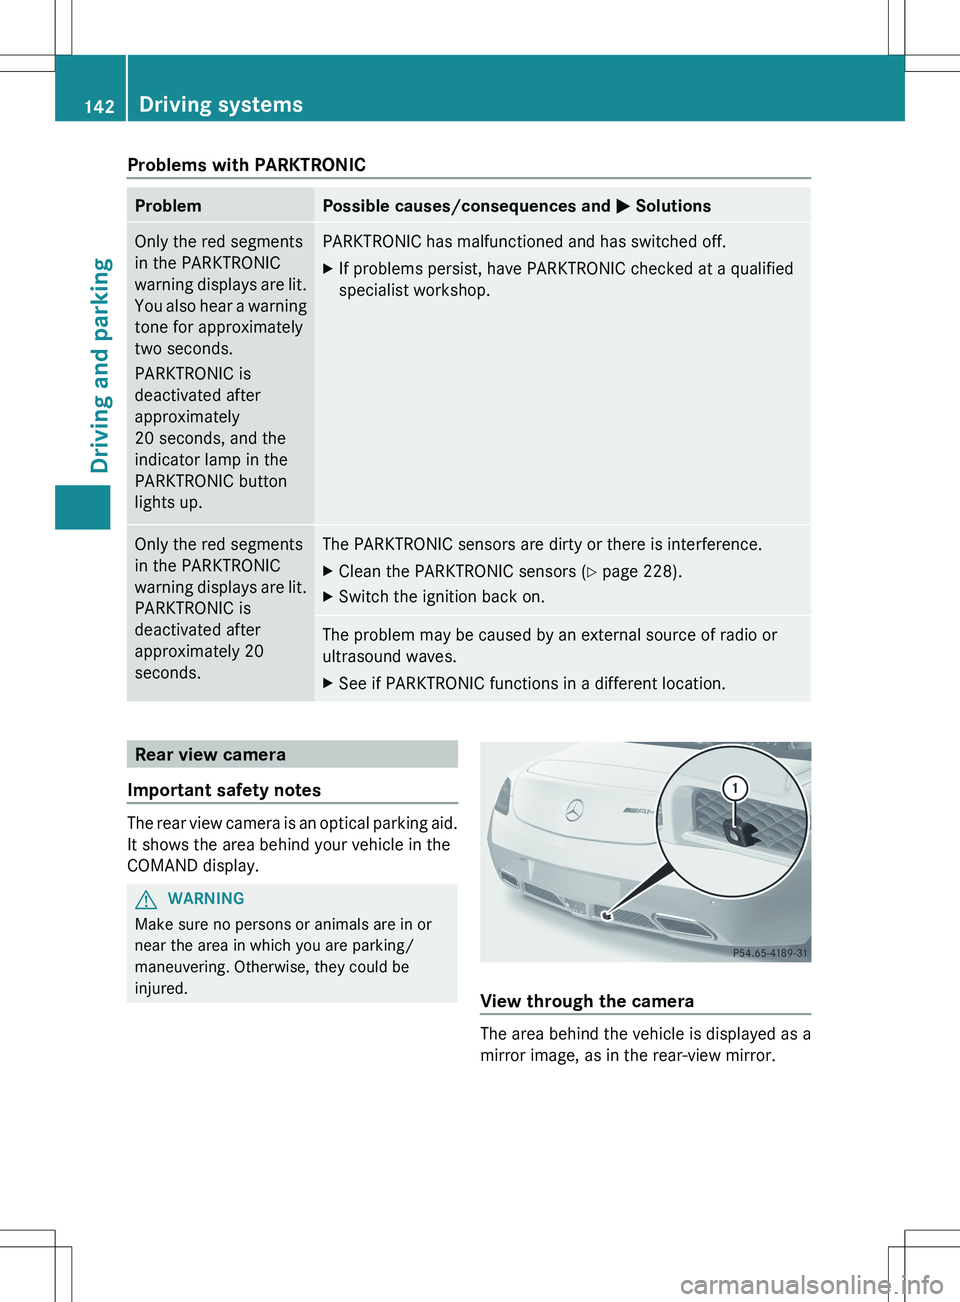
View through the camera
The area behind the vehicle is displayed as a
mirror image, as in the rear-view mirror.
142Driving systemsDriving and parking
Page 156 of 288
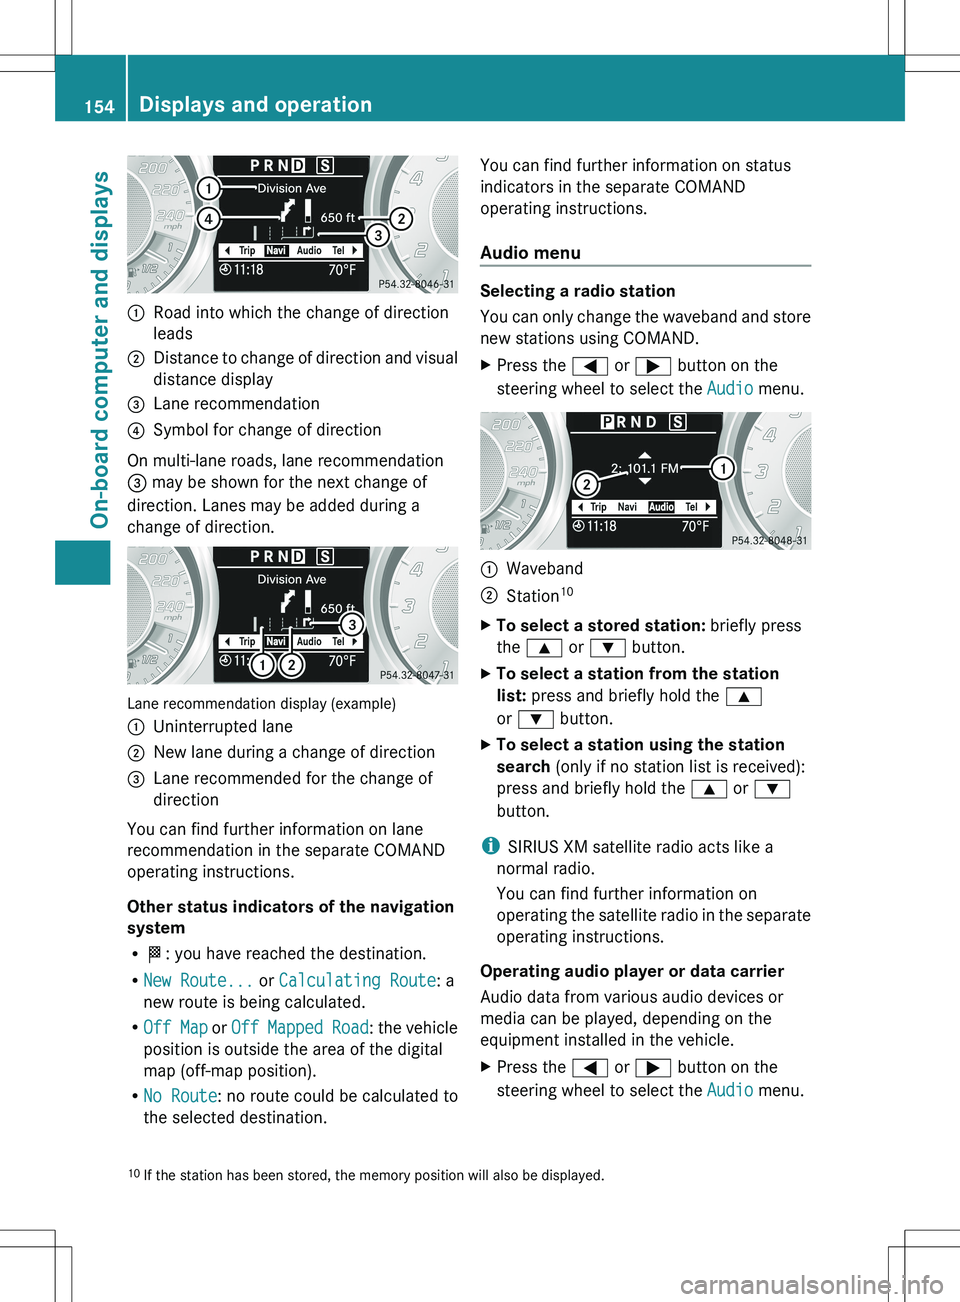
:Road into which the change of direction
leads;Distance to change of direction and visual
distance display=Lane recommendation?Symbol for change of direction
On multi-lane roads, lane recommendation
= may be shown for the next change of
direction. Lanes may be added during a
change of direction.
Lane recommendation display (example)
:Uninterrupted lane;New lane during a change of direction=Lane recommended for the change of
direction
You can find further information on lane
recommendation in the separate COMAND
operating instructions.
Other status indicators of the navigation
system
R O : you have reached the destination.
R New Route... or Calculating Route : a
new route is being calculated.
R Off Map or Off Mapped Road : the vehicle
position is outside the area of the digital
map (off-map position).
R No Route : no route could be calculated to
the selected destination.
You can find further information on status
indicators in the separate COMAND
operating instructions.
Audio menu
Selecting a radio station
You can only change the waveband and store
new stations using COMAND.
XPress the = or ; button on the
steering wheel to select the Audio menu.:Waveband;Station 10XTo select a stored station:
briefly press
the 9 or : button.XTo select a station from the station
list: press and briefly hold the 9
or : button.XTo select a station using the station
search (only if no station list is received):
press and briefly hold the 9 or :
button.
i SIRIUS XM satellite radio acts like a
normal radio.
You can find further information on
operating the satellite radio in the separate
operating instructions.
Operating audio player or data carrier
Audio data from various audio devices or
media can be played, depending on the
equipment installed in the vehicle.
XPress the = or ; button on the
steering wheel to select the Audio menu.10
If the station has been stored, the memory position will also be displayed.154Displays and operationOn-board computer and displays
Page 183 of 288
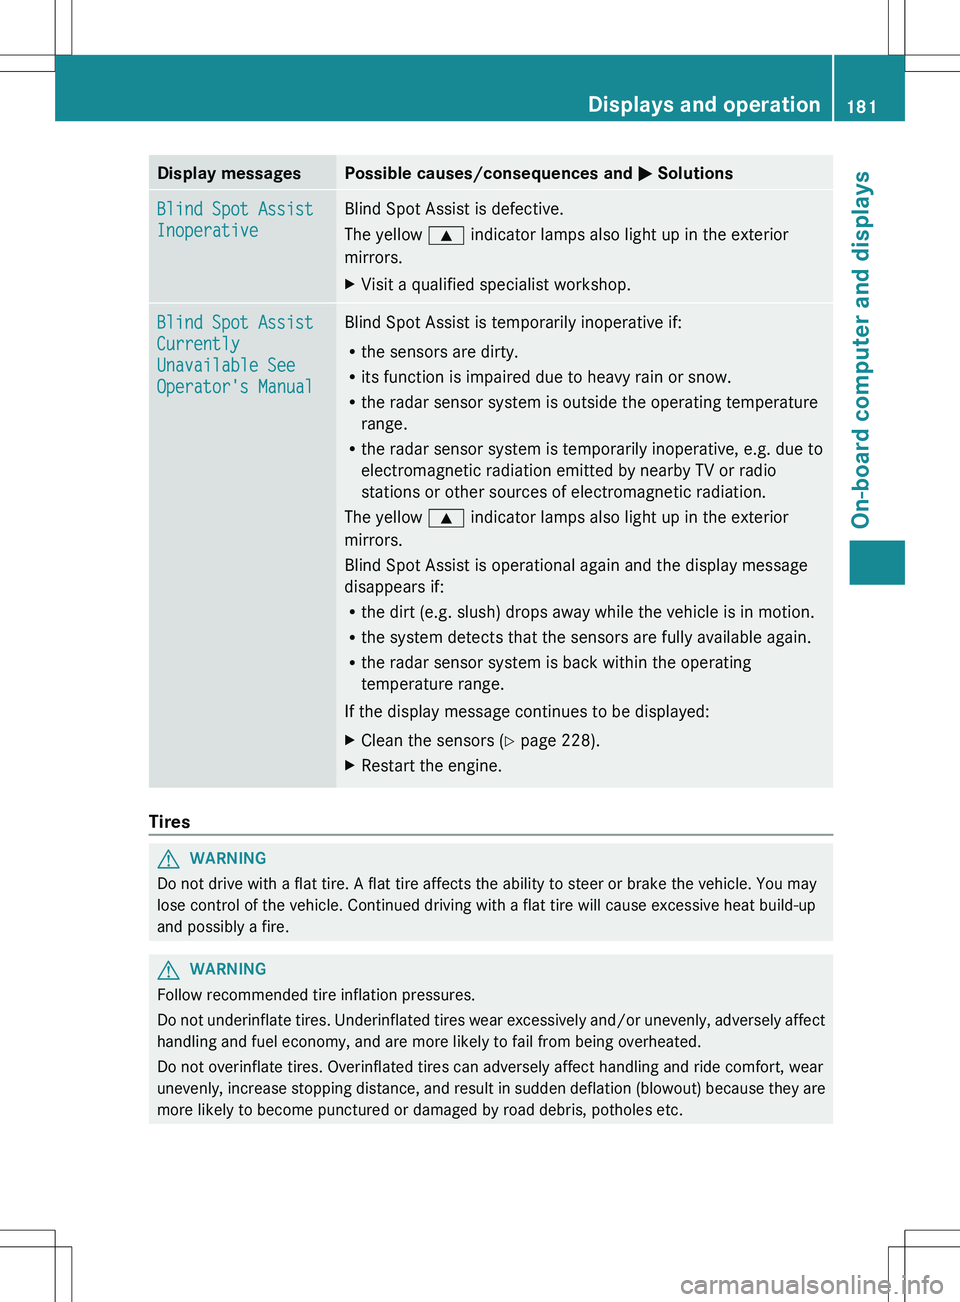
Display messagesPossible causes/consequences and M SolutionsBlind Spot Assist
InoperativeBlind Spot Assist is defective.
The yellow 9 indicator lamps also light up in the exterior
mirrors.XVisit a qualified specialist workshop.Blind Spot Assist
Currently
Unavailable See
Operator's ManualBlind Spot Assist is temporarily inoperative if:
R the sensors are dirty.
R its function is impaired due to heavy rain or snow.
R the radar sensor system is outside the operating temperature
range.
R the radar sensor system is temporarily inoperative, e.g. due to
electromagnetic radiation emitted by nearby TV or radio
stations or other sources of electromagnetic radiation.
The yellow 9 indicator lamps also light up in the exterior
mirrors.
Blind Spot Assist is operational again and the display message
disappears if:
R the dirt (e.g. slush) drops away while the vehicle is in motion.
R the system detects that the sensors are fully available again.
R the radar sensor system is back within the operating
temperature range.
If the display message continues to be displayed:XClean the sensors ( Y page 228).XRestart the engine.
Tires
GWARNING
Do not drive with a flat tire. A flat tire affects the ability to steer or brake the vehicle. You may
lose control of the vehicle. Continued driving with a flat tire will cause excessive heat build-up
and possibly a fire.
GWARNING
Follow recommended tire inflation pressures.
Do not underinflate tires. Underinflated tires wear excessively and/or unevenly, adversely affect
handling and fuel economy, and are more likely to fail from being overheated.
Do not overinflate tires. Overinflated tires can adversely affect handling and ride comfort, wear
unevenly, increase stopping distance, and result in sudden deflation (blowout) because they are
more likely to become punctured or damaged by road debris, potholes etc.
Displays and operation181On-board computer and displaysZ
Page 184 of 288
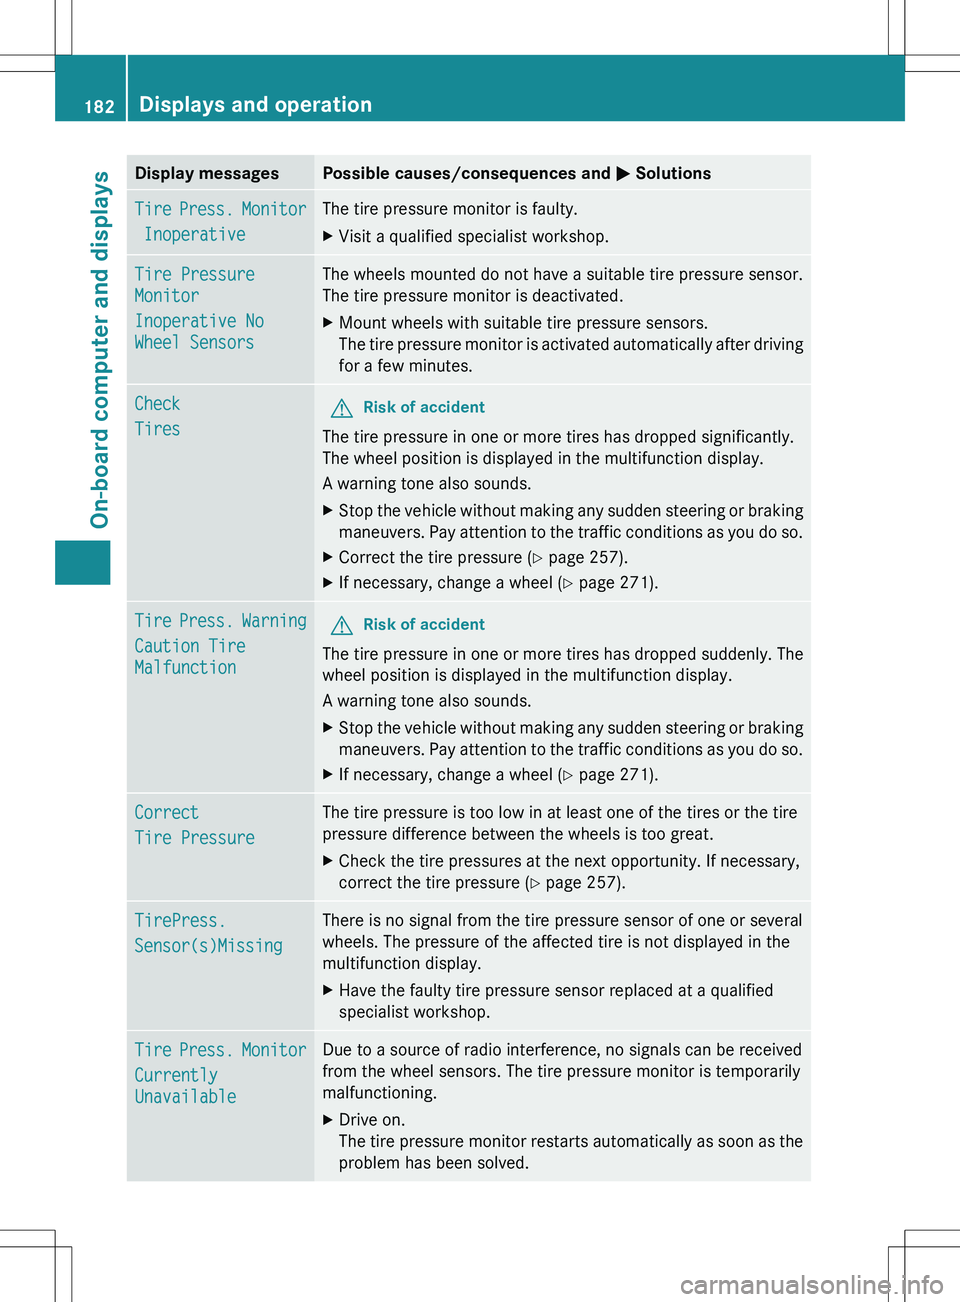
Display messagesPossible causes/consequences and M SolutionsTire Press. Monitor
InoperativeThe tire pressure monitor is faulty.XVisit a qualified specialist workshop.Tire Pressure
Monitor
Inoperative No
Wheel SensorsThe wheels mounted do not have a suitable tire pressure sensor.
The tire pressure monitor is deactivated.XMount wheels with suitable tire pressure sensors.
The tire pressure monitor is activated automatically after driving
for a few minutes.Check
TiresGRisk of accident
The tire pressure in one or more tires has dropped significantly.
The wheel position is displayed in the multifunction display.
A warning tone also sounds.
XStop the vehicle without making any sudden steering or braking
maneuvers. Pay attention to the traffic conditions as you do so.XCorrect the tire pressure ( Y page 257).XIf necessary, change a wheel ( Y page 271).Tire Press. Warning
Caution Tire
MalfunctionGRisk of accident
The tire pressure in one or more tires has dropped suddenly. The
wheel position is displayed in the multifunction display.
A warning tone also sounds.
XStop the vehicle without making any sudden steering or braking
maneuvers. Pay attention to the traffic conditions as you do so.XIf necessary, change a wheel ( Y page 271).Correct
Tire PressureThe tire pressure is too low in at least one of the tires or the tire
pressure difference between the wheels is too great.XCheck the tire pressures at the next opportunity. If necessary,
correct the tire pressure ( Y page 257).TirePress.
Sensor(s)MissingThere is no signal from the tire pressure sensor of one or several
wheels. The pressure of the affected tire is not displayed in the
multifunction display.XHave the faulty tire pressure sensor replaced at a qualified
specialist workshop.Tire Press. Monitor
Currently
UnavailableDue to a source of radio interference, no signals can be received
from the wheel sensors. The tire pressure monitor is temporarily
malfunctioning.XDrive on.
The tire pressure monitor restarts automatically as soon as the
problem has been solved.182Displays and operationOn-board computer and displays
Page 187 of 288
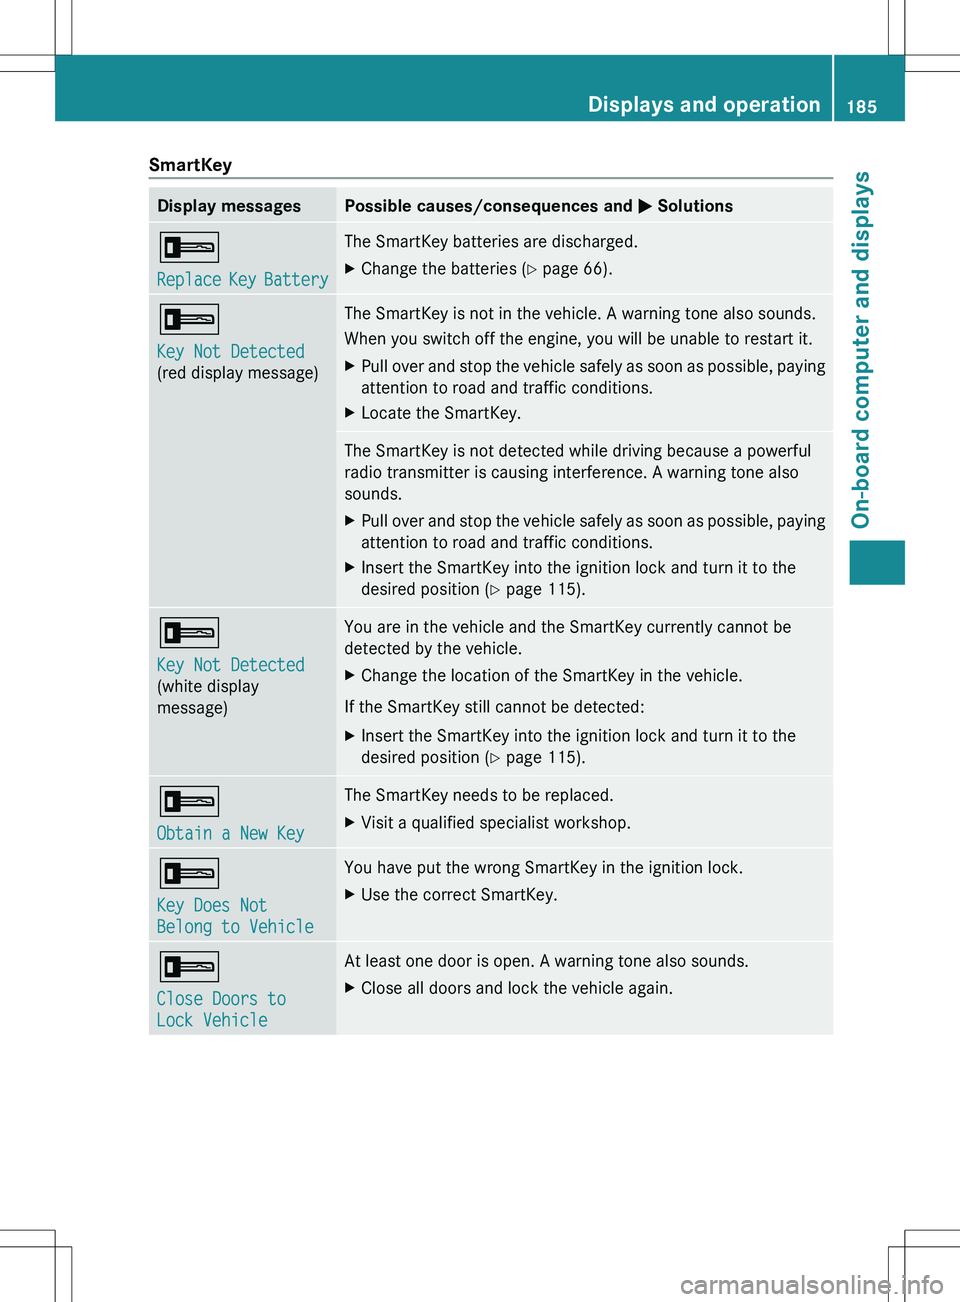
SmartKeyDisplay messagesPossible causes/consequences and M Solutions+
Replace Key BatteryThe SmartKey batteries are discharged.XChange the batteries ( Y page 66).+
Key Not Detected
(red display message)The SmartKey is not in the vehicle. A warning tone also sounds.
When you switch off the engine, you will be unable to restart it.XPull over and stop the vehicle safely as soon as possible, paying
attention to road and traffic conditions.XLocate the SmartKey.The SmartKey is not detected while driving because a powerful
radio transmitter is causing interference. A warning tone also
sounds.XPull over and stop the vehicle safely as soon as possible, paying
attention to road and traffic conditions.XInsert the SmartKey into the ignition lock and turn it to the
desired position ( Y page 115).+
Key Not Detected
(white display
message)You are in the vehicle and the SmartKey currently cannot be
detected by the vehicle.XChange the location of the SmartKey in the vehicle.
If the SmartKey still cannot be detected:
XInsert the SmartKey into the ignition lock and turn it to the
desired position ( Y page 115).+
Obtain a New Key The SmartKey needs to be replaced.XVisit a qualified specialist workshop.+
Key Does Not
Belong to VehicleYou have put the wrong SmartKey in the ignition lock.XUse the correct SmartKey.+
Close Doors to
Lock VehicleAt least one door is open. A warning tone also sounds.XClose all doors and lock the vehicle again.Displays and operation185On-board computer and displaysZ
Page 216 of 288

XPress and hold button B on remote control
A until indicator lamp : lights up green.
The programming has been successful if
indicator lamp : lights up or flashes
green.XRelease button ;, = or ? on the
integrated garage door opener and button
B on garage door remote control A.
If indicator lamp : lights up red:
XRepeat the programming operation for the
corresponding button on the rear-view
mirror. When doing so, vary the distance
between remote control A and the rear-
view mirror.
i If the indicator lamp flashes green after
successful programming, the garage door
system is operating on a rolling code. After
programming, you must synchronize the
garage door opener integrated in the rear-
view mirror with the receiver of the garage
door system.
Synchronizing the rolling code
Your vehicle must be within range of the
garage or gate opener drive. Make sure that
neither your vehicle nor any persons/objects
are present within the sweep of the door or
gate.
Observe the safety notes when performing
the rolling code synchronization
( Y page 212).
XTurn the SmartKey to position 2 in the
ignition lock.XPress the programming button of the door
or gate drive (see the door or gate drive
operating instructions, e.g. under
"Programming of additional remote
controls").
i Usually, you now have 30seconds to
initiate the next step.
XPress the previously programmed
button ;, = or ? of the integratedgarage door opener repeatedly until the
door starts to move.
The rolling code synchronization is then
complete.
Notes on programming the remote
control
Canadian radio frequency laws require a
"break" (or interruption) of the transmission
signals after broadcasting for a few seconds.
Therefore, these signals may not last long
enough for the integrated remote control. The
signal is not recognized during programming.
Comparable with Canadian law, some U.S.
garage door openers are designed to "time-
out" in the same manner.
Proceed as follows:
R if you live in Canada.
R if you have difficulties programming the
garage door opener (regardless of where
you live) when using the programming
steps.
XPress and hold one of the buttons ;
to ? on the integrated garage door
opener.
Indicator lamp : starts to flash yellow
after a short period.XRelease the switch.XPress button B of garage door remote
control A for two seconds, then release it
for two seconds.XPress button B again for two seconds.XRepeat this sequence on button B of
remote control A until indicator lamp :
lights up green.
Repeat the process if indicator lamp :
turns red.XContinue with the other programming
steps (see above).214FeaturesStowage and features
Page 244 of 288
Mercedes-Benz recommends that you do not
carry out work on batteries yourself, e.g.
removing or charging. Always have this work
performed at a qualified specialist workshop,
e.g. an authorized Mercedes-Benz Center.
i If the battery power supply has been
interrupted, e.g. if the battery has been
reconnected, you must reset the function
for automatically folding the exterior
mirrors in/out by folding the mirrors out
once ( Y page 90).
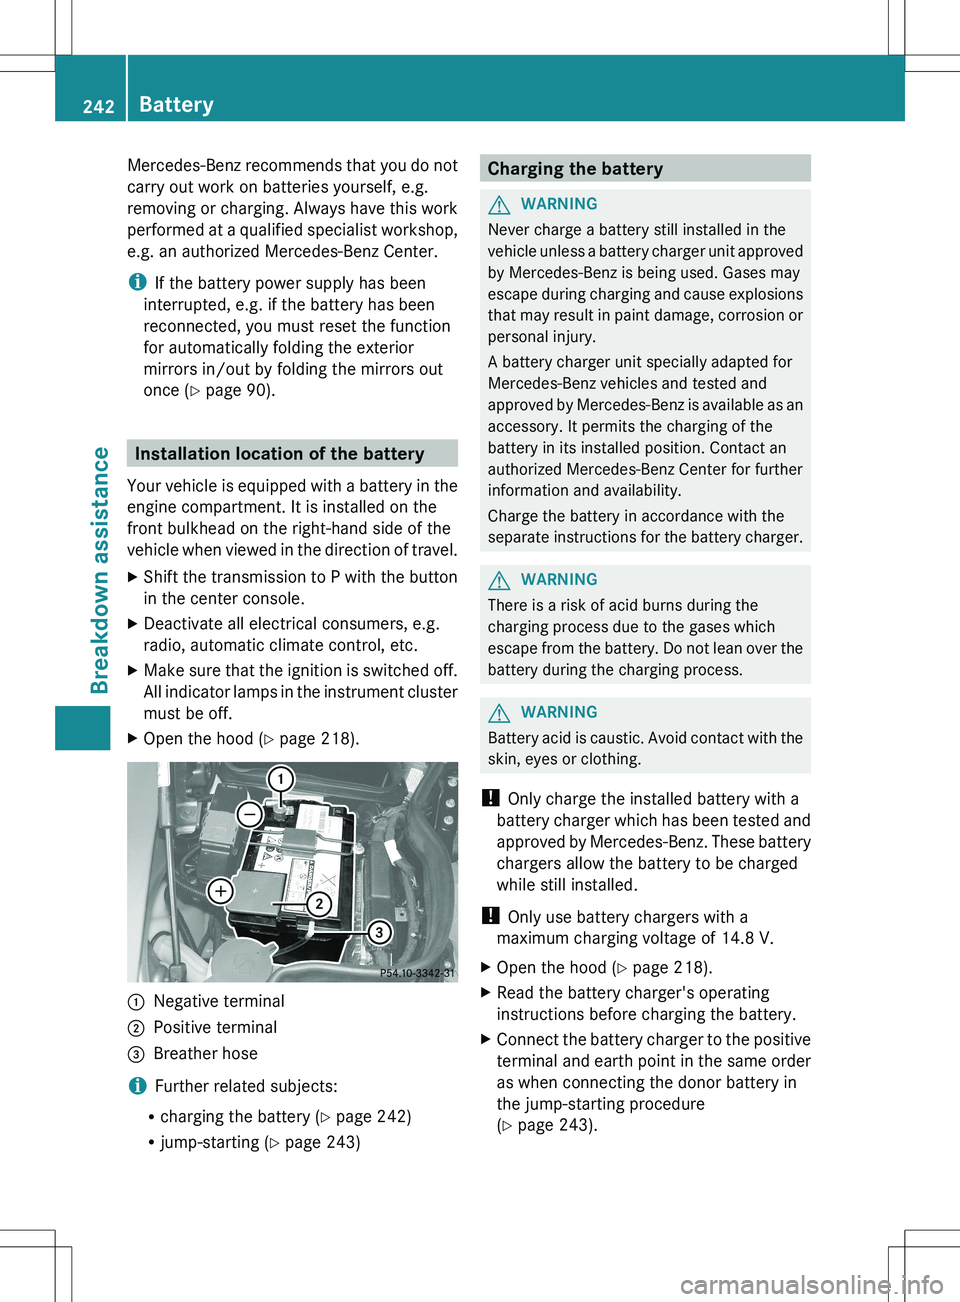
Installation location of the battery
Your vehicle is equipped with a battery in the
engine compartment. It is installed on the
front bulkhead on the right-hand side of the
vehicle when viewed in the direction of travel.
XShift the transmission to P with the button
in the center console.XDeactivate all electrical consumers, e.g.
radio, automatic climate control, etc.XMake sure that the ignition is switched off.
All indicator lamps in the instrument cluster
must be off.XOpen the hood ( Y page 218).:Negative terminal;Positive terminal=Breather hose
i Further related subjects:
R charging the battery ( Y page 242)
R jump-starting ( Y page 243)
Charging the batteryGWARNING
Never charge a battery still installed in the
vehicle unless a battery charger unit approved
by Mercedes-Benz is being used. Gases may
escape during charging and cause explosions
that may result in paint damage, corrosion or
personal injury.
A battery charger unit specially adapted for
Mercedes-Benz vehicles and tested and
approved by Mercedes-Benz is available as an
accessory. It permits the charging of the
battery in its installed position. Contact an
authorized Mercedes-Benz Center for further
information and availability.
Charge the battery in accordance with the
separate instructions for the battery charger.
GWARNING
There is a risk of acid burns during the
charging process due to the gases which
escape from the battery. Do not lean over the
battery during the charging process.
GWARNING
Battery acid is caustic. Avoid contact with the
skin, eyes or clothing.
! Only charge the installed battery with a
battery charger which has been tested and
approved by Mercedes-Benz. These battery
chargers allow the battery to be charged
while still installed.
! Only use battery chargers with a
maximum charging voltage of 14.8 V.
XOpen the hood ( Y page 218).XRead the battery charger's operating
instructions before charging the battery.XConnect the battery charger to the positive
terminal and earth point in the same order
as when connecting the donor battery in
the jump-starting procedure
( Y page 243).242BatteryBreakdown assistance