tire size MERCEDES-BENZ SLS AMG COUPE 2013 C197 Owner's Manual
[x] Cancel search | Manufacturer: MERCEDES-BENZ, Model Year: 2013, Model line: SLS AMG COUPE, Model: MERCEDES-BENZ SLS AMG COUPE 2013 C197Pages: 286, PDF Size: 3.26 MB
Page 17 of 286
Tire pressure monitoring system
Function/note s............................. 255
Restarting ...................................... 257
Warning lamp ................................. 193
Tires
Aspect ratio (definition) .................268
Average weight of the vehicle
occupants (definition) ....................267
Bar (definition) ............................... 266
Characteristics .............................. 266
Checking ........................................ 249
Definition of terms .........................266
Direction of rotatio n...................... 270
Display message ............................ 177
Distribution of the vehicle
occupants (definition) ....................269
DOT, Tire Identification Number
(TIN) .............................................. .266
DOT (Department of
Transportation) (definition) ............266
GAWR (Gross Axle Weight Rating)
(definition) ..................................... 267
GVW (Gross Vehicle Weight)
(definition) ..................................... 267
GVWR (Gross Vehicle Weight
Rating) (definition) .........................267
Important safety notes ..................248
Increased vehicle weight due to
optional equipment (definition) ......267
Kilopascal (kPa) (definition) ...........268
Labeling (overview )........................ 263
Load bearing index (definition) ......269
Load index ..................................... 265
Load index (definition) ...................268
Maximum loaded vehicle weight
(definition) ..................................... 267
Maximum load on a tire
(definition) ..................................... 268
Maximum permissible tire
pressure (definition) ....................... 268
Maximum tire loa d......................... 261
Maximum tire load (definition) .......268
Optional equipment weight
(definition) ..................................... 269
PSI (pounds per square inch)
(definition) ..................................... 268
Replacing ....................................... 269
Service life ..................................... 250Sidewall (definition)
.......................268
Speed rating (definition) ................267
Storing ........................................... 270
Structure and characteristics
(definition) ..................................... 266
Technical data ............................... 272
Temperature .................................. 262
TIN (Tire Identification Number)
(definition) ..................................... 269
Tire bead (definition) ......................268
Tire pressure (definition) ................268
Tire pressures (recommended )...... 267
Tire size (data) ............................... 270
Tire size designation, load-bearing
capacity, speed rating .................... 263
Tire tread ....................................... 249
Tire tread (definition) .....................268
Total load limit (definition) .............269
Traction ......................................... 262
Traction (definition) .......................269
Tread wea r..................................... 262
Uniform Tire Quality Grading
Standards ...................................... 261
Uniform Tire Quality Grading
Standards (definition) ....................267
Unladen weight (definition) ............268
Wear indicator (definition) .............269
Wheel rim (definition) ....................267
see Flat tire
Top Tether ............................................ 53
Tow-away alarm .................................. 59
Towing Important safety guidelines ...........242
Installing the towing eye ................243
Removing the towing eye ...............243
With the rear axle raised ................243
Towing away
With both axles on the ground .......244
Transmission
Driving tips .................................... 120
Selector lever ................................ 117
Shift range ..................................... 122
Transmission position display .........119
Transmission positions ....................119
Transporting the vehicle ..................244
Trim pieces (cleaning instructions) .225
Trip computer (on-board
computer) .......................................... 148 Index
15
Page 19 of 286
Interchanging/changing
................269
Mounting a new wheel ...................235
Removing a wheel ..........................235
Storing ........................................... 270
Tightening torque ........................... 236
Wheel size/tire size .......................270
Windows
see Side windows
Windshield washer system ..............217
Filling capacity ............................... 282
Notes ............................................. 281
Windshield wipers
Problem (malfunction) .....................99
Replacing the wiper blades ..............98
Switching on/off .............................. 97
Winter driving
Important safety notes ..................250
Slippery road surfaces ...................134
Snow chains .................................. 250
Winter tires
M+S tires ....................................... 251
Wiper blades
Cleaning ......................................... 223
Important safety notes ....................98
Replacing ......................................... 98
Wooden trim (cleaning
instructions) ...................................... 225
Workshops see Qualified specialist workshop Index
17
Page 58 of 286
G
WARNING
If the BAS malfunctions, the brake system still
functions, but without the additional brake
boost available that the BAS would normally
provide in an emergency braking maneuver.
Therefore, the braking distance may increase. ESP
®
(Electronic Stability Program)
General notes i
Observe the "Important safety notes"
section (Y page 56).
ESP ®
monitors driving stability and traction,
i.e. power transmission between the tires and
the road surface.
If ESP ®
detects that the vehicle is deviating
from the direction desired by the driver, one
or more wheels are braked to stabilize the
vehicle. The engine output is also modified to
keep the vehicle on the desired course within
physical limits. ESP ®
assists the driver when
pulling away on wet or slippery roads. ESP ®
can also stabilize the vehicle during braking.
ETS (Electronic Traction System) i
Observe the "Important safety notes"
section (Y page 56).
Traction control is part of ESP ®
.
Traction control brakes the drive wheels
individually if they spin. This enables you to
pull away and accelerate on slippery surfaces,
for example if the road surface is slippery on
one side.
Traction control remains active, even if you
deactivate ESP ®
.
Important safety notes G
WARNING
If ESP ®
is malfunctioning, ESP ®
is unable to
stabilize the vehicle. Additionally, further
driving safety systems are deactivated. This
increases the risk of skidding and an accident. Drive on carefully. Have ESP
®
checked at a
qualified specialist workshop.
! Switch the ignition off when:
R the electric parking brake is being tested
using a brake dynamometer.
R the vehicle is being towed with the rear
axle raised.
Application of the brakes by ESP ®
may
otherwise destroy the brake system.
When SPORT handling mode is activated, the
0074 warning lamp lights up in the instrument
panel.
When ESP ®
is deactivated, the 00BBand
0089 warning lamps light up in the instrument
panel.
Observe the information on warning lamps
(Y page 190) and display messages which
may be shown in the instrument cluster
(Y page 166).
i Only use wheels with the recommended
tire sizes. Only then will ESP ®
function
properly.
Characteristics of ESP ® ESP
®
is activated automatically when the
engine is started.
If ESP ®
intervenes, the 0089ESP®
warning
lamp flashes in the instrument cluster.
If ESP ®
intervenes:
X Do not deactivate ESP ®
under any
circumstances.
X Only depress the accelerator pedal as far
as necessary when pulling away.
X Adapt your driving style to suit the
prevailing road and weather conditions.
Deactivating/activating ESP ® Important safety notes
i Observe the "Important safety notes"
section (Y page 54). 56
Driving safety systemsSafety
Page 195 of 286
Tires
Problem Possible causes/consequences and
0050
0050Solutions 0077
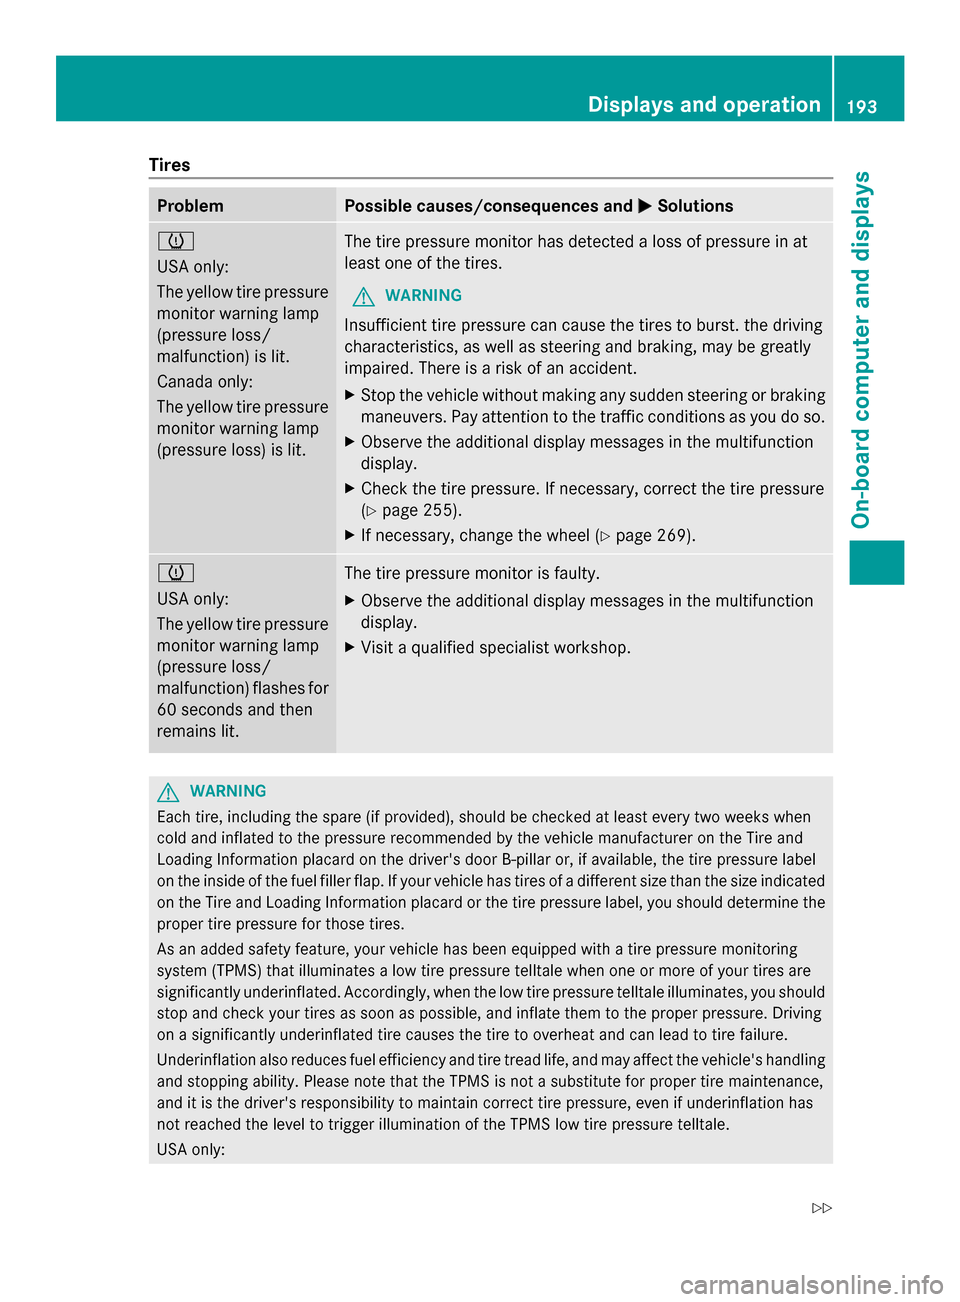
USA only:
The yellow tire pressure
monitor warning lamp
(pressure loss/
malfunction) is lit.
Canada only:
The yellow tire pressure
monitor warning lamp
(pressure loss) is lit. The tire pressure monitor has detected a loss of pressure in at
least one of the tires.
G WARNING
Insufficient tire pressure can cause the tires to burst. the driving
characteristics, as well as steering and braking, may be greatly
impaired. There is a risk of an accident.
X Stop the vehicle without making any sudden steering or braking
maneuvers. Pay attention to the traffic conditions as you do so.
X Observe the additional display messages in the multifunction
display.
X Check the tire pressure. If necessary, correct the tire pressure
(Y page 255).
X If necessary, change the wheel (Y page 269).0077
USA only:
The yellow tire pressure
monitor warning lamp
(pressure loss/
malfunction) flashes for
60 seconds and then
remains lit.
The tire pressure monitor is faulty.
X
Observe the additional display messages in the multifunction
display.
X Visit a qualified specialist workshop. G
WARNING
Each tire, including the spare (if provided), should be checked at least every two weeks when
cold and inflated to the pressure recommended by the vehicle manufacturer on the Tire and
Loading Information placard on the driver's door B-pillar or, if available, the tire pressure label
on the inside of the fuel filler flap. If your vehicle has tires of a different size than the size indicated
on the Tire and Loading Information placard or the tire pressure label, you should determine the
proper tire pressure for those tires.
As an added safety feature, your vehicle has been equipped with a tire pressure monitoring
system (TPMS) that illuminates a low tire pressure telltale when one or more of your tires are
significantly underinflated. Accordingly, when the low tire pressure telltale illuminates, you should
stop and check your tires as soon as possible, and inflate them to the proper pressure. Driving
on a significantly underinflated tire causes the tire to overheat and can lead to tire failure.
Underinflation also reduces fuel efficiency and tire tread life, and may affect the vehicle's handling
and stopping ability. Please note that the TPMS is not a substitute for proper tire maintenance,
and it is the driver's responsibility to maintain correct tire pressure, even if underinflation has
not reached the level to trigger illumination of the TPMS low tire pressure telltale.
USA only: Displays and operation
193On-boardcompu ter and displays
Z
Page 250 of 286
Useful information
i This Operator's Manual describes all
models and all standard and optional
equipment of your vehicle available at the
time of publication of the Operator's
Manual. Country-specific differences are
possible. Please note that your vehicle may
not be equipped with all features
described. This also applies to safety-
related systems and functions.
i Please read the information on qualified
specialist workshops (Y page 22).Important safety notes
Consult an authorized Mercedes-Benz Center
if you require information on approved and
recommended tires and wheels for summer
and winter operation. Advice on purchasing
and caring for tires is also available there. G
WARNING
Replace rims or tires with the same
designation, manufacturer and type as shown
on the original part. For further information
contact an authorized Mercedes-Benz Center.
If incorrectly sized rims and tires are
mounted, the wheel brakes or suspension
components can be damaged. Also, the
operating clearance of the wheels and the
tires may no longer be correct. G
WARNING
Worn, old tires can cause accidents. If the tire
tread is worn to minimum tread depth, or if
the tires have sustained damage, replace
them.
When replacing rims, only use genuine
Mercedes-Benz wheel bolts specified for the
particular rim type. Failure to do so can result
in the bolts loosening and possibly an
accident.
Retreaded tires are not tested or
recommended by Mercedes-Benz, since
previous damage cannot always be recognized on retreads. The operating safety
of the vehicle cannot be assured when such
tires are used. G
WARNING
If you feel a sudden significant vibration or
ride disturbance, or you suspect that possible
damage to your vehicle has occurred, you
should turn on the hazard warning flashers,
carefully slow down, and drive with caution to
an area which is a safe distance from the road.
Inspect the tires and the vehicle underbody
for possible damage. If the vehicle appears
unsafe, have the vehicle towed to the nearest
authorized Mercedes-Benz Center or tire
dealer for repairs. G
WARNING
Do not drive with a flat tire. A flat tire affects
the ability to steer or brake the vehicle. You
might lose control of the vehicle. Continued
driving with a flat tire or driving at high speed
with a flat tire will cause excessive heat build-
up and possibly a fire.
i Further information about tires and
wheels can be obtained from any
authorized Mercedes-Benz Center. Operation
Notes on driving
R If the vehicle is heavily loaded, check the
tire pressures and correct them if
necessary.
R When parking your vehicle, make sure that
the tires do not get deformed by the curb
or other obstacles. If it is necessary to drive
over curbs, speed humps or similar
elevations, try to do so slowly and at an
obtuse angle. Otherwise, the tires,
particularly the sidewalls, may be
damaged. 248
OperationWheels and tires
Page 252 of 286

Bar indicator
0043for tread wear is integrated
into the tire tread. Notes on selecting, mounting and
replacing tires
R Only mount tires and wheels of the same
type and make.
R Only mount tires of the correct size onto
the wheels.
R After mounting new tires, break them in at
moderate speeds for the first
60 miles (100 km), as they only reach their
full performance after this distance.
R Do not use tires until they are excessively
worn as the tire traction on wet road
surfaces decreases significantly when the
tread depth is less than 1
/ 8 in (3 mm).
R Replace the tires after six years at the
latest, regardless of wear. This also applies
to the spare wheel/emergency spare
wheel.
The service life of tires depends on the
following factors amongst other things:
R Driving style
R Tire pressure
R Distance covered Winter operation
General notes
Have your vehicle winterproofed at a qualified
specialist workshop at the onset of winter. Observe the notes in the "Changing a wheel"
section (Y
page 269). Driving with summer tires
At temperatures below 45 ‡(+7 †), summer
tires lose elasticity and therefore traction and
braking power. Change the tires on your
vehicle to M+S tires. Using summer tires at
very cold temperatures could cause cracks to
form, thereby damaging the tires
permanently. Mercedes-Benz cannot accept
responsibility for this type of damage. Snow chains
G
WARNING
If snow chains are installed to the front
wheels, they may drag against the vehicle
body or chassis components. This could
cause damage to the vehicle or the tires.
There is a risk of an accident.
To avoid hazardous situations:
R never install snow chains to the front
wheels
R always install snow chains in pairs to the
rear wheels.
! There is not enough space for snow
chains on some wheel sizes. Observe the
information under "Tires and wheels" in the
"Technical Data" section to avoid damage
to the vehicle or the wheels.
For safety reasons, Mercedes-Benz
recommends that you only use snow chains
that have been specially approved for your
vehicle by Mercedes-Benz, or are of a
corresponding standard of quality.
R You may not mount snow chains to all
wheel-tire combinations; see the
information under "Wheels and tires" in the
"Technical data" section.
R Only use snow chains when driving on
roads completely covered by snow.
Remove the snow chains as soon as 250
Winter operationWheels and tires
Page 255 of 286

pressure table for speeds over
100 mph (160 km/h) is adopted.
Make sure that the tire pressure for normal
speeds is adopted again.
Additional specifications of tire pressure
values for loads can also be found on the tire
pressure table on the inside of the fuel filler
flap.
i Specifications shown in the examples of
tire pressure tables are for illustration
purposes only. Tire pressure specifications
are vehicle-specific and may deviate from
the data shown here. Tire pressure
specifications applicable to your vehicle
are located in your vehicle's tire pressure
table.
Unless stated otherwise, the tire pressures
specified on the fuel filler flap apply to all tires
approved for this vehicle. Example: tire pressure table for all tires permitted
for this vehicle by the factory
If a tire size precedes a tire pressure, the tire
pressure information following is only valid
for that tire size. The load conditions "partially
laden" and "fully laden" are defined in the
table for different numbers of passengers and
amounts of luggage. The actual number of
seats may differ. Example: tire pressure table with tire dimensions
Some tire pressure tables show only the rim
diameters instead of the full tire size, e.g.
R18. The rim diameter is part of the tire size
and can be found on the tire sidewall
(Y
page 263). Underinflated or overinflated tires
Underinflation G
WARNING
Follow recommended tire inflation pressures.
Do not underinflate tires. Underinflated tires
wear excessively and/or unevenly, adversely
affect handling and fuel economy, and are
more likely to fail from being overheated.
Underinflated tires may:
R wear quickly and unevenly
R have an adverse effect on fuel consumption
R overheat, leading to tire defects
R have an adverse effect on handling
characteristics Tire pressure
253Wheels and tires Z
Page 257 of 286
Check the tire pressures at least once a
month.
Only check and correct tire pressures when
the tires are cold (Y page 251).
Checking tire pressures manually To determine and set the correct tire
pressure, proceed as follows:
X Remove the valve cap of the tire that is to
be checked.
X Press the tire pressure gauge securely onto
the valve.
X Read the tire pressure and compare it with
the recommended value on the Tire and
Loading Information placard on the
B-pillar on the driver's side of your vehicle.
X If necessary, increase the tire pressure to
the recommended value ( Ypage 251).
X If the tire pressure is too high, release air
by pressing down the metal pin in the valve
using the tip of a pen, for example. Then
check the tire pressure again using the tire
pressure checker.
X Screw the valve cap onto the valve.
X Repeat these steps for the other tires. Tire pressure monitor
Important safety notes If a tire pressure monitor system is installed,
the vehicle's wheels have sensors that
monitor the tire pressures in all four tires. The
tire pressure monitor warns you if the
pressure drops in one or more of the tires. The
tire pressure monitor only functions if the
correct wheel electronics units are installed
on each wheel. The tire pressure monitor has a yellow
warning lamp in the instrument cluster for
indicating pressure loss/malfunctions (USA)
or pressure loss (Canada). Whether the
warning lamp flashes or lights up indicates
whether a tire pressure is too low or the tire
pressure monitoring system is
malfunctioning:
R if the warning lamp is lit continuously, the
tire pressure on one or more tires is
significantly too low. The tire pressure
monitor is not malfunctioning.
R USA only: if the warning lamp flashes for
60 seconds and then remains lit constantly,
the tire pressure monitor is malfunctioning. G
WARNING
Each tire, including the spare (if provided),
should be checked at least once a month
when cold and inflated to the pressure
recommended by the vehicle manufacturer
on the Tire and Loading Information placard
on the driver's door B-pillar or the tire
pressure label on the inside of the fuel filler
flap. If your vehicle has tires of a different size
than the size indicated on the Tire and Loading
Information placard or the tire pressure label,
you should determine the proper tire pressure
for those tires.
As an added safety feature, your vehicle has
been equipped with a tire pressure monitoring
system (TPMS) that illuminates a low tire
pressure telltale when one or more of your
tires are significantly underinflated.
Accordingly, when the low tire pressure
telltale illuminates, you should stop and check
your tires as soon as possible, and inflate
them to the proper pressure. Driving on a
significantly underinflated tire causes the tire
to overheat and can lead to tire failure.
Underinflation also reduces fuel efficiency
and tire tread life, and may affect the vehicle's
handling and stopping ability. Please note that
the TPMS is not a substitute for proper tire
maintenance, and it is the driver's
responsibility to maintain correct tire
pressure, even if underinflation has not Tire pressure
255Wheels and tires
Z
Page 260 of 286

Loading the vehicle
Instruction labels for tires and loads
G
WARNING
Do not overload the tires by exceeding the
specified load limit as indicated on the Tire
and Loading Information placard on the
driver's door B-pillar. Overloading the tires
can overheat them, possibly causing a
blowout. Overloading the tires can also result
in handling or steering problems, or brake
failure.
Two instruction labels on your vehicle show
the maximum possible load.
(1) The Tire and Loading Information placard is on the B-pillar on the driver's side. The
Tire and Loading Information placard
shows the maximum permissible number
of occupants and the maximum
permissible vehicle load. It also contains
details of the tire sizes and
corresponding pressures for tires
installed at the factory.
(2) The vehicle identification plate is on the B-pillar on the driver's side. The vehicle
identification plate informs you of the
gross vehicle weight rating. It is made up
of the vehicle weight, all vehicle
occupants, the fuel and the cargo. You
can also find information about the
maximum gross axle weight rating on the
front and rear axle.
The maximum gross axle weight rating is
the maximum weight that can be carried
by one axle (front or rear axle). Never
exceed the maximum load or the
maximum gross axle weight rating for the
front or rear axle. 0043
B-pillar, driver's side Maximum permissible gross vehicle
weight rating
i The specifications shown on the Tire and
Loading Information placard in the
illustration are examples. The maximum
permissible gross vehicle weight rating is
vehicle-specific and may differ from that in
the illustration. You can find the valid
maximum permissible gross vehicle weight
rating for your vehicle on the Tire and
Loading Information placard. X
The Tire and Loading Information placard
gives you details on maximum permissible
gross vehicle weight rating 0043: "The gross
weight of occupants and luggage must
never exceed XXX kilograms or XXX
pounds."
The gross weight of all vehicle occupants,
cargo, luggage and trailer load/noseweight (if
applicable) must not exceed the specified
value. 258
Loading the vehicleWheels and tires
Page 262 of 286
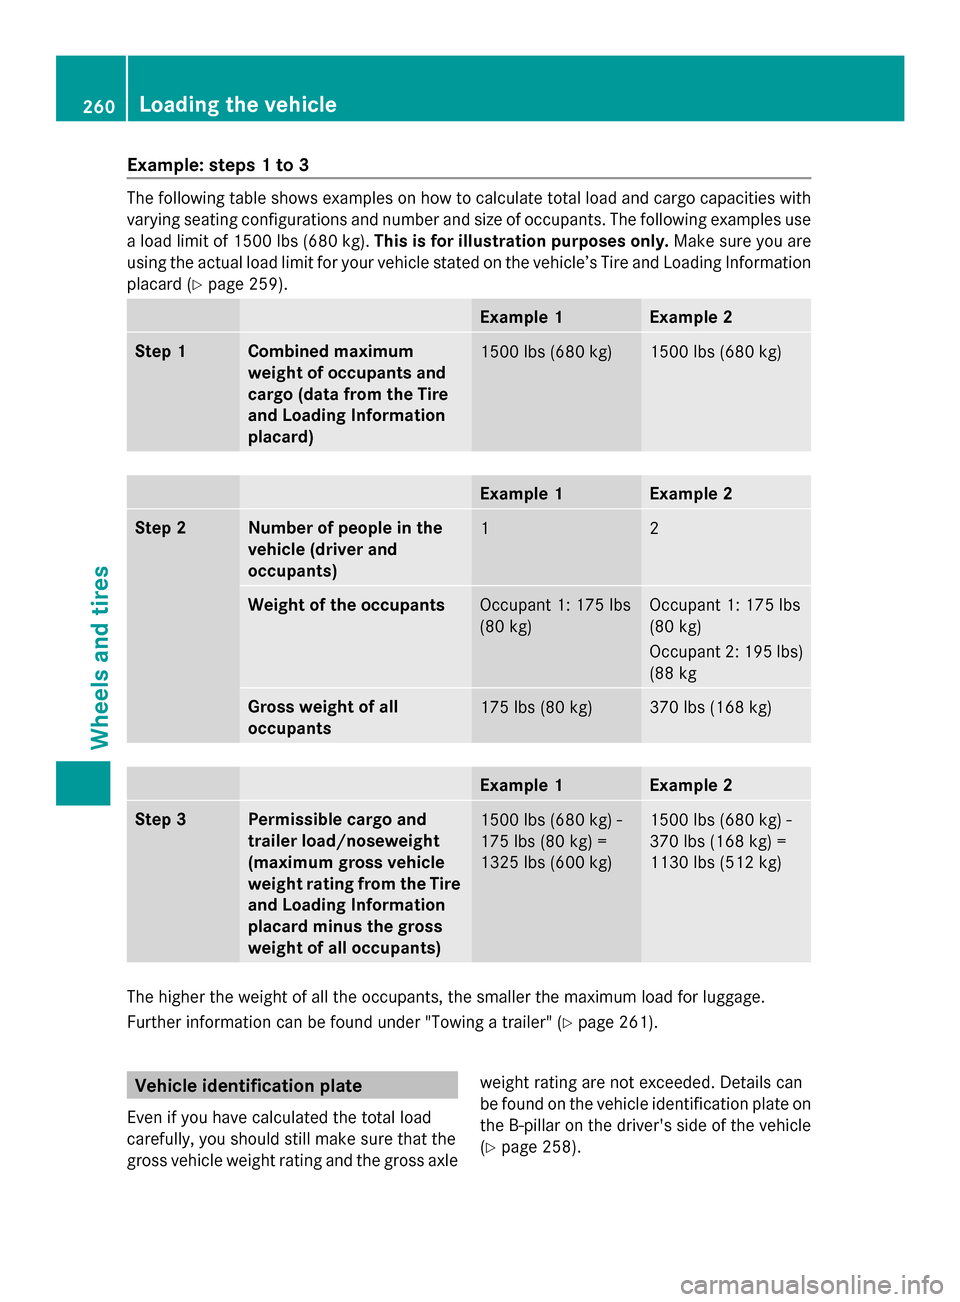
Example: steps 1 to 3
The following table shows examples on how to calculate total load and cargo capacities with
varying seating configurations and number and size of occupants. The following examples use
a load limit of 1500 lbs (680 kg). This is for illustration purposes only. Make sure you are
using the actual load limit for your vehicle stated on the vehicle’s Tire and Loading Information
placard (Y page 259). Example 1 Example 2
Step 1 Combined maximum
weight of occupants and
cargo (data from the Tire
and Loading Information
placard)
1500 lbs (680 kg) 1500 lbs (680 kg)
Example 1 Example 2
Step 2 Number of people in the
vehicle (driver and
occupants)
1 2
Weight of the occupants
Occupant 1: 175 lbs
(80 kg) Occupant 1: 175 lbs
(80 kg)
Occupant 2: 195 lbs)
(88 kg
Gross weight of all
occupants
175 lbs (80 kg) 370 lbs (168 kg)
Example 1 Example 2
Step 3 Permissible cargo and
trailer load/noseweight
(maximum gross vehicle
weight rating from the Tire
and Loading Information
placard minus the gross
weight of all occupants)
1500 lbs (680 kg) -
175 lbs (80 kg) =
1325 lbs (600 kg) 1500 lbs (680 kg) -
370 lbs (168 kg) =
1130 lbs (512 kg) The higher the weight of all the occupants, the smaller the maximum load for luggage.
Further information can be found under "Towing a trailer" (Y
page 261).Vehicle identification plate
Even if you have calculated the total load
carefully, you should still make sure that the
gross vehicle weight rating and the gross axle weight rating are not exceeded. Details can
be found on the vehicle identification plate on
the B-pillar on the driver's side of the vehicle
(Y
page 258). 260
Loading the vehicleWheels and tires