run flat MERCEDES-BENZ SLS AMG GT COUPE 2015 C197 Owner's Manual
[x] Cancel search | Manufacturer: MERCEDES-BENZ, Model Year: 2015, Model line: SLS AMG GT COUPE, Model: MERCEDES-BENZ SLS AMG GT COUPE 2015 C197Pages: 290, PDF Size: 6.24 MB
Page 53 of 290
constitute
ahealth hazard .The 0075 SRS
warning lamp lights up. G
WARNING
Pyrotechnic ETDs that were activate dmustbe
replaced.
For your safety ,whend isposing of the pyro-
techni cETDs always follow ou rsafety instruc-
tions .These are available at any authorized
Mercedes-Benz Center. Child restraint systems
Childre
ninthe vehicle
Important safety notes G
WARNING
Childre n12years old and under mus tbe
seated and properly secured in an appropriate
infant restraint, toddle rrestraint, or booster
sea trecommended for the size and weigh tof
the child.
The infant or chil drestraint mus tbep roperly
secured with the vehicle's sea tbeltf ully in
accordance with the chil dseatm anufactur-
er's instructions.
Occupants, especially children, shoul dalways
sit as upright as possible ,wearthe sea tbelt
properly and us eanappropriately size dinfant
restraint, toddle rrestraint, or booster seat
recommended for the size and weigh tofthe
child.
Childre ncan be kille dorseriously injured by
an inflating ai rbag.N ote the following impor-
tant information:
R You rvehicle is equipped with ai rbag tech-
nology designe dtodeactivate the front-
passenger front ai rbag in your vehicle
whe nthe system senses the weigh tofa
typica l12-month-old chil dorlessa long
with the weigh tofastandard appropriate
chil drestraint on the front-passenger seat.
R Ac hildinar ear-facing chil drestraint on the
front-passenger sea twillbes eriously
injured or eve nkilledift he front-passenger front ai
rbag inflate sinac ollision which
could occu runder some circumstances,
eve nwitht he ai rbag technolog yinstalled in
your vehicle.
R If yo uinstall arear-facing chil drestraint on
the front-passenger seat, make sure the
00730074 indicator lamp is illuminated,
indicating that the front-passenger front air ba gisd eactivated. Should the 00730074
indicator lamp not illuminate or go ou twhile
the restraint is installed, please check
installation. Periodicall ycheck the
00730074 indicator lamp while driving to
make sure the 00730074indicator lamp is
illuminated. If the 00730074indicator lamp
goe soutor remains out, do not transpor ta
chil dont he front-passenger sea tuntilthe
system ha sbeenr epaired.
Ac hildinar ear-facing chil drestraint on the
front-passenger sea twillbes eriously
injured or eve nkilledift he front-passenger
front ai rbag inflates.
R If yo uplace achildinaf orward-facing child
restraint on the front-passenger seat:
- move the sea tasfar back as possible
- uset he proper chil drestraint recom-
mended for the age, size and weigh tof
the child
- secure chil drestraint with the vehicle's
sea tbelta ccording to the chil dseatm an-
ufacturer's instructions
R For childre nlarge rthan atypica l12-month-
old child, the front-passenger front ai rbag
may or may not be activated. G
WARNING
Infants and small childre nshoul dneve rshare
as eatb eltw itha nother occupant. In the event
of an accident, they could be crushed
between the occupant and sea tbelt.
Ac hild's ris kofseriousorfatalinjurie sissig-
nificantl yincreased if the chil drestraints are
not properly secured in the vehicle and/or the chil disn ot properly secured in the child
restraint. Child restraint systems
51Safety
Z
Page 237 of 290
X
Remove th ejackf romt heleft-han dstow-
age spac einthetrunk to allow th estowage
compartmen ttobeopened.
X Turn fastener 0044in th edirection of the
arrow.
X Ope nstowage compartment 0043.
X Remove th eTIREFI Tkit,w hee lchock ,align-
men tbolt and gloves. Flat tire
Preparing th
evehicle
Your vehicl eisequipped wit haTIREFI Tkit.
X Stop th evehicl eons olid, non-slipper yand
level ground ,asfar away as possibl efrom
traffic.
X Switc hont hehazard warnin glamps.
X Apply th eelectric parkin gbrak em anually
(Y page 133).
X Brin gthe fron twheels into th estraight-
ahead position.
X Shift th etransmission to Pwit hthe button
in th ecenter console.
X Switc hoff th eengine.
X Remove th eSmartKey from th eignition
lock.
X Allo ccupant smustg et out of th evehicle.
Mak esuret hatthe ya re no tend angered as
they do so.
X Mak esuret hatnoo neis near th edanger
area while awhee lisb eingchanged. Any-
on ew ho is no tdirectl yassistin ginthe
whee lcha ng es hould, for example, stand
behind th ebarrier.
X Get out of th evehicle. Pay attention to traf-
fic condition swhen doin gso.
X Clos ethe driver's door. TIREFIT kit
Usin gthe TIREFIT kit TIREFI
Tisat ires ealant.
You can use TIREFI Ttoseal punctures of up to
0.16 in (4 mm), particularly those in th etire
tread. You can use TIREFI Tatoutside tem-
peratures down to 00F84‡(00F820 †). G
WARNING
In th efollowin gsituations, th etires ealant is
unable to provid esufficien tbreakdown assis-
tance ,asitisu nable to seal th etirep roperly:
R there are cut sorpunctures in th etirel arger
than those mentioned above.
R thew hee lrim is damaged.
R you hav edriven at ver ylow tire pressures or
on aflat tire.
There is ariskofana ccident.
Do no tdrive th evehicle. Contac taqualified
specialist workshop. G
WARNING
The tire sealant is harmful and causes irrita-
tion .Itm ustn otcome into contact wit hyour
skin ,eyes or clothin gorbeswallowed .Donot
inhale TIREFI Tfumes. Kee ptires ealant away
from children .There is ariskofi njury.
If you come into contact wit hthe tire sealant,
observ ethe following:
R Rinse off th etires ealant from your skin
immediately wit hwater.
R If th etires ealant comes into contact with
your eyes ,immediately rinse them thor-
oughly wit hclean water.
R If tire sealant is swallowed ,immediately
rinse your mout hout thoroughl yand drink
plenty of water. Do no tind ucev omiting,
and see kmedica lattention immediately.
R Immediately chang eout of clothin gwhich
has come into contact wit htires ealant.
R If an allergic reaction occurs, see kmedical
attention immediately. Flat ti
re
235Breakdo wn assis tance Z
Page 238 of 290
X
Do not remove any foreign objects which
have penetrated the tire, e.g .screws or
nails.
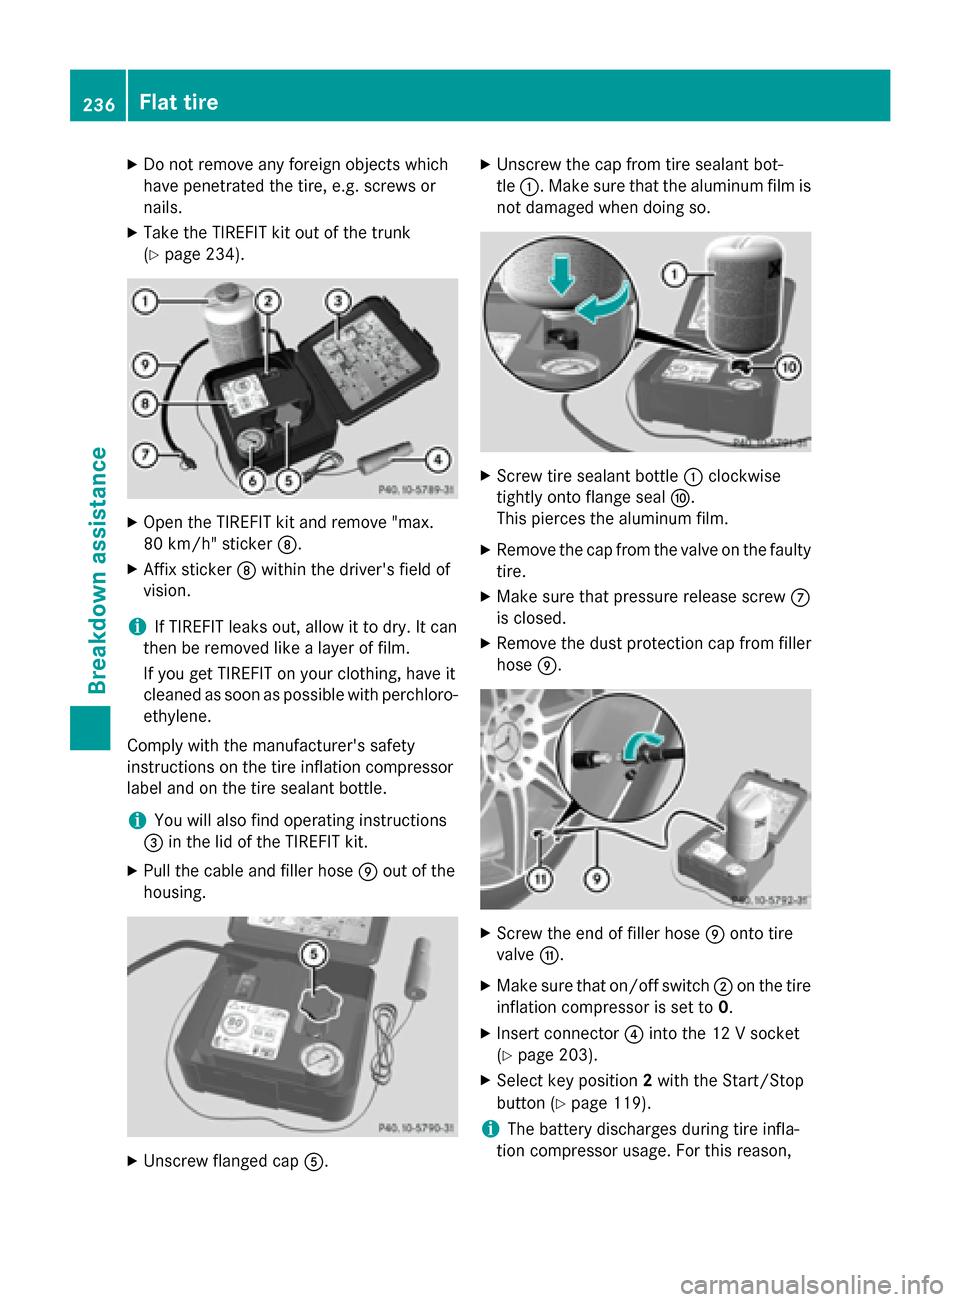
X Take the TIREFIT kit ou tofthe trunk
(Y page 234). X
Open the TIREFIT kit and remove "max.
80 km/h" sticker 006C.
X Affi xsticker 006Cwithi nthe driver's field of
vision.
i If TIREFIT leaks out, allo
wittodry.Itc an
the nberemove dlikeal ayer of film.
If yo ugetTIREFIT on your clothing, have it
cleane dassoona spossibl ewithp erchloro-
ethylene.
Compl ywitht he manufacturer's safety
instructions on the tir einflatio ncompressor
labe land on the tir esealan tbottle.
i Yo
uw illa lsof indo perating instructions
0087 in the li dofthe TIREFIT kit.
X Pull the cable and fille rhose 006Doutoft he
housing. X
Unscrew flange dcap 0083. X
Unscrew the cap fro mtires ealan tbot-
tle 0043.M akes uret hatthe aluminu mfilmis
not damage dwhend oing so. X
Scre wtires ealan tbottle 0043 clockwise
tightl yonto flange seal 006E.
This pierces the aluminu mfilm.
X Remov ethe cap fro mthe valv eonthe faulty
tire.
X Make sure tha tpressure release screw 006B
is closed.
X Remov ethe dust protection cap fro mfiller
hose 006D. X
Scre wthe end of fille rhose 006Donto tire
valve 006F.
X Make sure tha ton/off switch 0044on the tire
inflatio ncompressor is se tto0.
X Insert connector 0085into the 12 Vsocket
(Y page 203).
X Select key position 2with the Start/Stop
button (Y page 119).
i Th
eb attery discharge sdurin gtirei nfla-
tio nc ompressor usage. For thi sreason, 236
Flat tireBreakdow
nassistance
Page 239 of 290
you should start th
eengineu nless you are
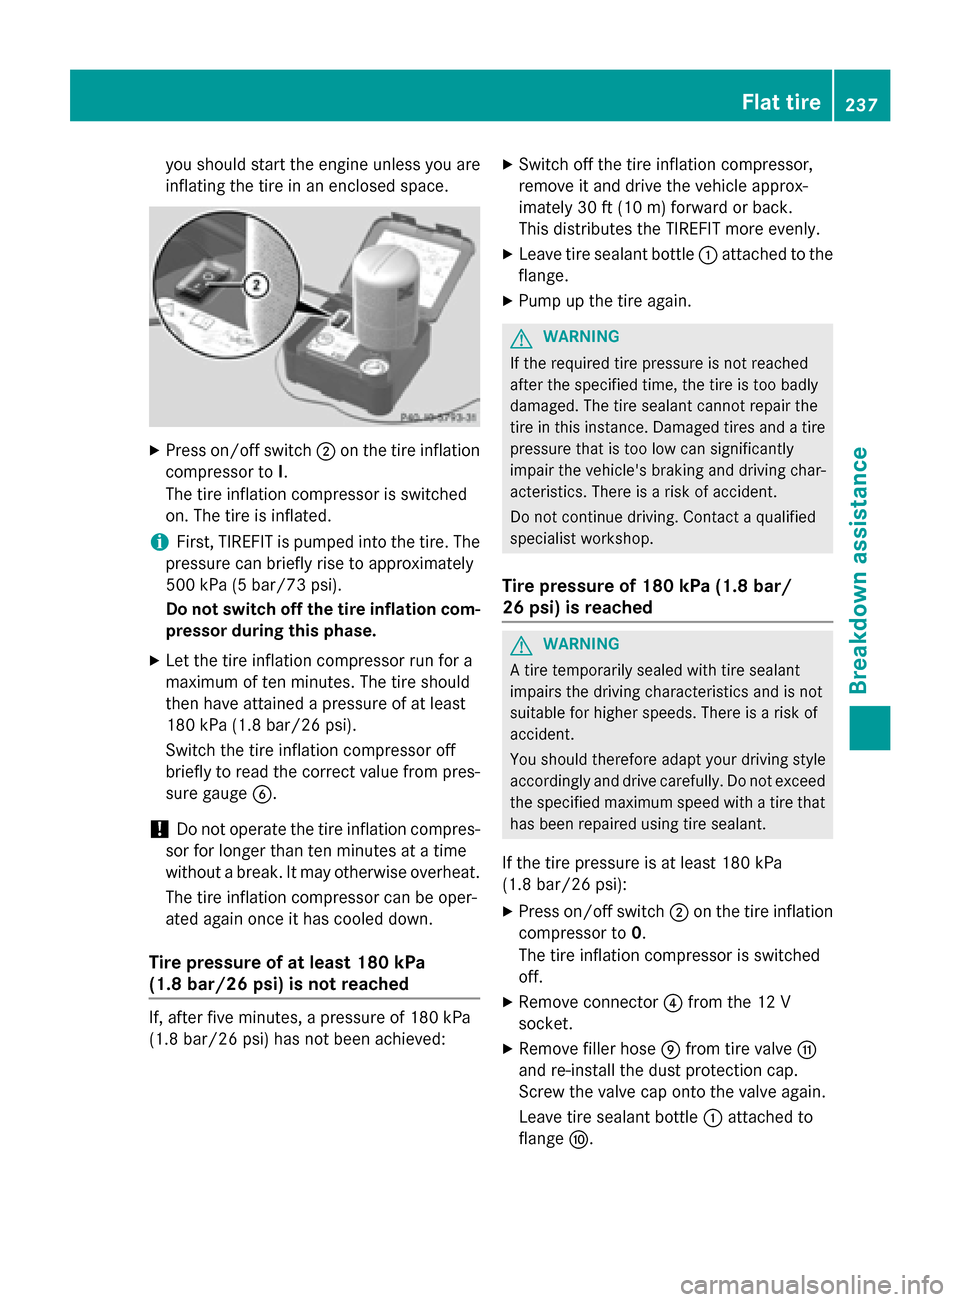
inflatin gthe tire in an enclosed space. X
Press on/off switch 0044on th etirei nflation
compressor to I.
The tire inflation compressor is switched
on .The tire is inflated.
i First
,TIREFI Tisp umped into th etire. The
pressur ecan briefl yrisetoa pproximately
50 0k Pa(5 bar/73 psi).
Do not switch off th etirei nflation com-
pressor during this phase.
X Let th etirei nflation compressor run fo ra
maximum of te nminutes. The tire should
then hav eattained apressur eofatl east
18 0k Pa (1.8 ba r/26psi).
Switch the tire inflation compressor off
briefly to read the correct value from pres- sure gauge 0084.
! Do not operate the tire inflation compres-
sor for longe rthan ten minute satatime
without abreak. It may otherwise overheat.
The tire inflation compressor can be oper-
ated again once it has coole ddown.
Tire pressure of at leas t180 kPa
(1.8 bar/2 6psi) is not reached If, after five minutes,
apressure of 180 kPa
(1.8 bar/26 psi )has not bee nachieved: X
Switch off the tire inflation compressor,
remove it and drive the vehicle approx-
imately 30 ft (10 m) forward or back.
Thi sd istributes the TIREFIT more evenly.
X Leave tire sealant bottle 0043attache dtothe
flange.
X Pump up the tire again. G
WARNING
If the required tire pressure is not reached
after the specified time, the tire is too badly
damaged. The tire sealant cannot repair the
tire in this instance. Damaged tires and atire
pressure that is too low can significantly
impair the vehicle's braking and driving char-
acteristics. There is arisk of accident.
Do not continue driving. Contact aqualified
specialist workshop.
Tire pressure of 180 kPa (1.8 bar/
26 psi) is reached G
WARNING
At ire temporarily sealed with tire sealant
impairs the driving characteristics and is not
suitabl efor higher speeds. There is arisk of
accident.
You should therefore adapt you rdriving style
accordingl yand drive carefully .Donot exceed
the specified maximu mspee dwithatire that
has bee nrepaired using tire sealant.
If the tire pressure is at least 180 kPa
(1.8 bar/26 psi): X Press on/off switch 0044on the tire inflation
compressor to 0.
The tire inflation compressor is switched
off.
X Remove connector 0085from the 12 V
socket.
X Remove filler hose 006Dfrom tire valve 006F
and re-instal lthe dus tprotectio ncap.
Screw the valve cap onto the valve again.
Leave tire sealant bottle 0043attache dto
flange 006E. Flat tire
237Breakdow nassistance Z
Page 240 of 290
X
Stow the TIREFIT kit in asafea nd accessi-
bl ep lace in the vehicle.
X Pul lawa yimmediately.
The maximum speed for atire seale dwitht ire
sealant is 50 mph (80 km/h). The uppe rpart
of the TIREFIT sticke rmustb ea ffixe dtot he
instrument cluster in the driver' sfield of
vision.
! After use, exces
sTIREFIT may run ou tof
the fille rhose. Thi scould cause stains.
X Stop afte rdriving for approximatel yten
minutes and check the tire pressure with
the tire inflation compressor.
The tire pressure mus tnow be at least
130 kPa (1.3 bar/19 psi).
i On tire
stha tare equipped with atire pres-
sure sensor (tire pressure monitor) ,the use
of sealant can lead to malfunction mes-
sages and incorrect displays. Therefore,
us ep ressure gauge 0084in the TIREFIT kit to
check and correct the tire pressure. G
WARNING
If the required tire pressure is not reached
afte rdriving for ashort period, the tire is too
badl ydam aged .The tire sealant canno trepair
the tire in this instance. Damaged tire sand a
tire pressure tha tist oo lo wcan significantly
impai rthe vehicle's braking and driving char-
acteristics. There is ariskofa ccident.
Do not continu edriving .Contact aquali fied
specialist workshop.
X Correct the tire pressure if it is stil latleast
130 kPa (1.3 bar/20 psi )(fort he values,
see the Tire and Loading Information plac-
ard on the driver' ssideB -pillar or tire pres-
sure table on the fue lfille rflap).
To increase the tire pressure: switch on
the tire inflation compressor.
To reduc ethe tire pressure: openrelease
screw 006B.
! The manufacturer doe
snot guarantee
tha talltire damag ecan be repaired using
the TIREFIT kit, particularly in the cas eofcuts and puncture
swithad iameter of more
tha nfou rm illimeters or on the sidewall. The
manufacturer is not responsible for dam-
ag ec aused by inappropriate us eofthe
TIREFIT kit.
X Drive to the neares tworksho pand have the
tire changed there.
X Hav ethe tire sealant bottl ereplaced as
soo naspossible at aquali fied specialist
workshop, e.g. at an authorized Mercedes- Benz Center. H
Environmental note
Hav ethe used tire sealant bottl edisposed of
professionally ,e.g. at an authorized
Mercedes-Benz Center.
X Hav ethe TIREFIT kit replaced every four
years at aquali fied specialist workshop,
e.g. an authorized Mercedes-Benz Center. Battery (vehicle)
Important safety notes
Specia ltool sand expert knowledge are
required when working on the battery ,e.g.
removal and installing .You shoul dtherefore
have al lworki nvolving the battery carrie dout
at aq uali fied specialist workshop. G
WARNING
Wor kcarrie doutincorrectl yonthe battery
can lead ,for example, to ashort circuit and
thu sdam aget he vehicl eelectronics. Thi scan
lead to function restrictions applying to
safety-relevant systems ,e.g. the lighting sys-
tem, ABS (anti-lock braking system) or ESP ®
(Electronic Stability Program). The operating
safety of your vehicl emay be restricted. You
could lose contro lofthe vehicle, for example:
R braking
R in the event of abrup tsteering maneuver
and/or when the vehicle's speed is not
adapted to the roa dconditions
There is ariskofana ccident. 238
Battery (vehicle)Breakdown assistance
Page 274 of 290
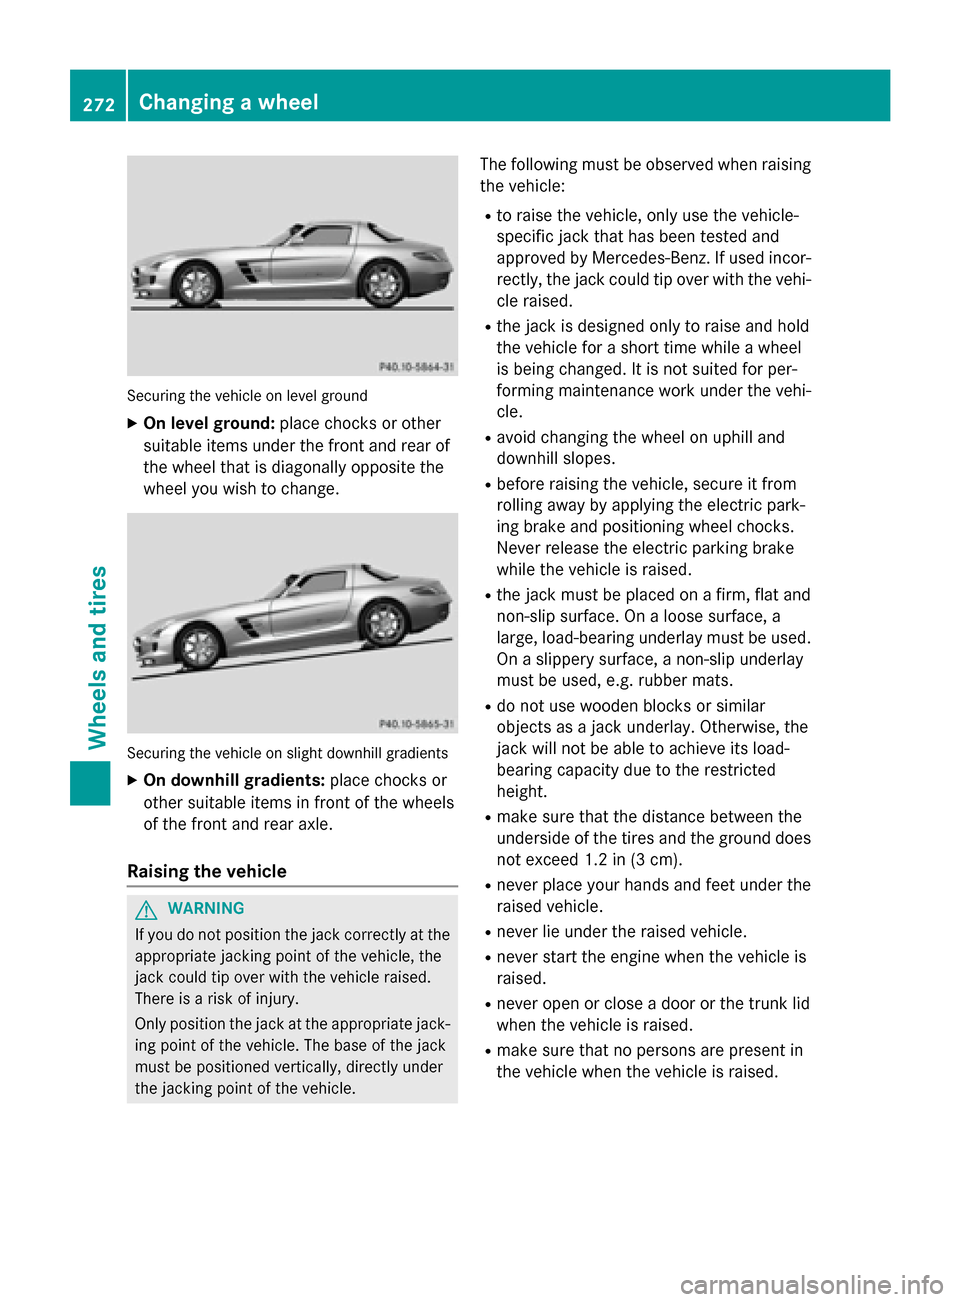
Securing the vehicle on level ground
X On level ground: place chocks or other
suitabl eitem sunder the front and rea rof
the wheel that is diagonall yopposite the
wheel yo uwishtoc hange. Securing the vehicle on slight downhil
lgradients
X On downhill gradients: place chocks or
othe rsuitabl eitem sinf ront of the wheels
of the front and rea raxle.
Raisin gthe vehicle G
WARNING
If yo udon ot position the jack correctly at the
appropriate jacking point of the vehicle ,the
jack could tip ove rwitht he vehicle raised.
There is ariskofi njury.
Only position the jack at the appropriate jack-
ing point of the vehicle .The base of the jack
mus tbep ositioned vertically ,directl yunder
the jacking point of the vehicle. The following mus
tbeo bserve dwhenr aising
the vehicle:
R to raise the vehicle ,only us ethe vehicle-
specifi cjack that ha sbeent ested and
approved by Mercedes-Benz. If used incor-
rectly, the jack could tip ove rwitht he vehi-
cle raised.
R the jack is designe donly to raise and hold
the vehicle for ashort time whil eawheel
is being changed .Itisnot suited for per-
forming maintenance work under the vehi-
cle.
R avoid changing the wheel on uphil land
downhil lslopes.
R before raising the vehicle ,secure it from
rolling away by applying the electri cpark-
ing brake and positioning wheel chocks.
Neve rrelease the electri cparking brake
whil ethe vehicle is raised.
R the jack mus tbep lace donaf irm,flata nd
non-slip surface. On aloose surface, a
large ,load-bearing underlay mus tbeu sed.
On aslippery surface, anon-slip underlay
mus tbeu sed, e.g. rubber mats.
R do not us ewoodenb locks or similar
objects as ajack underlay .Otherwise, the
jack will not be able to achieve its load-
bearing capacity du etothe restricted
height.
R make sure that the distance between the
underside of the tire sand the ground does
not excee d1.2 in (3 cm).
R never place your hands and fee tunder the
raised vehicle.
R never li eunder the raised vehicle.
R never star tthe engine when the vehicle is
raised.
R never ope norclosead oorort he trunk lid
when the vehicle is raised.
R make sure that no persons are present in
the vehicle when the vehicle is raised. 272
Changing
awheelWheels and tires
Page 277 of 290
X
Tighten the wheel bolts until they are fin-
ger-tight.
X Unscrew the alignment bolt.
X Tighten the last wheel bolt until it is finger-
tight.
Lowering the vehicle G
WARNING
The wheels could work loose if the wheel nuts and bolts are not tightened to the specified
tightening torque. There is arisk of accident.
Have the tightening torque immediately
checked at aqualified specialist workshop
after awheel is changed.
X Turn the crank of the jack counter-clock-
wise until the vehicle is once again standing
firmly on the ground.
X Place the jack to one side. X
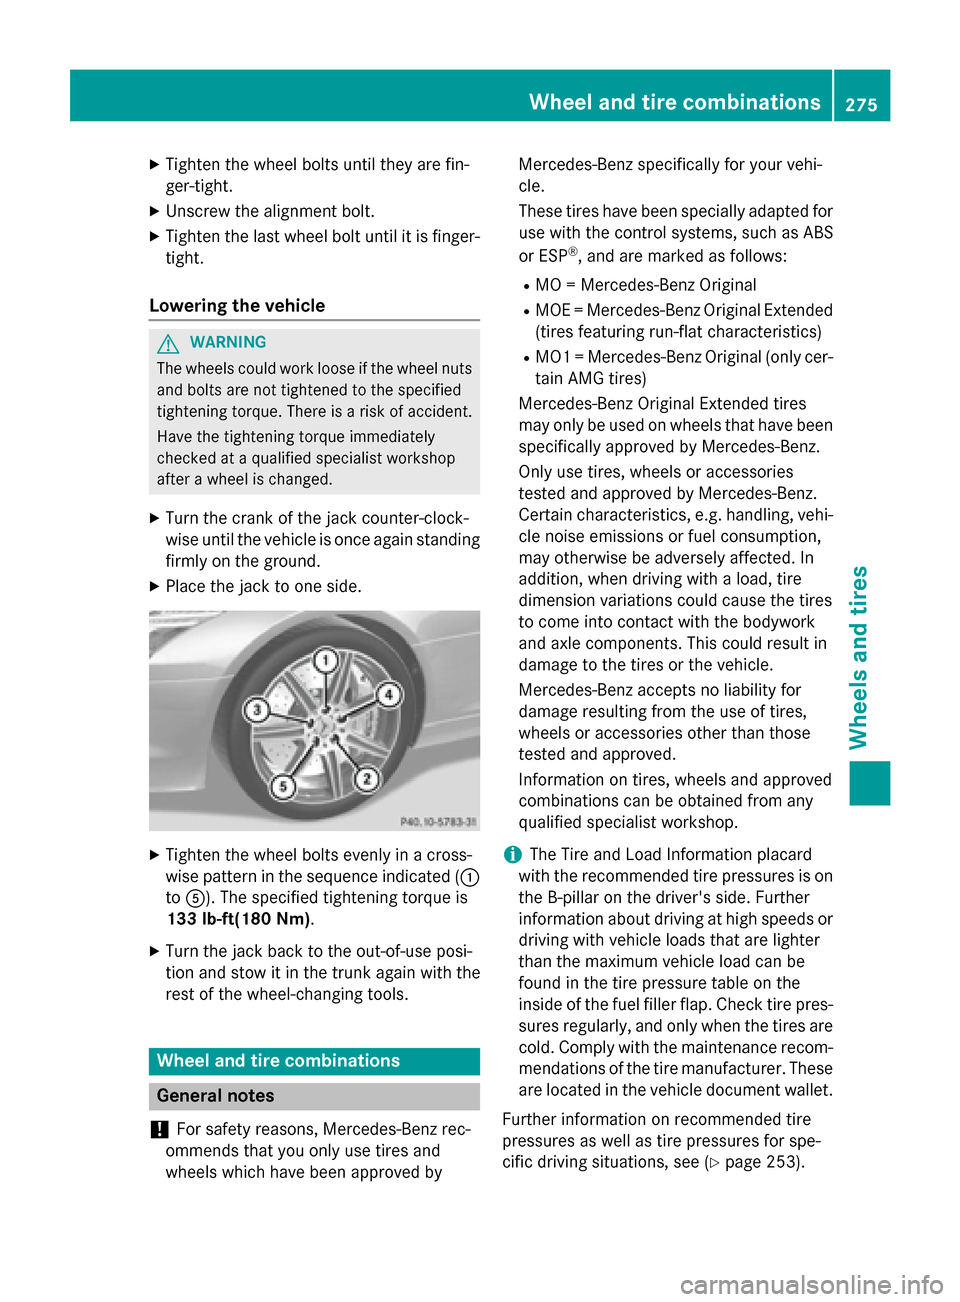
Tighten the wheel bolts evenly in across-
wise pattern in the sequence indicated ( 0043
to 0083). The specified tightening torque is
133 lb-ft(180 Nm).
X Turn the jack back to the out-of-use posi-
tion and stow it in the trunk again with the
rest of the wheel-changin gtools. Wheel and tire combinations
General notes
! For safety reasons, Mercedes-Benz rec-
ommends that you only use tires and
wheels which have been approved by Mercedes-Benz specifically for your vehi-
cle.
These tires have been specially adapted for
use with the control systems, such as ABS
or ESP ®
,a nd are marked as follows:
R MO =Mercedes-Benz Original
R MOE =Mercedes-Benz Original Extended
(tires featuring run-flat characteristics)
R MO1 =Mercedes-Benz Original (only cer-
tain AMG tires)
Mercedes-Benz Original Extended tires
may only be used on wheels that have been
specifically approved by Mercedes-Benz.
Only use tires, wheels or accessories
tested and approved by Mercedes-Benz.
Certain characteristics, e.g. handling, vehi-
cle noise emissions or fuel consumption,
may otherwise be adversely affected. In
addition, when driving with aload, tire
dimension variations could cause the tires
to come into contact with the bodywork
and axle components. This could result in
damage to the tires or the vehicle.
Mercedes-Benz accepts no liability for
damage resulting from the use of tires,
wheels or accessories other than those
tested and approved.
Information on tires, wheels and approved
combinations can be obtained from any
qualified specialist workshop.
i The Tire and Load Information placard
with the recommended tire pressures is on the B-pillar on the driver's side. Further
information about driving at high speeds or driving with vehicle loads that are lighter
than the maximum vehicle load can be
found in the tire pressure table on the
inside of the fuel filler flap. Check tire pres- sures regularly, and only when the tires arecold. Comply with the maintenance recom-
mendation softhe tire manufacturer. These
are located in the vehicle document wallet.
Further information on recommended tire
pressures as well as tire pressures for spe-
cific driving situations, see (Y page 253). Wheel and tirec
ombinations
275Wheels and tires Z