towing MERCEDES-BENZ SLS AMG GT ROADSTER 2015 C197 Owner's Manual
[x] Cancel search | Manufacturer: MERCEDES-BENZ, Model Year: 2015, Model line: SLS AMG GT ROADSTER, Model: MERCEDES-BENZ SLS AMG GT ROADSTER 2015 C197Pages: 290, PDF Size: 6.24 MB
Page 7 of 290
Important safety notes .................. 238
Jump starting .................................2
42
Belt
see Seat belts
Blin dSpot Assist
Activating/deactivating ................. 157
Display message ............................ 181
Notes/function .............................. 145
Brake Assist
see BAS (Brake Assist System)
Brake fluid
Display message ............................ 169
Notes ............................................. 285
Brake lamps (display message) ....... 174
Brakes ABS ................................................. .54
BAS .................................................. 55
Brake fluid (notes) ......................... 285
Displa ymessag e............................ 165
Displa ymessages .......................... 165
High-performance brake system .... 137
Important safety notes .................. 135
Maintenance .................................. 136
Riding tip s...................................... 135
Warning lamp ........................ 190 ,192
Breakdown
see Fla ttire
see Towing away/tow-starting
Bulbs
see Replacing bulbs C
California Important notice for retail cus-
tomers and lessees .......................... 20
Calling up amalfunction
see Displa ymessages
Capacities
see Technica ldata
Car
see Vehicle
Care
Carw ash. ....................................... 223
Displa y........................................... 229
Exhaus tpipe. ................................. 229
Exterior lights ................................ 228
Gear or selector lever .................... 229 Matte finish ................................... 226
Note
s............................................. 223
Paint .............................................. 225
Plastic trim .................................... 229
Power washe r................................ 225
Rear vie wcamera .......................... 228
Sea tbelt. ....................................... 230
Sea tcove r..................................... 230
Sensors ......................................... 228
Soft top .......................................... 227
Steering whee l............................... 229
Tri mp iece s.................................... 230
Washing by hand ........................... 225
Wheel s........................................... 225
Window s........................................ 227
Wipe rblade s.................................. 227
Woode ntrim .................................. 230
Car was h(care) ................................. 223
CD player/CD changer (on-board
computer) .......................................... 155
Cente rconsole
Lower section .................................. 31
Upper section .................................. 30
Central locking
Automati cloc king (on-board com-
puter) ............................................. 159
Locking/unlocking (SmartKey )........ 62
Changin gbulbs
License plate lighting ..................... 101
Charge maintenanc esocket ............ 214
Children In the vehicl e................................... 51
Restraint systems ............................ 51
Child seat
Specia lsea tb eltr etractor ............... 53
Top Tether ....................................... 53
Cigarette lighter ................................ 203
Climate control Automati cclimate control (dual-
zone) .............................................. 107
Controlling automaticall y............... 110
Cooling with ai rdehumidifica tion .. 108
Defrosting the window s................. 112
Defrosting the windshield .............. 111
Important safety notes .................. 106
Indicato rlam p................................ 110
Maximu mcooling .......................... 111 Index
5
Page 17 of 290
DOT (Department of Transporta-
tion) (definition) ............................. 268
GAW
R(GrossA xle Weight Rating)
(definition) .................................... .268
GVW (Gross Vehicle Weight) (def-
inition) .......................................... .268
GVW R(Gross Vehicle Weight Rat-
ing) (definition) .............................. 269
Important safety notes .................. 250
Increase dvehicle weight due to
optional equipment (definition) ...... 268
Kilopascal (kPa )(definition) ........... 269
Labeling (overview )........................ 264
Loa dbearing index (definition) ...... 270
Loa dindex ..................................... 266
Loa dindex (definition) ................... 269
Maximu mloaded vehicleweight
(definition) ..................................... 269
Maximu mloadona tire (definition) .. 269
Maximu mpermissibl etire pres-
sure (definition) ............................. 269
Maximu mtire load ......................... 267
Maximu mtire load (definition) ....... 269
Optiona lequipment weight (defi-
nition) ............................................ 269
PSI (pounds pe rsquare inch )(de f-
inition) ........................................... 269
Replacing ....................................... 270
Service life ..................................... 252
Sidewal l(de finition) ....................... 269
Speed rating (definition) ................ 268
Storing ........................................... 271
Structure and characteristics
(definition) ..................................... 268
Technica ldata. .............................. 277
Temperature .................................. 264
TIN (Tire Identification Number)
(definition) ..................................... 270
Tire bead (definition) ...................... 269
Tire pressure (definition) ................ 269
Tire pressures (recommended )...... 268
Tire size (data )............................... 275
Tire size designation, load-bearing capacity, speed rating .................... 264
Tire trea d....................................... 251
Tire trea d(definition) ..................... 269
Tota lloa dlim it (definition) ............. 270
Tractio n......................................... 263 Tractio
n(definition) ....................... 270
Tread wear ..................................... 263
Uniform Tire Quality Grading
Standard s...................................... 263
Uniform Tire Quality Grading
Standard s(de finition) .................... 268
Wea rindicator (definition) ............. 270
Wheel rim (definition) .................... 268
see Fla ttire
Top Tether ............................................ 53
Tow-away alarm .................................. 59
Towing Important safety guideline s........... 244
Installing the towing ey e................ 245
Removing the towing ey e............... 245
With the rea raxler aised ................ 245
Towin gaway
With both axles on the ground ....... 246
Transmission
Driving tip s.................................... 124
Selector lever ................................ 121
Shift rang e..................................... 127
Transmissio nposition display ......... 123
Transmissio npositions .................... 123
Transporting the vehicle .................. 246
Trim piece s(clea ning instructions) .. 230
Trip computer (on-board computer) .. 153
Trip odometer Calling up ....................................... 152
Trunk
Emergency release .......................... 74
Important safety guideline s............. 72
Locking separatel y........................... 74
Opening (automatically from
inside ).............................................. 73
Trunk lid
Displa ymessage ............................ 184
Opening/closing ........................ 72, 73
Opening dimensions ...................... 286
Trunk load (maximum) ...................... 286
see Technical data
Turn signal (display message) ......... 174
Turn signals Switching on/of f.............................. 98
Type identificatio nplate
see Vehicl eide ntification plate Index
15
Page 18 of 290
U
Unlocking Emergenc yunlocking .......................70
From inside the vehicle (central
unlocking button) ............................. 70
Upshift indicator ............................... 128V
Vanity mirror (i nthe sun visor) ........ 202
Vehicle Correct us e...................................... 23
Displa ymessag e............................ 184
Equipment ....................................... 19
Individua lsettings .......................... 157
Limite dWarranty ............................. 24
Loading .......................................... 260
Locking (i nanemergency) ............... 71
Locking (SmartKey ).......................... 62
Lowering ........................................ 275
Maintenance .................................... 20
Parking for alon gp eriod. ............... 134
Pulling away ................................... 120
Raising ........................................... 272
Reporting problems ......................... 23
Towing away .................................. 244
Transporting .................................. 246
Unlocking (i nanemergency) ........... 70
Unlocking (SmartKey )................ 62, 68
Vehicl edata. .................................. 286
Vehicl edata ....................................... 286
see Technica ldata
Vehicl edimensions ........................... 286
see Technica ldata
Vehicl eemergenc yloc king ................ 71
Vehicl eidentificatio nnumber
see VIN
Vehicl eidentificatio nplate .............. 280
Vehicl etoolkit.................................. 234
Vehicl eweigh ts
see Technica ldata
Vide o(DV D)........................................ 155
VIN ...................................................... 280 W
Warning and indicator lamps ABS ................................................ 192
Brakes ................................... 190 ,192
Check Engine ................................. 195
Cruise control ................................ 139
ESP ®
.............................................. 193
Fue ltank ........................................ 196
Overview .......................................... 28
PASSENGER AIR BAG OFF indica-
tor lamp ........................................... 42
Reserve fue l................................... 196
Sea tbelt. ....................................... 191
SPOR Thandling mod e................... 193
SRS ................................................ 194
Tire pressure monitor .................... 197
Warranty ...................................... 19, 280
Washer fluid see Windshield washe rsystem
Washer fluid (display message) ....... 185
Weight see Technical data
Wheel bolt tightenin gtorque ........... 275
Wheel chock ...................................... 271
Wheels Checking ........................................ 251
Cleaning ......................................... 225
Important safety notes .................. 250
Interchanging/changing ................ 270
Mounting anew whee l................... 274
Mounting awheel .......................... 271
Removing awheel .......................... 273
Storing ........................................... 271
Tightening torque ........................... 275
Wheel size/tire size ....................... 275
Windows
see Sid ewindows
Win dscreen ......................................... 80
Windshiel dwasher system .............. 221
Filling capacity ............................... 286
Note s............................................. 286
Windshiel dwipers
Problem (malfunction) ................... 103
Replacing the wipe rblade s............ 102
Switching on/of f........................... 101 16
Index
Page 235 of 290
Useful information
............................234
Wher ewillIfind...? ........................... 234
Flat tire .............................................. 235
Batter y(vehicle) ................................ 238
Jump-starting .................................... 242
Towing and tow-starting ..................244
Fuses .................................................. 246 233Breakdown assistance
Page 236 of 290
Useful information
i This Operator's Manual describes all
models and all standard and optional equip- ment of your vehicle available at the time of
publication of the Operator's Manual.
Country-specific differences are possible.
Please not ethat your vehicle may not be
equipped with all feature sdescribed. This
also applies to safety-related system sand
functions.
i Please read the information on qualified
specialist workshops (Y page 23).Wher
ewillIfind...? First-aid kit
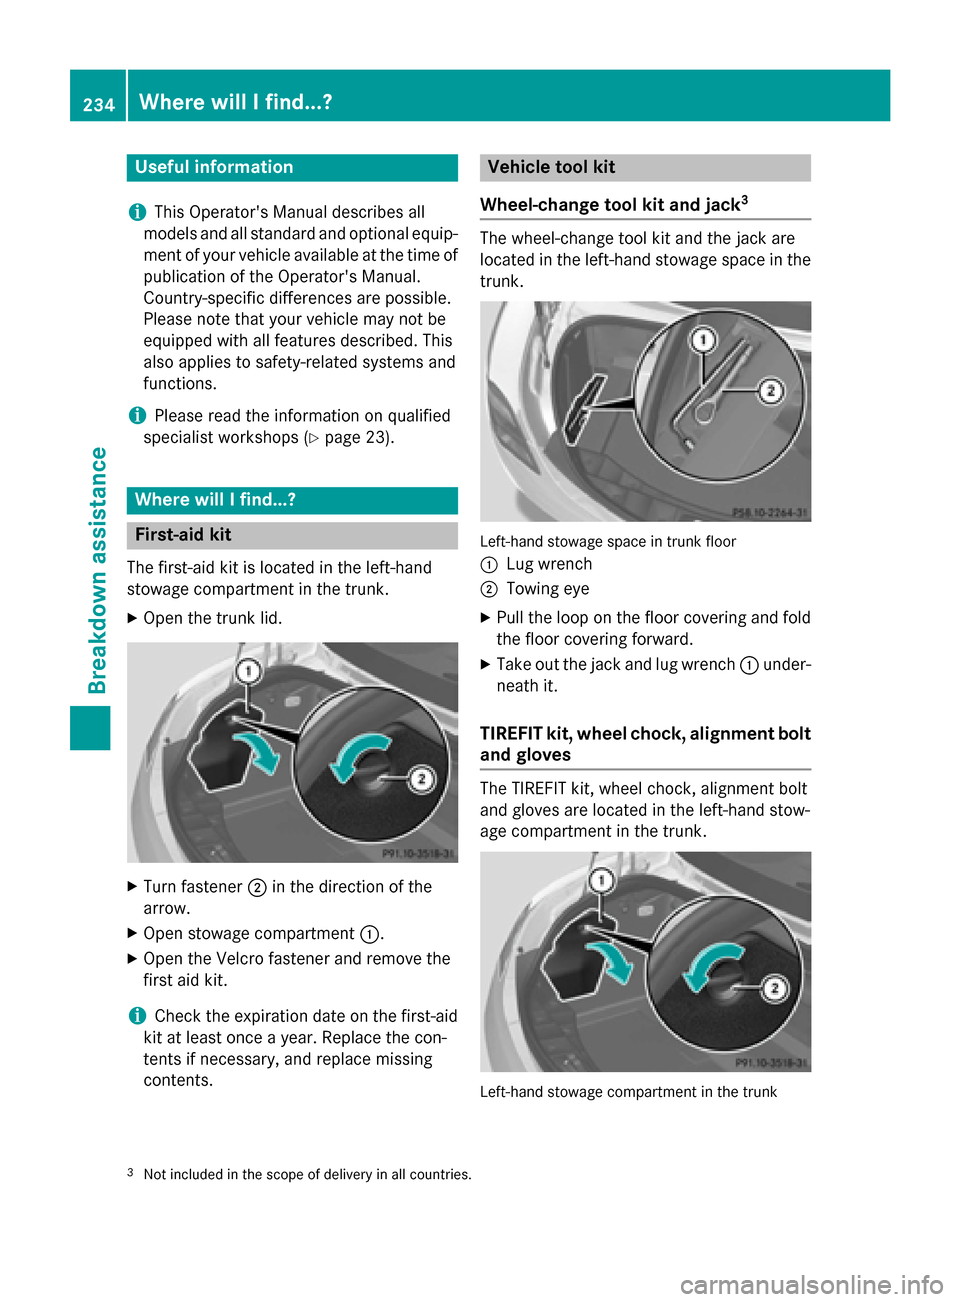
The first-aid kit is locate dinthe left-hand
stowage compartment in the trunk.
X Open the trun klid. X
Turn fastener 0044in the direction of the
arrow.
X Open stowage compartment 0043.
X Open the Velcr ofastener and remov ethe
first aid kit.
i Check the expiration date on the first-aid
kit at least onc eayear. Replace the con-
tents if necessary, and replace missing
contents. Vehicle tool kit
Wheel-change tool kit and jack 3 The wheel-change tool kit and the jack are
locate
dinthe left-hand stowage space in the
trunk. Left-han
dstowage space in trun kfloor
0043 Lug wrench
0044 Towing eye
X Pull the loop on the floor covering and fold
the floor covering forward.
X Take out the jack and lug wrench 0043under-
neat hit.
TIREFIT kit, wheel chock, alignment bolt
and gloves The TIREFIT kit
,wheel chock, alignmen tbolt
and gloves are locate dinthe left-hand stow-
age compartment in the trunk. Left-han
dstowage compartmen tinthe trunk
3 Not included in the scope of delivery in all countries. 234
Wher
ewillIfind...?Breakdown assistance
Page 246 of 290
X
First, remove the jumper cable sfrom earth point 0085and negative terminal 0087,then from
positiv eclamp 0043and positiv eterminal 0044.Each time beginning with your vehicle' sbattery.
X Slide cover 0083of the positiv eterminal in the opposite directio ntothe arrow.
X Have the battery checke dataqualified specialist workshop.
i Jump-starting is not considered to be
anorma loperating condition.
i Jumpe
rcable sand further information regarding jump-starting can be obtained at any
qualified specialist workshop. Towing and tow-starting
Important safety notes
G
WARNING
The rea raxlel ocks when:
R the engine is not running
R the engine stalls while the vehicle is being
towed
R there is amalfunction in the power supply
or the vehicle' selectrica lsystem
There is ariskofana ccident.
In the event of abreakdown, yo ushould
always hav ethe vehicle transported. G
WARNING
If the brake system or power steering is mal-
functioning and your vehicle is then towed
away ,significantly more effort may be
required to stee rand brake than is normally
required .There is ariskofana ccident.
In such cases, use atow bar. Befor etowing,
make sur ethat the steering move sfreely. G
WARNING
If the weigh tofthe vehicle to be towe dortow-
starte disgreater than the permissible gross
weigh tofyourv ehicle:
R the towing ey ecould detach itself
R the vehicle/trailer combinatio ncould roll-
over.
There is ariskofana ccident.
Whe ntowing or tow-starting another vehicle,
its weigh tshoul dnot be greater than the per-
missible gros sweigh tofy ourv ehicle. !
Use the SmartKe
yinstead of the Start/
Stop button whe ntowing the vehicle.
Start the engine and keep it running. Turn
the SmartKe ytoposition 2in the ignition.
Set the transmission to Nusing the E-
SELECT lever. Make sure that yo uthen
leave the SmartKe yinposition 2.
Check the transmission positio ninthe
instrument cluster.
! Make sure that the electric parking brake
is released .Ifthe electric parking brake is
faulty ,visit aquali fied specialist workshop.
Mercedes-Benz recommends that yo uuse
an authorized Mercedes-Benz Center for
this purpose.
! Whe
ntowing, pull away slowl yand
smoothly .Ifthe tractive power is too high,
the vehicles could be damaged.
! Only secure the tow rope or tow ba
ratthe
towing eyes. Otherwise, the vehicle could
be damaged.
! Do not us
ethe towing eyes for recovery
purposes as this could damag ethe vehicle.
If in doubt, recover the vehicle with acrane.
! The vehicle can be towe
damaximum of
30 miles (50km). The towing speed of
30 mph (50 km/h )mustn ot be exceeded.
If the vehicle ha stobetowedmore than
30 miles (50km), the entire vehicle mus tbe
raised and transported.
! Do not tow with sling-typ
eequipment.
Thi scould damag ethe vehicle. 244
Towinga
nd tow-startingBreakdow nassistance
Page 247 of 290
!
Tow-starting the vehicle is not permitted.
The transmission may otherwise be dam-
aged.
If the vehicle can no longer be driven because of an accident or breakdown, you have the
following options:
R transportingt he vehicle
As arule, you should have the vehicle trans-
ported.
R towing the vehicle with the rear axle raised
Only tow the vehicle with the rear axle
raised in exceptional cases.
R towing the vehicle with atow rope or tow
bar
Only tow the vehicle in exceptional cases.
The engine must be running if you tow the
vehicle with atow rope or tow bar. Observe
the following notes.
Also observe the following notes:
R If the engine does not start, try jump-start-
ing it (Y page 242). Tow-starting the vehicle
is not permitted.
R If it is not possibletoj ump-start the vehicle,
have it transported to the nearest qualified specialist workshop, e.g. an authorized
Mercedes-Benz Center.
R If the vehicle has transmission damage,
have it transported to aqualified specialist
workshop. Observe the displaym essages
in the instrument cluster. Installing/removing the towing eye
Installingt he towing eye X
Take the towing eye and the wheel wrench 4
out of the wheel-change tool kit
(Y page 234).
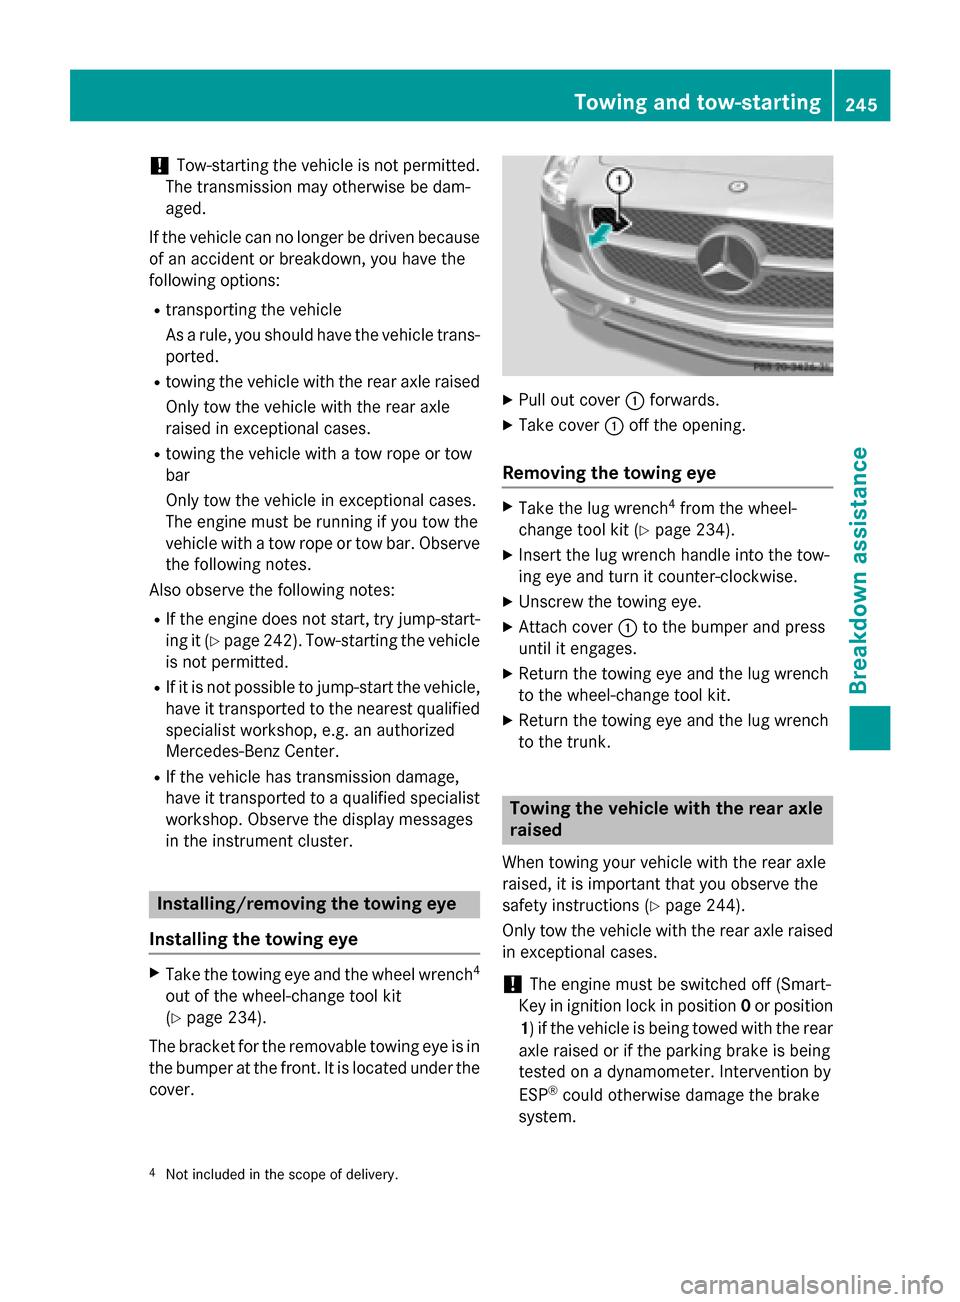
The bracket for the removable towing eye is in
the bumper at the front.Itisl ocated under the
cover. X
Pull out cover 0043forwards.
X Take cover 0043off the opening.
Removing the towing eye X
Take the lug wrench 4
from the wheel-
change tool kit (Y page 234).
X Insert the lug wrench handle into the tow-
ing eye and turn it counter-clockwise.
X Unscrew the towing eye.
X Attach cover 0043to the bumper and press
until it engages.
X Return the towing eye and the lug wrench
to the wheel-change tool kit.
X Return the towing eye and the lug wrench
to the trunk. Towing the vehiclew
ith the rear axle
raised
When towing your vehicle with the rear axle
raised, it is important that you observe the
safety instructions (Y page 244).
Only tow the vehicle with the rear axle raised in exceptional cases.
! The engine must be switched off (Smart-
Key in ignition lock in position 0or position
1)ift he vehicle is being towed with the rear
axle raised or if the parking brake is being
tested on adynamometer. Intervention by
ESP ®
could otherwise damage the brake
system.
4 Not included in the scope of delivery. Towing and tow-starting
245Breakdown assistance Z
Page 248 of 290
X
Switch on the hazard warning lamps
(Y page 98).
X Make sure tha tthe SmartKey is in position
2 in the ignition and tha tthe engine is run-
ning throughout the towing procedure.
X Mov ethe transmissio ntoNwith the E-
SELECT lever. Check the transmissio nposi-
tion in the instrument cluster. Towin
gavehicle with both axles on
the ground
It is important tha tyou observe the safety
instructions when towing away your vehicle
(Y page 244).
X Switch on the hazard warning lamps
(Y page 98).
i Whe
ntowing with the hazard warning
flashers switche don, us ethe combination
switch as usua ltosignal in which direction
yo ua re changing. In this case, onl ythe
indicator lamps for the direction of travel
flash. Whe nyou reset the combination
switch, the hazard warning flashers start
flashing again.
X Insert the SmartKey into the ignition lock
(Y page 119).
X Start the engine and leave the SmartKey in
the ignition.
X Mov ethe transmissio ntoNwith the E-
SELECT lever.
X Check the transmissio nposition in the
instrument cluster display (Y page 123).
X Leave the engine running throughout the
entir etowing procedure Transporting the vehicle
The towing ey ecan be used to pull the vehicle
onto atraile rort ransporter for transporting
purposes.
! Yo
um ay onl ysecure the vehicl ebythe
wheels, not by parts of the vehicl esuchas axl
eors teering components .Otherwise,
the vehicl ecould be damaged.
X Start the engine.
X Make sure tha tthe SmartKey is in position
2 in the ignition and tha tthe engine is run-
ning during the entir eloadin goperation.
X Mov ethe transmissio ntoNwith the E-
SELECT lever. Check the transmissio nposi-
tion in the instrument cluster.
As soon as the vehicle has been loaded: X Prevent the vehicl efrom rolling away by
applying the electri cparking brake.
X Shift the transmissio ntoPwith the button
in the center console.
X Turn the SmartKey to position 0in the igni-
tion lock and remove the SmartKey from
the ignition lock.
X Secure the vehicle. Fuses
Important safety notes
G
WARNING
If yo umanipulate or bridge afaulty fus eorif
yo ur eplace it with afusew ithah ighe ramper-
age, the electri ccable scould be overloaded.
Thi scould resul tinafire. There is ariskofan
accident and injury.
Alway sreplace faulty fuses with the specified
new fuses having the correct amperage.
! Only us
efuses tha thaveb eena pproved
for Mercedes-Benz vehicles and which
have the correct fus erating for the system
concerned. Otherwise, components or sys-
tems could be damaged.
The fuses in your vehicl eserve to close down
faulty circuits. If afuseb lows ,allthe compo-
nents on the circuit and thei rfunctions stop
operating.
Blown fuses mus tbereplaced with fuses of
the same rating, which yo ucan recognize by 246
FusesBreakdown assistance