ECU MERCEDES-BENZ SLS COUPE 2010 Owners Manual
[x] Cancel search | Manufacturer: MERCEDES-BENZ, Model Year: 2010, Model line: SLS COUPE, Model: MERCEDES-BENZ SLS COUPE 2010Pages: 361, PDF Size: 6.32 MB
Page 40 of 361
gered replaced at a qualified specialist work-
shop.
Comply with safety regulations when dispos-
ing of belt tensioners. Any Mercedes-Benz
Service Centre can provide details of these
regulations.
Airbags Airbag deployment slows down and restricts
the movement of the vehicle occupant.
If the airbags are deployed
,you will hear a
bang and a small amount of powder may also
be released. Only in rare cases will the bang
affect your hearing. The powder that is
released generally does not constitute a
health hazard. The 0018SRS warning lamp
lights up.
The SRS/AIRBAG symbol indicates the loca-
tion of the airbags. G
Risk of injury
Airbags provide additional protection; they
are not, however, a substitute for seat belts.
Observe the following notes to reduce the risk
of serious or even fatal injury caused by airbag
deployment:
R All vehicle occupants –inparticular, preg-
nant women – must wear their seat belt
correctly at all times and lean back against
the backrest, which should be positioned
as close to the vertical as possible.
R Always secure childre nless than 1.50mt all
and unde r12years of age in suitable child
restraint systems.
R All vehicle occupants must select a seat
position that is as far away from the airbag
as possible. The driver's seat position must
allow the vehicle to be driven safely. The
driver's chest should be as far away from
the centre of the driver's fron tairbag cover
as possible.
R Move the front-passenge rseat as far back
as possible. This is especially important if a
child is secured in a child restraint system
on this seat. R
Vehicle occupants –inparticular childre n–
must not lean their head in the area of the
window where the windowbag is deployed
R Rearward-facing child restraint systems
must not be fitted to the front-passenger
seat unless the front-passenger front air-
bag has been disabled .The front-passenger
front airbag is disabled if a child restraint
system with automatic child seat recogni-
tion is fitted to the front-passenger seat.
The 000A PASSENGER AIRBAG OFF indica-
tor lamp must be continuously lit. In order
for the automatic child seat recognition to
function, a Mercedes-Ben zapproved child
seat with transponder is required.
If you secure a forward-facing child
restraint system to the front-passenger
seat, you must move the front-passenger
seat as far back as possible.
R Make sure there are no heavy or sharp-
edged objects in pockets of clothing.
R Do not lean forwards, e.g. over the cover of
the driver's/front-passenger front airbag,
particularly when the vehicle is in motion.
R Do not put your feet on the dashboard.
R Only hold the steering wheel by the rim.
This allows the airbag to deploy fully. You
could be injured if the airbag is deployed
and you are holding the inside of the steer-
ing wheel.
R Do not lean on the doors from inside the
vehicle.
R Make sure that there are no people, ani-
mals or objects between the vehicle occu-
pants and the area of deployment of the
airbag.
R Do not place any objects between the seat
backrest and the door.
R Do not hang any hard objects, for example,
coat hangers, on the coat hooks.
R Do not attach accessories, e.g. cup holders,
to the doors.
It is not possible to rule out a risk of injuries
caused by an airbag due to the high speed at
which the airbag must deploy. Occupant safety
37Safety
BA 197 ECE RE 2010/6a; 1; 2, en-GB
sabbaeu Version: 3.0.3.6 2010-05-07T14:19:43+02:00 - Seite 37 Z
Page 43 of 361
They are deployed:
R
on the side on which an impact occurs
R at the start of an accident with a high rate
of lateral vehicle deceleration or accelera-
tion, e.g. in a side impact
R independently of seat belt use
R independently of the fronta irbags
R independently of the belt tensioners
R on the front-passenger side if the seat
occupancy recognition detects that the
front-passenger seat is occupied
Headbags
The purpose of the headbags is to enhance
the level of protection for the head (but not
the ches torarms) of the vehicle occupants
on the side of the vehicle on which the impact
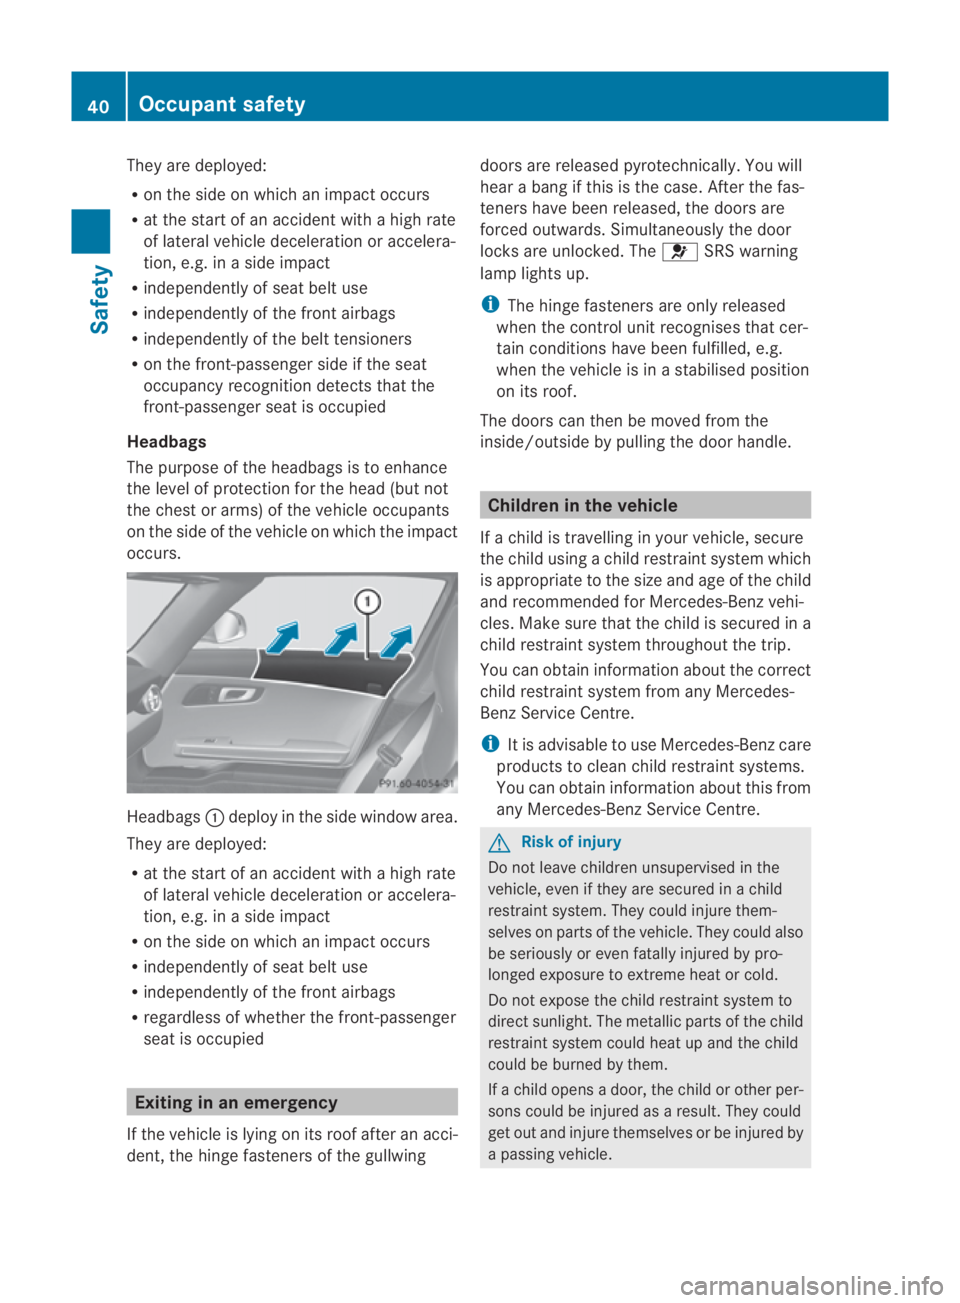
occurs. Headbags
0001deploy in the side windo warea.
They are deployed:
R at the start of an accident with a high rate
of lateral vehicle deceleratio noraccelera-
tion, e.g. in a side impact
R on the side on which an impact occurs
R independently of sea tbelt use
R independently of the fron tairbags
R regardless of whether the front-passenger
seat is occupied Exiting in an emergency
If the vehicle is lying on its roof after an acci-
dent, the hinge fasteners of the gullwing doors are released pyrotechnically. You will
hear a bang if this is the case. After the fas-
teners have been released, the doors are
forced outwards. Simultaneously the door
locks are unlocked. The
0018SRS warning
lamp lights up.
i The hinge fasteners are only released
when the control unit recognises that cer-
tain conditions have been fulfilled, e.g.
when the vehicle is in a stabilised position
on its roof.
The doors can then be moved from the
inside/outside by pulling the door handle. Children in the vehicle
If a child is travelling in your vehicle, secure
the child using a child restraint system which
is appropriate to the size and age of the child
and recommended for Mercedes-Ben zvehi-
cles. Make sure that the child is secured in a
child restraint system throughout the trip.
You can obtain information about the correct
child restraint system from any Mercedes-
Benz Service Centre.
i It is advisable to use Mercedes-Benzc are
products to clean child restraint systems.
You can obtain informatio nabout this from
any Mercedes-Benz Service Centre. G
Risk of injury
Do not leave children unsupervised in the
vehicle, even if they are secured in a child
restraint system. They could injure them-
selves on parts of the vehicle. They could also
be seriously or even fatally injured by pro-
longed exposure to extreme heat or cold.
Do not expose the child restraint system to
direct sunlight .The metallic parts of the child
restraint system could heat up and the child
could be burned by them.
If a child opens a door, the child or other per-
sons could be injured as a result. They could
get out and injure themselves or be injured by
a passing vehicle. 40
Occupant safetySafety
BA 197 ECE RE 2010/6a; 1; 2, en-GB
sabbaeu
Version: 3.0.3.6 2010-05-07T14:19:43+02:00 - Seite 40
Page 44 of 361
G
Risk of injury
An unsecured or an incorrectly positioned
load increases the ris kofinjury for the child
and all othe roccupants, during:
R an accident
R a braking manoeuvre
R a sudde nchange of direction
Do not carry heavy or hard objects inside the
vehicle unless they are secured. You will find
further information in the index under "Prac-
tical tips".
Child restraint systems Mercedes-Ben
zrecommends that you only
use the child restraint systems listed at
(Y page 45). G
Risk of injury
To reduce the risk of serious or even fatal
injury to the child in the event of a sudden
change in direction, braking or an accident:
R children less than 1.50 m tall and under
twelve years of age must always be secured
in special child restraint systems on a suit-
able vehicle seat. This is necessary
because the seat belts are not designed for
children of this size.
R if you secure a forward-facing child
restraint system without automatic child
seat recognition to the front-passenger
seat, you must move the front-passenger
seat as far back as possible.
R children must never travel sitting on the lap
of another occupant. Due to the forces
occurring in the event of a sudden change
of direction, heavy braking or an accident,
it would not be possible to restrain the
child. The child could be thrown against
parts of the vehicle interior and be seriously
or even fatally injured. G
Risk of injury
The child restraint system cannot perform its
protective function if it is not correctly fitted
to a suitable vehicle seat. The child cannot be restrained in the event of an accident, heavy
braking or sudden changes of direction. The
child could be seriously or even fatally injured.
For this reason, when fitting a child restraint
system, observe the manufacturer's installa-
tion instructions and the correct use of the
child restraint system.
The entire base of the child restraint system
must always rest on the seat cushion. There-
fore, never place objects, e.g. a cushion,
under the child restraint system.
Only use child restraint systems with the orig-
inal cover designed for them. Only replace
damaged covers with genuine Mercedes-Benz
covers.
When possible, only use child restraint sys-
tems which have been approved for use in
Mercedes-Benz vehicles.
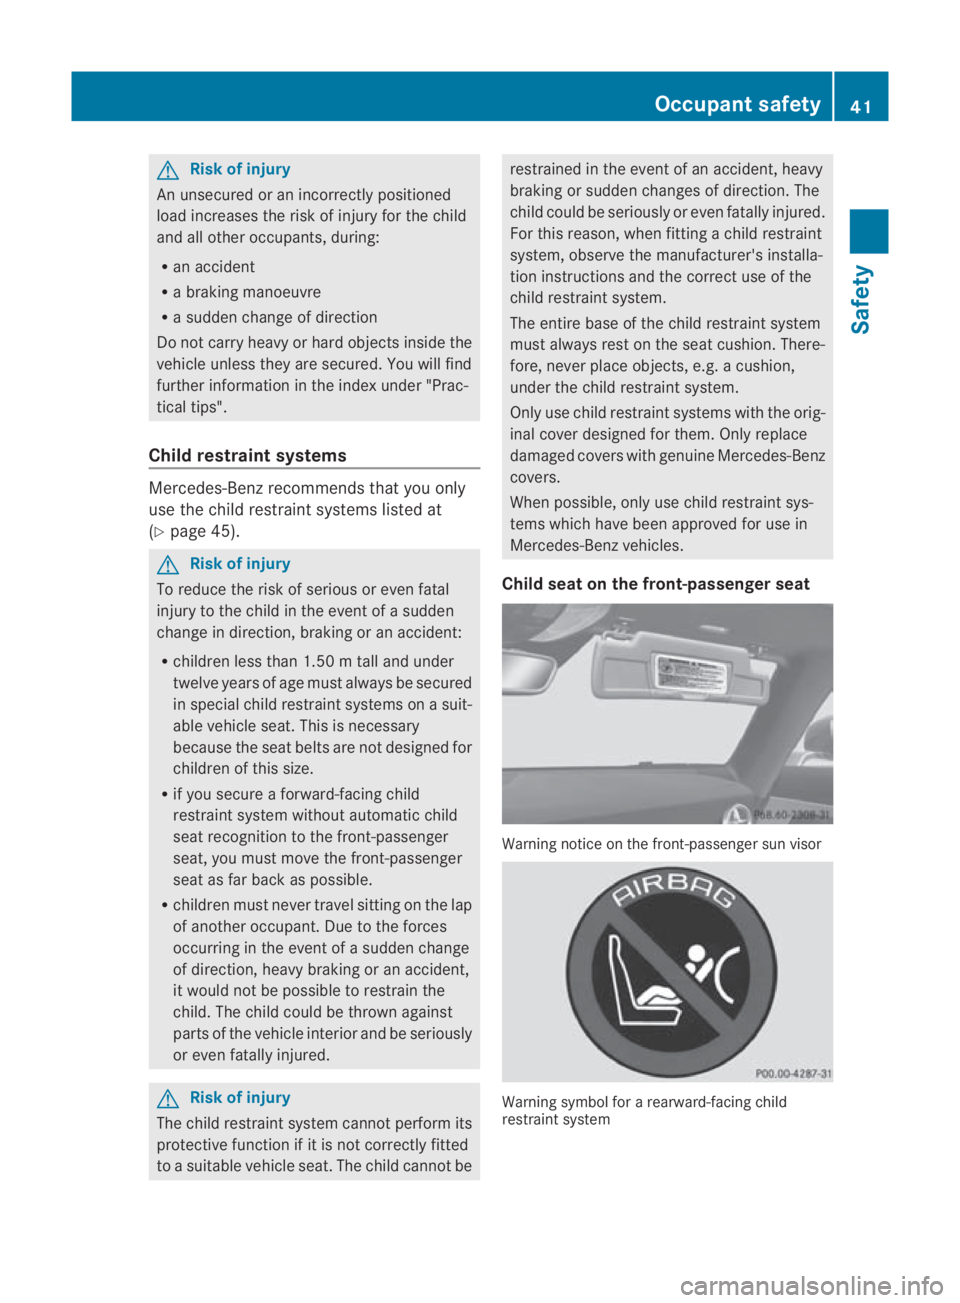
Child seat on the front-passenger seat Warning notice on the front-passenger sun visor
Warning symbol for a rearward-facing child
restraint system Occupant safety
41Safety
BA 197 ECE RE 2010/6a; 1; 2, en-GB
sabbaeu Version: 3.0.3.6 2010-05-07T14:19:43+02:00 - Seite 41 Z
Page 45 of 361
G
Risk of injury
If the front-passenger front airbag is not dis-
abled:
R a child secured in a child restraint system
on the front-passenger sea tcould be seri-
ously and even fatally injured by the front-
passenger front airbag deploying. This is
especially a risk if the child is in the imme-
diate vicinity of the front-passenger front
airbag when it deploys.
R Never secure a child on the front-passenger
seat in a rearward-facing child restraint sys-
tem.
R Always move the front-passenger seat to
the rearmost position if you secure a child
in a forward-facing child restraint system
on the front-passenger seat.
The front-passenger front airbag is not disa-
bled:
R if there is not a child restraint system with
automatic child seat recognition fitted. In
order to make use of the automatic child
seat recognition, a Mercedes-Benz
approved child seat with a transponder is
necessary.
R if the 000A PASSENGER AIRBAGO FF warn-
ing lamp on the centre console is not lit
To make you aware of this danger, a corre-
sponding warning sticker has bee naffixed on
the dashboard and on both sides of the sun
visor on the front-passenger side.
Information about recommended child
restraint systems is available at any
Mercedes-Benz Service Centre. Automatic chil
dseat recognition on the
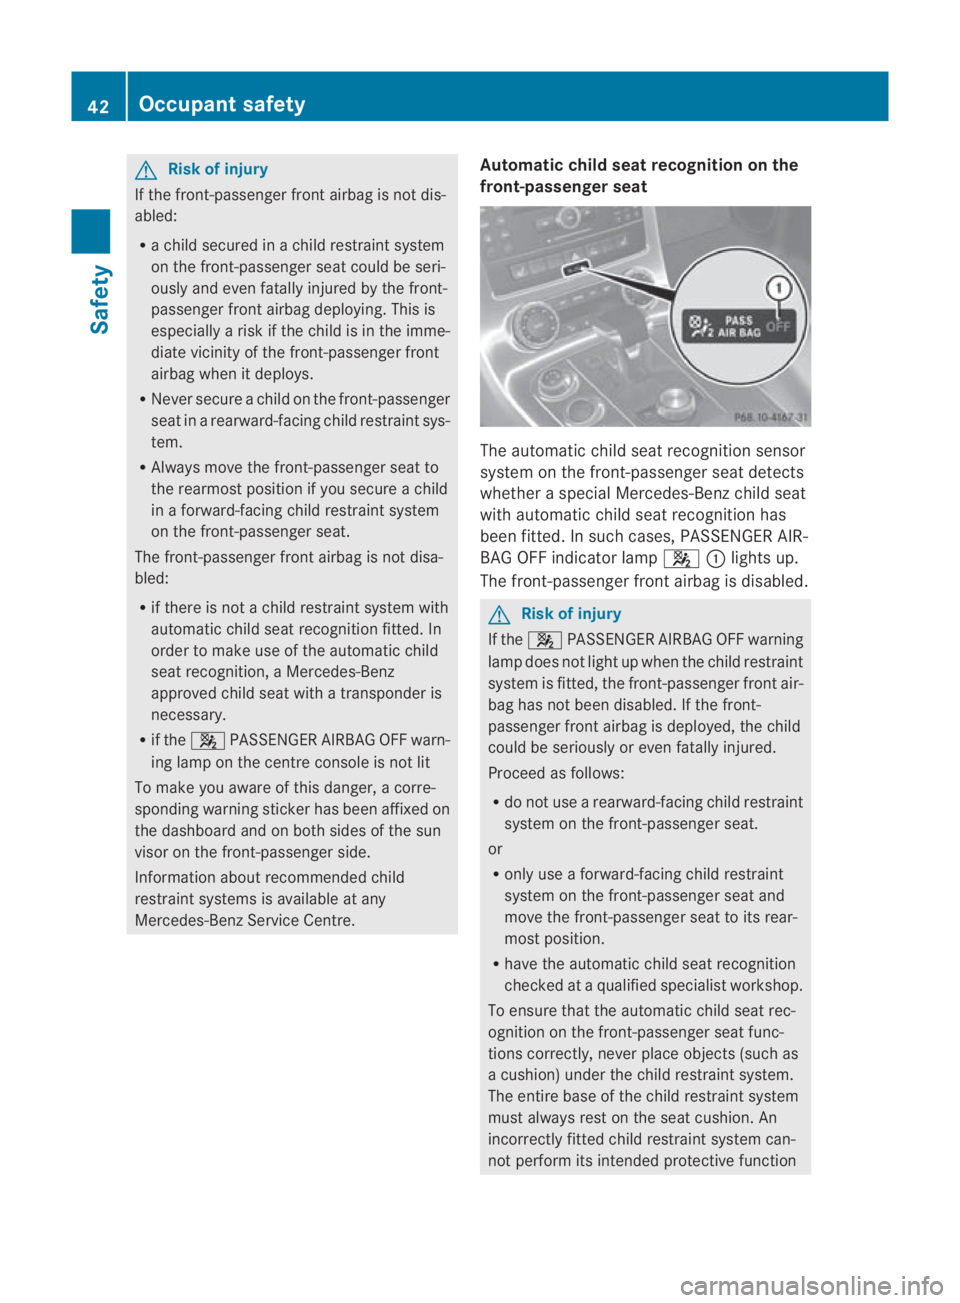
front-passenger seat The automatic child seat recognitio
nsensor
system on the front-passenger seat detects
whether a special Mercedes-Benzc hild seat
with automatic child seat recognition has
been fitted. In such cases, PASSENGER AIR-
BAG OFF indicator lamp 000A0001lights up.
The front-passenger front airbag is disabled. G
Risk of injury
If the 000A PASSENGER AIRBAG OFF warning
lamp does not light up when the child restraint
system is fitted, the front-passenger front air-
bag has not been disabled. If the front-
passenger front airbag is deployed, the child
could be seriously or even fatally injured.
Proceed as follows:
R do not use a rearward-facing child restraint
system on the front-passenger seat.
or
R only use a forward-facing child restraint
system on the front-passenger seat and
move the front-passenger seat to its rear-
most position.
R have the automatic child seat recognition
checked at a qualified specialist workshop.
To ensure that the automatic child seat rec-
ognition on the front-passenger seat func-
tions correctly, never place objects (such as
a cushion) under the child restraint system.
The entire base of the child restraint system
must always rest on the seat cushion. An
incorrectly fitted child restraint system can-
not perform its intended protective function 42
Occupant safetySafety
BA 197 ECE RE 2010/6a; 1; 2, en-GB
sabbaeu
Version: 3.0.3.6 2010-05-07T14:19:43+02:00 - Seite 42
Page 47 of 361
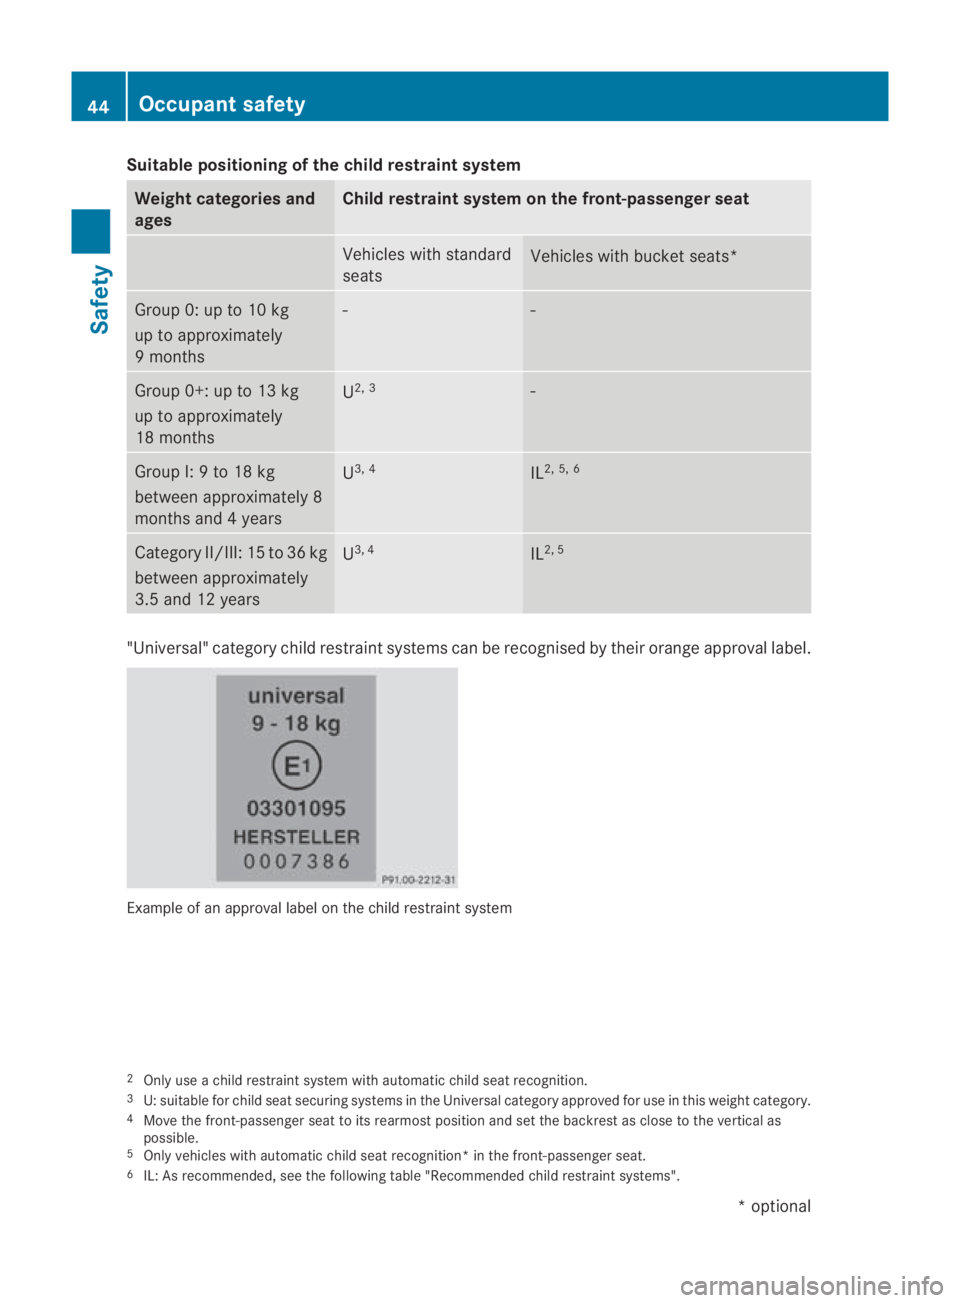
Suitable positioning of the child restraint system
Weight categories and
ages Child restraint system on the front-passenger seat
Vehicles with standard
seats
Vehicles with bucket seats*
Group 0: up to 10 kg
up to approximately
9 months - -
Group 0+: up to 13 kg
up to approximately
18 months
U
2, 3 -
Group I: 9 to 18 kg
between approximately 8
months and 4 years
U
3, 4 IL
2, 5, 6 Category II/III: 15 to 36 kg
between approximately
3.5 and 12 years
U
3, 4 IL
2, 5 "Universal" category child restraint systems can be recognised by their orange approval label.
Example of an approval label on the child restraint system
2 Only use a child restraint system with automatic child seat recognition.
3 U: suitable for child seat securing systems in the Universal category approved for use in this weight category.
4 Move the front-passenger seat to its rearmost position and set the backrest as close to the vertical as
possible.
5 Only vehicles with automatic child seat recognition* in the front-passenger seat.
6 IL: As recommended, see the following table "Recommended child restraint systems". 44
Occupant safetySafety
*o
ptional
BA 197 ECE RE 2010/6a; 1; 2, en-GB
sabbaeu
Version: 3.0.3.6 2010-05-07T14:19:43+02:00 - Seite 44
Page 48 of 361
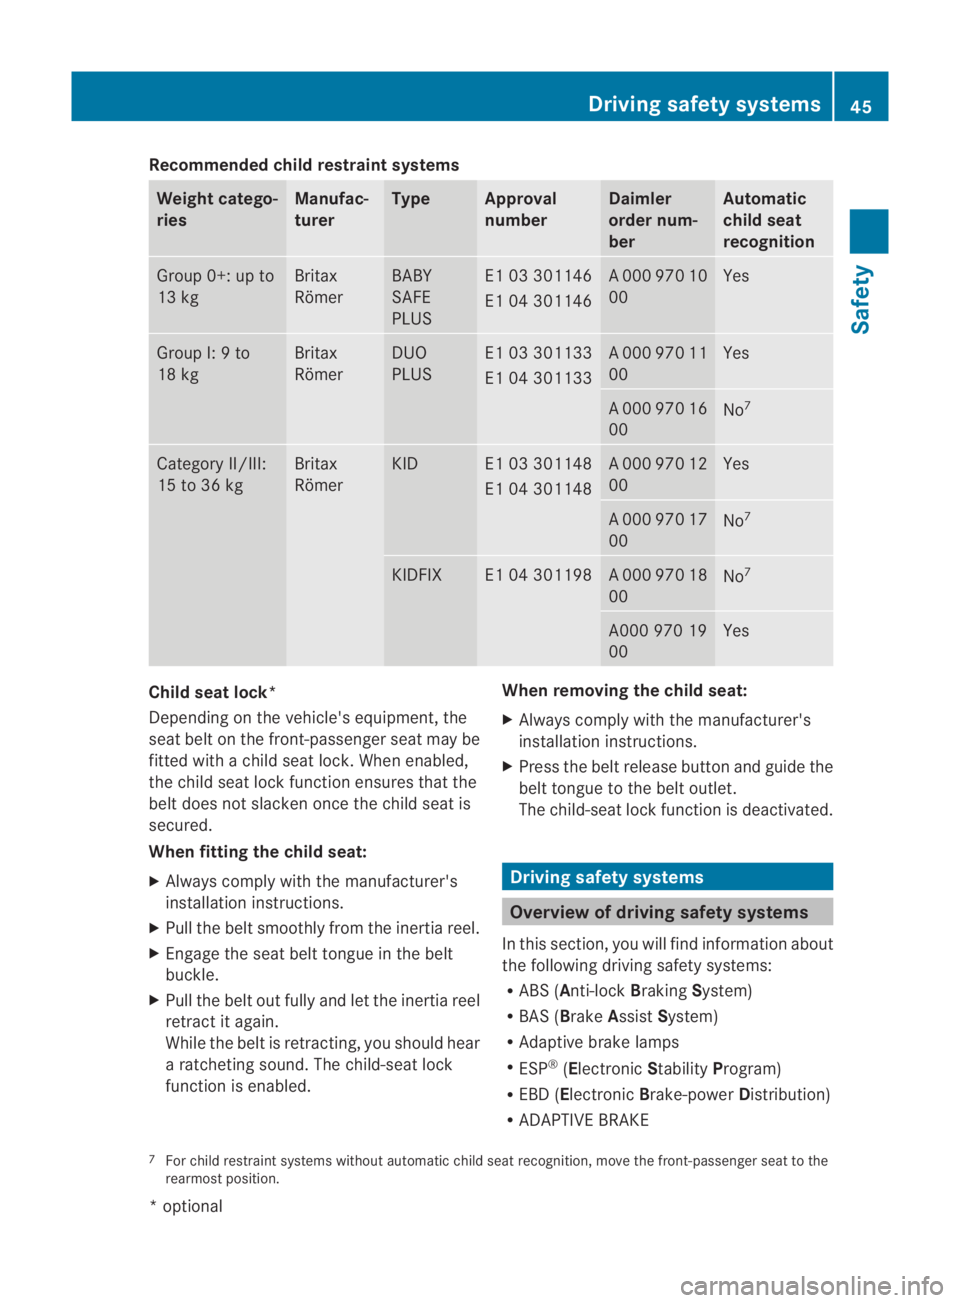
Recommended child restraint systems
Weight catego-
ries Manufac-
turer Type Approval
number Daimler
order num-
ber Automatic
child seat
recognition
Group 0+: up to
13 kg Britax
Römer BABY
SAFE
PLUS E1 03 301146
E1 04 301146 A 000 970 10
00 Yes
Group I: 9 to
18 kg Britax
Römer DUO
PLUS E1 03 301133
E1 04 301133 A 000 970 11
00 Yes
A 000 970 16
00
No
7 Category II/III:
15 to 36 kg Britax
Römer KID E1 03 301148
E1 04 301148 A 000 970 12
00 Yes
A 000 970 17
00
No
7 KIDFIX E1 04 301198 A 000 970 18
00
No
7 A000 970 19
00 Yes
Child seat lock*
Depending on the vehicle's equipment, the
sea
tbelt on the front-passenger seat may be
fitted with a child seat lock. When enabled,
the child seat lock function ensures that the
belt does not slacken oncet he child seat is
secured.
When fitting the child seat:
X Always comply with the manufacturer's
installation instructions.
X Pull the belt smoothly from the inertia reel.
X Engage the seat belt tongue in the belt
buckle.
X Pull the belt out fully and let the inertia reel
retract it again.
While the belt is retracting, you should hear
a ratcheting sound. The child-seat lock
function is enabled. When removing the child seat:
X
Always comply with the manufacturer's
installation instructions.
X Press the belt release button and guide the
belt tongue to the belt outlet.
The child-seat lock function is deactivated. Driving safety systems
Overview of driving safety systems
In this section, you will find information about
the following driving safety systems:
R ABS ( Anti-lock BrakingSystem)
R BAS ( Brake Assist System)
R Adaptive brake lamps
R ESP ®
(Electronic StabilityProgram)
R EBD ( Electronic Brake-power Distribution)
R ADAPTIVE BRAKE
7 For child restraint systems without automatic child seat recognition, move the front-passenger seat to the
rearmost position. Driving safety systems
45Safety
*optional
BA 197 ECE RE 2010/6a; 1; 2, en-GB
sabbaeu
Version: 3.0.3.6 2010-05-07T14:19:43+02:00 - Seite 45 Z
Page 80 of 361
X
Select the currently unauthorised device
(no 0011 icony et).
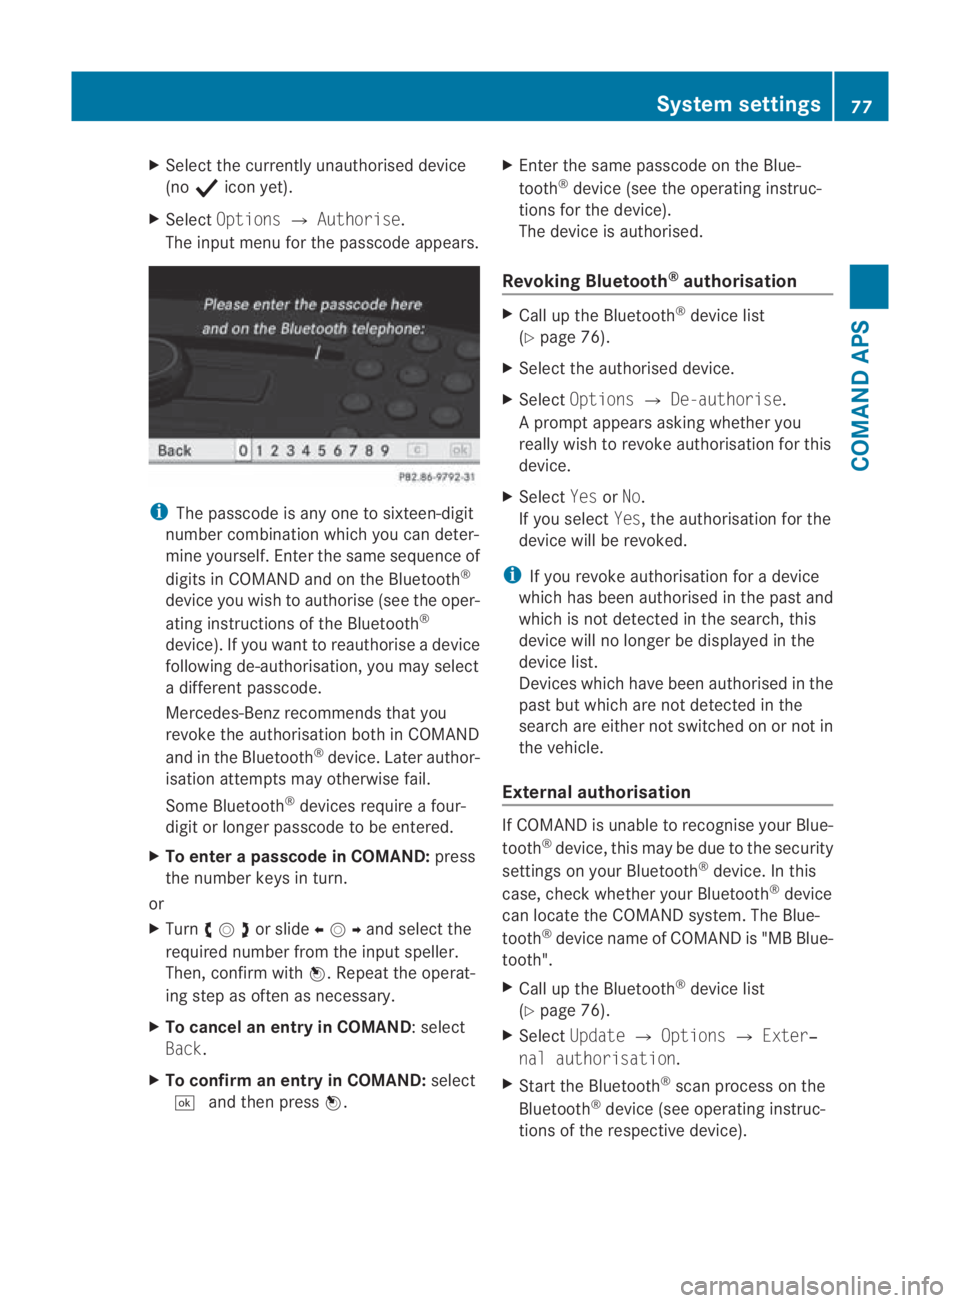
X Select Options 0004Authorise.
The input menu for the passcode appears. i
The passcode is any one to sixteen-digit
number combination which you can deter-
mine yourself. Enter the same sequence of
digits in COMAND and on the Bluetooth ®
device you wish to authorise (see the oper-
ating instructions of the Bluetooth ®
device). If you want to reauthorise a device
following de-authorisation, you may select
a differen tpasscode.
Mercedes-Ben zrecommends that you
revoke the authorisation both in COMAND
and in the Bluetooth ®
device. Later author-
isation attempts may otherwise fail.
Some Bluetooth ®
devices require a four-
digit or longer passcode to be entered.
X To enter apasscode in COMAND: press
the number keys in turn.
or
X Turn 002800130029or slide 002B0013002Cand selec tthe
required number from the input speller.
Then, confirm with 0017.Repeat the operat-
ing step as often as necessary.
X To cancel an entry in COMAND :select
Back.
X To confirm an entry in COMAND: select
0005 and then press 0017. X
Enter the same passcode on the Blue-
tooth ®
device (see the operating instruc-
tions for the device).
The device is authorised.
Revoking Bluetooth ®
authorisation X
Call up the Bluetooth ®
device list
(Y page 76).
X Select the authorised device.
X Select Options 0004De-authorise.
Ap rompt appears asking whethe ryou
really wish to revoke authorisation for this
device.
X Select YesorNo.
If you select Yes, the authorisation for the
device will be revoked.
i If you revoke authorisation for a device
which has been authorised in the past and
which is not detected in the search, this
device will no longer be displayed in the
device list.
Devices which have been authorised in the
past but which are not detected in the
search are either not switched on or not in
the vehicle.
External authorisation If COMAND is unable to recognise your Blue-
tooth
®
device, this may be due to the security
settings on your Bluetooth ®
device. In this
case, check whether your Bluetooth ®
device
can locate the COMAND system. The Blue-
tooth ®
device name of COMAND is "MB Blue-
tooth".
X Call up the Bluetooth ®
device list
(Y page 76).
X Select Update 0004Options 0004Exter‐
nal authorisation.
X Start the Bluetooth ®
scan process on the
Bluetooth ®
device (see operating instruc-
tions of the respective device). System settings
77COMAND APS
BA 197 ECE RE 2010/6a; 1; 2, en-GB
sabbaeu Version: 3.0.3.6 2010-05-07T14:19:43+02:00 - Seite 77 Z
Page 132 of 361
switching off (see the mobile phone oper-
ating instructions).
Convenience telephony*:
take the phone
out of its bracket* before switching
COMAND off.
"999" or "112" emergency call
Making emergency calls without entering a
PIN is only possible using the mobile phone.
The following conditions must be fulfilled in
order to make a 112emergency call:
R the mobile phone must be switched on.
R a network must be available.
R a valid and operational SIM card must be
inserted in the mobile phone.
R the PIN must have been entered.
If you cannot make an emergency call, you
must arrange rescue measures yourself.
The 999 emergency call number is a public
service. Any misuse is liable to prosecution. Using the telephone via the Blue-
tooth
®
interface
i If your vehicle is equipped with conveni-
ence telephony* and you wish to make
calls via the Bluetooth ®
interface, your
mobile phone should not be inserted in the
bracket*. Doing so could result in a mal-
function, depending on the type of mobile
phone.
Requirements for the mobile phone For telephony via COMAND's Bluetooth
®
interface, a Bluetooth ®
-capable mobile
phone is required.
i Not all mobile phones available on the
market are equally suitable. You can obtain
more detailed information abouts uitable
mobile phones and about connecting Blue-
tooth ®
-capable mobile phones to
COMAND from your Mercedes-Benz
Service Centre or on the Internet ( http://
www.mercedes-benz.com/connect ).In preparation for telephoning via the Blue-
tooth
®
interface, you should check the fol-
lowing items on your mobile phone (see the
mobile phone operating instructions):
X Hands-Free Profile
Your mobile phone should support Hands-
Free Profile 1. 0orhigher.
X Bluetooth ®
visibility
On some mobile phones, in additio nto
Bluetooth ®
being activated, the device
mus talso be made "visible" to other devi-
ces.
X Bluetooth ®
device name
Every Bluetooth ®
device is given a Blue-
tooth ®
device name at the factory. All devi-
ces sold by one manufacturer may have the
same device name. It is therefore recom-
mended that you change this name so that
you can easily recognise your mobile phone
(see the mobile phone operating instruc-
tions).
Connecting amobile phone X
Switch on the mobile phone and enter the
PIN, if necessary (see the mobile phone
operating instructions).
X Activate Bluetooth ®
functions and, where
necessary, Bluetooth ®
visibility on the
mobile phone (see the mobile phone oper-
ating instructions).
X Press the 0008function button on COMAND.
i When the Bluetooth ®
function is switched
off in COMAND, the following message
appears: Bluetooth not activated in
system settings.
X Activate the Bluetooth ®
function in
COMAND.
Registering (authorising) the mobile
phone
If you are using your mobile phone with
COMAND for the first time, you must register
(authorise) it. Telephone
129COMAND APS
*optional
BA 197 ECE RE 2010/6a; 1; 2, en-GB
sabbaeu
Version: 3.0.3.6 2010-05-07T14:19:43+02:00 - Seite 129 Z
Page 134 of 361
X
To confirm: select0005in the menu bar.
or
X Press the 0016or0009 button.
X To delete an entry: select0004in the menu
ba rand press 0017briefly (single numbers) or
hold down (fo ranentire numerical
sequence).
or
X Press the 0013delete button next to the
COMAND controller or the 001Fbutton next
to the keypad briefly (single number) or
press and hold it (whole numbe rsequence).
Entering the passkey on the mobile phone
If the Bluetooth ®
connection is successful,
you will be prompted by the mobile phone to
enter the passkey (access code, passkey);
(see the mobile phone operating instruc-
tions).
X Enter the same passkey as in COMAND.
i After entering the passkey, you may also
need to enter a confirmation in your mobile
phone. Check the display of your mobile
phone.
If the Authorisation procedure unsuc‐
cessful message appears on the
COMAND display, you may have exceeded
the allowed time. Repeat the procedure.
The mobile phone is authorised. You can now
phone using the COMAND hands-free sys-
tem.
External authorisation
If COMAND does not detec tyour mobile
phone, this may be due to particular security
settings of your mobile phone. In this case,
check whether your mobile phone can find
COMAND. The Bluetooth ®
device name of
COMAND is "MB Bluetooth".
X Press the 0008function button.
X Select Telephone0004Bluetooth tele‐
phones0004Update0004Options0004Exter‐
nal authorisation. X
Start the Bluetooth ®
search on the mobile
phone (see the mobile phone operating
instructions).
X Select COMAND (MB Bluetooth) on the
mobile phone.
X Enter the passkey on the mobile phone and
COMAND when requested.
Automatic reconnection
COMAND always searches for the last con-
nected mobile phone.
If no connection can be made to the most
recently connected mobile phone, the system
searches for the mobile phone which was
connected before that one.
Displaying details
For every mobile phone in the telephone list,
there is a detailed view.
X Press the 0008function button.
X Select Telephone0004Bluetooth tele‐
phones.
X Select the mobile phone from the list and
select Options 0004Details.
The following information concerning the
selected mobile phone is shown:
R Bluetooth ®
name
R Bluetooth ®
address
R availability
R authorisation status
X To close the detailed view: turn002800130029 or
slide 002B0013002C.
or
X Press 0017or the 0001button next to the
COMAND controller.
Deregistering (de-authorising) amobile
phone
X Press the 0008function button.
X Select Telephone 0004Bluetooth tele‐
phones . Telephone
131COMAND APS
BA 197 ECE RE 2010/6a; 1; 2, en-GB
sabbaeuV ersion: 3.0.3.6
2010-05-07T14:19:43+02:00 - Seite 131 Z
Page 181 of 361
i
If no Gracenote ®
data is available, the
Gracenote Media Database menu item
appears greyed out.
X To switch the display off: selectNone.
In the basicd isplay of the CD mode
(Y page 173), Track 1,Track 2etc. are
shown instead of the Gracenote ®
data, for
example.
X To switch on the display: select an entry
from the menu, e.g. 0002.
Updating Gracenote ®
music recognition
technology and the Gracenote Media
Database
The digital data on the Gracenote ®
Media
Database becomes obsolete due to the
release of new CDs. Optimum functionality
can only be attained with up-to-date Grace-
note ®
music recognition technology. Infor-
mation about new versions can be obtained
from a Mercedes-Benz Service Centre.
Setting the audio format i
You can only set the audio format in audio
DVD mode. The number of audio formats
available depends on the DVD. The content
of an audio DV Dis called an "album", which
can be divided into up to nine groups. A
group may contain music in various sound
qualities (stereo and multi-channel for-
mats, for example), or bonus tracks. Each
group can contain up to 99 tracks. If an
audio DVD only contains one audio format,
the "Group" menu item(s) cannot be selec-
ted.
X Switch to audio DVD mode (Y page 173).
X Select DVD-A0004Group.
The list of available audio formats appears.
The 0023dot indicates the format currently
selected.
X To change the setting: turn002800130029 or slide
001F0013000D.
X Press 0017. X
To exit the menu: slide002B0013002C.
or
X Press the 0001back button next to the
COMAND controller.
Playback options The following options are available to you:
R
Normal track sequence
The tracks are played in the normal order
(e.g. track 1, 2, 3, etc.).
R Random tracks:
The tracks are played in a random order
(e.g. track 3, 8, 5, etc.).
R Random folder (MP3 mode only)
You hear the tracks in the current active
folder and any subfolders in random order.
X To selecto ptions:switch to audio CD,
audio DVD or MP3 mode (Y page 173).
X Select CDorDVD-A orMP3.
The options list appears. A 0023dot indicates
the option selected.
X Select an option.
The option is switched on. For all options
excep t"Normal track sequence", you will
see a corresponding display in the display/
selection window.S ee example of display:
audio CD mode (Y page 173), item0013.
i The "Normal trac ksequence" option is
automatically selected when you change
the medium you are currently listening to
or when you select a differen tmedium. If
an option is selected, it remains selected
after COMAND is switched on or off. MUSIC REGISTER
You can store music files in MP3, WMA or AAC
format in the MUSIC REGISTER. The memory
has a capacity of 4GB.
! Retai nthe original music files in a secure
location. An error in COMAND might result
in the loss of the music files stored in the 178
AudioCOMAND APS
BA 197 ECE RE 2010/6a; 1; 2, en-GB
sabbaeu
Version: 3.0.3.6 2010-05-07T14:19:43+02:00 - Seite 178