spare wheel MERCEDES-BENZ SPRINTER 2014 MY14 Operator’s Manual
[x] Cancel search | Manufacturer: MERCEDES-BENZ, Model Year: 2014, Model line: SPRINTER, Model: MERCEDES-BENZ SPRINTER 2014Pages: 338, PDF Size: 6.78 MB
Page 315 of 338

X
Wheel with hub cap: position the opening
for the tire valve in the hub cap over the tire
valve.
X Push the edge of the hub cap with both
hands against the wheel until it clicks into
place. Make sure the hub cap retaining
catches engage on the steel wheel.
X Wheel with central hub cap: position the
retaining lugs of the central hub cap over
the wheel bolts.
X Hit the middle of the hub cap to engage it
on the wheel.
X Secure the faulty wheel in the spare wheel
bracket (Y page 314).
X Check the tire pressure of the newly
mounted wheel and adjust it if necessary.
Observe the recommended tire pressure
(Y page 290).
X Retighten the wheel bolts or wheel nuts to
the specified tightening torque after the
vehicle has been driven for 30 miles
(50 km).
When using a wheel/spare wheel with a new
or newly painted wheel rim, have the wheel
bolts/nuts retightened again after approx-
imately 600 to 3,000 miles (1,000 to
5,000 km). Observe the specified tightening
torque.
i Vehicles with the tire pressure monitor
system: all mounted wheels must be equip-
ped with functioning sensors. Wheel and tire combination
General notes
! Retreaded tires are neither tested nor rec-
ommended for Sprinter vehicles, since pre-
vious damage cannot always be detected
on retreaded tires. We can therefore not
guarantee driving safety. Do not mount
used tires if you have no information about
their previous usage. The recommended tire pressures can be
found:
R
on the Tire and Loading Information plac-
ard 8
on the B-pillar on the driver's side
R on the tire pressure table on the B-pillar on
the driver's side
The recommended tire pressure can also be
found in the "Tire pressure table" section in
these Operating Instructions (Y page 297).
The wheel/tire combination for your vehicle
can be found on the tire pressure table. Fur-
ther information on wheel/tire combination
can be obtained at any qualified specialist
workshop.
Check tire pressures regularly and only when
the tires are cold. Observe the notes on the
recommended tire pressures (Y page 290).
Follow the maintenance recommendations in
the tire manufacturer's warranty book in your
vehicle documents.
Notes on the vehicle equipment – always
install the vehicle:
R with tires of the same size across an axle
(left/right)
R with the same type of tires on all wheels at
a given time (summer tires, winter tires) Spare wheel
Important safety notes
G
WARNING
Wheel and tire dimensions as well as the type
of tire can vary between the spare wheel and
the wheel to be replaced. When the spare
wheel is mounted, driving characteristics may
be severely affected. There is a risk of an acci-
dent.
In order to reduce risks:
R you should therefore adapt your driving
style and drive carefully.
R never mount more than one spare wheel
that differs from the wheel to be replaced.
8 Only for vehicles with a gross weight of less than 10,000 lbs(4,536 kg). Spare wheel
313Wheels and tires
Z
Page 316 of 338

R
only use a spare wheel that differs from the
wheel to be replaced for a short time.
R do not deactivate ESP ®
.
R have a spare wheel that differs from the
wheel that has been changed replaced at
the nearest qualified specialist workshop.
You must observe the correct wheel and
tire dimensions as well as the wheel type.
When using a spare wheel of a different size,
do not exceed the maximum speed of
80 km/h. General notes
! Check the spare wheel regularly to see
that it is secure and has the prescribed tire
pressure.
The procedure for mounting the spare wheel
is described in "Mounting a wheel"
(Y page 308).
The following should be checked regularly,
particularly prior to long journeys:
R the tire pressure of the spare wheel, which
should then be corrected if necessary
(Y page 290).
R the fastenings of the spare wheel bracket.
The spare wheel is located in a spare wheel
bracket under the rear of the vehicle.
Replace the tires after 6 years at the latest,
regardless of wear. This also applies to the
spare wheel.
i If you have mounted a spare wheel, the
tire pressure monitor (Y page 293) will not
function for this wheel. The spare wheel is
not equipped with a sensor for monitoring
tire pressure. Removing and installing the spare
wheel
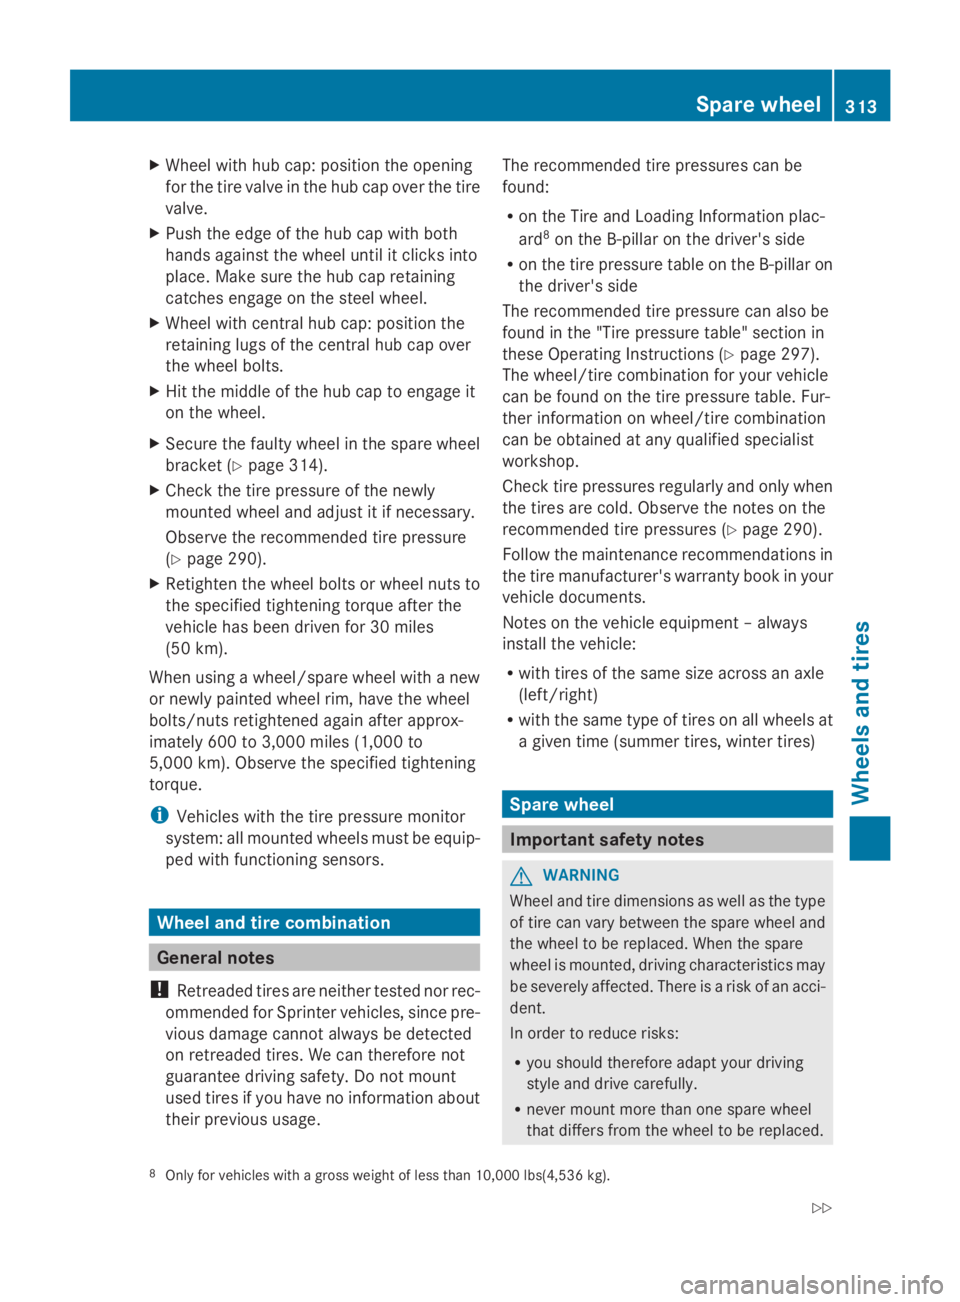
Cargo Van/Passenger Van Bolt covers for the safety catches (example: Cargo
Van)
Removing
X
Open the rear doors.
X Place a screwdriver into recesses 0044and
then prise off covers 0043.
X Using the lug wrench from the vehicle tool
kit (Y page 276), unscrew the now visible
bolts counter-clockwise by approximately
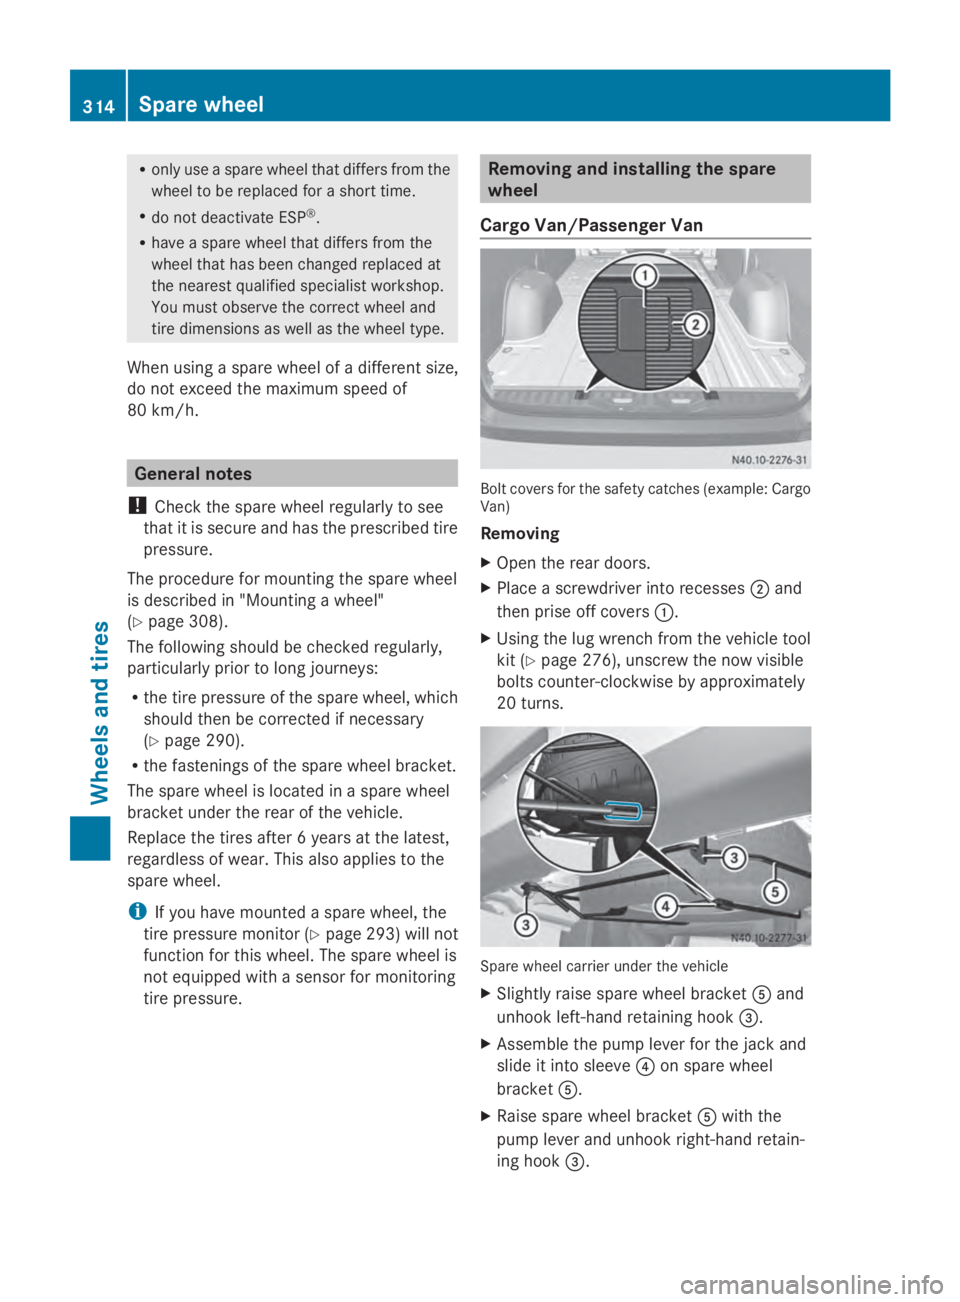
20 turns. Spare wheel carrier under the vehicle
X Slightly raise spare wheel bracket 0083and
unhook left-hand retaining hook 0087.
X Assemble the pump lever for the jack and
slide it into sleeve 0085on spare wheel
bracket 0083.
X Raise spare wheel bracket 0083with the
pump lever and unhook right-hand retain-
ing hook 0087. 314
Spare wheelWheels and tires
Page 317 of 338

X
Slowly lower spare wheel bracket 0083down
to the ground.
X Lift spare wheel bracket 0083slightly and pull
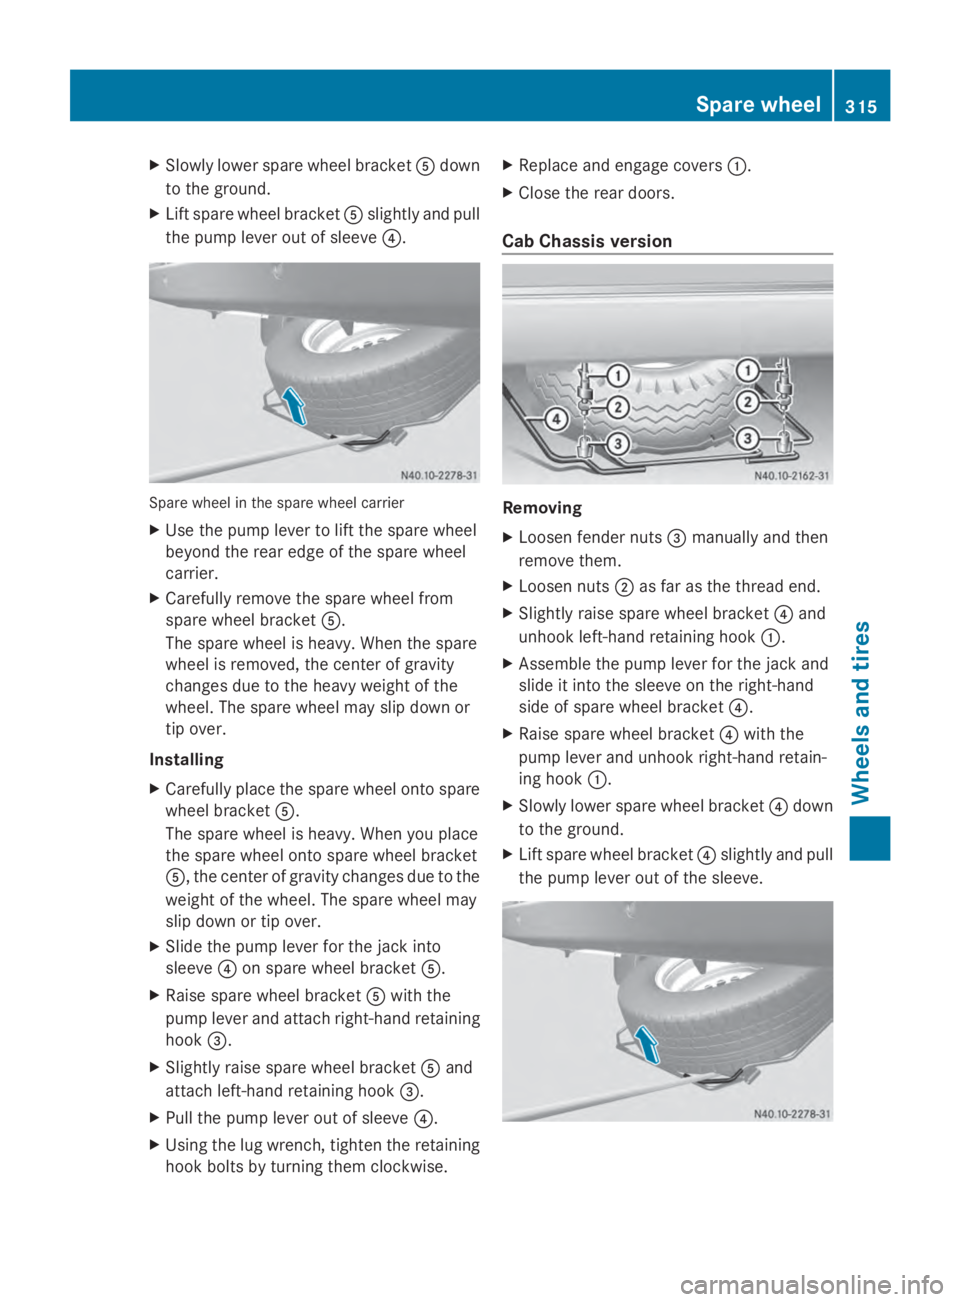
the pump lever out of sleeve 0085.Spare wheel in the spare wheel carrier
X Use the pump lever to lift the spare wheel
beyond the rear edge of the spare wheel
carrier.
X Carefully remove the spare wheel from
spare wheel bracket 0083.
The spare wheel is heavy. When the spare
wheel is removed, the center of gravity
changes due to the heavy weight of the
wheel. The spare wheel may slip down or
tip over.
Installing
X Carefully place the spare wheel onto spare
wheel bracket 0083.
The spare wheel is heavy. When you place
the spare wheel onto spare wheel bracket
0083, the center of gravity changes due to the
weight of the wheel. The spare wheel may
slip down or tip over.
X Slide the pump lever for the jack into
sleeve 0085on spare wheel bracket 0083.
X Raise spare wheel bracket 0083with the
pump lever and attach right-hand retaining
hook 0087.
X Slightly raise spare wheel bracket 0083and
attach left-hand retaining hook 0087.
X Pull the pump lever out of sleeve 0085.
X Using the lug wrench, tighten the retaining
hook bolts by turning them clockwise. X
Replace and engage covers 0043.
X Close the rear doors.
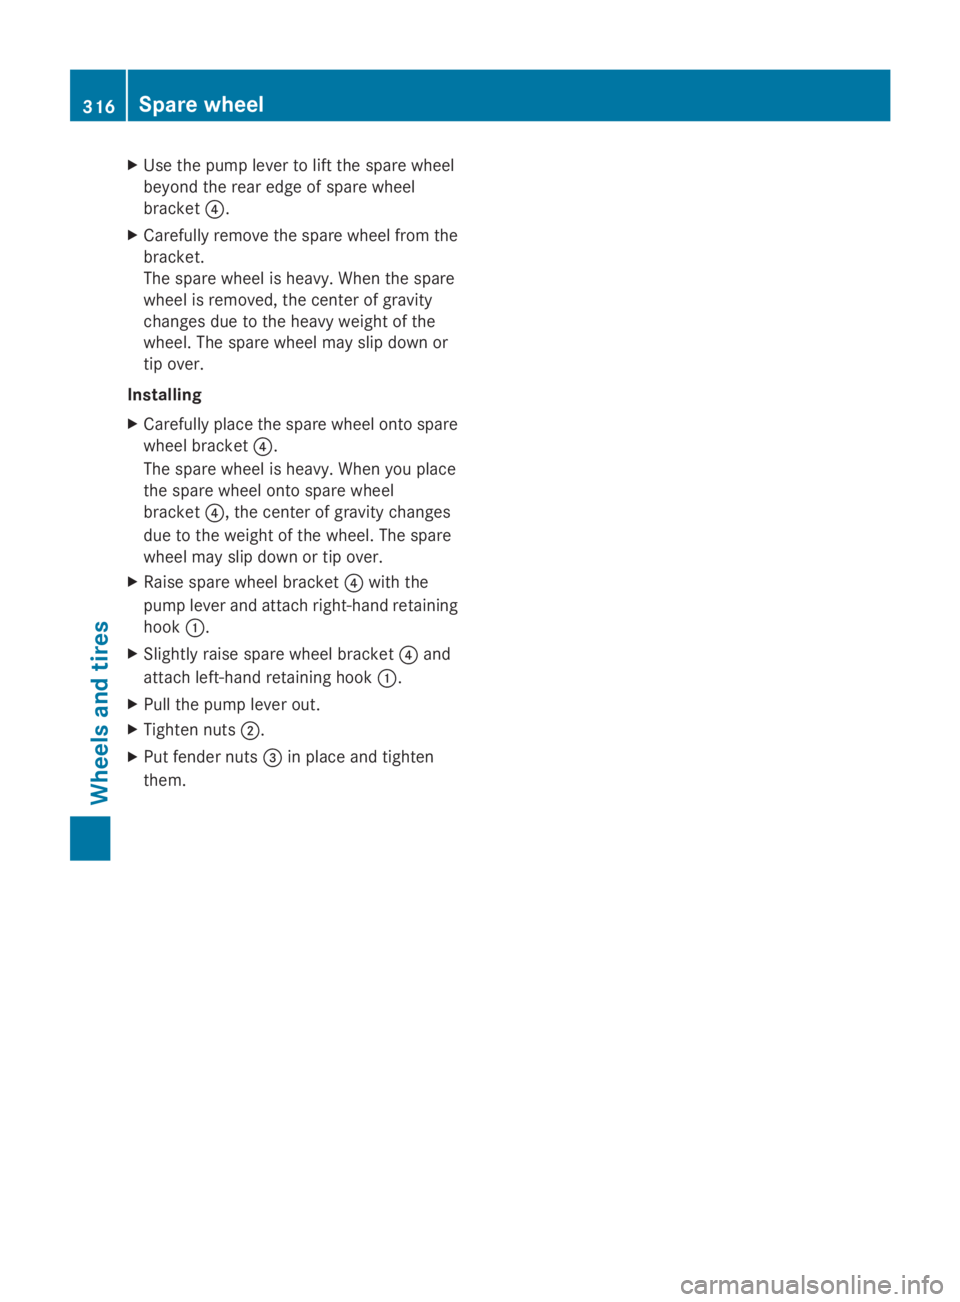
Cab Chassis version Removing
X
Loosen fender nuts 0087manually and then
remove them.
X Loosen nuts 0044as far as the thread end.
X Slightly raise spare wheel bracket 0085and
unhook left-hand retaining hook 0043.
X Assemble the pump lever for the jack and
slide it into the sleeve on the right-hand
side of spare wheel bracket 0085.
X Raise spare wheel bracket 0085with the
pump lever and unhook right-hand retain-
ing hook 0043.
X Slowly lower spare wheel bracket 0085down
to the ground.
X Lift spare wheel bracket 0085slightly and pull
the pump lever out of the sleeve. Spare wheel
315Wheels and tires Z
Page 318 of 338

X
Use the pump lever to lift the spare wheel
beyond the rear edge of spare wheel
bracket 0085.
X Carefully remove the spare wheel from the
bracket.
The spare wheel is heavy. When the spare
wheel is removed, the center of gravity
changes due to the heavy weight of the
wheel. The spare wheel may slip down or
tip over.
Installing
X Carefully place the spare wheel onto spare
wheel bracket 0085.
The spare wheel is heavy. When you place
the spare wheel onto spare wheel
bracket 0085, the center of gravity changes
due to the weight of the wheel. The spare
wheel may slip down or tip over.
X Raise spare wheel bracket 0085with the
pump lever and attach right-hand retaining
hook 0043.
X Slightly raise spare wheel bracket 0085and
attach left-hand retaining hook 0043.
X Pull the pump lever out.
X Tighten nuts 0044.
X Put fender nuts 0087in place and tighten
them. 316
Spare wheelWheels and tires