suspension MERCEDES-BENZ SPRINTER 2014 MY14 Operator’s Manual
[x] Cancel search | Manufacturer: MERCEDES-BENZ, Model Year: 2014, Model line: SPRINTER, Model: MERCEDES-BENZ SPRINTER 2014Pages: 338, PDF Size: 6.78 MB
Page 85 of 338

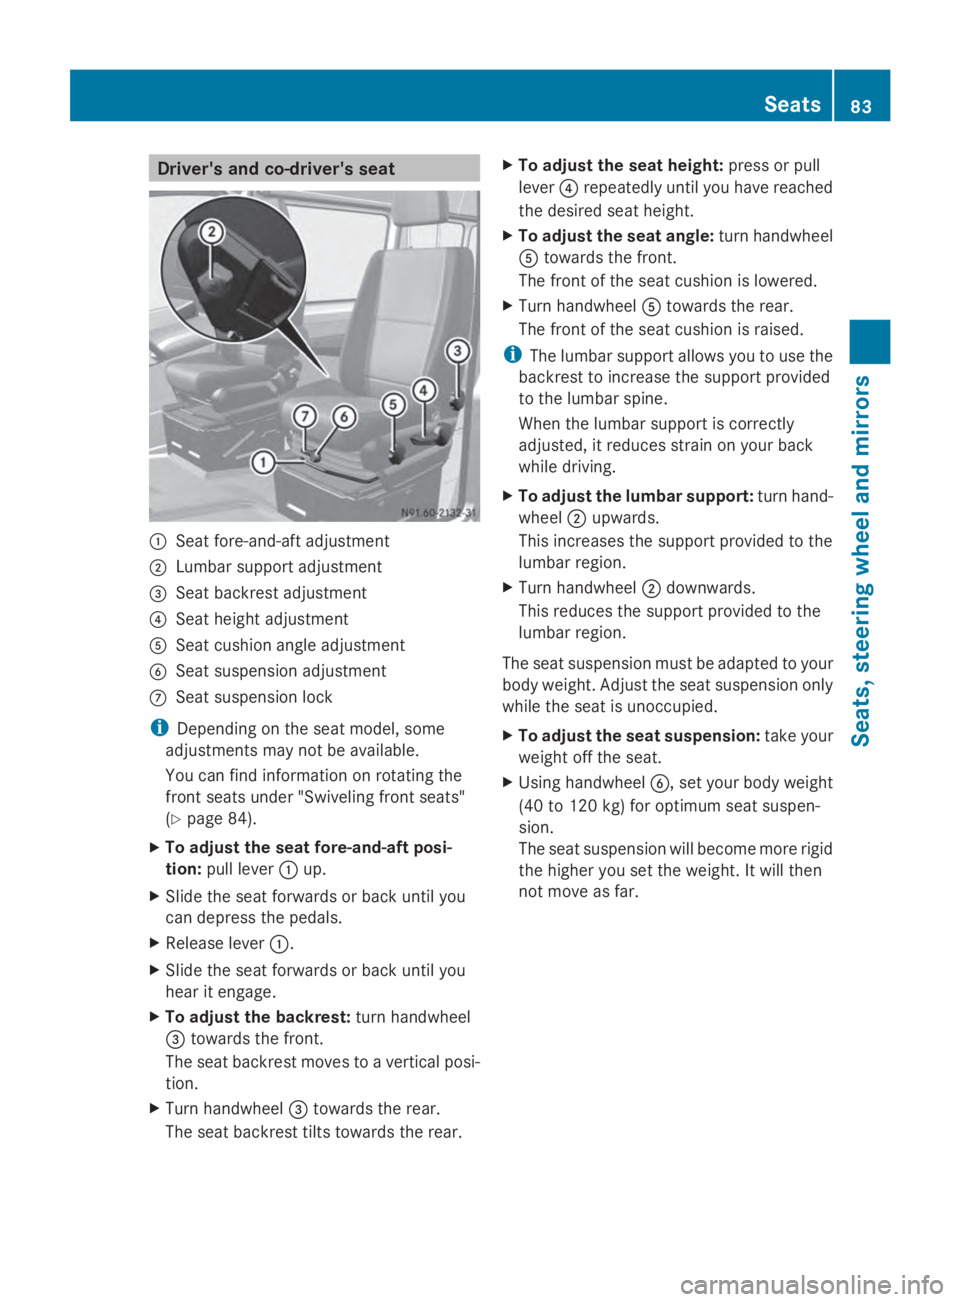
Driver's and co-driver's seat
0043
Seat fore-and-aft adjustment
0044 Lumbar support adjustment
0087 Seat backrest adjustment
0085 Seat height adjustment
0083 Seat cushion angle adjustment
0084 Seat suspension adjustment
006B Seat suspension lock
i Depending on the seat model, some
adjustments may not be available.
You can find information on rotating the
front seats under "Swiveling front seats"
(Y page 84).
X To adjust the seat fore-and-aft posi-
tion: pull lever 0043up.
X Slide the seat forwards or back until you
can depress the pedals.
X Release lever 0043.
X Slide the seat forwards or back until you
hear it engage.
X To adjust the backrest: turn handwheel
0087 towards the front.
The seat backrest moves to a vertical posi-
tion.
X Turn handwheel 0087towards the rear.
The seat backrest tilts towards the rear. X
To adjust the seat height: press or pull
lever 0085repeatedly until you have reached
the desired seat height.
X To adjust the seat angle: turn handwheel
0083 towards the front.
The front of the seat cushion is lowered.
X Turn handwheel 0083towards the rear.
The front of the seat cushion is raised.
i The lumbar support allows you to use the
backrest to increase the support provided
to the lumbar spine.
When the lumbar support is correctly
adjusted, it reduces strain on your back
while driving.
X To adjust the lumbar support: turn hand-
wheel 0044upwards.
This increases the support provided to the
lumbar region.
X Turn handwheel 0044downwards.
This reduces the support provided to the
lumbar region.
The seat suspension must be adapted to your
body weight. Adjust the seat suspension only
while the seat is unoccupied.
X To adjust the seat suspension: take your
weight off the seat.
X Using handwheel 0084, set your body weight
(40 to 120 kg) for optimum seat suspen-
sion.
The seat suspension will become more rigid
the higher you set the weight. It will then
not move as far. Seats
83Seats, ste ering wheel and mirrors Z
Page 86 of 338

If the seat moves up and down frequently and
to a great extent, you can lock the seat in the
lower movement range.
X To engage the seat suspension lock:
turn lever 006Bupwards.
When it next moves, the seat will lock in
position.
i The seat suspension lock will only engage
if your body weight equals or exceeds the
weight selected for the seat suspension.
X To release the seat suspension lock:
turn lever 006Bto the right.
The seat can now move up and down again. Swiveling front seats
G
WARNING
You could lose control of your vehicle if you
do the following while driving:
R adjust the driver's seat, head restraint,
steering wheel or mirrors
R fasten the seat belt
There is a risk of an accident.
Adjust the driver's seat, head restraint, steer-
ing wheel and mirror and fasten your seat belt
before starting the engine. G
WARNING
If the driver's and co-driver's seats are not
engaged facing the direction of travel while
driving, the restraint systems may not be able
to provide the intended protection. There is
an increased risk of injury, possibly even fatal.
Engage the driver's and co-driver's seats so
they are facing the direction of travel before
starting the engine.
! When rotating the seats, make sure that
there is sufficient space to do so.
Move the seat forward or back first. This
will help to avoid contact with other parts
of the interior.
Push the handbrake lever down to the stop. The parking brake or handbrake lever could
otherwise be damaged.
Seat release (example: co-driver's seat)
The driver's seat and co-driver's seat can be
rotated by 50° and 180°.
The seats engage when facing in the direction
of travel as well as when facing in the opposite
direction and also engage at an angle of 50°
to the door.
X Make sure that the parking brake has been
engaged and that the handbrake lever has
been pushed down to the stop
(Y page 152).
X Adjust the steering wheel to provide the
necessary space to rotate and adjust the
driver's seat (Y page 88).
X Before rotating, push the co-driver's seat
forwards (Y page 83).
X 2To rotate the seat: push lever0043on the
rear of the seat towards the center of the
vehicle and rotate the seat slightly inwards.
The rotation device is released.
X Release lever 0043.
X Turn the seat about 50° towards the out-
side or inside to the desired position. 84
SeatsSeats, steering wheel and mirrors
Page 288 of 338

Useful information
This Operator's Manual describes all models
as well as standard and optional equipment
of your vehicle that were available at the time
of going to print. Country-specific variations
are possible. Note that your vehicle may not
be equipped with all of the described func-
tions. This also applies to systems and func-
tions relevant to safety.
Read the information on qualified specialist
workshops (Y page 26). Important safety notes
G
Warning
A flat tire severely impairs the driving, steer-
ing and braking characteristics of the vehicle.
There is a risk of an accident.
do not drive with a flat tire. Immediately
replace the flat tire with your spare wheel, or
consult a qualified specialist workshop. G
WARNING
If wheels and tires of the wrong size are used,
the wheel brakes or suspension components
may be damaged. There is a risk of an acci-
dent.
Always replace wheels and tires with those
that fulfill the specifications of the original
part.
When replacing wheels, make sure to use the
correct:
R designation
R model
When replacing tires, make sure to use the
correct:
R designation
R manufacturer
R model
Accessories that are not approved for your
vehicle or are not being used correctly can
impair operating safety. Before purchasing and using non-approved
accessories, visit a qualified specialist work-
shop and inquire about:
R
suitability
R legal stipulations
R factory recommendations
Contact an authorized Sprinter dealer if you
require information on tested and recom-
mended wheels and tires for summer and
winter driving. Advice on purchasing and car-
ing for tires is also available there.
Information on tire and wheel dimensions and
types as well as the recommended tire pres-
sure for your vehicle can be found in the "Tire
pressure" section (Y page 297).
This data can also be found on the Tire and
Loading Information placard on the B-pillar.
Modifications to the brake system or wheels
are not permitted. The use of wheel spacers
or brake dust shields is not permitted. This
invalidates the general operating permit for
the vehicle.
i Further information on wheels and tires
can be obtained at any qualified specialist
workshop. Operation
Information for a journey
If the vehicle is heavily laden, check the tire
pressures, and correct them, if necessary.
While driving, pay attention to vibrations,
noises and unusual handling characteristics,
e.g. pulling to one side. This may indicate that
the wheels or tires are damaged. If you sus-
pect that a tire is defective, reduce your
speed immediately. Stop the vehicle as soon
as possible to check the wheels and tires for
damage. Hidden tire damage could also be
causing the unusual handling characteristics.
If you find no signs of damage, have the tires
and wheels checked at a qualified specialist
workshop. 286
OperationWheels and tires
Page 291 of 338

Always observe the maximum permissible
speed specified for the M+S tires you have
mounted.
If you mount M+S tires that have a lower max-
imum permissible speed than that of the vehi-
cle, affix a corresponding warning label in the
driver's field of vision. You can obtain this at
a qualified specialist workshop.
Once you have mounted the winter tires:
X Check the tire pressure (Y page 290).
X Reactivate the tire pressure moni-
tor*(Y page 295). Snow chains
G
WARNING
If you drive too fast with snow chains
mounted, they may snap. As a result, you
could injure others and damage the vehicle.
There is a risk of an accident.
Observe the maximum permissible speed for
operation with snow chains.
When driving with snow chains fitted, do not
exceed the maximum permissible speed of
30 mph (50 km/h). Observe the country-spe-
cific laws and regulations for operation with
snow chains.
! Check the snow chains for damage before
mounting them. Damaged or worn snow
chains may snap and damage the following
components:
R wheel
R wheel housing
R wheel suspension
For this reason, you must use only snow
chains that are free of defects. Observe the
manufacturer's mounting instructions.
! Vehicles with steel wheels: if you
mount snow chains on steel wheels, you
may damage the hub caps. Remove the hub
caps from the relevant wheels before
mounting the snow chains. Snow chains increase traction on roads in
wintry conditions.
For reasons of safety we only recommend
using snow chains or traction aids that are
approved for the Sprinter. The snow chains or
traction aids must be of class U or meet the
SAE type U specification. Information on
snow chains is available at any qualified spe-
cialist workshop.
When mounting snow chains, please bear the
following points in mind:
R Snow chains cannot be mounted on all
wheel/tire combinations. When mounting
the snow chains, note the permissible tire
and snow chain dimensions.
R Mount snow chains only in pairs and only
to the rear wheels. On vehicles with twin
tires, mount the snow chains to the outer
wheels. Observe the manufacturer's
mounting instructions.
R Only use snow chains when the road is cov-
ered by a layer of snow. Remove the snow
chains as soon as possible when you come
to a road that is not snow-covered.
R The use of snow chains may be restricted
by local regulations. Observe the appropri-
ate regulations before mounting snow
chains.
R When driving with snow chains fitted, do
not exceed the maximum permissible
speed of 30 mph (50 km/h).
R Check the tension of the chains after a dis-
tance of approximately 0.5 miles (1.0 km).
You can deactivate ASR (Y page 60) when
pulling away with snow chains mounted. This
allows the wheels to spin in a controlled man-
ner, achieving an increased driving force (cut-
ting action). Operation in winter
289Wheels and tires
* optional Z
Page 309 of 338

Traction
Traction is the result of friction between the
tires and the road surface.
TWR (permissible trailer drawbar load)
The TWR is the maximum permissible weight
that may act on the ball coupling of the trailer
tow hitch.
Wear indicator
Narrow bars (tread wear bars) that are dis-
tributed over the tire tread. If the tire tread is
level with the bars, the wear limit of 00CDin
(1.6 mm) has been reached.
Distribution of the vehicle occupants
The distribution of vehicle occupants over
designated seat positions in a vehicle.
Maximum permissible payload weight
Nominal load and goods/luggage load plus
68 kg (150 lbs) multiplied by the number of
seats in the vehicle. Flat tire
General notes
Your vehicle is equipped with a spare wheel.
The spare wheel is under the vehicle at the
rear (Y page 313).
Information about fitting a wheel can be found
in the "Wheel change" section (Y page 308).
When you replace a tire, we recommend that
you also replace the tire valve. Please observe
the safety-relevant information on tire valve
(Y page 292). Changing wheels
Rotating the wheels
G
WARNING
Interchanging the front and rear wheels may
severely impair the driving characteristics if
the wheels or tires have different dimensions.
The wheel brakes or suspension components may also be damaged. There is a risk of acci-
dent.
Rotate front and rear wheels only if the wheels
and tires are of the same dimensions.
! On vehicles equipped with a tire pressure
monitor, electronic components are
located in the wheel.
Tire-mounting tools should not be used
near the valve. This could damage the elec-
tronic components.
Only have tires changed at a qualified spe-
cialist workshop.
Always observe the instructions and safety
notes in the "Mounting a wheel" section
(Y page 308).
The wear patterns on the front and rear tires
differ, depending on the operating conditions.
Rotate the wheels before a clear wear pattern
has formed on the tires. Front tires typically
wear more on the shoulders and the rear tires
in the center.
If your vehicle's tire configuration allows, you
can rotate the wheels according to the inter-
vals in the tire manufacturer's warranty book
in your vehicle documents. If no warranty
book is available, the tires should be rotated
every 3,000 to 6,000 miles (5,000 to
10,000 km), or earlier if tire wear requires. Do
not change the direction of rotation.
Clean the contact surfaces of the wheel and
the brake disc thoroughly every time a wheel
is rotated. Check the tire pressure and reac-
tivate the tire pressure monitor if necessary. Changing wheels
307Wheels and tires Z