audio MERCEDES-BENZ SPRINTER 2016 MY16 Operator’s Manual
[x] Cancel search | Manufacturer: MERCEDES-BENZ, Model Year: 2016, Model line: SPRINTER, Model: MERCEDES-BENZ SPRINTER 2016Pages: 290, PDF Size: 6.44 MB
Page 15 of 290
Menu (vehicles with steering
wheel buttons)Audio ............................................. 167
Operation ....................................... 166
Settings .........................................1 68
Telephone ...................................... 175
Message
see Display message
Message memory (on-board com-
puter) ..................................................1 76
Mirrors
Exterior mirrors ................................ 78
Rear-view mirror .............................. 78
Mobile navigation devices ................ 211
Mobile phone ..................................... 211
Important safety notes .................. 210
Pre-installation ............................... 210
Type approval/frequency .............. 275
Mounting wheels
Lowering the vehicle ......................2 71
Mounting a new wheel ................... 270
Preparing the vehicle ..................... 267
Raising the vehicle ......................... 268
Removing a wheel .......................... 269
Removing and mounting the spare
wheel ............................................. 273
Securing the vehicle against roll-
ing away ........................................ 267
N
Navigation
Fittings for PND mobile navigation
devices .......................................... 211
Notes on breaking-in a new vehi-
cle ....................................................... 118
O
Occupant safety
Children in the vehicle ..................... 47
Important safety notes .................... 39
Introduction to the restraint sys-
tem ..................................................3 9
Pets in the vehicle ........................... 52
Restraint system warning lamp ........ 39 Odometer
Display (vehicles with steering
wheel buttons) ...............................1 67
Display (vehicles without steering
wheel buttons) ............................... 163
Off-road driving
Checklist after driving off-road ...... 139
Important safety notes .................. 137
Rules for driving off-road ...............1 39
Oil
see Engine oil
On-board computer
Checking the oil level ..................... 220
Display message ............................ 176
Lighting submenu .......................... 171
On-board computer (vehicles with
steering wheel buttons)
Audio menu ................................... 167
Display message ............................ 164
Menu overview .............................. 166
Operating ....................................... 164
Operation menu .............................1 66
Settings menu ............................... 168
Standard display ............................ 167
Telephone menu ............................ 175
Trip computer menu ...................... 174
On-board computer (vehicles with-
out steering wheel buttons)
Display message ............................ 176
General notes ................................ 163
Setting the clock ............................ 164
Standard display ............................ 163
Operating Instructions
Before the first journey .................... 22
Limited Warranty ............................. 22
Operating safety
Limited Warranty ............................. 22
Operating safety and vehicle
approval
Attachments and bodies .................. 27
Changing the engine power out-
put ................................................... 26
Correct use ...................................... 24
Declaration of conformity ................ 26
Equipment and conversions ............. 27
Imp
ortant safety notes .................... 25
Information about body/equip-
ment mounting directives ................ 27
Index13
Page 30 of 290

Further information can be obtained at any
authorized Sprinter Dealer.
GWARNING
The function of systems or components can
be affected by conversions or modifications
to the vehicle. They might not function prop-
erly anymore and/or jeopardize the opera-
tional safety of the vehicle. There is an
increased risk of an accident and injury.
Conversions or modifications should always
be carried out at qualified specialist work-
shop.
If you intend to make modifications to your vehi-
cle, we strongly recommend that you contact
the distributor named on the inside of the front
cover. There you will receive all the necessary
information and a charge may be levied.
You alone accept the responsibility if body man-
ufacturers or dealers make modifications that
affect the final certification of the engine, the
vehicle or the equipment. This also applies to
the identification and documentation of modifi-
cations to the affected vehicle components.
You are responsible for certification and confir-
mation that:
Rall the applicable standards and regulations
that are affected by the vehicle modification
are met
Rthe modified vehicle fulfills the vehicle safety standards and emissions laws and regula-
tions
Rthe modifications or installation of accesso-
ries does not affect the safety of the vehicle
We are not responsible for the final certification,
product liability or warranty claims which result
from the modifications. This applies to:
Rthe modified components, assemblies or sys-
tems
Rany resulting noncompliance with any of the
emissions laws and regulations or the motor
vehicle safety standards
Rany consequences arising from the changes
that make the vehicle less safe or even render it defective
We do not assume responsibility as the final-
stage manufacturer or for the consequential
product liability.
Notes on the radiator
Even seemingly small changes to the vehicle,
such as attaching a radiator trim for winter driv-
ing, is not permitted. Do not cover up the radi-
ator. Do not use thermal mats, insect protection
covers or anything similar.
Otherwise, the values of the diagnostic system
may be affected. Some of these values are
legally prescribed and must always be correct.
Information on the cargo compartment
floor
!The wooden or plastic cargo area floor fitted
at the factory is an integral component of the
vehicle structure. The vehicle body could be
damaged if you have the load area floor
removed. This then affects the securing of
loads and the maximum loading capacity of
the lashing points is no longer guaranteed.
Therefore, do not have the load area floor
removed.
Genuine Mercedes-Benz parts
!
Air bags and Emergency Tensioning Devi-
ces, as well as control units and sensors for
these restraint systems, may be installed in
the following areas of your vehicle:
Rdoors
Rdoor pillars
Rdoor sills
Rseats
Rcockpit
Rinstrument cluster
Rcenter console
Do not install accessories such as audio sys-
tems in these areas. Do not carry out repairs or welding. You could impair the operating
efficiency of the restraint systems.
Have aftermarket accessories installed at a
qualified specialist workshop.
HEnvironmental note
We supply reconditioned assemblies and
parts which are of the same quality as new
parts. The same New Vehicle Limited War-
ranty applies as for new parts.
28Introduction
Page 33 of 290
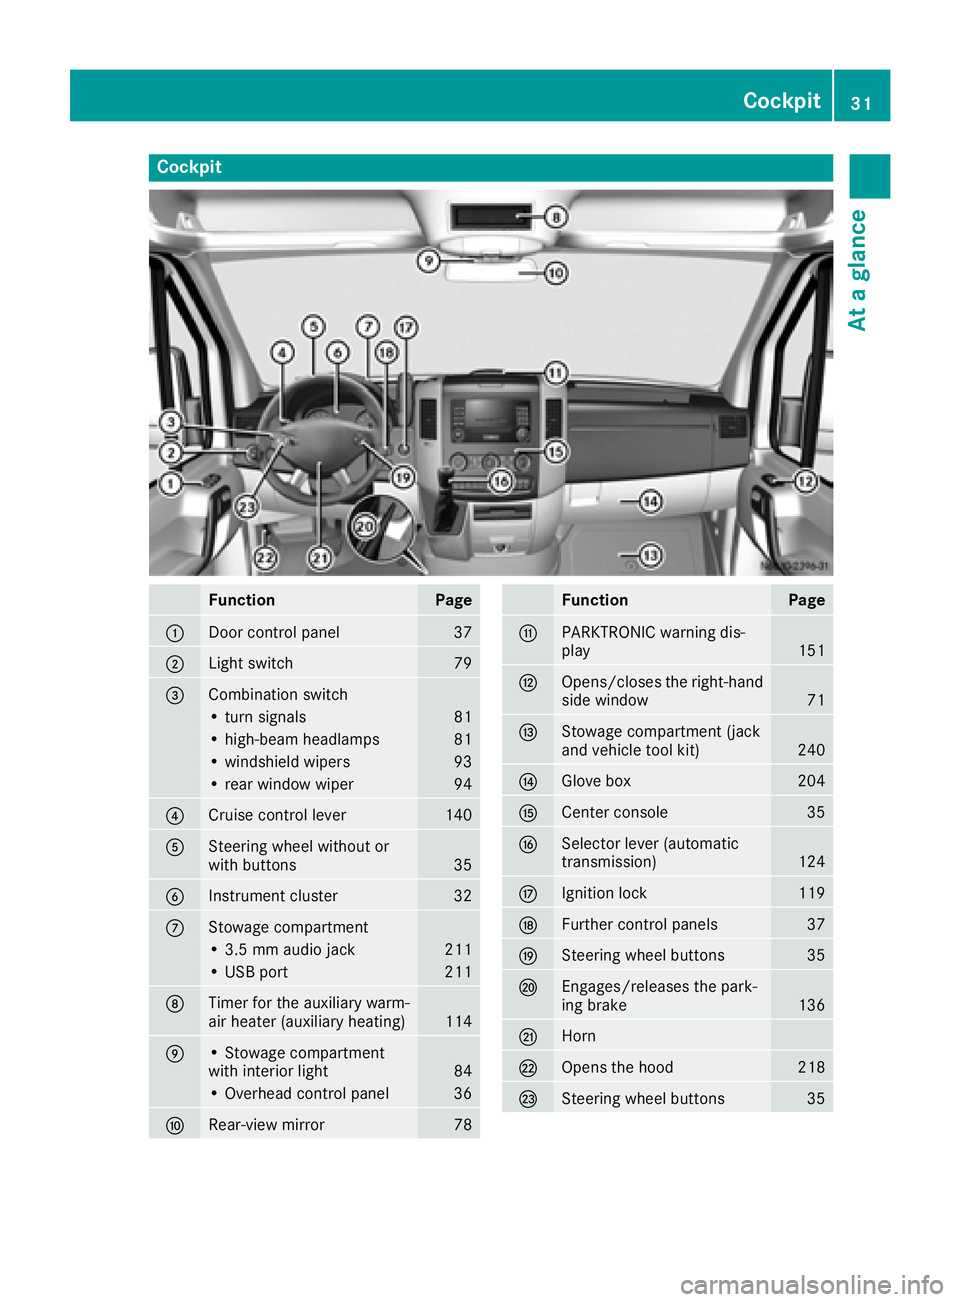
Cockpit
FunctionPage
:Door control panel37
;Light switch79
=Combination switch
• turn signals81
• high-beam headlamps81
• windshield wipers93
• rear window wiper94
?Cruise control lever140
ASteering wheel without or
with buttons35
BInstrument cluster32
CStowage compartment
• 3.5 mm audio jack211
• USB port211
DTimer for the auxiliary warm-
air heater (auxiliary heating)114
E• Stowage compartment
with interior light84
• Overhead control panel36
FRear-view mirror78
FunctionPage
GPARKTRONIC warning dis-
play151
HOpens/closes the right-hand
side window71
IStowage compartment (jack
and vehicle tool kit)240
JGlove box204
KCenter console35
LSelector lever (automatic
transmission)124
MIgnition lock119
NFurther control panels37
OSteering wheel buttons35
PEngages/releases the park-
ing brake136
QHorn
ROpens the hood218
SSteering wheel buttons35
Cockpit31
At a glance
Page 37 of 290
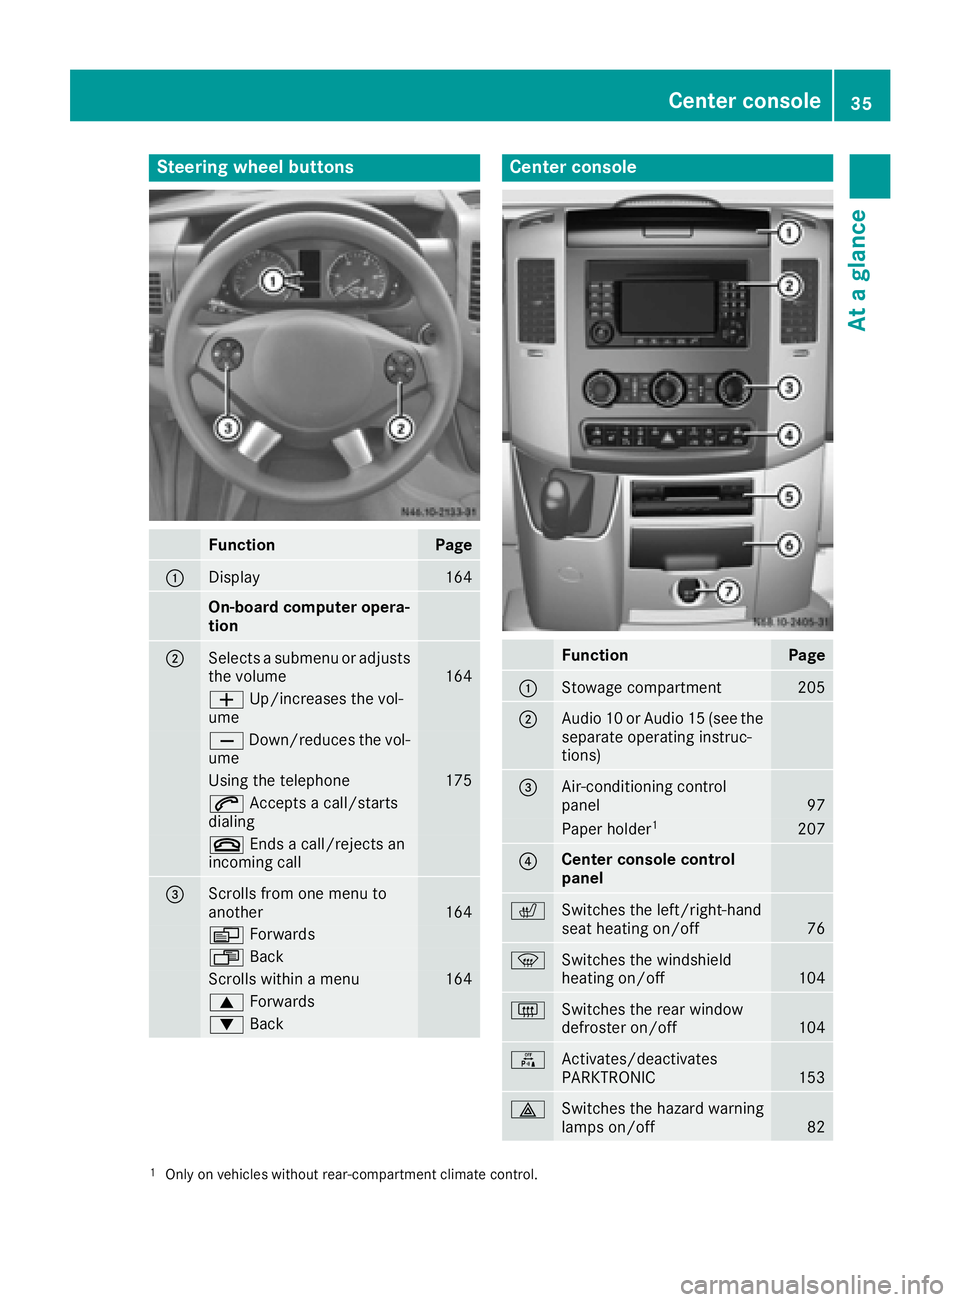
Steering wheel buttons
FunctionPage
:Display164
On-board computer opera-
tion
;Selects a submenu or adjusts
the volume164
WUp/increases the vol-
ume
X Down/reduces the vol-
ume
Using the telephone175
6 Accepts a call/starts
dialing
~ Ends a call/rejects an
incoming call
=Scrolls from one menu to
another164
V Forwards
UBack
Scrolls within a menu164
9Forwards
:Back
Center console
FunctionPage
:Stowage compartment205
;Audio 10 or Audio 15 (see the
separate operating instruc-
tions)
=Air-conditioning control
panel97
Paper holder1207
?Center console control
panel
cSwitches the left/right-hand
seat heating on/off76
zSwitches the windshield
heating on/off104
|Switches the rear window
defroster on/off104
fActivates/deactivates
PARKTRONIC153
£Switches the hazard warning
lamps on/off82
1Only on vehicles without rear-compartment climate control.
Center console35
At a glance
Page 156 of 290
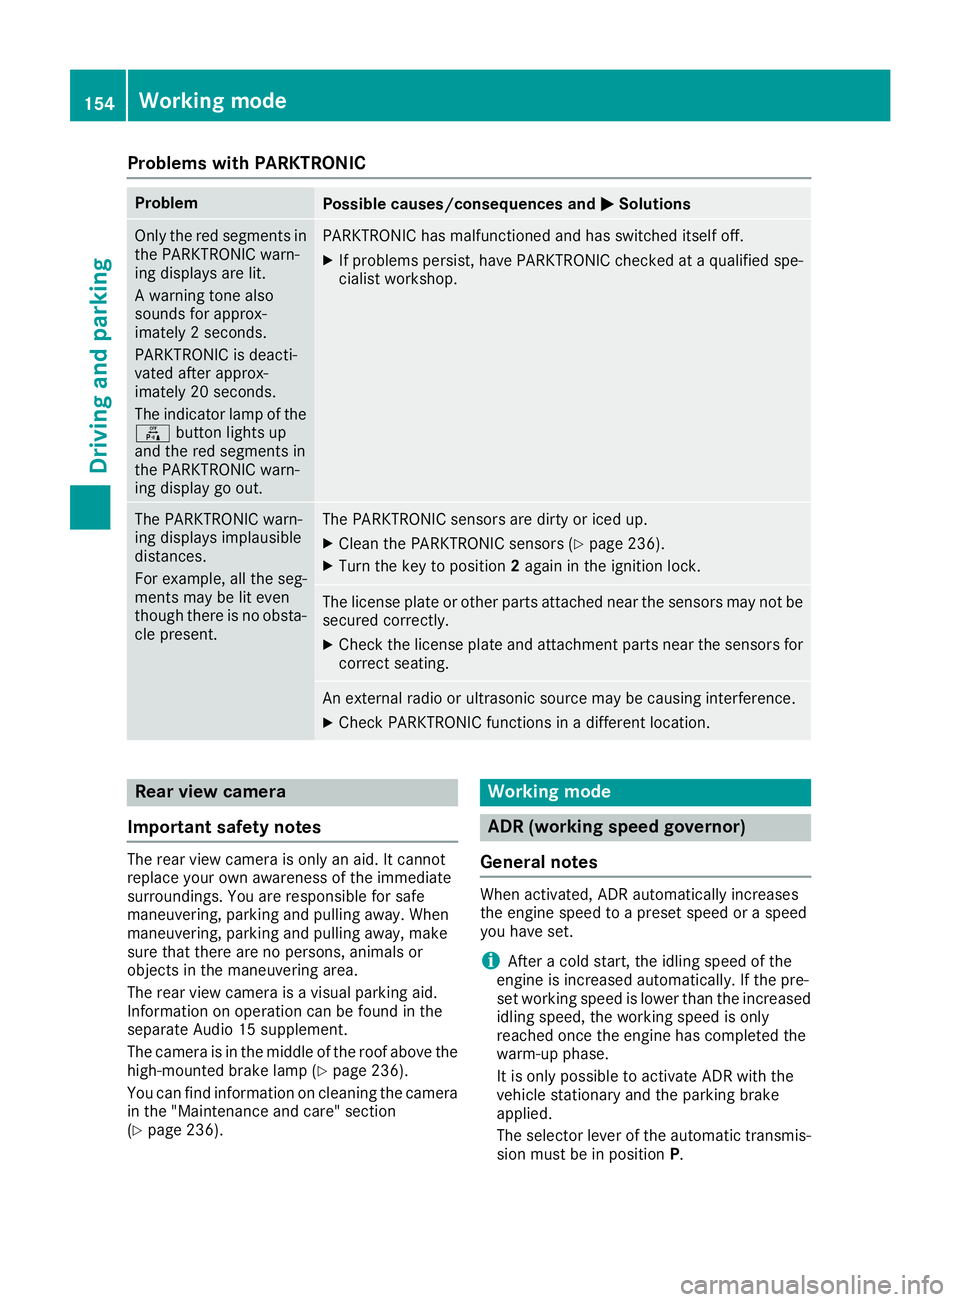
Problems with PARKTRONIC
ProblemPossible causes/consequences andMSolutions
Only the red segments in
the PARKTRONIC warn-
ing displays are lit.
A warning tone also
sounds for approx-
imately 2 seconds.
PARKTRONIC is deacti-
vated after approx-
imately 20 seconds.
The indicator lamp of the
f button lights up
and the red segments in
the PARKTRONIC warn-
ing display go out.PARKTRONIC has malfunctioned and has switched itself off.
XIf problems persist, have PARKTRONIC checked at a qualified spe- cialist workshop.
The PARKTRONIC warn-
ing displays implausible
distances.
For example, all the seg-
ments may be lit even
though there is no obsta-
cle present.The PARKTRONIC sensors are dirty or iced up.
XClean the PARKTRONIC sensors (Ypage 236).
XTurn the key to position 2again in the ignition lock.
The license plate or other parts attached near the sensors may not be
secured correctly.
XCheck the license plate and attachment parts near the sensors for
correct seating.
An external radio or ultrasonic source may be causing interference.
XCheck PARKTRONIC functions in a different location.
Rear view camera
Important safety notes
The rear view camera is only an aid. It cannot
replace your own awareness of the immediate
surroundings. You are responsible for safe
maneuvering, parking and pulling away. When
maneuvering, parking and pulling away, make
sure that there are no persons, animals or
objects in the maneuvering area.
The rear view camera is a visual parking aid.
Information on operation can be found in the
separate Audio 15 supplement.
The camera is in the middle of the roof above the
high-mounted brake lamp (
Ypage 236).
You can find information on cleaning the camera
in the "Maintenance and care" section
(
Ypage 236).
Working mode
ADR (working speed governor)
General notes
When activated, ADR automatically increases
the engine speed to a preset speed or a speed
you have set.
iAfter a cold start, the idling speed of the
engine is increased automatically. If the pre-
set working speed is lower than the increased idling speed, the working speed is only
reached once the engine has completed the
warm-up phase.
It is only possible to activate ADR with the
vehicle stationary and the parking brake
applied.
The selector lever of the automatic transmis-
sion must be in position P.
154Working mode
Driving and parking
Page 167 of 290
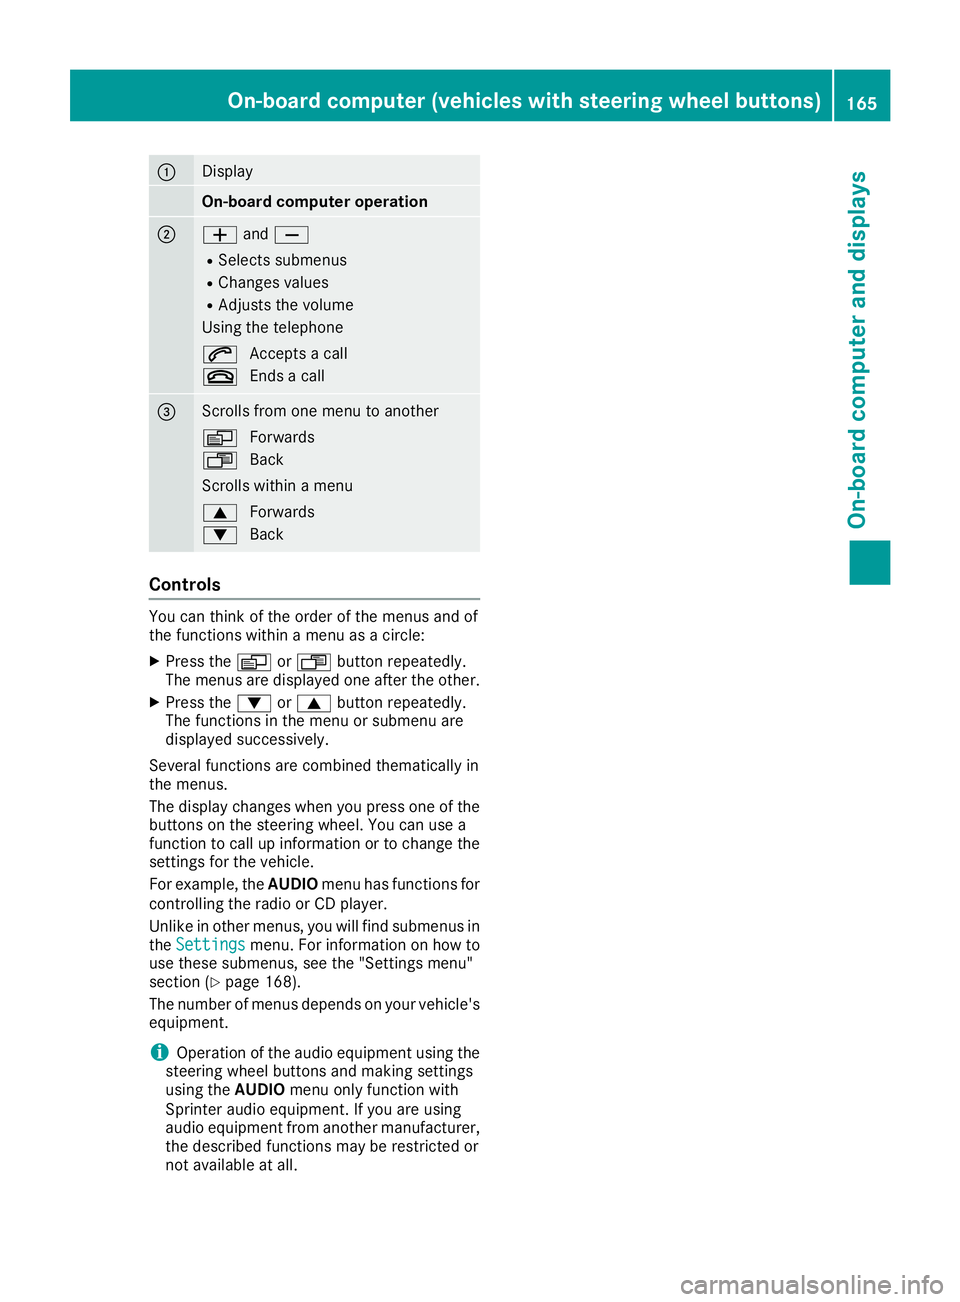
:Display
On-board computer operation
;WandX
RSelects submenus
RChanges values
RAdjusts the volume
Using the telephone
6 Accepts a call
~ Ends a call
=Scrolls from one menu to another
V Forwards
U Back
Scrolls within a menu
9 Forwards
: Back
Controls
You can think of the order of the menus and of
the functions within a menu as a circle:
XPress the VorU button repeatedly.
The menus are displayed one after the other.
XPress the :or9 button repeatedly.
The functions in the menu or submenu are
displayed successively.
Several functions are combined thematically in
the menus.
The display changes when you press one of the
buttons on the steering wheel. You can use a
function to call up information or to change the
settings for the vehicle.
For example, the AUDIOmenu has functions for
controlling the radio or CD player.
Unlike in other menus, you will find submenus in
the Settings
menu. For information on how to
use these submenus, see the "Settings menu"
section (
Ypage 168).
The number of menus depends on your vehicle's
equipment.
iOperation of the audio equipment using the
steering wheel buttons and making settings
using the AUDIOmenu only function with
Sprinter audio equipment. If you are using
audio equipment from another manufacturer,
the described functions may be restricted or
not available at all.
On-board computer (vehicles withsteering whee lbu ttons)165
On-board computer and displays
Z
Page 168 of 290
Menu overview
Diagrams
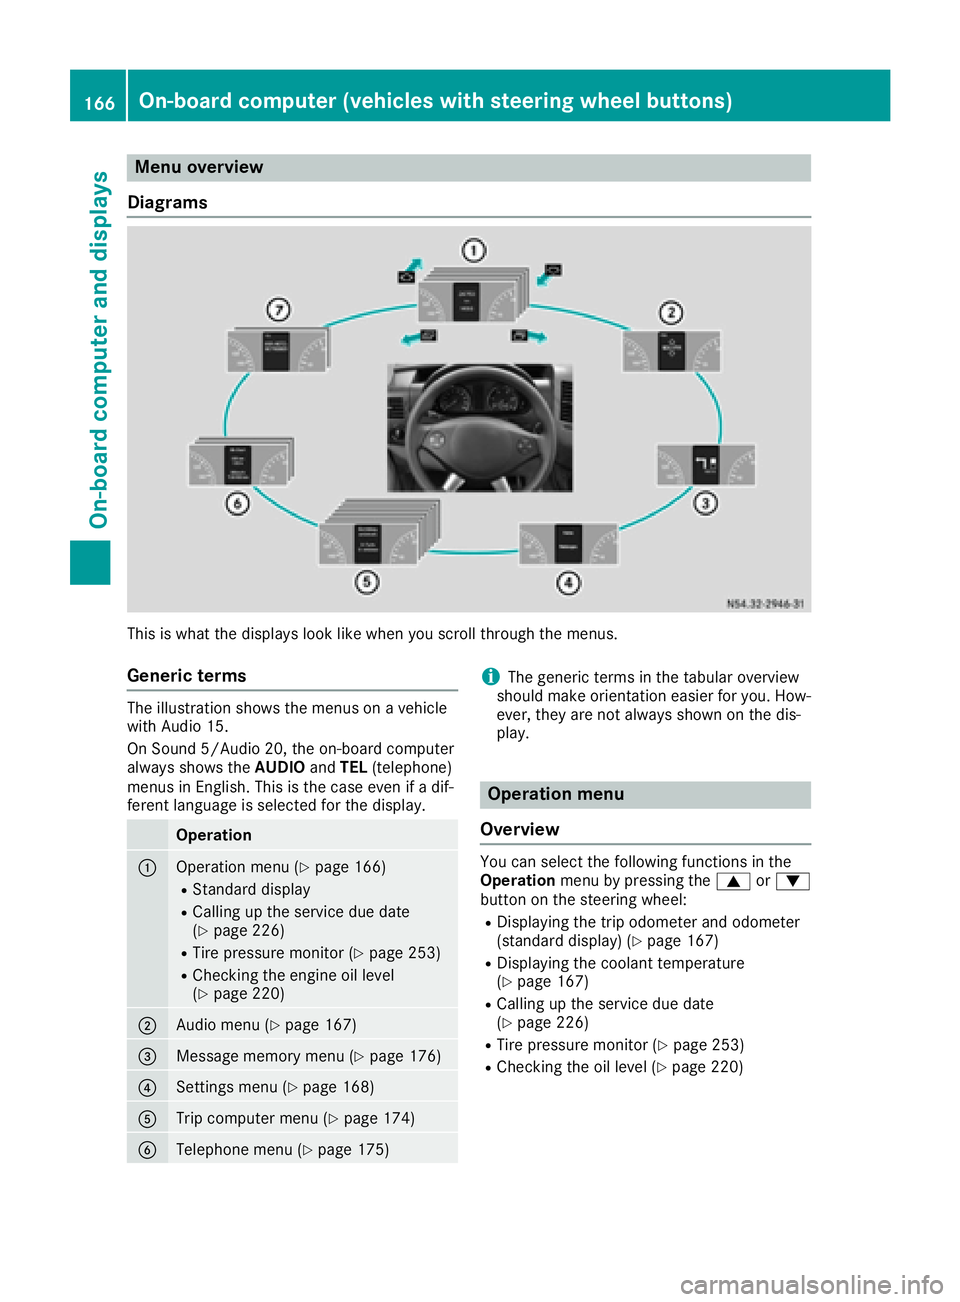
This is what the displays look like when you scroll through the menus.
Generic terms
The illustration shows the menus on a vehicle
with Audio 15.
On Sound 5/Audio 20, the on-board computer
always shows the AUDIOandTEL (telephone)
menus in English. This is the case even if a dif-
ferent language is selected for the display.
Operation
:Operation menu (Ypage 166)
RStandard display
RCalling up the service due date
(Ypage 226)
RTire pressure monitor (Ypage 253)
RChecking the engine oil level
(Ypage 220)
;Audio menu (Ypage 167)
=Message memory menu (Ypage 176)
?Settings menu (Ypage 168)
ATrip computer menu (Ypage 174)
BTelephone menu (Ypage 175)
iThe generic terms in the tabular overview
should make orientation easier for you. How-
ever, they are not always shown on the dis-
play.
Operation menu
Overview
You can select the following functions in the
Operation menu by pressing the 9or:
button on the steering wheel:
RDisplaying the trip odometer and odometer
(standard display) (Ypage 167)
RDisplaying the coolant temperature
(Ypage 167)
RCalling up the service due date
(Ypage 226)
RTire pressure monitor (Ypage 253)
RChecking the oil level (Ypage 220)
166On-board computer (vehicles with steering wheel buttons)
On-board computer and displays
Page 169 of 290
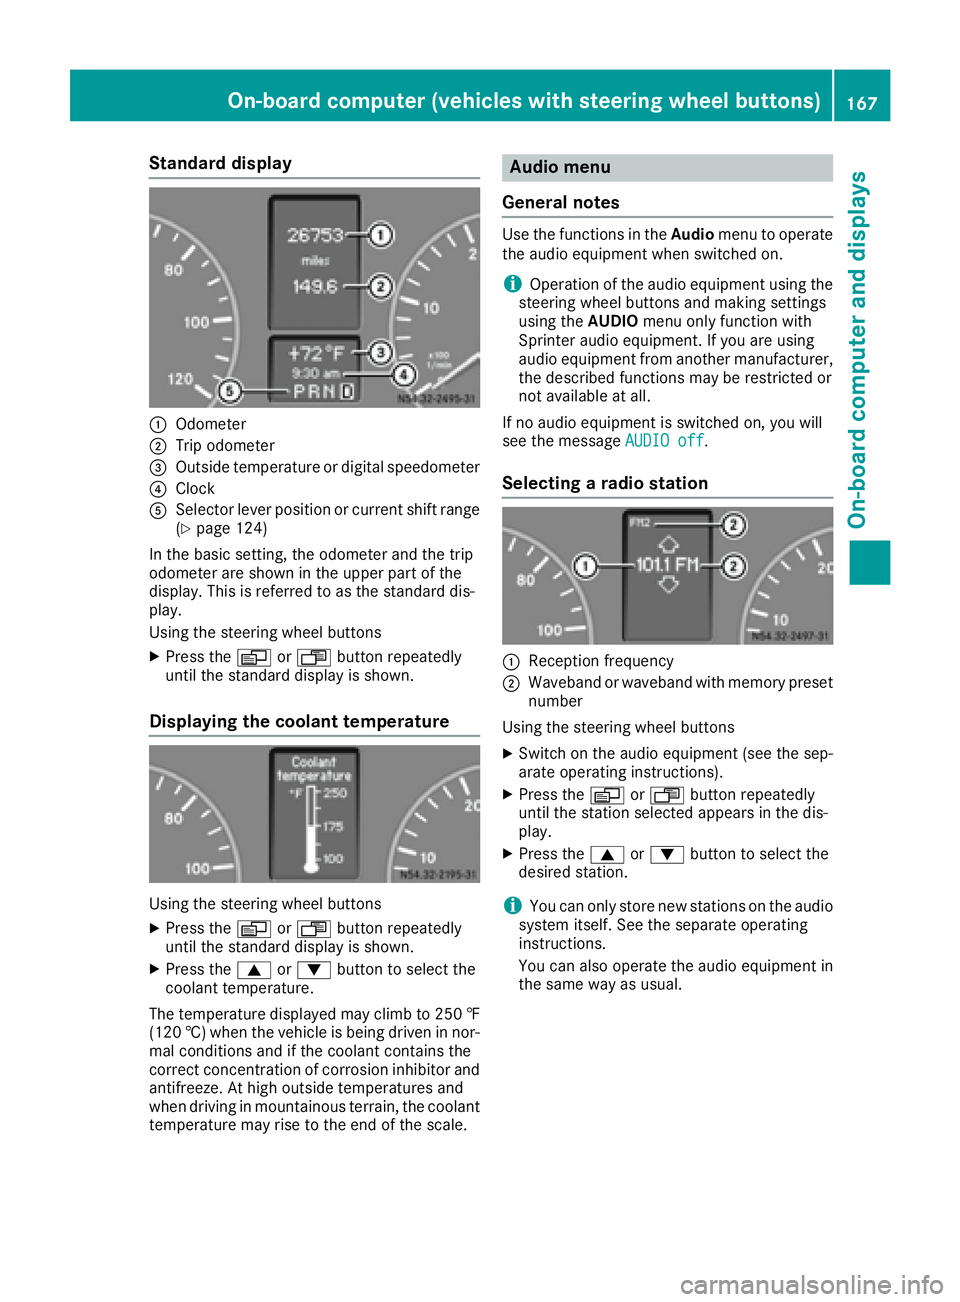
Standard display
:Odometer
;Trip odometer
=Outside temperature or digital speedometer
?Clock
ASelector lever position or current shift range
(Ypage 124)
In the basic setting, the odometer and the trip
odometer are shown in the upper part of the
display. This is referred to as the standard dis-
play.
Using the steering wheel buttons
XPress the VorU button repeatedly
until the standard display is shown.
Displaying the coolant temperature
Using the steering wheel buttons
XPress the VorU button repeatedly
until the standard display is shown.
XPress the 9or: button to select the
coolant temperature.
The temperature displayed may climb to 250 ‡
(120 †) when the vehicle is being driven in nor-
mal conditions and if the coolant contains the
correct concentration of corrosion inhibitor and
antifreeze. At high outside temperatures and
when driving in mountainous terrain, the coolant
temperature may rise to the end of the scale.
Audio menu
General notes
Use the functions in the Audiomenu to operate
the audio equipment when switched on.
iOperation of the audio equipment using the
steering wheel buttons and making settings
using the AUDIOmenu only function with
Sprinter audio equipment. If you are using
audio equipment from another manufacturer,
the described functions may be restricted or
not available at all.
If no audio equipment is switched on, you will
see the message AUDIO off
.
Selecting a radio station
:Reception frequency
;Waveband or waveband with memory preset
number
Using the steering wheel buttons
XSwitch on the audio equipment (see the sep-
arate operating instructions).
XPress the VorU button repeatedly
until the station selected appears in the dis-
play.
XPress the 9or: button to select the
desired station.
iYou can only store new stations on the audio
system itself. See the separate operating
instructions.
You can also operate the audio equipment in
the same way as usual.
On-board computer (vehicles with steering wheel buttons)167
On-board computer and displays
Z
Page 170 of 290
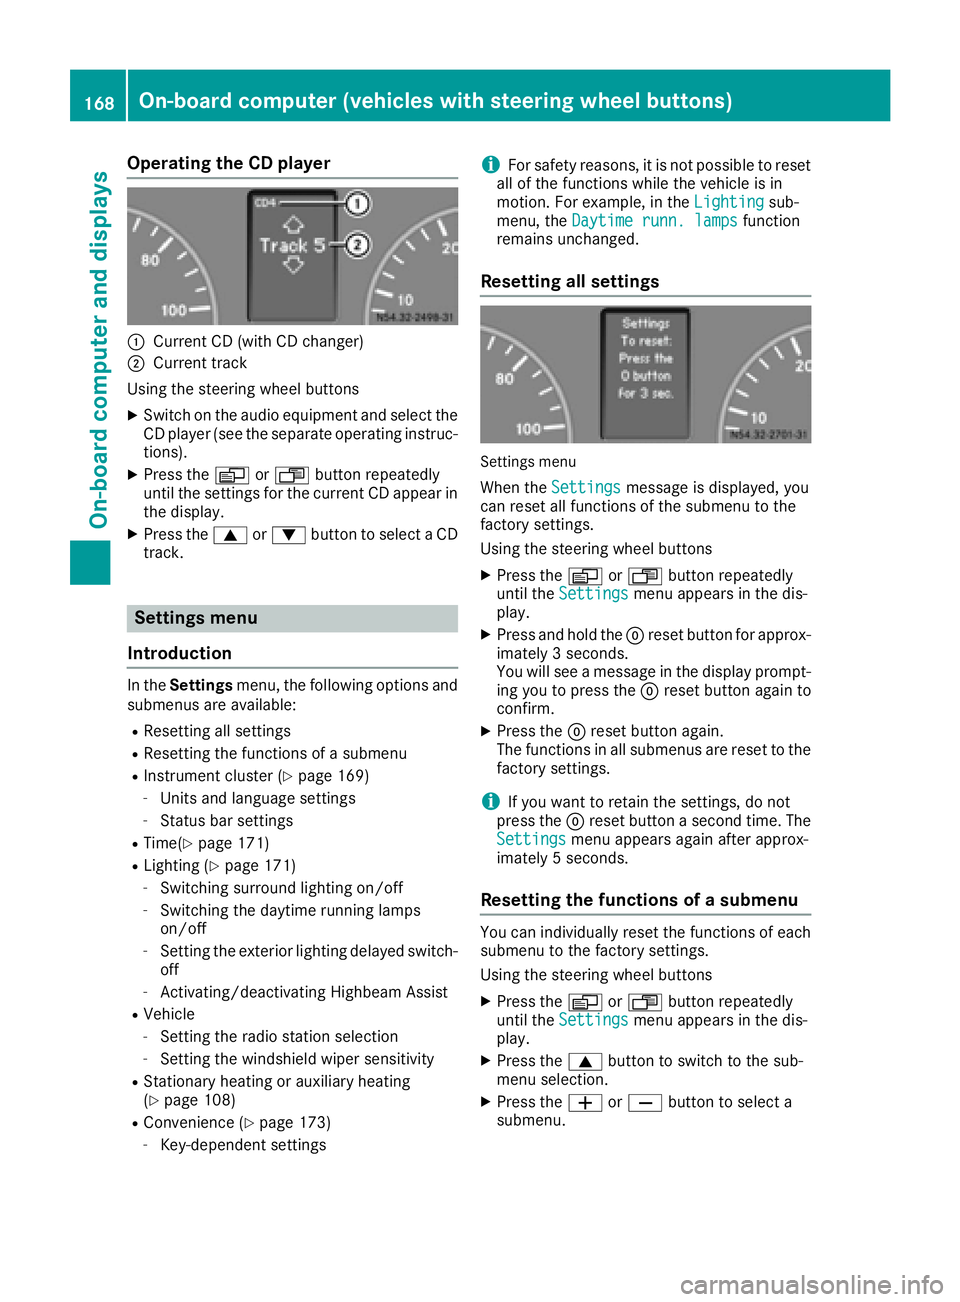
Operating the CD player
:Current CD (with CD changer)
;Current track
Using the steering wheel buttons
XSwitch on the audio equipment and select the
CD player (see the separate operating instruc-
tions).
XPress the VorU button repeatedly
until the settings for the current CD appear in
the display.
XPress the 9or: button to select a CD
track.
Settings menu
Introduction
In the Settings menu, the following options and
submenus are available:
RResetting all settings
RResetting the functions of a submenu
RInstrument cluster (Ypage 169)
-Units and language settings
-Status bar settings
RTime(Ypage 171)
RLighting (Ypage 171)
-Switching surround lighting on/off
-Switching the daytime running lamps
on/off
-Setting the exterior lighting delayed switch-
off
-Activating/deactivating Highbeam Assist
RVehicle
-Setting the radio station selection
-Setting the windshield wiper sensitivity
RStationary heating or auxiliary heating
(Ypage 108)
RConvenience (Ypage 173)
-Key-dependent settings
iFor safety reasons, it is not possible to reset
all of the functions while the vehicle is in
motion. For example, in the Lighting
sub-
menu, the Daytime runn. lampsfunction
remains unchanged.
Resetting all settings
Settings menu
When the Settingsmessage is displayed, you
can reset all functions of the submenu to the
factory settings.
Using the steering wheel buttons
XPress the VorU button repeatedly
until the Settingsmenu appears in the dis-
play.
XPress and hold the 9reset button for approx-
imately 3 seconds.
You will see a message in the display prompt-
ing you to press the 9reset button again to
confirm.
XPress the 9reset button again.
The functions in all submenus are reset to the
factory settings.
iIf you want to retain the settings, do not
press the 9reset button a second time. The
Settings
menu appears again after approx-
imately 5 seconds.
Resetting the functions of a submenu
You can individually reset the functions of each
submenu to the factory settings.
Using the steering wheel buttons
XPress the VorU button repeatedly
until the Settingsmenu appears in the dis-
play.
XPress the 9button to switch to the sub-
menu selection.
XPress the WorX button to select a
submenu.
168On-board computer (vehicles with steering wheel buttons)
On-board computer and displays
Page 177 of 290
Telephone menu
Introduction
GWARNING
If you operate information systems and com-
munication equipment integrated in the vehi-
cle while driving, you will be distracted from
traffic conditions. You could also lose control
of the vehicle. There is a risk of an accident.
Only operate the equipment when the traffic
situation permits. If you are not sure that this
is possible, park the vehicle paying attention
to traffic conditions and operate the equip-
ment when the vehicle is stationary.
You must observe the legal requirements of the
country in which you are currently driving when
operating a mobile phone in the vehicle. If it is
permitted to operate a mobile phone while the
vehicle is in motion, only operate it when road
and traffic conditions permit.
If you have connected a mobile phone to the
Sprinter hands-free system, you can operate it
using the functions in the TEL
menu.
XSwitch on the mobile phone (see the separate
operating instructions).
XSwitch on the audio equipment (see the sep-
arate operating instructions).
XEstablish a Bluetooth®connection between
the mobile phone and the audio equipment
(see the separate operating instructions).
XPress the VorU button on the steering
wheel to select the TELmenu.
XWhenPlease enter PIN:appears in the
display, enter the PIN using the mobile phone
or audio equipment.
The mobile phone will search for a network.
The display remains blank during this time.
You will see the mobile phone operational
readiness display once the mobile phone has
found a network.
iYou can obtain further information about
suitable mobile phones and connecting
mobile phones via Bluetooth
®at any qualified
specialist workshop.
iIf the mobile phone operational readiness
symbol goes out, your vehicle is outside of the
transmission and reception range.
Accepting a call
XPress the 6button on the steering wheel
to accept an incoming call.
The display shows the call duration.
Rejecting or ending a call
XPress ~button on the steering wheel to
reject or end a call.
The caller then hears the engaged tone.
The display shows the mobile phone opera-
tional readiness symbol again.
Dialing a number from the phone book
You can enter new telephone numbers into the
phone book via the mobile phone (see the sep-
arate operating instructions). If your mobile
phone is able to receive calls, you can search for
and dial a number from the phone book.
Using the steering wheel buttons
XUse the VorU button to select the TELmenu.
The display shows the mobile phone opera-
tional readiness symbol.
XPress the9or: button to switch to
the phone book.
The on-board computer reads the phone book
stored on the SIM card or in the mobile phone.
This may take more than a minute.
When the message is no longer displayed,
reading has ended.
XPress the 9or: button to select the
desired name.
or
XTo start rapid scrolling: press and hold the
9 or: button longer than 1 second.
Rapid scrolling stops when you release the
button or reach the end of the list.
Using the steering wheel buttons
XTo start dialing: press the6button.
The on-board computer dials the correspond-
ing phone number.
When a connection is established, the name
of the other person and/or the call duration
appear in the display.
XTo exit the phone book: press the~but-
ton.
On-board computer (vehicles withsteering whee lbu ttons)175
On-board computer and displays
Z