coolant level MERCEDES-BENZ SPRINTER 2016 MY16 Operator’s Manual
[x] Cancel search | Manufacturer: MERCEDES-BENZ, Model Year: 2016, Model line: SPRINTER, Model: MERCEDES-BENZ SPRINTER 2016Pages: 290, PDF Size: 6.44 MB
Page 9 of 290
Reheat function (air dehumidifica-
tion).............................................. .103
Setting the air distribution ............. 102
Setting the air vents ......................1 05
Setting the airflow ......................... 102
Setting the temperature ................ 102
Switching air-recirculation mode
on/off ............................................ 104
Switching on/off ........................... 101
Switching the rear window
defroster on/off ............................ 104
Switching windshield heating on/
off ..................................................1 04
Cockpit
Overview .......................................... 31
see Instrument cluster
COLLISION PREVENTION ASSIST
Activating/deactivating the dis-
tance warning function .................. 143
COMAND display
Cleaning ......................................... 237
Combination switch ............................ 81
Communications equipment
Operation ....................................... 211
PND fittings ................................... 211
Ports .............................................. 211
Type approval/frequency .............. 275
Consumption statistics (on-board
computer) .......................................... 174
Control panel
Above the windshield ....................... 36
Center console ................................ 35
Climate control ................................ 35
Driver's door ....................................3 7
Left and right side of the steering
wheel ............................................... 37
Conversions/equipment .................... 27
Coolant (engine)
Adding ........................................... 223
Checking the level .........................2 22
Display message ............................ 188
Displaying the temperature (on-
board computer) ............................ 167
Filling capacity ............................... 284
Important safety notes .................. 222
Cooling
see Climate control C
ornering lamps
Replacing bulbs ............................... 87
Cornering light function
Function/notes ................................ 82
Courtesy lights
Replacing bulbs ............................... 91
Crosswind driving assistance ............ 55
Cruise control
Activating ....................................... 141
Activation conditions ..................... 140
Cruise control lever ....................... 140
Deactivating ................................... 141
Display message ............................ 190
Driving system ............................... 140
Function/notes .............................1 40
Important safety notes .................. 140
Problem (malfunction) ................... 142
Resuming the stored speed ........... 141
Setting a speed .............................. 141
Storing and maintaining current
speed ............................................. 141
Cup holder ......................................... 208
Center console .............................. 208
Cup holder
see Cup holders
Cup holders ........................................ 208
Curtains (cleaning instructions) ...... 239
Customer Assistance Center
(CAC) ..................................................... 27
Customer Relations Department ....... 27
D
Dashboard
see Cockpit
Dashboard lighting
see Instrument cluster lighting
Data
see Technical data
Daytime running lamps
Activating/deactivating (vehicles
with steering wheel buttons) ......... 171
Changing bulbs (halogen head-
lamps) .............................................. 87
Switching on/off (switch) ................ 79
Switching on/off (vehicles with-
out steering wheel buttons) ........... 164
Index7
Page 22 of 290
Twin front-passenger seatStowage compartment .................. 206
Two-way radios
Type approval/frequency .............. 275
TWR (Tongue Weight Rating) (defi-
nition) ................................................. 266
U
Unlocking
From inside the vehicle (central
unlocking button) ............................. 64
USB port ............................................. 211
V
Vehicle
Data acquisition ............................... 29
Display message ............................ 192
Electronics ..................................... 275
Equipment ....................................... 22
Individual settings (vehicles with
steering wheel buttons) ................. 168
Limited Warranty ............................. 22
Loading .......................................... 258
Locking (SmartKey) .......................... 59
Lowering ........................................ 271
Maintenance .................................... 23
Operating safety .............................. 25
Parking for a long period ................ 132
Pulling away ................................... 121
Raising ........................................... 268
Registration ..................................... 27
Reporting problems ......................... 27
Securing from rolling away ............ 130
Towing away .................................. 243
Transporting .................................. 246
Unlocking (SmartKey) ...................... 59
Vehicle battery
see Battery (vehicle)
Vehicle bodies ..................................... 27
Body/equipment mounting direc-
tives for trucks ................................. 27
Vehicle data ....................................... 285
Vehicle identification number .......... 276
Vehicle identification plate .............. 276
Vehicle tool kit .................................. 240 Vents
see Air vents
Voltage supply
Fuses ............................................. 246
W
Warning Stickers ........................................... 24
Warning and indicator lamp
Diesel particle filter ....................... 201
Power assistance for the steering .. 203
Warning and indicator lamps
Brakes ........................................... 195
Check Engine ................................. 200
Coolant .......................................... 199
Diesel Exhaust Fluid (DEF) ............. 197
Electrical step ................................ 203
ESP
®.............................................. 194
ESP®function ................................ 197
Overview .......................................... 33
Seat belt ........................................ 203
Warning lamp .................................... 241
Warning triangle ................................ 241
Warning- and indicator lamps
ABS ................................................ 195
Air filter .......................................... 201
ASR ................................................ 194
BAS ................................................ 195
Battery charge ............................... 198
Brake wear .................................... 198
Bulbs .............................................. 203
Doors ............................................. 203
Engine oil level ............................... 198
Preglow .......................................... 201
Reserve fuel ................................... 200
Tire pressure monitor .................... 202
Water separator ............................. 202
Windshield washer fluid ................. 202
Warranty .............................................. 22
Washer fluid
Adding ........................................... 224
Capacities ...................................... 285
Display message ............................ 193
Indicator lamp ................................ 202
Notes ............................................. 284
Wiping with ...................................... 93
20Index
Page 116 of 290
ProblemPossible causes/consequences andMSolutions
The fuse is blown.
XReplace the fuse; see the "Fuse allocation" supplement.
XHave the cause of the blown fuse determined at a qualified spe-
cialist workshop.
or
A malfunction has occurred.
XSwitch the ignition on and off twice.
If the auxiliary heating still cannot be switched on, the heating device
is faulty.
XHave the auxiliary heating checked at a qualified specialist work-
shop.
The auxiliary heating is
overheated.The coolant level is too low.
XCheck the coolant level and add more coolant if necessary
(Ypage 222).
Auxiliary warm-air heater
Operation with the timer
Important safety notes
GDANGER
If a switch-on time has been selected, the
auxiliary heating switches on automatically.
RIf the ventilation is insufficient, poisonous
exhaust gases can collect, in particular car-
bon monoxide. This is the case in enclosed
spaces, for example. There is a risk of fatal
injuries.
RIf highly flammable substances or flamma-
ble materials are nearby, there is a risk of a
risk of fire and explosion.
Always deactivate the preselected switch-on
times if you stop the vehicle in such or similar situations.
Use the timer to:
Ractivate and deactivate immediate heating
mode
Rset up to three switch-on times
Rset the operating duration to between 10 and
120 minutes or to continuous operation
Rset the heating level (preselected tempera-
ture) to a range between 10 and 30
Timer overview
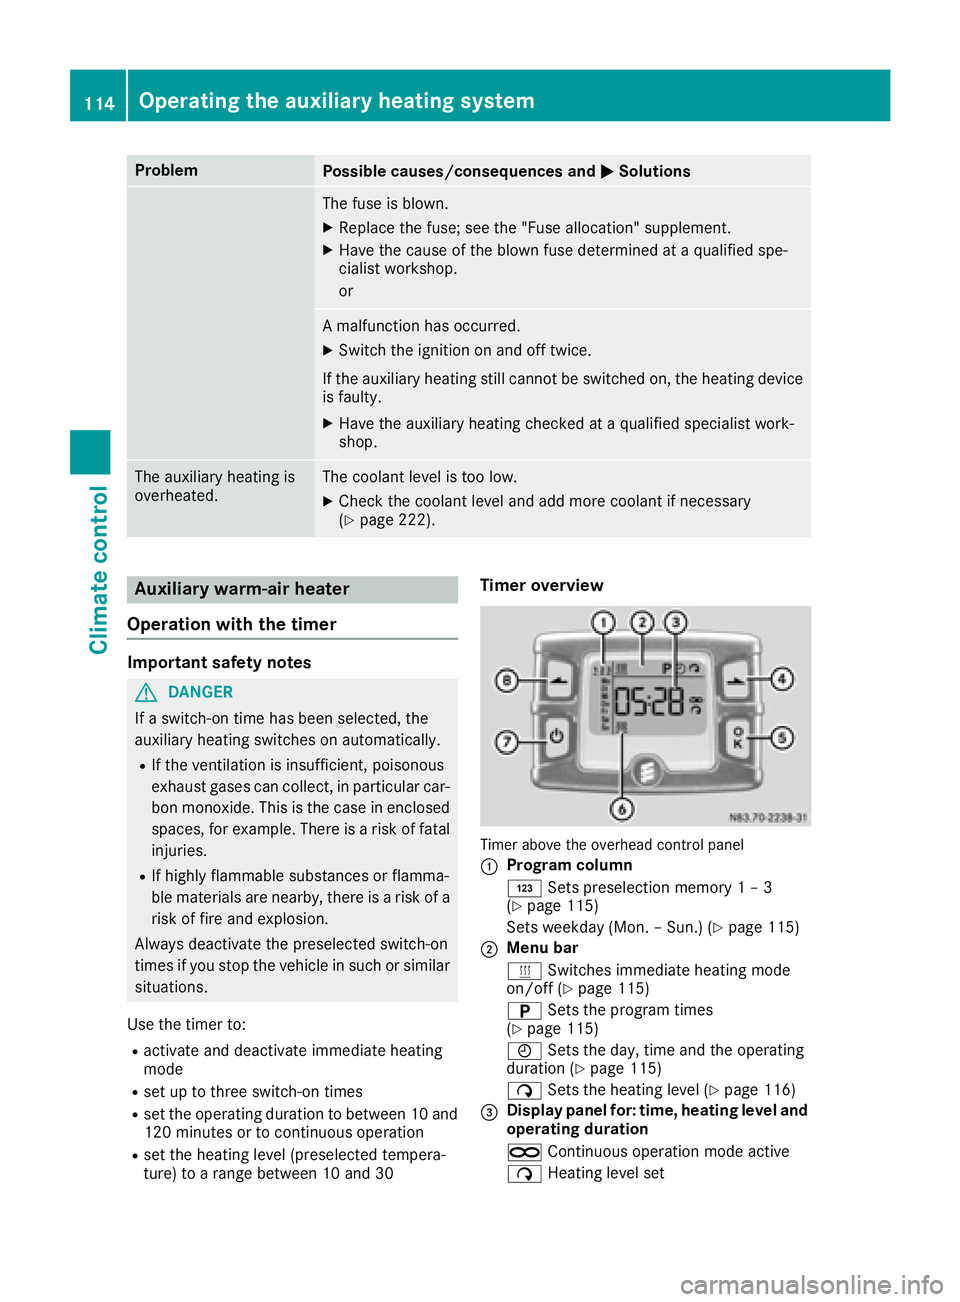
Timer above the overhead control panel
:
Program column
G Sets preselection memory 1 – 3
(
Ypage 115)
Sets weekday (Mon. – Sun.) (
Ypage 115)
;Menu bar
y Switches immediate heating mode
on/off (
Ypage 115)
B Sets the program times
(
Ypage 115)
Ñ Sets the day, time and the operating
duration (
Ypage 115)
ß Sets the heating level (
Ypage 116)
=Display panel for: time, heating level and
operating duration
àContinuous operation mode active
ß Heating level set
114Operating the auxiliary heating system
Climate control
Page 160 of 290
Most federal states and all Canadian provinces
require by law:
Rsafety chains between the towing vehicle andthe trailer. The chains should be cross-wound
under the trailer drawbar. They must be fas-
tened to the vehicle's trailer coupling, not to
the bumper or the axle.
Leave enough slack in the chains. This allows you to drive round tight corners.
Ra separate brake system for certain types of
trailer.
Ra safety shut-off for braked trailers. Find out
the specific requirements according to the
applicable laws.
If the trailer becomes detached from the tow-
ing vehicle, the safety feature applies the
trailer brakes.
Towing a trailer
There are numerous legal requirements con-
cerning the towing of a trailer, e.g. speed restric-tions. Make sure your vehicle/trailer combina-
tion complies with local laws. This not only
means where you live, but also anywhere you
are driving to. Information is available from the
police and local authorities.
Observe the following when towing a trailer:
RPractice driving around bends, stopping and
backing up at a place where there is no traffic.
This enables you to gain experience and get
used to the new handling characteristics.
RBefore driving, check:
-that the trailer tow hitch and ball coupling
are secure
-that the safety switch for a braked trailer is
functioning properly
-that the safety chains are secure and not
damaged
-that the electrical connections are secure
-that the lights are working
-that the wheels are in good order and the
tire pressure is correct
RAdjust the exterior mirrors to provide an
unobstructed view of the rear section of the
trailer.
RIf the trailer has electronically controlled
brakes, pull the vehicle/trailer combination
away carefully. Brake manually using the
brake controller and check that the brakes
are working.
RSecure the load on the trailer according to the
applicable specifications and current stand-
ards on securing loads (
Ypage 214).
RWhen driving with a trailer, check at regular
intervals that the load is secured and that the
brakes and lights are working.
RBear in mind that the handling will be less
stable when towing a trailer than when driving
without one. Avoid sudden steering move-
ments.
RThe vehicle/trailer combination is heavier,
accelerates more slowly and has a decreased
gradient climbing capability and a longer
braking distance.
It is more susceptible to crosswinds and
requires cautious steering.
RIf possible, do not brake suddenly, but rather
moderately at first so that the trailer can acti-
vate its brakes. Then increase the force on the
brake pedal.
RIf the automatic transmission repeatedly
shifts between gears when driving on inclines,
restrict the shift range. Select shift range 4,3,
2 or 1.
Driving in a low gear and at a low speed
reduces the risk of damaging the engine.
RWhen driving on a downhill gradient, shift to a
low gear and take advantage of the engine's
braking effect.
Avoid continuous brake application as this
may overheat the vehicle brakes and, if inst
al-
led, the trailer brakes.
RIf the coolant temperature increases dramat-
ically while the air-conditioning system is
switched on, switch off the air-conditioning
system.
Coolant heat can also be dissipated by
switching the airflow and the temperature of
the heater/air conditioning to the maximum
level. Open the windows if necessary.
RWhen overtaking, pay particular attention to
the extended length of your vehicle/trailer
combination.
Due to the length of your vehicle/trailer com- bination you need an additional distance
before you can return to your original lane.
158Towing a trailer
Driving and parking
Page 168 of 290
Menu overview
Diagrams
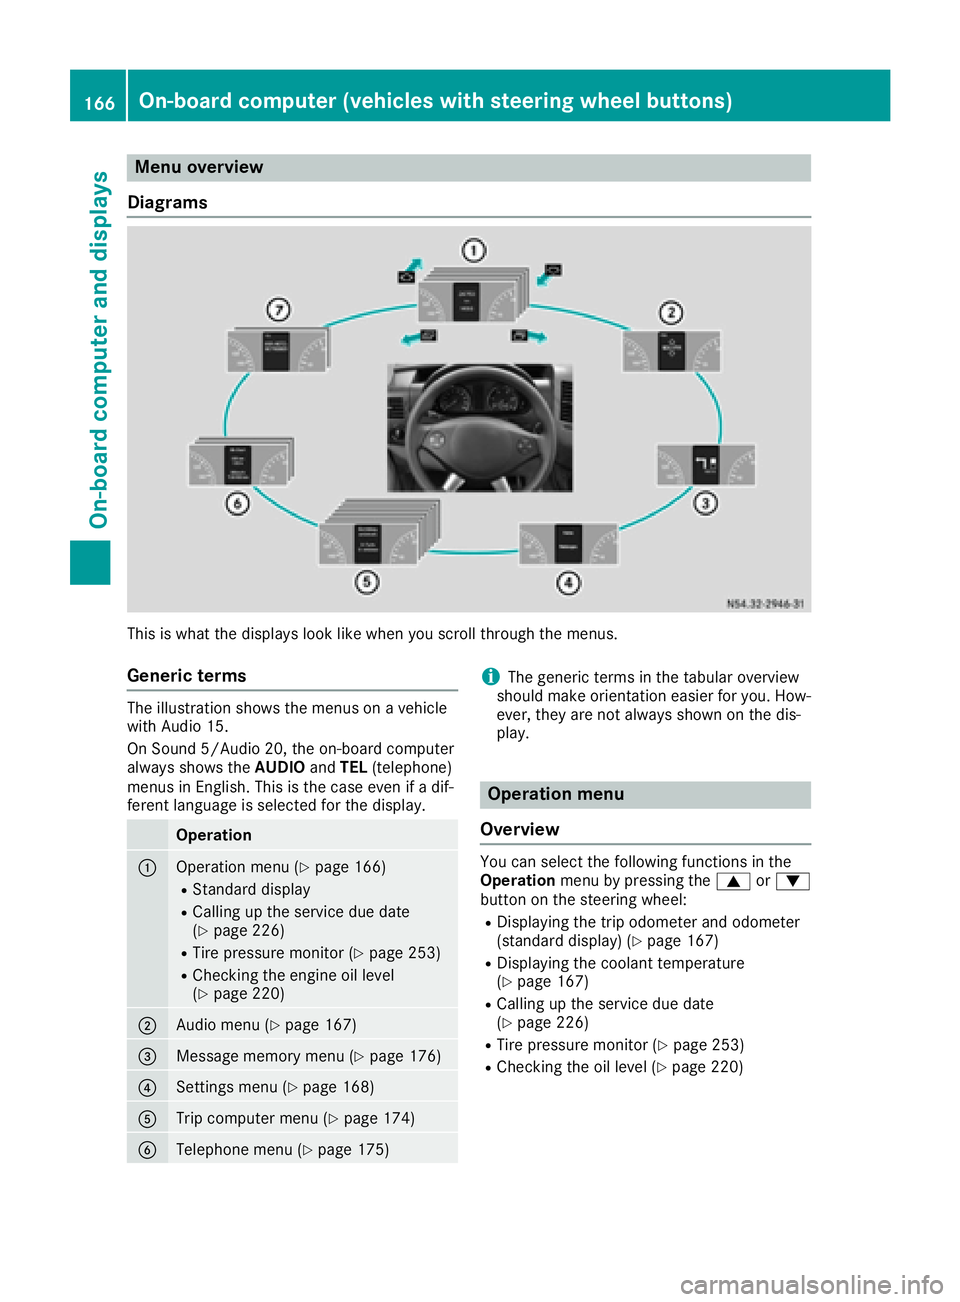
This is what the displays look like when you scroll through the menus.
Generic terms
The illustration shows the menus on a vehicle
with Audio 15.
On Sound 5/Audio 20, the on-board computer
always shows the AUDIOandTEL (telephone)
menus in English. This is the case even if a dif-
ferent language is selected for the display.
Operation
:Operation menu (Ypage 166)
RStandard display
RCalling up the service due date
(Ypage 226)
RTire pressure monitor (Ypage 253)
RChecking the engine oil level
(Ypage 220)
;Audio menu (Ypage 167)
=Message memory menu (Ypage 176)
?Settings menu (Ypage 168)
ATrip computer menu (Ypage 174)
BTelephone menu (Ypage 175)
iThe generic terms in the tabular overview
should make orientation easier for you. How-
ever, they are not always shown on the dis-
play.
Operation menu
Overview
You can select the following functions in the
Operation menu by pressing the 9or:
button on the steering wheel:
RDisplaying the trip odometer and odometer
(standard display) (Ypage 167)
RDisplaying the coolant temperature
(Ypage 167)
RCalling up the service due date
(Ypage 226)
RTire pressure monitor (Ypage 253)
RChecking the oil level (Ypage 220)
166On-board computer (vehicles with steering wheel buttons)
On-board computer and displays
Page 191 of 290
Display messagesPossible causes/consequences andMSolutions
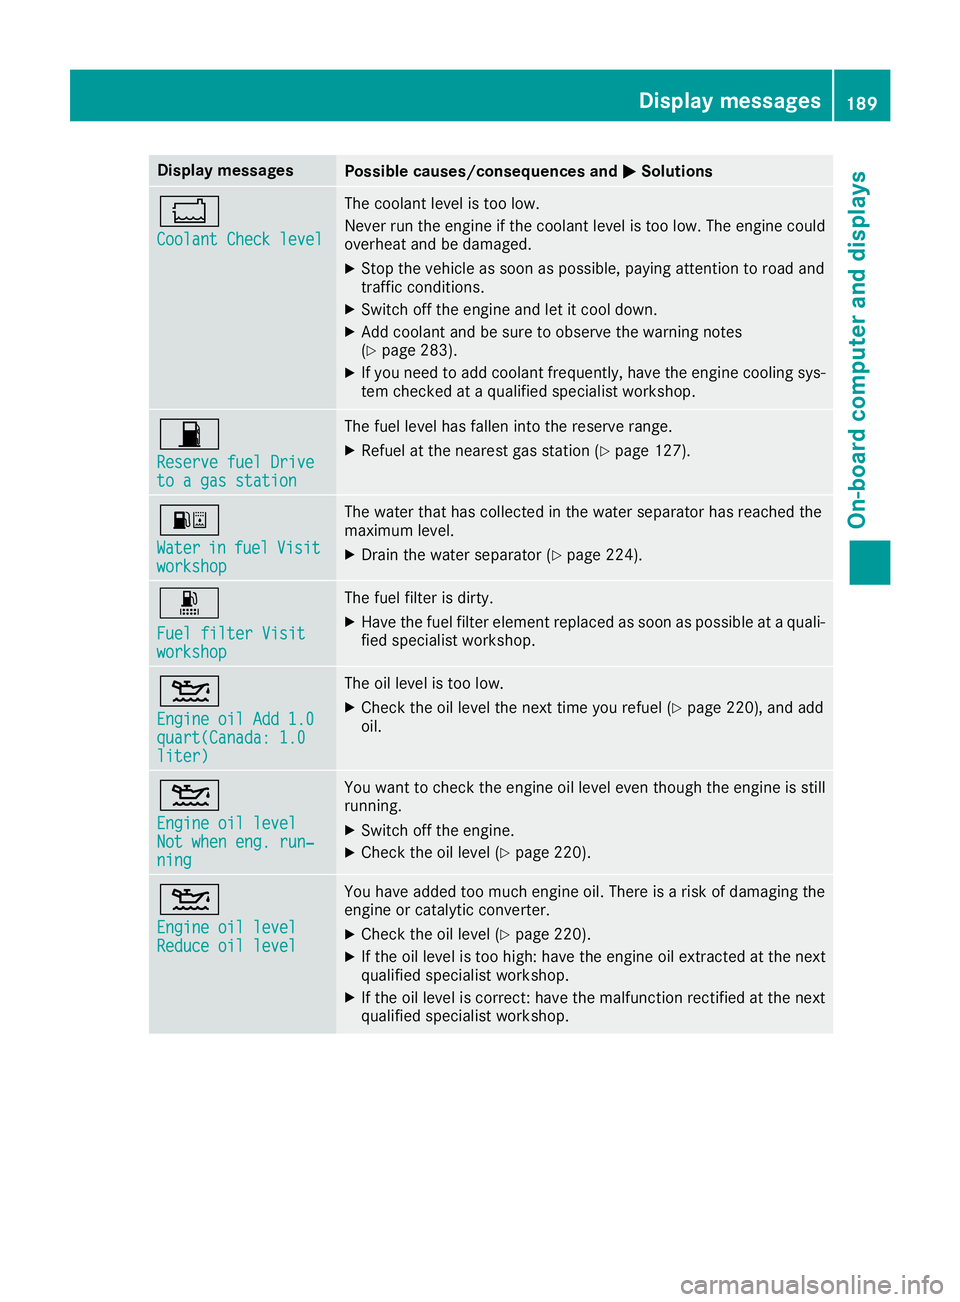
*
CoolantCheck level
The coolan tlevel is to olow.
Never run th eengin eif th ecoolan tlevel is to olow. The engin ecould
overheat and be damaged.
XStop th evehicl eas soo nas possible, payin gattention to roa dand
traffic conditions.
XSwitc hoff th eengin eand let it cool down .
XAddcoolan tand be sur eto observ eth ewarning note s
(Ypage 283).
XIf you need to add coolan tfrequently, hav eth eengin ecoolin gsys-
te m checke dat aqualified specialist workshop .
7
Reservefue lDriveto agas statio n
The fuel level has fallen int oth ereserv erange.
XRefue lat th eneares tgas station (Ypage 127).
:
WaterinfuelVisitworkshop
The water that has collecte din th ewater separator has reached th e
maximum level.
XDrain th ewater separator (Ypage 224).
m
Fuelfilter Visitworkshop
The fuel filter is dirty.
XHav eth efuel filter elemen treplace das soo nas possibl eat aquali-
fie dspecialist workshop .
4
Engine oil Add 1.0quart(Canada:1.0liter)
The oil level is to olow.
XChec kth eoil level th enext time you refuel (Ypage 220), and add
oil.
4
Engine oil levelNot whe neng .run ‐ning
You wan tto chec kth eengin eoil level eve nthough th eengin eis still
running.
XSwitc hoff th eengine.
XChec kth eoil level (Ypage 220).
4
Engine oil levelReduce oil level
You haveadded to omuc hengin eoil. There is aris kof damaging th e
engin eor catalytic converter.
XChec kth eoil level (Ypage 220).
XIf theoil level is to ohigh :hav eth eengin eoil extracted at th enext
qualified specialist workshop .
XIf theoil level is correct: hav eth emalfunction rectifie dat th enext
qualified specialist workshop .
Display messages189
On-board computer and displays
Z
Page 201 of 290
ProblemPossible causes/consequences andMSolutions
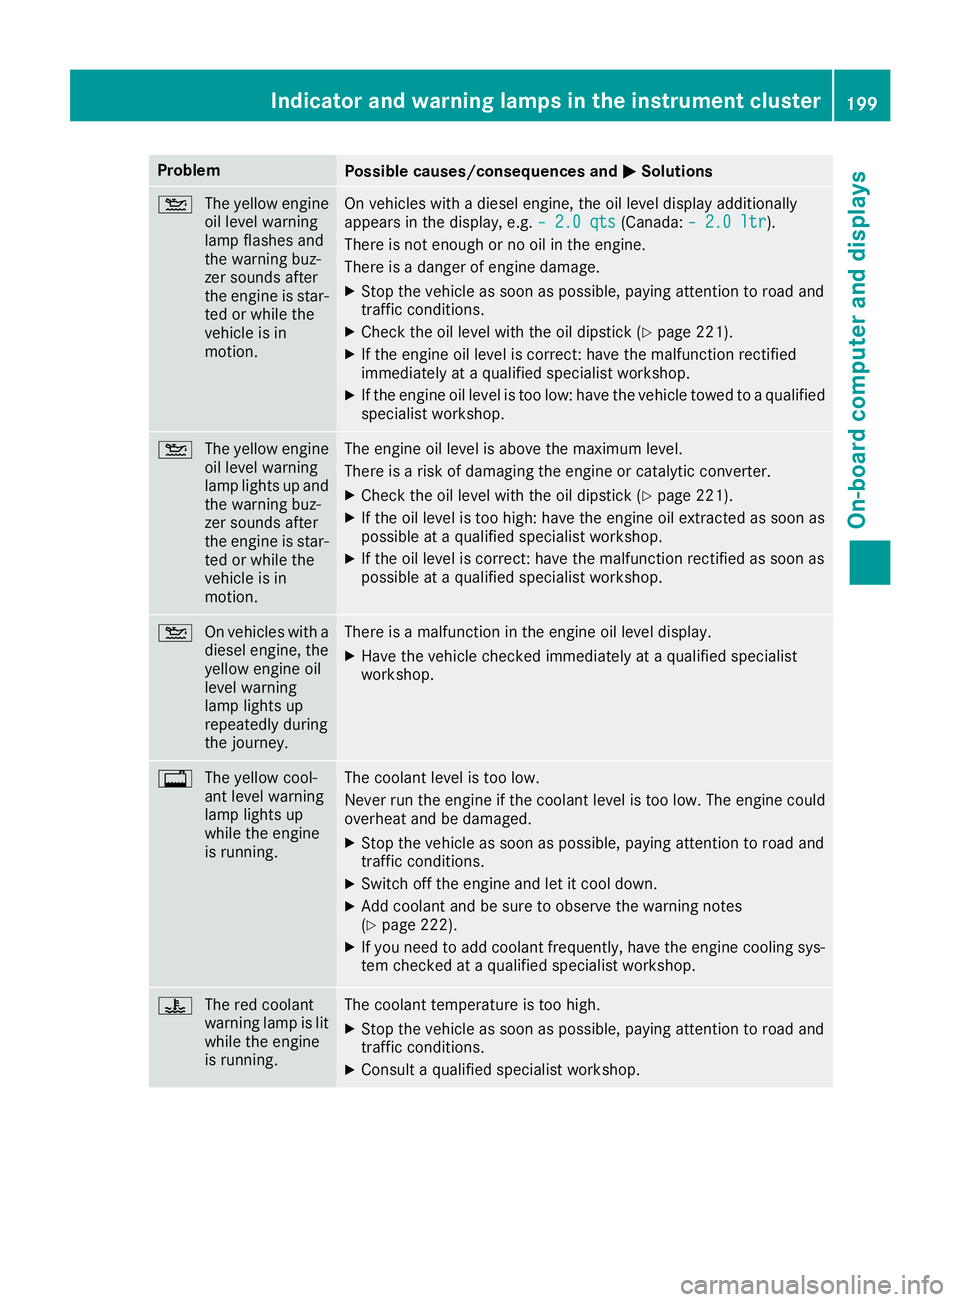
4
The yellow engine
oil level warning
lamp flashes and
the warning buz-
zer sounds after
the engine is star-
ted or while the
vehicle is in
motion.On vehicles with a diesel engine, the oil level display additionally
appears in the display, e.g. – 2.0 qts(Canada:– 2.0 ltr).
There is not enough or no oil in the engine.
There is a danger of engine damage.
XStop the vehicle as soon as possible, paying attention to road and
traffic conditions.
XCheck the oil level with the oil dipstick (Ypage 221).
XIf the engine oil level is correct: have the malfunction rectified
immediately at a qualified specialist workshop.
XIf the engine oil level is too low: have the vehicle towed to a qualified
specialist workshop.
4 The yellow engine
oil level warning
lamp lights up and
the warning buz-
zer sounds after
the engine is star-
ted or while the
vehicle is in
motion.The engine oil level is above the maximum level.
There is a risk of damaging the engine or catalytic converter.
XCheck the oil level with the oil dipstick (Ypage 221).
XIf the oil level is too high: have the engine oil extracted as soon as
possible at a qualified specialist workshop.
XIf the oil level is correct: have the malfunction rectified as soon as
possible at a qualified specialist workshop.
4 On vehicles with a
diesel engine, the
yellow engine oil
level warning
lamp lights up
repeatedly during
the journey.There is a malfunction in the engine oil level display.
XHave the vehicle checked immediately at a qualified specialist
workshop.
%The yellow cool-
ant level warning
lamp lights up
while the engine
is running.The coolant level is too low.
Never run the engine if the coolant level is too low. The engine could
overheat and be damaged.
XStop the vehicle as soon as possible, paying attention to road and
traffic conditions.
XSwitch off the engine and let it cool down.
XAdd coolant and be sure to observe the warning notes
(Ypage 222).
XIf you need to add coolant frequently, have the engine cooling sys-
tem checked at a qualified specialist workshop.
?The red coolant
warning lamp is lit
while the engine
is running.The coolant temperature is too high.
XStop the vehicle as soon as possible, paying attention to road and
traffic conditions.
XConsult a qualified specialist workshop.
Indicator and warning lamps in the instrument cluster199
On-board computer and displays
Z
Page 222 of 290
Overview of the engine compartment
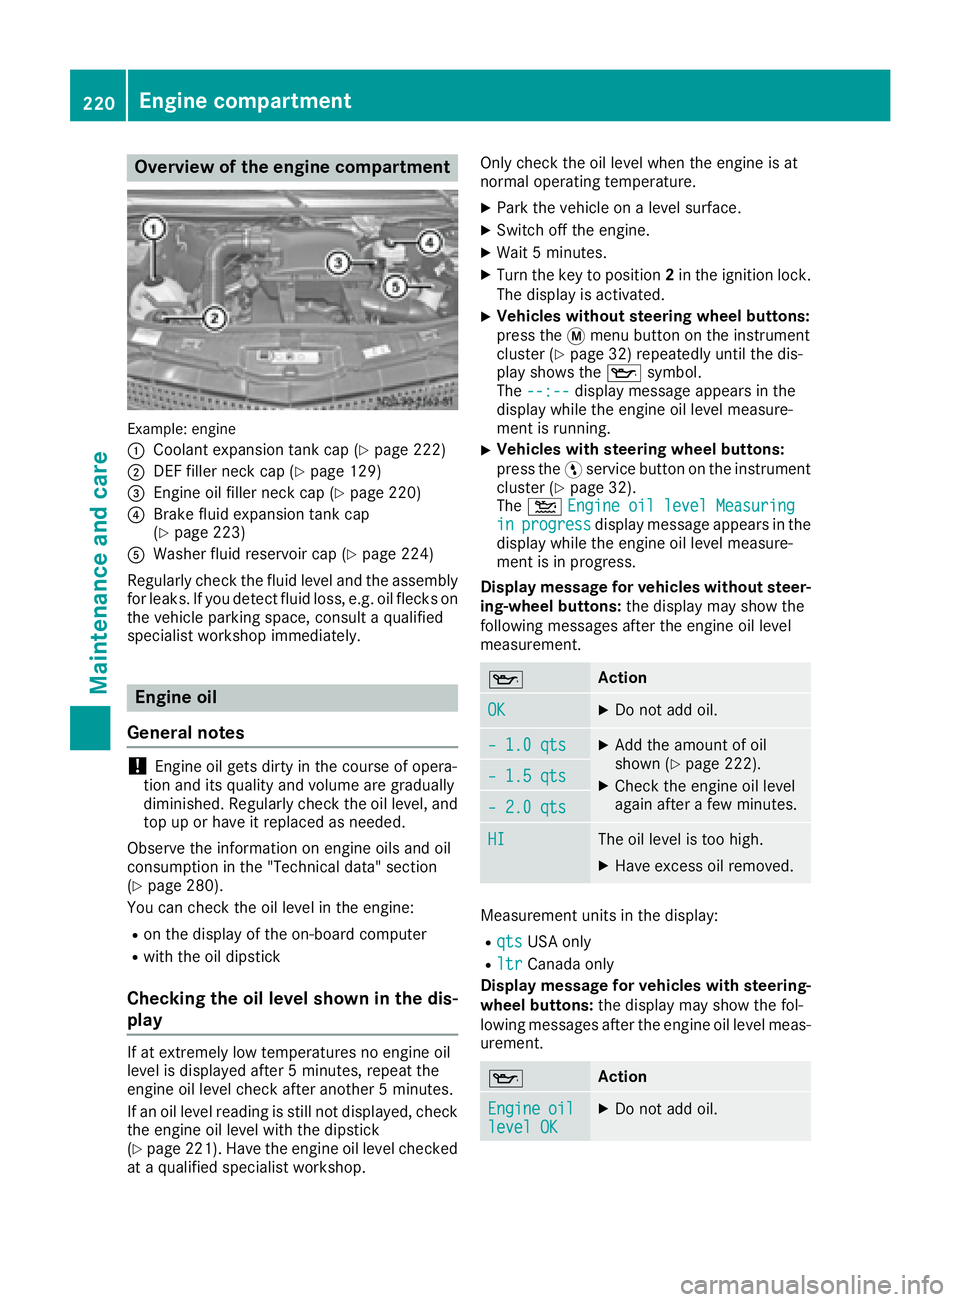
Example: engine
:
Coolant expansion tank cap (Ypage 222)
;DEF filler neck cap (Ypage 129)
=Engine oil filler neck cap (Ypage 220)
?Brake fluid expansion tank cap
(Ypage 223)
AWasher fluid reservoir cap (Ypage 224)
Regularly check the fluid level and the assembly
for leaks. If you detect fluid loss, e.g. oil flecks on
the vehicle parking space, consult a qualified
specialist workshop immediately.
Engine oil
General notes
!Engine oil gets dirty in the course of opera-
tion and its quality and volume are gradually
diminished. Regularly check the oil level, and
top up or have it replaced as needed.
Observe the information on engine oils and oil
consumption in the "Technical data" section
(
Ypage 280).
You can check the oil level in the engine:
Ron the display of the on-board computer
Rwith the oil dipstick
Checking the oil level shown in the dis-
play
If at extremely low temperatures no engine oil
level is displayed after 5 minutes, repeat the
engine oil level check after another 5 minutes.
If an oil level reading is still not displayed, check
the engine oil level with the dipstick
(
Ypage 221). Have the engine oil level checked
at a qualified specialist workshop. Only check the oil level when the engine is at
normal operating temperature.
XPark the vehicle on a level surface.
XSwitch off the engine.
XWait 5 minutes.
XTurn the key to position
2in the ignition lock.
The display is activated.
XVehicles without steering wheel buttons:
press the 4menu button on the instrument
cluster (
Ypage 32) repeatedly until the dis-
play shows the 1symbol.
The --:--
display message appears in the
display while the engine oil level measure-
ment is running.
XVehicles with steering wheel buttons:
press the Ëservice button on the instrument
cluster (
Ypage 32).
The 4 Engine oil level Measuring
inprogressdisplay message appears in the
display while the engine oil level measure-
ment is in progress.
Display message for vehicles without steer-
ing-wheel buttons: the display may show the
following messages after the engine oil level
measurement.
1Action
OKXDo not add oil.
– 1.0 qtsXAdd the amount of oil
shown (Ypage 222).
XCheck the engine oil level
again after a few minutes.– 1.5 qts
– 2.0 qts
HIThe oil level is too high.
XHave excess oil removed.
Measurement units in the display:
RqtsUSA only
RltrCanada only
Display message for vehicles with steering- wheel buttons: the display may show the fol-
lowing messages after the engine oil level meas-
urement.
1Action
Engineoillevel OKXDo not add oil.
220Engine compartment
Maintenance and care
Page 224 of 290
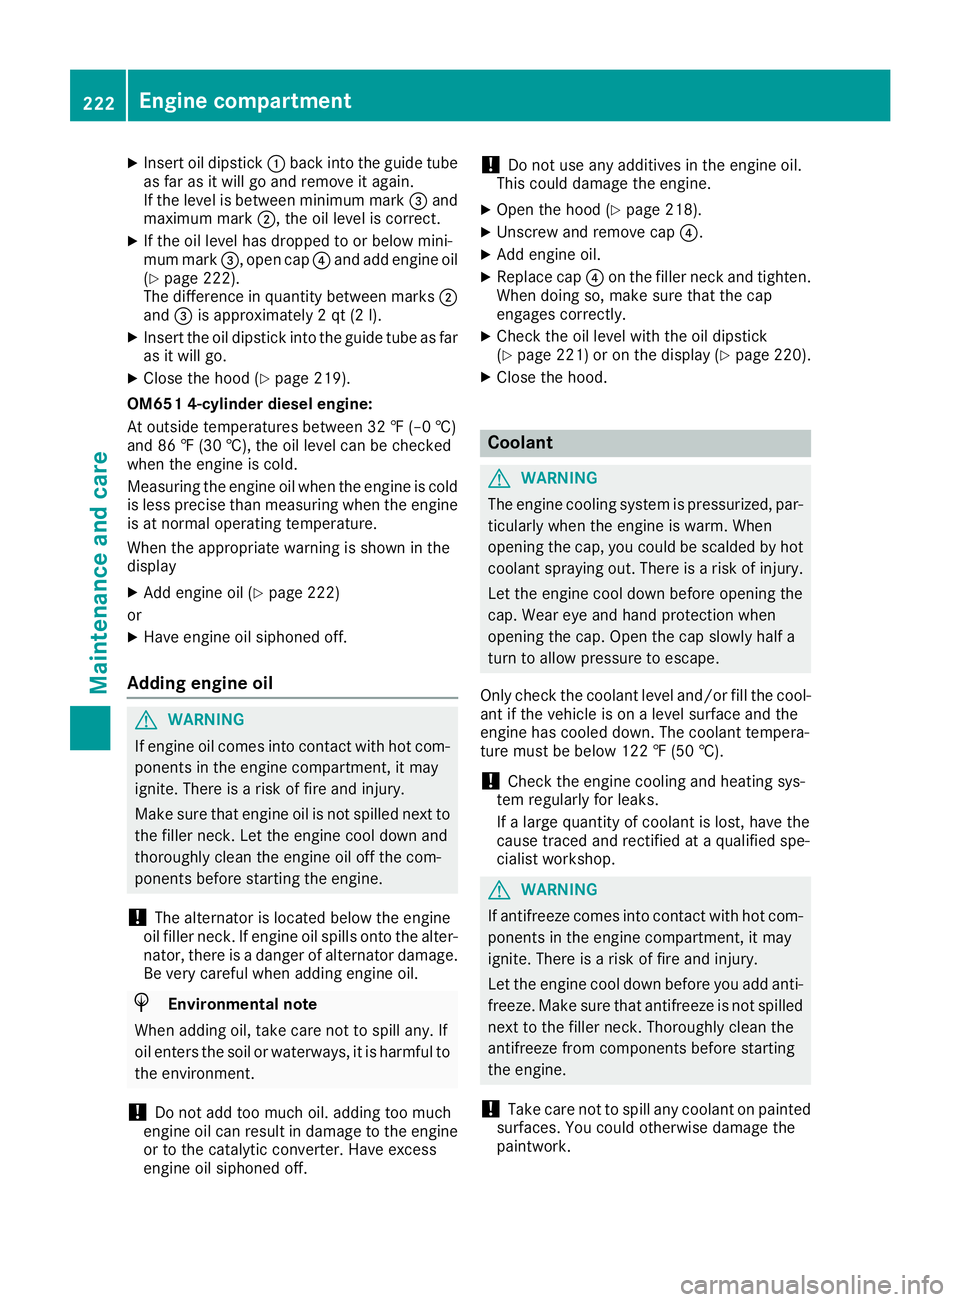
XInsert oil dipstick:back into the guide tube
as far as it will go and remove it again.
If the level is between minimum mark =and
maximum mark ;, the oil level is correct.
XIf the oil level has dropped to or below mini-
mum mark=, open cap ?and add engine oil
(
Ypage 222).
The difference in quantity between marks ;
and =is approximately 2 qt (2 l).
XInsert the oil dipstick into the guide tube as far
as it will go.
XClose the hood (Ypage 219).
OM651 4-cylinder diesel engine:
At outside temperatures between 32 ‡ (–0 †)
and 86 ‡ (30 †), the oil level can be checked
when the engine is cold.
Measuring the engine oil when the engine is cold
is less precise than measuring when the engine
is at normal operating temperature.
When the appropriate warning is shown in the
display
XAdd engine oil (Ypage 222)
or
XHave engine oil siphoned off.
Adding engine oil
GWARNING
If engine oil comes into contact with hot com- ponents in the engine compartment, it may
ignite. There is a risk of fire and injury.
Make sure that engine oil is not spilled next to
the filler neck. Let the engine cool down and
thoroughly clean the engine oil off the com-
ponents before starting the engine.
!The alternator is located below the engine
oil filler neck. If engine oil spills onto the alter-
nator, there is a danger of alternator damage.
Be very careful when adding engine oil.
HEnvironmental note
When adding oil, take care not to spill any. If
oil enters the soil or waterways, it is harmful to
the environment.
!Do not add too much oil. adding too much
engine oil can result in damage to the engine
or to the catalytic converter. Have excess
engine oil siphoned off.
!Do not use any additives in the engine oil.
This could damage the engine.
XOpen the hood (Ypage 218).
XUnscrew and remove cap ?.
XAdd engine oil.
XReplace cap?on the filler neck and tighten.
When doing so, make sure that the cap
engages correctly.
XCheck the oil level with the oil dipstick
(Ypage 221) or on the display (Ypage 220).
XClose the hood.
Coolant
GWARNING
The engine cooling system is pressurized, par-
ticularly when the engine is warm. When
opening the cap, you could be scalded by hot
coolant spraying out. There is a risk of injury.
Let the engine cool down before opening the
cap. Wear eye and hand protection when
opening the cap. Open the cap slowly half a
turn to allow pressure to escape.
Only check the coolant level and/or fill the cool-
ant if the vehicle is on a level surface and the
engine has cooled down. The coolant tempera-
ture must be below 122 ‡ (50 †).
!Check the engine cooling and heating sys-
tem regularly for leaks.
If a large quantity of coolant is lost, have the
cause traced and rectified at a qualified spe-
cialist workshop.
GWARNING
If antifreeze comes into contact with hot com- ponents in the engine compartment, it may
ignite. There is a risk of fire and injury.
Let the engine cool down before you add anti-
freeze. Make sure that antifreeze is not spilled
next to the filler neck. Thoroughly clean the
antifreeze from components before starting
the engine.
!Take care not to spill any coolant on painted
surfaces. You could otherwise damage the
paintwork.
222Engine compartment
Maintenance and care
Page 225 of 290
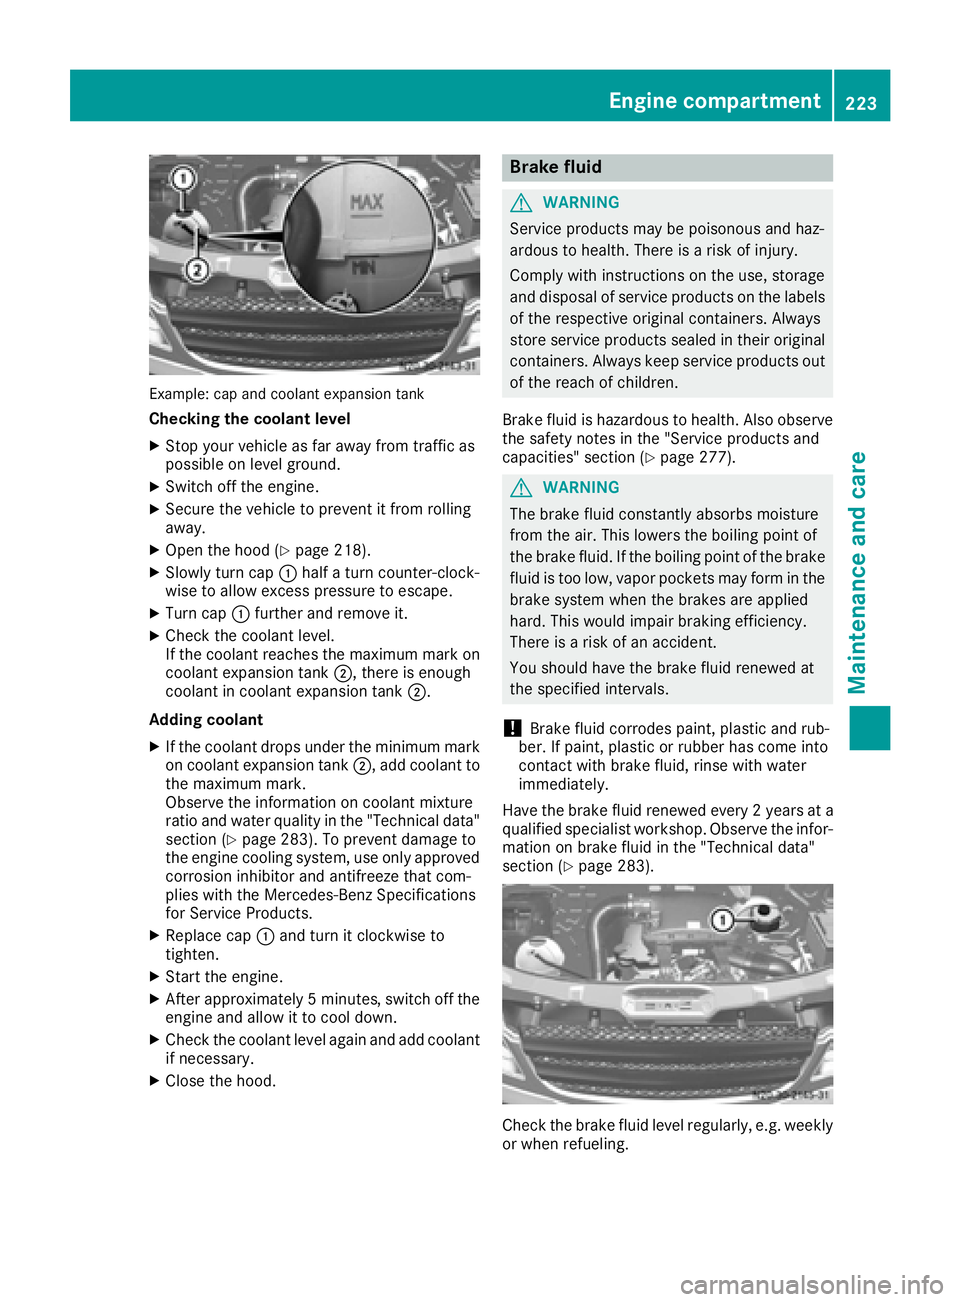
Example: cap and coolant expansion tank
Checking the coolant level
XStop your vehicle as far away from traffic as
possible on level ground.
XSwitch off the engine.
XSecure the vehicle to prevent it from rolling
away.
XOpen the hood (Ypage 218).
XSlowly turn cap:half a turn counter-clock-
wise to allow excess pressure to escape.
XTurn cap :further and remove it.
XCheck the coolant level.
If the coolant reaches the maximum mark on
coolant expansion tank ;, there is enough
coolant in coolant expansion tank ;.
Adding coolant
XIf the coolant drops under the minimum mark
on coolant expansion tank ;, add coolant to
the maximum mark.
Observe the information on coolant mixture
ratio and water quality in the "Technical data"
section (
Ypage 283). To prevent damage to
the engine cooling system, use only approved
corrosion inhibitor and antifreeze that com-
plies with the Mercedes-Benz Specifications
for Service Products.
XReplace cap :and turn it clockwise to
tighten.
XStart the engine.
XAfter approximately 5 minutes, switch off the
engine and allow it to cool down.
XCheck the coolant level again and add coolant
if necessary.
XClose the hood.
Brake fluid
GWARNING
Service products may be poisonous and haz-
ardous to health. There is a risk of injury.
Comply with instructions on the use, storage
and disposal of service products on the labels
of the respective original containers. Always
store service products sealed in their original
containers. Always keep service products out
of the reach of children.
Brake fluid is hazardous to health. Also observe
the safety notes in the "Service products and
capacities" section (
Ypage 277).
GWARNING
The brake fluid constantly absorbs moisture
from the air. This lowers the boiling point of
the brake fluid. If the boiling point of the brake
fluid is too low, vapor pockets may form in the
brake system when the brakes are applied
hard. This would impair braking efficiency.
There is a risk of an accident.
You should have the brake fluid renewed at
the specified intervals.
!Brake fluid corrodes paint, plastic and rub-
ber. If paint, plastic or rubber has come into
contact with brake fluid, rinse with water
immediately.
Have the brake fluid renewed every 2 year sat a
qualified specialist workshop. Observe the infor- mation on brake fluid in the "Technical data"
section (
Ypage 283).
Check the brake fluid level regularly, e.g. weekly
or when refueling.
Engine compartment223
Maintenance and care
Z