cooling MERCEDES-BENZ SPRINTER 2016 MY16 Operator’s Manual
[x] Cancel search | Manufacturer: MERCEDES-BENZ, Model Year: 2016, Model line: SPRINTER, Model: MERCEDES-BENZ SPRINTER 2016Pages: 290, PDF Size: 6.44 MB
Page 5 of 290
1, 2, 3 ...
4ETS (Electronic Traction System).... 55
12 V socket ........................................ 210
A
ABS (Anti-lock Braking System)
Display message ............................ 181
Function/notes ................................ 53
Important safety notes .................... 53
Indicator lamp ................................ 195
Access step in the bumper
Cleaning .........................................2 37
Activating/deactivating cooling
with air dehumidification ................. 102
Activating/deactivating the roof
ventilator ...........................................1 17
Adaptive Brake Assist
Function/notes .............................1 43
ADAPTIVE ESP
®
see ESP®(Electronic Stability Program)
Add-on equipment ............................... 27
Additional indicators
Replacing bulbs ............................... 88
Replacing bulbs (roof) ......................9 1
Additives
Diesel ............................................ 279
Engine oil ...................................... .281
Adjusting the headlamp range ........... 81
ADR (working speed governor) ........154
Air bags
Deployment ..................................... 45
Front air bag (driver, front
passenger) ....................................... 44
Important safety notes .................... 43
Introduction ..................................... 43
Side impact air bag .......................... 45
Window curtain air bag .................... 45
Air filter
Indicator lamp ................................ 201
Air pressure
see Tire pressure
Air vents
Adjusting for the passenger com-
partment ........................................ 106
Adjusting on the roof ..................... 106
Importa nt sa
fety notes .................. 105 Setting the center air vents ........... 105
Setting the side air vents ...............1
06
Air-conditioning system
Refrigerant ..................................... 284
see Climate control
Air-recirculation mode
Important safety notes .................. 104
Switching on/off ........................... 104
Alarm system
see ATA (Anti-Theft Alarm system)
All-wheel drive
Engaging/disengaging ................... 148
Important safety notes .................. 147
LOW RANGE transmission ratio ..... 148
Anti-lock Braking System
see ABS (Anti-lock Braking System)
Anti-Theft Alarm system
see ATA (Anti-Theft Alarm system)
Anti-theft system
Interior motion sensor ..................... 57
Armrests .............................................. 76
Ashtray ............................................... 209
ASR (acceleration skid control)
Activating/deactivating ................... 53
Display message ............................ 182
Function/notes ................................ 53
Important safety notes .................... 53
Indicator lamp ................................ 195
ATA (Anti-Theft Alarm system)
Activating/deactivating ................... 56
Switching off the alarm .................... 56
Authorized workshop
see Qualified specialist workshop
Automatic car wash (care) ...............233
Automatic climate control
see Climate control
Automatic headlamp mode ................ 80
Automatic locking ............................... 64
Automatic transmission
Accelerator pedal position ............. 126
Changing gear ............................... 125
Changing gear yourself .................. 125
Driving tips .................................... 126
Emergency running mode .............. 127
Important safety notes .................. 124
Kickdown ....................................... 126
Maneuvering .................................. 126
Index3
Page 8 of 290
Central lockingAutomatic locking ............................ 64
Important safety notes .................... 64
Locking/unlocking (buttons) ........... 64
Locking/unlocking (SmartKey) ........ 59
Locking/unlocking manually ............ 64
Central locking system
see Central locking
Changing bulbs
Additional indicators (roof) .............. 91
Additional turn signals ..................... 88
Backup lamp (Chassis Cab) ............. 90
Backup lamps .................................. 89
Bi-Xenon bulbs ................................. 86
Brake lamps ..................................... 89
Brake lamps (Chassis Cab) .............. 90
Cornering lamps .............................. 87
Courtesy lights ................................. 91
Daytime running lamps (halogen
headlamps) ...................................... 87
Display message ............................ 185
Front interior light ............................ 92
High-beam headlamps ..................... 87
Interior light ..................................... 92
Interior lighting ................................ 92
License plate lamp ........................... 90
License plate lamp (Chassis Cab) .... 90
Low-beam headlamps ...................... 87
Overview of lamp types (front
bulbs) ............................................... 86
Overview of lamp types (rear
bulbs, Cargo Van/Passenger
Van) ................................................. 89
Overview of lamp types (rear
bulbs, Chassis Cab) ......................... 90
Parking lamps .................................. 87
Perimeter lamp .......................... 90, 91
Rear fog lamp .................................. 89
Rear fog lamp (Chassis Cab) ............ 90
Rear interior light ............................. 92
Standing lamps (rear, Chassis
Cab) ................................................. 90
Standing lamps (rear) ...................... 89
Tail lamps ........................................ 89
Tail lamps (Chassis Cab) .................. 90
Turn signals (front) ........................... 88
T
urn signals (rear, Chassis Cab) ....... 90
Turn signals (rear) ............................ 89 Warning and indicator lamps ......... 203
see Replacing bulbs
Changing bulbs
see Replacing bulbs
Checklist
Before driving off-road ................... 138
Child
Restraint system .............................. 48
Child seat
Forward-facing restraint system ...... 51
LATCH-type (ISOFIX) child seat
anchors ............................................ 49
On the front-passenger seat ............ 51
Rearward-facing restraint system .... 51
Top Tether ....................................... 50
Child-proof locks
Important safety notes .................... 51
Rear door ......................................... 52
Children
Special seat belt retractor ............... 48
Chock ................................................. 132
Cigarette lighter ................................ 209
Cleaning
Mirror turn signal ........................... 236
Trailer tow hitch ............................. 237
Climate control
Air conditioning in the rear com-
partment ........................................ 101
Air-conditioning system ................... 99
Auxiliary heating ............................ 106
Checking/cleaning the air filter
(rear-compartment air condition-
ing) ................................................ 225
Cooling with air dehumidification .. 102
Defrosting the windows ................. 103
Heating ............................................ 98
Heating in the rear compartment ... 100
Important safety notes .................... 97
Operating the cargo compartment
air vents ......................................... 117
Overview of systems ........................ 97
Problem with the rear window
defroster ........................................ 104
Problems with the windshield
heating .......................................... 104
Rear-compartment air condition-
ing ................................................. 101
Rear-compartment heating ............ 100
6Index
Page 9 of 290
Reheat function (air dehumidifica-
tion).............................................. .103
Setting the air distribution ............. 102
Setting the air vents ......................1 05
Setting the airflow ......................... 102
Setting the temperature ................ 102
Switching air-recirculation mode
on/off ............................................ 104
Switching on/off ........................... 101
Switching the rear window
defroster on/off ............................ 104
Switching windshield heating on/
off ..................................................1 04
Cockpit
Overview .......................................... 31
see Instrument cluster
COLLISION PREVENTION ASSIST
Activating/deactivating the dis-
tance warning function .................. 143
COMAND display
Cleaning ......................................... 237
Combination switch ............................ 81
Communications equipment
Operation ....................................... 211
PND fittings ................................... 211
Ports .............................................. 211
Type approval/frequency .............. 275
Consumption statistics (on-board
computer) .......................................... 174
Control panel
Above the windshield ....................... 36
Center console ................................ 35
Climate control ................................ 35
Driver's door ....................................3 7
Left and right side of the steering
wheel ............................................... 37
Conversions/equipment .................... 27
Coolant (engine)
Adding ........................................... 223
Checking the level .........................2 22
Display message ............................ 188
Displaying the temperature (on-
board computer) ............................ 167
Filling capacity ............................... 284
Important safety notes .................. 222
Cooling
see Climate control C
ornering lamps
Replacing bulbs ............................... 87
Cornering light function
Function/notes ................................ 82
Courtesy lights
Replacing bulbs ............................... 91
Crosswind driving assistance ............ 55
Cruise control
Activating ....................................... 141
Activation conditions ..................... 140
Cruise control lever ....................... 140
Deactivating ................................... 141
Display message ............................ 190
Driving system ............................... 140
Function/notes .............................1 40
Important safety notes .................. 140
Problem (malfunction) ................... 142
Resuming the stored speed ........... 141
Setting a speed .............................. 141
Storing and maintaining current
speed ............................................. 141
Cup holder ......................................... 208
Center console .............................. 208
Cup holder
see Cup holders
Cup holders ........................................ 208
Curtains (cleaning instructions) ...... 239
Customer Assistance Center
(CAC) ..................................................... 27
Customer Relations Department ....... 27
D
Dashboard
see Cockpit
Dashboard lighting
see Instrument cluster lighting
Data
see Technical data
Daytime running lamps
Activating/deactivating (vehicles
with steering wheel buttons) ......... 171
Changing bulbs (halogen head-
lamps) .............................................. 87
Switching on/off (switch) ................ 79
Switching on/off (vehicles with-
out steering wheel buttons) ........... 164
Index7
Page 99 of 290
Useful information
This Operator's Manual describes all models as
well as standard and optional equipment of your
vehicle that were available at the time of going
to print. Country-specific variations are possi-
ble. Note that your vehicle may not be equipped
with all of the described functions. This also
applies to systems and functions relevant to
safety.
Read the information on qualified specialist
workshops (
Ypage 26).
Overview of climate control systems
Important safety notes
Observe the recommended settings on the fol-
lowing pages. Otherwise, the windows could fog
up.
Climate control regulates the temperature and
the humidity in the vehicle interior and filters
undesirable substances from the air.
Climate control is only operational when the
engine is running. The system only functions
optimally when the side windows are closed.
iVentilate the vehicle for a brief period during
warm weather. In order to cool the vehicle
more rapidly, switch climate control to air-
recirculation mode briefly. This will speed up
the cooling process and the desired interior
temperature will be reached more quickly.
iThe integrated filter can filter out most par-
ticles of dust and completely filters out pollen.
A clogged filter reduces the airflow into the
vehicle interior. For this reason, you should
always observe the interval for replacing the
filter, which is specified in the Maintenance
Booklet. As it depends on environmental con-
ditions, e.g. heavy air pollution, the interval
may be shorter than that stated in the Main-
tenance Booklet.
Overview of climate control systems97
Climate control
Page 101 of 290
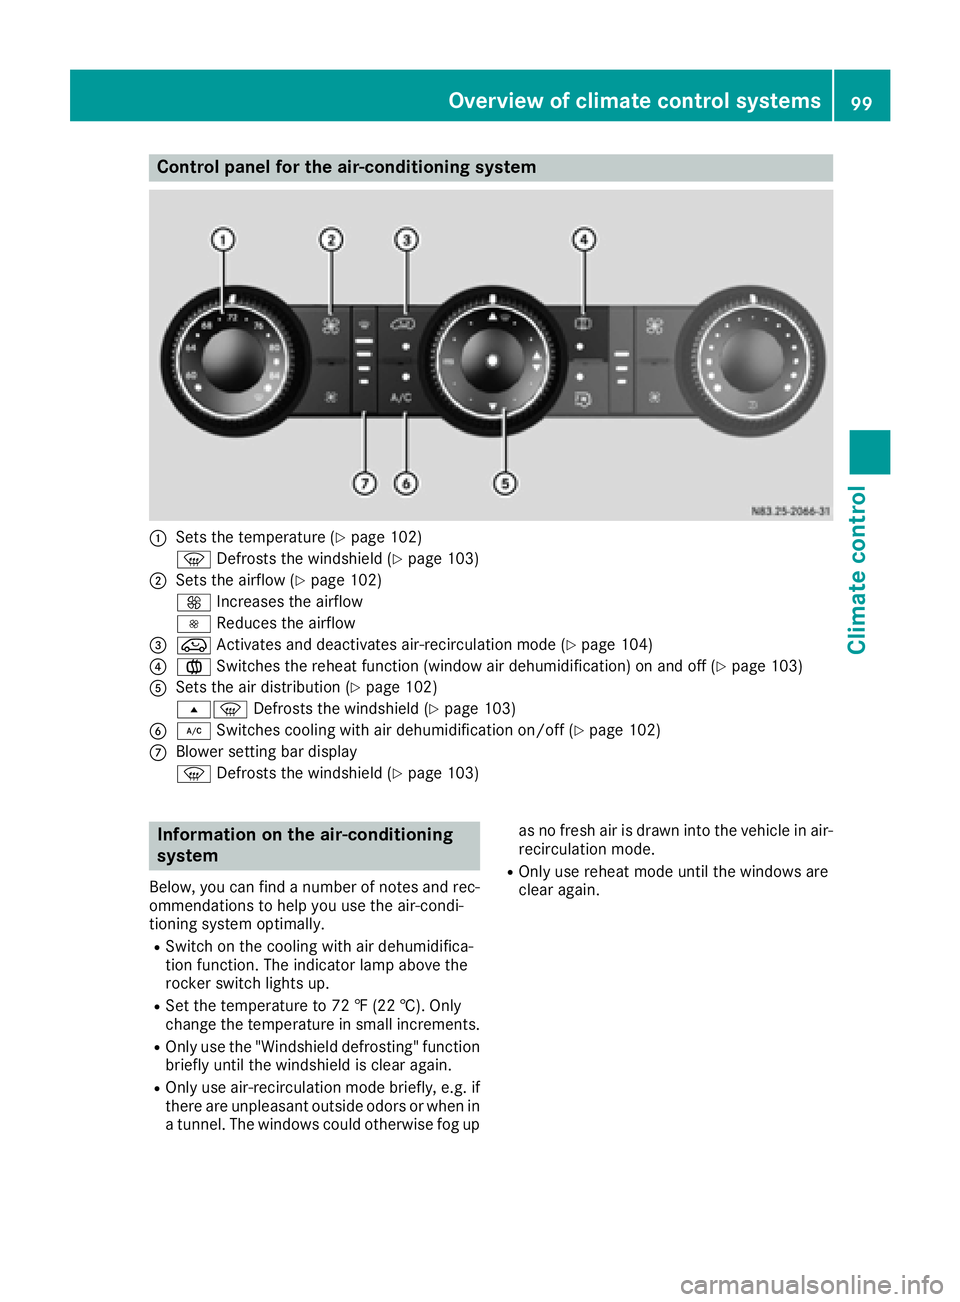
Control panel for the air-conditioning system
:Sets the temperature (Ypage 102)
z Defrosts the windshield (
Ypage 103)
;Sets the airflow (Ypage 102)
K Increases the airflow
I Reduces the airflow
=eActivates and deactivates air-recirculation mode (Ypage 104)
?xSwitches the reheat function (window air dehumidification) on and off (Ypage 103)
ASets the air distribution (Ypage 102)
sz Defrosts the windshield (
Ypage 103)
B¿Switches cooling with air dehumidification on/off (Ypage 102)
CBlower setting bar display
zDefrosts the windshield (
Ypage 103)
Information on the air-conditioning
system
Below, you can find a number of notes and rec-
ommendations to help you use the air-condi-
tioning system optimally.
RSwitch on the cooling with air dehumidifica-
tion function. The indicator lamp above the
rocker switch lights up.
RSet the temperature to 72 ‡ (22 †). Only
change the temperature in small increments.
ROnly use the "Windshield defrosting" function
briefly until the windshield is clear again.
ROnly use air-recirculation mode briefly, e.g. if
there are unpleasant outside odors or when in
a tunnel. The windows could otherwise fog up as no fresh air is drawn into the vehicle in air-
recirculation mode.
ROnly use reheat mode until the windows are
clear again.
Overview of climate control systems99
Climate control
Page 104 of 290
Vehicle with rear-compartment heating/
rear-compartment air conditioning
XTo switch on/off:press theiswitch.
If the indicator lamp in the button lights up,
the rear-compartment heating/rear-com-
partment air conditioning is switched on.
Switching the cooling with air dehu-
midification function on/off
Important information
If you switch off the "Cooling with air dehumid-
ification" function, the air inside the vehicle will
not be cooled (in warm weather) or dehumidi-
fied. The windows could fog up more quickly.
The cooling with air dehumidification function is
only available when the engine is running. The
air inside the vehicle is cooled and dehumidified
according to the temperature selected.
Condensation may appear on the underside of
the vehicle when in cooling mode. This is normal
and not a sign that there is a malfunction.
Switching on and off
Vehicle with air conditioning
XPress the ¿button.
If the indicator lamp in the button lights up,
cooling with air dehumidification is switched
on.
Setting the temperature
Increasing and reducing temperature in
the front compartment via the control
panel
Only change the temperature in small incre-
ments. Start at the center position, or at 72 ‡
(22 †).
XSwitch on climate control (Ypage 101).
XTurn temperature control :clockwise to
increase or counterclockwise to reduce the
temperature (
Ypage 99).
Increasing and reducing temperature in
the rear compartment via the control
panel
Only change the temperature in small incre-
ments.
XSwitch on climate control (Ypage 101).
XTurn rear-compartment temperature control
= (Ypage 100) or rear-compartment air-
conditioning system ;(Ypage 101) clock-
wise to increase or counterclockwise to
reduce the temperature.
iVehicles with additional air conditioning and
heating in the rear compartment: if you set
the temperature control to the center posi-
tion, only one of the two climate control sys-
tems works in the rear compartment and in
air-recirculation mode (
Ypage 104).
Setting the air distribution
Air distribution settings
The air distribution symbols have the following
meanings:
m Directs air through the center and side
air vents
s
z Directs air to the windshield and the air
vents
q Directs air to the windshield, the air
vents and into the footwell
r Directs air to the air vents and into the
footwell
Adjusting
XSwitch on climate control (Ypage 101).
XSet air-distribution control ?for the heating
(Ypage 98) or air-conditioning system A
(Ypage 99) to the corresponding symbol.
Setting the airflow
XSwitch on climate control (Ypage 101).
XVehicle with heating/rear-compartment
heating: set airflow control ;of the heating
(
Ypage 98) or of the rear-compartment heat-
ing (Ypage 100) to the desired level.
XVehicle with air conditioning/rear-com-
partment air conditioning: press theI
102Operating the climate control system
Climate control
Page 105 of 290
button to reduce or theKbutton to
increase the airflow.
The blower speeds are shown in bars next to
the buttons.
Defrosting the windows
You can use the "defrosting" function to defrost
the windshield or to demist the inside of the
windshield and the side windows.
Only use the following settings until the win-
dows are clear again.
XVehicle with window heating: switch on the
front (Ypage 104) and/or rear window
defroster (Ypage 104) .
XSwitch on climate control (Ypage 101).
Vehicle with heating
XSet temperature control :and airflow con-
trol ;toz (Ypage 98).
XSet air-distribution control ?tosz
(Ypage 98).
XClose the center air vents (Ypage 105) and
the air outlets for the headroom and the rear compartment (
Ypage 106).
XDirect the side air vents towards the side win-dows and open the defroster vents for the
side windows (
Ypage 106).
Vehicle with air conditioning
XSet temperature control :to
z (Ypage 99).
XPress the Kbutton until the maximum
blower output is reached.
All bars in the display next to the button light up.
XSet air-distribution control Atosz
(Ypage 99).
XClose the center air vents (Ypage 105) and
the air outlets for the headroom and the rear compartment (
Ypage 106).
XDirect the side air vents towards the side win-dows and open the defroster vents for the
side windows (
Ypage 106).
Clearing condensation from the win-
dows
Windows fogged up on the inside
You should only select this setting until the win-
dows are clear again.
XVehicle with window heating: switch on the
front (Ypage 104) and/or rear window
defroster (Ypage 104) .
XSwitch on climate control (Ypage 101).
XSwitch off air-recirculation mode
(Ypage 104).
Vehicle with heating
XSet temperature control :to a higher tem-
perature (Ypage 98).
XSet airflow control ;to a higher blower set-
ting. It should be set at least to level two
(
Ypage 98).
XSet air-distribution control ?tosz
(Ypage 98).
iIf the windows still fog up, set the control as
described for defrosting (Ypage 103).
Vehicle with air conditioning
XActivate cooling with air dehumidification
(Ypage 102).
XPress the ¨button (Ypage 99).
Reheat mode is activated. The indicator lamp
in the switch lights up.
To deactivate reheat mode, press the ¨
button again. The indicator lamp in the button
goes out.
Windows fogged up on the outside
You should only select this setting until the
windshield is clear again.
XSwitch on the windshield wipers (Ypage 93).
XSwitch on climate control (Ypage 101).
XAdjust air distribution to the footwell
(Ypage 102).
XClose the air vents (Ypage 105).
Operating the climate control system103
Climate control
Page 201 of 290
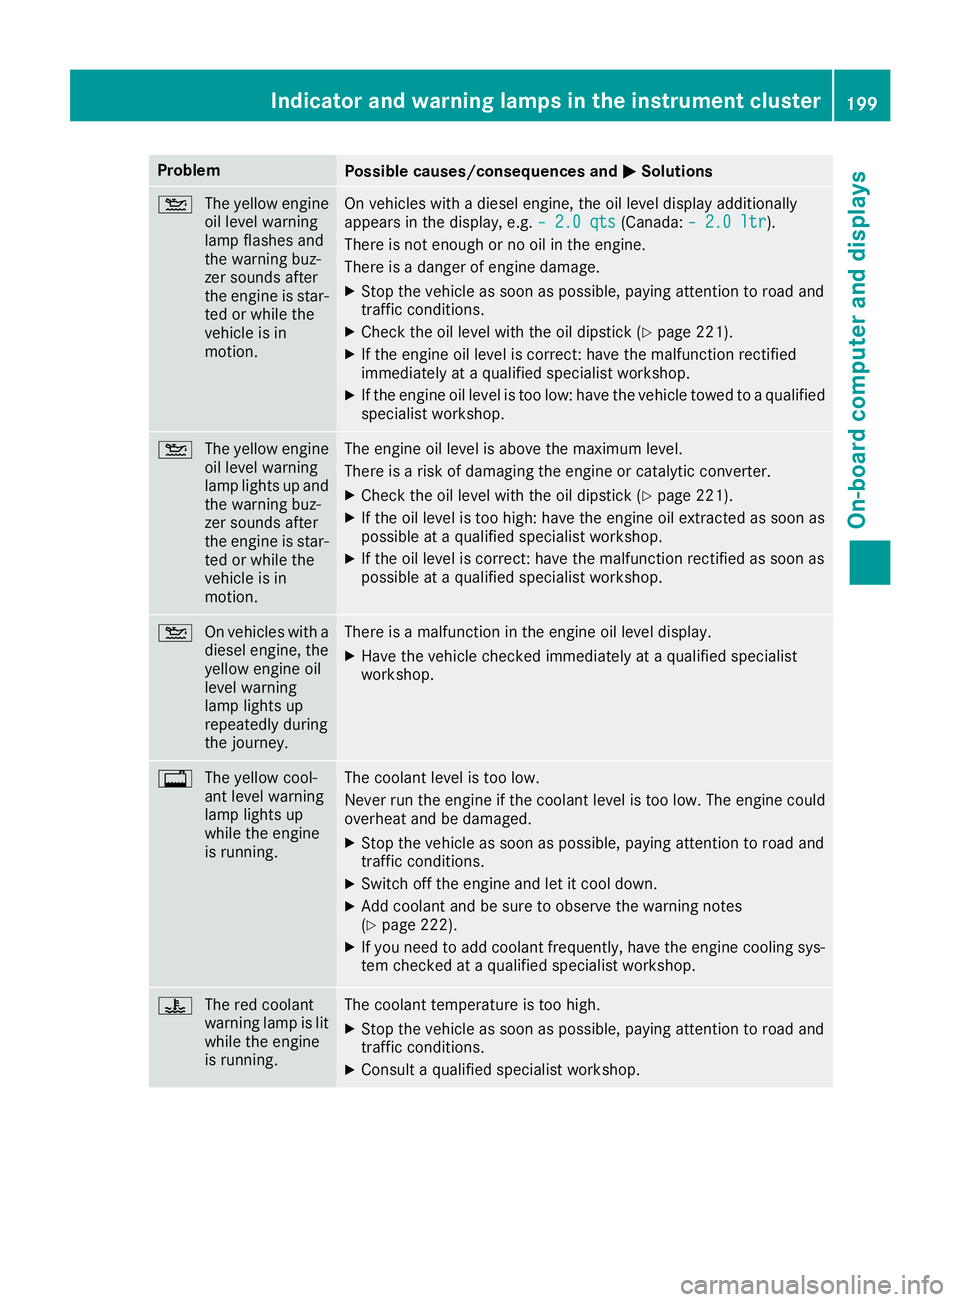
ProblemPossible causes/consequences andMSolutions
4
The yellow engine
oil level warning
lamp flashes and
the warning buz-
zer sounds after
the engine is star-
ted or while the
vehicle is in
motion.On vehicles with a diesel engine, the oil level display additionally
appears in the display, e.g. – 2.0 qts(Canada:– 2.0 ltr).
There is not enough or no oil in the engine.
There is a danger of engine damage.
XStop the vehicle as soon as possible, paying attention to road and
traffic conditions.
XCheck the oil level with the oil dipstick (Ypage 221).
XIf the engine oil level is correct: have the malfunction rectified
immediately at a qualified specialist workshop.
XIf the engine oil level is too low: have the vehicle towed to a qualified
specialist workshop.
4 The yellow engine
oil level warning
lamp lights up and
the warning buz-
zer sounds after
the engine is star-
ted or while the
vehicle is in
motion.The engine oil level is above the maximum level.
There is a risk of damaging the engine or catalytic converter.
XCheck the oil level with the oil dipstick (Ypage 221).
XIf the oil level is too high: have the engine oil extracted as soon as
possible at a qualified specialist workshop.
XIf the oil level is correct: have the malfunction rectified as soon as
possible at a qualified specialist workshop.
4 On vehicles with a
diesel engine, the
yellow engine oil
level warning
lamp lights up
repeatedly during
the journey.There is a malfunction in the engine oil level display.
XHave the vehicle checked immediately at a qualified specialist
workshop.
%The yellow cool-
ant level warning
lamp lights up
while the engine
is running.The coolant level is too low.
Never run the engine if the coolant level is too low. The engine could
overheat and be damaged.
XStop the vehicle as soon as possible, paying attention to road and
traffic conditions.
XSwitch off the engine and let it cool down.
XAdd coolant and be sure to observe the warning notes
(Ypage 222).
XIf you need to add coolant frequently, have the engine cooling sys-
tem checked at a qualified specialist workshop.
?The red coolant
warning lamp is lit
while the engine
is running.The coolant temperature is too high.
XStop the vehicle as soon as possible, paying attention to road and
traffic conditions.
XConsult a qualified specialist workshop.
Indicator and warning lamps in the instrument cluster199
On-board computer and displays
Z
Page 224 of 290
XInsert oil dipstick:back into the guide tube
as far as it will go and remove it again.
If the level is between minimum mark =and
maximum mark ;, the oil level is correct.
XIf the oil level has dropped to or below mini-
mum mark=, open cap ?and add engine oil
(
Ypage 222).
The difference in quantity between marks ;
and =is approximately 2 qt (2 l).
XInsert the oil dipstick into the guide tube as far
as it will go.
XClose the hood (Ypage 219).
OM651 4-cylinder diesel engine:
At outside temperatures between 32 ‡ (–0 †)
and 86 ‡ (30 †), the oil level can be checked
when the engine is cold.
Measuring the engine oil when the engine is cold
is less precise than measuring when the engine
is at normal operating temperature.
When the appropriate warning is shown in the
display
XAdd engine oil (Ypage 222)
or
XHave engine oil siphoned off.
Adding engine oil
GWARNING
If engine oil comes into contact with hot com- ponents in the engine compartment, it may
ignite. There is a risk of fire and injury.
Make sure that engine oil is not spilled next to
the filler neck. Let the engine cool down and
thoroughly clean the engine oil off the com-
ponents before starting the engine.
!The alternator is located below the engine
oil filler neck. If engine oil spills onto the alter-
nator, there is a danger of alternator damage.
Be very careful when adding engine oil.
HEnvironmental note
When adding oil, take care not to spill any. If
oil enters the soil or waterways, it is harmful to
the environment.
!Do not add too much oil. adding too much
engine oil can result in damage to the engine
or to the catalytic converter. Have excess
engine oil siphoned off.
!Do not use any additives in the engine oil.
This could damage the engine.
XOpen the hood (Ypage 218).
XUnscrew and remove cap ?.
XAdd engine oil.
XReplace cap?on the filler neck and tighten.
When doing so, make sure that the cap
engages correctly.
XCheck the oil level with the oil dipstick
(Ypage 221) or on the display (Ypage 220).
XClose the hood.
Coolant
GWARNING
The engine cooling system is pressurized, par-
ticularly when the engine is warm. When
opening the cap, you could be scalded by hot
coolant spraying out. There is a risk of injury.
Let the engine cool down before opening the
cap. Wear eye and hand protection when
opening the cap. Open the cap slowly half a
turn to allow pressure to escape.
Only check the coolant level and/or fill the cool-
ant if the vehicle is on a level surface and the
engine has cooled down. The coolant tempera-
ture must be below 122 ‡ (50 †).
!Check the engine cooling and heating sys-
tem regularly for leaks.
If a large quantity of coolant is lost, have the
cause traced and rectified at a qualified spe-
cialist workshop.
GWARNING
If antifreeze comes into contact with hot com- ponents in the engine compartment, it may
ignite. There is a risk of fire and injury.
Let the engine cool down before you add anti-
freeze. Make sure that antifreeze is not spilled
next to the filler neck. Thoroughly clean the
antifreeze from components before starting
the engine.
!Take care not to spill any coolant on painted
surfaces. You could otherwise damage the
paintwork.
222Engine compartment
Maintenance and care
Page 225 of 290
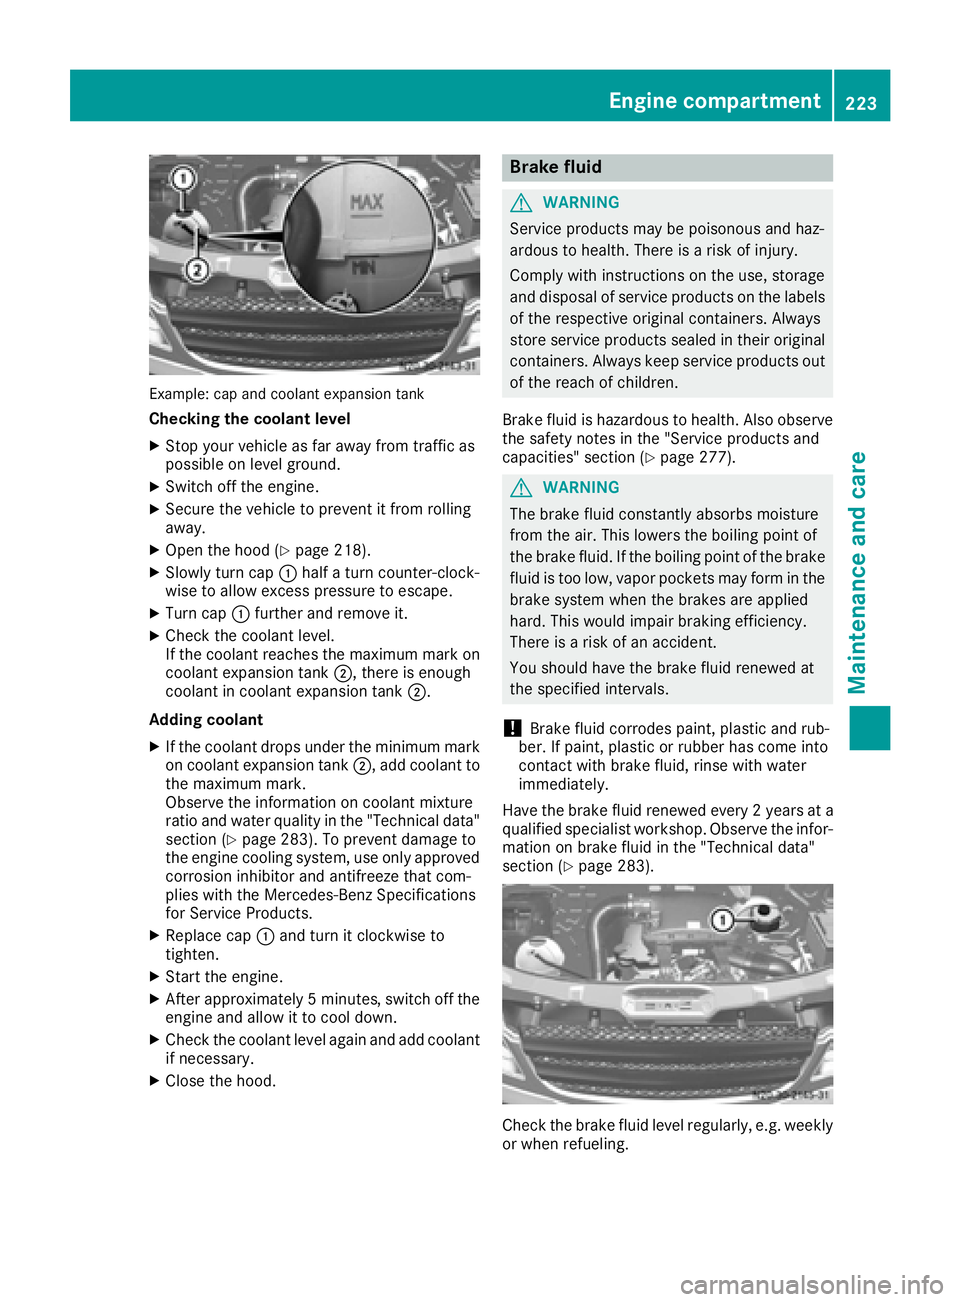
Example: cap and coolant expansion tank
Checking the coolant level
XStop your vehicle as far away from traffic as
possible on level ground.
XSwitch off the engine.
XSecure the vehicle to prevent it from rolling
away.
XOpen the hood (Ypage 218).
XSlowly turn cap:half a turn counter-clock-
wise to allow excess pressure to escape.
XTurn cap :further and remove it.
XCheck the coolant level.
If the coolant reaches the maximum mark on
coolant expansion tank ;, there is enough
coolant in coolant expansion tank ;.
Adding coolant
XIf the coolant drops under the minimum mark
on coolant expansion tank ;, add coolant to
the maximum mark.
Observe the information on coolant mixture
ratio and water quality in the "Technical data"
section (
Ypage 283). To prevent damage to
the engine cooling system, use only approved
corrosion inhibitor and antifreeze that com-
plies with the Mercedes-Benz Specifications
for Service Products.
XReplace cap :and turn it clockwise to
tighten.
XStart the engine.
XAfter approximately 5 minutes, switch off the
engine and allow it to cool down.
XCheck the coolant level again and add coolant
if necessary.
XClose the hood.
Brake fluid
GWARNING
Service products may be poisonous and haz-
ardous to health. There is a risk of injury.
Comply with instructions on the use, storage
and disposal of service products on the labels
of the respective original containers. Always
store service products sealed in their original
containers. Always keep service products out
of the reach of children.
Brake fluid is hazardous to health. Also observe
the safety notes in the "Service products and
capacities" section (
Ypage 277).
GWARNING
The brake fluid constantly absorbs moisture
from the air. This lowers the boiling point of
the brake fluid. If the boiling point of the brake
fluid is too low, vapor pockets may form in the
brake system when the brakes are applied
hard. This would impair braking efficiency.
There is a risk of an accident.
You should have the brake fluid renewed at
the specified intervals.
!Brake fluid corrodes paint, plastic and rub-
ber. If paint, plastic or rubber has come into
contact with brake fluid, rinse with water
immediately.
Have the brake fluid renewed every 2 year sat a
qualified specialist workshop. Observe the infor- mation on brake fluid in the "Technical data"
section (
Ypage 283).
Check the brake fluid level regularly, e.g. weekly
or when refueling.
Engine compartment223
Maintenance and care
Z