maintenance MERCEDES-BENZ SPRINTER 2017 MY17 Operator’s Manual
[x] Cancel search | Manufacturer: MERCEDES-BENZ, Model Year: 2017, Model line: SPRINTER, Model: MERCEDES-BENZ SPRINTER 2017Pages: 286, PDF Size: 4.36 MB
Page 97 of 286
iCanada only:
If the wind shield wiper s areswitched on and
you stop the veh icle, the windshield wiper
speed isreduced. For example, ifyou have
selected level IIand stop the veh icle,wipin g
continues with intermittent wipe whilethe
veh icle is stationary. Ifintermittent wipe is
selected, the intervals become longer.
Vehicles with a rain and light sensor: you
can use level Ias the universal setting. The
rain and light sensor sets the appropriate wip-
ing frequency automatically, according to the
intensity of the rain. When you stop the veh i-
cle, leve lsIII and IIare swit ched down to
level Iautomatically.
The wind shield wiper will return to the original
level when you drive faster than 5 mph
(8 km/h).
You can adjust the sensitivit y of the rain and
light sensor using the on-board computer
(
Ypage 170).
In formation on checking the washer fluid level
can befound inthe "Maintenance and care"
section (
Ypage 220).
Switching the rear window wiper on/
off
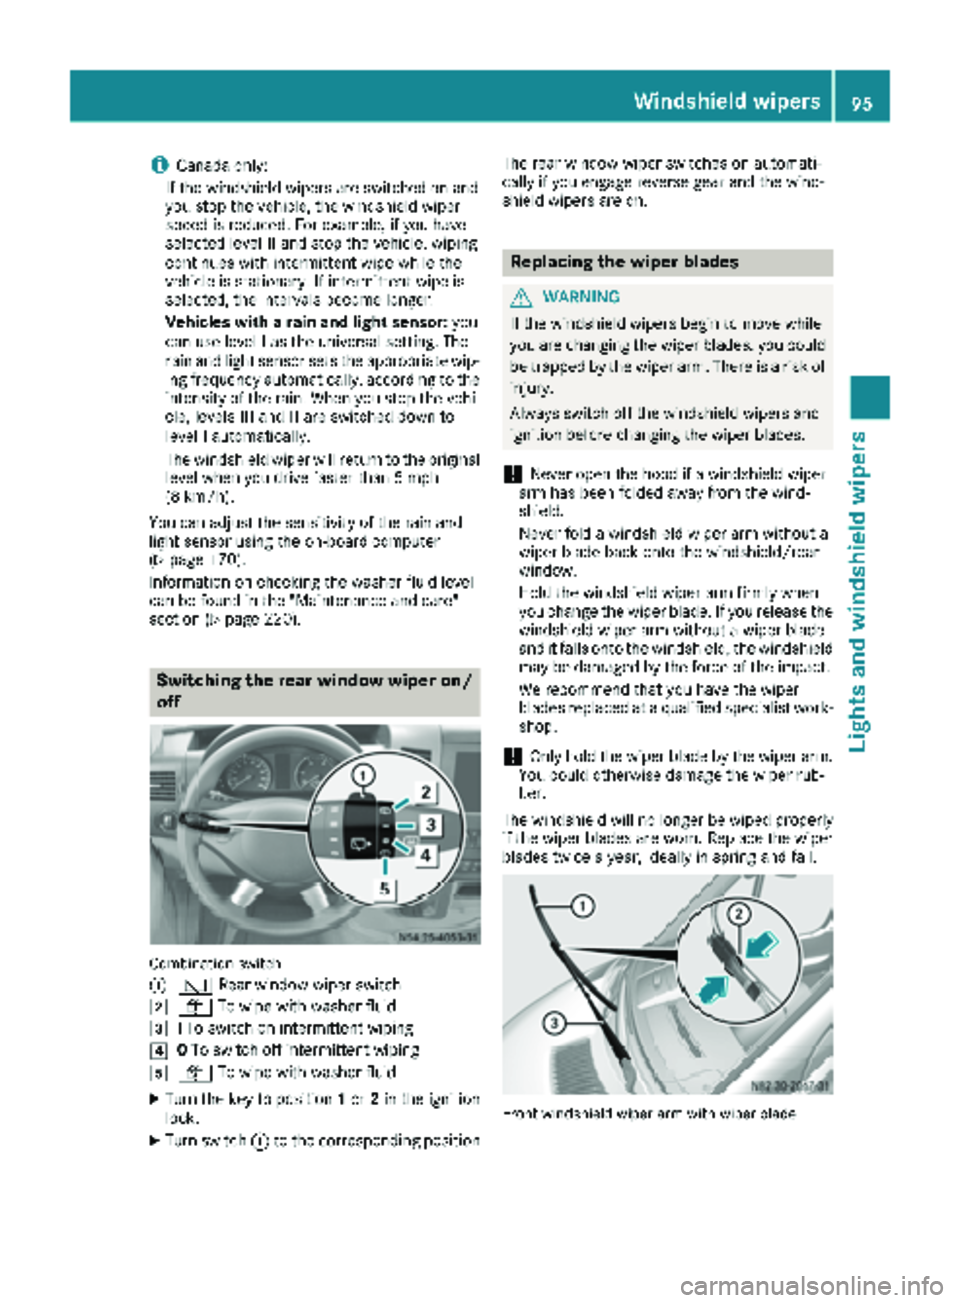
Combination switch
:
è Rearwindowwiper swit ch
2ôTowipe wit h washer fluid
3ITo swit ch on intermittent wiping
40To swit ch off intermittent wiping
5ô Towipe wit h washer fluid
XTurn the key to position 1or 2in the ignition
lock.
XTurn switch: to the corresponding position The rear window wiper
switches on automati-
cally if you engage reverse gear and the wind-
shield wiper s are on.
Replacing the wiper blades
GWARNING
If the wind shield wipers begin to move while
you are changing the wiperblades, you could
be trapped by the wiper arm. There isa risk of
injury.
Always switch off the windshield wipers and
ignition before changing the wiper blades.
!Never open the hood if a windshield wiper
arm has been folded away from the wind-
shield.
Never fold a windshield wiper armwithout a
wiper blade back onto the windshield/rear
wind ow.
Hold the windshield wiper arm firmly when
you change the wiper blade. If you release the
windshield wiper arm without a wiperblade
and itfalls onto the windshield, the windshield
may be damaged by the force of the impact.
We recommend that you have the wiper
blades replaced at a qualified specialist work-
shop.
!Only hold the wiperblade by the wiperarm.
You could otherwise damage the wiper rub-
ber.
The wind shield will no longerbe wipedproperly
if the wiper blades are worn. Replace the wiper
blades twice a year, ideally in spring and fall.
Fron twindshield wiper arm wit hwiper blade
Windshield wipers95
Lights and windshield wipers
Z
Page 99 of 286
Useful information
This Operator's Manual describes all models as
well as standard and optional equipment of your
vehicle that were available at the time of going
to print. Country-specific variations are possi-
ble. Note that your vehicle may not be equipped
with all of the described functions. This also
applies to systems and functions relevant to
safety.
Read the information on qualified specialist
workshops (
Ypage 27).
Overview of climate control systems
Important safety notes
Observe the recommended settings on the fol-
lowing pages. Otherwise, the windows could fog
up.
Climate control regulates the temperature and
the humidity in the vehicle interior and filters
undesirable substances from the air.Climate control is only operational when the
engine is running. The system only functions
optimally when the side windows are closed.
iVentilate the vehicle for a brief period during
warm weather. In order to cool the vehicle
more rapidly, switch climate control to air-
recirculation mode briefly. This will speed up
the cooling process and the desired interior
temperature will be reached more quickly.
iThe integrated filter can filter out most par-
ticles of dust and completely filters out pollen.
A clogged filter reduces the airflow into the
vehicle interior. For this reason, you should
always observe the interval for replacing the
filter, which is specified in the Maintenance
Booklet. As it depends on environmental con-
ditions, e.g. heavy air pollution, the interval
may be shorter than that stated in the Main-
tenance Booklet.
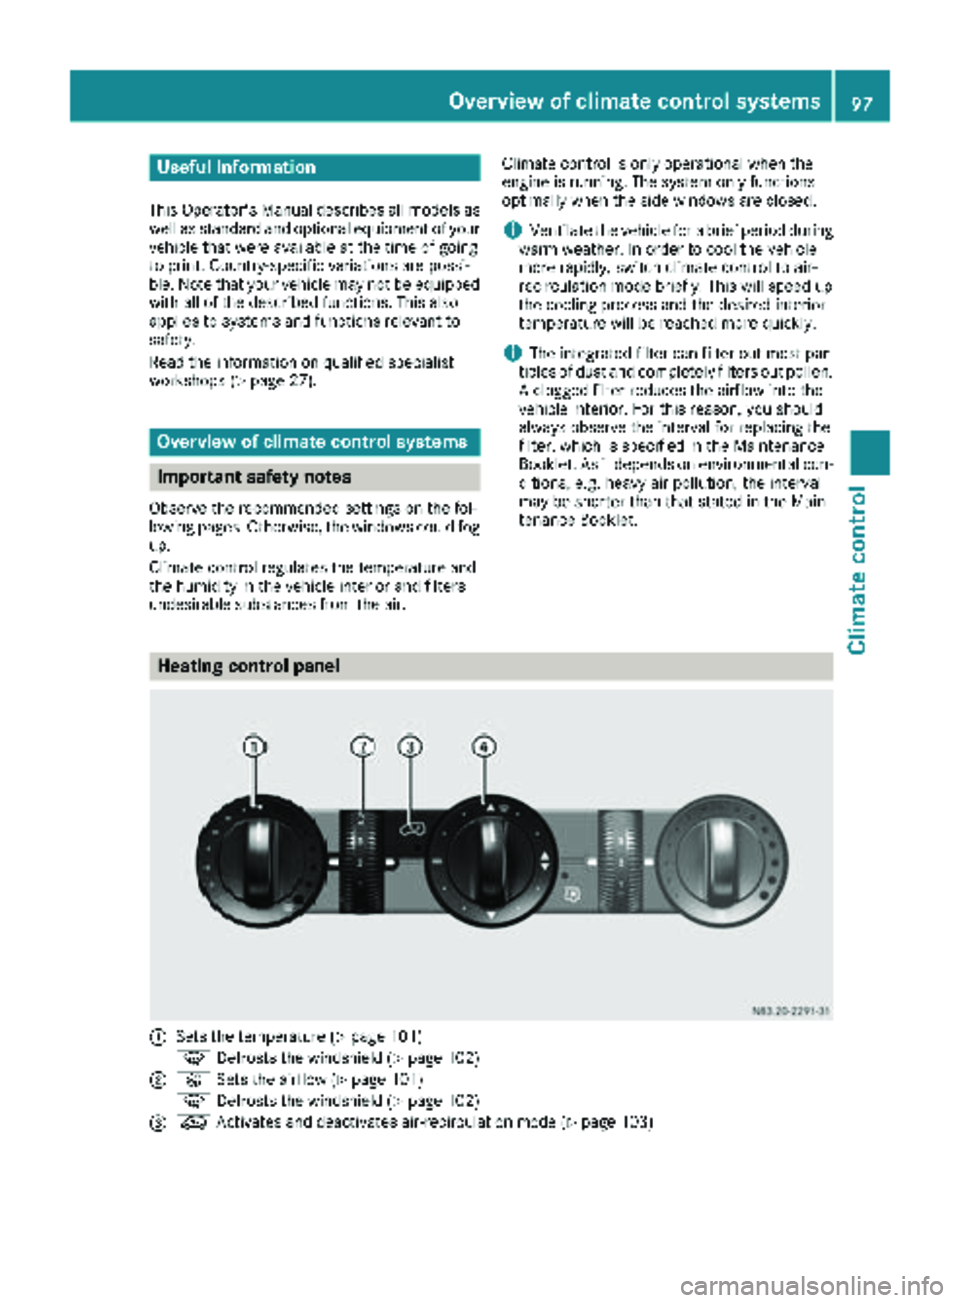
Heating control panel
:Sets the temperature (Ypage 101)
z Defrosts the windshield (
Ypage 102)
;KSets the airflow (Ypage 101)
z Defrosts the windshield (
Ypage 102)
=eActivates and deactivates air-recirculation mode (Ypage 103)
Overview of climate control systems97
Climate control
Page 120 of 286
Preparing for a journey
Visual check of the vehicle exterior
XIn particular, check the following components
on the vehicle, and on the trailer as necessary:
Rlicense plates, vehicle lighting, turn signals,
brake lamps and wiper blades for dirt and
damage
Rtires and wheels for firm seating, correct
tire pressure and general condition
Rtrailer tow hitch for play and security
The trailer coupling is one of the most
important vehicle parts with regard to road safety. The separate instructions issued by
the manufacturer pertaining to operation,
care and maintenance should be observed.
Rthat contour markings on attachments and
bodies are in good condition
XRectify any noticeable defects before com-
mencing the journey.
Checks in the vehicle
Emergency equipment and first-aid kit
XCheck the equipment to make sure that it is
accessible, complete and ready for use.
The first aid and breakdown assistance equip-
ment is in the front door stowage compartments
and behind the driver's seat.
Vehicle lighting
XTurn the key to position 2in the ignition lock.
XCheck the lighting system with the aid of a
second person.
XReplace defective bulbs (Ypage 87).
Before driving off
GWARNING
Objects in the driver's footwell may restrict
the clearance around the pedals or block a
depressed pedal. This jeopardizes the oper-
ating and road safety of the vehicle. There is a risk of an accident.
Stow all objects securely in the vehicle so that
they do not get into the driver's footwell.
When using floormats or carpets, make sure
that they are properly secured so that they do
not slip or obstruct the pedals. Do not place
several floormats or carpets on top of one
another.
GWARNING
Unsuitable footwear can hinder correct usage of the pedals, e.g.:
Rshoes with thick soles
Rshoes with high heels
Rslippers
There is a risk of an accident.
Wear suitable footwear to ensure correct
usage of the pedals.
XSecure the load as per the loading guidelines
(Ypage 208).
XStow luggage items securely. Secure the load
as per the loading guidelines (Ypage 208).
XMake sure that the floormats and carpets are
properly secured so that they cannot slip and
obstruct the pedals.
XClose all doors.
Starting the engine
GWARNING
Combustion engines emit poisonous exhaust
gases such as carbon monoxide. Inhaling
these exhaust gases leads to poisoning. There
is a risk of fatal injury. Therefore never leave
the engine running in enclosed spaces with-
out sufficient ventilation.
!Do not depress the accelerator pedal when
starting the engine.
XBefore starting the engine, make sure that:
Rall the doors are closed.
Rall the vehicle occupants are wearing their
seat belts correctly.
Rthe parking brake is applied.
iIf you depress the brake pedal before start-
ing the engine, the pedal travel is short and
pedal resistance is high.
If you depress the brake pedal again after
starting the engine, pedal travel and resist-
ance will be back to normal again.
118Driving
Driving and parking
Page 132 of 286
Rswitch off the electrical system using the bat-
tery main switch (Ypage 116) and
Rdisconnect the vehicle's auxiliary battery
Otherwise, you need to check the battery's con- dition of charge every three weeks, since
standby power consumption can drain the bat-
tery. If the battery voltage is lower than 12.2 V,
the battery must be charged. Otherwise, the
battery may be damaged by exhaustive dis-
charging.
Be sure to observe the notes on disconnecting
and charging the batteries under "Battery"
(
Ypage 223). You can obtain information about
trickle chargers from a qualified specialist work- shop.
If you leave the vehicle parked for longer than
6 weeks, the vehicle may suffer damage as a
result of lack of use. In this event, consult a
qualified specialist workshop.
Driving tips
General notes
Important safety notes
GWARNING
The driver's attention to the road must always be his/her primary focus when driving. For
your safety and the safety of others, we rec-
ommend that you pull over to a safe location
and stop before placing or taking a telephone
call. If you choose to use the telephone while
driving, please use the hands-free device and
only use the telephone when road, weather
and traffic conditions permit.
Some jurisdictions prohibit the driver from
using a mobile phone while driving a vehicle.
Bear in mind that at a speed of just 30 mph
(approximately 50 km/h), your vehicle covers
a distance of 44 feet (approximately 14 m)
ever yse cond.
GWARNING
If you switch off the ignition while driving,
safety-relevant functions are only available
with limitations, or not at all. This could affect, for example, the power steering and the brake
boosting effect. You will require considerably
more effort to steer and brake. There is a risk
of an accident.
Do not switch off the ignition while driving.
!Always observe the ground clearance of the
vehicle and avoid obstacles. On vehicles with a step, ground clearance is further restricted.
Obstacles can damage the vehicle.
If you must drive over obstacles, drive espe-
cially slowly and carefully. If necessary, have
another person direct you.
Drive sensibly – save fuel
In order to save fuel, observe the following tips:
XThe tires should always be inflated to the rec-
ommended tire pressure.
XRemove unnecessary loads.
XRemove roof carriers when they are not nee-
ded.
XWarm up the engine at low engine speeds.
XAvoid frequent acceleration or braking.
XHave all maintenance work carried out as
indicated by the service intervals in the Main-
tenance Booklet or by the service interval dis-
play.
Fuel consumption also increases when driving in cold weather, in stop-start traffic and in moun-
tainous terrain.
Overrun cutoff
If you are in overrun mode and take your foot off
the accelerator pedal, the fuel supply is cut off
when the engine speed is out of the idle speed
control range.
Drinking and driving
GWARNING
Drinking and driving and/or taking drugs and driving are very dangerous combinations.
Even a small amount of alcohol or drugs can
affect your reflexes, perceptions and judg-
ment.
The possibility of a serious or even fatal acci-
dent are greatly increased when you drink or
take drugs and drive.
130Driving tips
Driving and parking
Page 133 of 286
Do not drink or take drugs and drive or allow
anyone to drive who has been drinking or tak-ing drugs.
Emission control
GWARNING
Combustion engines emit poisonous exhaust
gases such as carbon monoxide. Inhaling
these exhaust gases leads to poisoning. There
is a risk of fatal injury. Therefore never leave
the engine running in enclosed spaces with-
out sufficient ventilation.
Certain engine systems are designed to keep
the level of poisonous substances in exhaust
fumes within legal limits.
These systems only work optimally if they are
maintained exactly in accordance with the man-
ufacturer's specifications. Any work on the
engine should therefore be carried out by quali-
fied and authorized technicians at a Sprinter
dealer.
The engine settings must not be changed under any circumstances. In addition, all specific
maintenance work must be carried out at regu-
lar intervals and in accordance with the service
requirements of the dealer listed here on the
inside title page. Details can be found in the
Maintenance Booklet.
Short journey
!
If the vehicle is predominantly used for
short-distance driving or is stationary for long
periods, this could lead to a malfunction in the automatic cleaning function for the diesel par-
ticle filter. This can lead to blockage of the
diesel particle filter. This can also result in fuel
collecting in the engine oil and cause engine
failure.
Therefore, if you mainly drive short distances,
drive on a highway or an inter-urban road for
20 minute severy 300 miles (500 km). This facil-
itates the diesel particle filter's burn-off proc-
ess.
Speed limiter
GWARNING
Exceeding the stated tire load-bearing capa-
city and the approved maximum speed could
lead to tire damage or the tire bursting. There is a risk of accident.
Therefore, only use tire types and sizes
approved for your vehicle model. Observe the
tire load rating and speed rating required for
your vehicle.
As the driver, you must find out about the max-
imum speed of the vehicle permitted for the
tires (tire and tire pressure). In particular, also
observe the tire approval regulations for each
country.
You must not exceed the speed limit for the tires
listed in the tire pressure tables. You can find
information on tire pressures in the "Wheels and
tires" section (
Ypage 246).
You can permanently limit the speed of your
vehicle to 65 mph (105 km/h) or 75 mph
(120 km/h).
We recommend that you have the speed limit
programmed at an authorized Sprinter dealer.
Before overtaking, take into consideration that
the engine speed limiter prevents the speed
increasing beyond the programmed speed limit.
Driving abroad
Service
An extensive network of authorized Sprinter
Dealers is also at your disposal when you are
traveling abroad. Nevertheless, please bear in
mind that service facilities or replacement parts may not always be immediately available. You
can obtain a list of workshops at any authorized
Sprinter Dealer.
Fuel
In some countries, only fuels with a higher sulfur
content are available.
Unsuitable fuel can cause engine damage. Infor-
mation on fuel (
Ypage 273).
Driving tips131
Driving and parking
Z
Page 153 of 286
Problems with PARKTRONIC
ProblemPossible causes/consequences andMSolutions
Only the red segments in
the PARKTRONIC warn-
ing displays are lit.
In addition, a warning
tone sounds for approx.
two seconds
PARKTRONIC is deacti-
vated after approx-
imately 20 seconds.
The indicator lamp of the
f button lights up
and the red segments in
the PARKTRONIC warn-
ing display go out.PARKTRONIC has malfunctioned and has switched itself off.
XIf problems persist, have PARKTRONIC checked at a qualified spe- cialist workshop.
The PARKTRONIC warn-
ing displays implausible
distances.
For example, all the seg-
ments may be lit even
though there is no obsta-
cle present.The PARKTRONIC sensors are dirty or iced up.
XClean the PARKTRONIC sensors (Ypage 232).
XTurn the key to position 2in the ignition lock.
The license plate or other parts attached near the sensors may not be
secured correctly.
XCheck the license plate and attachment parts near the sensors for
correct seating.
An external radio or ultrasonic source may be causing interference.
XCheck PARKTRONIC functions in a different location.
Rear view camera
Important safety notes
The rear view camera is only an aid. It cannot
replace your own awareness of the immediate
surroundings. You are responsible for safe
maneuvering, parking and pulling away. When
maneuvering, parking and pulling away, make
sure that there are no persons, animals or
objects in the maneuvering area.
The rear view camera is a visual parking aid.
Information on operation can be found in the
separate Audio 15 supplement.
The camera is in the middle of the roof above the
high-mounted brake lamp (
Ypage 232).
You can find information on cleaning the camera
in the "Maintenance and care" section
(
Ypage 232).
Working mode
ADR (working speed governor)
General notes
When activated, ADR automatically increases
the engine speed to a preset speed or a speed
you have set.
iAfter a cold start, the idling speed of the
engine is increased automatically. If the pre-
set working speed is lower than the increased idling speed, the working speed is only
reached once the engine has completed the
warm-up phase.
It is only possible to activate ADR with the
vehicle stationary and the parking brake
applied.
The selector lever of the automatic transmis-
sion must be in position P.
Working mode151
Driving and parking
Z
Page 216 of 286
Useful information
This Operator's Manual describes all models as
well as standard and optional equipment of your
vehicle that were available at the time of going
to print. Country-specific variations are possi-
ble. Note that your vehicle may not be equipped
with all of the described functions. This also
applies to systems and functions relevant to
safety.
Read the information on qualified specialist
workshops (
Ypage 27).
Engine compartment
Hood
Important safety notes
GWARNING
If the hood is unlatched, it may open up when the vehicle is in motion and block your view.
There is a risk of an accident.
Never unlatch the hood while driving.
GWARNING
Opening the hood when the engine is over-
heated or when there is a fire in the engine
compartment could expose you to hot gases
or other service products. There is a risk of
injury.
Let an overheated engine cool down before
opening the hood. If there is a fire in the
engine compartment, keep the hood closed
and contact the fire department.
GWARNING
The engine compartment contains moving
components. Certain components, such as
the radiator fan, may continue to run or start
again suddenly when the ignition is off. There is a risk of injury.
If you need to do any work inside the engine
compartment:
Rswitch off the ignition
Rnever reach into the area where there is a
risk of danger from moving components,
such as the fan rotation area
Rremove jewelry and watches
Rkeep items of clothing and hair, for exam-
ple, away from moving parts
GWARNING
The fuel injection system operates with a high
voltage. If you touch the live components, you could receive an electric shock. There is a risk
of injury.
Never touch components of the fuel injection
system when the ignition is switched on.
The live components of the fuel injection system
are, for example, the injectors.
GWARNING
Certain components in the engine compart-
ment, such as the engine, radiator and parts
of the exhaust system, can become very hot.
Working in the engine compartment poses a
risk of injury.
Where possible, let the engine cool down and touch only the components described in the
following.
If you have to carry out work in the engine com-
partment, only touch the following components:
RHood
ROil dipstick
REngine oil filler neck cap
RWasher fluid reservoir cap
RCoolant expansion tank cap
Opening the hood
!Make sure that the windshield wipers are
not folded away from the windshield. You
could otherwise damage the windshield wip-
ers or the hood.
214Engine compartment
Maintenance and care
Page 217 of 286
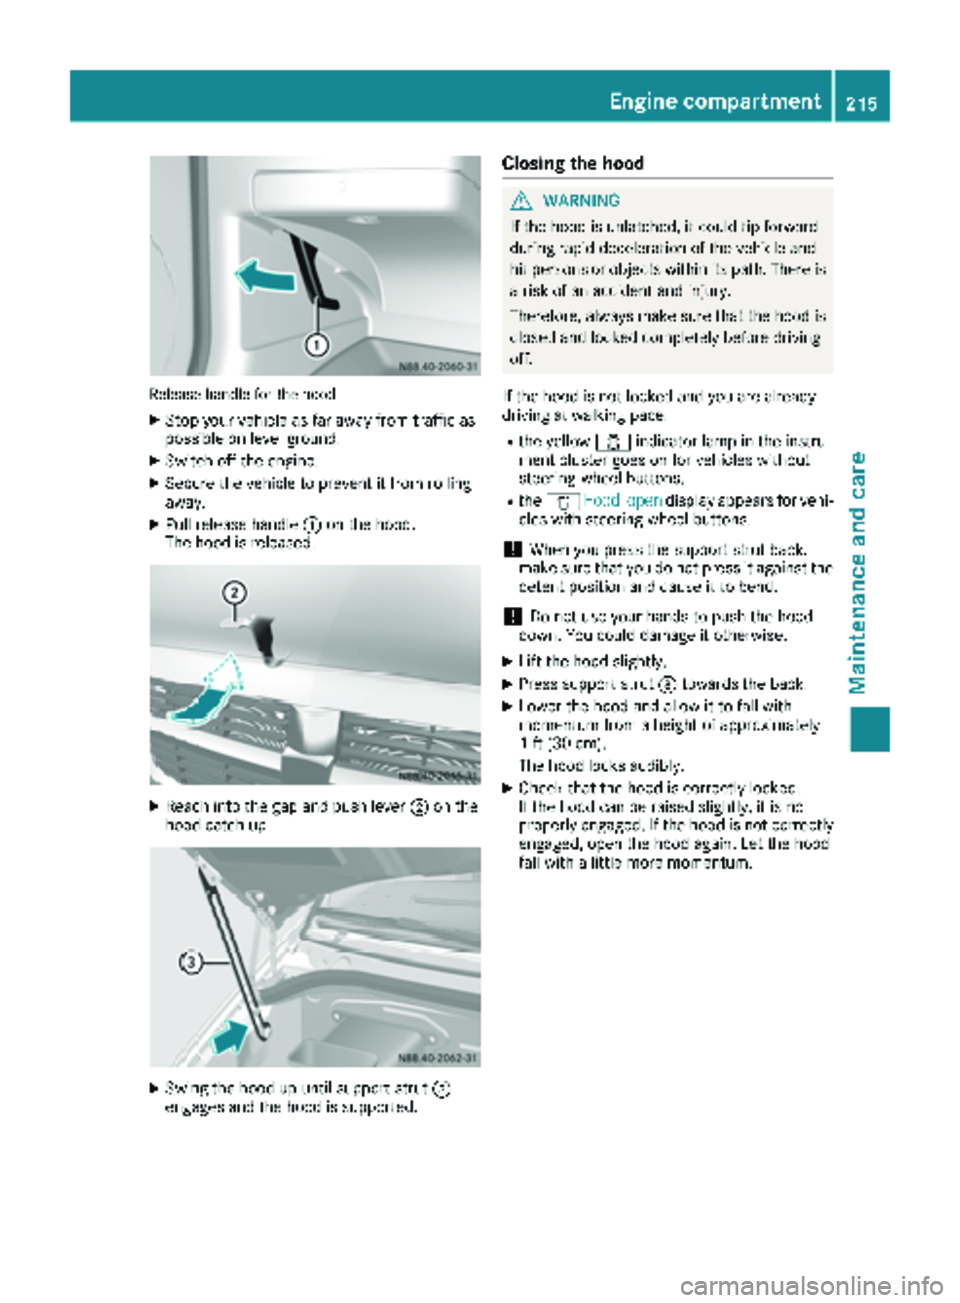
Releasehandle for th ehoo d
XStop your veh icleas far away fr omtraff icas
possible on level ground.
XSwitch off the engine.
XSecure the veh icleto prevent itfrom rolling
away.
XPull release handle :onthe hood.
The hoodis released.
XReach into the gap and push lever ;onthe
hoo d catch up.
XSwin g the hood up unt ilsupport strut =
engages and the hood issupported.
Closing the hood
GWARNIN G
If the hoodis unlatched, it could tip forward
during rapid decelerati on ofthe vehicle and
hit persons or objectswithin its path. There is
a risk ofan accident and injury.
Therefore, always make sure that the hood is
closed and locked co mpletely before driv ing
off.
If the hood is not locked and you are alrea dy
driving at walkingpace:
Rthe yellow 1indicat or lamp in theinstru-
ment cluster goes onfor vehicles without
steering-wheel butto ns.
Rthe 1 Hoodopendisp lay appears for vehi-
cles with steering-wheel butto ns.
!When you press the support strut back,
make sure that you do not press it against the
detent position and cause itto bend.
!Do no t use your hands to push thehood
down .You could damage it otherwise.
XLift the hood slightly.
XPress support strut =towards the back.
XLowe r the hood and allow itto fall with
mom entum fr oma height of approximat ely
1 ft (30 cm).
The hood locks audibly.
XChec k that the hood is correctly locke d.
If the hood can beraised slightly, it is not
properly engaged. If the hood is not correctly
engaged, openthehood again. Let the hood
fall with a little moremom entum.
Engine compartment215
Maintenance and care
Z
Page 218 of 286
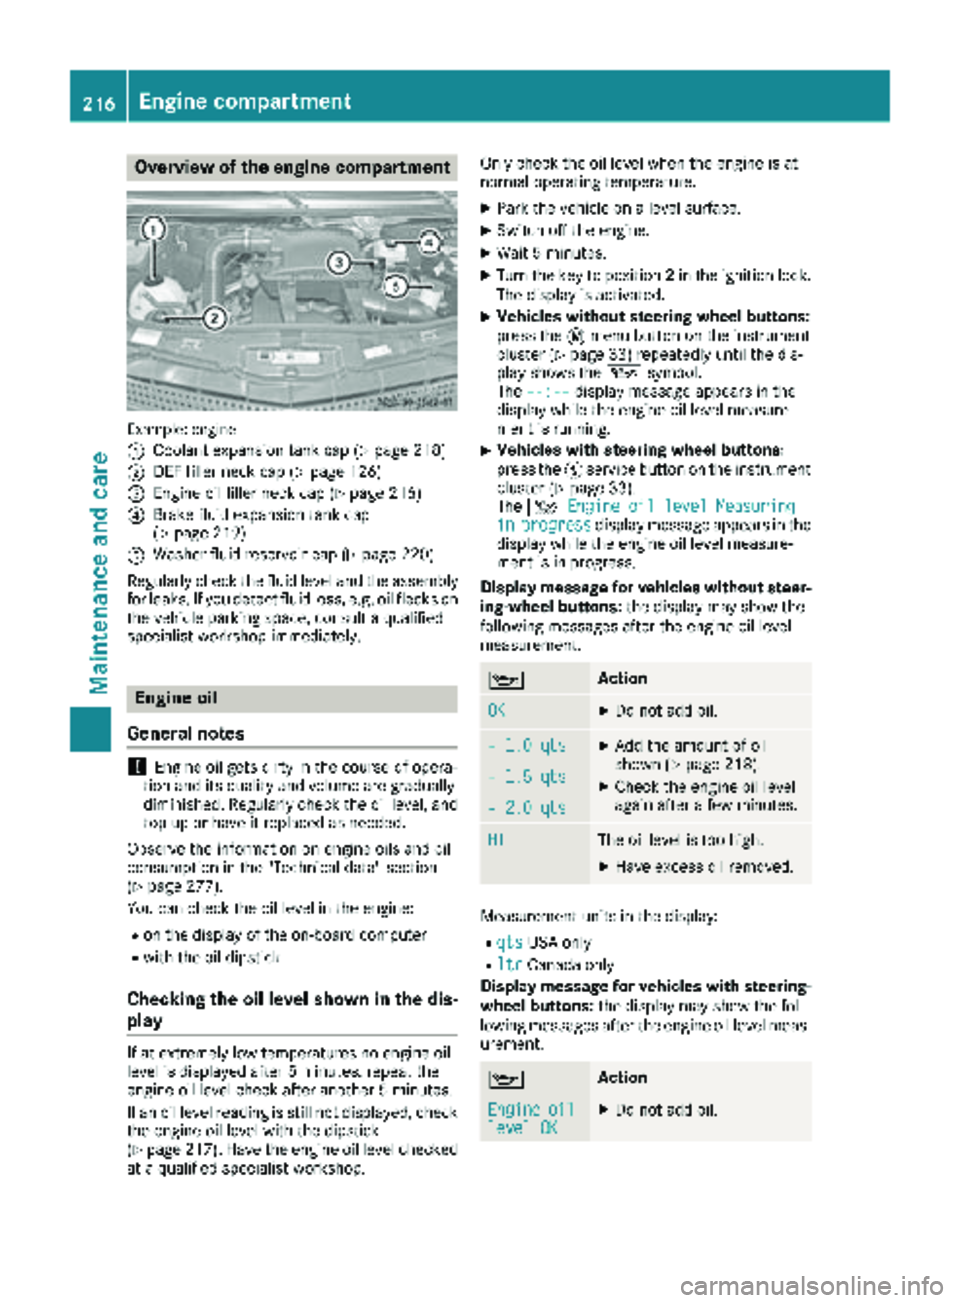
Overview of the engine compartment
Example: engine
:
Coolant expansion tank cap (Ypage 218)
;DEF filler neck cap (Ypage 126)
=Engine oil filler neck cap (Ypage 216)
?Brake fluid expansion tank cap
(Ypage 219)
AWasher fluid reservoir cap (Ypage 220)
Regularly check the fluid level and the assembly
for leaks. If you detect fluid loss, e.g. oil flecks on
the vehicle parking space, consult a qualified
specialist workshop immediately.
Engine oil
General notes
!Engine oil gets dirty in the course of opera-
tion and its quality and volume are gradually
diminished. Regularly check the oil level, and
top up or have it replaced as needed.
Observe the information on engine oils and oil
consumption in the "Technical data" section
(
Ypage 277).
You can check the oil level in the engine:
Ron the display of the on-board computer
Rwith the oil dipstick
Checking the oil level shown in the dis-
play
If at extremely low temperatures no engine oil
level is displayed after 5 minutes, repeat the
engine oil level check after another 5 minutes.
If an oil level reading is still not displayed, check
the engine oil level with the dipstick
(
Ypage 217). Have the engine oil level checked
at a qualified specialist workshop. Only check the oil level when the engine is at
normal operating temperature.
XPark the vehicle on a level surface.
XSwitch off the engine.
XWait 5 minutes.
XTurn the key to position
2in the ignition lock.
The display is activated.
XVehicles without steering wheel buttons:
press the 4menu button on the instrument
cluster (
Ypage 33) repeatedly until the dis-
play shows the 1symbol.
The --:--
display message appears in the
display while the engine oil level measure-
ment is running.
XVehicles with steering wheel buttons:
press the Ëservice button on the instrument
cluster (
Ypage 33).
The 4 Engine oil level Measuring
inprogressdisplay message appears in the
display while the engine oil level measure-
ment is in progress.
Display message for vehicles without steer-
ing-wheel buttons: the display may show the
following messages after the engine oil level
measurement.
1Action
OKXDo not add oil.
– 1.0 qtsXAdd the amount of oil
shown (Ypage 218).
XCheck the engine oil level
again after a few minutes.– 1.5 qts
– 2.0 qts
HIThe oil level is too high.
XHave excess oil removed.
Measurement units in the display:
RqtsUSA only
RltrCanada only
Display message for vehicles with steering- wheel buttons: the display may show the fol-
lowing messages after the engine oil level meas-
urement.
1Action
Engineoillevel OKXDo not add oil.
216Engine compartment
Maintenance and care
Page 219 of 286
EngineoilAdd1.0 quart
XAdd the amount of oil
shown (Ypage 218).
XCheck the engine oil level
again after a few minutes.
EngineoilAdd1.5quarts
EngineoilAdd2.0quarts
EngineoillevelReduceoillevel
The oil level is too high.
XHave excess oil removed.
Eng. oillev. Turnignitionon forlevel
XTurn the key to position2in
the ignition lock.
Observewait.period
XRepeat the engine oil
measurement after about
5 minutes if the engine is at
normal operating tempera-
ture.
XRepeat the engine oil
measurement after about
30 minutes if the engine is
not at normal operating
temperature.
Engineoillevel Notwhen eng.running
XSwitch off the engine when it is at normal operating
temperature and wait
approximately 5 minutes
before measuring the
engine oil level.
Measurement units in the display:
RqtsUSA only
RltrCanada only
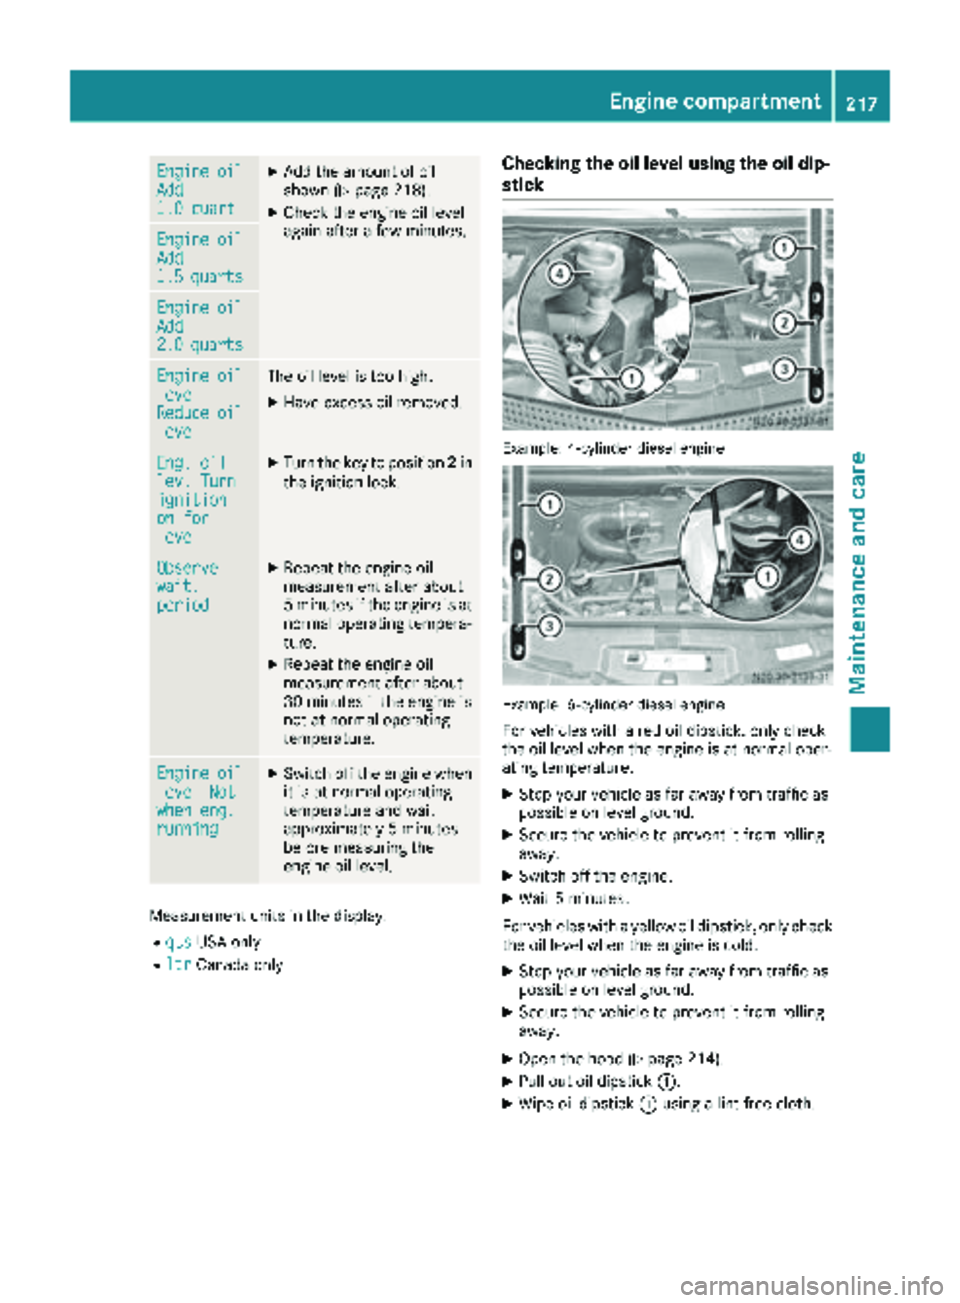
Checking the oil level using the oil dip-
stick
Example: 4-cylinder diesel engine
Example: 6-cylinder diesel engine
For vehicles with a red oil dipstick, only check
the oil level when the engine is at normal oper-
ating temperature:
XStop your vehicle as far away from traffic as
possible on level ground.
XSecure the vehicle to prevent it from rolling
away.
XSwitch off the engine.
XWait 5 minutes.
For vehicles with a yellow oil dipstick, only check
the oil level when the engine is cold.
XStop your vehicle as far away from traffic as
possible on level ground.
XSecure the vehicle to prevent it from rolling
away.
XOpen the hood (Ypage 214).
XPull out oil dipstick :.
XWipe oil dipstick:using a lint-free cloth.
Engine compartment217
Maintenance and care
Z