automatic transmission MERCEDES-BENZ SPRINTER 2017 MY17 Operator’s Manual
[x] Cancel search | Manufacturer: MERCEDES-BENZ, Model Year: 2017, Model line: SPRINTER, Model: MERCEDES-BENZ SPRINTER 2017Pages: 286, PDF Size: 4.36 MB
Page 131 of 286
Exceptionally, if the service brake fails, the park-
ing brake can be used to brake the vehicle in an
emergency.
XEmergency braking: press and hold release
button ;and carefully apply brake lever :.
Switching off the engine
GWARNING
The automatic transmission switches to neu-
tral position Nwhen you switch off the engine.
The vehicle may roll away. There is a risk of an
accident.
After switching off the engine, always switch
to parking position P. Prevent the parked vehi-
cle from rolling away by applying the parking
brake.
!If the coolant temperature is very high, e.g.
after driving on hilly roads, leave the engine
running at idle speed for about two minutes
before turning it off.
This allows the coolant temperature to return
to normal.
XStop the vehicle.
XShift the automatic transmission to position
P .
XApply the parking brake.
XTurn the key to position 0in the ignition lock
and remove it.
The immobilizer is activated.
XSecure the vehicle to prevent it from rolling
away (Ypage 127).
Wheel chock
Use the wheel chock or a similar object to pre-
vent the vehicle from rolling away, e.g. when
parking or changing a wheel.
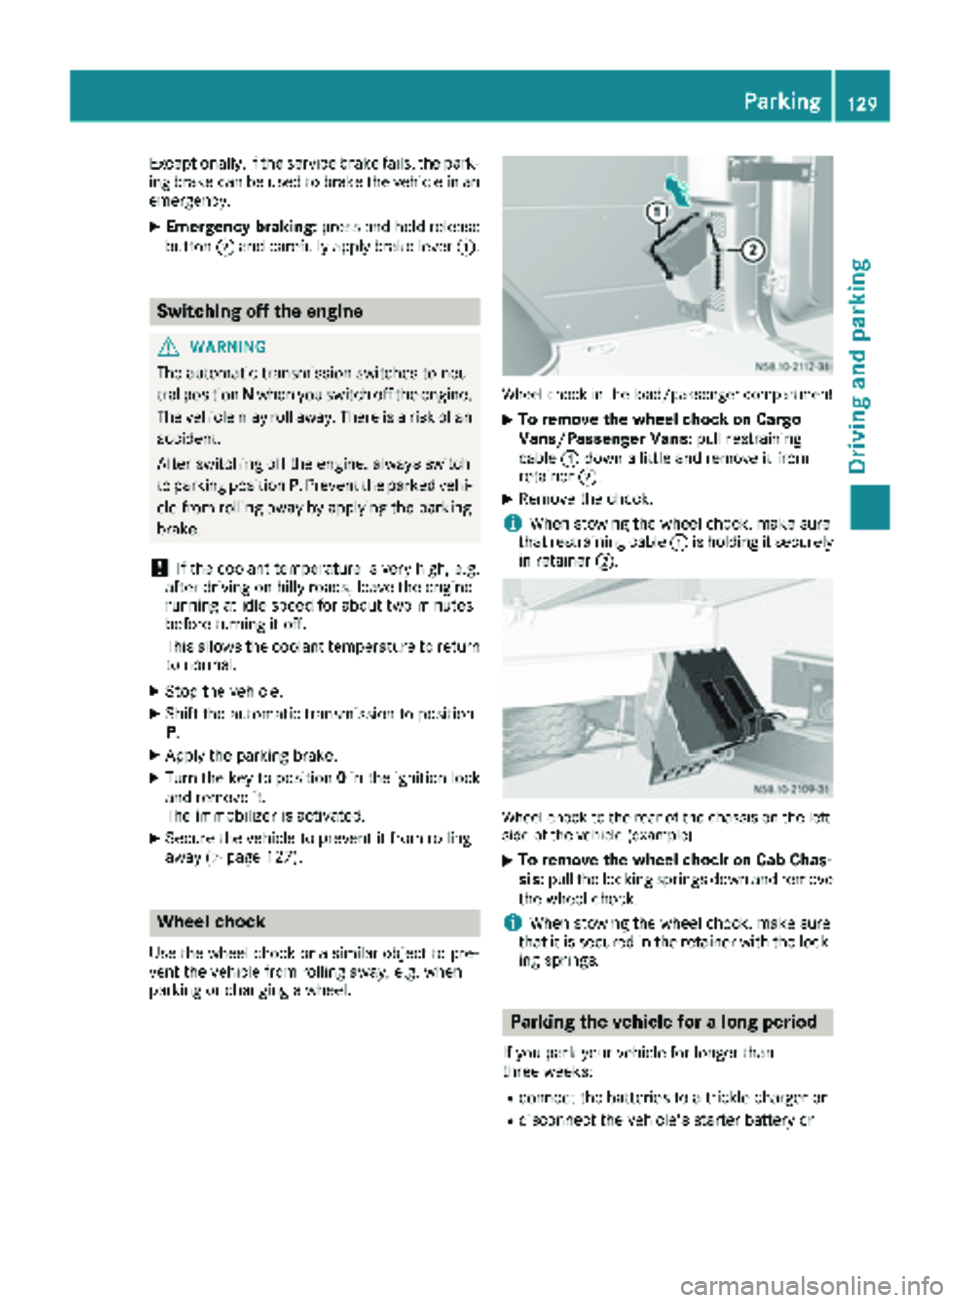
Wheel chock in the load/passenger compartment
XTo remove the wheel chock on Cargo
Vans/Passenger Vans: pull restraining
cable :down a little and remove it from
retainer ;.
XRemove the chock.
iWhen stowing the wheel chock, make sure
that restraining cable :is holding it securely
in retainer ;.
Wheel chock to the rear of the chassis on the left
side of the vehicle (example)
XTo remove the wheel chock on Cab Chas-
sis:pull the locking springs down and remove
the wheel chock.
iWhen stowing the wheel chock, make sure
that it is secured in the retainer with the lock-
ing springs.
Parking the vehicle for a long period
If you park your vehicle for longer than
three weeks:
Rconnect the batteries to a trickle charger or
Rdisconnect the vehicle's starter battery or
Parking129
Driving an d parking
Z
Page 136 of 286
Drivingin wet conditions
Hydroplaning
GWARNING
There is adanger of hydroplaning occurring,
eve nif you are drivin gslowly and your tires
hav esufficien ttread depth, dependin gon th e
dept hof water on th eroad. There is aris kof
an accident.
Fo rthis reason ,avoid tire rut sand brake care-
fully.
Therefore, in heav yrain or other condition sin
whic hhydroplaning can occur ,drive as follows:
Rreduce your speed
Ravoid tire rut s
Rapply thebrake swit hcar e
Drivin gon flooded road s
!Do notdrive through floode dareas. Chec k
th edept hof any water befor edrivin gthrough
it .Drive slowly through standin gwater. Oth-
erwise ,water may ente rth evehicle interio ror
th eengin ecompartment. Thi scan damage
th eelectronic component sin th eengin eor
th eautomatic transmission. Water can also
be drawn in by th eengine's air suction nozzles
and this can cause engin edamage.
If you hav eto drive on stretches of road on whic h
water has collected, please bear in min dthat :
Rthewater level of standin gwater should no t
be abov eth elowe redg eof th efron tbumper
Rdo no tdrive faste rthan walkin gspeed
Drivin gin winter
General notes
GWARNING
If you shift down on aslipper yroad surfac ein
an attempt to increase th eengine's braking
effect ,th edrive wheels could los etheir grip.
There is an increase ddanger of skidding and
accidents .
Do no tshift down fo radditional engin ebrak-
in g on aslipper yroad surface.
GDANGER
If th eexhaus tpipe is blocke dor adequat e
ventilation is no tpossible, poisonous gases
suc has carbon monoxide (CO) may ente rth e
vehicle. Thi sis th ecase, e.g. if th evehicle
becomes trappe din snow. There is aris kof
fatal injury.
If you leav eth eengin eor th eauxiliar yheatin g
running ,mak esur eth eexhaus tpipe and are a
around th evehicle are clear of snow. To
ensur ean adequat esupply of fresh air, ope n a
window on th esid eof th evehicle that is no t
facin ginto th ewind.
Hav eyour vehicle winterproofed at aqualified
specialis tworkshop in goo dtime at th eonset of
winter.
iDo no tcover th eradiator ,e.g. wit h awinte r
cover .The measurement sof th eon-boar d
diagnostic system may otherwise return inac-
curat evalues. Some of these values are
legally prescribed and mus ttherefore always
be exact .
Observ eth enote sin th e"Winte roperation "sec -
tion (
Ypage 245).
Slipper yroad surfaces
GWARNING
If you shift down on aslipper yroad surfac ein
an attempt to increase th eengine's braking
effect ,th edrive wheels could los etheir grip.
There is an increase ddanger of skidding and
accidents .
Do no tshift down fo radditional engin ebrak-
in g on aslipper yroad surface.
GWARNING
The outsid etemperature indicator is no t
designed to serve as an ice-warnin gdevic e
and is therefore unsuitable fo rthat purpose.
Indicated temperature sjust abov eth efreez -
in g poin tdo no tguarantee that th eroad sur -
fac eis free of ice. The road may still be icy,
especially in wooded areas or on bridges.
!Vehicles wit hautomatic transmissio nmay
roll only briefly in th eneutral position N.Pro-
134Driving tips
Driving and parking
Page 141 of 286
Cruise controlisdeactivated automatically
when:
Ryou apply the brakes
Ryouapply the parking brake and the c
indicator lamp inthe instrument cluster lights
up
Ryou are driving slower than 20 mph (30 km/h)
Ryou shift the automat ictransmission to neu-
tral position Nwhile the vehicle is inmotion
RESP®or ASR intervenes
Rthere isa malfunction inthe ESP®, ASR or ABS
system
Problems with cruise control
ProblemPossible causes/consequences and MSolutions
On vehicleswit h steering
wheel buttons, the
speed cannot beset
when cruise control is
activated.The displ ay shows a high-priority message. Thus a change in speed is
not possible.
XProceed as instructed by the message inthe display.
XDeactivate cruise control
COLLISION PREVENTION ASSIST
General notes
COLL ISION PREVENTION AS SISTcomprises the
dist ance warning function and adaptive Brake
Assist.
Distance warning function
Important safety notes
iNote the section on 'Important safety notes'
(Ypage 53).
GWAR NING
The distance warning function does not react:
Rto people or animals
Rto oncoming veh icles
Rto crossing traff ic
Rwhen cornering
Thus, the distance warning function cannot
provide a warning inall critical situations.
There isa risk of an acc ident.
Alwa ys pay careful attention to the traff icsit-
uation and beready to brake.
GWAR NING
The distance warning function cannot always
clearly identify objects and co mplex traff ic
situations.
In such cases, the distance warning function
may:
Rgive an unnecessary warning
Rnot give a warning
There is a risk of an accident.
Alwa ys pay careful attention to the traff icsit-
uation and donot rely solely on the distance
warning function.
Operation
The distance warning function can help you to
minimize the risk of a front-end collision with a
vehicle ahead or reduce the effects of such a
collision. Ifthe distance warning function
detects that there isa risk of a collision, you will
be warned visually and acoustically. Without
your intervention, the distance warning function
cannot prevent a collision.
The distance warning function willissue a warn-
ing at speeds of around 20 mph (30 km/h)or
more if:
Ryou approach a vehicle ahead of you very
quickly. You will then hear an intermittent
warning tone and the red ·warning lamp
in the instrument cluster flashes.
XBrake immediately in order to increase the
distance from the vehicle in front.
or
XTake evasive action provided it is safe to do
so.
Driving systems139
Driving and parking
Z
Page 146 of 286
Lane Keeping Assist does not keep your vehicle
in its lane.
The system may be impaired or may not function
if:
Rif the vehicle is incorrectly loaded
(Ypage 208)
Rthere is poor visibility, e.g. due to insufficient
illumination of the road, or due to snow, rain,
fog or spray
Rthere is glare, e.g. from oncoming traffic, the
sun or reflection from other vehicles (e.g. if
the road surface is wet)
Rthe windshield is dirty, fogged up, damaged or
covered, for instance by a sticker, in the vicin-
ity of the camera
Rno, or several, unclear lane markings are pres-
ent for one lane, e.g. in a construction area
Rthe lane markings are worn away, dark or cov-
ered up, e.g. by dirt or snow
Rthe distance to the vehicle in front is too small
and the lane markings thus cannot be detec-
ted
Rthe lane markings change quickly, e.g. lanes
branch off, cross one another or merge
Rthe road is narrow and winding
Rthere are highly variable shade conditions on
the road
A warning may be given if a front wheel passes
over a lane marking. In addition, a warning tone
sounds and the Ãindicator lamp in the
instrument cluster flashes red.
Activating/deactivating Lane Keeping
Assist
Lane Keeping Assist is automatically activated
when you start the engine.
XTo deactivate: press thejbutton in the
center console (Ypage 36).
On vehicles without steering wheel but-
tons:
OFF
flashes briefly in the display and the Ã
indicator lamp in the instrument cluster
flashes yellow and then lights up continu-
ously.
On vehicles with steering wheel buttons:
The Lane
Keep.AssistDeactivatedmes-
sage appears in the display and the Ã
indicator lamp in the instrument cluster
flashes yellow and then lights up continu-
ously. Lane Keeping Assist is deactivated.
XTo activate:
press thejbutton in the
center console again (Ypage 36).
On vehicles without steering wheel but-
tons:
on
flashes briefly in the display and the Ã
indicator lamp in the instrument cluster goes
out. If a lane marking is detected, the Ã
indicator lamp lights up green.
On vehicles with steering wheel buttons:
The Lane Keep. Assist Activated
mes-
sage appears in the display and the Ã
indicator lamp in the instrument cluster goes
out. If a lane marking is detected, the Ã
indicator lamp lights up green.
Lane Keeping Assist is activated.
A Lane Keeping Assist warning is suppressed if:
Ra driving safety system intervenes, such as
ABS, BAS or ESP®.
Ryou have set the turn signal and a lane change is detected. In this case, the warnings are
suppressed for a certain period of time.
Ryou accelerate hard, e.g. kickdown on vehi-
cles with an automatic transmission.
Ryou brake hard.
Ryou steer actively, e.g. swerve to avoid an
obstacle or change lane quickly.
Ryou cut the corner on a sharp bend.
In order that you are warned only when neces-
sary and in good time if you cross the lane mark-
ing, the system recognizes certain conditions
and warns you accordingly.
Lane Keeping Assist warns you earlier if:
Ryou approach the outer lane marking on a
bend.
Rthe road has very wide lanes, e.g. a freeway.
Rthe system recognizes solid lane markings.
Warnings are given later if:
Rthe road has narrow lanes.
Ryou cut the corner on a bend.
All-wheel drive
Important safety notes
!Never tow the vehicle with one axle raised.
This may damage the transfer case. Damage
of this sort is not covered by the Mercedes-
Benz Limited Warranty. All wheels must
144Driving systems
Driving and parking
Page 147 of 286
remain either on the ground or be fully raised.
Observe the instructions for towing the vehi-
cle with all wheels in full contact with the
ground.
!A function or performance test should only
be carried out on a two-axle dynamometer.
Before you operate the vehicle on such a
dynamometer, please consult a qualified
workshop. You could otherwise damage the
drive train or the brake system.
If you fail to adapt your driving style or if you are
inattentive, the all-wheel drive system can nei-
ther reduce the risk of an accident nor override
the laws of physics. The all-wheel drive system
cannot take road, weather and traffic conditions
into account. The all-wheel drive system is only
an aid. You are responsible for the distance to
the vehicle in front, for vehicle speed and for
braking in good time.
4ETS ensures permanent drive for all four
wheels, and together with ESP
®it improves the
vehicle's traction.
If a driven wheel spins due to lack of traction:
RWhen pulling away, make use of the traction
control integrated in ESP®. Depress the
accelerator pedal as far as necessary.
RWhile driving, slowly take your foot off the
accelerator pedal
In wintry driving conditions, always use winter
tires (M+S tires) and if necessary, snow chains
(
Ypage 246). This is the only way to get the full
benefit from the all-wheel drive system.
For information on "Driving off-road", see
(
Ypage 135).
Engaging all-wheel drive
Conditions for engaging/disengaging
All-wheel drive can only be engaged or disen-
gaged if:
Rthe engine is running
Rthe vehicle is stationary
If it is not possible to engage all-wheel-drive:
Rmove the selector lever to position N
Rrelease the brake pedal
Rpress the;button
Rmove the selector lever from Nto Dor R
Engaging/disengaging all-wheel drive
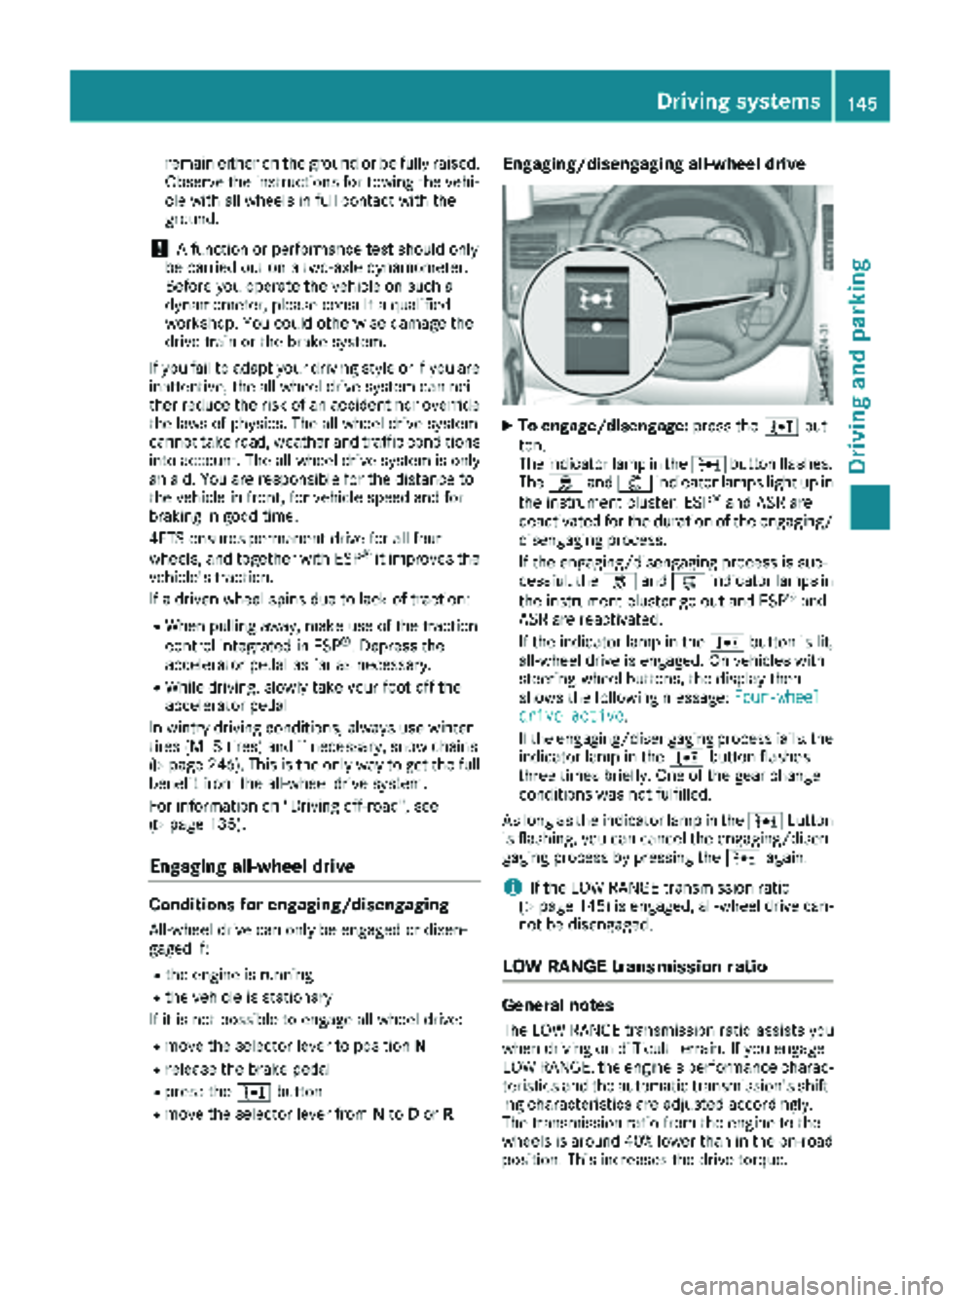
XTo engage/disengage: press the;but-
ton.
The indicator lamp in the ;button flashes.
The h and: indicator lamps light up in
the instrument cluster. ESP
®and ASR are
deactivated for the duration of the engaging/ disengaging process.
If the engaging/disengaging process is suc-
cessful, the hand: indicator lamps in
the instrument cluster go out and ESP
®and
ASR are reactivated.
If the indicator lamp in the ;button is lit,
all-wheel drive is engaged. On vehicles with
steering-wheel buttons, the display then
shows the following message: Four-wheel
drive active.
If the engaging/disengaging process fails, the indicator lamp in the ;button flashes
three times briefly. One of the gear change
conditions was not fulfilled.
As long as the indicator lamp in the ;button
is flashing, you can cancel the engaging/disen-
gaging process by pressing the ;again.
iIf the LOW RANGE transmission ratio
(Ypage 145) is engaged, all-wheel drive can-
not be disengaged.
LOW RANGE transmission ratio
General notes
The LOW RANGE transmission ratio assists you
when driving on difficult terrain. If you engage
LOW RANGE, the engine's performance charac-
teristics and the automatic transmission's shift-
ing characteristics are adjusted accordingly.
The transmission ratio from the engine to the
wheels is around 40% lower than in the on-road position. This increases the drive torque.
Driving systems145
Driving and parking
Z
Page 150 of 286
and accelerator pedals or the cruise control
lever.
XBrake or accelerate the vehicle to the
required speed on the downhill gradient.
XRelease the brake or accelerator pedal. The
current speed is stored.
or
XBriefly push the cruise control lever up :to
increase the speed or down =to reduce the
speed.
The last speed stored is increased or reduced
incrementally.
XRelease the cruise control lever. The current
speed is stored.
or
XPress and hold the cruise control lever up :
or down =until the desired speed has been
reached.
XRelease the cruise control lever.
The current speed is stored.
iIt may take a moment before the vehicle
brakes to the set speed. Take this delay into
account when setting the speed with the
cruise control lever.
Deactivating DSR
XBriefly press the cruise control lever
forward ?.
or
XAccelerate and drive faster than 28 mph
(45 km/h).
DSR deactivates automatically if:
Ryou are driving faster than 28 mph (45 km/h).
Ryou disengage th eLOW RANGE transmission
ratio.
Rthere is amalfunction in th eES P®or AB Ssys-
tem.
PARKTRONIC
Gene ral notes
PARKTRONI Cis an electronic parkin gaid. The
system is equipped wit hultrasonic sensor sin
th efron tand rear bumpers to monitor th earea
around your vehicle. PARKTRONI Cindicate svis -
ually and audibl yth edistanc ebetween your
vehicl eand an object.
Your vehicl efeatures tw oseparat esoun demit-
ters wit hdifferen tfrequencie sfor th ewarnin gtones. The warnin
granges in fron tof and behind
th evehicl eare indicate dby differen twarnin g
tones.
PARKTRONI Cis activated automatically when
you:
Rtur nth eke yto position 2in th eignition loc k
Rrelease theparkin gbrak eand
Rmov eth eselector lever to D,Nor R.
PARKTRONI Cis deactivated at speeds abov e
11 mph (18 km/h). PARKTRONI Cis reactivated
at speeds belo w10 mph (16 km/h).
Impor tant safety notes
PARKTRONI Cis only an aid. It canno treplac e
your own awareness of th eimmediat esurround-
ings. You are responsibl efor saf emaneuvering,
parkin gand pullin gaway. Whe nmaneuvering,
parkin gand pullin gaway, mak esur ethat there
are no persons, animals or objects in th emaneu-
verin garea .
!Pay particular attention to obstacles abov e
or belo wthesensor swhen parking, suc has
flower pot sor trailer towbars. PARKTRONI C
does no trecogniz esuc hobjects when they
are in th eimmediat evicinit yof th evehicle.
You could damage th evehicl eor objects .
PARKTRONI Ccan suffer interferenc efrom:
Rultrasonic source ssuc has atruck's
compressed-air brakes, an automati ccar
wash or apneumati cdrill
Rattachments to th evehicle, e.g. rear moun -
te dracks
Rnumber plates (vehicle license plates) that
are no taffixe dflat against th ebumper
Rdirty or icy sensor s
Remove adetachable trailer couplin gif it is no
longer required. PARKTRONI Cmeasures th e
minimum detection range to an obstacle from
th ebumper, no tth eball coupling.
Range ofthe sensor s
PARKTRONI Cdoes no taccoun tfor obstacles
that are:
Rbeneat hits detection range, e.g. persons, ani -
mals or objects
Rabov eits detection range, e.g. overhangin g
loads ,overhang sor truck loading ramps
148Driving systems
Driving and parking
Page 156 of 286
Weight information can be found in the “Per-
missible trailer and drawbar noseweights” sec-
tion (
Ypage 156).
iThe height of the ball neck changes accord-
ing to the load on the vehicle. If this is case,
use a trailer with a height-adjustable trailer
drawbar.
Driving tips
The maximum permissible speed for vehicle/
trailer combination depends on the type of
trailer. Before setting off, check the vehicle
documents of the your trailer to find out the
permissible maximum speed. Observe the
legally prescribed maximum speed for vehicle/
trailer combinations in the relevant country,
state or Canadian province.
When towing a trailer, your vehicle's handling
characteristics will be different in comparison to when driving without a trailer and it will con-
sume more fuel.
On long, steep downhill slopes you must select
shift range 3,2or 1in good time.
iThis also applies if cruise control is activa-
ted.
This enables you to utilize the engine's braking
effect and you do not need to brake so heavily to
keep the correct speed. which protects the
brake system and prevents the brakes from
overheating and wearing too quickly. If you need to brake additionally, to not depress the brake
pedal constantly, but periodically.
Driving tips
If the trailer begins to swing from side to side:
XDo not accelerate.
XDo not counter-steer.
XBrake if necessary.
iYou can reduce the risk of the trailer swing-
ing and rocking by retrofitting anti-roll bars or trailer stability programs. More information is
available from your authorized Sprinter
Dealer.
RMaintain a greater distance than you would
when driving without towing a trailer.
RAvoid sudden braking. Apply the brakes gen-
tly at first to allow the trailer brake to overrun.
Then, increase the brake force quickly.
RThe figures for the gradient climbing capabil-
ities from a standstill refer to sea level. When
driving in mountainous areas, note that the
power output of the engine, and with it its
gradient climbing capability, decrease with
increasing altitude.
Coupling up a trailer
Trailer coupled ready for use
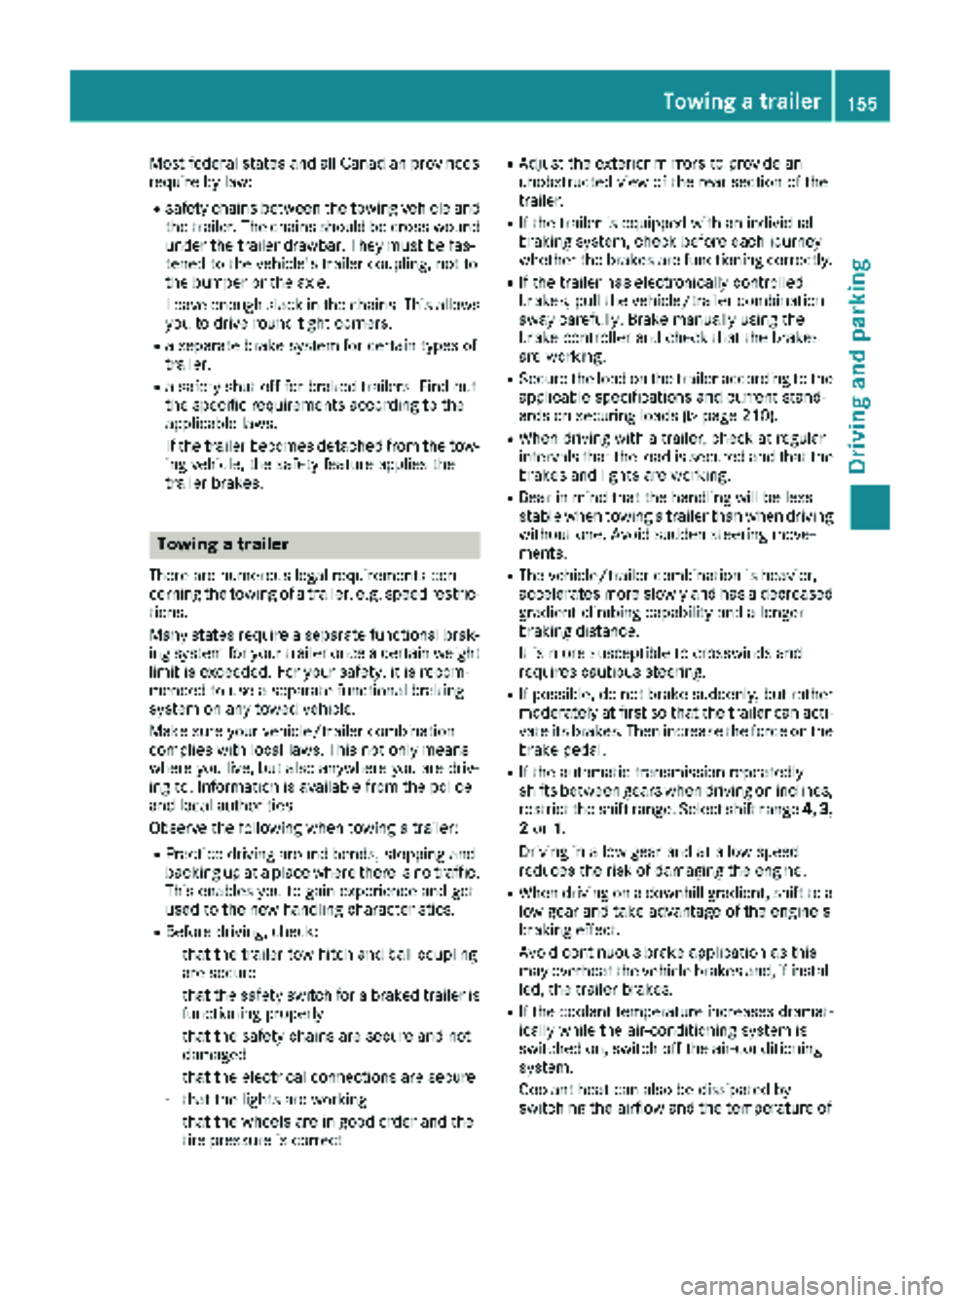
XMake sure the selector lever of the automatic
transmission is in position P.
XApply the vehicle's parking brake.
XClose all doors.
XPosition the trailer horizontally behind your
vehicle.
iThe height of the ball neck changes accord-
ing to the load on the vehicle. In this case, use
a trailer with a height-adjustable trailer draw-
bar.
XCouple the trailer.
XEstablish all electrical and other connections to the trailer. When doing so, hook the break-
away cable of the trailer into eyelet :on the
ball coupling.
XRemove the objects that are preventing the
trailer from rolling, e.g. wheel chocks.
XRelease the trailer parking brake.
iThe subharness of the vehicle has a cable
connection to the brake lamp indicator lamp.
Observe the maximum permissible trailer
dimensions (width and length).
154Towing a trailer
Driving and parking
Page 157 of 286
Most federal states and all Canadian provinces
require by law:
Rsafety chains between the towing vehicle andthe trailer. The chains should be cross-wound
under the trailer drawbar. They must be fas-
tened to the vehicle's trailer coupling, not to
the bumper or the axle.
Leave enough slack in the chains. This allows you to drive round tight corners.
Ra separate brake system for certain types of
trailer.
Ra safety shut-off for braked trailers. Find out
the specific requirements according to the
applicable laws.
If the trailer becomes detached from the tow-
ing vehicle, the safety feature applies the
trailer brakes.
Towing a trailer
There are numerous legal requirements con-
cerning the towing of a trailer, e.g. speed restric-tions.
Many states require a separate functional brak-
ing system for your trailer once a certain weight limit is exceeded. For your safety, it is recom-
mended to use a separate functional braking
system on any towed vehicle.
Make sure your vehicle/trailer combination
complies with local laws. This not only means
where you live, but also anywhere you are driv-
ing to. Information is available from the police
and local authorities.
Observe the following when towing a trailer:
RPractice driving around bends, stopping and
backing up at a place where there is no traffic.This enables you to gain experience and get
used to the new handling characteristics.
RBefore driving, check:
-that the trailer tow hitch and ball coupling
are secure
-that the safety switch for a braked trailer is
functioning properly
-that the safety chains are secure and not
damaged
-that the electrical connections are secure
-that the lights are working
-that the wheels are in good order and the
tire pressure is correct
RAdjust the exterior mirrors to provide an
unobstructed view of the rear section of the
trailer.
RIf the trailer is equipped with an individual
braking system, check before each journey
whether the brakes are functioning correctly.
RIf the trailer has electronically controlled
brakes, pull the vehicle/trailer combination
away carefully. Brake manually using the
brake controller and check that the brakes
are working.
RSecure the load on the trailer according to the
applicable specifications and current stand-
ards on securing loads (
Ypage 210).
RWhen driving with a trailer, check at regular
intervals that the load is secured and that the
brakes and lights are working.
RBear in mind that the handling will be less
stable when towing a trailer than when driving
without one. Avoid sudden steering move-
ments.
RThe vehicle/trailer combination is heavier,
accelerates more slowly and has a decreased
gradient climbing capability and a longer
braking distance.
It is more susceptible to crosswinds and
requires cautious steering.
RIf possible, do not brake suddenly, but rather
moderately at first so that the trailer can acti-
vate its brakes. Then increase the force on the
brake pedal.
RIf the automatic transmission repeatedly
shifts between gears when driving on inclines,
restrict the shift range. Select shift range 4,3,
2 or 1.
Driving in a low gear and at a low speed
reduces the risk of damaging the engine.
RWhen driving on a downhill gradient, shift to a
low gear and take advantage of the engine's
braking effect.
Avoid continuous brake application as this
may overheat the vehicle brakes and, if instal-
led, the trailer brakes.
RIf the coolant temperature increases dramat-
ically while the air-conditioning system is
switched on, switch off the air-conditioning
system.
Coolant heat can also be dissipated by
switching the airflow and the temperature of
Towing a trailer155
Driving and parking
Z
Page 158 of 286
the heater/air conditioning to the maximum
level. Open the windows if necessary.
RWhen overtaking, pay particular attention to
the extended length of your vehicle/trailer
combination.
Due to the length of your vehicle/trailer com-bination you need an additional distance
before you can return to your original lane.
Uncoupling a trailer
GWARNING
If you uncouple a trailer with the overrun
brake engaged, you could trap your hand
between the vehicle and the trailer drawbar.
There is a risk of injury.
Do not uncouple a trailer if the overrun brake
is engaged.
!Do not disconnect a trailer with an engaged
overrun brake. Otherwise, your vehicle could
be damaged by the rebounding of the overrun
brake.
XMake sure the selector lever of the automatic
transmission is in position P.
XApply the parking brake of the vehicle.
XClose all doors.
XApply the parking brake of the trailer.
XIn addition, secure the trailer against rolling
away with a wheel chock or similar object.
XRemove the trailer cable and safety chains
and decouple the trailer.
Permissible trailer loads and trailer
drawbar noseweights
Weight information
!On vehicles with a permissible gross vehicle
weight of 11030 lbs (5003 kg), the permissi -
bl egros scombin ation weight is less than the
total of the permissible gross vehicle weight
and the permissible trailer load. Exceeding
the permissible gross combination weight can
lead to damage to the drivetrain, to the trans-
mission or to the trailer tow hitch.
If the vehicle or the trailer is fully laden, the
relevant value for the permissible gross vehi-
cle weight or the permissible trailer load is therefore lower. In this case, the trailer or the
vehicle may only be partially loaded.
The gross trailer weight (GTW) is calculated by
adding the weight of the trailer to the weight of
the load and equipment. If the trailer is equipped with a separate functional braking system, then
the maximum gross trailer weight is 5000 lbs
(2268 kg )or 7500 lb s(3402 kg).
GWARNING
If you to w atrailer without aseparat efunc-
tional brakin gsystem and agross trailer
weigh t(GTW) of mor ethan 1635 lbs (750kg),
the nthe vehicl ebr ake system may overheat.
This increases the braking distance and the
brake system may even fail. There is an
increased risk of accident and injury, possibly
even fatal.
Always use a trailer with a separate functional
braking system when towing a trailer with a
gross trailer weight (GTW) of more than
1635 lbs (750kg).
Th emaximu mpermissibl etrailer dr awbar nose-
weight on the ball coupling is 500 lbs (227 kg) or
750 lbs (340 kg). The actual noseweight may not
exceed the value given on the identification
plates of the trailer tow hitch or the trailer. If the
values vary, the lowest value always applies.
The gross combination weight rating (GCWR) is
calculated by adding the gross weight of the
trailer to the gross vehicle weight including a
driver's weight of approximately 150 lbs (68 kg).
The maximum permissible gross combination
weight is vehicle-specific and equipment-
dependent.
When driving with a trailer, you should not
exceed the maximum permitted gross combi-
nation weight rating (GCWR).
The permissible values, which must not be
exceeded, can be found in your vehicle docu-
ments and on the trailer tow hitch type plates for the t
railer and the vehicle (Ypage 272). The
basic values approved by the manufacturer can
also be found in the "Technical data" section
(
Ypage 282). If the values vary, the lowest
value always applies.
156Towing a trailer
Driving and parking
Page 162 of 286
If the supply of DEF falls below the reserve range
of 0.8 US gal (3.0l)the StArtS RExxmessage
appears in the display. Also, the yellow å
DEF indicator lamp lights up in the instrument
cluster and three warning tones sound.
In the display, xx
corresponds to the number of
possible remaining engine starts ( 16to0).
When the display shows that the number of
remaining starts is 0
, theStArtSIdLEmessage
appears in the display and three warning tones
sound.
In addition, the yellow åDEF indicator lamp
and the ;Check Engine indicator lamp light
up in the instrument cluster and three warning
tones sound.
The engine management only allows speeds of
up to 5 mph (8 km/h).
Add at least 1.5 US gal (5.5 l) of DEF
(
Ypage 126).
The display message only disappears when the
vehicle is stationary, at the latest after
20 second s, as soon as yo uswit ch on the igni-
tion or start the engine after refueling.
Vehicles with steering wheel buttons
If the supply of DEF is less than 1.5 US gal
(5.5 l),the Check Diesel Exhaust Fluid
See Operator's Manualmessage appears in
the display.
If the supply of DEF falls below the reserve range
of 0.8 US ga l(3.0 l),the XX
startsremainingmessage is displayed.
Three short warning tones also sound.
In the display, xx
corresponds to the number of
possible remaining engine starts ( 16to0).
When the display shows that the number of
remaining starts is 0
, theStArtSIdLEmessage
appears in the display.
The yellow ;Check Engine indicator lamp
also lights up and three short warning tones
sound.
The engine management only allows speeds of
up to 5 mph (8 km/h).
Add at least 1.5 US gal (5.5 l) of DEF
(
Ypage 126).
The display message only disappears when the
vehicle is stationary, at the latest after
20 seconds, as soon as you switch on the igni-
tion or start the engine after refueling.
On-board computer (vehicles without
steering wheel buttons)
Operating the on-board computer
General notes
The on-board computer is activated as soon as
you turn the key to position 1in the ignition lock.
The on-board computer shows vehicle informa-
tion and settings in the display.
You can control the display and the settings in
the on-board computer using the adjustment
buttons on the instrument cluster.
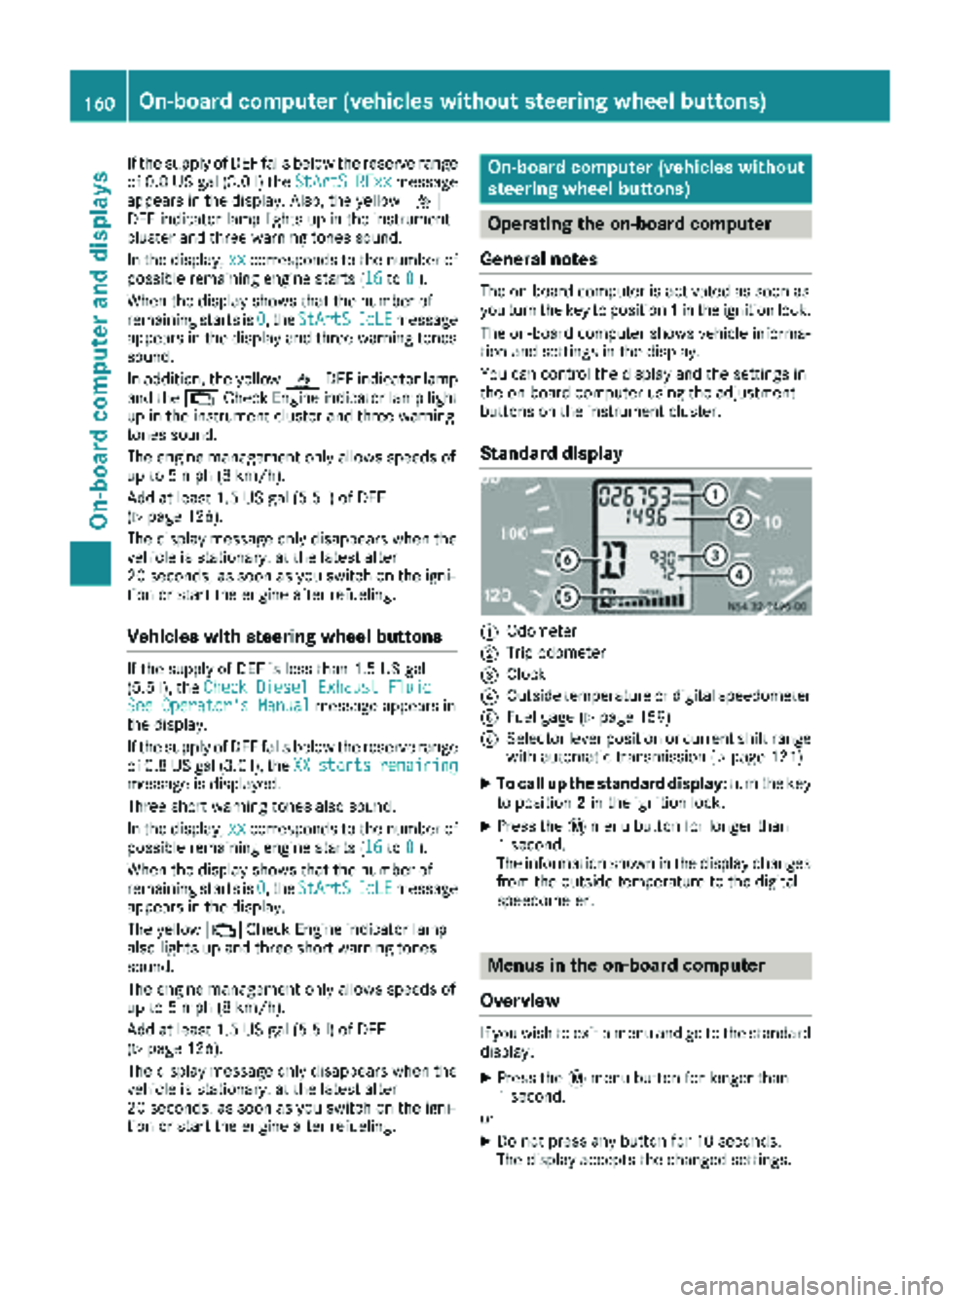
Standard display
:Odometer
;Trip odometer
=Clock
?Outside temperature or digital speedometer
AFuel gage (Ypage 159)
BSelector lever position or current shift range
with automatic transmission (Ypage 121)
XTo call up the standard display: turn the key
to position 2in the ignition lock.
XPress the 4menu button for longer than
1 second.
The information shown in the display changes
from the outside temperature to the digital
speedometer.
Menus in the on-board computer
Overview
If you wish to exit a menu and go to the standard display:
XPress the 4menu button for longer than
1 second.
or
XDo not press any button for 10 seconds.
The display accepts the changed settings.
160On-board computer (vehicles without steering wheel buttons)
On-board computer and displays