audio MERCEDES-BENZ V-CLASS MPV 2021 Owners Manual
[x] Cancel search | Manufacturer: MERCEDES-BENZ, Model Year: 2021, Model line: V-CLASS MPV, Model: MERCEDES-BENZ V-CLASS MPV 2021Pages: 337, PDF Size: 9.88 MB
Page 19 of 337
Environmental pr
otection
+ ENVIRONMENTAL
NOTEEnvironmental
damage due tooperating conditions and
personal driving style The pollutant emission of
theve hicle is
directly related totheve hicle's operation.
Operate theve hicle in an environmentally
re sponsible manner tomake a contribution to
environmen tal pr otection. Todo this, obser ve
th efo llowing recommendations on opera ting
conditions and your personal driving style.
Operating conditions: #
Make sure that the tyre pressures are
alw ays cor rect. #
Do not transport any unnecessa ry
we ight (e.g. a roof rack which is no lon‐
ge rre qu ired). #
Obser vethe service inter vals.
A regularly serviced vehicle will contri b‐
ute toenvironmen tal pr otection. #
Always ha vemaintenance workcar ried
out at a qualified specialist workshop.
Pe rsonal driving style: #
Do not depress the accelera tor pedal
when starting the engine. #
Do not warm upthe engine while sta‐
tionar y. #
Drive carefully and maintain a su fficient
dis tance to ot hervehicles. #
Avoid frequent, sudden acceleration and
braking. #
Shift gears in good time and use each
ge ar only up to00C3 of its maximum
engine speed. #
Switch off the engine in stationary traf‐
fi c, e.g. use the ECO start/ stop func‐
tion. #
Drive in a fuel-ef ficient manne r.Pay
attention tothe ECO display for a fuel-
ef ficient driving style. Ta
ke -back of end-of-life vehicles
EU countries onl y:
Mercedes-Benz will take back your end-of-life
ve hicle for environment-friendly disposal in accordance with
the European Union (EU) End-Of-
Life Vehicles Directive.
A network of vehicle take -ba ckpoints and dis‐
mantlers has been es tablished foryo uto return
yo ur vehicle. You can lea veit at any of these
points free of charge . This makes an impor tant
contribution toclosing there cycling circle and
conserving resources.
Fo r fur ther information about there cycling and
disposal of end-of-life vehicles, and theta ke -ba ck
conditions, please visit the national
Mercedes-Benz website foryo ur countr y. Mercedes-Benz GenuineParts
+ ENVIRONMENTAL
NOTEEnvironmental
damage caused bynot using recycled
re conditioned components Mercedes‑Benz
AGoffers recycled recondi‐
tioned components and pa rts with the same
qu ality as new parts. The same entitlement
from the implied warranty is valid as for new
parts. #
Recycled reconditioned components
and pa rts from Mercedes‑Benz AG. *
NO
TEImpairment of the operating ef fi‐
ciency of there stra int sy stems from
ins talling accessory parts or from repairs
or we lding Airbags and seat belt
tensioners, as well as
control units and sensors forth ere stra int
sy stems, may be ins talled in thefo llowing
areas of your vehicle:
R doors
R door pillars
R door sills
R seats
R cockpit
R instrument clus ter
R centre console #
Do not ins tall accessories such as audio
sy stems in these areas. #
Do not car ryout repairs or welding. #
Have accesso ryparts retrofitted at a
qu alified specialist workshop. 16
General no tes
Page 184 of 337
Coolant
temperature display &
WARNING Risk of burn s when opening
th e bonn et
If yo u open the bonn etwhen the engine has
ove rheated or when there is a fire inthe
engine compartment, thefo llowing situations
may occur:
R You could come into con tact with hot
ga ses.
R You could come into con tact with other
hot, escaping operating fluids. #
Before opening the bonn et, allow the
engine tocool down. #
Intheeve nt of a fire inthe engine com‐
partment, keep the bonn etclosed and
call thefire service. The coolant
temp erature display is located within
th e instrument clus ter's rev counter.
During normal driving and if the coolant le vel is
cor rect, the display is permitted torise to120°C. Overview and operation of
the on-boa rd
compu ter &
WARNING Risk of distraction from infor‐
mation sy stems and communications
equipment
If yo u operate information and communica‐
tion equipment integ rated in theve hicle when
driving, you will be distracted from the tra ffic
situation. This could also cause youto lose
control of theve hicle. #
Only operate this equipment when the
traf fic situation permits. #
Ifyo u cannot be sure of this, stop the
ve hicle whilst paying attention toroad
and traf fic conditions and ope rate the
equipment with theve hicle stationar y. Yo
u must obse rveth e legal requirements forthe
country in whi chyou are cur rently driving when
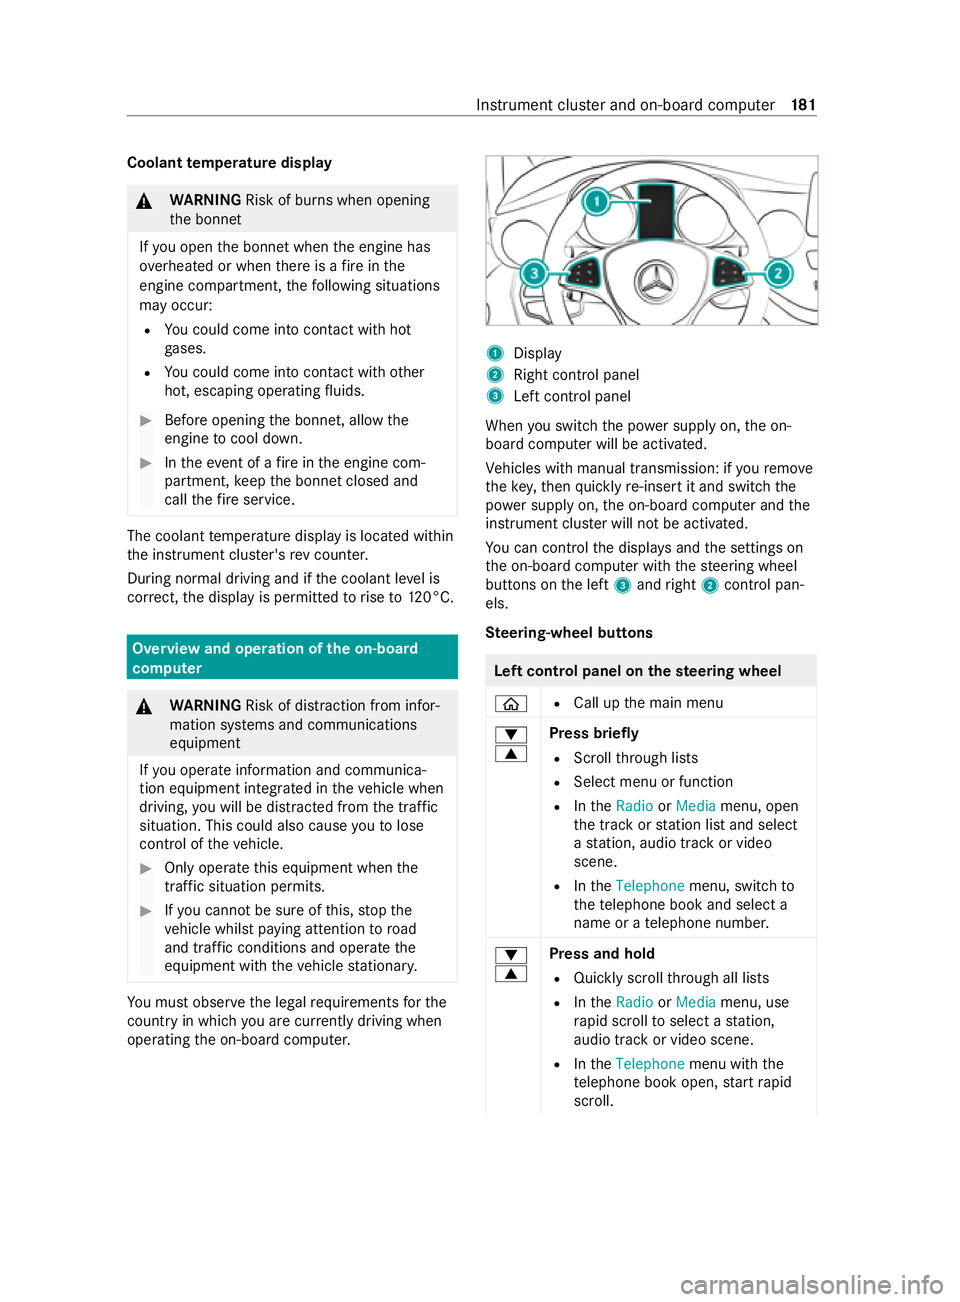
ope rating the on-board computer. 1
Display
2 Right contro l panel
3 Left control panel
When you swit ch the power supply on, the on-
board computer will be activated.
Ve hicles with manual transmission: if youre mo ve
th eke y,then quickly re-inse rtit and switch the
po we r supp lyon, the on-board computer and the
instrument clus ter will not be activated.
Yo u can control the displa ysand the settings on
th e on-board computer with thesteering wheel
buttons on the left 3and right 2contro l pan‐
els.
Ste ering-wheel but tons Left control panel on
thest eering wheel
00E2 R
Call up the main menu
0064
0063 Press briefly
R Scroll thro ugh lists
R Select menu or function
R IntheRadio orMedia menu, open
th e tra ckorstation list and select
a st ation, audio track or video
scene.
R IntheTelephone menu, switch to
th ete lephone book and select a
name or a telephone numbe r.
0064
0063 Press and hold
R Quickly scroll thro ugh all lists
R IntheRadio orMedia menu, use
ra pid scroll toselect a station,
audio track or video scene.
R IntheTelephone menu with the
te lephone book open, start rapid
scroll. Instrument clus
ter and on-board computer 181
Page 189 of 337
Chan
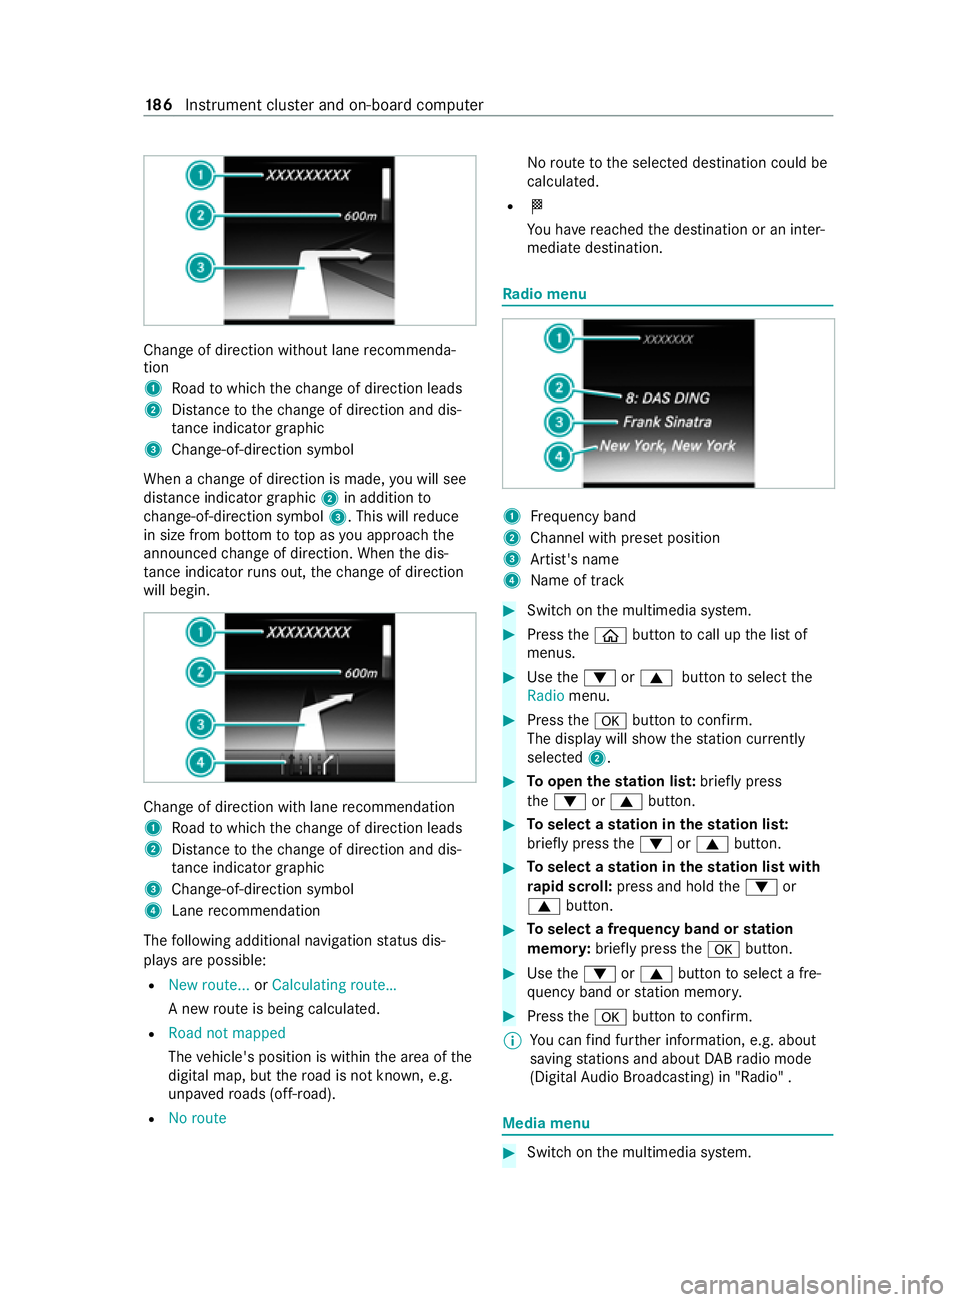
geof direction without lane recommenda‐
tion
1 Road towhich thech ange of direction leads
2 Distance tothech ange of direction and dis‐
ta nce indica tor graphic
3 Change-of-direction symbol
When a change of direction is made, you will see
dis tance indica tor graphic 2in addition to
ch ange-of-direction symbol 3. This willreduce
in size from bottom to top as you approach the
announced change of direction. When the dis‐
ta nce indica torru ns out, thech ange of direction
will begin. Change of direction with lane
recommendation
1 Road towhich thech ange of direction leads
2 Distance tothech ange of direction and dis‐
ta nce indica tor graphic
3 Change-of-direction symbol
4 Lane recommendation
The following additional navigation status dis‐
pla ysare possible:
R New route... orCalculating route…
A new route is being calculated.
R Road not mapped
The vehicle's position is within the area of the
digital map, but thero ad is not kn own, e.g.
unpa vedro ads (off- road).
R No route No
route tothe selected destination could be
calculated.
R 004B
You ha vereached the destination or an inter‐
mediate destination. Ra
dio menu 1
Frequency band
2 Channel with preset position
3 Artist's name
4 Name of track #
Switch on the multimedia sy stem. #
Press the00E2 button tocall up the list of
menus. #
Use the0064 or0063 button toselect the
Radio menu. #
Press the0076 button toconfirm.
The display will show thest ation cur rently
selected 2. #
Toopen thest ation lis t:briefly press
th e0064 or0063 button. #
Toselect a station in thest ation lis t:
brief lypress the0064 or0063 button. #
Toselect a station in thest ation list with
ra pid sc roll: press and hold the0064 or
0063 button. #
Toselect a frequency band or station
memor y:brief lypress the0076 button. #
Use the0064 or0063 button toselect a fre‐
qu ency band or station memor y. #
Press the0076 button toconfirm.
% Yo
u can find fur ther information, e.g. about
saving stations and about DABra dio mode
(Digital Audio Broadcasting) in "Radio" . Media menu
#
Switch on the multimedia sy stem. 18 6
Instrument clus ter and on-board computer
Page 190 of 337

#
Press the00E2 button tocall up the list of
menus. #
Use the0064 or0063 button toselect the
Media menu. #
Press the0076 button toconfirm.
Changing the media sou rceYo
u can change the media source and the play‐
back type (audio, video or TV) in theMedia menu. #
Toopen/close the media source lis t:
brief lypress the0076 button.
Depending on theve hicle equipment, the list
will show thefo llowing media sources, for
ex ample:
R Disc (CD/ DVD)
R Memory card (SD or SDHC)
R Media Regis ter
R USB storage devices
R Blue tooth ®
audio equipment
% Obse
rveth e additional information on media
support in "Media" .
Operating the audio pla yer or data storage
media 1
Media sou rce, e.g. the name of the USB flash
drive
2 Current track
3 Artist's name
4 Name of album
5 Folder name Depending on
theve hicle's equipment, you can
play back audio files from dif fere nt audio pl ayers
or data storage media. #
Toselect the audio pla yer or data storage
medium: briefly press the0076 button.
The display will show the list of media sour‐
ces. #
Use the0064 or0063 button toselect the
audio pla yer or data storage medium. #
Press the0076 button toconfirm. #
Toopen the track lis t:brief lypress the0064
or 0063 button. #
Toselect the next or pr evious track on
th e track lis t:briefly press the0064 or0063
button. #
Toselect a track on the track list with
ra pid sc roll: press and hold the0064 or
0063 button until the desired tra ckhas been
re ached.
If yo u press and hold the0064 or0063 but‐
to n, thera pid scroll speed will increase af ter
a short time. Not all audio pla yers or data
st orage media support this function.
If th e cor responding track information has been
sa ve dto the audio pla yer or data storage
medium, the display can show thefo llowing:
R Track number
R Track name
R Artist
R Album
The track information will not be displa yed in AUX
audio mode (auxiliary audio mode: extern al audio
source connec ted).
Operating DVD-Video #
Toselect theDV D drive or disc: briefly
press the0076 button.
The display will show the list of media sour‐
ces. #
Use the0064 or0063 button toselect the
DV D drive or disc. #
Press the0076 button toconfirm. #
Toopen the scene lis t:briefly press
th e0064 or0063 button. #
Toselect the next or pr evious scene on
th e scene lis t:briefly press the0064 or
0063 button. #
Toselect a scene on the scene list with
ra pid sc roll: press and hold the0064 or Instrument clus
ter and on-board computer 187
Page 199 of 337
#
Toenter characters with theke yboard: tap
on a button. #
Touse handwriting toenter characters:
write thech aracter with one finger on the
to uchsc reen. #
Tozoom in and out of the map: movetwo
fi ngers toget her or apart. #
Toenlar georreduce the size of a section
of a website: movetwo fingers toget her or
apart. #
Tocall up a global menu in the applica‐
tions: touch theto uchsc reen and hold until
th eOPTIONS menu appears.
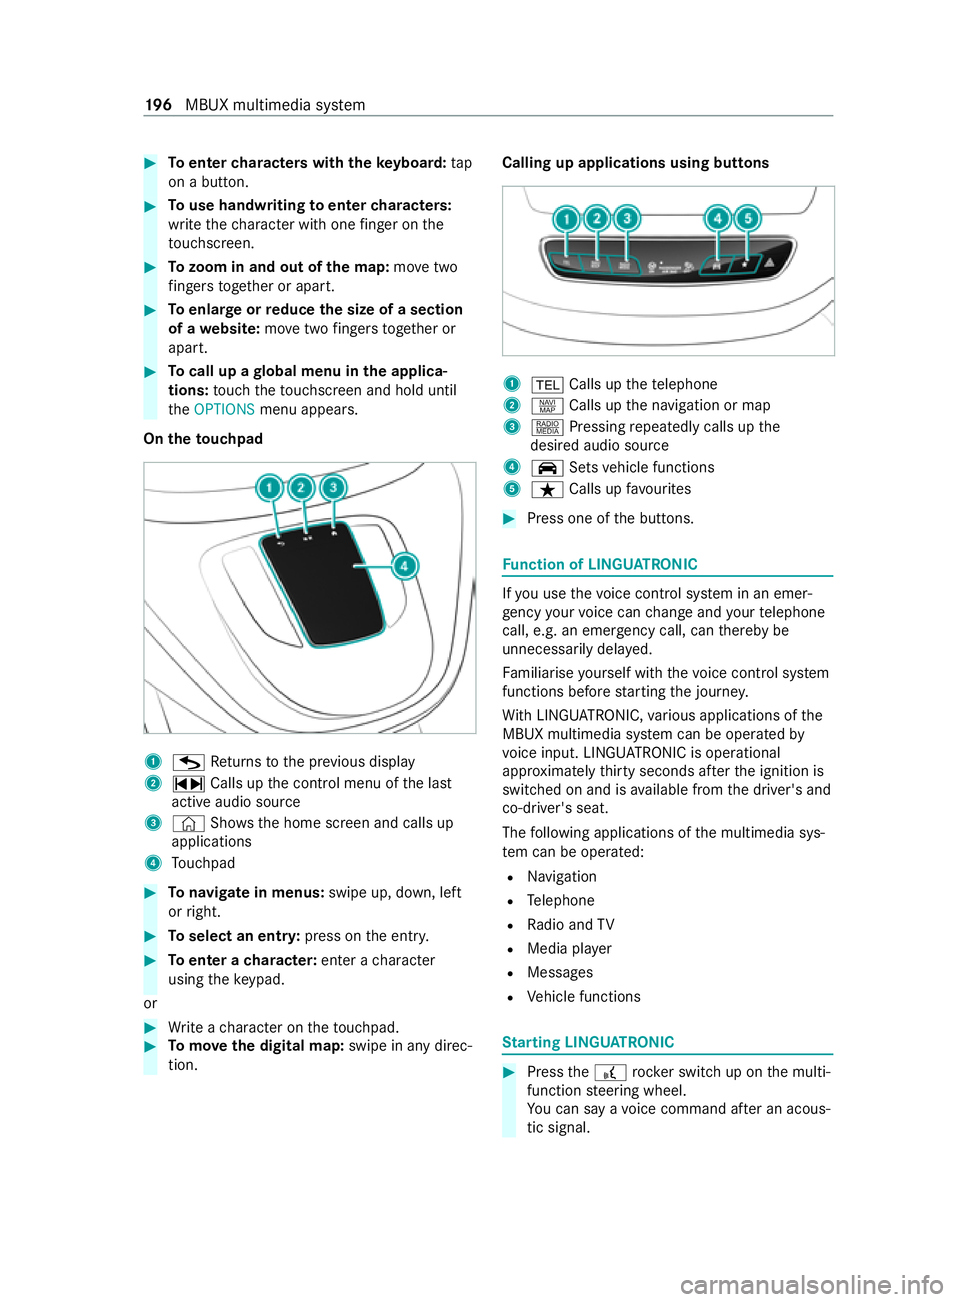
On theto uchpad 1
G Returns tothe pr evious display
2 ~ Calls up the cont rol menu of the last
active audio source
3 © Shows th e home screen and calls up
applications
4 Touchpad #
Tonavigate in menus: swipe up, down, left
or right. #
Toselect an entr y:press on the entry. #
Toenter a character: enter acharacter
using theke ypad.
or #
Write a character on theto uchpad. #
Tomo vethe digital map: swipe in any direc‐
tion. Calling up applications using butto
ns 1
002B Calls up thete lephone
2 z Calls up the navigation or map
3 | Pressing repeatedly calls up the
desired audio source
4 00CE Setsvehicle functions
5 ß Calls up favo urites #
Press one of the buttons. Fu
nction of LINGU ATRO NIC If
yo u use thevo ice control sy stem in an emer‐
ge ncy your voice can change and your telephone
call, e.g. an emer gency call, can thereby be
unnecessarily dela yed.
Fa miliarise yourself with thevo ice control sy stem
functions before starting the journe y.
Wi th LINGU ATRO NIC, various applications of the
MBUX multimedia sy stem can be operated by
vo ice input. LINGU ATRO NIC is operational
appr oximately thirty seconds af terth e ignition is
switched on and is available from the driver's and
co-driver's seat.
The following applications of the multimedia sys‐
te m can be operated:
R Navigation
R Telephone
R Radio and TV
R Media pla yer
R Messages
R Vehicle functions St
arting LING UATRONIC #
Press the£ rocker switch up on the multi‐
function steering wheel.
Yo u can say a voice command af ter an acous‐
tic signal. 19 6
MBUX multimedia sy stem
Page 208 of 337

The
following information is displa yed (if avail‐
able):
R Destination address, dis tance from cur‐
re nt vehicle position and ar riva l time
R Information on the multi-s torey car
park/car par k,forex ample:
- Opening times
- Parking charges
- Current occupancy
- Maximum pa rking time
- Maximum access height
The maximum access height shown by
th e parking service does not replace
th e need for obser vation of the actual
circums tances.
R Available payment options (Mercedes pa y,
coins, bank no tes, cards)
R Details on parking tariffs
R Numb er ofavailable parking spaces
R Payment me thod (e.g. at the parking
me ter)
R Services/facilities at the parking option
R Telephone number Te
lephone Te
lephony Note
s ontelephony &
WARNING Risk of distraction from oper‐
ating integrated communication equip‐
ment while theve hicle is in motion
If yo u operate communication equipment
integ rated in theve hicle when driving, you
could be distracted from the tra ffic situation.
This could also cause youto lose control of
th eve hicle. #
Only operate this equipment when the
traf fic situation permits. #
Ifyo u cannot be sure of this, stop the
ve hicle whilst paying attention toroad
and traf fic conditions and ope rate the
equipment with theve hicle stationar y. &
WARNING Risk of an accident from oper‐
ating mobile communication equipment
while theve hicle is in motion
Mobile communications devices distract the
driver from the traf fic situation. This could
also cause the driver tolose control of the
ve hicle. #
Asthe driver, only operate mobile com‐
munications devices when theve hicle is
st ationar y. #
As a vehicle occupant, only use mobile
communications devices in the areas
intended forth is purpose, e.g. in the
re ar passenger compartment. Yo
u must obse rveth e legal requirements forthe
country in whi chyou are cur rently driving when
ope rating mobile communication equipment in
th eve hicle.
Blue tooth ®
connection:
The menu view and theav ailable functions in the
phone menu are partly dependent on the Blue‐
tooth ®
profile of the mobile phone connected.
If th e mobile phone supports these Blue tooth®
profiles, the full range of features is available:
R PBAP (Phone Book Access Profile)
- The mobile phone's contacts are au tomat‐
ical lydispla yed on the multimedia sy stem.
R MAP (Message Access Profile)
- The message functions of the mobile
phone can be used on the multimedia sys‐
te m.
Ir re spective of this, Blue tooth ®
audio functional‐
ity can byused with any mobile device.
Fo r information on the functionality of the mobile
device tobe connected, see the manufacturer's
operating instructions.
Ne twork connection:
In thefo llowing cases, calls may be inter rupted
while driving:
R there is insuf ficient network co verage inthe
area.
R you swit chtoa transmitting/receiving station
in which no communication channel is free. MBUX multimedia sy
stem 205
Page 212 of 337

Symbol
DesignationFunction
: Repeat a trac kS electtorepeat the cur rent track or the
active playlist.
R Select once: the active pla ylist is
re peated.
R Select twice: the cur rent track is
re peated.
R Select thre e times: the function is
deactivated.
9 Random play backS electtoplay the trac ksinrandom order.
00F5 /00F6 Skip
forw ards/bac kS electtoskip tothe next or tothe pr evi‐
ous trac k.
f OptionsSelecttoshow additional options.
5 CategoriesSelecttoshow or sear ch through available
categories (e.g. playback lists, albums,
artists, etc.).
00D3 Sea
rchS electtosear chinthe active menu. Yo u
can sea rchfo r artists or genres, forex am‐
ple.
Z SettingsS electtomake settings.
© HomeSelecttoreturn tothe home screen.
0043 Fu
ll screen Selecttoswitch tofull screen mode. The
following functions and settings are available
in the Media menu:
R Connect extern al data car riers tothe multi‐
media sy stem (e.g. via USB or Blue tooth ®
)
R Playback of audio or video files Au
thorising Blu etoo th®
audio equipment for
media playba ck Requ
irements:
R Blue tooth ®
is activated on the multimedia
sy stem and audio equipment .
R The audio equipment supports the Blue tooth®
audio profiles A2DP and AVRC P.
R The audio equipment is "visible" forot her
devices. Multimedia sy
stem:
4 © 5
Media 5
Bluetooth 5
00A5
Using Blue tooth®
Au dio, you can play back music
fi les via the MBUX multimedia sy stem from an
ex tern al data storage medium, e.g. your smart‐
phone. #
Toplay back audio files using the multimedia
sy stem, authorise theex tern al data storage
medium on the MBUX multimedia sy stem.
Au thorising a new Blu etoo th®
audio device #
Select Connect new device. #
Select an audio device.
Auth orisation starts. A code is displa yed on
th e multimedia sy stem and on the mobile
phone. #
Ifth e codes are identical, confirm on the
audio equipment. MBUX multimedia sy
stem 209
Page 213 of 337
#
Select Only as Bluetooth audio device .
The Blu etoo th®
audio equipment is connec ted
with the multimedia sy stem.
Connecting pr eviously authorised Blue tooth ®
audio equipment #
Select a Blue tooth®
audio device from the
list.
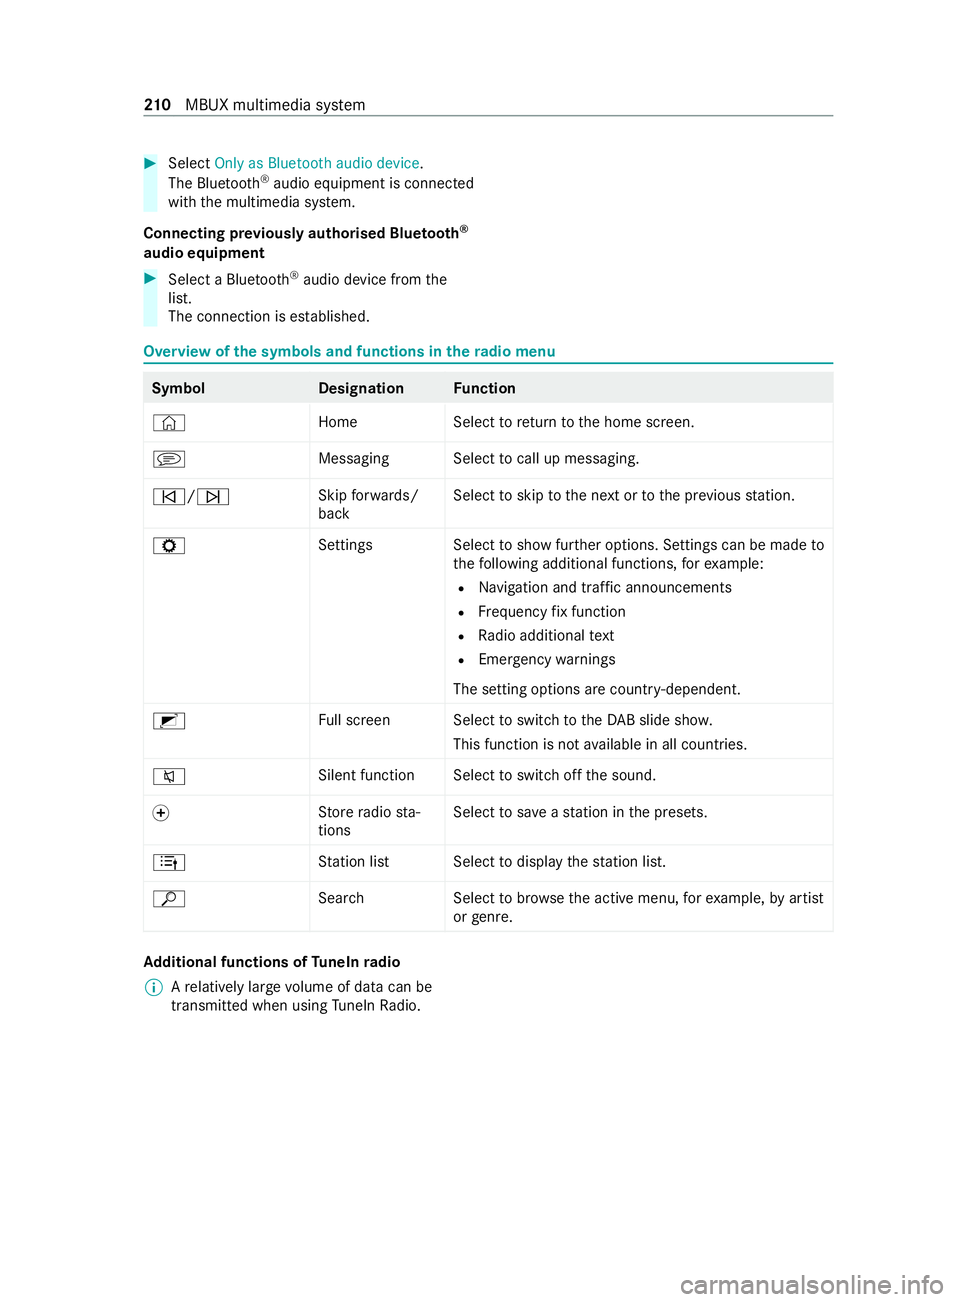
The connection is es tablished. Overview of
the symbols and functions in thera dio menu Symbo
lD esignationFunction
© HomeSelecttoreturn tothe home screen.
j Messaging Select tocall up messaging.
00F5/00F6 Skip
forw ards/
back Select
toskip tothe next or tothe pr evious station.
Z SettingsS electtoshow fur ther options. Settings can be made to
th efo llowing additional functions, forex ample:
R Navigation and traf fic announcements
R Frequency fix function
R Radio additional text
R Emergency warnings
The setting options are countr y-dependent.
2 Full screen Select toswitch totheDA B slide sho w.
This function is not available in all countries.
0063 Silent function Select
toswitch off the sound.
0074 St
ore radio sta‐
tions Select
tosave ast ation in the presets.
4 Station lis tS electtodisplay thest ation list.
ª Search Selecttobrows eth e active menu, forex ample, byartist
or genre. Ad
ditional functions of TuneIn radio
% A
relatively lar gevolume of data can be
transmitte d when using TuneIn Radio. 210
MBUX multimedia sy stem
Page 241 of 337

When jump-s
tarting, obser vethefo llowing points:
R The battery is not accessible in all vehicles. If
th eot her vehicle's battery is not accessible,
st arting assis tance is tobe pr ovided using a
donor battery or a starting assis tance device.
R You may only jump-s tart theve hicle when the
engine and exhaust sy stem are cold.
R Do not start the engine if the battery is fro‐
zen. Let the battery thaw firs t.
R Starting assis tance may only be pr ovided
using batteries with a nominal voltage of 12V.
R Only use jump leads that ha vea suf ficient
cross-section and insulate dte rm inal clamps.
R Ifth e battery is fully dischar ged, attach the
donor battery for a few minutes before
attem pting tostart. This charge sth e dis‐
ch arge d battery a little.
R Make sure that the two vehicles do not touch.
Jump leads and fur ther information rega rding
st arting assis tance can be obtained at any quali‐
fi ed specialist workshop.
Ensure thefo llowing before connecting the jump
lead:
R The jump leads are not damaged.
R Parts of thete rm inal clamps which are not
insulated do not come into conta ct withother
me tal parts while the jump leads are connec‐
te dto the batter y.
R The jump leads do not touch moving parts
when the engine is star ted and while it is run‐
ning, su chastheV- belt pulley or thefa n. #
Apply the parking brake. #
Vehicles with automatic transmission:
shift the transmission toposition 005D. #
Vehicles with manual transmission: shift
to neutral. #
Switch off all electrical consumers, e.g. audio
device, bl ower. #
Switch off the ignition immediately and
re mo vethekey. #
Open the bonn et (/ page 221). Connecting and disconnecting
the ju mp lead Example: jump-s
tart connection point #
Push contact pr otection co ver1 ofthe
jump-s tart connection point towa rdsth ere ar
of theve hicle against the spring pressure as
fa r as it will go.
The jump-s tart connection point is visible. Te
rm inal connection diagram #
Remo vethe co ver from positive term inal 3
of the donor batter y. #
Connect the positive term inal clamp of the
jump lead topositive term inal 3ofthe
donor batter y,and then topositive term inal
5 ofthe jump-s tart connection point. #
Connect the negative term inal clamp of the
jump lead tonegati ve terminal 2ofthe
donor batter y,and then toear thcontact 4
of your ow nve hicle. #
Start the engine of the donor vehicle and run
it at idling speed. 238
Breakdown assis tance
Page 323 of 337

St
arting............................................. .196
Live Traf fic Information
Swit ching the tra ffic information
display on.......................................... .204
Load comp artment and rear interior
lamps
Replacing light sources.......................1 15
Load distribution.................................... 213
Load pr otection net ................................ 216
Load securing Fitting and removing tie-down eyes.... 215
Lashing points.................................... 215
No tes.................................................. 214
Load securing aid Luggage compartment partition......... 217
Re moving/fitting a load pr otection
net...................................................... 216
Loading guidelines .................................212
Low beam Replacing light sources.......................1 12
Lu bricant additives
see Additive
Lu ggage compartment partition
Fo lding up/down................................ 217
Re moving/fitting............................... .217
St ow age compartments......................2 17
Lu mbar support (4-w ay).......................... 73
Lu xury rear seat
Ad justing electrically............................ 86
Ad justing the head restra int................. 94
EAS Y-ENTRY easy entry and exit
fe atur e.................................................. 85
Moving................................................ .87M
M+S tyres................................................ 24 9
Main beam Adaptive Highbeam Assist Plus.......... 109
Maintenance Notes.................................................2 20
Maintenance see ASS YST PLUS service inter val display
Malfunction Restra int sy stem.................................. 27
Manual transmission Engaging reve rsege ar......................... 141
Using thege arshift le ver.................... .141
Map Displaying online map contents......... 204 Displaying
weather information.......... 204
Moving.............................................. .203
Selecting the map orientation............ 203
Setting the map scale........................ 203
Switching mo torw ay information
on/off............................................... .203
Matt finish (cleaning instructions) .......228
Maximum gross vehicle weight ............ 268
Maximum speed see Limiter
MBUX multimedia sy stem
No tes.................................................. 194
Operating theto uchsc reen................. 19 5
Overview............................................ 194
Re setting (factory setting).................. 200
MBUX multimedia sy stem
see Display (MBUX multimedia sy stem)
Media Menu (on-board computer)................. 186
Operating media playbac k.................. 186
Overview of the functions and sym‐
bols.................................................... 208
Selecting a media source...................1 86
Media display Home screen...................................... 19 5
Media mode Connecting Blue tooth®
audio
equipment.......................................... 209
Medical aids ............................................ .23
Memory function (seat).......................... .73
Menu (on-board computer) Assis tance graphic............................ .183
Media................................................. 186
Na vigation.......................................... 185
Ra dio..................................................1 86
Service............................................... 183
Settings.............................................. 189
Te lephon e.......................................... .188
Menu overview (on-boa rdcompu ter)... 183
Mercedes me Information......................................... 191
Mercedes me connect Breakdown assi stance call via the
breakdown assis tance button............. 19 2
Calling the Cus tomer Centr e............... 191
Consenting todata transfer................ 19 2
Information......................................... 191
Making a call via theov erhead con‐
trol panel............................................ 19 2
Tr ans ferred data................................. 19 2320
Index