fuel cap MERCEDES-BENZ WAGON 2015 S212 Owner's Manual
[x] Cancel search | Manufacturer: MERCEDES-BENZ, Model Year: 2015, Model line: WAGON, Model: MERCEDES-BENZ WAGON 2015 S212Pages: 426, PDF Size: 8.27 MB
Page 12 of 426
EASY-PACK cargo compartment
management system
........................ 304
EASY-PACK folding floor Important safety notes .................. 306
EASY-PACK folding luggage-com-
partment floor
Opening and closing ...................... 306
EASY-PACK load-securing kit
Components and storage .............. 304
Inserting the brackets into the
loading rail .................................... .305
EASY-PACK rear sill protector .......... 307
EASY-PACK trunk box ....................... 303
EBD (electronic brake force distri-
bution)
Display message ............................ 254
Function/notes ................................ 78
ECO display
Function/notes ............................ .182
On-board computer ....................... 236
ECO start/stop function
General information ....................... 161
Electronic Stability Program
see ESP ®
(Electronic Stability Program)
Emergency
Automatic measures after an acci-
dent ................................................. 61
Emergency release
Driver's door ................................... .91
Fuel filler fla p................................. 175
Trunk ............................................... 98
Vehicle ............................................. 91
Emergency spare wheel
General notes ................................ 404
Important safety notes .................. 404
Removing ....................................... 404
Storage location ............................ 404
Stowing .......................................... 405
Technical data ............................... 407
Emergency Tensioning Devices
Activation ......................................... 57
Emergency unlocking
Tailgate ............................................ 98
Emissions control
Service and warranty information .... 24 Engine
Check Engine warning lamp ........... 286
Display message ............................ 264
ECO start/stop function ................ 161
Engine number ............................... 411
Irregular running ............................ 164
Jump-starting ................................. 353
Starting problems .......................... 164
Starting the engine with the
SmartKey ....................................... 160
Starting with KEYLESS-GO ............. 160
Switching off .................................. 180
Tow-starting (vehicle) ..................... 358
Engine electronics
Problem (malfunction) ................... 164
Engine oil
Adding ........................................... 332
Additives ........................................ 416
Checking the oil level ..................... 331
Checking the oil level using the
dipstick .......................................... 332
Display message ............................ 266
Filling capacity ............................... 416
Notes about oil grade s................... 415
Notes on oil level/consumption .... 331
Temperature (on-board com-
puter) ............................................. 247
Viscosity ........................................ 416
ESP ®
(Electronic Stability Pro-
gram) AMG menu (on-board computer) ... 248
Characteristics ................................. 75
Deactivating/activating (AMG
vehicles) .......................................... 76
Deactivating/activating (except
AMG vehicles) ................................ 241
Deactivating/activating (notes;
except AMG vehicles) ...................... 76
Display message ............................ 252
ETS/4ETS ........................................ 75
Function/note s................................ 74
General notes .................................. 74
Important safety information ........... 75
Warning lamp ................................. 283
ETS/4ETS (Electronic Traction Sys-
tem) ...................................................... 75
Exhaust check ................................... 18210
Index
Page 13 of 426
Exhaust pipe (cleaning instruc-
tions)
.................................................. 340
Exterior lighting Setting options .............................. 128
see Lights
Exterior mirrors
Adjusting ...................................... .122
Dipping (automatic) ....................... 124
Folding in/out (automatically) ....... 123
Folding in/out (electrically) ........... 123
Folding in when locking (on-board computer) ...................................... 247
Out of position (troubleshooting) ... 123
Setting ........................................... 123
Storing settings (memory func-
tion) ............................................... 125
Storing the parking position .......... 124
Eyeglasses compartment ................. 293F
Filler cap see Fuel filler flap
Flat tire
MOExtended tire s.......................... 345
Preparing the vehicle ..................... 345
TIREFIT kit ...................................... 346
see Emergency spare wheel
Floormats ........................................... 327
Folding bench seat (cargo com-
partment) ........................................... 115
Fuel Additives ........................................ 413
Consumption statistics .................. 235
Displaying the current consump-
tion ................................................ 236
Displaying the range ...................... 236
Driving tip s.................................... 182
Flexible fuel vehicles ...................... 414
Fuel gauge ....................................... 33
Grade (gasoline )............................ 412
Important safety notes .................. 412
Premium-grade unleaded gaso-
line ................................................. 412
Problem (malfunction) ................... 177
Quality (diesel )............................... 413
Refueling ........................................ 173
Tank content/reserve fue l............. 412 Fuel filler flap
Emergency release ........................ 175
Opening ......................................... 175
Fuel filter (display message) ............ 267
Fuel level Calling up the range (on-board
computer) ...................................... 236
Fuel tank
Capacity ........................................ 412
Problem (malfunction) ................... 177
Fuse allocation chart (vehicle tool
kit) ...................................................... 344
Fuses Allocation chart ............................. 358
Before changing ............................. 358
Fuse box in the cargo compart-
ment .............................................. 359
Fuse box in the engine compart-
ment .............................................. 358
Fuse box in the trunk ..................... 359
Important safety notes .................. 358 G
Garage door opener Clearing the memory ..................... 327
General notes ................................ 324
Important safety notes .................. 325
Opening/closing the garage doo r..3 27
Programming (button in the rear-
view mirror) ................................... 325
Gear indicator (on-board com-
puter) ................................................. .247
Genuine parts ...................................... 23
Glove box .......................................... .293 H
Handbrake see Parking brake
HANDS-FREE ACCESS .......................... 94
Hazard warning lamps ......................131
Head bags Display message ............................ 258
Headlamps
Fogging up ..................................... 133
see Automatic headlamp mode Index
11
Page 21 of 426
Steering wheel paddle shifters
........ 170
Stopwatch (RACETIMER) ...................248
Stowage areas ................................... 292
Stowage compartments Armrest (under) ............................ .294
Center console .............................. 294
Cup holders ................................... 309
Eyeglasses compartment .............. .293
Glove box ....................................... 293
Important safety information ......... 293
Rear ............................................... 295
Stowage net ................................... 295
Under driver's seat/front-
passenger sea t.............................. 294
Stowage net ....................................... 295
Stowage well beneath the trunk
floor .................................................... 306
Summer tires ..................................... 364
Sun visor ............................................ 311
Surround lighting (on-board com-
puter) .................................................. 245
Suspension tuning AIRMATIC ...................................... 203
AMG adaptive sport suspension
system ........................................... 204
SETUP (on-board computer) .......... 248
Switching air-recirculation mode
on/off ................................................. 152 T
Tachometer ........................................ 232
Tailgate Display message ............................ 277
Emergency unlocking ....................... 98
Important safety notes .................... 91
Limiting the opening angle ............... 97
Opening/closing (automatically
from inside) ...................................... 96
Opening/closing (automatically
from outside) ................................... 93
Opening/closing (from outside) ....... 93
Opening dimensions ...................... 419
Tail lamps
Display message ............................ 262
Tank
see Fuel tank Tank content
Fuel gauge ....................................... 33
Technical data
Capacities ...................................... 411
Emergency spare wheel ................. 407
Information .................................... 410
Tires/wheels ................................. 389
Vehicle data ................................... 419
TELEAID
Call priority .................................... 320
Downloading destinations
(COMAND) ..................................... 320
Downloading routes ....................... 323
Emergency call .............................. 317
General notes ................................ 316
Geo fencing ................................... 324
Locating a stolen vehicle ............... 322
MB info call button ........................ 319
Remote vehicle locking .................. 322
Roadside Assistance button .......... 318
Search & Send ............................... 321
Self-test ......................................... 317
Speed alert .................................... 324
System .......................................... 317
Triggering the vehicle alarm ........... 324
Vehicle remote malfunction diag-
nosis .............................................. 323
Vehicle remote unlocking .............. 321
Telephone
Accepting a cal l............................. 239
Display message ............................ 278
Menu (on-board computer) ............ 239
Number from the phone book ........ 240
Redialing ........................................ 240
Rejecting/ending a call ................. 239
Telescopic rod (EASY-PACK load-
securing kit) ....................................... 305
Temperature Coolant .......................................... 232
Coolant (on-board computer) ......... 247
Engine oil (on-board computer) ...... 247
Outside temperature ...................... 233
Setting (climate control )................ 149
Through-loading feature ................... 297
Timing (RACETIMER) ......................... 248
TIREFIT kit .......................................... 346 Index
19
Page 35 of 426
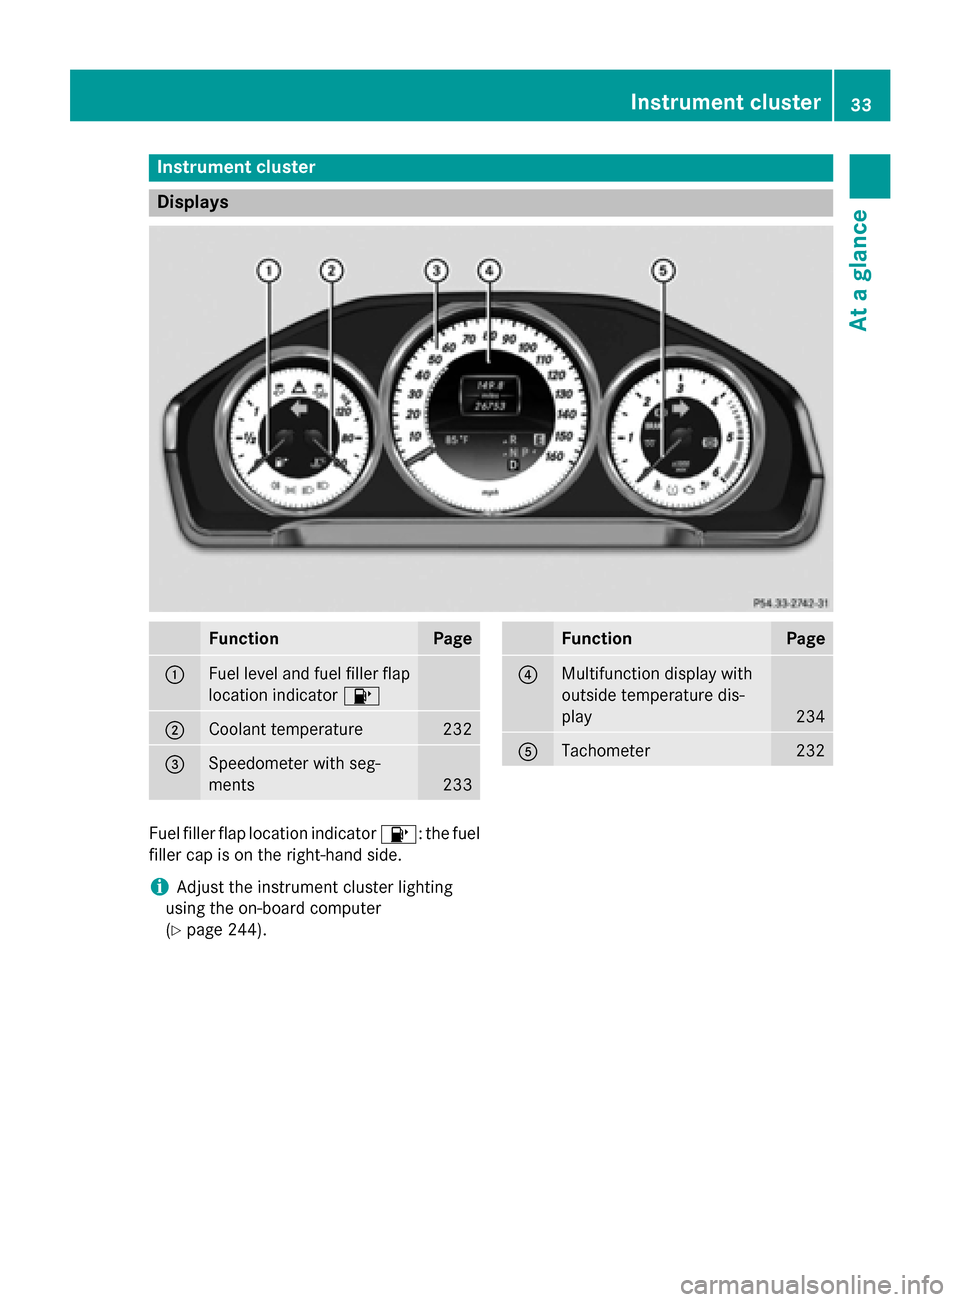
Instrument cluster
Displays
Function Page
0043
Fuel level and fuel filler flap
location indicator 00B6 0044
Coolant temperature 232
0087
Speedometer with seg-
ments
233 Function Page
0085
Multifunction display with
outside temperature dis-
play
234
0083
Tachometer 232
Fuel filler flap location indicator
00B6: the fuel
filler cap is on the right-hand side.
i Adjust the instrument cluster lighting
using the on-board computer
(Y page 244). Instrument cluster
33At a glance
Page 176 of 426
If you or others come into contact with fuel,
observe the following:
R Wash away fuel from skin immediately
using soap and water.
R If fuel comes into contact with your eyes,
immediately rinse them thoroughly with
clean water. Seek medical assistance with- out delay.
R If fuel is swallowed, seek medical assis-
tance without delay. Do not induce vomit-
ing.
R Immediately change out of clothing which
has come into contact with fuel. G
WARNING
Electrostatic buildup can create sparks and
ignite fuel vapors. There is a risk of fire and
explosion.
Always touch the vehicle body before opening the fuel filler flap or touching the fuel pump
nozzle. Any existing electrostatic buildup is
thereby discharged. G
WARNING
Vehicles with a diesel engine:
If you mix diesel fuel with gasoline, the flash
point is lower than that of pure diesel fuel.
When the engine is running, exhaust system
components could overheat without being
noticed. There is a risk of fire.
Never refuel with gasoline. Never mix gasoline with diesel fuel.
! Do not use diesel to refuel vehicles with a
gasoline engine. Do not switch on the igni-
tion if you accidentally refuel with the
wrong fuel. Otherwise, the fuel will enter
the fuel system. Even small amounts of the wrong fuel could result in damage to the
fuel system and the engine. Notify a quali-
fied specialist workshop and have the fuel
tank and fuel lines drained completely.
! Do not use gasoline to refuel vehicles with
a diesel engine. Do not switch on the igni-
tion if you accidentally refuel with the wrong fuel. Otherwise, the fuel will enter
the fuel system. Even small amounts of the
wrong fuel could result in damage to the
fuel system and the engine. The repair
costs are high. Notify a qualified specialist
workshop and have the fuel tank and fuel
lines drained completely.
! Overfilling the fuel tank could damage the
fuel system.
! Take care not to spill any fuel on painted
surfaces. You could otherwise damage the
paintwork.
! Use a filter when refueling from a fuel can.
Otherwise, the fuel lines and/or injection
system could be blocked by particles from
the fuel can.
Do not get into the vehicle again during the
refueling process. Otherwise, electrostatic
charge could build up again.
If you overfill the fuel tank, fuel could spray
out when the fuel pump nozzle is removed.
i Flexible Fuel vehicles can be recognized
by the Ethanol up to E85 sticker on the
inside of the fuel filler flap.
For further information on fuel and fuel quality
(Y page 412). Refueling
General information Pay attention to the important safety notes
(Y
page 173).
The fuel filler flap is unlocked or locked auto-
matically when you open or close the vehicle
with the SmartKey or with KEYLESS-GO.
The position of the fuel filler cap is displayed
00B6 in the instrument cluster. The arrow
next to the filling pump indicates the side of
the vehicle. 174
RefuelingDriving and parking
Page 177 of 426
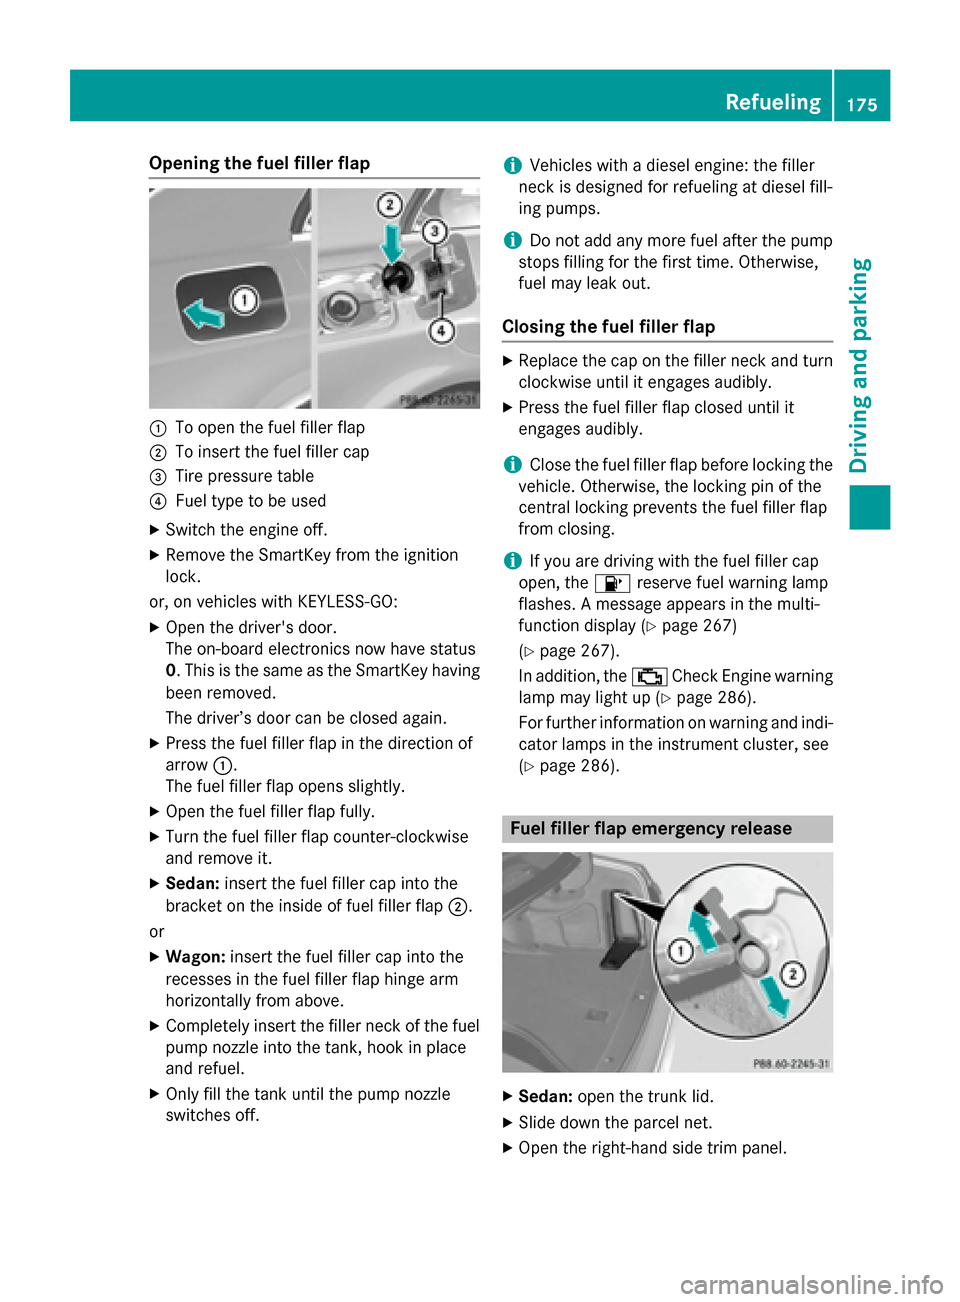
Opening the fuel filler flap
0043
To open the fuel filler flap
0044 To insert the fuel filler cap
0087 Tire pressure table
0085 Fuel type to be used
X Switch the engine off.
X Remove the SmartKey from the ignition
lock.
or, on vehicles with KEYLESS‑GO: X Open the driver's door.
The on-board electronics now have status
0. This is the same as the SmartKey having
been removed.
The driver’s door can be closed again.
X Press the fuel filler flap in the direction of
arrow 0043.
The fuel filler flap opens slightly.
X Open the fuel filler flap fully.
X Turn the fuel filler flap counter-clockwise
and remove it.
X Sedan: insert the fuel filler cap into the
bracket on the inside of fuel filler flap 0044.
or X Wagon: insert the fuel filler cap into the
recesses in the fuel filler flap hinge arm
horizontally from above.
X Completely insert the filler neck of the fuel
pump nozzle into the tank, hook in place
and refuel.
X Only fill the tank until the pump nozzle
switches off. i
Vehicles with a diesel engine: the filler
neck is designed for refueling at diesel fill-
ing pumps.
i Do not add any more fuel after the pump
stops filling for the first time. Otherwise,
fuel may leak out.
Closing the fuel filler flap X
Replace the cap on the filler neck and turn
clockwise until it engages audibly.
X Press the fuel filler flap closed until it
engages audibly.
i Close the fuel filler flap before locking the
vehicle. Otherwise, the locking pin of the
central locking prevents the fuel filler flap
from closing.
i If you are driving with the fuel filler cap
open, the 00B6reserve fuel warning lamp
flashes. A message appears in the multi-
function display (Y page 267)
(Y page 267).
In addition, the 00B9Check Engine warning
lamp may light up (Y page 286).
For further information on warning and indi- cator lamps in the instrument cluster, see
(Y page 286). Fuel filler flap emergency release
X
Sedan: open the trunk lid.
X Slide down the parcel net.
X Open the right-hand side trim panel. Refueling
175Driving and parking Z
Page 180 of 426
membranes and to the eyes. You may expe-
rience a burning sensation in your eyes, nose
and throat. Coughing and watering of the
eyes are possible.
Do not inhale ammonia vapors. Fill the DEF
tank only in well-ventilated areas.
DEF must not come into contact with your
skin, eyes or clothing and must not be swal-
lowed. Keep DEF away from children.
If you or other persons come into contact with DEF, observe the following:
R Rinse DEF from your skin immediately with
soap and water.
R If DEF comes into contact with your eyes,
immediately rinse them thoroughly with
clean water. Seek medical assistance with- out delay.
R If DEF has been swallowed, rinse your
mouth out immediately. Drink plenty of
water. Seek medical assistance without
delay.
R Change out of clothing contaminated with
DEF immediately.
! Only use DEF in accordance with
ISO 22241. Do not mix any additives with
DEF, and do not dilute DEF with water. This
may destroy the BlueTEC exhaust gas after-
treatment system.
! Rinse surfaces that have come into con-
tact with DEF immediately with water or
remove DEF using a damp cloth and cold
water. If the DEF has already crystallized,
use a sponge and cold water to clean it. DEF residues crystallize after time and contam-inate the affected surfaces.
! DEF is not a fuel additive and must not be
added to the fuel tank. If DEF is added to
the fuel tank, this can lead to engine dam-
age.
! Only screw on the DEF refill bottle hand-
tight. It could otherwise be damaged.
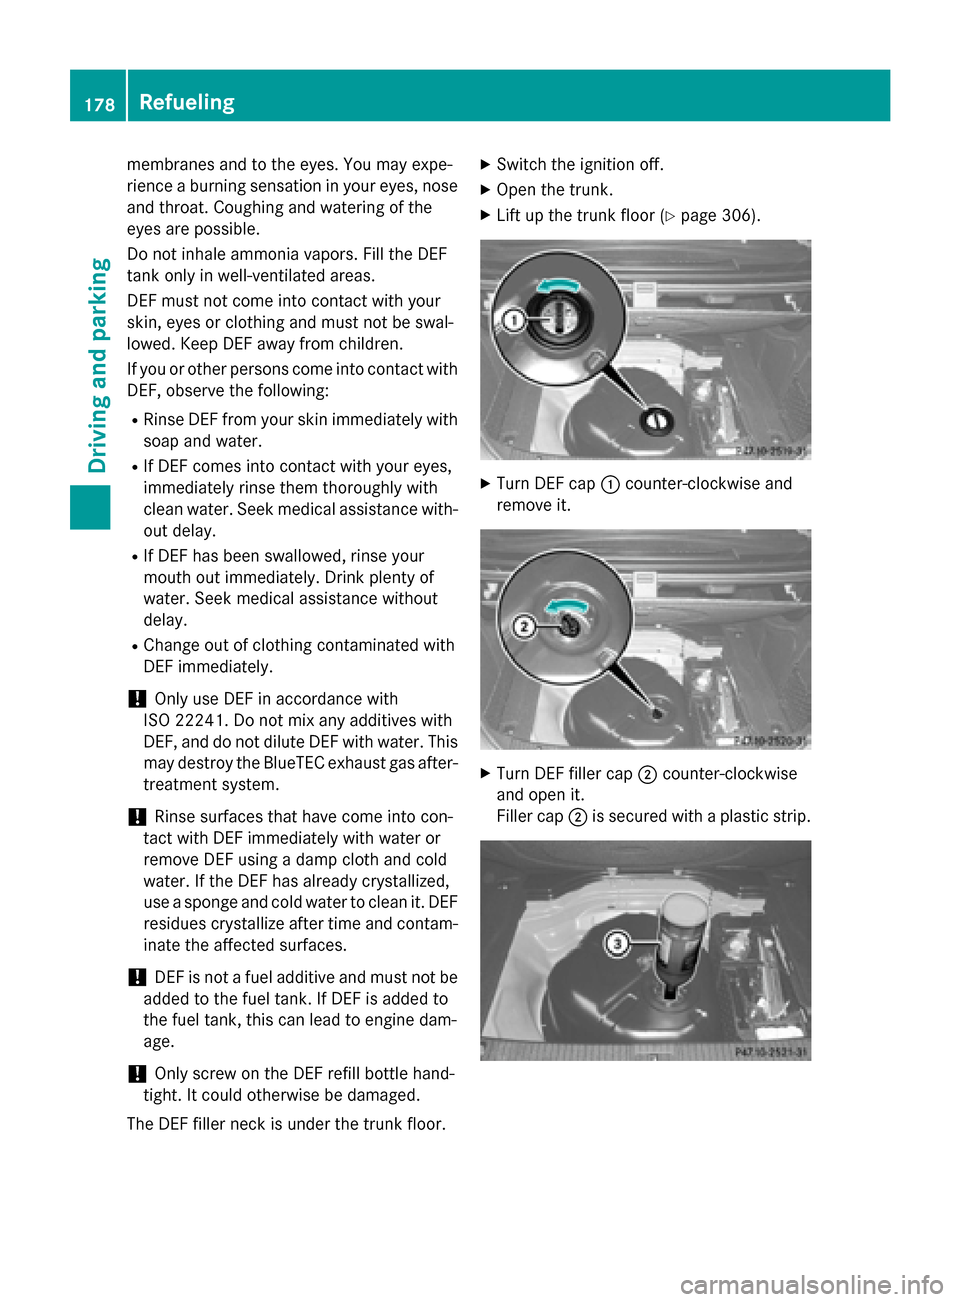
The DEF filler neck is under the trunk floor. X
Switch the ignition off.
X Open the trunk.
X Lift up the trunk floor (Y page 306). X
Turn DEF cap 0043counter-clockwise and
remove it. X
Turn DEF filler cap 0044counter-clockwise
and open it.
Filler cap 0044is secured with a plastic strip. 178
RefuelingDriving and parking
Page 269 of 426
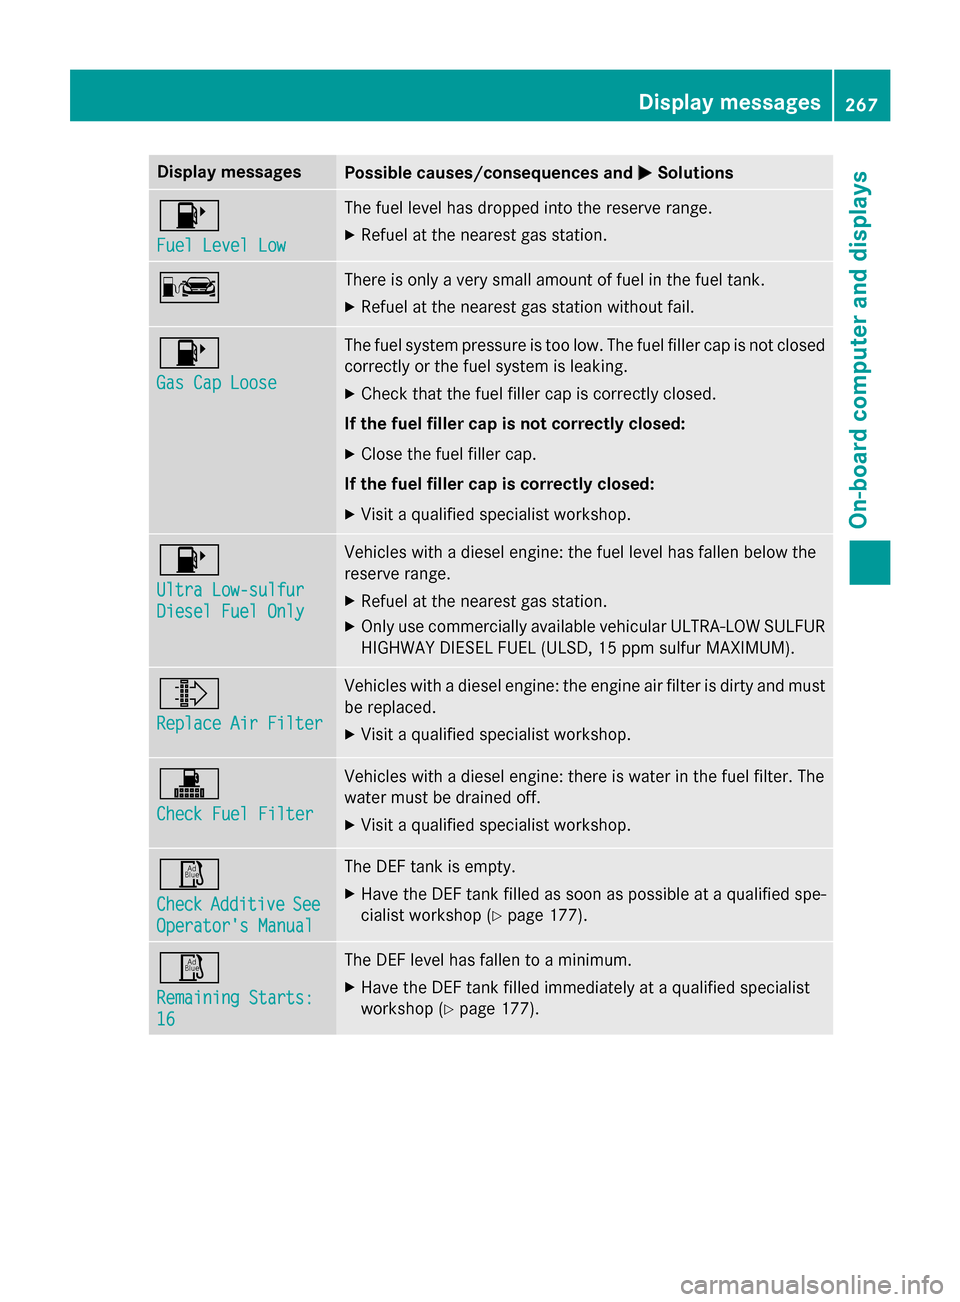
Display messages
Possible causes/consequences and
0050
0050Solutions 00B6
Fuel Level Low Fuel Level Low The fuel level has dropped into the reserve range.
X Refuel at the nearest gas station. 00A8 There is only a very small amount of fuel in the fuel tank.
X Refuel at the nearest gas station without fail. 00B6
Gas Cap Loose Gas Cap Loose The fuel system pressure is too low. The fuel filler cap is not closed
correctly or the fuel system is leaking.
X Check that the fuel filler cap is correctly closed.
If the fuel filler cap is not correctly closed: X Close the fuel filler cap.
If the fuel filler cap is correctly closed: X Visit a qualified specialist workshop. 00B6
Ultra Low-sulfur Ultra Low-sulfur
Diesel Fuel Only Diesel Fuel Only Vehicles with a diesel engine: the fuel level has fallen below the
reserve range.
X Refuel at the nearest gas station.
X Only use commercially available vehicular ULTRA-LOW SULFUR
HIGHWAY DIESEL FUEL (ULSD, 15 ppm sulfur MAXIMUM). 009E
Replace Air Filter Replace Air Filter Vehicles with a diesel engine: the engine air filter is dirty and must
be replaced.
X Visit a qualified specialist workshop. 003A
Check Fuel Filter Check Fuel Filter Vehicles with a diesel engine: there is water in the fuel filter. The
water must be drained off.
X Visit a qualified specialist workshop. 00C8
Check Check
Additive
Additive See
See
Operator's Manual
Operator's Manual The DEF tank is empty.
X Have the DEF tank filled as soon as possible at a qualified spe-
cialist workshop (Y page 177). 00C8
Remaining Starts: Remaining Starts:
16 16 The DEF level has fallen to a minimum.
X Have the DEF tank filled immediately at a qualified specialist
workshop (Y page 177). Display
messages
267On-board computer and displays Z
Page 288 of 426
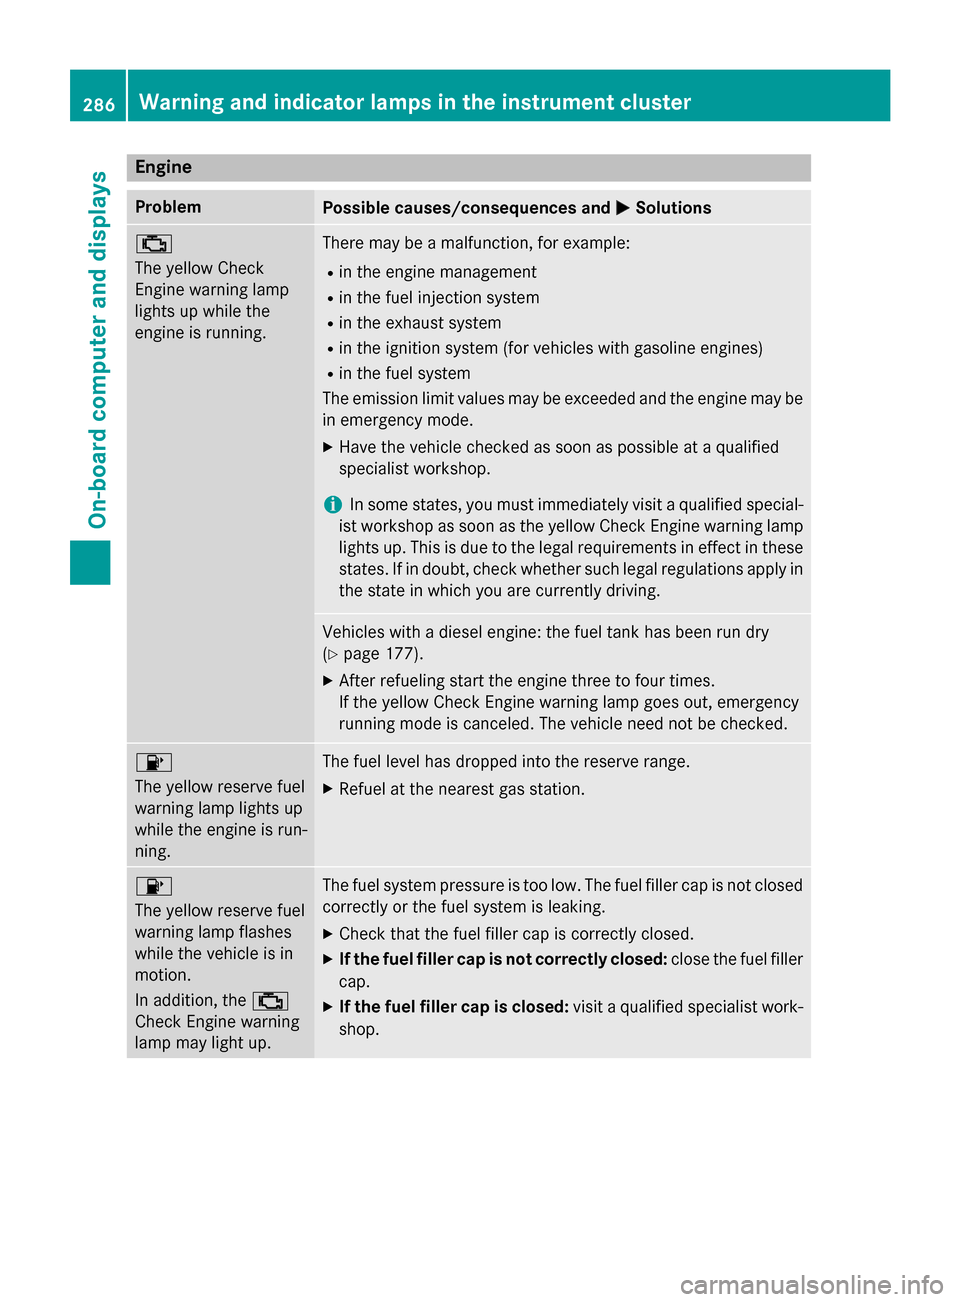
Engine
Problem
Possible causes/consequences and
0050
0050Solutions 00B9
The yellow Check
Engine warning lamp
lights up while the
engine is running.
There may be a malfunction, for example:
R in the engine management
R in the fuel injection system
R in the exhaust system
R in the ignition system (for vehicles with gasoline engines)
R in the fuel system
The emission limit values may be exceeded and the engine may be
in emergency mode.
X Have the vehicle checked as soon as possible at a qualified
specialist workshop.
i In some states, you must immediately visit a qualified special-
ist workshop as soon as the yellow Check Engine warning lamp
lights up. This is due to the legal requirements in effect in these
states. If in doubt, check whether such legal regulations apply in the state in which you are currently driving. Vehicles with a diesel engine: the fuel tank has been run dry
(Y
page 177).
X After refueling start the engine three to four times.
If the yellow Check Engine warning lamp goes out, emergency
running mode is canceled. The vehicle need not be checked. 00B6
The yellow reserve fuel
warning lamp lights up
while the engine is run-
ning.
The fuel level has dropped into the reserve range.
X Refuel at the nearest gas station. 00B6
The yellow reserve fuel
warning lamp flashes
while the vehicle is in
motion.
In addition, the
00B9
Check Engine warning
lamp may light up. The fuel system pressure is too low. The fuel filler cap is not closed
correctly or the fuel system is leaking.
X Check that the fuel filler cap is correctly closed.
X If the fuel filler cap is not correctly closed: close the fuel filler
cap.
X If the fuel filler cap is closed: visit a qualified specialist work-
shop. 286
Warning and indicator lamps in the instrument clusterOn-board computer and displays
Page 351 of 426
Therefore, place the filler hose in the plastic
bag which contained the TIREFIT kit. H
Environmental note
Have the used tire sealant bottle disposed of
professionally, e.g. at a qualified specialist
workshop.
If a tire pressure of 180 kPa (1.8 bar/26 psi) has been attained after five minutes:
X Switch off the tire inflation compressor.
X Unscrew the filler hose from the valve of
the faulty tire.
X Stow the tire sealant bottle and the tire
inflation compressor.
X Pull away immediately.
X Stop after driving for approximately ten
minutes and check the tire pressure with
the tire inflation compressor.
The tire pressure must now be at least
130 kPa (1.3 bar/19 psi). G
WARNING
If the required tire pressure is not reached
after driving for a short period, the tire is too
badly damaged. The tire sealant cannot repair the tire in this instance. Damaged tires and a
tire pressure that is too low can significantly
impair the vehicle's braking and driving char-
acteristics. There is a risk of accident.
Do not continue driving. Contact a qualified
specialist workshop.
i In cases such as the one mentioned
above, contact an authorized Mercedes-
Benz Center. Or call 1-800-FOR-MERCedes
(in the USA) or 1-800-387-0100 (in Can-
ada).
X Correct the tire pressure if it is still at least
130 kPa (1.3 bar/19 psi). See the Tire and
Loading Information placard on the driver's side B-pillar or the tire pressure table in the fuel filler flap for values.
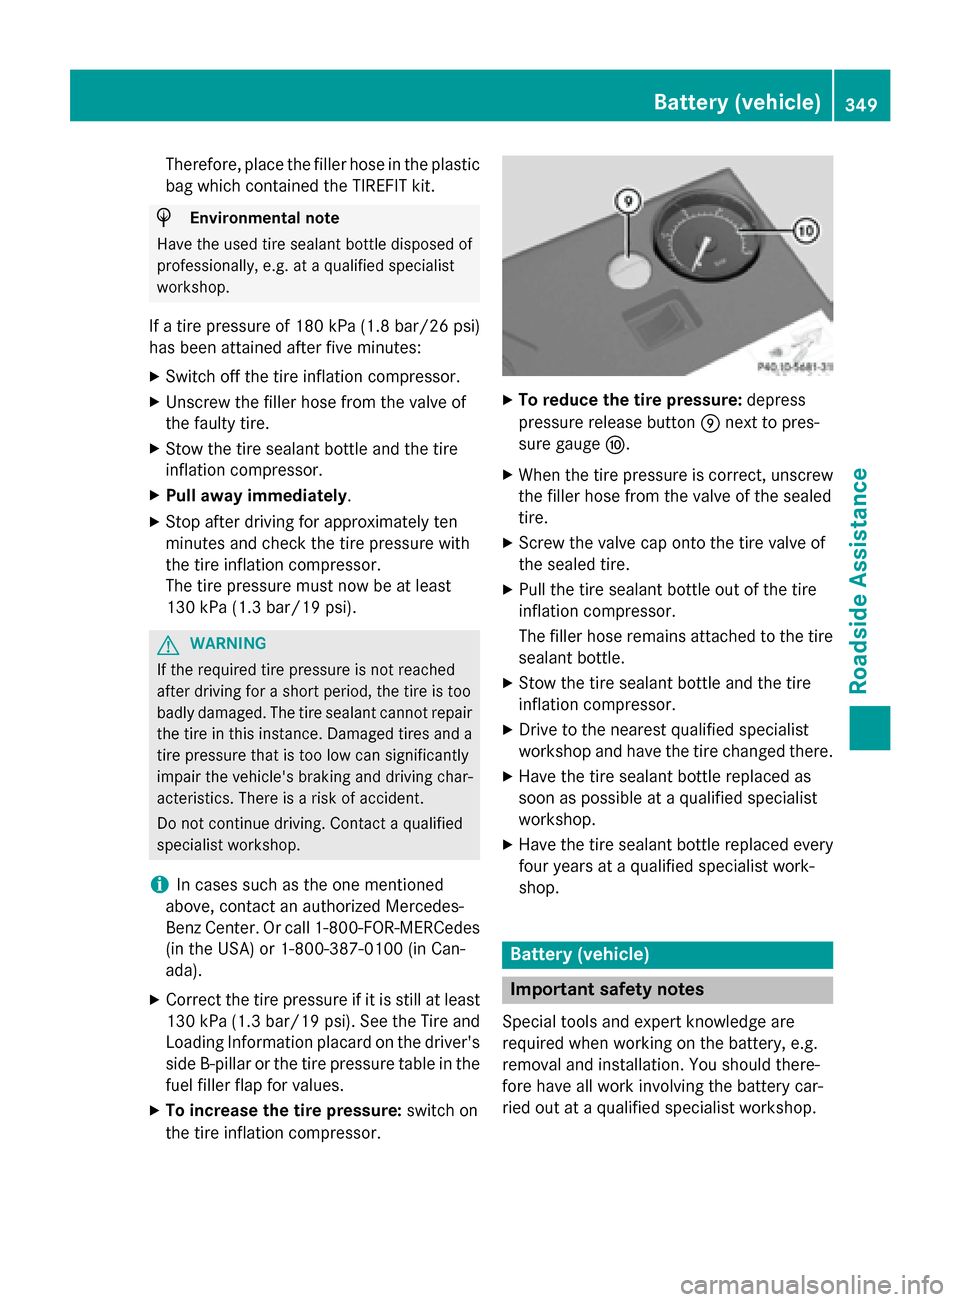
X To increase the tire pressure: switch on
the tire inflation compressor. X
To reduce the tire pressure: depress
pressure release button 006Dnext to pres-
sure gauge 006E.
X When the tire pressure is correct, unscrew
the filler hose from the valve of the sealed
tire.
X Screw the valve cap onto the tire valve of
the sealed tire.
X Pull the tire sealant bottle out of the tire
inflation compressor.
The filler hose remains attached to the tire
sealant bottle.
X Stow the tire sealant bottle and the tire
inflation compressor.
X Drive to the nearest qualified specialist
workshop and have the tire changed there.
X Have the tire sealant bottle replaced as
soon as possible at a qualified specialist
workshop.
X Have the tire sealant bottle replaced every
four years at a qualified specialist work-
shop. Battery (vehicle)
Important safety notes
Special tools and expert knowledge are
required when working on the battery, e.g.
removal and installation. You should there-
fore have all work involving the battery car-
ried out at a qualified specialist workshop. Battery (vehicle)
349Roadside Assistance Z