fog light MERCEDES-BENZ WAGON 2016 Owners Manual
[x] Cancel search | Manufacturer: MERCEDES-BENZ, Model Year: 2016, Model line: WAGON, Model: MERCEDES-BENZ WAGON 2016Pages: 350, PDF Size: 6.71 MB
Page 13 of 350
Activating/deactivating (on-
board computer, except AMG
vehicles) ........................................ 190
AMG menu (on-board computer) ... 190
Characteristics ................................. 81
Deactivating/activating (button
in AMG vehicles) .............................. 82
Deactivating/activating (except
AMG vehicles) ................................ 190
Display message ............................ 192
ETS/4ETS ........................................ 81
Function/notes ................................ 80
General notes .................................. 80
Important safety information ........... 81
Trailer stabilization ........................... 84
Warning lamp ................................. 206
ETS/4ETS (Electronic Traction Sys-
tem) ...................................................... 81
Exhaust check ................................... 154
Exhaust tail pipe (cleaning instruc-
tions) .................................................. 268
Exterior lighting
Setting options .............................. 120
see Lights
Exterior mirrors
Adjusting ....................................... 117
Dipping (automatic) ....................... 117
Folding in when locking (on-board
computer) ...................................... 190
Folding in/out (automatically) ....... 117
Folding in/out (electrically) ........... 117
Setting ........................................... 117
Storing settings (memory func-
tion) ............................................... 117
Storing the parking position .......... 117
Eyeglasses compartment ................. 239
F
Favorites
Adding ........................................... 223
Deleting ......................................... 224
Displaying and calling up ............... 223
Moving ........................................... 224
Overview ........................................ 223
Renaming ....................................... 224
Filler cap
see Fuel filler flap Flat tire
MOExtended tires .......................... 272
Preparing the vehicle ..................... 271
TIREFIT kit ...................................... 273
see Emergency spare wheel
Floormats ........................................... 259
Frequencies
Mobile phone ................................. 334
Two-way radio ................................ 334
Front fog lamps
Display message ............................ 191
Fuel
Additives ........................................ 339
Consumption statistics .................. 190
Displaying the current consump-
tion ................................................ 190
Displaying the range ...................... 190
Driving tips .................................... 153
Flexible fuel vehicles ...................... 340
Fuel gauge ....................................... 37
Grade (gasoline) ............................ 338
Important safety notes .................. 337
Premium-grade unleaded gaso-
line ................................................. 338
Problem (malfunction) ................... 149
Quality (diesel) ............................... 339
Refueling ........................................ 145
Tank content/reserve fuel ............. 338
Fuel filler flap
Emergency release ........................ 147
Opening ......................................... 146
Fuel level
Calling up the range (on-board
computer) ...................................... 190
Fuel tank
Capacity ........................................ 338
Problem (malfunction) ................... 149
Fuse allocation chart (vehicle tool
kit) ...................................................... 270
Fuses
Allocation chart ............................. 284
Before changing ............................. 284
Fuse box in the cargo compart-
ment .............................................. 285
Fuse box in the engine compart-
ment .............................................. 285
Fuse box in the trunk ..................... 285
Important safety notes .................. 284
Index11
Page 14 of 350
G
Garage door openerClearing the memory .....................2 59
General notes ................................ 256
Important safety notes .................. 257
Opening/closing the garage door .. 259
Programming (button in the rear-
view mirror) ................................... 257
Synchronizing the rolling code ....... 257
Gear indicator (on-board com-
puter) ..................................................1 90
Gear or selector lever (cleaning
guidelines) ......................................... 268
Genuine parts ...................................... 27
Glove box ...........................................2 39
Google™ Local Search
see also Digital Operator's Man-
ual ..................................................2 14
H
HANDS-FREE ACCESS.......................... 99
Hazard warning lamps ......................120
Head bags
Display message ............................ 196
Head restraints
Adjusting ....................................... 116
Adjusting (rear) .............................. 116
see NECK-PRO head restraints
see NECK-PRO luxury head restraints
Headlamps
Fogging up ..................................... 120
see Automatic headlamp mode
Heating
see Climate control
High-beam headlamps
Adaptive Highbeam Assist ............. 122
Changing bulbs .............................. 124
Display message ............................ 191
Switching on/off ........................... 121
Hill start assist .................................. 141
HOLD function
Activating ....................................... 165
Deactivating ................................... 166
Function/notes .............................1 65Home address
see also Digital Operator's Man-
ual ..................................................2 14
Hood
Closing ...........................................2 63
Display message ............................ 201
Important safety notes .................. 262
Opening ......................................... 262
Hydroplaning ..................................... 155
I
Ignition lock
see Key positions
Immobilizer .......................................... 87
Indicator and warning lamps
COLLISION PREVENTION ASSIST
PLUS .............................................. 210
Indicator lamps
see Warning and indicator lamps
Indicators
see Turn signals
Insect protection on the radiator .... 263
Instrument cluster
Overview .......................................... 37
Settings ......................................... 190
Warning and indicator lamps ........... 38
Instrument cluster lighting .............. 190
Interior lighting
Automatic control .......................... 123
Delayed switch-off (on-board
computer) ...................................... 190
Emergency lighting ........................ 123
Manual control ............................... 123
Overview ........................................ 123
Reading lamp ................................. 123
Setting the brightness of the
ambient lighting (on-board com-
puter) ............................................. 190
Setting the brightness of the dis-
play/switch (on-board computer) .. 190
Setting the color of the ambient
lighting (on-board computer) ......... 190
Internet
Selecting/setting access data ....... 232
Setting up an Internet connection .. 232
12Index
Page 15 of 350
iPod®
see also Digital Operator's Man-
ual .................................................. 214
J
JackStorage location ............................ 270
Using ............................................ .310
Jump starting (engine) ......................279
K
Key positions
KEYLESS-GO .................................. 138
SmartKey ....................................... 137
KEYLESS-GO
Deactivation ..................................... 91
Display message ............................ 191
Locking ............................................ 91
Removing the Start/Stop button ... 139
Start/Stop button .......................... 138
Starting the engine ........................ 140
Unlocking ......................................... 91
Kickdown
Driving tips ....................................1 44
Manual drive program .................... 145
Knee bag .............................................. 56
L
Lamps
see Warning and indicator lamps
Lane Keeping Assist
Activating/deactivating ................. 190
Function/information .................... 179
Lane Tracking package ..................... 177
Lap time (RACETIMER) ...................... 190
LATCH-type (ISOFIX) child seat
anchors ................................................ 70
License plate lamp (display mes-
sage) ................................................... 191
Light function, active
Display message ............................ 191
Light sensor (display message) ....... 191
Lights
Activating/deactivating the inte-
rior lighting delayed switch-off ....... 190
Adaptive Highbeam Assist ............. 122 Automatic headlamp mode ............ 121
Cornering light function ................. 121
Hazard warning lamps ................... 120
High beam flasher .......................... 121
High-beam headlamps ................... 121
Light switch ................................... 120
Low-beam headlamps .................... 121
Parking lamps ................................ 121
Rear fog lamp ................................ 121
Setting the brightness of the
ambient lighting (on-board com-
puter) ............................................. 190
Setting the brightness of the dis-
play/switch (on-board computer) .. 190
Setting the color of the ambient
lighting (on-board computer) ......... 190
Standing lamps .............................. 121
Switching the daytime running
lamps on/off (on-board com-
puter) ............................................. 190
Switching the daytime running
lamps on/off (switch) .................... 121
Switching the exterior lighting
delayed switch-off on/off (on-
board computer) ............................ 190
Switching the surround lighting
on/off (on-board com-
puter) ............................................. 190
Turn signals ................................... 121
see Replacing bulbs
List of access data
New provider ................................. 233
List of mobile phone network pro-
viders
With the se
lected provider ............. 233
Loading guidelines ............................ 238
Locking
see Central locking
Locking (doors)
Automatic ........................................ 95
Emergency locking ........................... 96
From inside (central locking but-
ton) .................................................. 95
Locking centrally
see Central locking
Locking verification signal (on-
board computer) ............................... 190
Index13
Page 122 of 350
Useful information
i
This Operator's Manual describes all
models and all standard and optional equip-
ment of your vehicle available at the time of
publication of the Operator's Manual.
Country-specific differences are possible.
Please note that your vehicle may not be
equipped with all features described. This
also applies to safety-related systems and
functions.
iRead the information on qualified special-
ist workshops (
Ypage 31).
Exterior lighting
General notes
For reasons of safety, Mercedes-Benz recom-
mends that you drive with the lights switched
on even during the daytime. Therefore, your
vehicle is equipped with special daytime run-
ning lamps. In some countries, operation of
the headlamps varies due to legal require-
ments and self-imposed obligations.
If you wish to drive during the daytime without
lights, switch off the daytime running lamps
function in the on-board computer
(
Ypage 190).
Information in the Digital Operator's
Manual
In the Digital Operator's Manual you will find
information on the following topics:
RHazard warning lamps
RHeadlamps fogged up on the inside
Setting the exterior lighting
Setting options
Exterior lighting can be set using:
Rthe light switch
Rthe combination switch (Ypage 121)
Rthe on-board computer (Ypage 190)
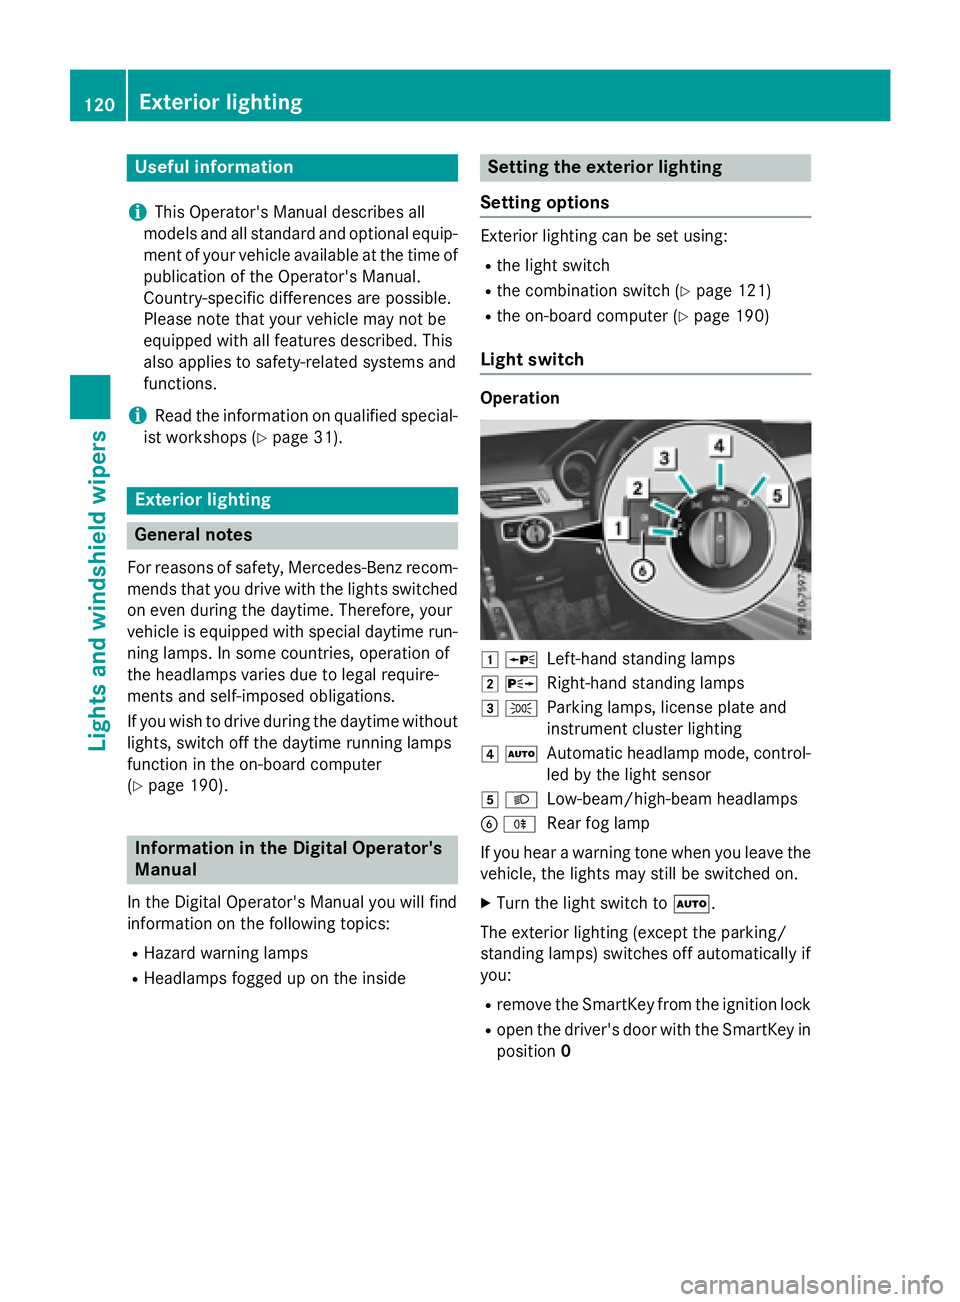
Light switch
Operation
1 WLeft-hand standing lamps
2XRight-hand standing lamps
3TParking lamps, license plate and
instrument cluster lighting
4ÃAutomatic headlamp mode, control-
led by the light sensor
5LLow-beam/high-beam headlamps
BRRear fog lamp
If you hear a warning tone when you leave the
vehicle, the lights may still be switched on.
XTurn the light switch to Ã.
The exterior lighting (except the parking/
standing lamps) switches off automatically if
you:
Rremove the SmartKey from the ignition lock
Ropen the driver's door with the SmartKey in
position 0
120Exterior lighting
Lights and windshield wipers
Page 123 of 350
Information in the Digital Operator's
Manual
Inthe Digital Operator's Manual you willfind
information on the following topics:
RAutomat icheadlamp mode
RDaytime running lamps
RLow-beam headlamps
RRear fog lamp
RParking lamps
RStanding lamps
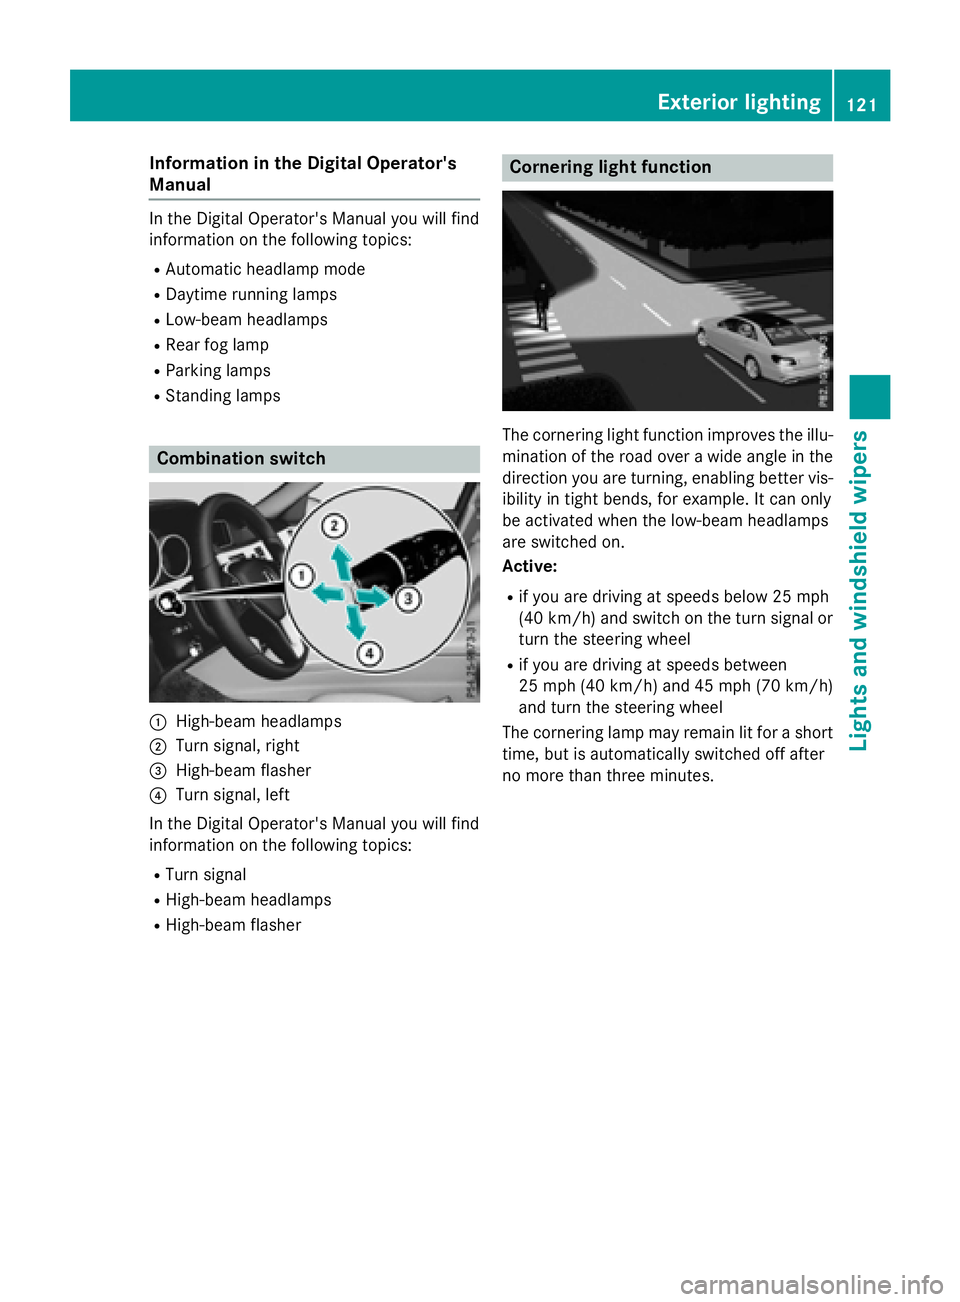
Combination switch
:High-beam headlamps
;Turn signal, right
=High-beam flasher
?Turn signal, left
In the Digital Operator's Manual you willfind
information on the fol lowing topics:
RTurn signal
RHigh-beam headlamps
RHigh-beam flasher
Cornering light function
The cornering light function improves the illu-
mination of the road over a wideangle in the
dire ction you are turning, enabling better vis-
ibilit yin tight bends, for example. Itcan only
be activated when the low-beam headlamps
are switched on.
Acti ve:
Rifyou are driving at speeds below 25 mph
(40 km /h) and switch on the turn signal or
turn the steering wheel
Rif you are driving at speeds between
25 mph (40 km/ h)and 45 mph (70 km/h)
and turn the steering wheel
The cornering lamp may remain lit for a short
time, but is automatically switched off after
no more than three minutes.
Exterior lighting121
Lights and windshield wipers
Page 124 of 350
Adaptive Highbeam Assist
Gene ral notes
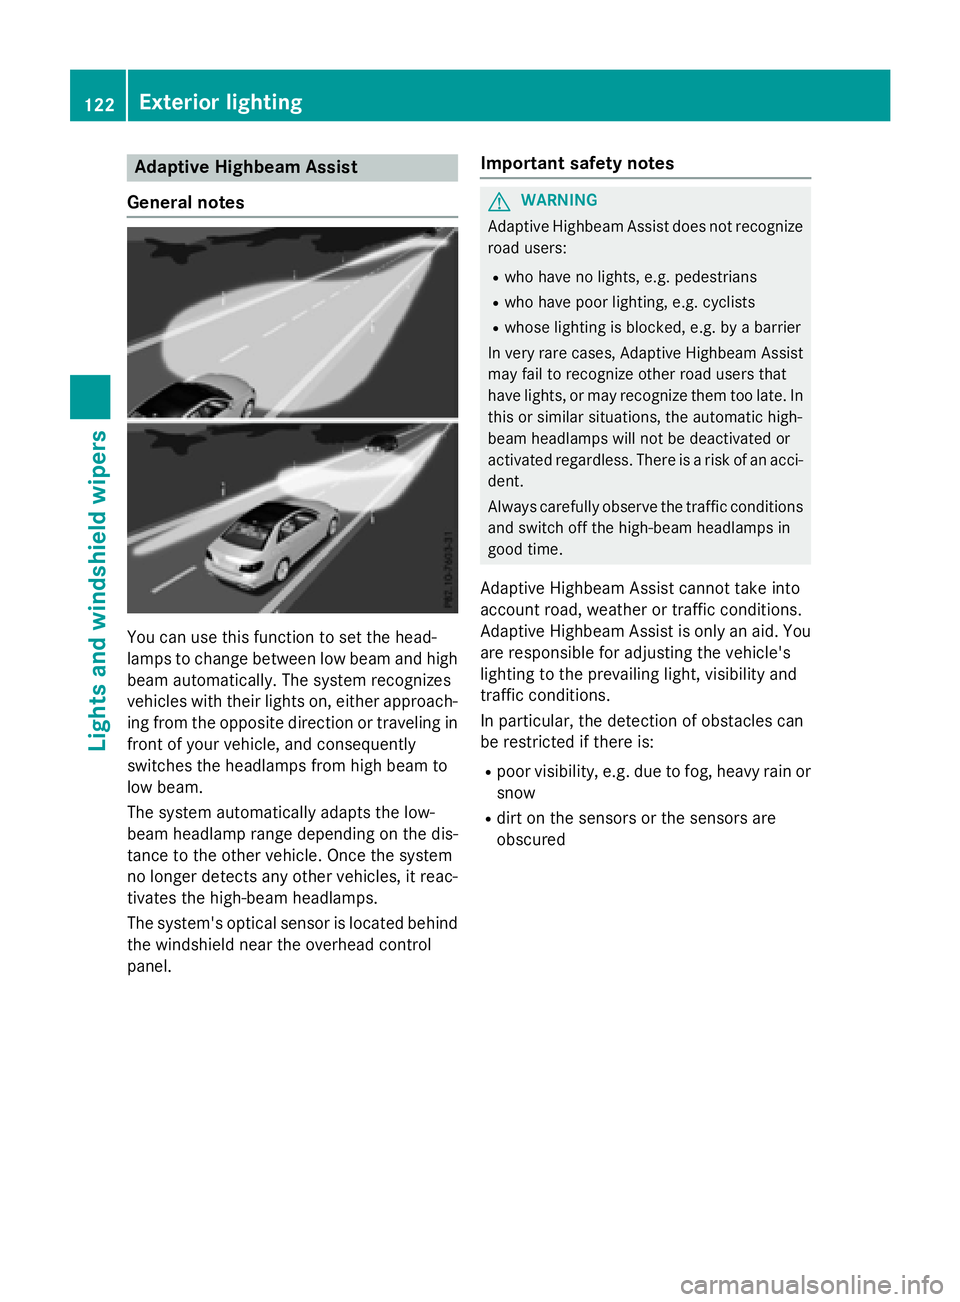
You can use this function to set th ehead-
lamp sto chang ebetween low beam and high
beam automatically. The system recognizes
vehicles wit htheir lights on ,either approach-
ing from th eopposit edirection or traveling in
fron tof your vehicle, and consequentl y
switches th eheadlamps from high beam to
low beam .
The system automatically adapt sth elow-
beam headlamp range depending on th edis-
tance to th eother vehicle. Once thesystem
no longer detects any other vehicles, it reac -
tivates th ehigh-beam headlamps .
The system' soptical sensor is locate dbehind
th ewindshield near th eoverhead control
panel.
Import ant safety notes
GWARNIN G
Adaptive Highbea mAssis tdoes no trecogniz e
road users:
Rwho hav eno lights ,e.g. pedestrian s
Rwho havepoor lighting ,e.g. cyclist s
Rwhoselighting is blocked, e.g. by abarrier
In ver yrar ecases, Adaptive Highbea mAssis t
may fail to recogniz eother road user sthat
hav elights ,or may recogniz ethem to olate. In
this or similar situations, th eautomatic high -
beam headlamp swill no tbe deactivated or
activated regardless .There is aris kof an acci-
dent.
Always carefully observ eth etraffic condition s
and switch off th ehigh-beam headlamp sin
goo dtime.
Adaptive Highbeam As sistcanno ttak eint o
accoun troad ,weather or traffic conditions.
Adaptive Highbeam As sistis only an aid. You
are responsible for adj usting thevehicle's
lighting to th eprevailing light, visibilit yand
traffic condition s.
In particular, th edetection of obstacles can
be restricted if there is:
Rpoor visibility, e.g. due to fog ,heav yrain or
snow
Rdirt on th e sensors or the sensors are
obscured
122Exterior lighting
Lights and windshield wipers
Page 158 of 350
Do not use cruise control:
Rin road and traffic conditions which do not
allow you to maintain a constant speed e.g.
in heavy traffic or on winding roads
Ron slippery road surfaces. Braking or accel-
erating could cause the drive wheels to lose
traction and the vehicle could then skid
Rwhen there is poor visibility, e.g. due to fog,
heavy rain or snow
If there is a change of drivers, advise the new
driver of the speed stored.
GWARNING
If you call up the stored speed and it differs
from the current speed, the vehicle acceler-
ates or decelerates. If you do not know the
stored speed, the vehicle could accelerate or brake unexpectedly. There is a risk of an acci-
dent.
Pay attention to the road and traffic condi-
tions before calling up the stored speed. If you
do not know the stored speed, store the
desired speed again.
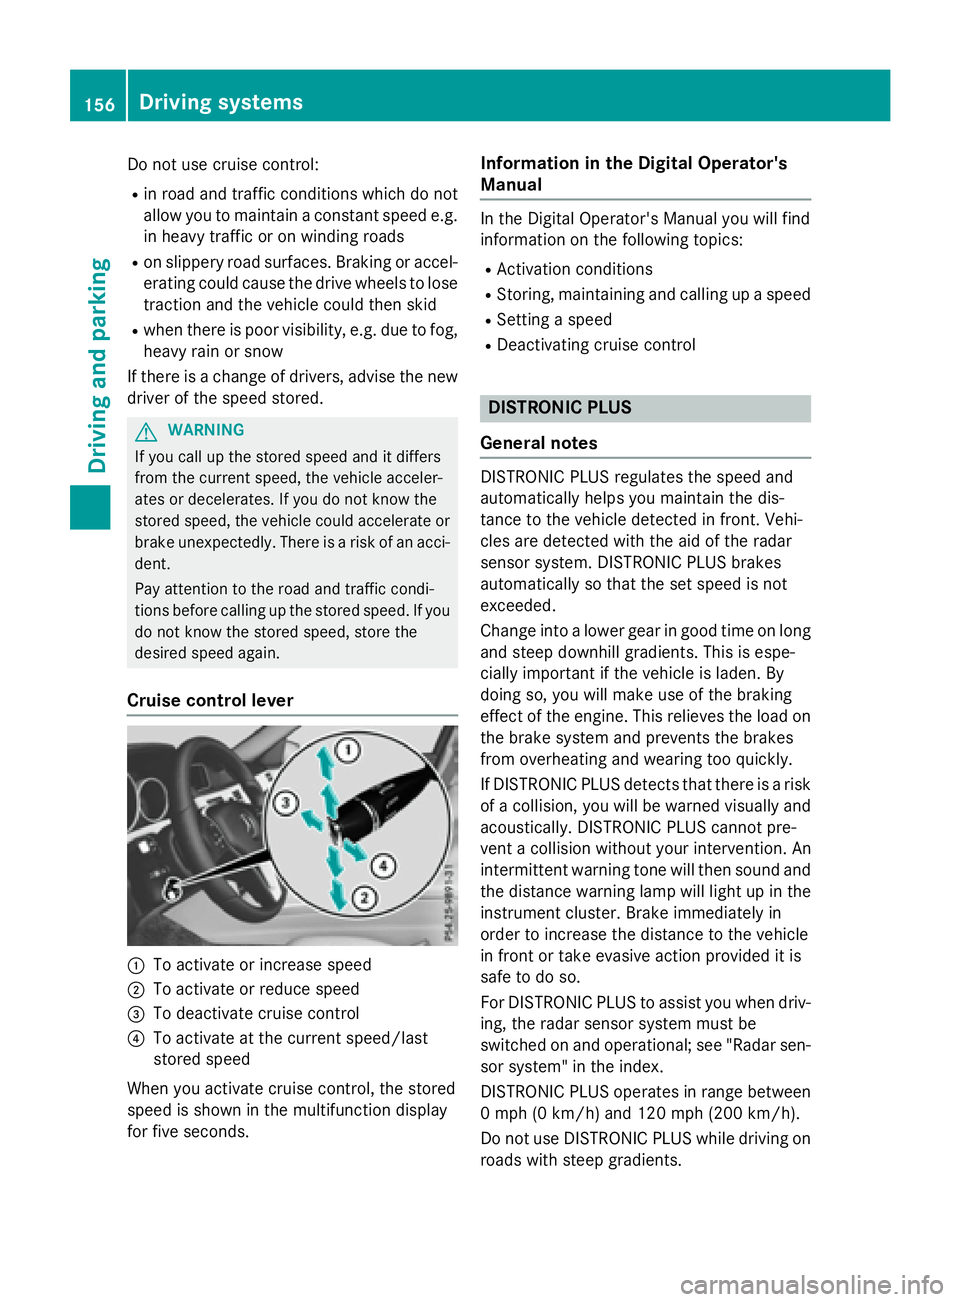
Cruise control lever
:To activate or increase speed
;To activate or reduce speed
=To deactivate cruise control
?To activate at the current speed/last
stored speed
When you activate cruise control, the stored
speed is shown in the multifunction display
for five seconds.
Information in the Digital Operator's
Manual
In the Digital Operator's Manual you will find
information on the following topics:
RActivation conditions
RStoring, maintaining and calling up a speed
RSetting a speed
RDeactivating cruise control
DISTRONIC PLUS
General notes
DISTRONIC PLUS regulates the speed and
automatically helps you maintain the dis-
tance to the vehicle detected in front. Vehi-
cles are detected with the aid of the radar
sensor system. DISTRONIC PLUS brakes
automatically so that the set speed is not
exceeded.
Change into a lower gear in good time on long
and steep downhill gradients. This is espe-
cially important if the vehicle is laden. By
doing so, you will make use of the braking
effect of the engine. This relieves the load on
the brake system and prevents the brakes
from overheating and wearing too quickly.
If DISTRONIC PLUS detects that there is a risk
of a collision, you will be warned visually and
acoustically. DISTRONIC PLUS cannot pre-
vent a collision without your intervention. An
intermittent warning tone will then sound and the distance warning lamp will light up in the
instrument cluster. Brake immediately in
order to increase the distance to the vehicle
in front or take evasive action provided it is
safe to do so.
For DISTRONIC PLUS to assist you when driv-
ing, the radar sensor system must be
switched on and operational; see "Radar sen- sor syste m" i
n the index.
DISTRONIC PLUS operates in range between
0 mph (0 km/h) and 120 mph (200 km/h).
Do not use DISTRONIC PLUS while driving on
roads with steep gradients.
156Driving system s
Driving an d parking
Page 174 of 350
Under the following circumstances, the rear
view camera will not function, or will function
in a limited manner:
Rif the trunk lid or tailgate is open
Rin heavy rain, snow or fog
Rat night or in very dark places
Rif the camera is exposed to very bright light
Rif the area is lit by fluorescent bulbs or LED
lighting (the display may flicker)
Rif there is a sudden change in temperature,
e.g. when driving into a heated garage in
winter
Rif the camera lens is dirty or obstructed.
Observe the notes on cleaning
(
Ypage 268)
Rif the rear of your vehicle is damaged. In this
event, have the camera position and setting
checked at a qualified specialist workshop
The field of vision and other functions of the
rear view camera may be restricted due to
additional accessories on the rear of the vehi-
cle (e.g. license plate holder, bicycle rack).
On vehicles with height-adjustable chassis,
leaving the standard height can result in inac-
curacies in the guide lines, depending on
technical conditions.
iThe rear view camera is protected from
raindrops and dust by means of a flap.
When the rear view camera is activated,
this flap opens.
The flap closes again when:
Ryou have finished the maneuvering proc-
ess
Ryou switch off the engine
Ryou open the trunk
Observe the notes on cleaning
(
Ypage 268).
For technical reasons, the flap may remain
open briefly after the rear view camera has
been deactivated.
!Objects not at ground level may appear to
be further away than they actually are, e.g.:
Rthe bumper of a parked vehicle
Rthe drawbar of a trailer
Rthe ball coupling of a trailer tow hitch
Rthe rear section of an HGV
Ra slanted post
Use the guidelines only for orientation.
Approach objects no further than the bot-
tom-most guideline.
The rear view camera may show a distorted
view of obstacles, show them incorrectly or
not at all. The rear view camera does not show
objects in the following positions:
Rvery close to the rear bumper
Runder the rear bumper
Rin the area immediately above the tailgate
handle
Activating/deactivating the rear view
camera
XTo activate: make sure that the SmartKey
is in position 2in the ignition lock.
XMake sure that the Activation by R
gearfunction is selected in Audio 20 or
COMAND, see the Digital Operator's Man-
ual.
XEngage reverse gear.
The rear view camera flap opens. The area
behind the vehicle is shown with guide lines
in the Audio 20 or COMAND display.
The image from the rear view camera is
available throughout the maneuvering
process.
To deactivate: the rear view camera deacti-
vates if you shift the transmission to Por after
driving forwards a short distance.
172Driving systems
Driving and parking
Page 176 of 350
Rif the trunk lid/tailgate is open
Rin heavy rain, snow or fog
Rat night or in very dark places
Rif the cameras are exposed to very bright
light
Rif the area is lit by fluorescent bulbs or LED
lighting (the display may flicker)
Rif there is a sudden change in temperature,
e.g. when driving into a heated garage in
winter
Rif the camera lenses are dirty or covered
Rif the vehicle components in which the
cameras are installed are damaged. In this
event, have the camera position and setting
checked at a qualified specialist workshop.
Do not use the 360° camera in this case. You
can otherwise injure others or cause damage to objects or the vehicle.
Guide lines are always shown at road level.
On vehicles with height-adjustable chassis,
depending on technical conditions, leaving
the standard height can result in:
Rinaccuracies in the guide lines
Rinaccuracies in the display of generated
images (top view)
Activation conditions
The 360° camera image can be displayed if:
Ryour vehicle is equipped with a 360° cam-
era
Rthe SmartKey is in position 2in the ignition
lock
RCOMAND/Audio 20 is switched on
Rthe 360° Camerafunction is switched on
Switching on the 360° camera
XPress the Øbutton in the center con-
sole for longer than two seconds.
Depending on whether position Dor Ris
engaged, the following is shown:
Ra split screen with top view and the
image from the front camera or
Ra split screen with top view and the
image from the rear view camera
or
XPress the Øbutton in the center con-
sole.
The vehicle menu is displayed.
XSelect 360° Cameraand press 7to con-
firm.
Depending on whether position Dor Ris
engaged, the following is shown:
Ra split screen with top view and the
image from the front camera or
Ra split screen with top view and the
image from the rear view camera
Activating the 360° camera using
reverse gear
The 360° camera images can be automati-
cally displayed by engaging reverse gear.
XMake sure that the SmartKey is in position
2 in the ignition lock.
XMake sure that the Activation by R
gearfunction is selected in COMAND/
Audio 20 (see the separate COMAND/
Audio 20 operating instructions).
XTo show the 360° camera image: engage
reverse gear.
The area behind the vehicle is shown in the
COMAND/Audio 20 display in split-screen
mode. You see the top view of the vehicle
and the image from the rear view camera.
Selecting the split-screen and full
screen displays
Switching between split screen views
XTo switch to the line with the vehicle icons:
slide 5the controller.
XTo select one of the vehicle icons: turn
3 the controller.
174Driving systems
Driving and parking
Page 186 of 350
For Active Lane Keeping Assist to assist you
when driving, the radar sensor system must
be operational
Important safety notes
If you fail to adapt your driving style, Active
Lane Keeping Assist can neither reduce the
risk of accident nor override the laws of phys-
ics. Active Lane Keeping Assist cannot take
account of road and weather conditions. It
may not recognize traffic situations. Active
Lane Keeping Assist is only an aid. You are
responsible for the distance to the vehicle in
front, for vehicle speed, for braking in good
time and for staying in your lane.
Active Lane Keeping Assist cannot continu-
ously keep your vehicle in its lane.
GWARNING
Active Lane Keeping Assist cannot always
clearly detect lane markings.
In such cases, Active Lane Keeping Assist
can:
Rgive an unnecessary warning and then
make a course-correcting brake application
to the vehicle
Rnot give a warning or intervene
There is a risk of an accident.
Always pay particular attention to the traffic
situation and keep within the lane, especially
if Active Lane Keeping Assist alerts you. Ter-
minate the intervention in a non-critical driv-
ing situation.
The system may be impaired or may not func-
tion if:
Rthere is poor visibility, e.g. due to insuffi-
cient illumination of the road, or due to
snow, rain, fog or spray
Rthere is glare, e.g. from oncoming traffic,
the sun or reflections (e.g. when the road
surface is wet)
Rthe windshield is dirty, fogged up, damaged or covered, for instance by a sticker, in the
vicinity of the camera
Rthe radar sensors in the front or rear bump-
ers or the radiator trim are dirty, e.g.
obscured by snow
Rthere are no, several or unclear lane mark- ings for a lane, e.g. in areas with road con-
struction work
Rthe lane markings are worn away, dark or
covered up, e.g. by dirt or snow
Rthe distance to the vehicle in front is too
small and the lane markings thus cannot be
detected
Rthe lane markings change quickly, e.g.
lanes branch off, cross one another or
merge
Rthe road is narrow and winding
Rthere are strong shadows cast on the road
If no vehicle is detected in the adjacent lane
and broken lane markings are detected, no
lane-correcting brake application is made.
Warning vibration in the steering wheel
A warning may be given if a front wheel
passes over a lane marking. It will warn you by
means of intermittent vibration in the steer-
ing wheel for up to 1.5 seconds.
Lane-correcting brake application
GWARNING
A lane-correcting brake application cannot
always bring the vehicle back into the original lane. There is a risk of an accident.
Always steer, brake or accelerate yourself,
especially if Active Lane Keeping Assist warns
you or makes a lane-correcting brake appli-
cation.
GWARNING
Active Lane Keeping Assist only detects traf-
fic conditions or road users to a limited
extent. In very rare cases, the system may
make an inappropriate brake application, e.g. after intentionally driving over a solid lane
marking. There is a risk of an accident.
An inappropriate brake application may be
interrupted at any time if you steer slightly in
the opposite direction. Always make sure that
184Driving systems
Driving and parking